


Zed Head
Free Member
-
Joined
-
Last visited
Everything posted by Zed Head
-
 People have just eyeballed the disc over the spigot/pilot bushing to get it centered with good luck.. I'm pretty sure that you can get it centered also by eyeballing the edges of the disc on the flywheel. Just make the edges even all the way around. Sometimes, you can just wiggle the transmission around and/or lift it up and down a bit to get the shaft started. The input shaft actually has some play in it so even though the transmission body might be aligned the shaft itself can be a bit low. Your input shaft has a pretty big chamfer cut in to it so should actually be easy to start. Put a small amount of grease on the tip it, it might help. But, I've had a pilot bushing that was just wrong-sized. It wouldn't fit in the crankshaft. I had to break it in to pieces to get it back out after getting it halfway in. So sizing errors are possible. Might be worthwhile to spend a few bucks and get another of the same brand just to be sure it fits the input shaft. Then maybe replace what's in there with the known quantity.
 -
How far does it go? How big is the gap?
-
Open the AFM vane before you open the throttle it should rev because of the extra fuel if it's a fuel problem. You didn't say that the vane actually moves with air flow. Maybe it moves a little and stops. Might be that the AMF is not right now. Work and work right are not the same thing.
-
Are you sure the AFM is plugged in? You can check at the ECU connector. That's actually the best place anyway. I'd say try the fuel tweaker but if it won't rev with no load then it's probably not seeing the AFM signal. Also, you might pop the black cover on the AFM and be sure the vane is moving when the throttle opens. Quick and easy. If the vane doesn't move the ECU doesn't add fuel. Here's the tweaker for future ref - http://www.atlanticz.ca/zclub/techtips/tempsensorpot/index.html
-
I left something out in the post above. It's confusing. The MAP reading is the pressure left over in the manifold after vacuum is pulled. So, to make a new table of MAP pressure readings from a vacuum reading table, you have to subtract the vacuum reading from absolute pressure. We all live under approximately 14.7 psi all the time. 760 mm Hg. 100 KPa. 123ignition's web site actually has a tutorial on it. But if you read too much of it the subject gets even more confusing. It's basically physics class stuff. https://123ignition.com/support/create-curve-tutorial/ " Regarding the vacuum curve, this is a little bit more complex. 123ignition works with absolute vacuum in stead of relative vacuum. The advantage of absolute vacuum is, it works also when you drive the car on high altitudes. In case of relative vacuum, you have to adjust the ignition manually. The values in the original Bosch graph are given in mmHg, 123ignition works with kPa. First we convert the values to kPa and crankshaft degrees instead of distributor degrees. You can type in Google: 80 mmHg to kPa 0 deg @ 11 kPa 10 deg @ 27 kPa Now we have to convert the relative values to absolute values. Atmospheric vacuum at see level is 100 kPa. So 100 kPa is our base point. Al values below 100 kPa is vacuum all values above 100 kPa is pressure. in this case we have a vacuum curve, so our result will be: 0 deg @ 100 – 11 kPa = 89 kPa 10 deg @ 100 – 27 kPa = 73 kPa"
-
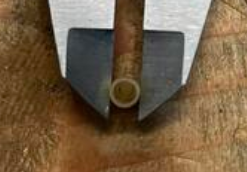
Yes. I consider the brass tube to be the locater of the spring, just holding it under the contact point. The forces aren't really trying to separate the parts. At worst they have to resist a side-load, mostly resulting from friction as the switch is actuated. You can look at the pictures of the parts and see that there is little (no?) sign of distortion of the tube even though there was, apparently, enough heat to melt the tip. Actually, the flatness of that melted part in the picture is kind of surprising. That takes a lot of heat to cause that.
-
Here's a red 70. Didn't sell. $43,000. It got a higher no-sell bid the first time it was on BAT. $65,000. Uh oh.... https://bringatrailer.com/listing/1970-datsun-240z-79/ https://bringatrailer.com/listing/1970-datsun-240z-94/

-
Here's a good conversion tool for converting mm hg (millimeters of mercury) to pressure. Manifold absolute pressure (MAP) is the pressure inside the manifold. So it is kind of the inverse of vacuum readings. A high pressure number will need low ignition timing advance, whereas a high vacuum number will need a high ignition advance. Anyway, for the purpose of creating a MAP map you can just take the points on the Nissan curves and convert them to pressure. Convert the mm-Hg to whatever unit your 123 is set for. I think that there are two settings, metric and imperial maybe. Not sure. Pick a curve, convert the numbers to make a new table to match what 123 software needs, plug the numbers in. https://www.onlineconversion.com/pressure.htm p.s. I had to wake up some sleeping (deeply) brain cells to get in to this. No guarantees that it's correct but I think it's close. Feel free to correct anything.
-
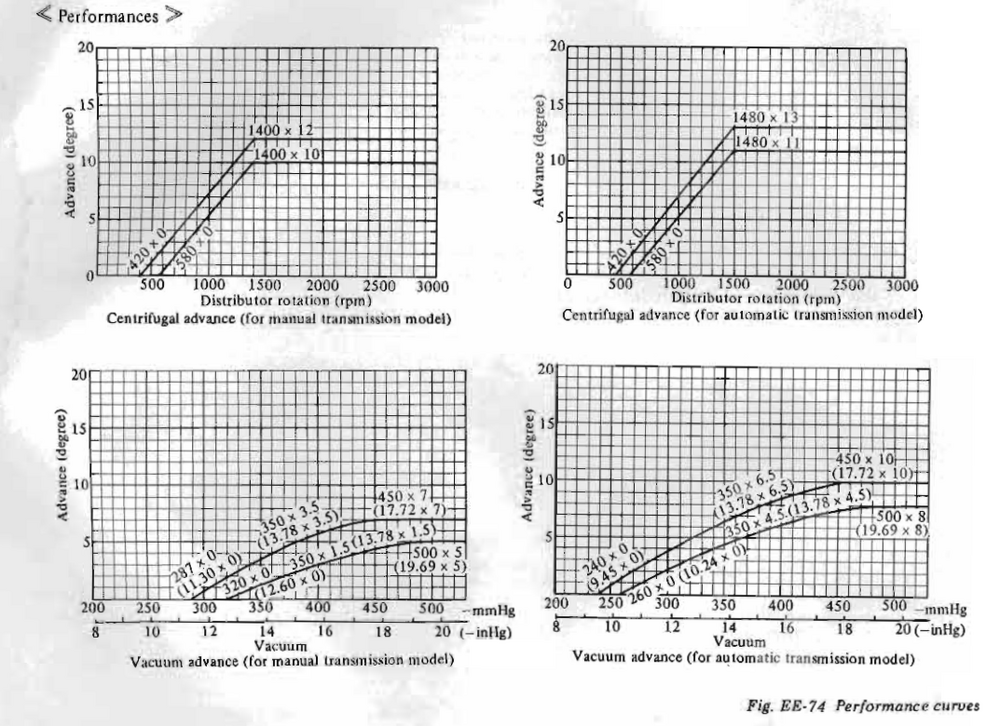
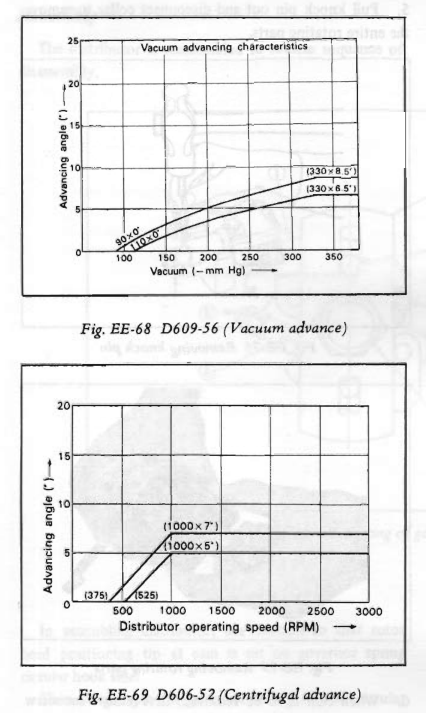
Here's 1973. If you just get close to these you'll probably be fine, for starters. 1973 was starting to lean toward emissions goals. I haven't really compared the changes to the early curves so can't say if they're significant. Edit -actually you can see that they delayed the advance in 1973. Retarded timing is cleaner than advanced. So the 72 curves probably add a little bit more mid-range power, I'd guess. That's the tradeoff.
-
You could match a curve from a 240Z. Should get you in the ball park. The curves are in the FSM. Pick an early one, they later ones are emissions focused. Here's 1972. Don't forget that distributor speed is 1/2 crankshaft speed. And, therefore, the degrees are double also. e.g. 9 distributor degrees = 18 crankshaft degrees. You'll want to study up on the vacuum and MAP readings also. It takes a little bit of thinking. The curves are for the two types of engines and their distributors that were offered in 1972. It's detailed in the chapter.
-
I see a brass tube with a plastic knob inserted. That is an injection molded part. Those thin walls will be difficult to replicate. The cost of machining is in the tolerances, not the dimensions.
-
Just realized it's a 280Z. You'll get much better responses if you put your car details in your sig. My earlier reply was for a 73 240Z. Your screen name has 240Z in it. Looks like it's the same system though. p.s. I don't pay attention to the titles after I open a thread.
-
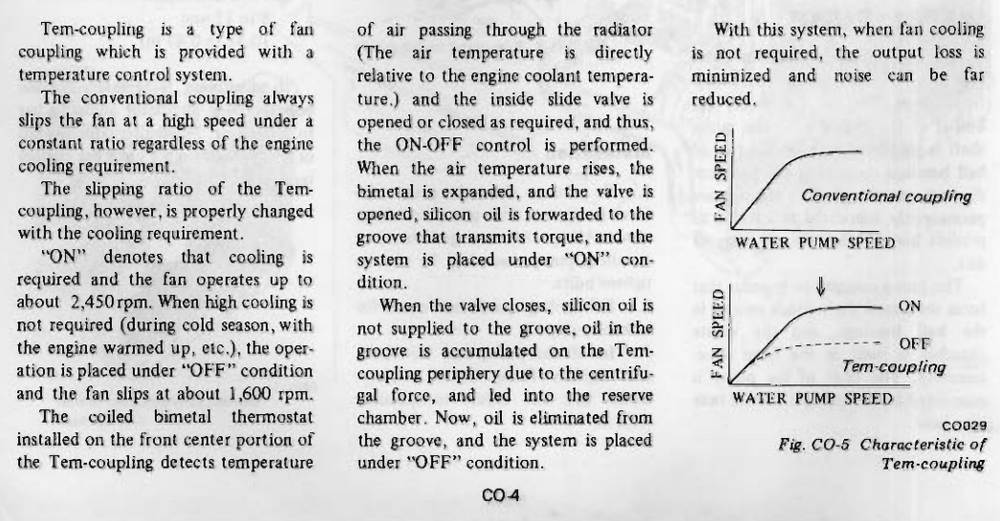
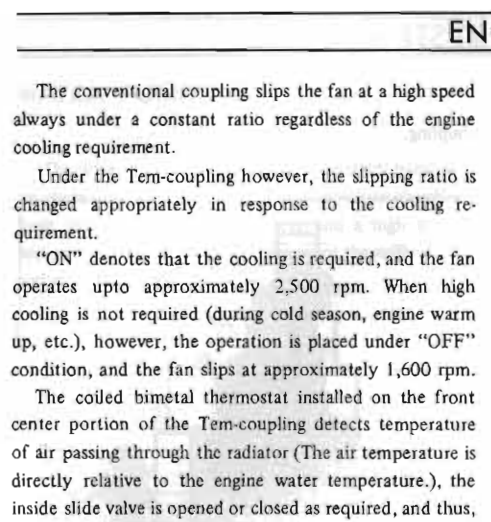
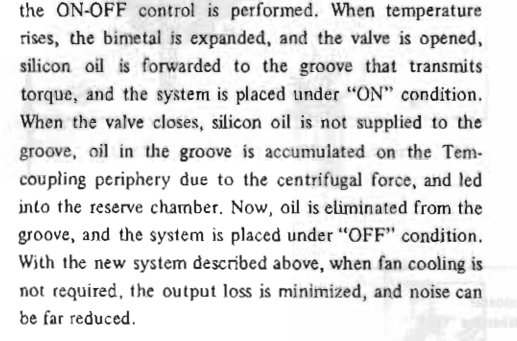
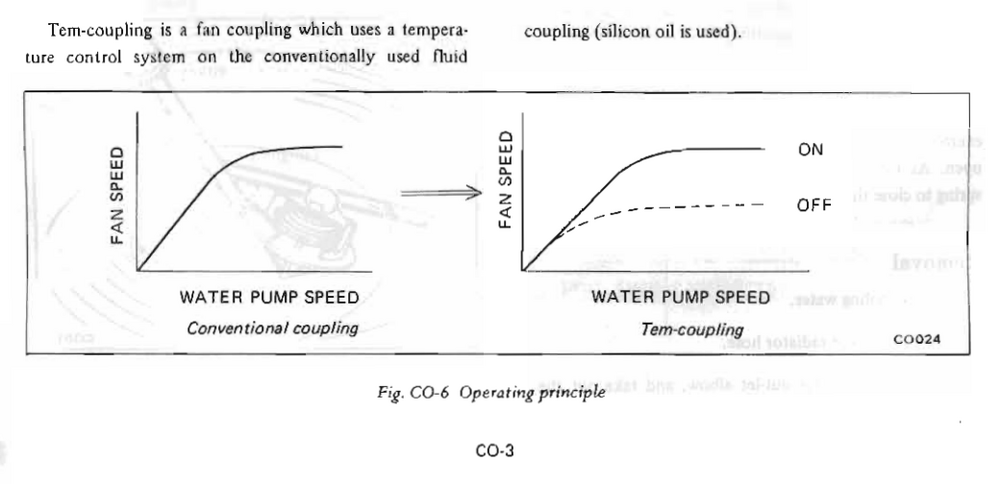
This thread is a bit bizzaro. I did learn something about the fan clutch though. Didn't realize that Nissan had designed an RPM set point into it. Off? at 1600 or? to? 2500 RPM. Not really clear how solid the limits are. Pretty interesting. Introduced in 1973 apparently. Not clear what year you're working on though. I think that your biggest concern might be your overcharging. That will boil your battery and overheat numerous electrical components. Your voltage regulator is not regulating.
-
Acrylic will probably abrade and wear pretty quickly. Nylon and polyacetal (Delrin) have what's known as "natural lubricity". And acrylics are more difficult to machine, they tend to be brittle. Since the part is plastic it will machine pretty easily compared to metal. A lathe will offer accuracy and precision, but, for what it is, a drill press and some handiwork with sharp objects should get the job done easily. I guess I'm saying don't make it overly complicated. It's not an engine part. Here's an in-depth article about plastics and friction. If you want to test the original material you can stick a red hot wire in it, or touch it with a torch flame, and take a whiff of the vapors. If it smells like burnt hair it's nylon. If it smells like formaldehyde it's polyacetal. The smell test is an actual test method from the past. Probably not allowed anymore though. Odds are it's nylon. https://www.machinedesign.com/archive/article/21816534/plastics-that-dont-wear-out-their-welcome " The most important semicrystalline polymers for friction and wear include: Acetal (POM) which is rigid and strong with good creep resistance. It has a low coefficient of friction, remains stable at high temperatures, and offers good resistance to hot water. Nylon (PA) absorbs more moisture than most polymers, affecting processability, dimensional stability, and physical properties. However, nylon's impact strength and general energy absorbing qualities improve as it absorbs moisture. Nylons also have a low coefficient of friction, good electrical properties, and resist chemicals. High-temperature nylon (HTN) and polyphthalamide (PPA) extend the nylon family through improved temperature resistance and lower moisture absorption. They ....
-
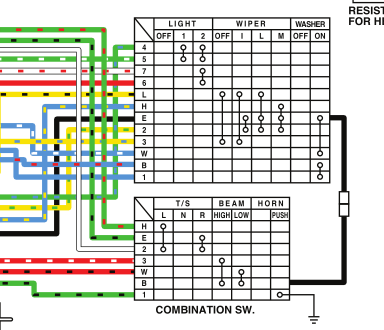
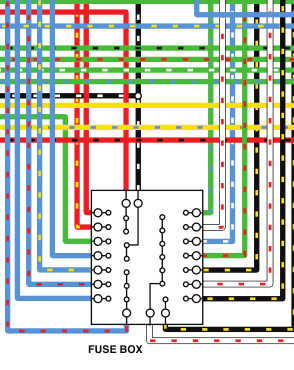
Just a thought (more mud maybe). There are other big wires up there that carry a lot of load and could easily be tapped to power the ECU. A relay controlled by the ignition switch and power from one of those wires and you've got solid power and no worries about overloading the ignition switch or those other crusty old wires. Relays don't pull much, and you run brand new wire for the new load. There's a good color wiring diagram in the downloads area, for pondering. https://www.classiczcars.com/files/category/1-wiring-diagrams/
-
For a one off an Exacto knife and a pierce of plastic rod would probably do it. It's not really a high precision piece. Look at how long it lasted while it was melting. p.s. if you add a relay you don't have to worry as much about the heat. Except for the running lights right next to it. I also ended up putting a relay on my running light circuit. That was tougher though because Nissan buried that wire way up under the dash. My original problem was the solder joints breaking.
-
I put a single relay on my 76 to take the heat out of the switch. If I recall right you just cut the red wire from the switch to the fuse panel and insert the relay there. I punched a hole through the rubber plug in the firewall to the battery terminal. Full power still runs through the dimmer switch but the combo switch only sees the amps to actuate the relay. The circuit is kind of odd to look at because power comes through the switch from the W/R wire (on a fusible link circuit) then passes through the switch on the way to the fuse box. So the relay doesn't control power in to the switch it controls current out. Instead of supplying the fuse box through the switch you supply it through the relay, controlling it with the red wire out of the switch. I have vague memories of posting (maybe just thinking) incorrect logic about the fuses in the past, I think because my thinking was backward about the current direction. (One way in which the internet sucks. The internet forgets nothing.). I thought that the fuses saw less current with the relay in place. But they see the same current just from a different source, the power still passes through the fuses on the way to the headlights. Assuming my 2022 logic is better than that past logic. I could be wrong. Only adding in case someone sees an old post. Maybe I'll dig it up myself. (Just remembered that the fusible link is actually taken out of the circuit, not the fuses. Rambling...) p.s. if you take a few minutes and study that headlight circuit you see that there is "potential" in the factory setup to run 40 amps (assuming a green fusible link is 40 amps) through that tiny switch if there's a short in the red wire that heads to the fuse box. Seems like the switch might melt before the fusible link. p.s. 2 - the running lights run through the circuit right next to the headlights. It's just a bad design. Lots of heat.
-
So you destroyed two other BCDD's/TB's? Not good. Anyway, at least one problem down. Good luck.
-
Multi-quote doesn't work across two pages weird. Had to stick an image in there instead. You had a block-off plate on the other two TB's? Just wondering....

-
I think that he has a Hall sensor on a modified Jeep CAS. And he has coil on plugs, AKA COP, controlled through the Haltech system. Could be a coil circuit in the Haltech ECU, or the tach circuit with all six coils ganged, or maybe the Hall sensor on the CAS. Lots of things to check. Meter time. Check, check, check , check...

-
I don't want to muddy up the waters either. But a "full" short would completely fry the insulation and the wire very quickly. That wire has just seen too much current for too long. But there is a load, some resistance, between the source and the ground somewhere. Have you measured resistance through that IAC valve? Easy to do and worth verifying.
-
Found a few. https://www.classiczcars.com/search/?q=bcdd block plate&quick=1
-
It's probably the solenoid valve for the vacuum advance supply hose to the distributor. For some reason Nissan only wanted the early years to have vacuum advance in 4th gear. There's a switch on the transmission.
-
Pretty sure that CO has posted that you can't just put a plate on the BCDD mounting area. There are passages that will still be open, that you have to block. Pretty, pretty, pretty,sure. But not positive. Search around on Captain Obvious and BCDD.
-
The BCDD is a known idle speed screwer-upper. It's on the bottom of the throttle body. It lets air past the throttle blade under certain conditions. You might try one of the other TB's.


