Mike
Administrator
-
Joined
-
Last visited
Everything posted by Mike
-
 Drive through Tokyo these days and you see them everywhere: zippy little automobiles that look like bumper cars for grown-ups. Quirky subcompacts such as Toyota Motor Corp.'s pod-shaped Vitz and Honda Motor Co.'s insect-like Fit are huge hits in Japan, providing a rare piece of good news for an industry that will sell 0.7% fewer vehicles at home this year than last. So where has Nissan Motor Co. (NSANY ) been while Toyota and Honda were cleaning up with the Vitz and Fit? Carlos Ghosn, the former Renault executive who now runs Nissan, ruefully explains: "This is a segment where we didn't renew our [lineup] as quickly as we should have." Now Nissan has a chance to make up for that oversight. This month, Japan's No. 3 carmaker unveils its answer to the Fit and the Vitz: the March, the first Nissan car to share a platform with Renault, which owns a controlling stake in the Japanese auto maker. Nissan hopes the new car, a reworking of a 10-year-old design, will help the company reverse a perilous decade of sliding sales in Japan. For while Ghosn has pushed Nissan through a brutal restructuring that made the carmaker profitable again--it expects to announce record earnings for fiscal 2001, the second year in a row--Nissan still hasn't reconnected with Japanese drivers. That's despite the launch of a half-dozen new models in the past 18 months. "Nissan can't rely on restructuring forever," says Koji Endo, an analyst at Credit Suisse First Boston in Tokyo. "There's no question it can't afford to fail with this model." The success or failure of the March also will be a referendum on Ghosn. This is the first Nissan car that firmly bears the Brazil-born Frenchman's imprint and that of his handpicked team of French and Japanese designers. The stakes are high. Last year, 4 of the 10 best-selling cars in Japan were subcompacts. As a result, says Ghosn, "this is a segment where you want to be competitive." Nissan certainly needs the boost: Last year, it eked out a mere 0.2% gain in Japanese market share, to 18%, a long way from the 33%-plus share of the 1970s. Besides, selling more cars at home would relieve pressure on Nissan's U.S. operations, which analysts say will acount for about three-quarters of the $2.5 billion net profit the company expects to earn in the fiscal year ending in March. "Gaining domestic market share is very important," says Patrick Pelata, executive vice-president for product planning. "It's what everybody inside the company is looking at." With the new March, Nissan is trying to recapture the edge it held when it pioneered Japan's subcompact market with the original version in 1992. Nissan hopes to lure both longtime March fans and newcomers with an array of styling cues that combine retro with modern. The car's Volkswagen Bug-like silhouette, grinning grill, and compact size are classic. But elliptical headlights riding halfway up the hood are new, as are the faux-ivory dashboard dials. The result is both Japanese and European, reflecting the sensibilities of design studios in Germany and Japan. Says Satoru Tai, the veteran who oversaw the process: "We want people to think of the March as more pet than tool." Nissan wants this car to turn heads--especially women's heads. That explains five new colors, ranging from paprika orange to lima-bean green. The designers came up with the color scheme after staking out interior-design boutiques frequented by single women in their 20s and 30s, the chief target group. These car buyers tend to have more disposable income than average, in part because most still live with their parents. But they are finicky, prone to fixate on easy seat adjustment and interior color coordination rather than horsepower or trunk capacity. Hence, the ivory knobs. "Not all clothes have black buttons," says Hideshi Saiki, a 34-year-old design team member. "So why should all cars have black controls?" In a sign of the March's importance to the bottom line, Nissan is bending its own rules to generate buzz. In a break with tradition, dealers have been handing out promo materials and price lists--stamped "company secret"--before the official launch. Since December, marketing teams have fanned out nationwide to brief dealers about such selling points as standard side airbags, a new, gutsier engine, and an onboard computer that allows drivers to download directions and send e-mails--a feature more often found in luxury cars. Will the March be a hit? Most analysts believe it will, though some current March owners may not like the Euro styling. For his part, analyst Endo predicts back orders will hit 40,000 by the time the car arrives in showrooms next month, creating enough pent-up demand to keep sales at 10,000 units a month for the first six months. That kind of pace would trail the red-hot Fit, which is moving off lots at a rate of 17,000 units a month. But it would easily blow the March past the Toyota Vitz. "Customers are excited about the new model," says Fumio Sato, who runs a Nissan showroom in Tokyo. "It's been a long wait for diehard March fans." The car is priced to sell. The most basic version starts at $7,800, less expensive than the $8,100 Honda Fit but pricier than the $5,385 Toyota Vitz (table). Nissan can afford to keep the price low because of economies of scale achieved by platform-sharing with Renault. A whole class of sister models will be built around the March, including the similar Cube model, to debut in Japan later this year, and a version for Europe called the Micra. Company officials say Nissan will save hundreds of millions of dollars over the life of each platform by sharing chassis and engines. If the March doesn't perform as promised, investors will wonder just how sustainable Nissan's turnaround really is. One cause for concern: The Renault veterans now running the show at Nissan have misjudged consumer tastes in Japan before. Sales of the new Bluebird Sylphy sedan and X-Trail sport-utility vehicle have hovered near monthly targets, but other recent additions, including the Stagea wagon, Primera, and Skyline midsize sedans and the Cima, or Infiniti Q45, luxury car, are undershooting sales goals. To be sure, these cars were all in the development pipeline before Ghosn arrived, but his team tweaked the designs. And while the new March was also on the drawing board, Ghosn's team is responsible for the end result. Early indications are that Nissan has a winner on its hands. But if the March fails, Ghosn's creation will need a new name. How about the Plod?
 -
I'll have to dig to find it. I can't remember off hand.
-
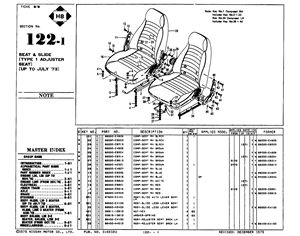
Here's what the Zcar CD says: Okay, here's what the CDROM 'fiche says (for the 240z): 17350-E4600, 240z, up to 6/71 17350-E4601, 240z, from 7/71 to 7/73

-
Hmm... that thing should fit nicely under my F350. If one of those pulls out in front of me... I can just drive over and barely nick the top of the car...
-
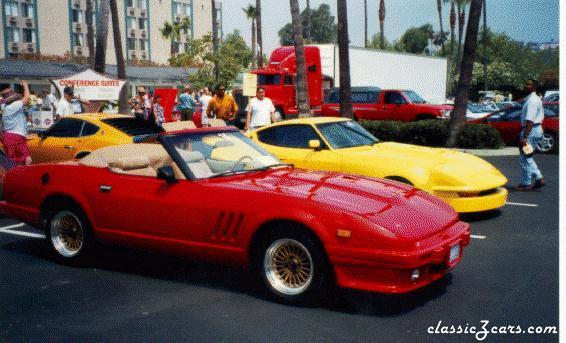
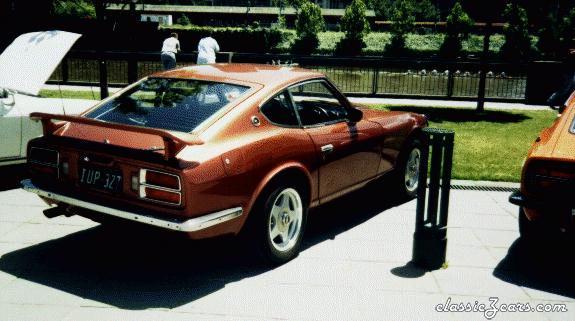
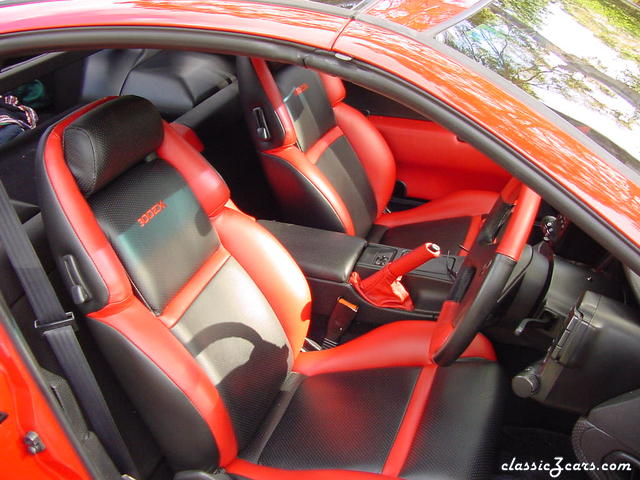 This is beautiful! I really want to get my hands on a 300 ZX
 -
Hmm.... interesting idea. But, I wonder if a metal fab shop can put together something that custom for under $150. Somehow I don't think it would be possible. However, I have no experience with metal fab shops. Anyone else chime in on this? I've seen custom fuel tanks, how much are those?
-
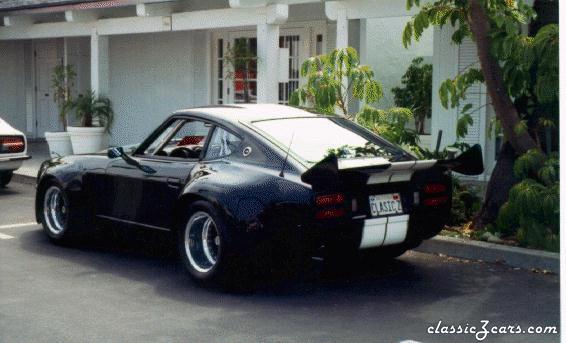 Quite the body modification on this baby. Extensive mods throughout.
 -
-
-
-
-
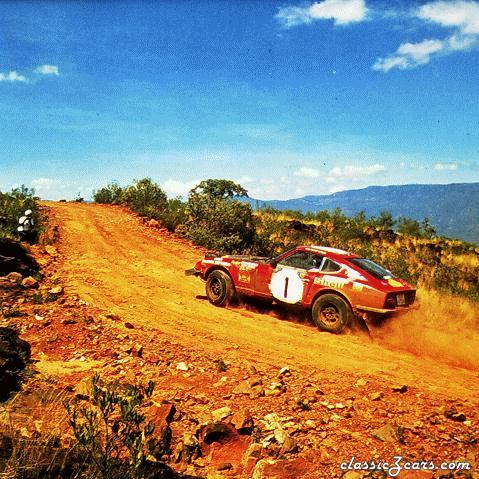
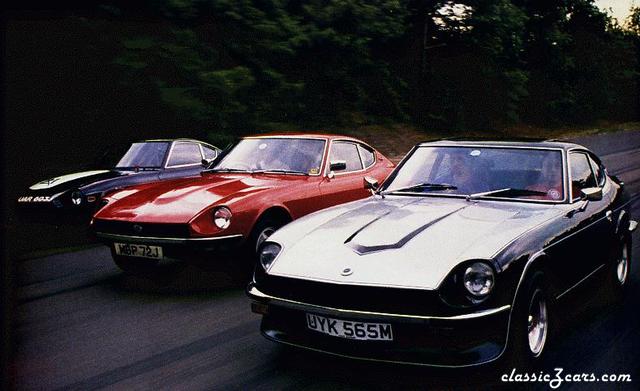 A pretty famous pict of 3 zcars racing.
 -
-
-
TOKYO, Feb 26 (Reuters) - Three years after getting together in a whirlwind romance, Japan's Nissan Motor Co Ltd (7201) and partner Renault SA (RENA) of France have their first baby -- the new March subcompact, or the Micra as it is called in Europe. The first vehicle to be born from a platform -- the underbody and engine compartment -- shared by the two automakers, the Nissan March will also have much of Nissan's brand name riding on its sales performance. "Today I can say that Nissan is ready for growth," Nissan Chief Executive Carlos Ghosn said as he launched the new vehicle in Tokyo on Tuesday. Nissan has come a long way since March 1999 when Renault took a 36.8 percent stake in it. Closing five plants, slashing 21,000 jobs, halving its supplier base and posting record profits, the once-troubled automaker has become a model restructuring story. Ghosn said on Tuesday Nissan would post record net and recurring profits for the year to March 31 in addition to record operating income, but declined to comment on specific numbers. Last year Nissan forecast a net profit of 330 billion yen ($2.47 billion), 0.3 percent off the previous year, but said it would have revised it higher but for potential market uncertainty after September 11 -- uncertainty that has not materialised. But despite its success, the question has hung over the company: can Nissan make a smooth transition from a restructuring carmaker to a growth carmaker? Or will the legacy of years of falling sales and unprofitable cars prove hard to shake off? In North America, Nissan has gone far in answering its critics after its new Altima sedan won "The Car of the Year" award at the Detroit auto show. But in Japan and Europe, where smaller cars reign, the jury is still out. Sales of admittedly bigger models launched in Japan last year -- the Cima luxury sedan, the Primera sedan and wagon -- have fallen below target, making success for the high-volume March all the more critical. Nor will the task be easy. The original 1982 March was a pioneer in the subcompact class but 10 years have passed since its last remodelling and competitors now dominate the field -- Toyota Motor Corp's (7203) Vitz, and Honda Motor Co's (7267) Fit, called the Yaris and the Jazz in Europe respectively. LUVVY-DUVVY Both are blockbuster hits in Japan, with the Vitz averaging 19,000 units a month since its release two years ago and the Fit averaging 16,000 a month since its launch in June last year. Nissan's ambitions for the March, which has a base price of 1.095 million yen, are also high. "We've set a Japan monthly sales target of 8,000 units for the life of the vehicle -- a four- to five-year span -- but in the first year, it should sell over 10,000 per month," says Kouji Hori, programme director for the March. In Europe, where the Micra will be launched in early 2003, Nissan is aiming for 160,000 to 170,000 vehicle sales a year. Investing some 30 billion to 35 billion yen domestically in the new car, Nissan said costs are around 15 percent lower on the new March compared with the old version. And while exact comparisons are hard to make, Hori says the costs of developing a shared platform were at least 20 percent lower compared with Nissan developing a new one by itself. "It's thanks to those cost cuts that we've had a lot more freedom in design," added Satoru Tai, the March's chief designer. The March has a curved roof reminiscent of Volkswagen AG's (VOWG) New Beetle and large oval headlights. Tai said his hardest call was deciding how bold the vehicle's lines should be. He opted for bolder rather than not, a move that also reflects European tastes. The path of true love, however, does not always run smooth. Nissan's need to get the March to market by 2002 meant the platform -- the front half designed by Renault and the back half by Nissan -- does not include a common engine. Thus Renault's Clio, to be built on the same platform, will have a Renault engine. It's a decision that avoids a lot of internal quibbling about which automaker makes the better engine, but it does not maximise potential cost benefits. Even so, the two automakers appear to be more luvvy-duvvy than competitors that have also decided to get together. Boardroom and cultural friction plagued DaimlerChrysler AG (DCX) (DCXGn) after the merger between Chrysler and Mercedes in 1998. Also, the first true child of their marriage -- the Chrysler Crossfire sports coupe which has 39 percent of its parts from Mercedes -- will hit the road only next year.
-
Sounds good... Just stay away from the metal tanks. They won't fit. I was "guaranteed" that one would fit my '71. And, it didn't (by a long shot). My tank is plastic and was cracked. Instead of spending the $150+ on a new tank, I just epoxied it. I know I'll regret that in the future (smell), but, I have to draw the line somewhere on my resto. I figured this is an easy swap later on.... l8r
-
Timothy, You are looking for a plastic vapor recovery tank. The metal one from a '72 will not fit. I tried. You might have to order it from Nissan. Get ready for a plug....... Buy the Zcar Microfiche CD and you can look up your own part numbers!! Click the ad on our main page (upper right side). [m]
-
Can you post to other forums? I still can't find anything that disables posts in this forum (for you specifically).... argh...
-
-
I was asked to post this for a member until he is able to set up web-software at home. Please reply to this message in the forums. Thanks. Here it is: Hey Mike, I need your help please. Can I please ask you to post the followig dilemna of mine on the Help Me section of the Forums while I try to find a version of IE5.5+ to download for home use? Last monday night while running errands I park the Z in a lot and go into a store. I come out 15min later and headlights and brakelights suddenly do not work anymore. I only had working sidemarkers, turn signals, and hazard lights. Because of my work schedule I couldn't get to it Tues/Wed/Thur. Friday I looked into it. Of course I had already checked the fuses and found no problem there. First I swapped out the headlight switch for a known working one - it made no difference. Then I switched out the entire fuse box and that made no difference either. What do I look at next? -e
-
It looks like we need to do a little housecleaning. But, you CAN filter the forum and tell it to only show you the stuff for sale in the last 30, 60, 90 days (or whatever you want).
-
Sorry, I just thought that it's not possible to vote twice if you have two cars of the same year.
-
Let others know the year of Zcar(s) that you own! Plural means that you can vote more than once if you have multiple Z's!
-
This was posted to our mailing list by steve j daniels, Hey folks; I saw all of the talk about brake bleeding kits. The speed bleeders are pretty cool, I checked out their web site, and I think the idea is sound, but it'll cost you 31 dollars a car (seven dollars a bleeder and 3 dollars shipping). I have a Mighty Vac, I thought that was pretty cool for a while also. But if you ever used one, you know that sooner or later you'll run into the situation where you have to empty the reservoir and you end up spill brake fluid all over your hands...worse yet you pump brake fluid through the "pump head", and over time brake fluid softens and swells the rubber hoses and "fittings". I ended up just using the reservoir and a rubber hose. Here's an inexpensive Do It Yourself brake bleeding Kit. 1. A 16 ounce plastic soft drink bottle and cap. 2. A 2 to 3 foot length of rubber vacuum line or wind shield washer hose. It can be longer if you want. 3. A length of 2x4, I use an aluminum baseball bat. I'll get to that explanation. Now, take your hose and the plastic soft drink cap, look at the hose and choose a drill bit size that will allow you to drill a hole in the cap that will give a tight fit when you pass the hose through the cap. You don't want the hose to pull out of the cap easily. Next, drill another very small hole it the cap, this will be a "pressure relief" hole, a sixteenth of an inch is good. Screw the cap back onto the bottle and push the hose home until it touches the bottom of the bottle. If your bleeder is working and free, put a box end wrench on the bleeder, then push the end of your hose onto the bleeder. Crack open the bleeder a quarter to half a turn. Set the plastic bottle on the ground standing straight up. Now you can start pumping the pedal, slowly please. "I like to pump out almost all of the old fluid first, our you can take an old kitchen baster and suck out all of the old fluid first and top up with new fluid to start with. But anyway the idea is to get all new fluid throughout all of the brake system.". The idea here is to pump in enough fluid into the bottle so that the end of the hose is submerged, you pump until no more air bubbles come out of the hose end. Now this is where the length of 2x4, or baseball bat comes into play. Push the pedal all of the way down to the floor and place/wedge the 2x4 between the pedal and the seat cushion. "I can't tell you how long that is, I've never bothered to measure this, you'll just have to figure that out for yourself." Now you can close the bleeder screw. Don't forget to watch and top up the reservoir, or else you'll pump air into the system and you'll have to start over. Brake fluid will attack the rubber hose that you use and you will loose the tight fit that you want, but this is so inexpensive, you just replace the hose when that happens. Bleeding sequence.... convention has it that you start with the bleeder farthest from the master cylinder and work back. This is for Dual Circuit Systems. Some cars, not many, have Triangulated Systems, such as Volvos. Volvos have four disc brakes and eight bleeders screws, three on each front caliper, and one on each rear caliper. In Volvos case you do need a "map", you have to follow a set sequence of bleeding or else you are just pounding sand. Eh, I know that was a lot of words to describe a simple operation, but what can I say, I don't have an editor. Steve J. Daniels
-
This was posted to our mailing list by Doug Antleman, I've done a fair amount of towing, so I will throw in my 2 cents. The advantage of an open car trailer is less weight and less wind resistance compared to a higher profile closed trailer. Weight is a major consideration, since you will be pulling with a V-6, which I doubt is rated much over 4,000 lb tow capacity. Some things to consider, any trailer that is more than 2,000 lb loaded should ALWAYS have electric brakes. A double axle trailer is better than single because the weight will be distributed over a larger area and it will track better (less sway) on the freeway. As far as tow vehicles go, a conversion van with a bed should be fine (though cramped when compared to a RV). My brother in law tows a 5,000# camping trailer with a Chevy Van with a 350 V-8. He uses a 4.11 rear axle ratio, trans. cooler etc. With towing, more capacity than you need is better- you do not want to push the weight limit on your tow vehicle or trailer to close to the maximum. You will need the reserve when towing on a hot summer day, uphill into the headwind.