Namerow
-
Posts
1,483 -
Joined
-
Last visited
-
Days Won
23
Content Type
Profiles
Knowledge Base
Zcar Wiki
Forums
Gallery
Events
Downloads
Store
Blogs
Collections
Classifieds
Everything posted by Namerow
-
I've finally managed to get my computer working properly again after its forced upgrade to Windows 10, so I'll see what I can do to post the package to the CZCC site. It was fortunate that all but one of the gaskets (and there are many) were of a size that would fit on the glass of my scanner.
-
When I worked for an engineering company that was engaged as prime contractor in turnkey design-and-supply projects for overseas clients, we would use a banking vehicle known as an irrevocable letter of credit, 'ILC' to manage client payments. An ILC assures both buyer and seller that: a) the buyer's money is definitely in place with the banker and can't move out of the bank's control (in either direction) until certain conditions are met, and; b. the buyer's money can't move from banker to seller until certain paperwork certifying delivery of the item-for-sale to a shipper/expediter in the seller's country has been produced to the satisfaction of the banker or its agent. There is, of course, a fee exacted by the bank for this service. The escrow service referred to by Zed Head probably works in exactly the same way, but using a commercial escrow agent rather than a bank as the middleman. A large shipper might offer exactly such a service. Why not talk to a local commercial banking specialist? (prob. available in Barrie, definitely available in Vaughan, Concord or Newmarket).
-
I think that Blue's input would be valuable to both you and Buyer #2. One of the members here ('George' from NB?) has Blue's telno in NS, I believe. If not, go the the Atlantic Z-Car club's website and ask there. Just remember that, other than the sea shipment part, there's really no difference (from your perspective) between selling to a buyer in the USA vs. selling to a buyer in Europe. Your obligations to a buyer (foreign or domestic) re shipment end at your driveway. The shipment, whether by truck or by truck/ship is the buyer's problem. Same goes for the paperwork, shipping insurance, brokerage fees, inspections, duties, and taxes that are imposed at the dock and at the border. I agree with the others that you need your terms met by Buyer #1 and you are perfectly entitled to move on to Buyer #2 if they aren't met within a reasonable period of time. 'Reasonable period of time' is subjective, but I think that 2 business days would be appropriate here, given that you risk losing Buyer #2 if you give Buyer #1 too much time to stall. I'm not an eBay expert, but don't see how they can interfere with your rights as the owner of a piece of property that you've offered for sale with stated conditions. My two cents.
-
OK. And the moustache bar is installed correctly, too (oriented so that the mounting 'eyes' sit on the trailing side of the bar)... so that seems to confirm that incorrect orientation of the rubber isolator block is the culprit.
-
I have in my notes a caution that it's possible to accidentally install the front transverse crossmember backwards (I'm talking about the big, stamped-metal piece that bolts to the underside of the vehicle and provides the mounting point for the rubber isolator block). If you do this, it shifts the position of the mounting holes for the rubber isolator block. Perhaps that's what you've done. My notes apply to the crossmember for a Series 1 and they say that a flipped front crossmember will shift the fore/aft location of the isolator block by 3/4". The crossmember design changed for the later cars, but I wouldn't be surprised if that asymmetry is still there.
-
I have a friend who used to work on the line at a parts rebuild shop (alternators, water pumps, etc). Mind-numbing work. He had some interesting stories!
-
This should be an entertaining thread. I envy your two-car garage and workspace. Nevertheless, isn't it amazing how shelf space fills up so quickly? I've adopted the strategy of hanging larger parts from the overhead beams in my workshop. Even with that, shelf space always seems to be at a premium. Is the blue Z in the driveway a runner or is it a parts donor? BTW, nice job on the paint-spray enclosure.
-
Congrats on the sale, Chris. Suggest you ask that the buyer include in the bill-of-sale the words, "conditional upon transfer of funds from buyer to seller's bank account (___ insert name/location of bank & acct no.) in an amount equal to the full, agreed-to price, as noted in this bill of sale, by not later than __ (insert drop-dead date for completed transaction)." Other items: Be sure that the bill-of-sale properly notes the name and address of both you ('seller') and the other guy ('buyer'). Condition of the vehicle should be described as, 'used condition, as-is' Vehicle description should include mftr, model, MY, VIN, exterior color, and odometer reading List major spare parts (if any) to be included in the vehicle sale There's probably a sample b-o-s available on-line (somewhere) for this type of private, distance transaction. The b-o-s is a negotiable item, so don't feel like you have to accept whatever the buyer puts under your nose.
-
When you have the heater box and blower housing out of the car, you may want to replace all of the foam gaskets that are used throughout the housings and ducts. I made tracings for all of these when I re-built the system for my '70 a couple of winters ago and then scanned them into .pdf docs (made it easy to print new ones if/when I made a mistake cutting out the template to be laid on top of the foam sheet). Once I get my home computer working again (thanks, Windows 10), I'll email these to you.
-
Before Chris bought it from me, the car had sat (stationary) in three different driveways across Ontario: Burlington (3 yrs), Cobourg (3 yrs) and Oshawa (unknown, but probably at least another 3 yrs). Not sure when the mice came on board .
-
Didn't someone else (not Red Green) use a rented portable cement mixer as a tank tumbler?
-
Looking at the latest photos posted here (which are quite hi-res), you can see the full weld line. As Chris notes, it's most obvious along the transmission tunnel. It runs to just aft of the aforementioned later-style floor brace, then across to the sill (notice that the floor kick-up behind the floor brace features the Series 1 tie-down tabs for the jack and tools). Going forward, it looks like the join line between the inserted floor and the native structure runs along the bottom of the toeboard. Looks like a pretty sanitary job, actually. I wonder if #60 and #72 were both Alberta cars, or whether they found each other here in Ontario? I would suppose that #60 may have been the victim of crash damage or a fire. Floors this good wouldn't have come out of a rust-bucket.
-

Another conundrum -- Rear License Plate Light housing
Namerow replied to Namerow's topic in Open Discussions
Well, it appears that the photo was actually taken in Japan and these are cars that are about to be loaded onto the ship rather than having been parked after off-loading. Judging from the six cranes, it looks like the vehicles may have been hoisted onboard rather than driven. -
Another conundrum -- Rear License Plate Light housing
Namerow replied to Namerow's topic in Open Discussions
I've never seen this photo before. Port of Vancouver? Yellow, white, and orange seem to be the dominant colours, although it's hard to tell how many other Z's might be parked outside of the frame. Is that actually a pair orange Z's with white interiors parked nose-to-tail in the centre of the frame? -
Another conundrum -- Rear License Plate Light housing
Namerow replied to Namerow's topic in Open Discussions
More on the topic of black vs. grey... Here's a different Z that was recently up for sale. In this case, the license plate light housing appears in basic-black, unpainted condition. To my eye, it just doesn't look right.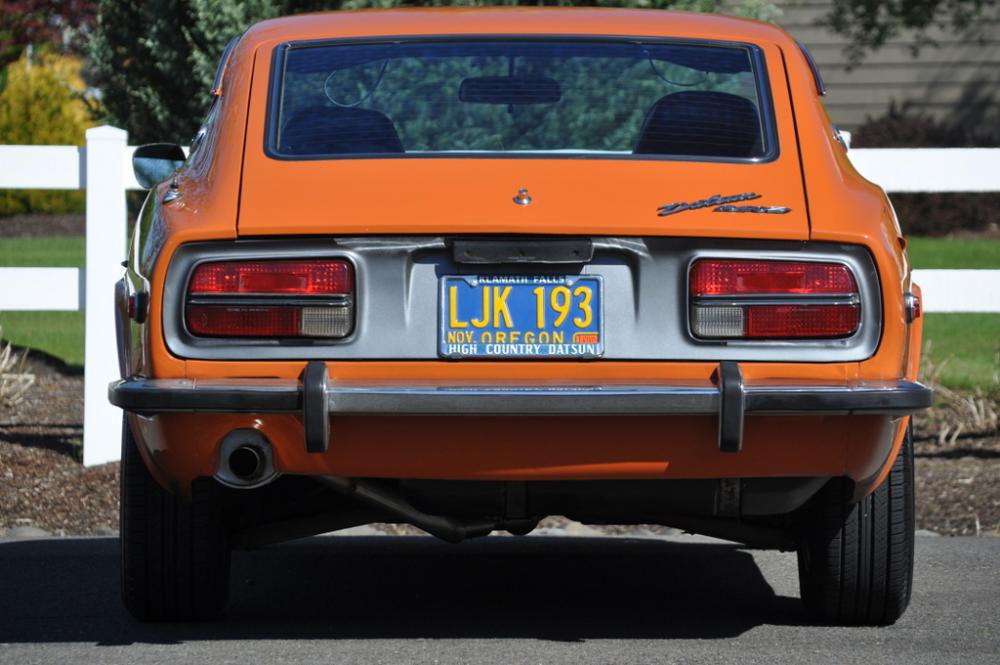
-
Another conundrum -- Rear License Plate Light housing
Namerow replied to Namerow's topic in Open Discussions
https://www.superbrightleds.com/moreinfo/tail-brake-turn/67-led-bulb-15-led-forward-firing-cluster-ba15s-retrofit-car/169/#/tab/Overview Note that this vendor's site provides a search-by-vehicle / search-by-application function that returns a faulty result for the license light application (it recommends an 1156 bulb/socket -- that won't match an 89 socket/or bulb). -
Another conundrum -- Rear License Plate Light housing
Namerow replied to Namerow's topic in Open Discussions
Answering my own question, I've found that there is an LED bulb that's a direct replacement for the #89 incandescent versions. 'Tower' type, with 210-degree illumination spread, medium-low lumens output. Correct socket size & pins, matching 'bulb' diameter. That's probably the way to go. Regarding colour treatment for the black-plastic housing cover (i.e. should it be left as plain black plastic or painted to match the rear finisher panels?), I'm still perplexed by photo of this apparently-unmolested '70... Looks grey to me.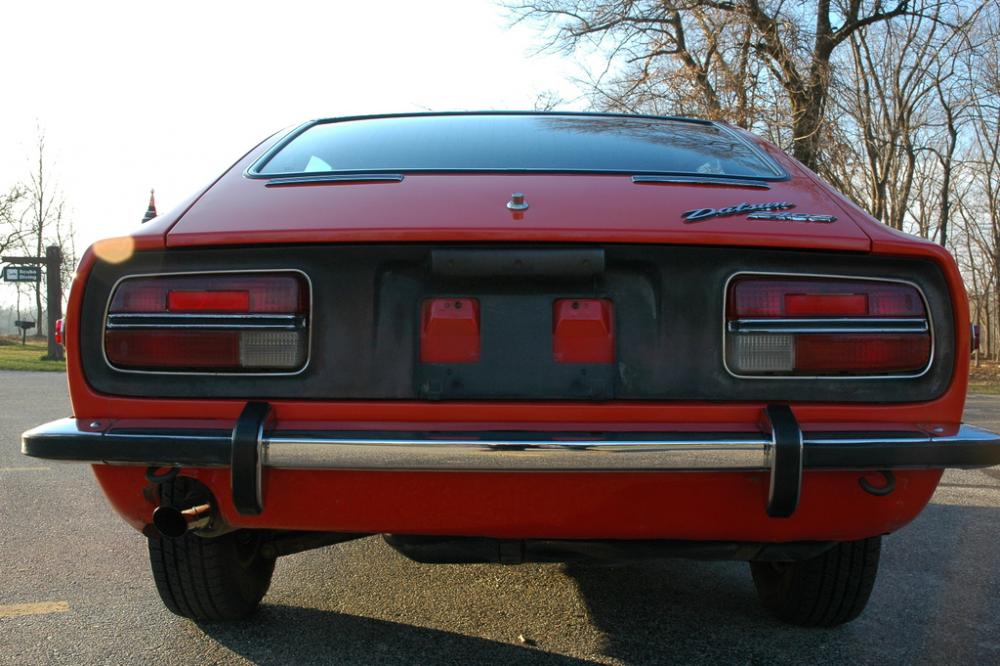


-
Now just shy of US$16K with 7 days of bidding still to go. Looks very positive. Given your documented and quality work on the structure, together with a nice paint job and a sanitary, OE interior, I think this should close in the $25K - $30K range. GLWTS.
-
Another conundrum -- Rear License Plate Light housing
Namerow replied to Namerow's topic in Open Discussions
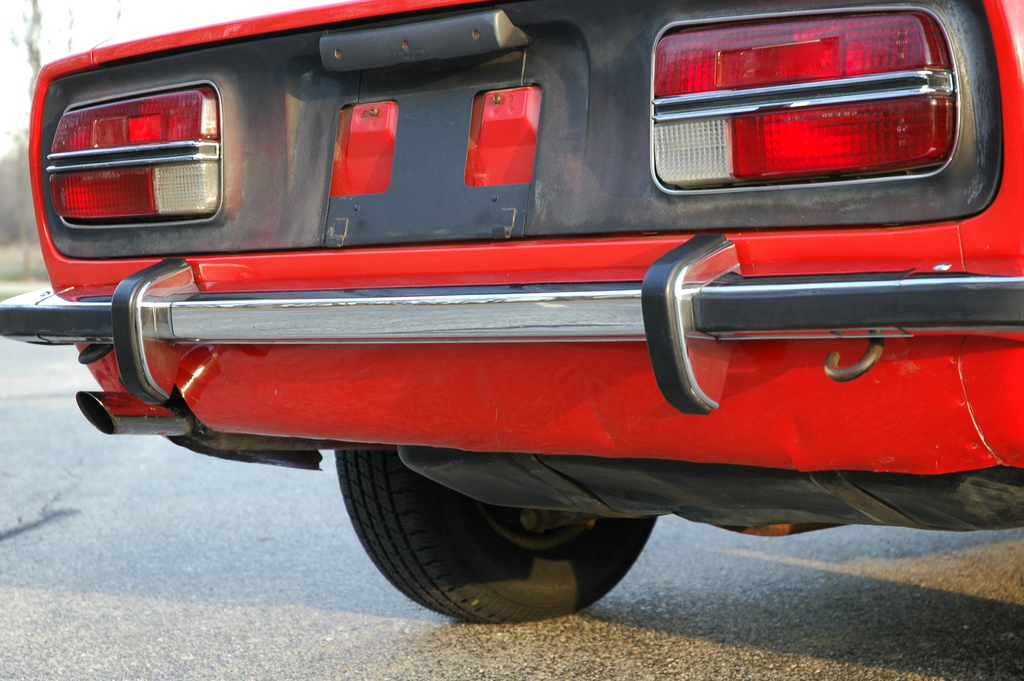
Great photos, CanTechZ. Couldn't have asked for a better real-world illustration of the (good) possibility that those metal inserts have nothing to do with heat protection and, in fact, create the opposite effect. Auto manufacturers never spend money on parts that don't have a purpose. These insert plates look like they were designed to be installed only in particular situations. Otherwise, the housing looks perfectly happy (very happy, in fact) to have them left off. My theory is that the plates are shades and were only installed for markets where there was some government-enforced limit on the amount of illumination that could be used on the rear of a vehicle above and beyond the left and right 'running lights' (brake and turn signal lights don't count, because they're occasional and short-duration). It will be interesting to see if anyone from Europe (or Japan) reports that their lamp housing does not have these insert plates. At this point, I have one good housing assembly and I don't want to have it warp. I'm thinking about ditching the insert plates and maybe reducing the wattage of the bulbs, too (add something to the circuit to create a voltage drop?). Conversion to LED's would be another way to get rid of the excess-heat issue, but it looks like it could turn into a 'project' (unless, of course, there's an available LED with the right combination of beam pattern, lumens, and bayonet fitting size). -
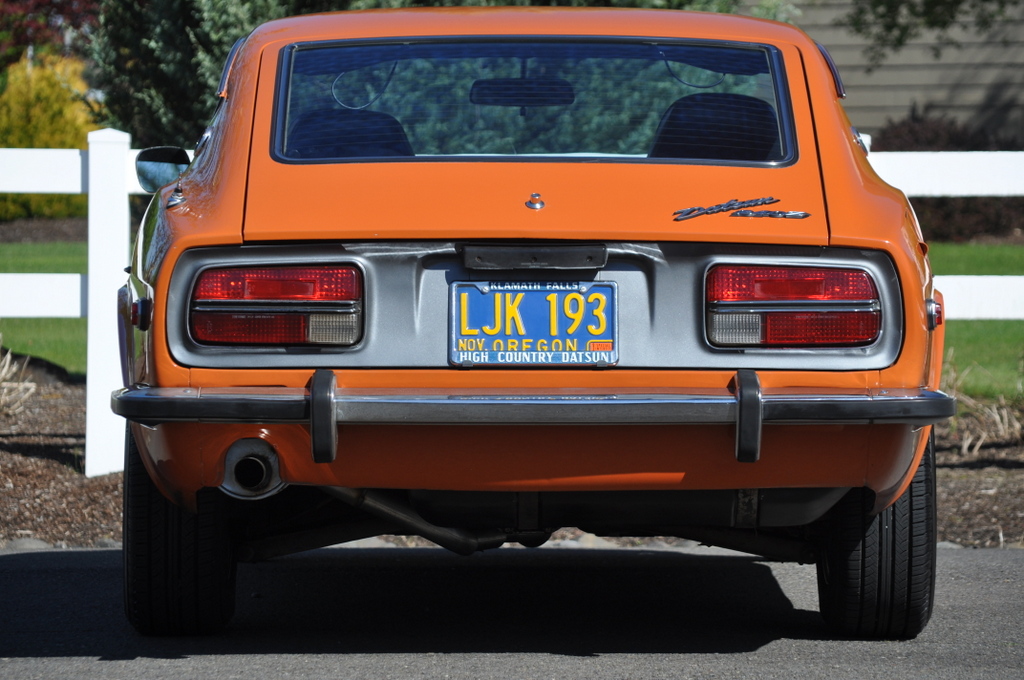
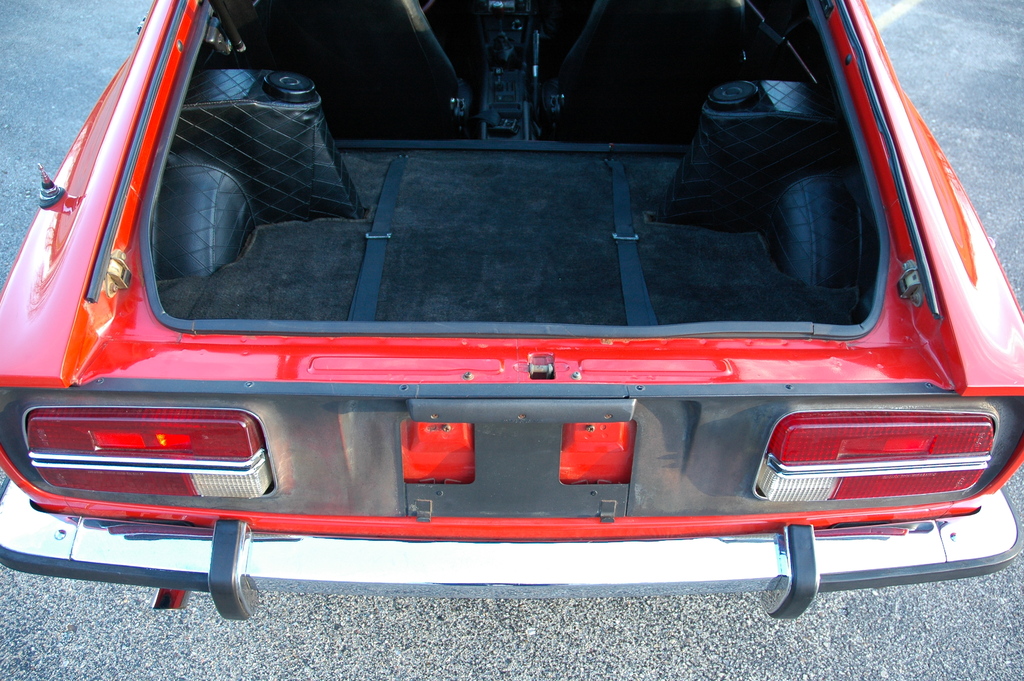
I'm in the midst of 'restoring' the license (licence?) plate light assembly for my 70 Z. For those familiar with these units, you'll know that many are heat-damaged so that both the outer shell (black plastic) and the inner base plate (white plastic) sag and no longer seal well, esp. along the top seam and despite the rubber gasket. The illumination is, of course, provided by two #89 bulbs. These apparently generate enough heat during long periods of lights-on driving to cause the plastic pieces to soften and deform. The housing assembly is 98% sealed (there are four small, open drain holes on the bottom surface of the outer shell) to keep out water, with the reverse effect that it seals in the heat. I have a couple of questions for anyone who's tried to remedy the situation: Clipped inside the black outer shell are two zinc-plated, stamped-metal insert plates. They fit over the clear-plastic 'lens' surfaces on the left and right side of the shell, such that they block the center 70% of the lens, leaving only the sides of each lens (and a little centre slit) open to light passage. Some say that these metal inserts are to keep heat away from the clear-plastic lens, but I find this hard to believe. Metal is a pretty good heat conductor and these things sit right on top of the clear-plastic lens surface, so how they act as heat protection is beyond me. My guess is that they're actually installed as 'shades' because -- for some markets - Nissan decide that the fully-open clear-plastic lenses allowed too much illumination onto the license plate. I'm wondering if they're possibly responsible for the excessive heat build-up inside the housing. Anybody know the real reason for these metal inserts being installed? Were they also found in Euro-market or Japan-market Z's? Given the heat build-up issue, the license plate light assy seems like a perfect place for substituting LED's for the OE incandescent bulbs. Has anyone tried this? Is it a plug-and-play solution, or do the bulb sockets and connections need to be modified? Where were the LED's sourced from? There's been debate in the past over the correct colour for the 'black' outer shell. Some say that this piece was painted by the factory so that it has the same 'anthracite' grey colour as the taillight finisher panels. I believe that a photo of a MIB unit was produced to support this idea. Paint overspray on the white base piece was pointed to as proof of the spray-painted final finish treatment. I've checked some pictures of a bone-stock '70 that was recently listed for sale and it, too, shows the license plate light's housing to be the same colour as the taillight finisher panels. There's just one problem. I have three of these light assemblies (one from a '70, two from '72's) and in all cases the outer shell is unpainted and matte black in colour/texture. There's not a trace of paint on the outer shells. They haven't been sanded, because the matte surface texture is molded in. There is paint on the white base plates, but it's flat black, not grey, and it doesn't seem to have been applied with any purpose in mind -- partial surface coverage, and not very good at that (which makes me wonder why the supplier that produced these pieces for Nissan had somebody randomly waving a spray gun at them loaded with flat black paint). So: Were the outer shells painted. Or not? Thanks to anyone who can shed some light on these questions!
-
DIY results were well documented by Grannyknot (c/w lots of pix) a few months back (use the search function). Additional comments were offered there by Nix240 and Patcon, IIRC. While what you want to to achieve is do-able, I think that the phrase, 'Your results may vary' applies here. A large, angular piece like the radio chassis may offer special challenges because of 'masking' in and around the corners.
-
Side Window Quandary - What is the 'duck-shaped' metal piece?
Namerow posted a topic in Body & Paint
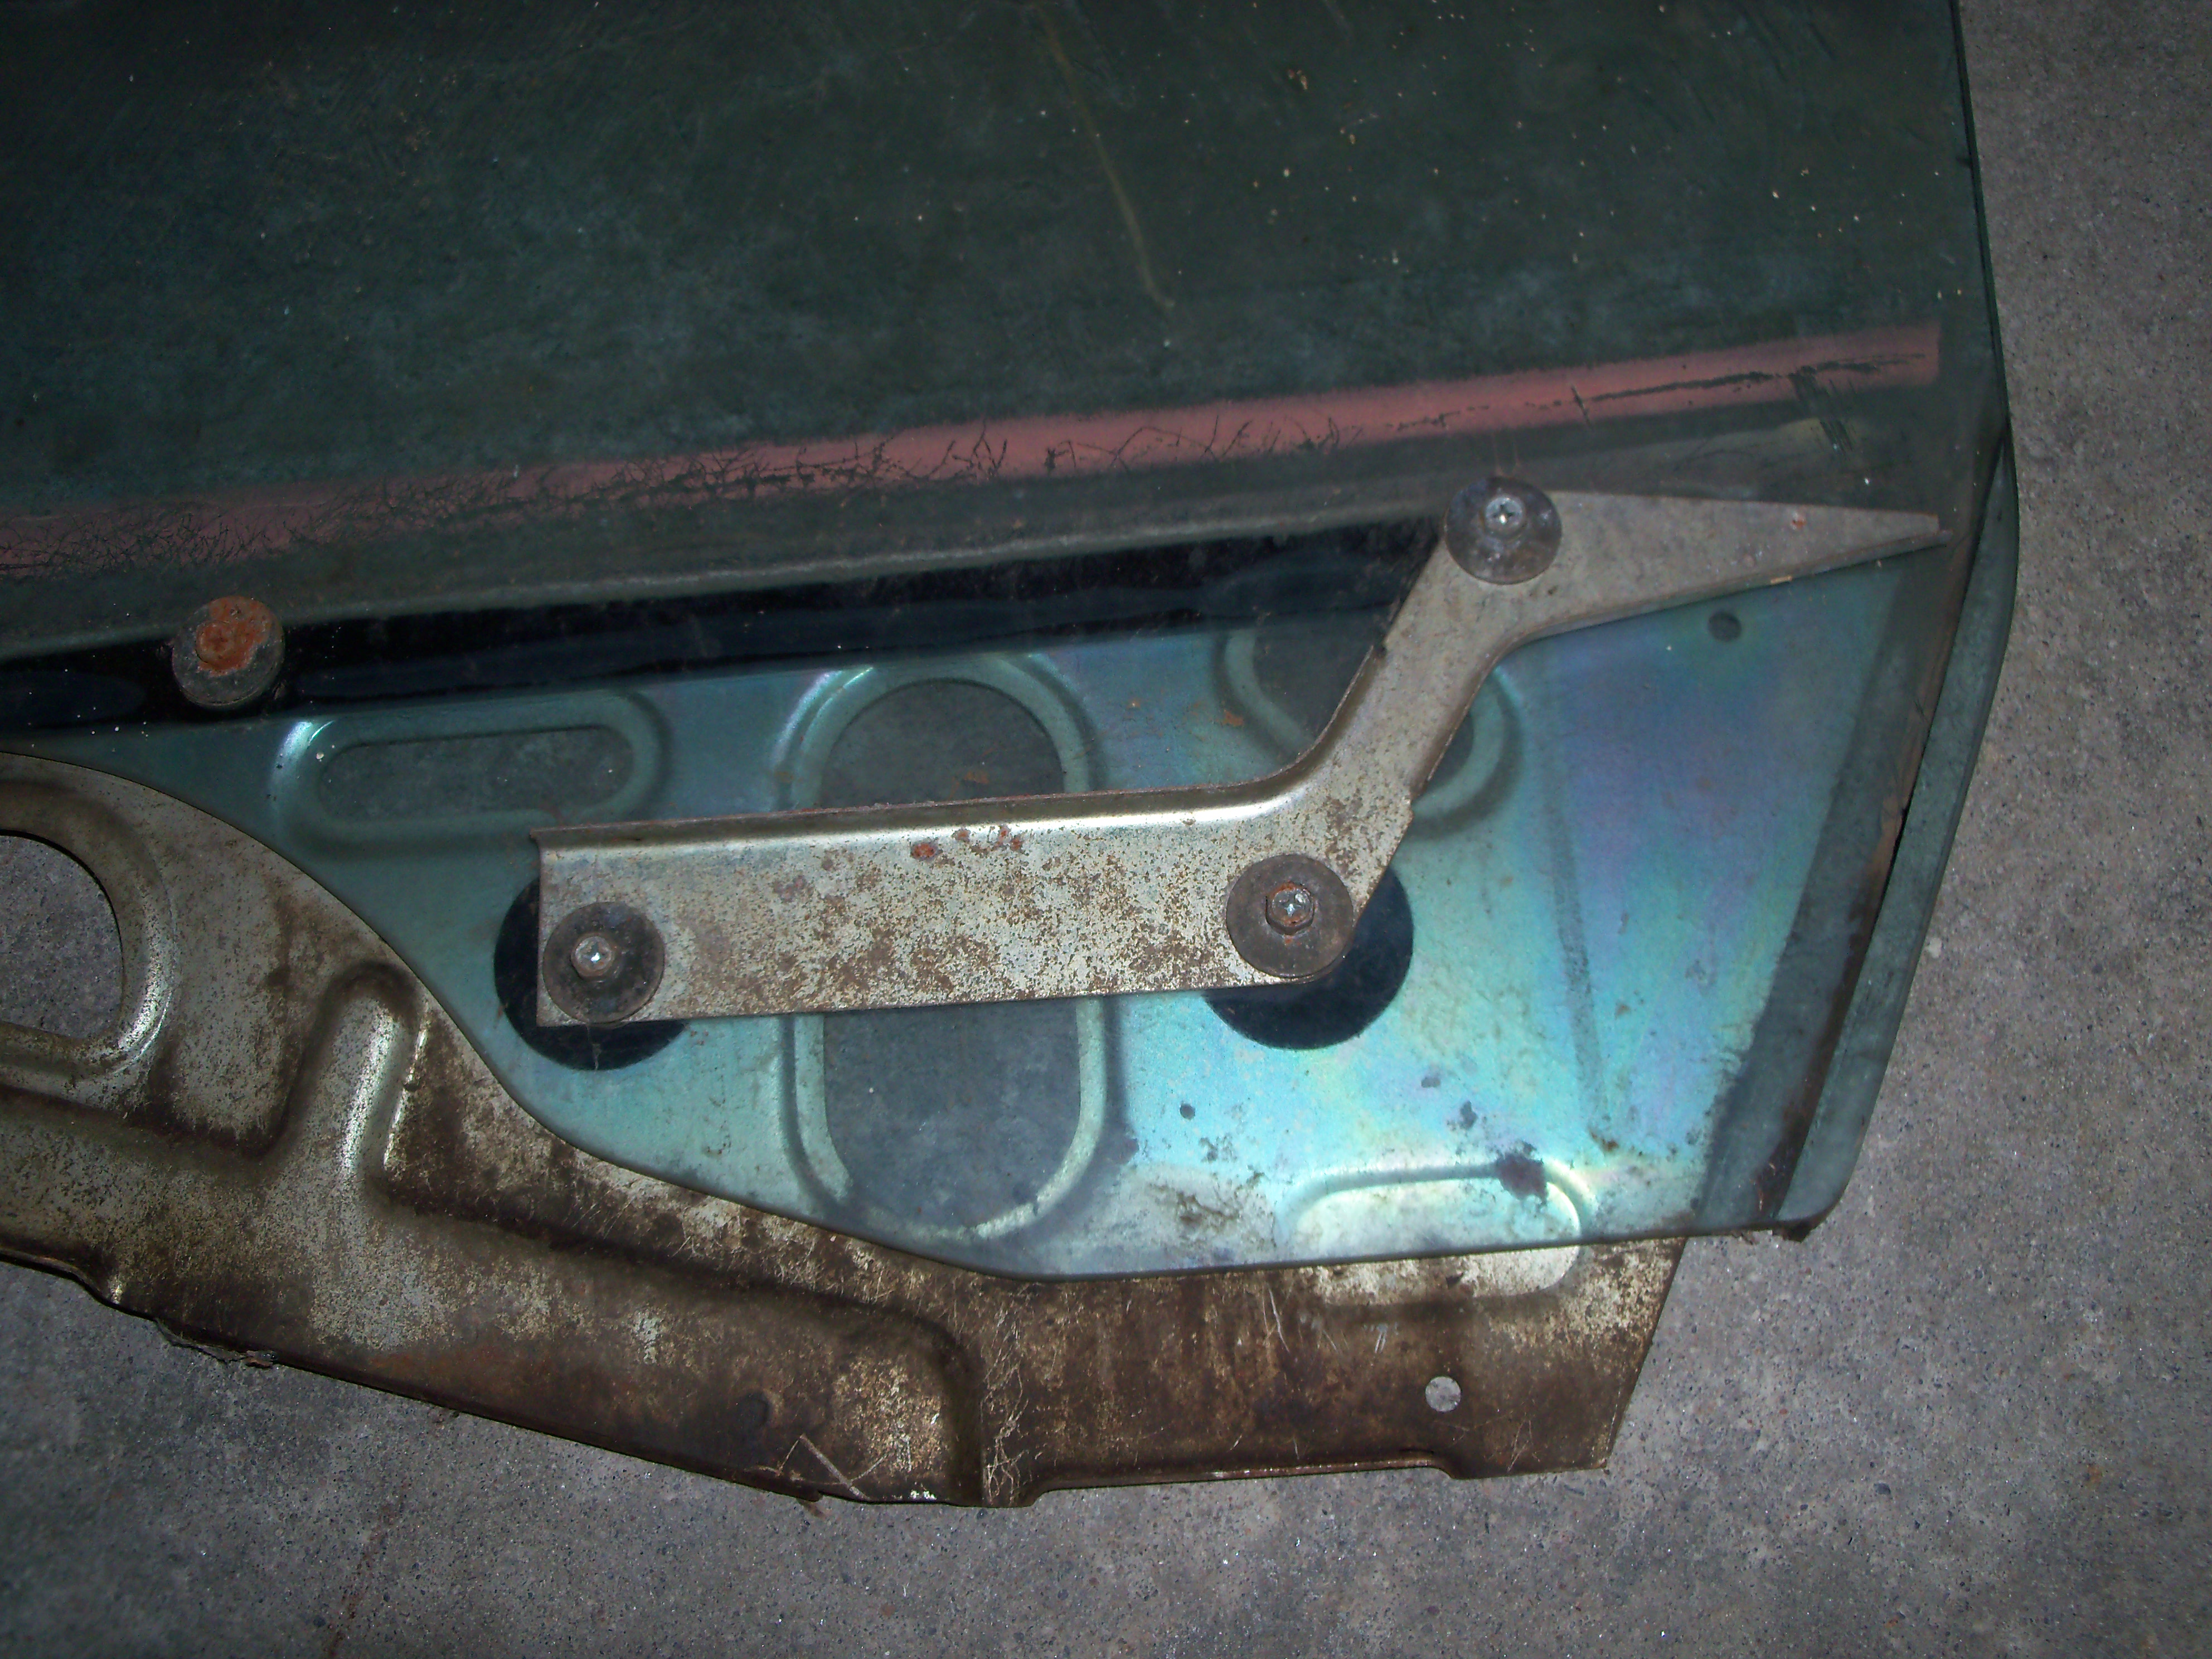
The picture shows the driver-side window glass assembly taken from a long-gone 72 Z. If you look at the bottom-right quadrant of the assembly, you'll observe a stamped-metal piece bolted onto the near side of the glass. It looks kind of like a swimming duck (ok, maybe a loon), with the beak pointing to the right. With the glass installed in the door, this piece would be on the outboard side of the glass. Question: What is the purpose of this stamped-metal piece? It doesn't show in the parts fiche drawing and I don't see in the FSM drawings either. In addition, the side glass from the 70 Z that I'm working on doesn't have this piece either. The 72 donor from which I took the window assembly was my daily driver back in the 1970's and I'm 99% positive that this is the glass that was installed at the factory. Is it some kind of brace or reinforcement for this part of the glass? Or is it an anti-'Slim Jim' theft-deterrent piece? Is it a factory piece? (It sure looks like it). If so, when did these start to get fitted to our Z's? I'm trying to decide whether this something that my 70 Z would benefit from receiving as a transplant.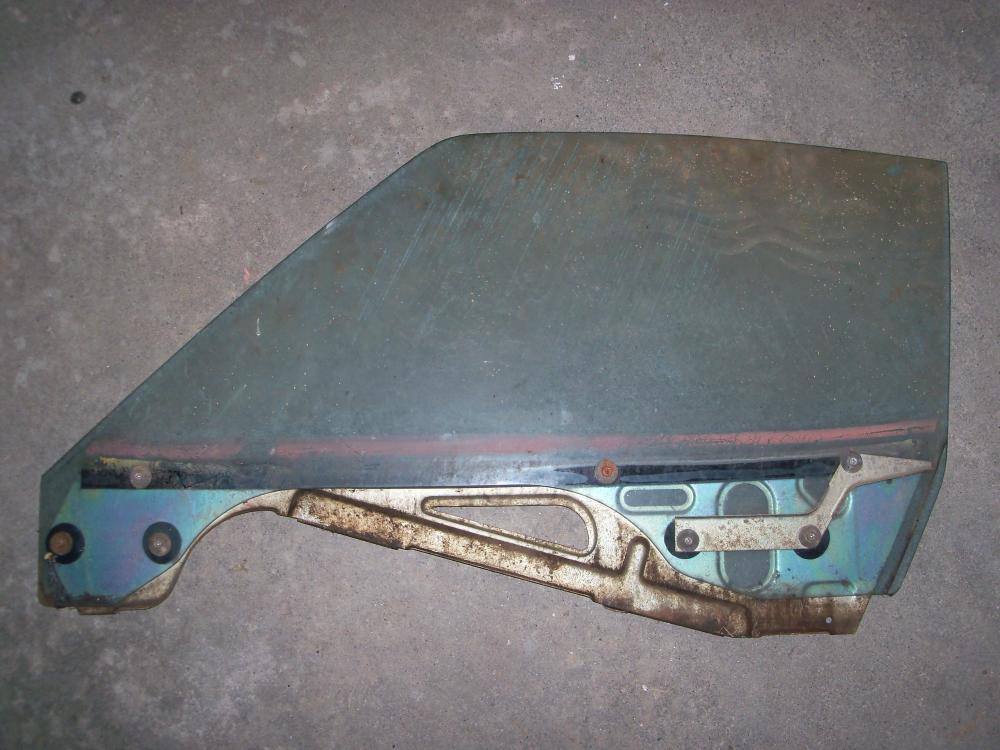

-
It will be interesting, then, to see how the use of adhesives finds its way into the auto hobbyists' world of restoration, where welded-in patch panels have been the traditional standard. Would a pro body shop tasked with the job of installing a set of Zedd Finder's floor panels use adhesive, for example?
-
That's an interesting note re use of adhesive to bond in the dogleg-area repair (vs. the traditional weld-in approach). Care to comment further? Does the shop have experience to support the long-term effectiveness of an adhesive join for this type of repair? I assume that it's all about getting a perfectly clean and straight joint area that assures a not-too-thick adhesive layer. p.s. I'm not sure that flooding an adhesive-repaired area with an oil-based preservative like Rust Check is a good idea. Once again, does the shop have anyexperience with the long-term results of doing this?
-
FWIW, here's a bit more info on cyanoacrylate (CA) glue (c/o Wiki): "When added to baking soda (sodium bicarbonate), cyanoacrylate glue forms a hard, lightweight adhesive filler (baking soda is first used to fill a gap then the adhesive is dropped onto the baking soda). This works well with porous materials that the glue does not work well with alone. This method is sometimes used by aircraft modelers to assemble or repair polystyrene foam parts. It is also used to repair small nicks in the leading edge of composite propeller blades on light aircraft. The reaction between cyanoacrylate and baking soda is very exothermic (heat-producing) and also produces noxious vapors." " CA glue is also used in combination with sawdust (from a saw or sanding) to fill voids and cracks. These repair methods are used on piano soundboards, wood instruments, and wood furniture." And a big caution: " Applying cyanoacrylate to some natural materials such as cotton, leather or wool (cotton swabs, cotton balls, and certain yarns or fabrics) results in a powerful, rapid exothermic reaction. The heat released may cause serious burns,[23] ignite the cotton product, or release irritating white smoke. Material Safety Data Sheets for cyanoacrylate instruct users not to wear cotton or wool clothing, especially cotton gloves, when applying or handling cyanoacrylates.[24] " Fortunately, it appears that this caution doesn't apply to the natural fibres (if there are any) in our Z's door cards!