Namerow
-
Posts
1,483 -
Joined
-
Last visited
-
Days Won
23
Content Type
Profiles
Knowledge Base
Zcar Wiki
Forums
Gallery
Events
Downloads
Store
Blogs
Collections
Classifieds
Everything posted by Namerow
-
Take a look at the headlines during Years 1963 - 1970. Those were heady times for Nissan and the Japanese auto industry. New models introduced. New assembly plants started around the world. New car transporter ships being launched and new harbour facilities built to service them. New headquarters building constructed. Motorsports entries and victories. New sales records set.
- 1 reply
-
- 1
-

-
Both options (professional repair vs do-it-yourself) have their good and bad considerations. The do-it-yourself option requires much attention to detail in order to create a good and lasting result. There are two or three good threads available on CZCC that will provide you with a list of recommended tools, materials, and procedures. Based on my own experience, the main limitation is that the final exterior finish -- typically accomplished using texturized 'bed liner' paint -- has 'look' and 'feel' that is different from the original textured vinyl. Although a casual observer would not notice the difference, a knowledgeable person will see it very quickly. I found some upholstery vinyl (long sheet with 1m width) that had a texture very close to the original material used by Nissan. Unfortunately, it was only available with a bonded fabric backing. Despite the use of a heat gun, it would not stretch enough to follow the contours of the S30 dash surface (those contours become quite extreme around the openings for the instrument pods. If you can find a suitable vinyl that does not have a fabric backing, you might be able to achieve a successful result. I look forward to reading about your dash restoration. There may be materials available to you in Japan that we in North America have not discovered.
-

1970 240Z Works Rally - the road to restoration
Namerow replied to xs10shl's topic in Open Discussions
Perhaps a letter to the manager of the new (?) Nissan Heritage Zone -- listed as a part of the Global Headquarters Gallery in Yokohama -- might find them willing to support the cost of digitizing the two reels of historic film. The NHZ includes a small reference library and would seem a logical curator for films such as these. -
I like it, but I think I'd like to see a rear-quarter view before I make up my mind.
-
I used a small, specialty paint supplier who mixed up a custom batch of vinyl paint using a small swatch of my car's seat vinyl as the basis for the colour blend. The resulting colour match was perfect and the application (standard HVLP gun) was trouble-free. I did this job five years ago and the vinyl paint still looks as good as when first applied. The paint specialist (Parasol) is based in Toronto, Canada. You should be able to find a similar supplier in the U.S. south-east. Try looking for boat upholstery specialists.
-
240ZBUILTBYME 1971 240z HS-001063 Project Georgia
Namerow replied to 240ZBUILTBYME's topic in Build Threads
Good presentation. Thanks. A few questions: What was the cost of the dry ice? You would have paid in Australian $, of course. How was it packaged for transport? How did you handle it when working with it in the shop... gloves? garden trowel? Was 5 kg enough? -
Not sure that I agree. Once the engine gets up to normal operating temps, the carb heating loop is closed (as in: inactive, does nothing, might as well not be there). Any emissions-related benefits would be restricted to start and warmup conditions, where the presence of the manual choke would overwhelm any contribution that carb heating might make toward reduced exhaust emissions. Remember, too, that the federal exhaust emissions standards (and related compliance testing) at the time were performed only at ~ room temperature ambient air conditions and with the engine up to operating temperature (i.e. choke off, main thermostat open). It was always my understanding that the carb heating circuit was introduced in an effort to inhibit drivability issues caused by carb icing. Not all carbureted engines suffer from this problem. As well, it apparently isn't specific to constant-vacuum carbs, nor to inline engines, nor to water-cooled engines. Nor to cold-weather operating conditions. It seems to occur only with certain combinations of engine, carburetor, and engine compartment layout and under certain air temperature/humidity/engine speed/throttle-opening conditions. Evidently, Nissan decided that it had heard enough reports of problems with early Z's to warrant spending the (not-inconsiderable) amount of money required to install the carb heating loop (complete with revised castings for the carb bodies and the thermostat housing). There's a useful discussion of the Z's carb heating system on Hybrid-Z, here. And if you use the search function here on the CZCC site, you'll discover that several discussions about the system have taken place over the years.
-
I 'misremembered' on that rail gauge. It was actually was 4 ft. 10-7/8 in. and it applies to the trackage used for the Toronto streetcar and subway systems. Otherwise, our Canadian mainline railways use the more common 4 ft. 8-1/2 in. (because to do otherwise would mean that our trains wouldn't be able to enter the USA and U.S. trains wouldn't be able to enter Canada). Here's how the so-called 'Toronto gauge' came to be: The Toronto Street Railway created the basis for the Toronto streetcar system when it opened a horsecar line in 1861. At the time, the city's streets were unpaved. A broader-than-standard 'Toronto gauge' was mandated by the city in order to allow not just horse-drawn passenger carriages ('streetcars'), but also both horse-drawn cargo wagons to use the tracks. The rail used for these horsecar tracks was a 'step' type. The horse-drawn streetcars were equipped with iron wheels with inboard flanges. They ran on the outer (upper) step of the rail, with the wheel flanges providing guidance. The horse-drawn cargo wagons, on the other hand, used wheels made of wood, with a flat iron tread and no flange. These cargo wagons used the inner (lower) step of the rail, with the upper step of the rail serving to guide the wagon along the track. In order to accommodate this arrangement, the track gauge had to be 4 feet, 11 inches*. When the TSR's franchise ended in 1891, a new company (the Toronto Railway Company) took over the system and replaced horse-drawn streetcars with electric trams. Rather than rip up all of the existing trackage, it continued the use of Toronto gauge and had its electric trams' equipped with axles whose wheel separations were set for the Toronto gauge. When the subway system was built in the 1950's, the transit commission decided to extent the use of the Toronto gauge to the new system (probably so that it could use common storage yards and service depots for the streetcars and the new subway vehicles). (* later reduced by 1/8" for some reason I haven't been able to determine) Toronto wasn't at all unique in having a horse-drawn streetcar system. However, I think the the 'Toronto gauge' was (and remains) unique to the city -- as did our streetcar system for many years (at least, in Canada and the US). Just about everywhere else, the municipal transit authorities replaced streetcars with buses in the 1950's and ripped up their streetcar tracks. Although some claim this was a conspiracy on the part of the U.S. auto industry (sell more cars and buses) and the oil companies (sell more fuel), there were lots of good reasons: 1) The streetcars impeded the flow of automobile traffic; 2) the tracks were tough on vehicles equipped with bias-ply tires (not to mention motorcycles and bicycles); 2) no overhead electrical wiring needed; 3) new routes could be created without the need to tear up pavement and install tracks and overhead wiring; 4) no track or electrical systems to maintain; 5) buses could change direction and cross each other's paths without the need for track/wire switches or crossovers. Streetcars really work best when they operate on a dedicated right-of-way (typically, a centre strip running down the middle of the road). However, that requires either a very wide street or the sacrificing of a pavement lane. And there's still that unsightly business of putting up an overhead power wire system. Some people love streetcars. Others hate them.
-
Here in Canada, we gradually switched to the metric system over the course of the 1970's. Since this period coincided with my entry into the engineering profession, I got to witness the changeover as a consumer, an engineer, and as someone living in a country right next door to the US (which, to this day, has never really embraced the metric system). Despite the many positive aspects of the metric system, you will still find that Canadian grocery stores advertise prices in both $/kg and $/lb -- although, curiously, we've gone pretty much 100% to metric when it comes to volumes (no more gallons, quarts or pints... unless you're buying berries or small fruit). Outside of the food store, we still have difficulties applying the metric system for real estate (lot frontages and depths are still quoted in feet and property sizes are better understood by most when stated in acres rather than hectares). Gas, however, is uniformly sold by the litre, temperature levels are almost always quoted in degrees C (except for the kitchen oven), and fuel economy is pretty much always stated in litres per 100km (I still like mpg... but only if the 'g' is measured in Imperial gallons). In the technical work that I was involved with in the 1970's, there was also a mixture of metric and 'imperial' measures. Railways in North America were tied to a track gauge system measured in feet and inches (4 ft. 7-1/8", IIRC) and that seemed to find its way up through the rest of the vehicle and infrastructure layouts. Steel rails were -- and I believe still are -- categorized by weight per unit length, measured in lb/ft. Buses and trucks were an odd mix of metric and imperial (trailers, for example, are still often categorized as 45-footers and 53-footers -- the latter oversized to accommodate two extra rows of 4-foot pallets). Despite the prevalence of metric fasteners, you have to work hard to find a set of metric drill bits (for your 1/4" or 3/8" electric drill). Metric lumber? Not gonna happen in North America. Which means that the residential homebuilding industry still has to accommodate fps. It was interesting to watch how the US auto industry tried to deal with the metric system during the 1970's. The vehicle engineers and designers really wanted to go metric (note: 'designers' are not 'stylists', although stylists sometimes like to be called designers), but the sunk costs in fps-based tooling, infrastructure and support equipment made it difficult. And the American consumer would have problems dealing with a speedometer calibrated in km/hr. I believe that it was decided to start by going metric with the engine design only. The rest of the vehicle systems' designs gradually followed suit afterwards (except for the speedometer calibration and the diameter of the road wheels). Which is why most of us have two sets of socket wrenches (to fit our 1/4", 3/8", and 1/2"-drive ratchets).
-
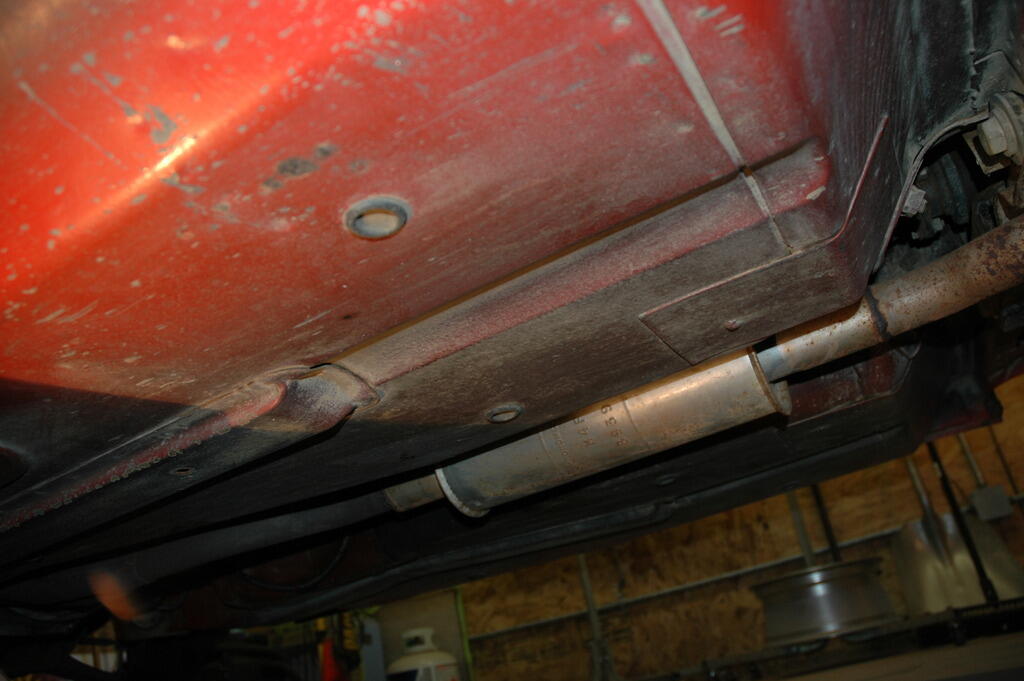
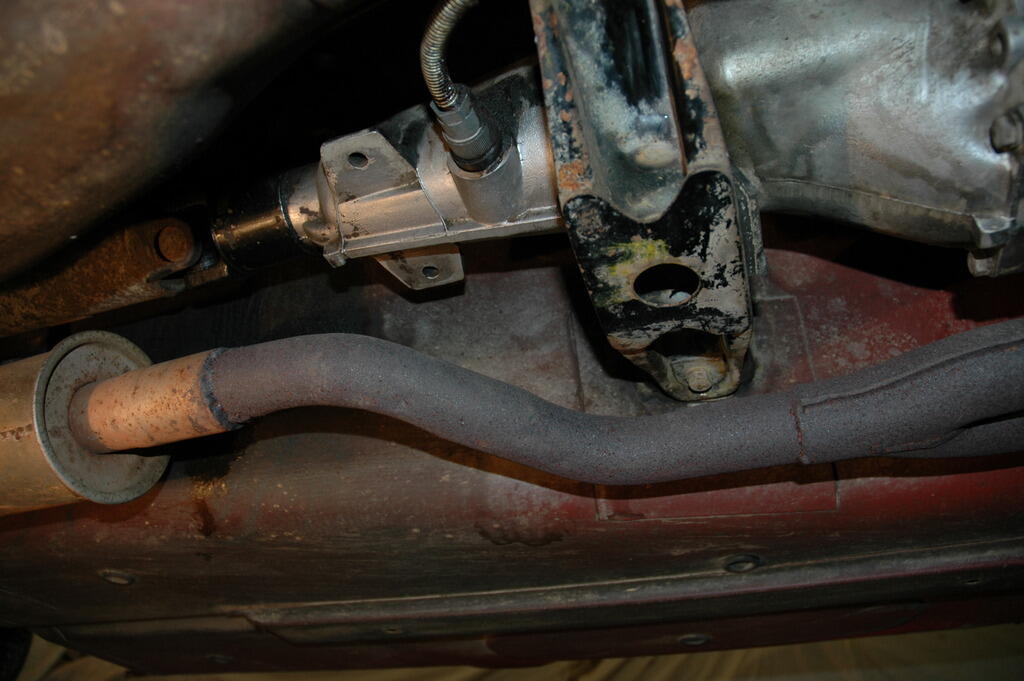
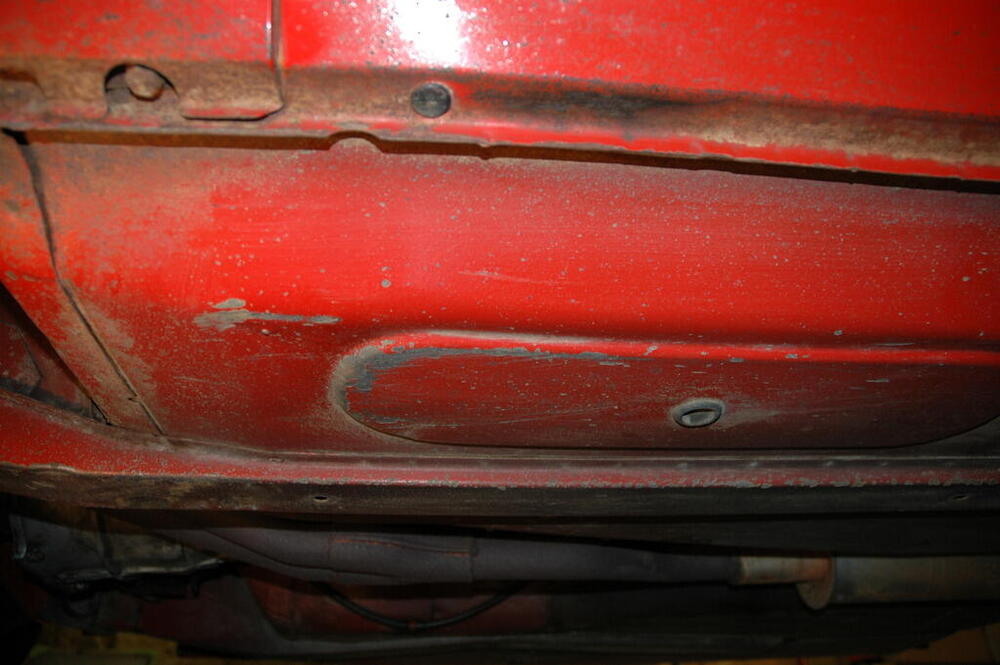
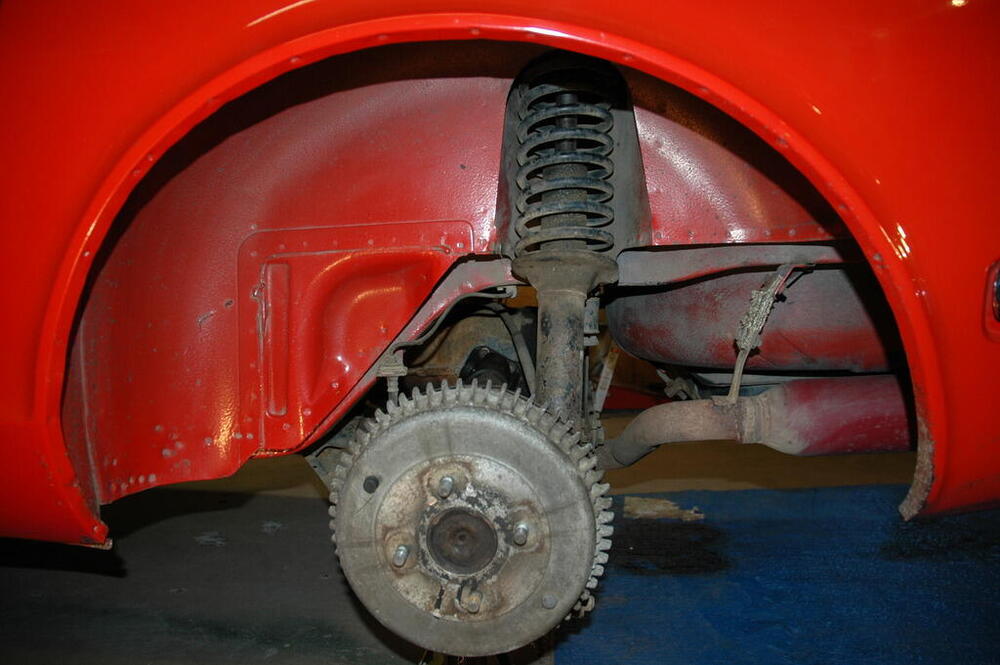
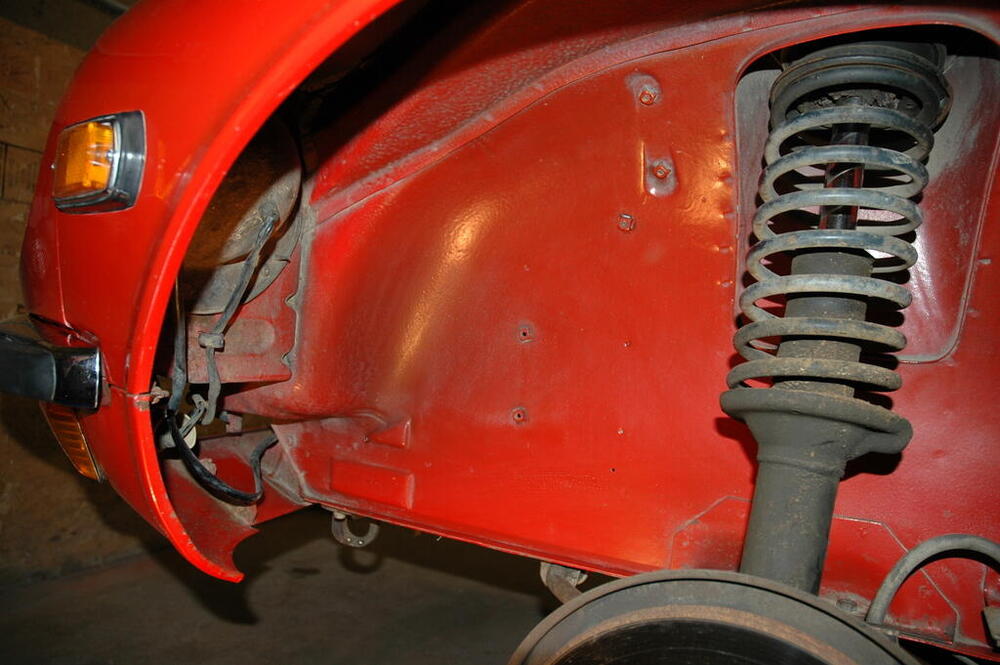
To illustrate zspert's points, here are a couple of photos of VIN 19769 (01/71), taken from the nicely-documented BaT listing when the car was up for sale in 2016. Both paint and lack of paint are in evidence, depending on the location on the underside.


-
Best I can do for you...

-
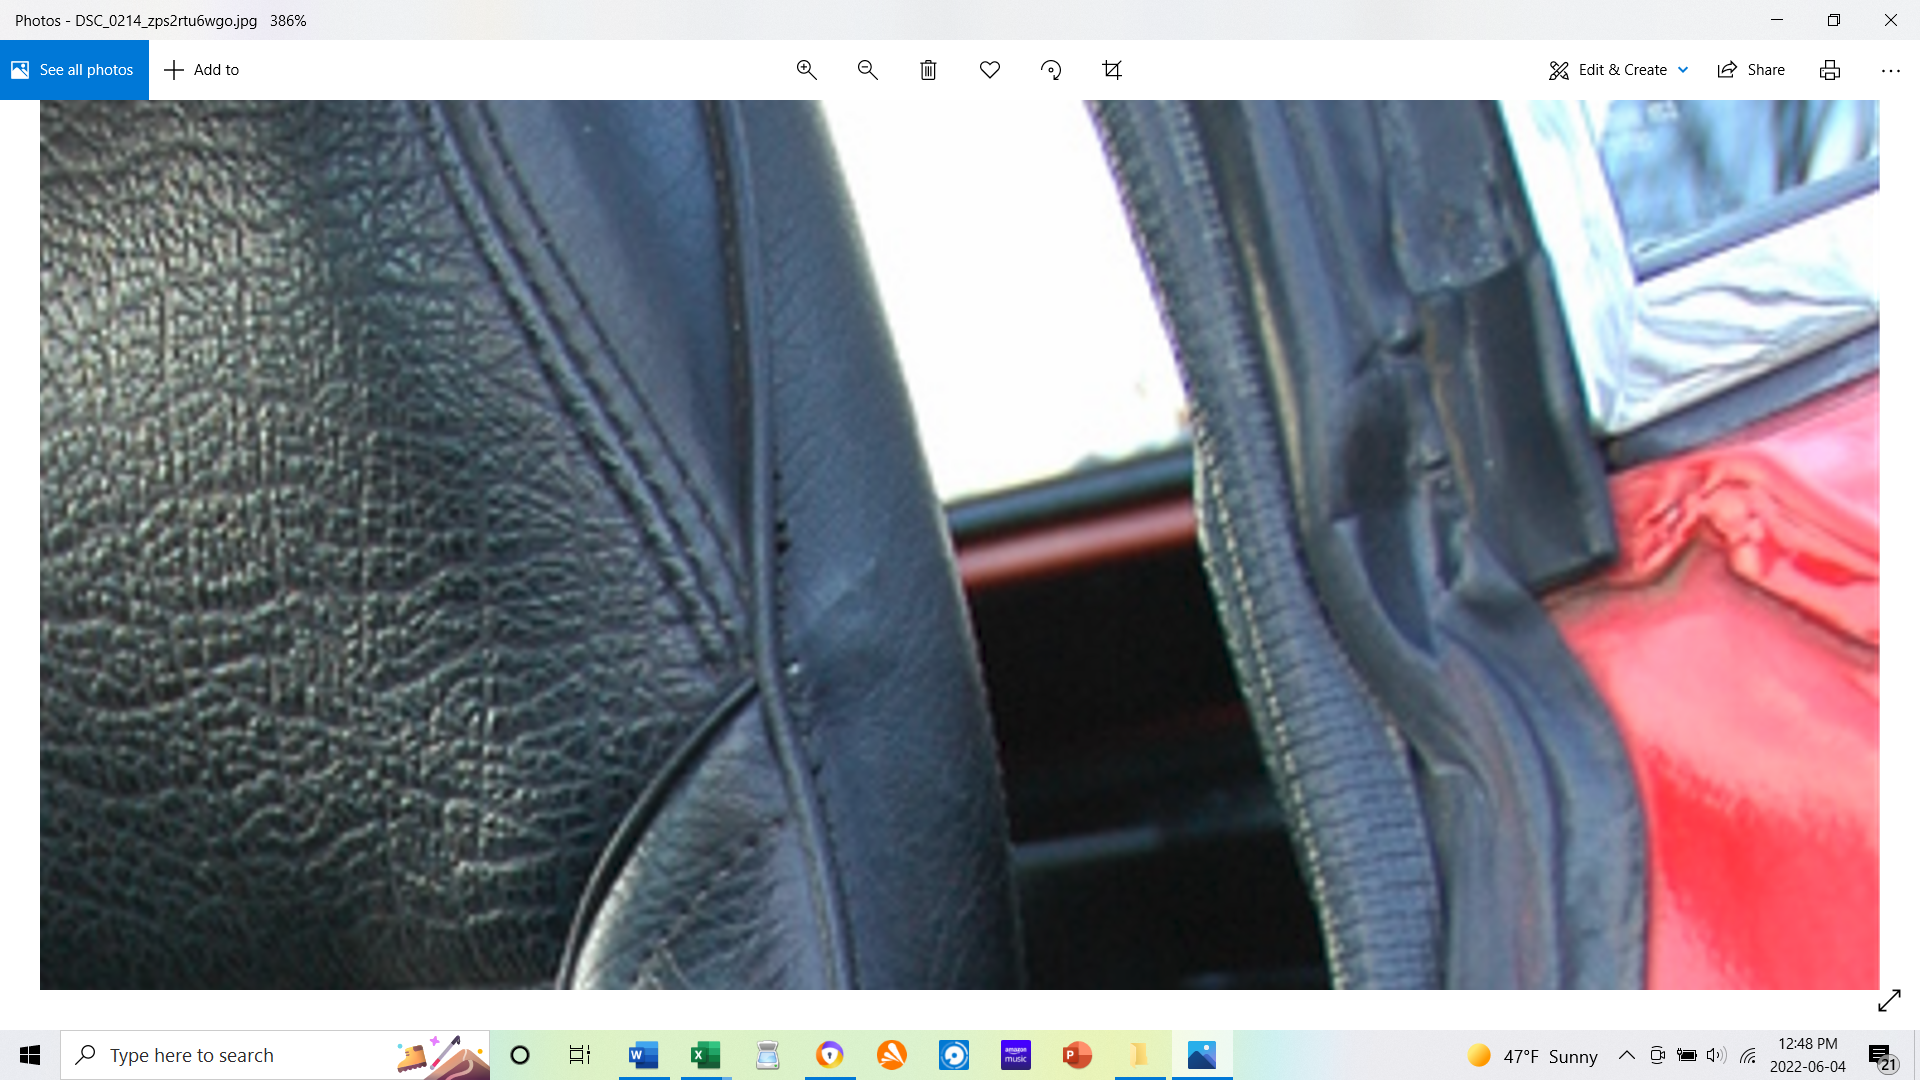
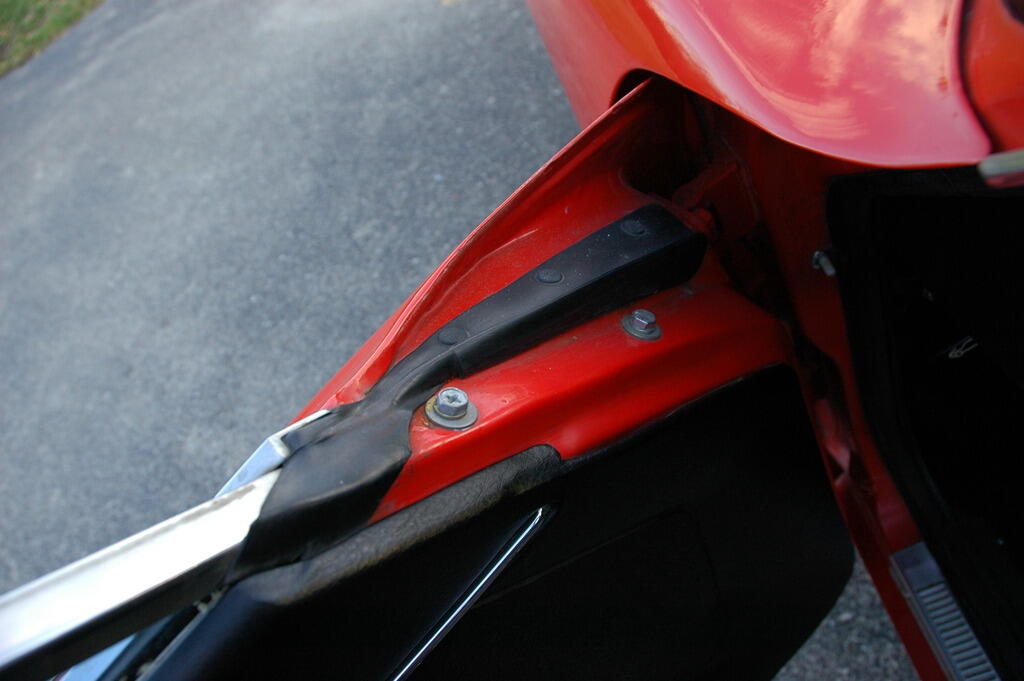
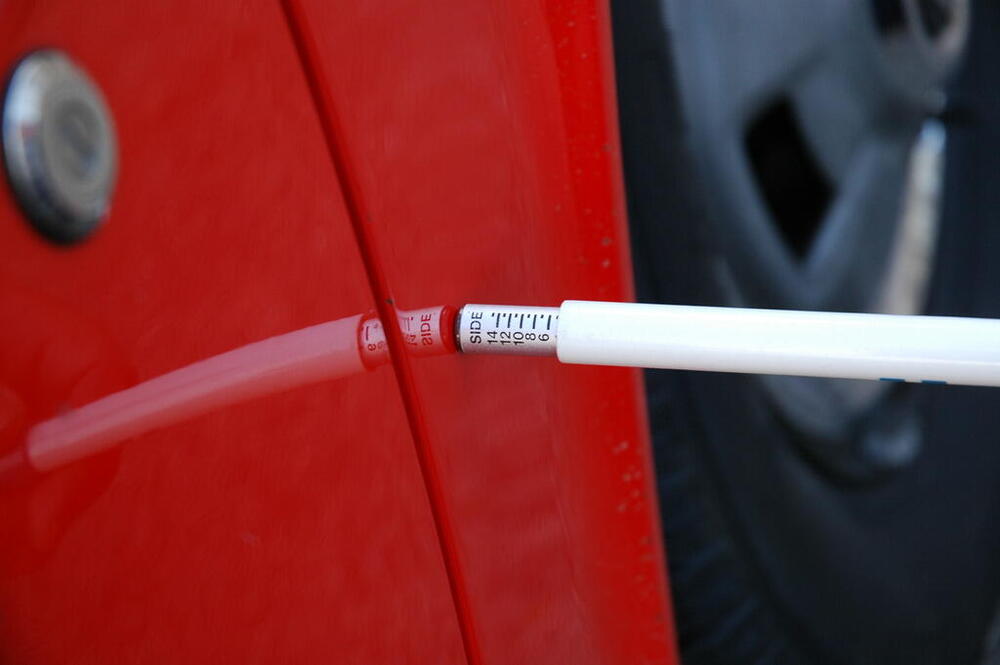
Here are pictures from a very original 1971 Z (VIN019769) that illustrate what the OE seals looked like. Maybe they'll help you sort out your quandary...


-
If, instead, you decide to pull out the glovebox liner first, these are the notes I wrote down after getting the liner out of my 70 Z's dash: Grasp the centre of the front lip of the liner’s roof panel, then pull the lip outwards until the top corners of the liner clear the inside corners of the dash opening. One corner may clear before the other does. Now continue pulling the liner Roof through the dash opening by about 1”, pivoting the liner on its front lower edge in the process. Working from behind the dash, push the lower corners of the liner inward so that the liner's floor panel buckles. Keep pushing until the lower corners of the liner clear the lower lip of the dash opening. Work from side to side. Push the lower corners of the liner out of the dash by about ½”. However, keep the front edge of the liner’s Floor resting on top of the lower ledge of the dash opening. With both of the liner’s lower corners now free, resume tilting the liner out from the top until the entire liner comes free. Throughout the process, the front edge of the liner Floor rests on top of the lower ledge of the dash opening. Good luck!
-
Charlie Osborne at ZeddFindings has been in business for many, many years. I don't think I've ever heard anyone accuse him of being 'unreliable'. That certainly wasn't my experience. Until the recent arrival of KlassicFab on the Datsun scene, he was the market's leading supplier for Z frame rail and floor replacements.
-
I'm not aware of any vendor that offers an inner fender panel replacement (whether complete, or just the bottom strip). If the rot on your car hasn't travelled too far up from the frame rail seam, the panel is pretty straight from front to rear and it shouldn't be too difficult to graft in new metal cut from flat sheet (20 gauge, IIRC). A CZCC member from Calgary, Alberta (name?) posted a detailed build about 2 years ago that illustrated this repair quite nicely.
-
I know of two vendors that offer the LHS and RHS rails separately... ZeddFindings (https://www.datsunzparts.com/services/frame-rails/) KlassicFab JDM (https://kfvintagejdm.com/shop/datsun/front-chassis-rail-left-side/) Neither offer rails that are specifically identified as '280Z'. Perhaps others will offer opinions as to whether or not the 240Z rail can be successfully adapted to a 280Z. IIRC, the main design difference is a reduction in width over the front-most 6" of the 280Z rail, required for clearance for the wider 280Z radiator.
-
Great progress. It's always nice to have a talented welder in the family! Can you comment on how you removed the old sheet metal? Did you drill out spot welds? Metal saw? Angle grinder? All of the above?
-
240ZBUILTBYME 1971 240z HS-001063 Project Georgia
Namerow replied to 240ZBUILTBYME's topic in Build Threads
Perth! Well then, that explains everything Your dash surface was pretty badly damaged. It looks like the shop did an excellent job. A bit of a head-scratcher, though, because this type of work typically requires a large vacuum chamber with heat treatment (steam, IIRC) in order to pull the new vinyl overlay down onto the restored form. Did you get a chance to look at the equipment they use? -
Sorry. I missed the '280' in your user name. I'm not familiar with the 280 heater, so you'll have to rely on other members for help. Having looked at your pictures, I suggest you start by putting some good-quality penetrating oil (not WD40) on any fastener that looks like it's going to need to be loosened. If you do that now, it will same you a lot of grief when you actually set to work on repairing the system.
-
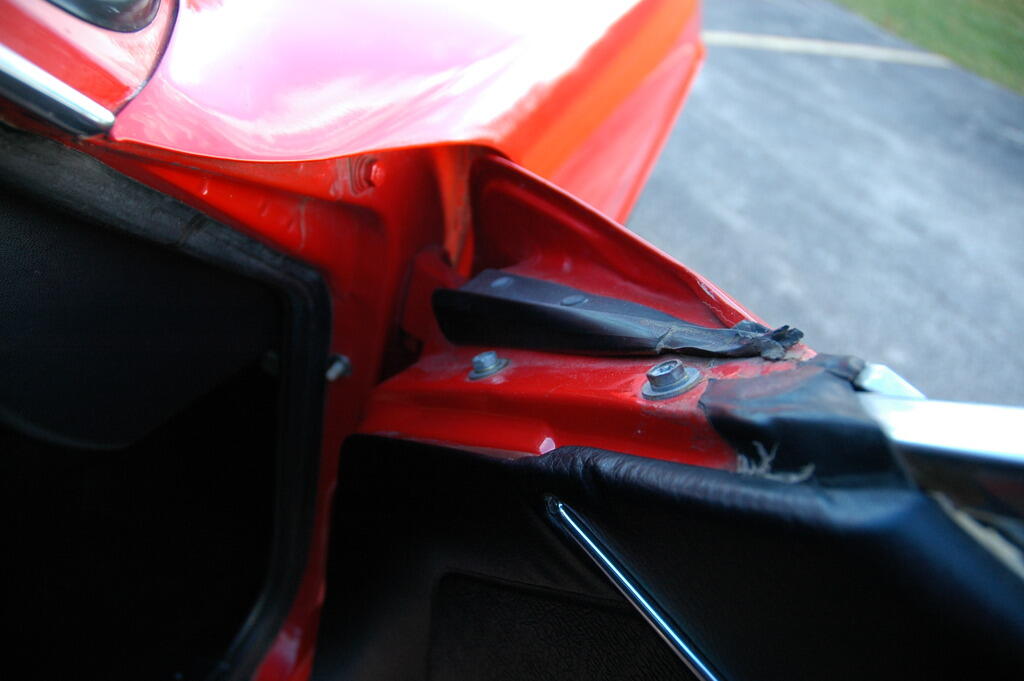
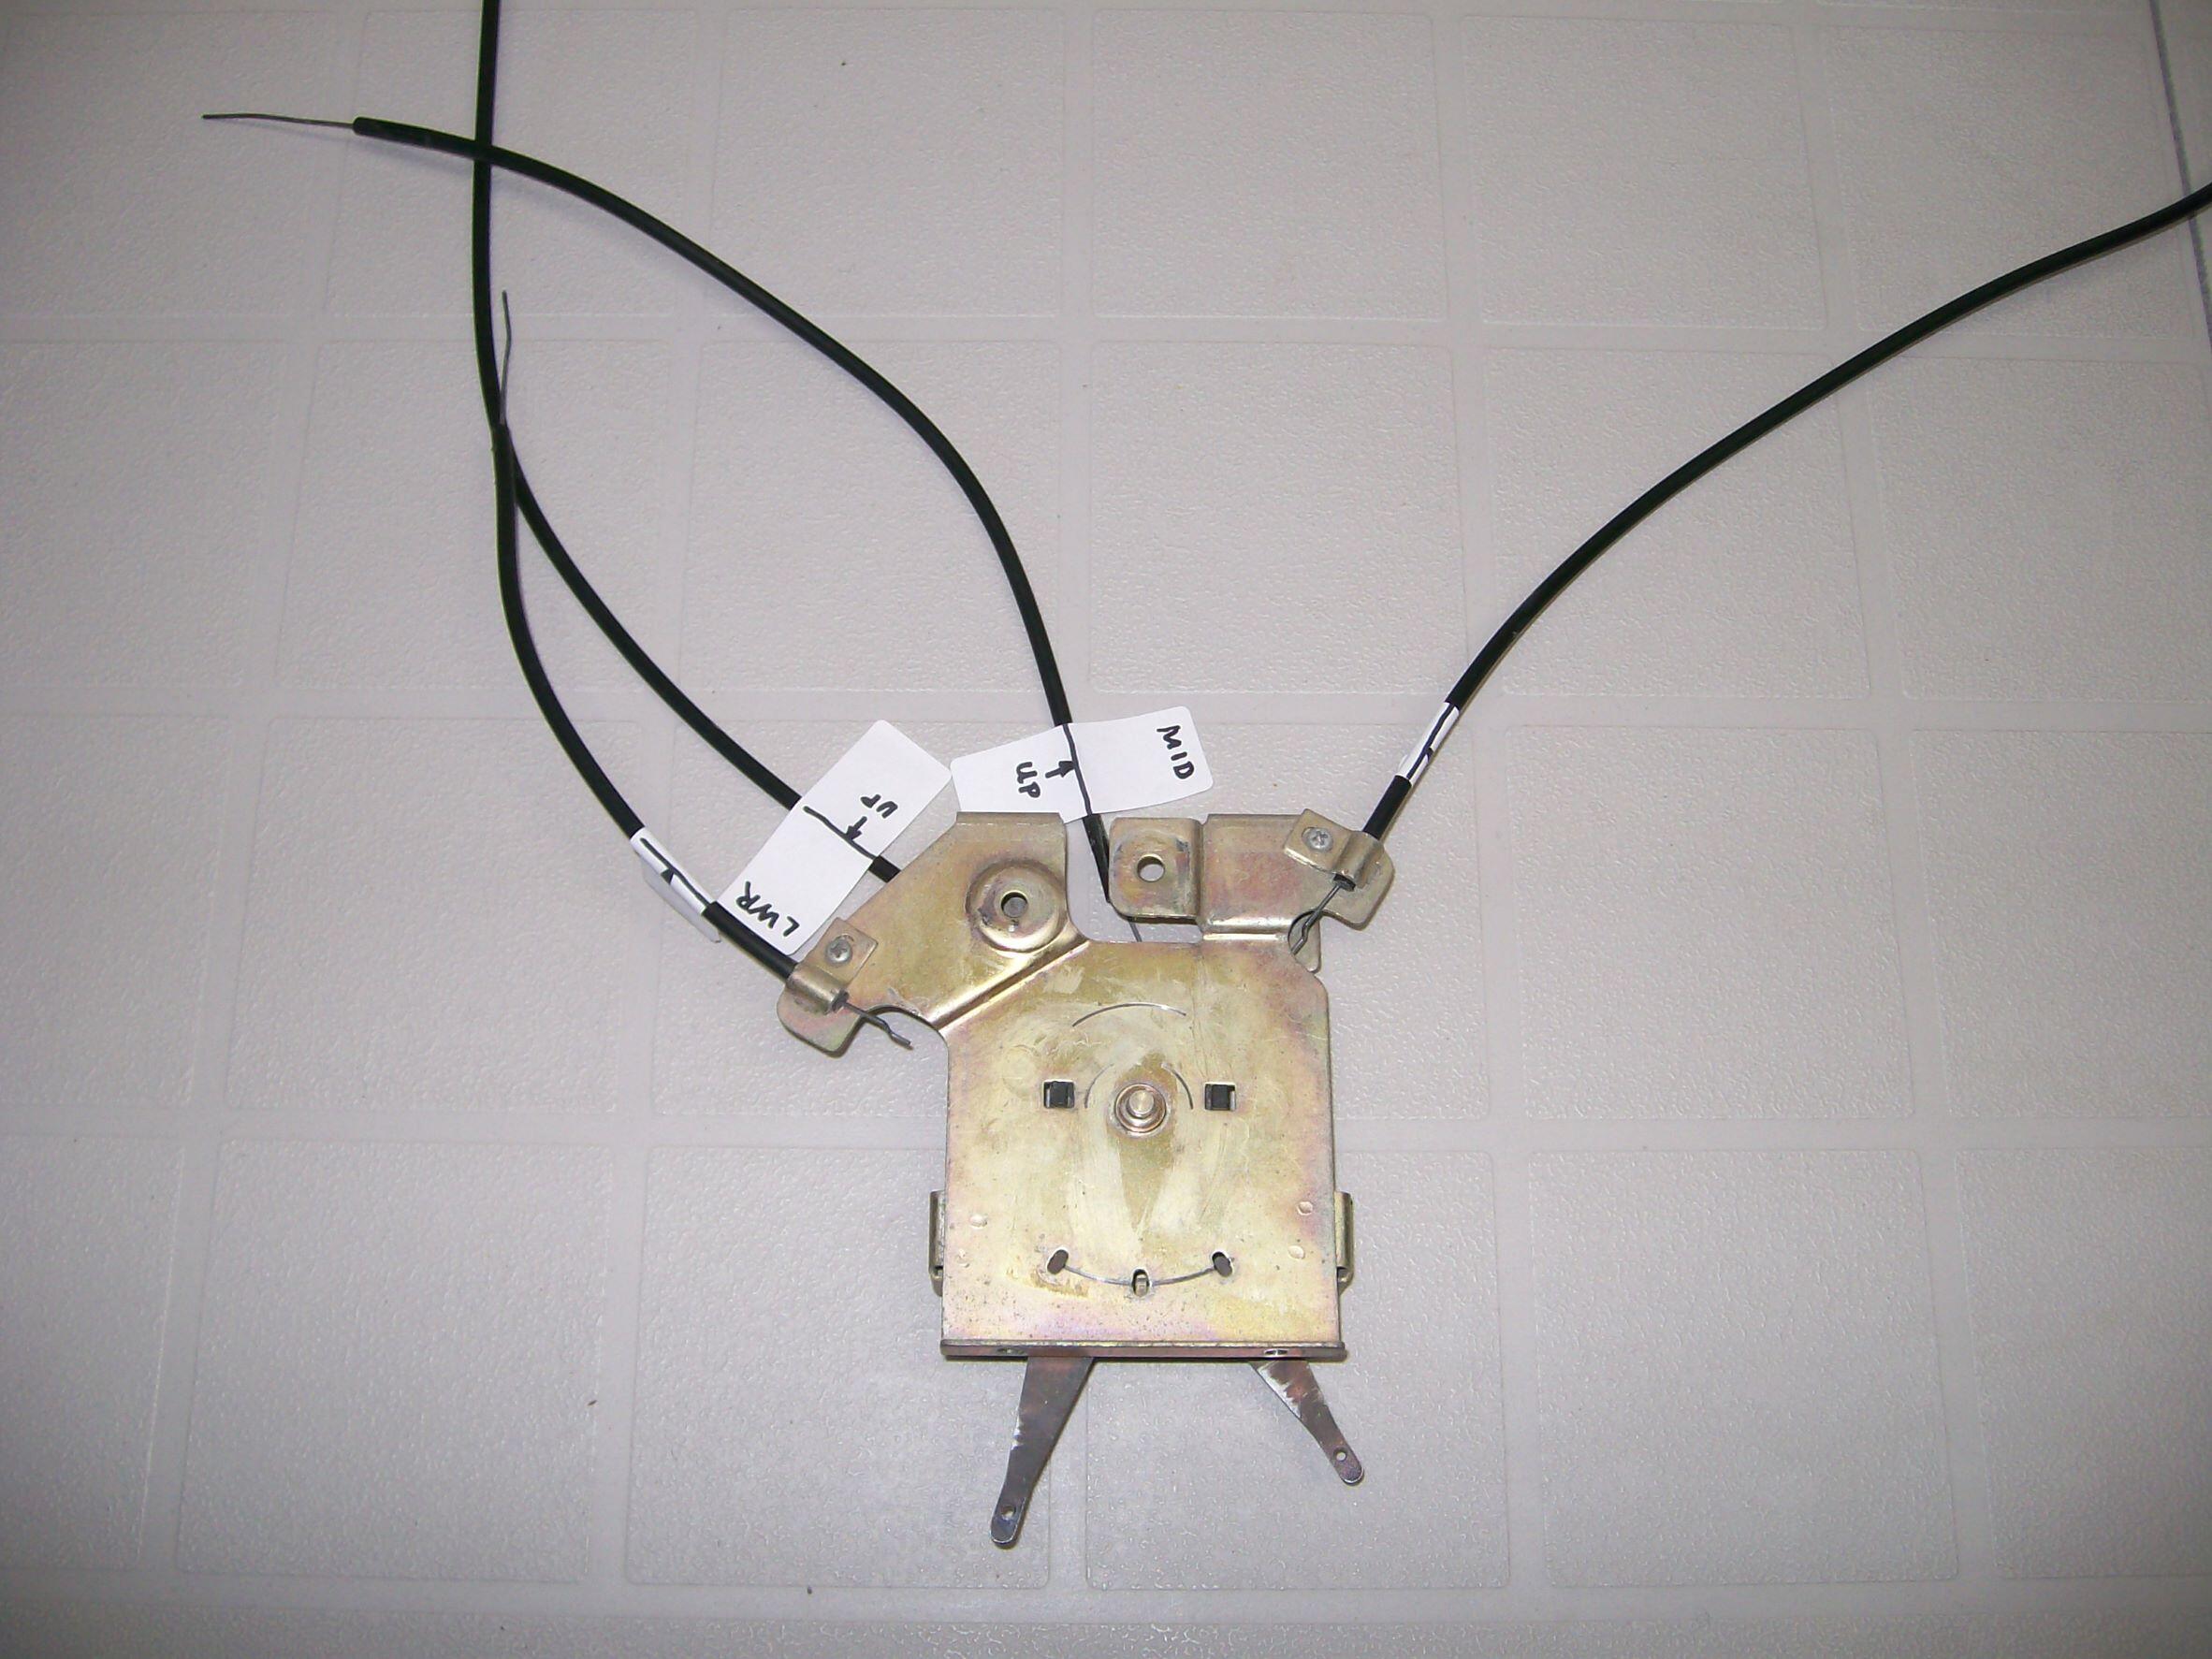
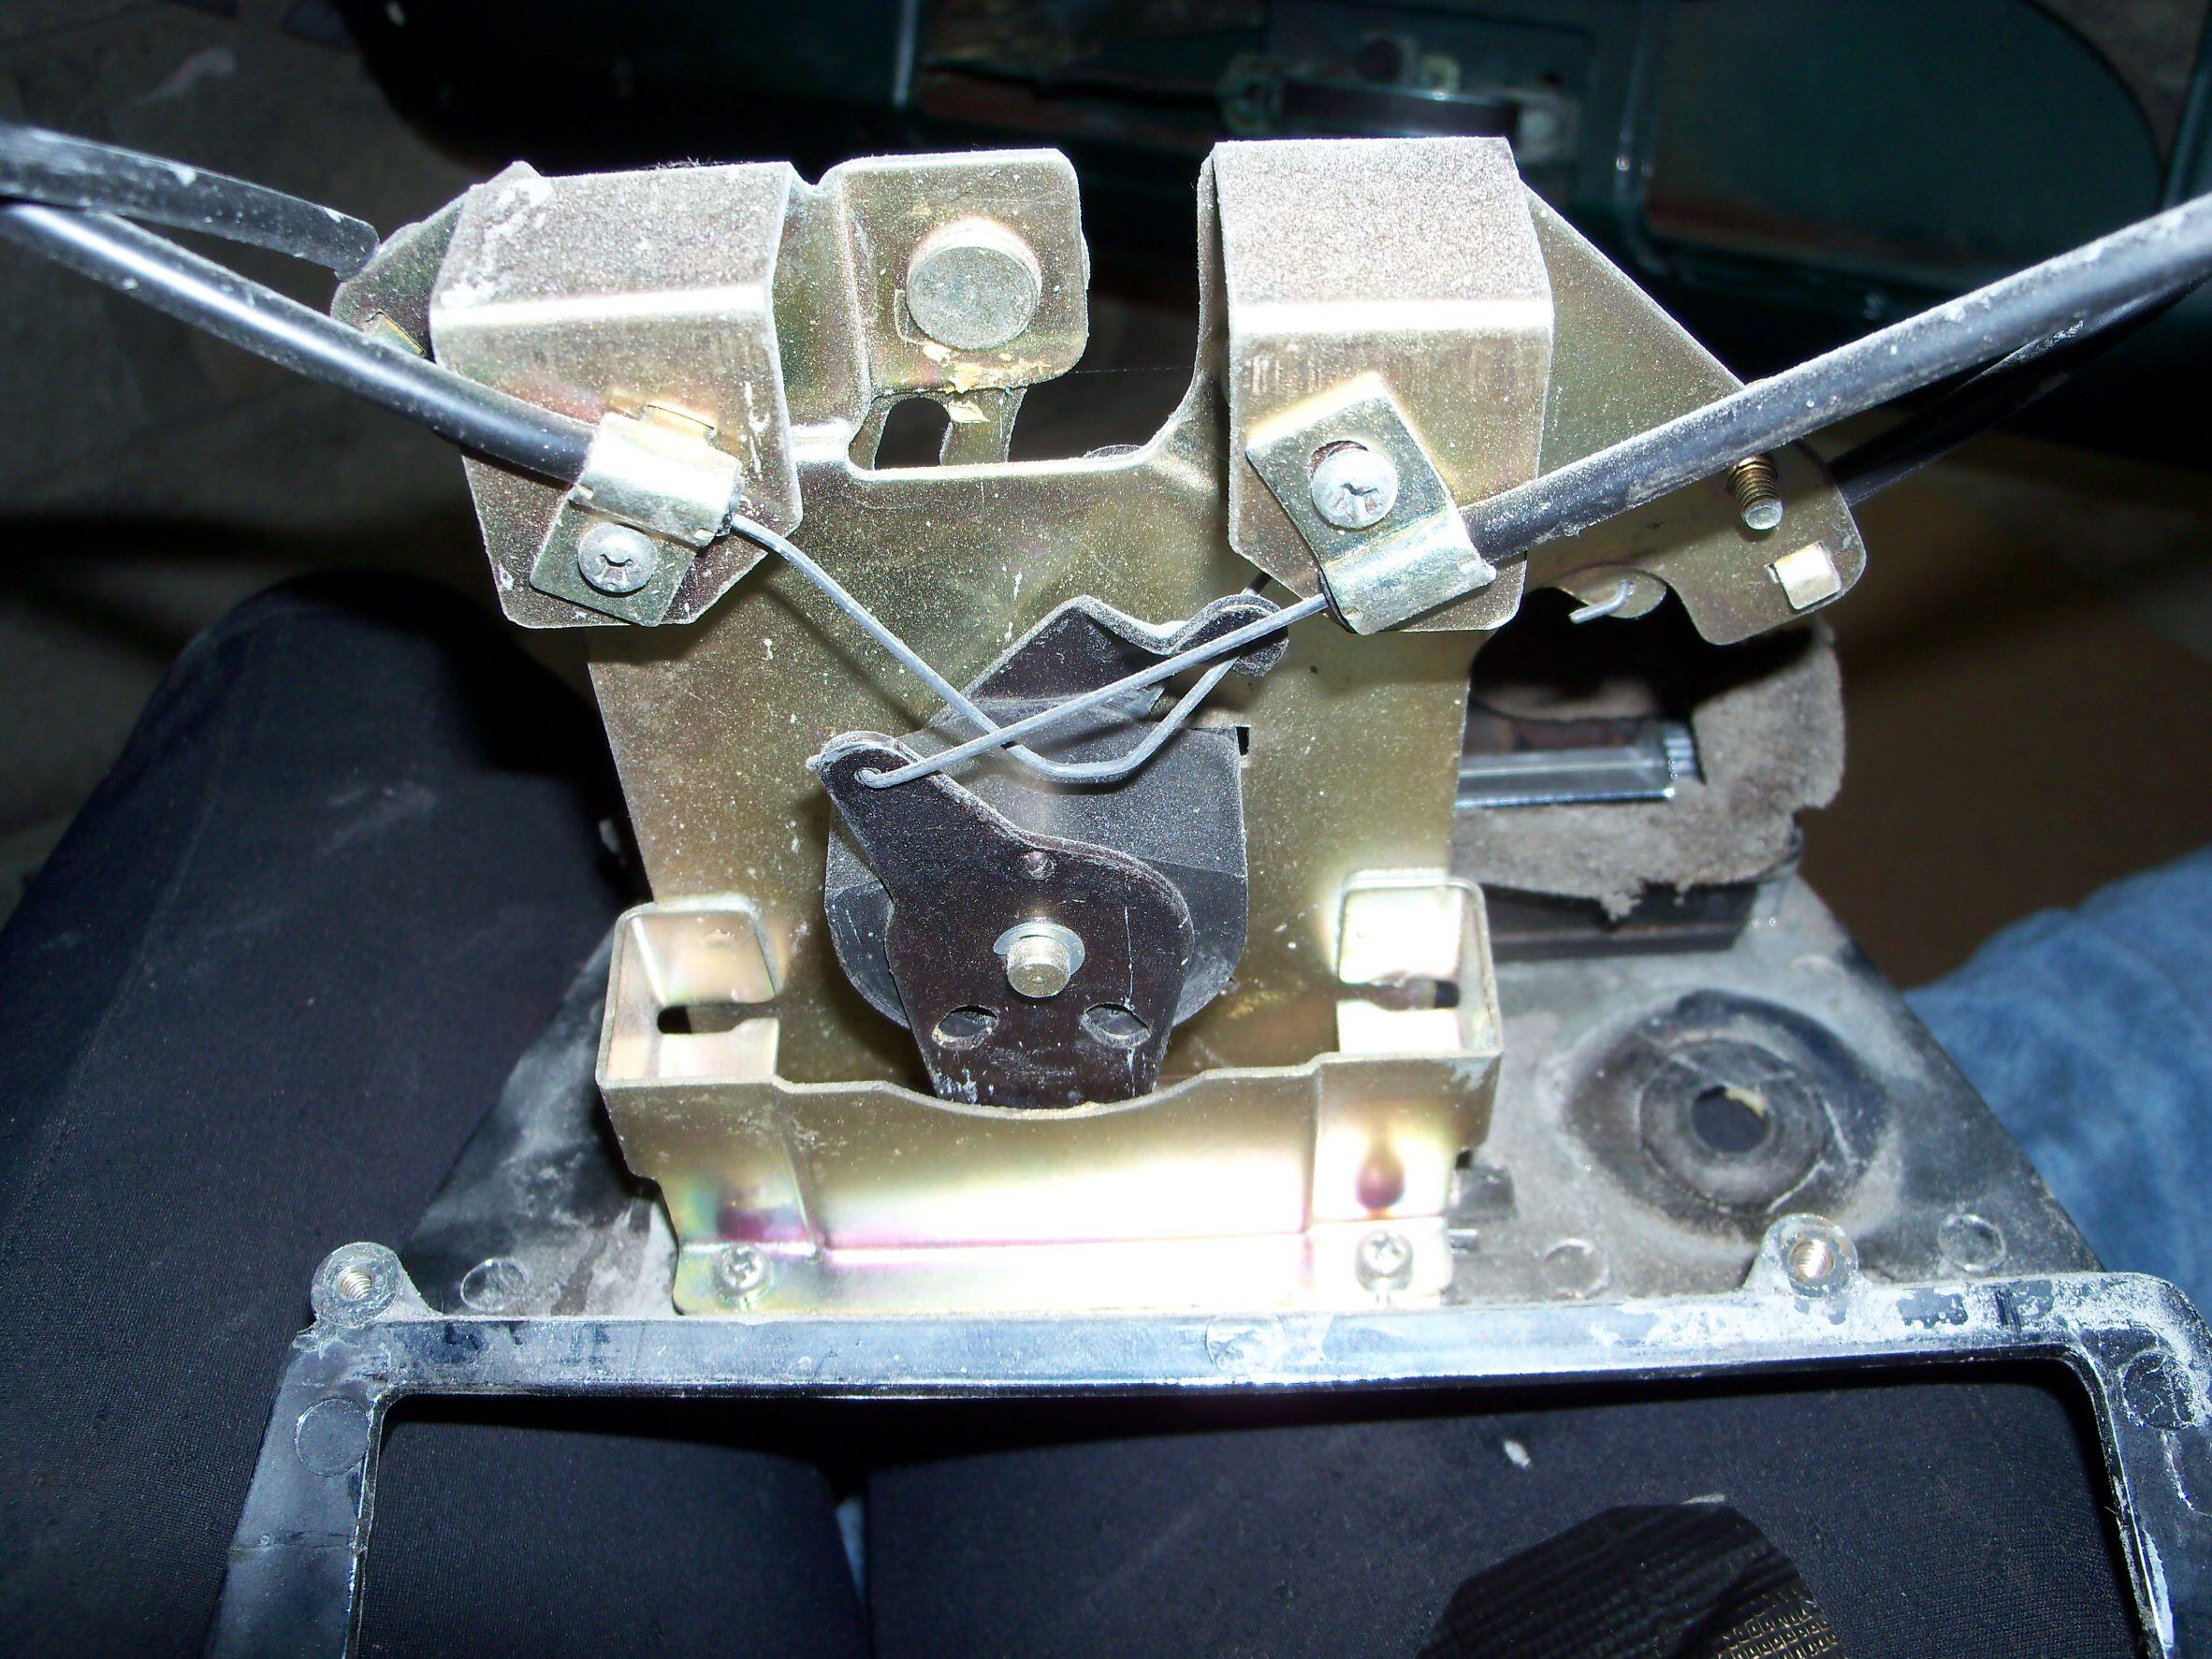
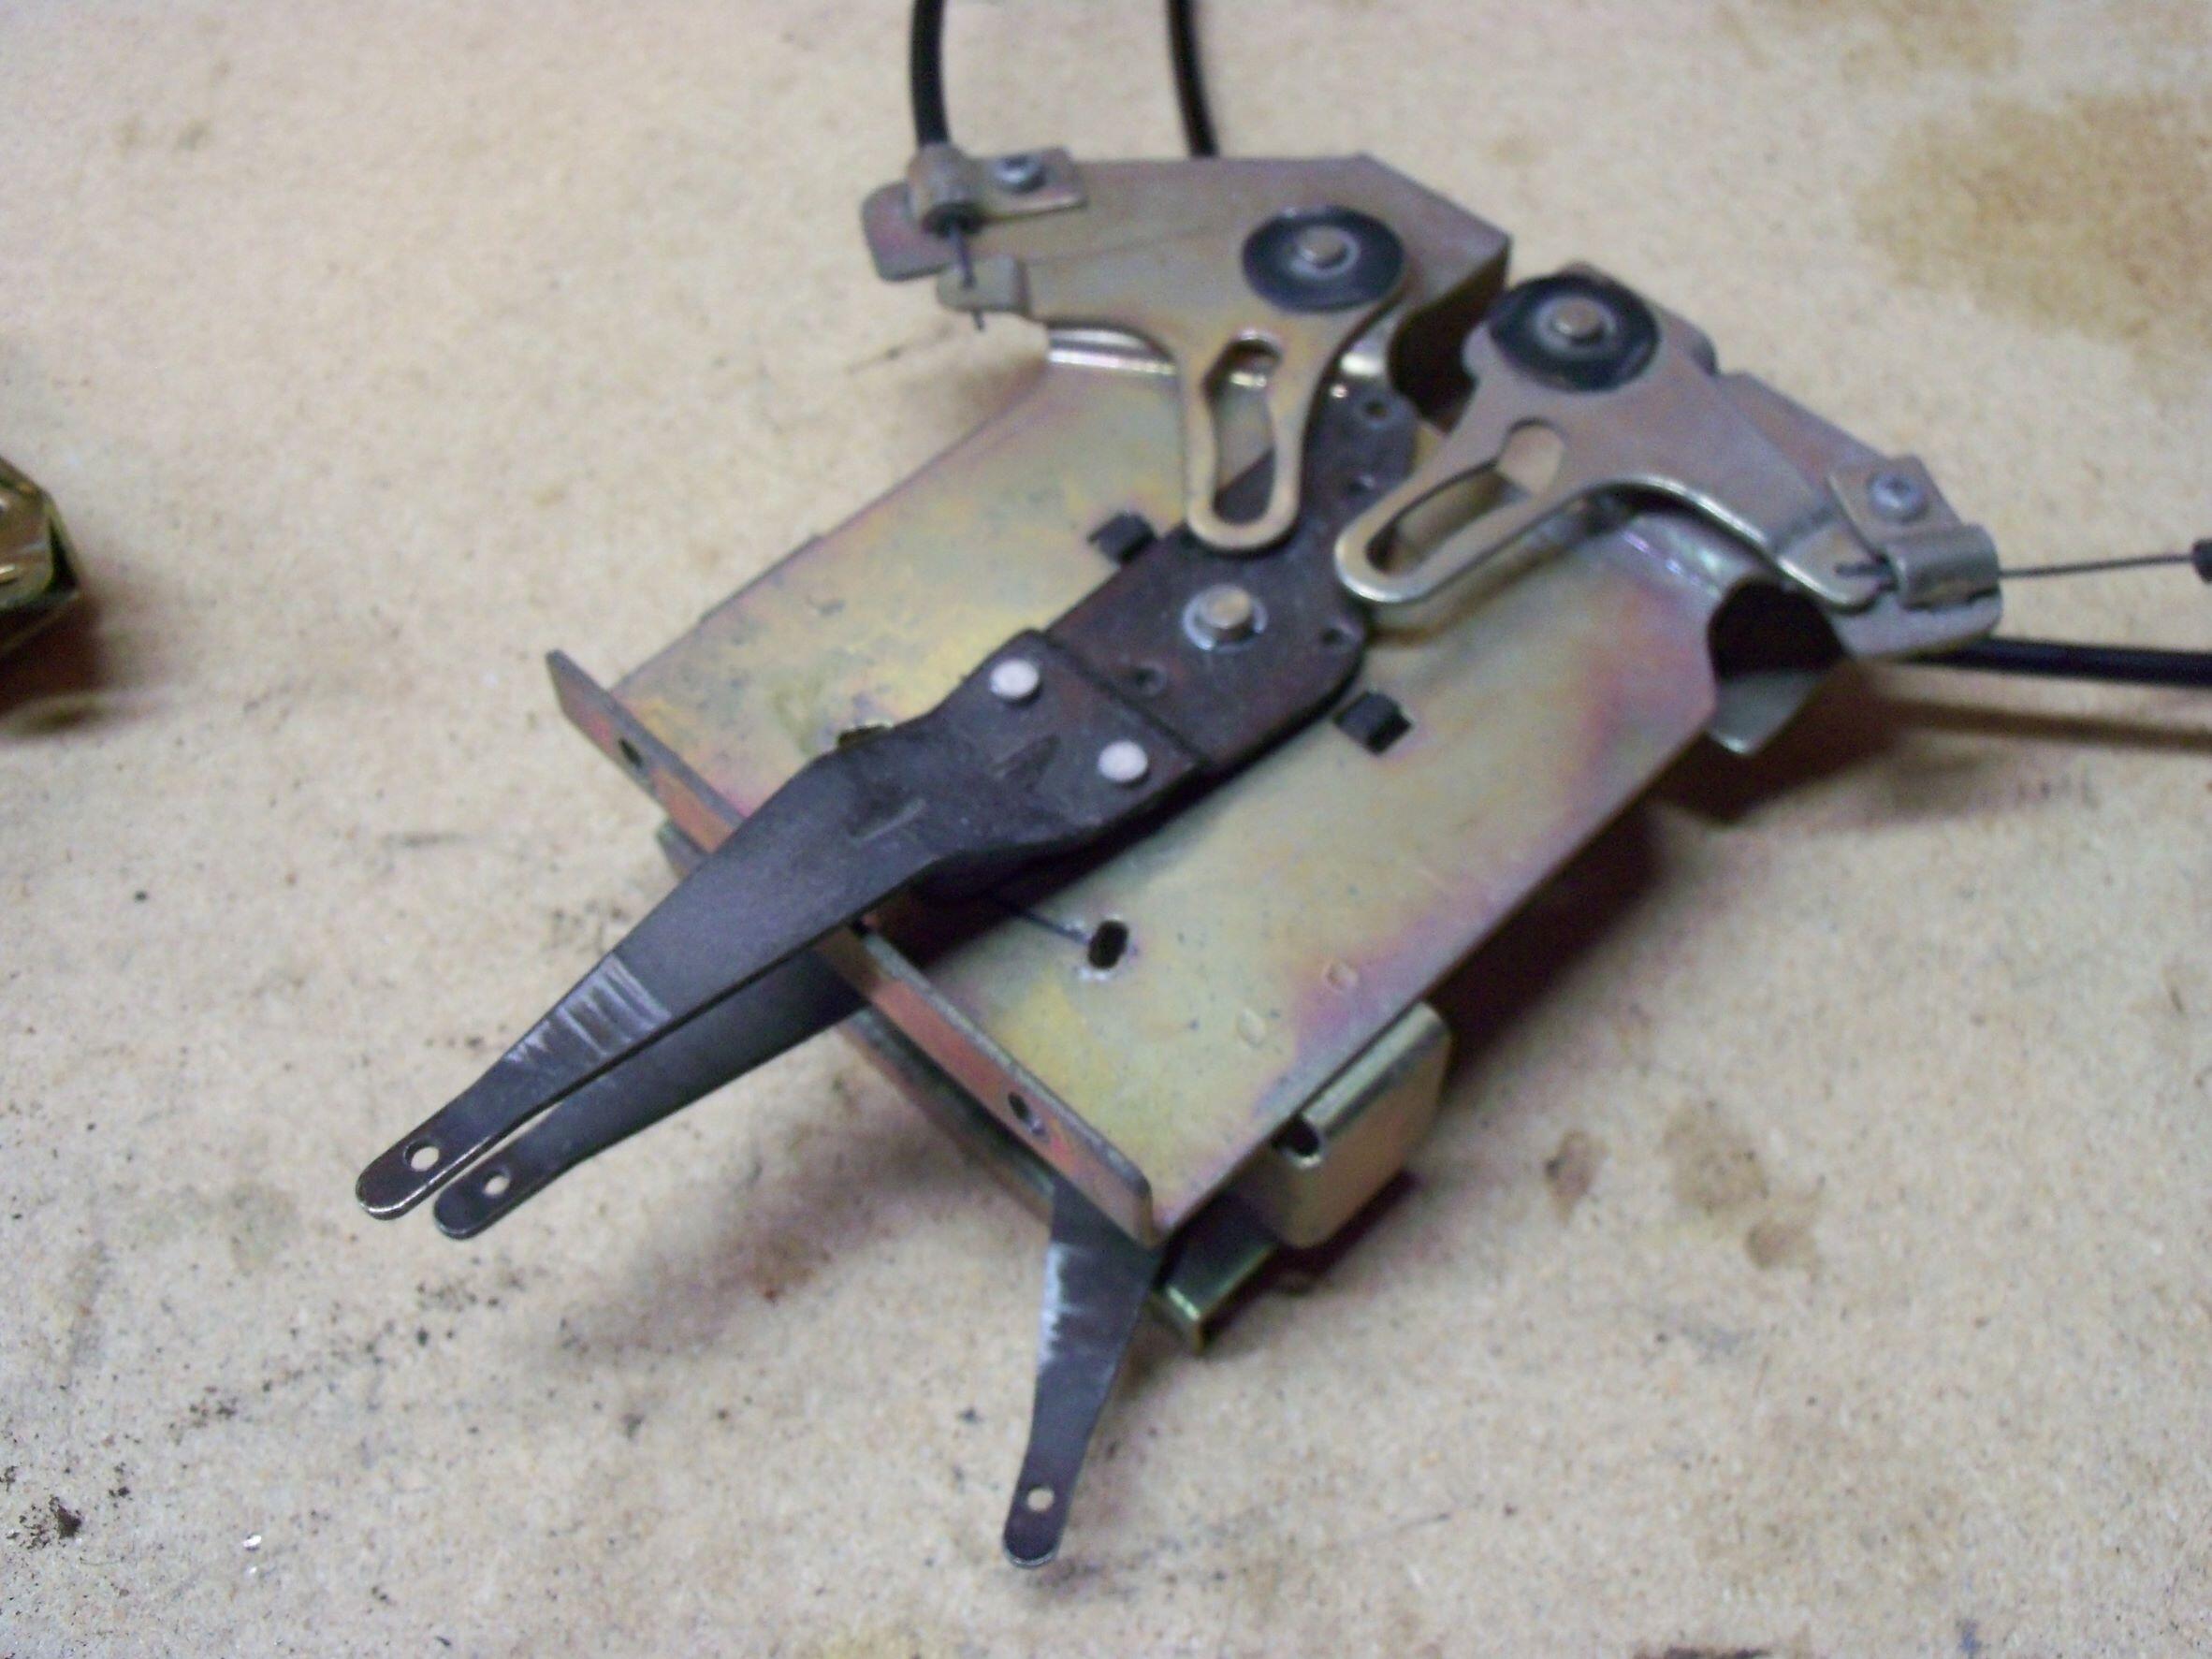
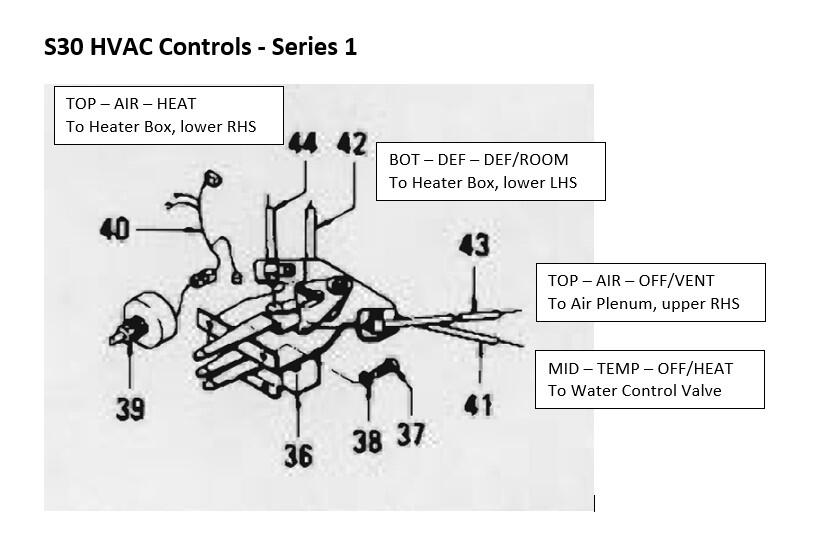
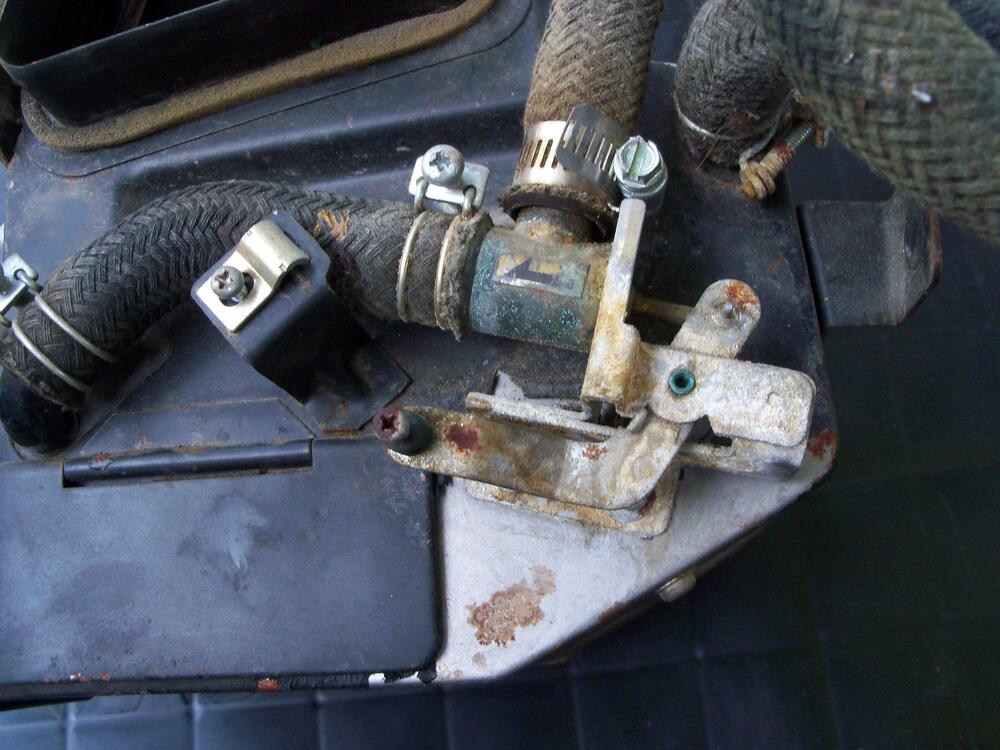
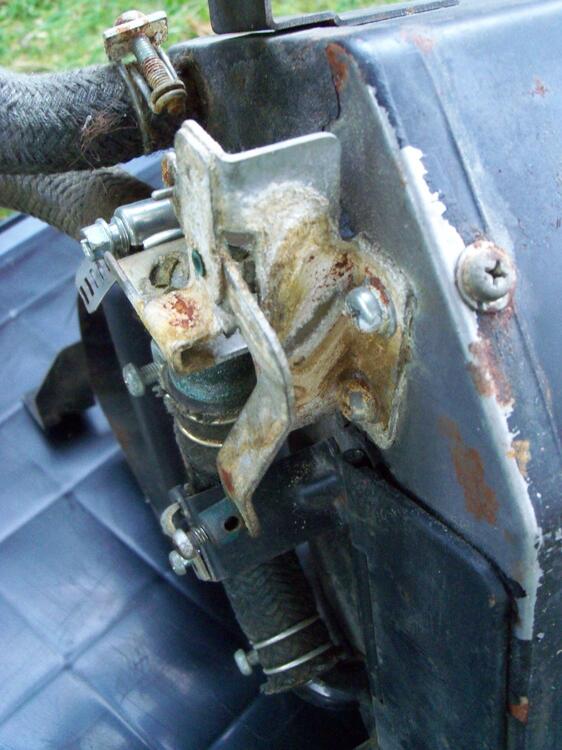
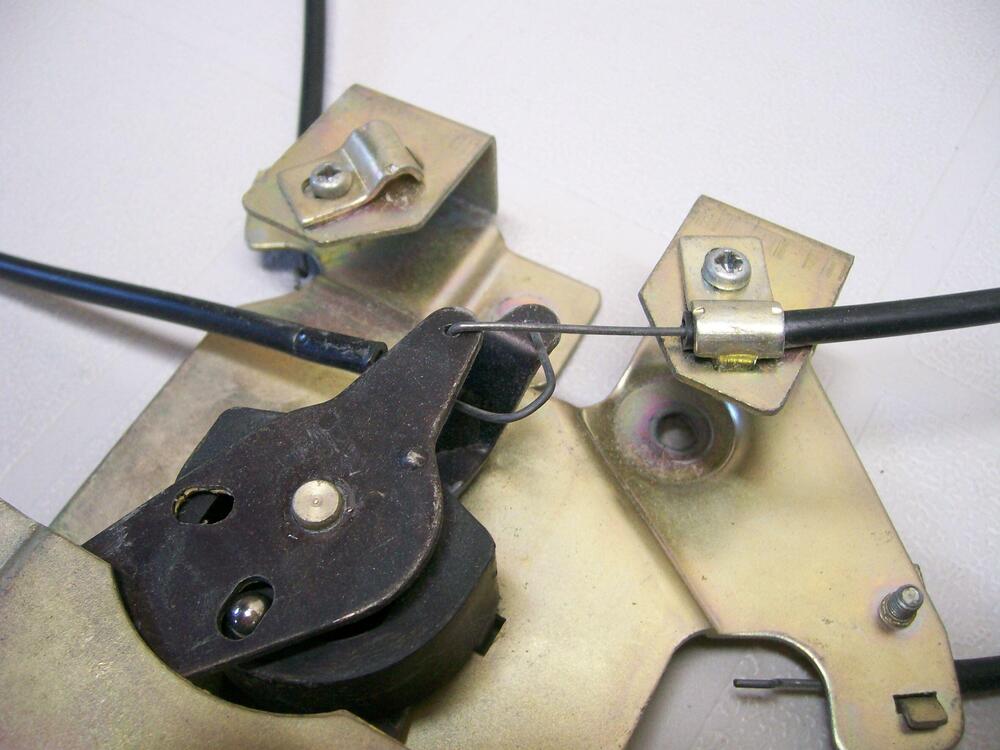
Just to clarify what SteveJ, S30Driver and ZedHead have said, you most likely have two issues: 1) your water control valve is seized; 2) with the result that your 'TEMP' control cable wire has bent at the point where it connects to the control lever. If you have an early car ('Series 1'), this is almost certainly what's happened. Some pix and comments follow: The control cable wire for the early Z's ('Series 1') was undersized (1.0mm dia) and therefore prone to bending if anything in the assembly got stuck or balky. In later versions ('Series 2', etc.) the cable diameter was increased to 1.2mm. The cable sheaths were upsized to match. The Series 2 design incorporated numerous other detail changes to the heater control system's mechanicals in an effort to make it more robust: revised lever frame, levers, and finish knobs; revised control cable wire ends (loop-over-peg). Lawn mower control cables can be a good replacement. Alternatively, try tempered-steel 'piano wire'. Otherwise, non-tempered wire from the hardware store will probably be ok, unless something gets stuck again and you try to operate the controls at sub-zero temps. Unfortunately, your water control valve and/or its actuator lever have probably seized. The probable reason is that the valve has a leaky seal. White stains on the outside of the heater plenum box are a clue. NAPA (but not Nissan) used to offer a replacement seal, but it's been NLA for years. So, if your water control valve is leaking you'll need to buy a complete new control valve. If you don't fix this problem, the old valve will leak coolant onto the floor whenever it's left in the 'COLD' position. Also, the actuator lever will probably start to stick again, too. I suspect that problems with the water control valve stem from PO's who run their cooling systems filled with straight tap water. A stuck water control valve responds nicely to an overnight soak in a de-liming product like 'C-L-R'. If the seal is ok, then you may be good to go. However, The older-design water control valves were said to also suffer from internal leakage, leading to a situation where the valve isn't able to fully block coolant flow even when it's set to the 'off' (cold) position. That certainly wouldn't help if you plan to drive a Series 1 car on hot summer days. Make sure you also free up the water control valve's actuator lever. Lubricate its pivot pin and grease the sliding surfaces. These are some pix that I took when rebuilding the Heater system for my Series 1 car: Below: Top side of Lever Assy Note: Control cable on the left side (TEMP) had been removed when this photo was taken) Below: Bottom side of Lever Assy (photo #1 of 2) Note: The bottom control lever (DEF/ROOM) and the associated left and right bellcrank plates had been removed before this photo was taken) Below: Bottom side of Lever Assy (photo #2 of 2) Note: In this photo, the DEF/ROOM control lever, bellcrank plates, and cables are in place. However, the control lever's centre actuating pin had snapped off so the bellcrank plates had nothing to engage with. Below: Water Control Valve, c/w actuator lever assy (actuator cable has been removed) Note: Control valve's actuator rod can be seen here. Actuator lever may need to be freed up and lubricated if it, too, has become frozen because of corrosion. Below: Water Control Valve's actuator lever assy Note stains. Presumably caused by leakage from the Water Control Valve. They look like calcium deposits. If they are, then my car's cooling system must have been filled with straight water at some point (probably during the time when it lived in New Mexico). Below: 'TEMP' actuator cable with bent wire (photo #1 of 2) Note: Here, the cable is fully extended and the bellcrank has been rotated about 45 degrees CW from its centred position. Below: 'TEMP' actuator cable with bent wire (photo #2 of 2) Note: Here, the cable is fully retracted, but the bellcrank has not been rotated CCW any further than its centred position.


-
240ZBUILTBYME 1971 240z HS-001063 Project Georgia
Namerow replied to 240ZBUILTBYME's topic in Build Threads
Given that your location in Darwin is a bit off the beaten path, I'm curious to know who you used for the dash restoration work. -
Useful new repair panels on offer from KF Vintage JDM
Namerow replied to Namerow's topic in Body & Paint
It's certainly quite a change from, say, five years ago. At that time, only high-skill restorers were able to deal comfortably with the body rot (in complex areas) that plagues so many fifty-year-old Z's. It's still not a trivial task, but at least the availability of these panels means that high-level metal fab skills aren't so important. I'm surprised that it took this long for someone to recognize the profit potential of the Z repair panel market (served so marginally beforehand by the likes of Tabco) -- huge production numbers, significant rust issues, economical price-to-buy, attractive design, strong owner base. They seem to have timed the market quite nicely. I suppose that the profitability for KF lies in locating their production in a low-labor-cost country like Colombia. Plus, they had a complete playbook already in place, c/o their original business of servicing another popular rust pig, the VW Kombi van. -
Useful new repair panels on offer from KF Vintage JDM
Namerow replied to Namerow's topic in Body & Paint
Yes, this and other firewall pieces are now listed on their site. -
I just noticed that KF Vintage JDM have introduced a few new repair panel items. Two are items for which Z restorers have been waiting a long time to be able to buy over the counter: Dogleg inner repair panel, c/w seat belt anchoring point Rad core replacement kit, c/w top panel, lower crossmember and main vertical panel
-
I experienced the same issue and outcome when attempting to soften some Z parts made from rubber. With age, they had become rock hard. An overnight soak in the recommended 'rejuvenating' chemical (acetone, IIRC) did a beautiful job and I thought my problems were solved. Unfortunately, the parts reverted to their previous, hard-as-a-rock state within 24 hours.