Namerow
Free Member
-
Joined
-
Last visited
Everything posted by Namerow
-
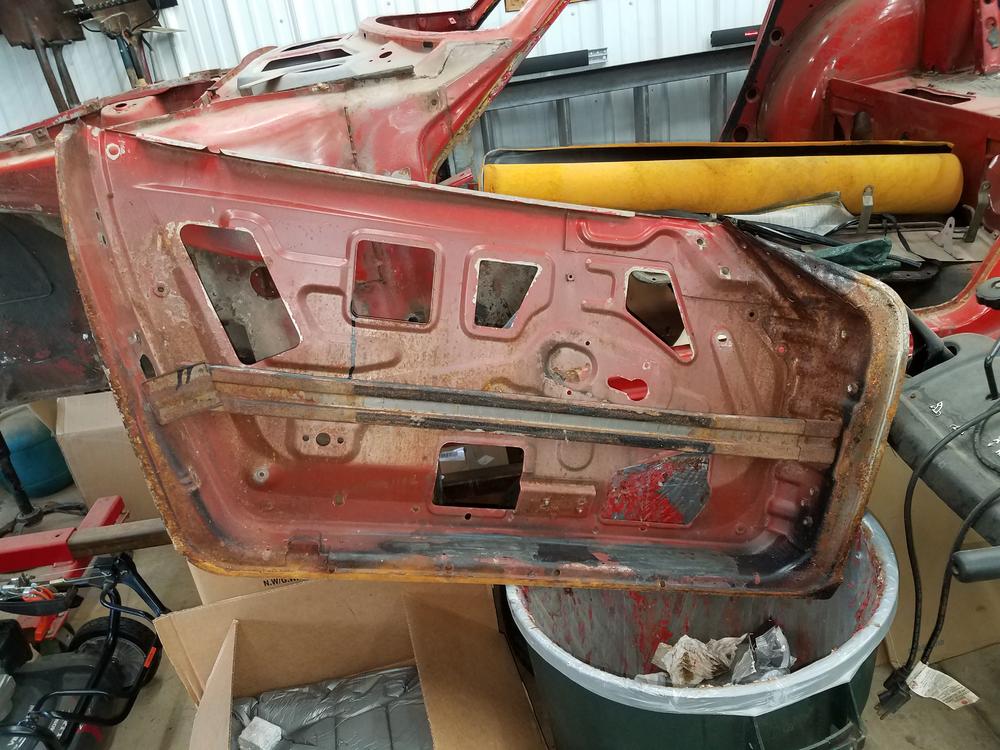
 I don't think the PN change in 10-71 has to do with the addition of side impact bars. The 1970 FSM mentions a feature that I think refers to the side impact bars ("The door main unit is rigidly constructed, the outer panel is provided with two stiffeners, and thus, together with the highly rigid inside panel shape, the strength, rigidity, and safety of the rider compartment is highly improved.") and that language is repeated verbatim in the 1971, 1972 and 1973 FSM's. Curious that the FSM describes these two stiffeners ads being attached to the outer panel when, in fact, they're really attached to the inner panel (albeit, located right up against the outer panel. For reference, have a look at these photos posted recently by a CZCC member (Patcon, I think)... x FWIW, the US federal safety standard mandating side impact protection (FMVSS 214) came into effect in November 1970. It appears that the auto manufacturers had been advised well ahead that this was coming, because a quick check of in-period write-ups on US domestic models like the Chevy Camaro and Ford Mustang shows that the feature was introduced on their 1970 models. My April 1970 production 240Z has these beams. Hard to say, though, whether they were fitted to all Z's, right from the start, or introduced as a running change sometime before April 1970. Maybe someone with a very early car can chime in on this.
-
I hope you're right, Jim. The only early front diff mount I've seen advertised was on a Japanese website back in July and the asking price was a cool 28,000 Yen ($300+). p.s. It's ok to call it a 'Series 1' car. You're with friends here.
-
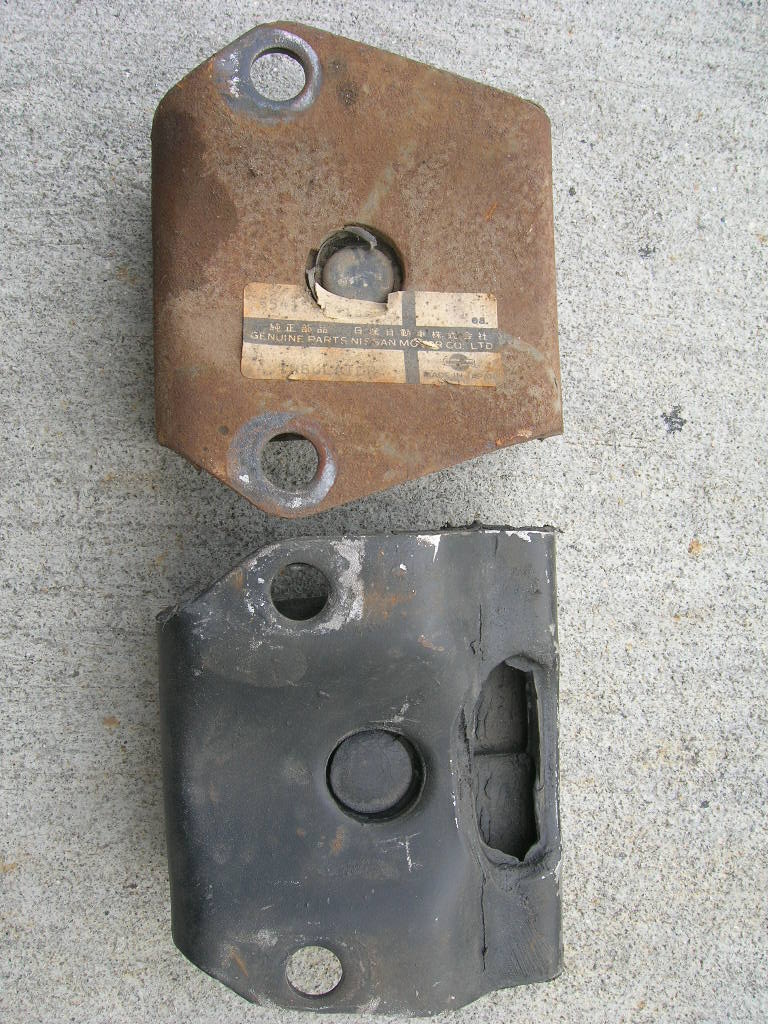
The mounts are quite different in shape and I've seen no one claim that the later mount (easily available) can be used in place of the earlier mount (NLA). Here are some pictures (posted by someone, somewhere -- apologies for not knowing who to credit)...


-
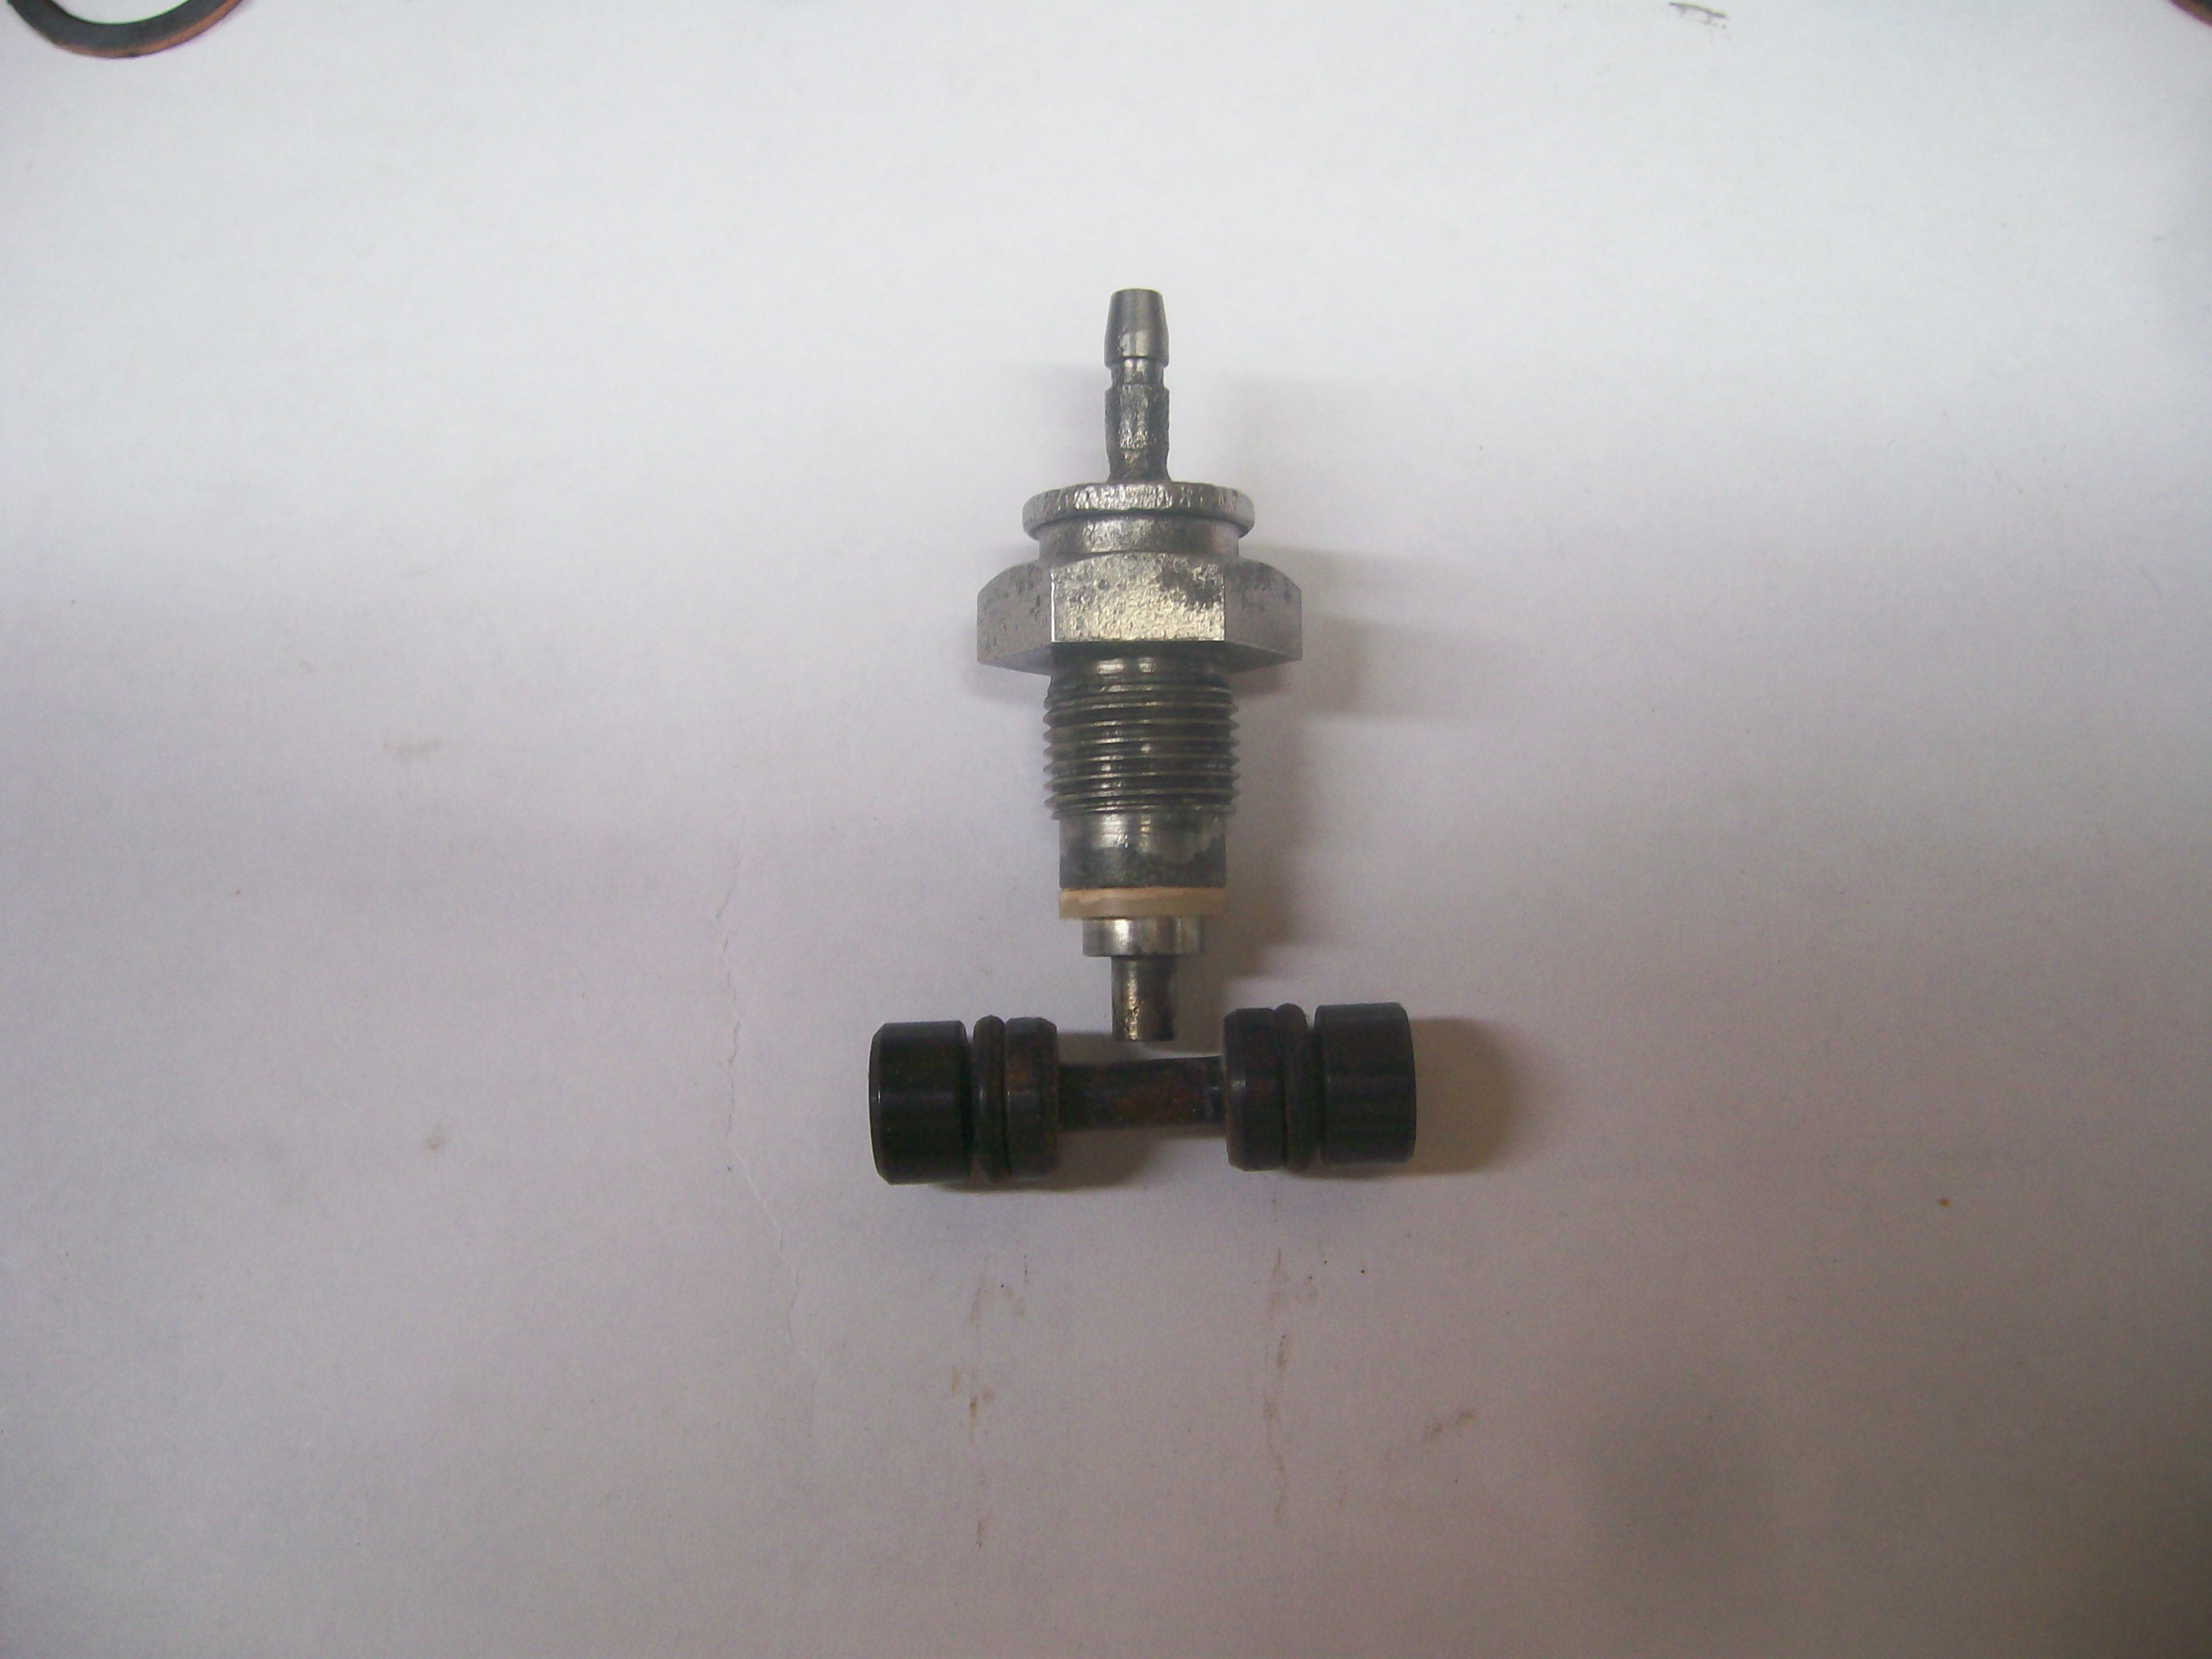
ZH wins the debate. I forgot all about those springs. And they weren't a later add-on. Here are pictures of the internals as they came out of the unit installed in my April 1970 Z...

-
Nice. I'd thought about the possibility of carving a control knob (I need a mirror-image version for the hand-throttle lever on my car). Thanks for demonstrating that it can be done. With a finish coat of gloss black epoxy paint, it might be pretty much indistinguishable from the real thing made of plastic. Probably stronger, too . Not so sure that I have the engraving skills to carve in a logo, though. Winter project.
-
Not so sure about that. Obviously the movable valve/plunger/whatever will shift off its normal, centred position if hydraulic pressure drops on the left or the right side. And once it shifts off centre, it stays there. So let's say you fix the problem you had in the front or rear brake circuit. Now when you step on the brake pedal, the valve/plunger once again sees equal pressure on both sides -- so it won't move from its new, off-centre position. I'm inclined to agree with Grannyknot that it needs to be manually re-centred. Can't verify from actual experience, but, hydraulically speaking, that's the way I see it. Unless someone can come up with an alternative explanation. A couple of other comments: I disassembled the switch from my 4-70 car and it was kind of gummed up. But probably not so much that it wouldn't have shifted had I lost pressure in one of the brake circuits so that the valve/plunger was exposed to full pressure from one side only. That's a lot of force. I think the factory didn'y want anyone messing around with this switch because an internal leak caused by a botched service job could result in the front and rear brake circuits becoming connected, thereby negating the safety function of the dual-circuit braking system.
-
Re door panel assemblies: No, sorry. You're looking at the wrong diagram. See items 1 & 2 on this diagram... http://www.carpartsmanual.com/datsun/Z-1969-1978/body-240z/door-panel-glass-hinge
-
I have a few questions that I'm hoping some of our CZCC veterans can answer: Door Panels: The parts manual shows a change made to the Door Panel Assemblies (lhs and rhs) starting in 71-10. Can anyone comment on the design change(s) made? (Note that the upper/lower Hinges are not considered to be part of the Door Panel Assemblies) Door Hinges: The parts manual shows a change made, starting in 72-07. Oddly, though, the change is noted only for the upper hinges. The lower hinges are shown as staying unchanged. This seems odd, because I believe that the design change included adding a revised travel limiter link with a detent, so that the doors would have two opening positions: fully-opened, and half-opened. The travel-limiter link, however, is part of the lower hinge. And the Nissan 'updates' document that Carl Beck posted a couple of days ago indicated that the detent feature was added to the driver's door only. Is there a mistake in the parts manual, or am I missing something? Lock Cylinders and Keys: At some point in its development, the S30's locking system switched from a 2-key set-up to a single-key arrangement (I thought this took place as part of the launch of 1972 models, but maybe it was actually when the 'early-to-late' transition happened during MY-71). In any case, it would seem that the design of the lock cylinders would have been revised as part of this change. However, the parts manuals shows no changes to the parts numbers for the door and tailgate lock cylinders over the complete span of the 240 model. The steering column lock assembly (c/w lock cylinder), on the other hand, shows a change in 70-10 (why?) and then nothing until 73-07. Can anyone explain how all of this works?
-
Mr. Neyerlin at zparts.com has some nicely done 'parts chronology' posts in the 'Blog' section of his website. The piece that 7tooZ has noted suggests that there may have been four choke knob designs within the 240Z model range (plus the fifth design for the 260Z).
-
I forgot to mention at the time when this topic first appeared that it seems to my eye that there were two early choke knob designs. The earliest is the very curvaceous, asymmetric version that Steve (nix240) reproduces so nicely. The one that the other Steve (sdyck, aka 'Steve from Calgary) had break on his car does not look the same. Instead, it's kind of halfway between the early-early, no-hard-corners style vs. the quite angular version that showed up in MY-72 and is now the only version that's conveniently available. Notice too how Steve-from-Calgary's broken item has a head that looks quite symmetric. All the other versions are visibly asymmetric. 3 choke knob designs in the course of just three years, then? And then a 4th version added when the 260Z arrived.
-
-
I wonder if the original owners of both your cars simply bought aftermarket A/R bars from the same mail order operation. You've reminded me of the two big sportscar accessory shops in Toronto back in the 1970's. One was called Piranha Motorsports . The other was R&R, or something like that. Both benefited from large sums of hard-earned money I pushed across their counters.
-
Topic: Relevance and usage of 'Series 1' vs. 'Series 2' vs. 'Series 3' definitions --- Jaguar E-Type vs. Nissan/Datsun S30. Discuss.
-
Ha! Zkars has opened an entirely new can of worms, that being the really early Series 1 cars. Shall we call them the Series 0.5 cars? They deserve entirely separate consideration. New levels of minutia beckon (and I have a list).
-
I am an incurable keeper of notes and lists. When I bought my 70 Z a few years back and starting researching my 'refresh-toration' project, I started to keep track of all the big and little and obscure changes that I found others had discovered over the years. The list I've ended up with is longer than what I've seen others publish. But I think everything on my list is verifiable. And I may have missed several items, too. Do the differences really matter? Let the market speak, I say.
-
So, growing consensus (4 owners!) that bolts, not studs, are correct for the top row of manifold fasteners. Now the still-unanswered question: Why?
-
Here's my list of items that changed from Series 1 to Series 2...
-
It's about the only way to do a decent paint job. Too many nooks and crannies otherwise and v. difficult to spray the slats properly because they mask each other. Reassembly's actually not too hard, other than needing to use care not to scratch your new paint when fitting the slats into the slots in the vertical ribs.
-
Check out the website for ZeddFindings (Kingston, Ontario)... http://www.datsunzparts.com/products.html Charlie Osborne offers the lower valence panel for C$189 + shipping. ZeddFindings has a great reputation and has been in business for decades.
-
Hey Captain O -- I've got a new way for you to hate remanufactured parts: Yesterday, while trying to install the rebuilt mastervac booster that I'd bought for my car (a Cardone unit, purchased from my local NAPA outlet), I discovered that the metric mounting studs (8x1.25) had been replaced with 5/16-24 SAE items! The first signs of trouble were when the metric nuts would start on the stud threads but then jam. At first, I thought maybe the stud threads were gunked up with paint, so I pulled the booster out of the car and tried to run a die down one of the studs, just to clean up the threads a bit. When the die wouldn't start easily, I started to get suspicious. I grabbed my thread gauge (metric) and discovered that I couldn't get a match with either the 1.25 or the 1.00 pitch. Then the light-bulb went on! How close are these threads? So: On diameter, near enough as to not matter. On thread pitch, though, they're close enough to get things started but far enough off to chew things up if you go beyond that. I'm just glad that I didn't get impatient and try to force 8mm nuts onto those studs. Oddly, the studs on the other side of the booster (that mount the brake master cylinder) were left as metric. Go figure.

-
When you get the opportunity, take some pix of your new system when the car is up on a lift. I'm sure we'd all like to see your muffler guy's handiwork.
-
Who did you source the clamps from? (I can't read the tags in the photo -- looks like just a bar code).
-
It's not. I came from the western US.
-
OK, thanks. I have a similar tumbler that I bought from a USA-based online supplier, Eastwood. They offer a few different types of media, including the green pyramids. I'd just never heard them referred to as a Delfir-chip, and a google search on that phrase came up empty, too. I've had 'ok' results with mine. It doesn't perform miracles, but it's a lot better than a wire wheel (ouch!) for nuts and bolts. The green pyramid media doesn't last forever. They're made from plastic, of course, and the sharp edges wear off over time, diminishing their effectiveness. They do seem to have a remarkable facility for getting (firmly) lodged inside the threads of certain sizes of nuts! I've often wondered whether a real tumbler (i.e. rotating 'can') would do a better job than these vibratory machines. I haven't seen one being offered for sale from any of the suppliers that I deal with, but I think they're available from .
-
If no one comes up with a loaner, I noticed that Zcar Depot has added a spindle-pin puller to their catalog. Look under 'Tools'. No CZCC member reviews that I've seen yet, so all bets are off as to how good it is.