Captain_Zeros
Free Member
-
Joined
-
Last visited
Everything posted by Captain_Zeros
-
 I oiled my KYBs a year (and a few thousand miles) ago, despite them saying not to. I figured "why the hell not". No issues thus so far. Like jcb I didn't brim the tubes, it only takes a very small amount of oil.
 -
My fix for this problem involved wrapping thin copper wire around the inside of the horn button where the cracks form, as many laps around as will fit, then twist the end and hit it with your glue of choice to make it permanent. The cracks form due to the plastic part being under tension, what we're doing here is putting the wire (or ziptie) under tension where they're strongest, and letting the plastic be under compression (where it can shine).
-
83 maxima is the right generation to get bolt on rear disk brakes, if I remember correctly
-
Yeah! Real fiber optics, and just a normal lightbulb in that housing. I love pointing out that my 40 year old Datsun has fiber optics in the dashboard and carburetor oil dipsticks
-
How about more pictures I wanna see under that cap.
-
Undocumented midyear changes are the norm in my '73 for sure, it wouldn't surprise me in other years.
-
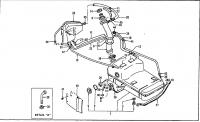
Not terribly. Disconnect all the hoses without taking a gasoline shower, undo a bolt on each of the two straps, and out she comes. Here's a picture of where all the vapor recovery lines go. The fuel filler neck can be accessed through a little panel that unscrews in the rear right fender (item 40 in the image), and some of the upper hoses can be more easily reached after undoing the straps and letting it drop a few inches. Try not to ruin your fuel filler neck, they're made of unobtanium the last time I checked; a little wd40 as a rubber conditioner goes a long way towards making old plasticized rubber flexible enough to handle. There's a drain plug on the bottom if you can get it out. Edit: Don't forget to unhook the wires from your fuel tank level sender! They have weird little slide on connectors.
-
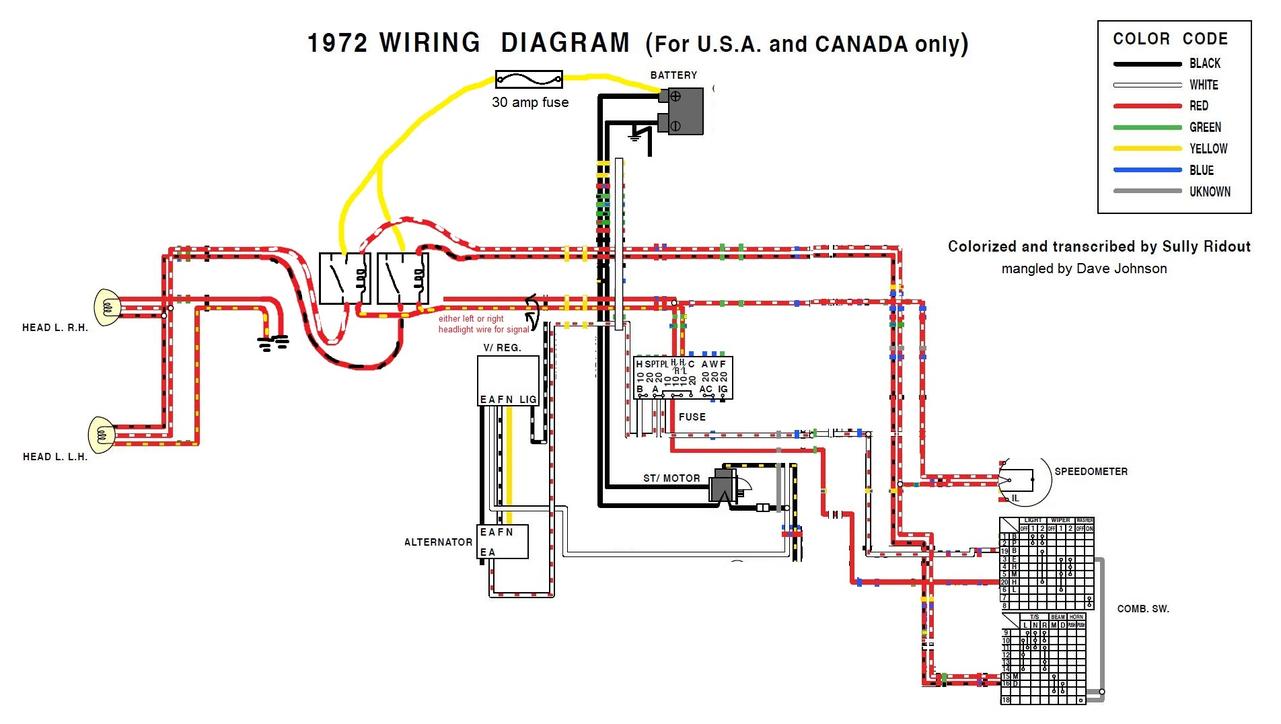
It helps to know where the rest of the harness in the car goes. Here's my own scribblings to keep it sorted in my mind. The headlight on/off switch receives power from the alternator, then feeds to the fuses in the fusebox, which feeds to the headlights themselves. The highbeam switch selects which element in the bulbs to ground out to give you either the high beam (M for main, pin 15) or low beam (D for dimmed, pin 16) The knee bone's connect to the leg bone, etc So long story short the relay signal pins do have a ground, it's just controlled by the highbeam switch in the cabin! Also, this is why if you have a failing highbeam switch it can go into a "neither" contact position and your headlights don't work and you panic a lot. The more you know!
-
Sounds like it might be time to shop for a tank in better condition?
-
My own tank got a length of steel chain chucked inside it and half a pint of acetone, then the crap shaken out of it. It wasn't a horrible tank to begin with, but it turned into a much nicer one after a few rounds of that.
-
Effectively it would be an adjustable restriction orifice, right? That might make you see less vacuum on the vacuum servo at any given point, but the vacuum servo would still has it's full travel (it might just need harder vacuum to get there), unless I'm mistaken. Edit: A restrictor IS a proven method of smoothing out a vacuum signal, it would cause your vac advance to become less peaky which isn't a bad thing in itself.
-
Interesting. Not sure if I trust it though, as it wouldn't actually limit travel.
-
Check your switch! The front turn signals and the dashboard indicators are on a separate contactor than the rear turn signals, something to do with the rear signals having an interruptor for the brake light switch in them and the front indicators don't!
-
$155 shipping included sounds like a pretty good deal, actually. Only way I can think of doing it cheaper would be to pull used parts of a parts car locally.
-
I'd even be comfortable in the back seats if I didn't have feet!
-
Don't worry, he got it. Over on my video post:
-
ADDITIONAL CRAZY INCOMING, copied this over from my post in another thread: Directed at folks with crappy high vac advance malaise era 280zx distributors! Now this is something I wished I would've documented, by I am running a 1981 non-turbo electronic distributor... you know... the one with about a billion degrees of vacuum advance (30 to be specific, more than twice the 14 degrees my car came with stock, but I don't want to deal with points). It wasn't particularly drivable, so I figured what the hell, and cored out the little epoxy plug in the end of the vacuum advance servo. (pointy hand tools and patience are suitable, I think I used a pocket knife) Inside there were two screws within each other, a large coarse insert that changed the inner volume of the diaphragm chamber by a bit, and a long skinny central narrow one that serves as a bump-stop for total throw distance. I monkied with it using the high tech approach of throwing a protractor on it and eyeballing it, corroborated by measuring the travel of the vacuum servo when I sucked on it with a piece of nice clean vacuum hose and doing some bar napkin math and was able to achieve somewhere in the vicinity of 7.5 degrees of vac advance in the distributor plus or minus a degree or so (15 at the crank, gearing and all that). Then capped it off with a new plug in the end made of RTV (the screws are NOT airtight). A timing light corroborated that yes, in fact, I had achieved fairly close to 15 degrees of advance at the crank. All this being unscientific and from the angle of "this part is junk to me if I can't modify it, so if I break it modifying it... oh well". All things considered I don't have much of any control over the characteristics of that advance because I haven't change the diaphragm itself, only it's overall travel limit, but I've been daily driving my Z on it for over a year now and it feels great, some day I'll rip it apart and take pictures, I didn't at the time because it was all experimental and I wasn't expecting much. Considering I don't have as much mechanical advance as I might like, I DO have to run quite a bit more static timing, I forget the numbers offhand, but it doesn't cause any issues for me, I just set timing appropriately at full mechanical advance. Anyhow, I haven't seen this particular modification documented anywhere, just people saying "Some distributors are not suitable", so I figured I'd throw in my two bits. /additional crazy
-
Little bit cheaper, shipping is still a bear though. Datsun 240Z Windshield Glass, 280Z Windshield Glass, 260Z, 1970-78
-
Speak of the Devil, Arizona Z Car Source has free ground shipping on orders over $100 through 2/19/14 (eligible items, I hope bumpers and front aero are eligible!) No promo codes necessary.
-
My solution is to only buy clutches that come with the throwout bearing assembly, as long as the collar matches the clutch you're good to go!
-
Not all L series were created equal when it comes to clutches, the transmissions and flywheels will all interchange, but some of the flywheels were slightly different from one another in the diameter of their clutches and therefore their mounting points. I unhelpfully can't remember exactly the differences, I know the 2+2 used a different clutch from the coupes (240mm on the 2+2 vs 225mm on the coupe if I recall correctly), I wouldn't rule out there being slight differences in other applications. That being said as long as your clutch fits your flywheel and your flywheel fits your L and your throwout bearing matches your clutch, you should be good. I would want some corroboration before going out and buying a new clutch though. Annoyingly enough google is going to give you about a million hits for L20B 4 cylinder engines instead of L20 sixes. Not directly useful, but this link shows some of the differences between various L series clutches and flywheels, it might prove indirectly useful. Tech Wiki - L-series Engine Components : Datsun 1200 Club
-
TANGENT ALERT: Directed at folks with crappy high vac advance malaise era 280zx distributors! Now this is something I wished I would've documented, by I am running a 1981 non-turbo electronic distributor... you know... the one with about a billion degrees of vacuum advance (30 to be specific, more than twice the 14 degrees my car came with stock, but I don't want to deal with points). It wasn't particularly drivable, so I figured what the hell, and cored out the little epoxy plug in the end of the vacuum advance servo. (pointy hand tools and patience are suitable, I think I used a pocket knife) Inside there were two screws within each other, a large coarse insert that changed the inner volume of the diaphragm chamber by a bit, and a long skinny central narrow one that serves as a bump-stop for total throw distance. I monkied with it using the high tech approach of throwing a protractor on it and eyeballing it, corroborated by measuring the travel of the vacuum servo when I sucked on it with a piece of nice clean vacuum hose and doing some bar napkin math and was able to achieve somewhere in the vicinity of 7.5 degrees of vac advance in the distributor plus or minus a degree or so (15 at the crank, gearing and all that). Then capped it off with a new plug in the end made of RTV (the screws are NOT airtight). A timing light corroborated that yes, in fact, I had achieved fairly close to 15 degrees of advance at the crank. All this being unscientific and from the angle of "this part is junk to me if I can't modify it, so if I break it modifying it... oh well". All things considered I don't have much of any control over the characteristics of that advance because I haven't change the diaphragm itself, only it's overall travel limit, but I've been daily driving my Z on it for over a year now and it feels great, some day I'll rip it apart and take pictures, I didn't at the time because it was all experimental and I wasn't expecting much. Considering I don't have as much mechanical advance as I might like, I DO have to run quite a bit more static timing, I forget the numbers offhand, but it doesn't cause any issues for me, I just set timing appropriately at full mechanical advance. Anyhow, I haven't seen this particular modification documented anywhere, just people saying "Some distributors are not suitable", so I figured I'd throw in my two bits. End Tangent Alert
-
That's when you use the rag trick. Why do you think I didn't mind popping my window crank handle off just to show how to put it back on
-
Looks like you'd need a lower valence and a bumper to start with, also your grill looks pushed in. If you wanna look really killer, get a BRE spook front spoiler to maintain a lot of the stock-Z lines and actually have some aero advantage.

-
A picture's worth a thousand words! Here's a moving one. a93cf8f82e7d0004995550c888a792af edit: not sure if the embed worked, here's a link: https://www.facebook.com/photo.php?v=10153829065345327