ZohanIsBack
Free Member
-
Joined
-
Last visited
Everything posted by ZohanIsBack
-
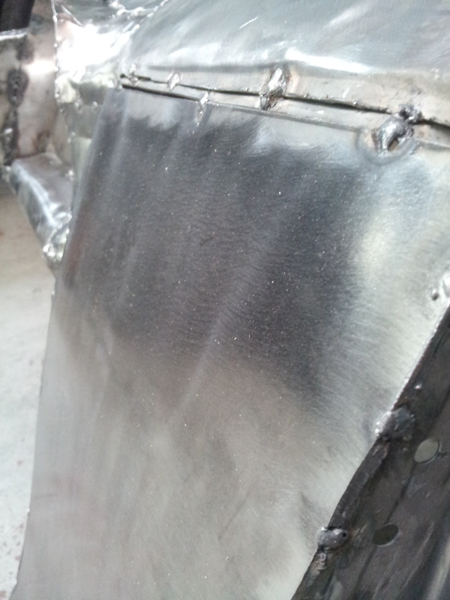
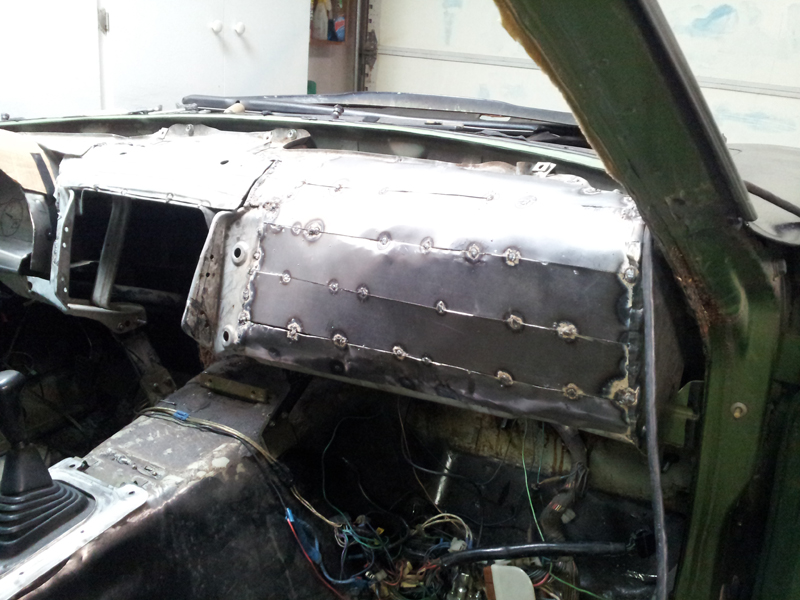
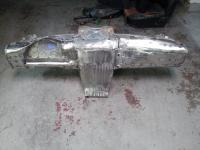
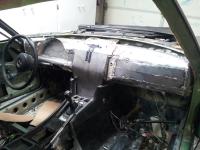
Used a wire wheel over the entire dash to clear out welding slag and roughen up the metal further for foam placement tomorrow. Looking pretty good. I like the brushed look. And some youtube vids:


-
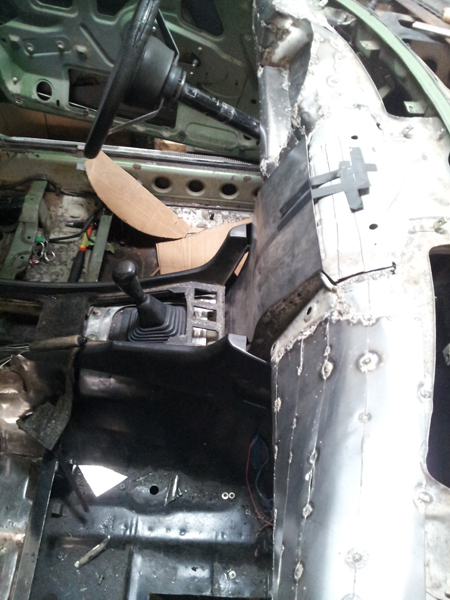
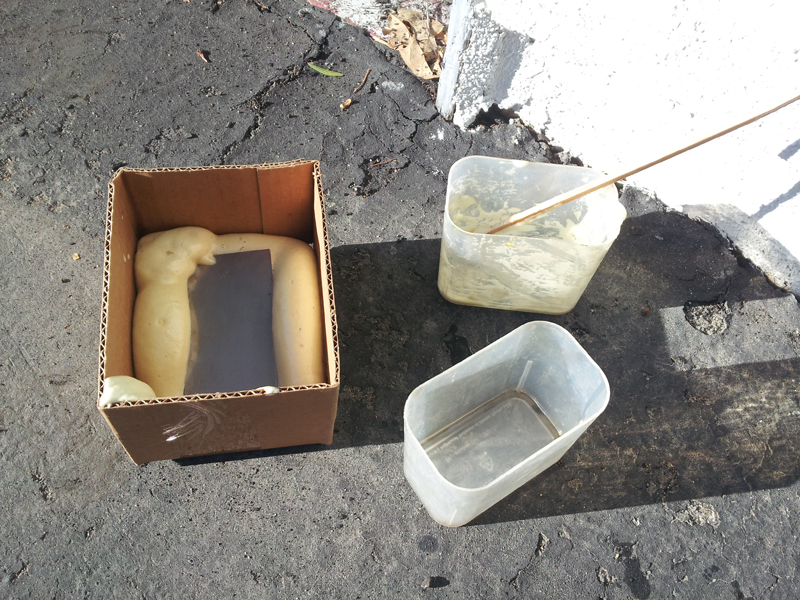
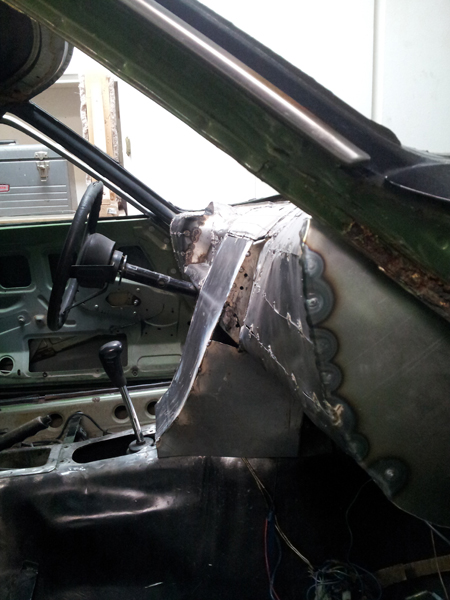
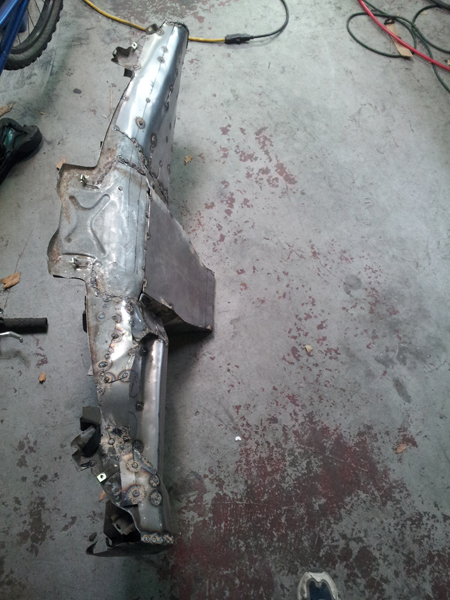
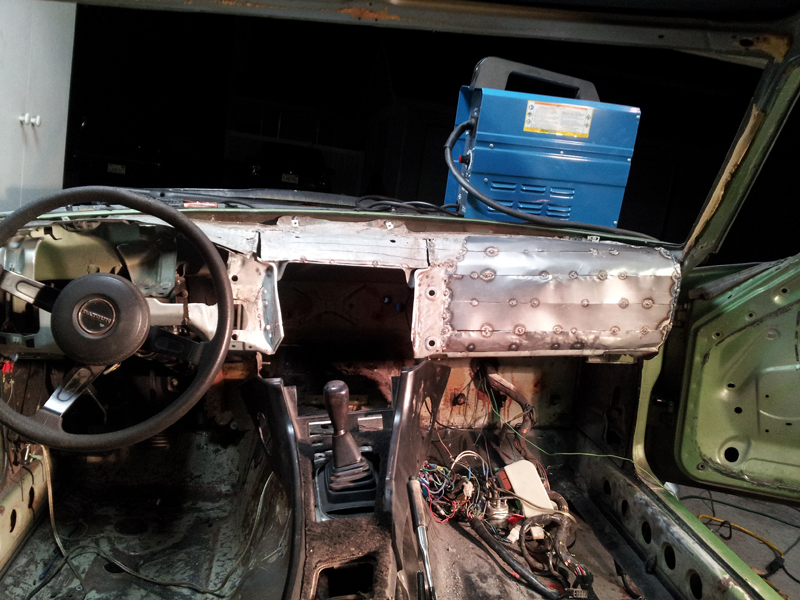
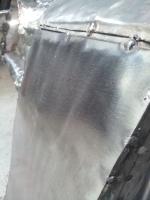
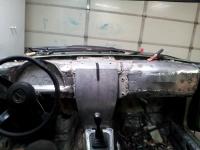
Testing a rough S shape for the center dash. Decided I didn't like it as much as a concave curve many of the newer and modern dashes have. An S shape would be amazing, but would have require more thought into how the shifter it placed and a harsher initial curve right off the dash. This stuff is amazing. I filled each little cup with about 2 mm of the liquid, then combined them. It is "cold" here in SoCal, so it only expanded about 20x, but still was very impressive. Hardens to workable in about 30 minutes. This was basically a test to see if the foam actually sticks to metal. Strangely, it broke away from the cardboard pretty easily. Just a few good tugs. But getting that metal piece off, even after trimming the foam wrapped around the edge, was nearly impossible. I believe I can pour it right on the dash. Tranny tunnel trim tacked up and center console fit over it. I do believe that with some trimming, the center console will work with this design. For myself, I intend to redesign the center console with cup holders. Without the console in place. Looks pretty rough with the box edges, but nothing a little foam won't take care of! Yup, out of the car again already! Stands up nicely and came right out without any problems. Mounting points were well preserved.


-
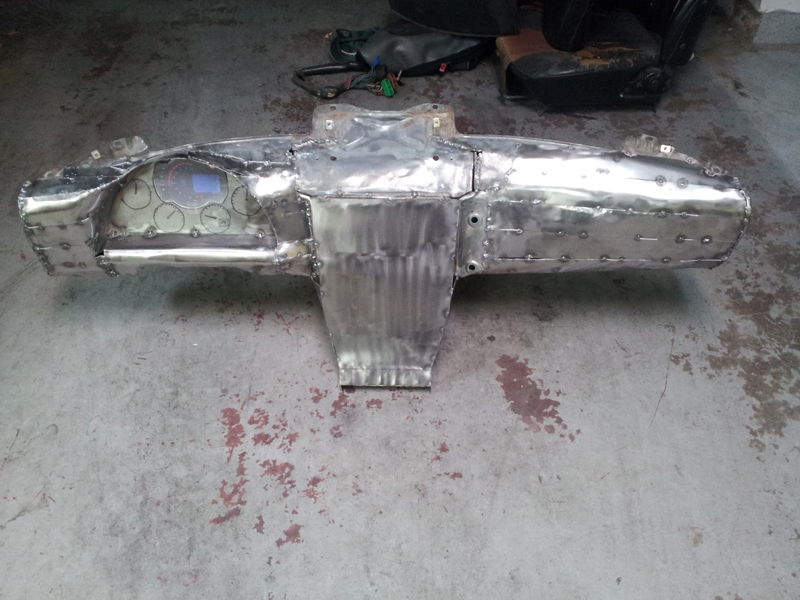
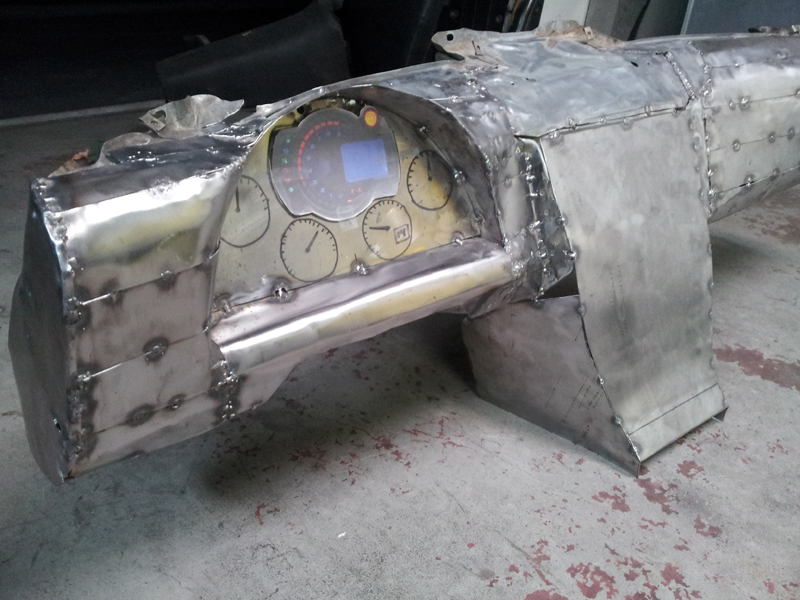
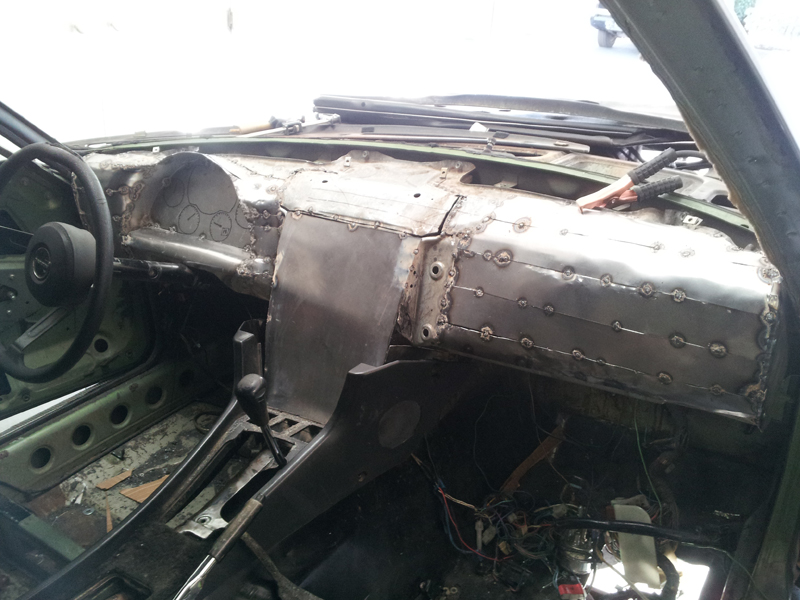
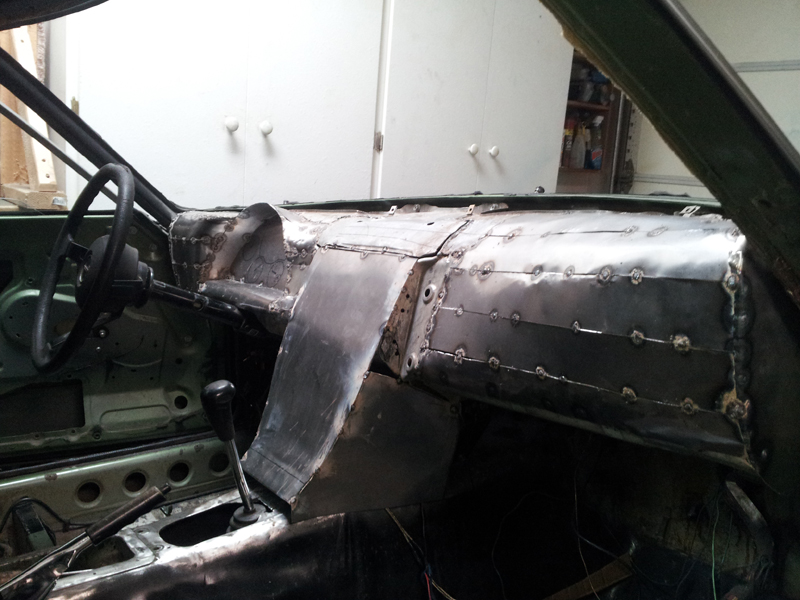
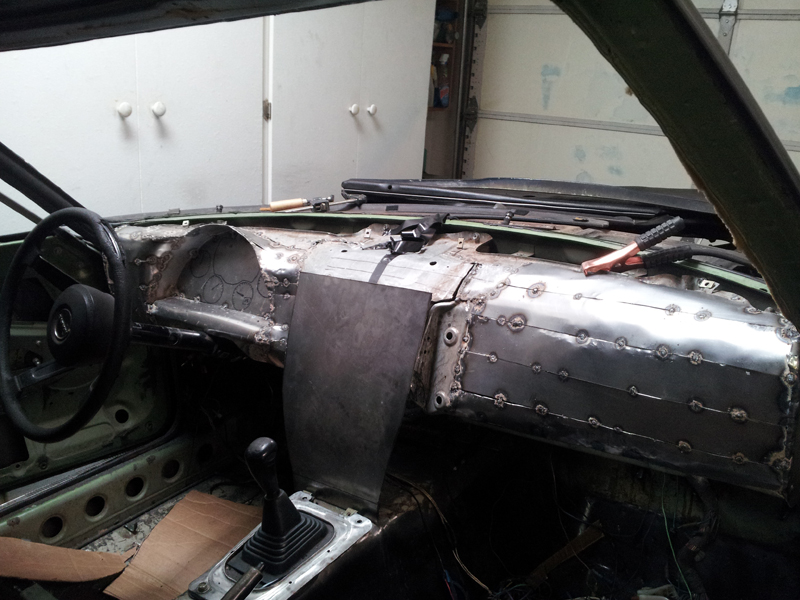
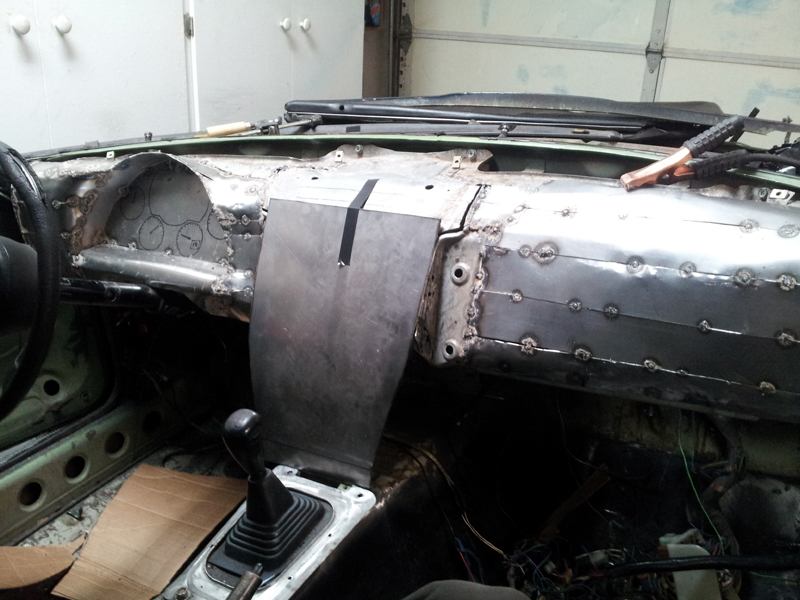
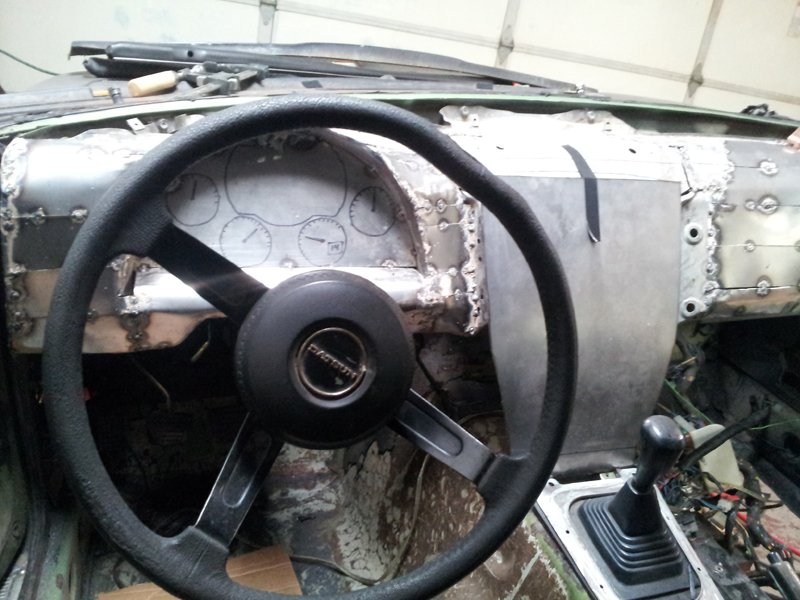
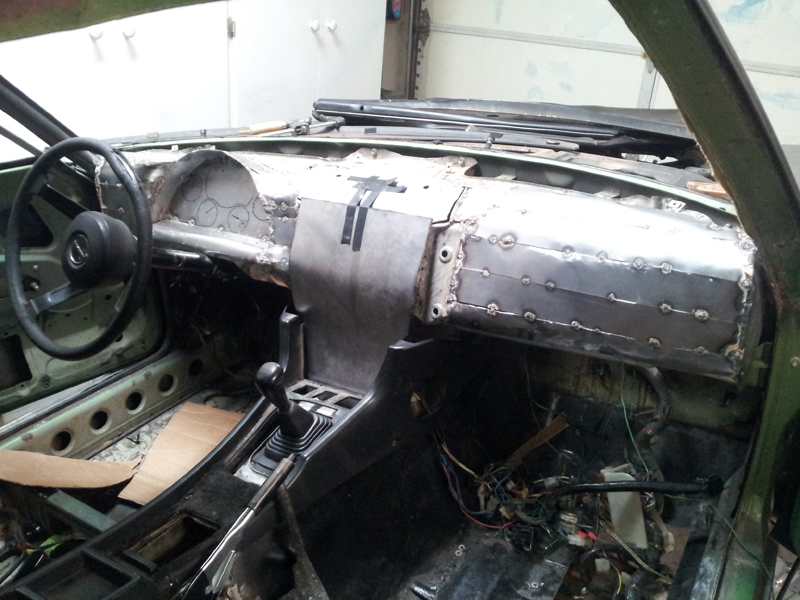
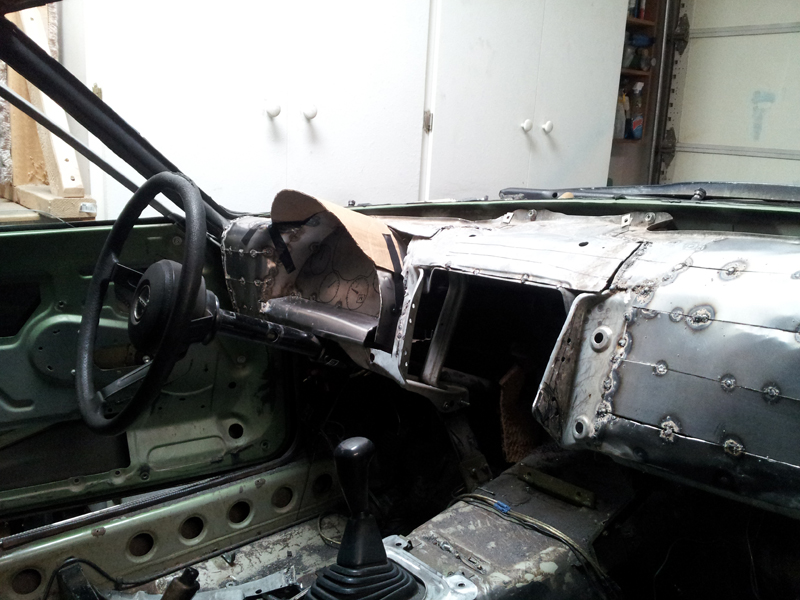
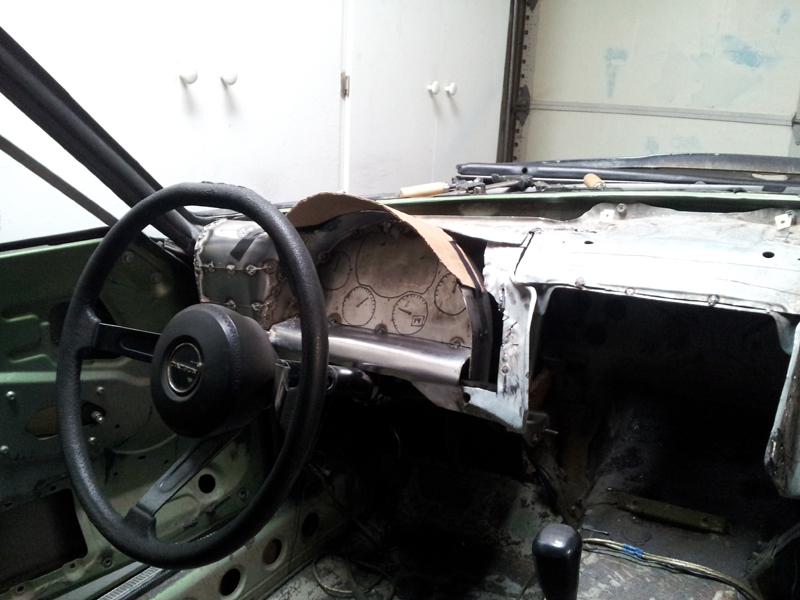
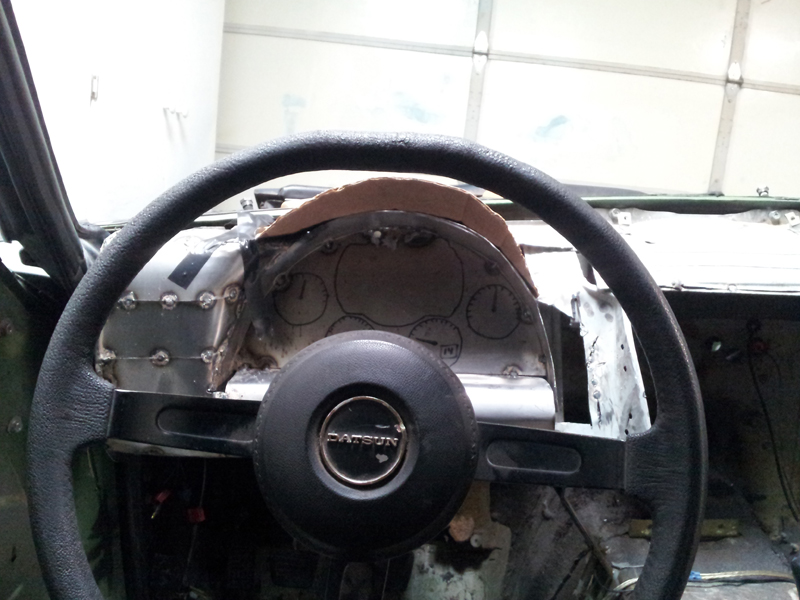
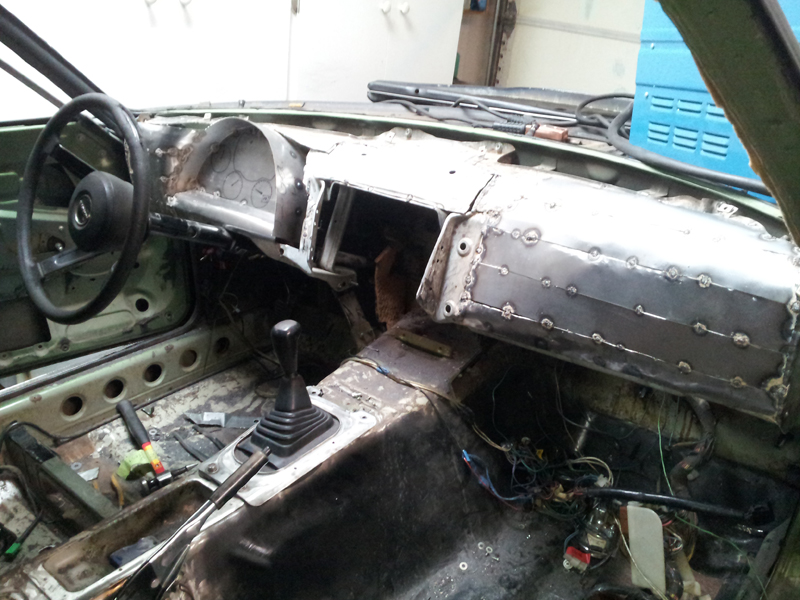
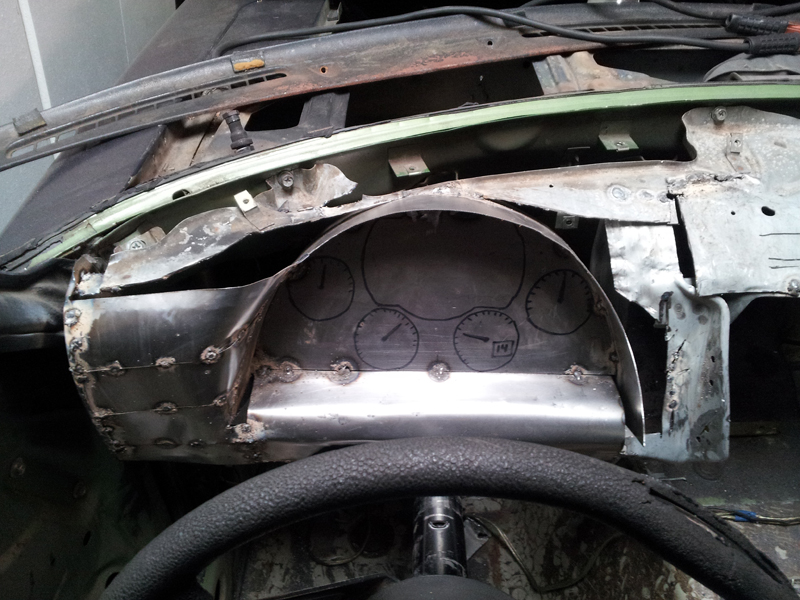
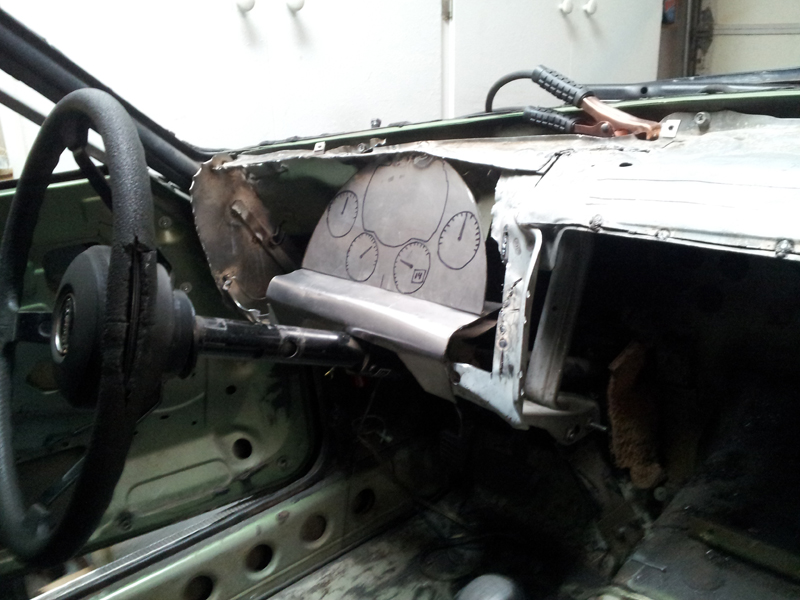
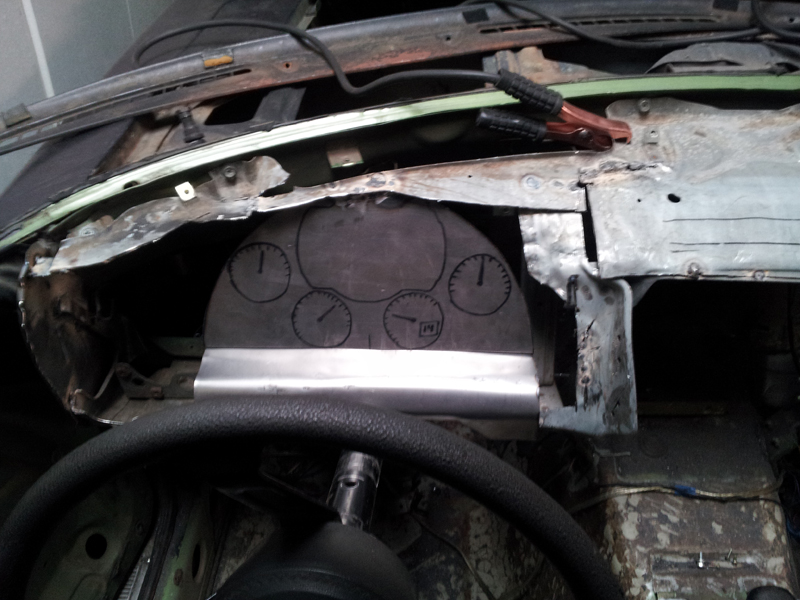
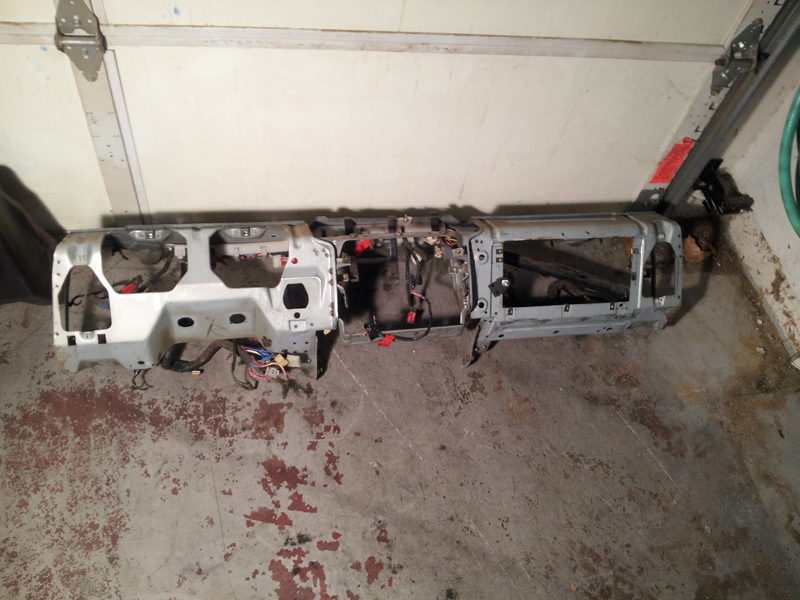
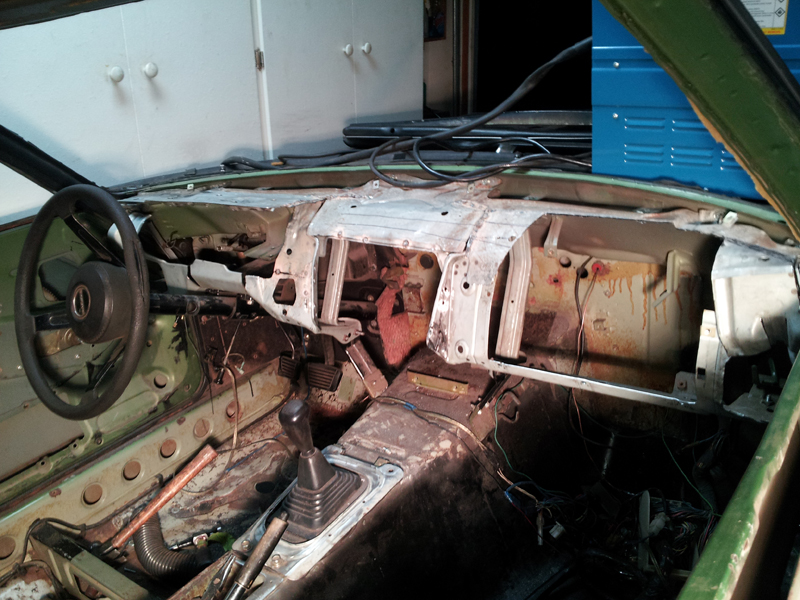
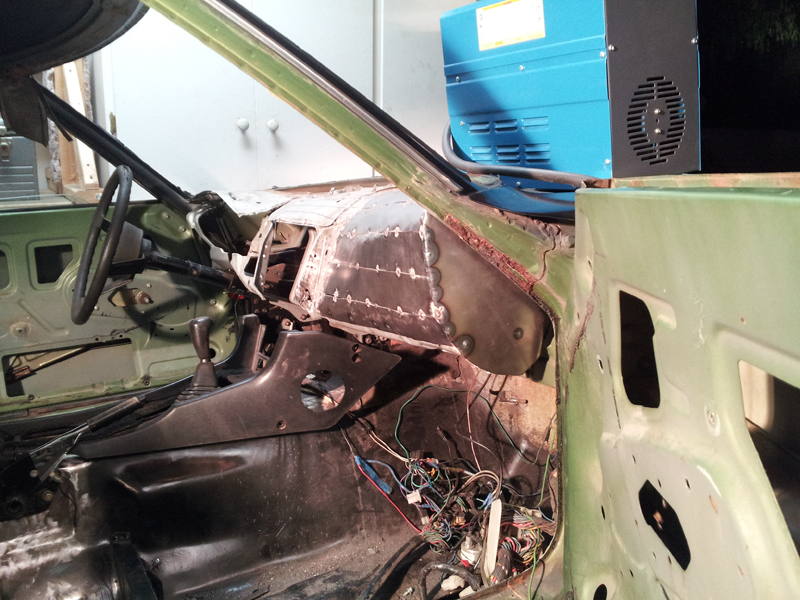
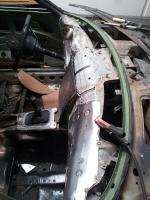
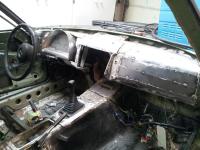
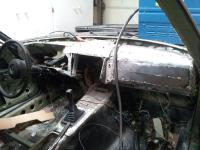
So what I finished doing was the right side of the instrument cluster and the center dash. I really don't like how the right side of the cluster turned out because it looks like a dent, so I am going to go ahead and foam in that area and level it off close to the center dash curve. The dash is now out of the car, as you will see in later pics. It came right out with no problems, even after all that welding. I bought in preparation for foaming and fiberglassing the mold: Two part urethane foam Release wax PVA 1.5 and 2 oz fiberglass Fiberglass roller 2" ABS for gauges Polyester resin Hardener And here are the pics of what's been done. Center panel installed for a test run of what it will look like and maybe what the general curve will be. Ugg, that dent I "made" on the right side of the cluser looks bad. Definitely going to be using a lot of foam to level it out with the left side of the center dash. Might be able to actually fit this center console in here, maybe....


-
Oh sweet, that looks great! Yeah the heating component does look really similar. This dash opens up so much space in the dash I believe I will be forced to modify a much more modern heating and A/C unit. Might have to pull one out of those smart cars, Ha! Actually, hoping to go with a GTO or infiniti A/C and heating if it will fit. I would love to fit an airbag in the dash and steering wheel, but I'll be upgrading to a racing wheel and my car will have a full roll cage, so the harness should keep me inside....hopefully, . But thank you! These old dashes just don't fit with the sexy lines these cars have when modded with kits to make them more modern (think Twisted Sixx on TunerZine). Needed a big face lift, so I figure I would give it a try and maybe keep a mold I could reproduce the parts from for others. I have more pictures, I just need to get them uploaded. Probably this evening.
-
Whoa! Yes it does, but I really wanted to go out there as far as the passenger dash and center console does. The 240sx also has a rounded instrument cluster, as do many 90s cars, but they're either hard to adapt or don't have the modern curves. This dash should be clearly set very apart from other dashes, and better yet, will bolt right in. But yes...takes a lot of work. Are you working on a mercedes dash swap-in right now?
-
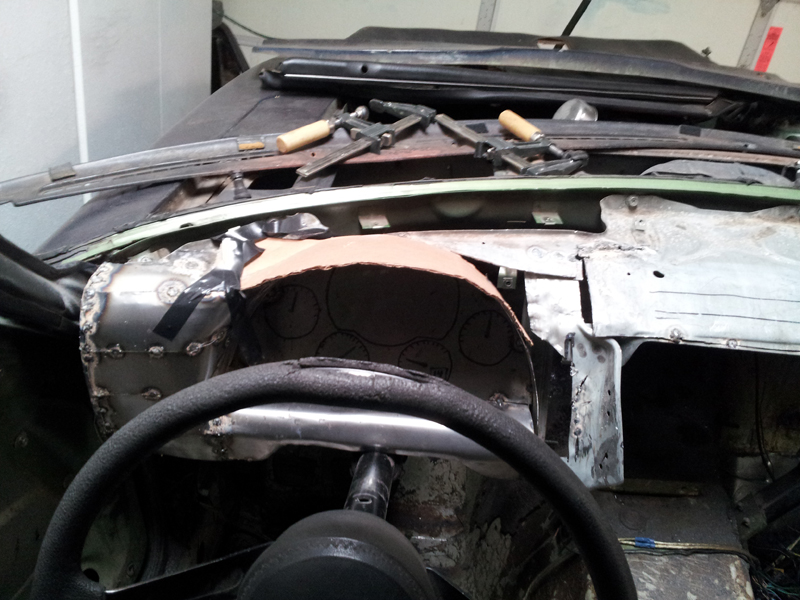
Shroud Comparison 3. NICE! Love this shot. Really shows the angle cutout on the right side cluster shroud. That's it guys, let me know what you think. I was gonna post a video of me grinding down the frame in prep for the shroud, but it was just too long and boring. End Addition. , I could see a few users watching as I uploaded to the last few posts. Sorry for the wait. The inline insert is kinda dumb and inserts images out of order, so I have to drag them back in order. should start using photobucket. :-/ Enjoy guys and Merry Christmas!


-
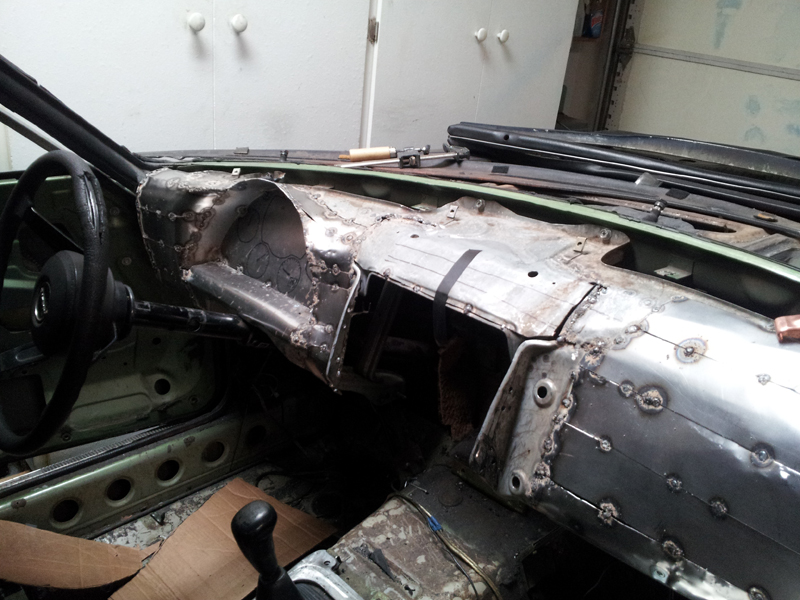
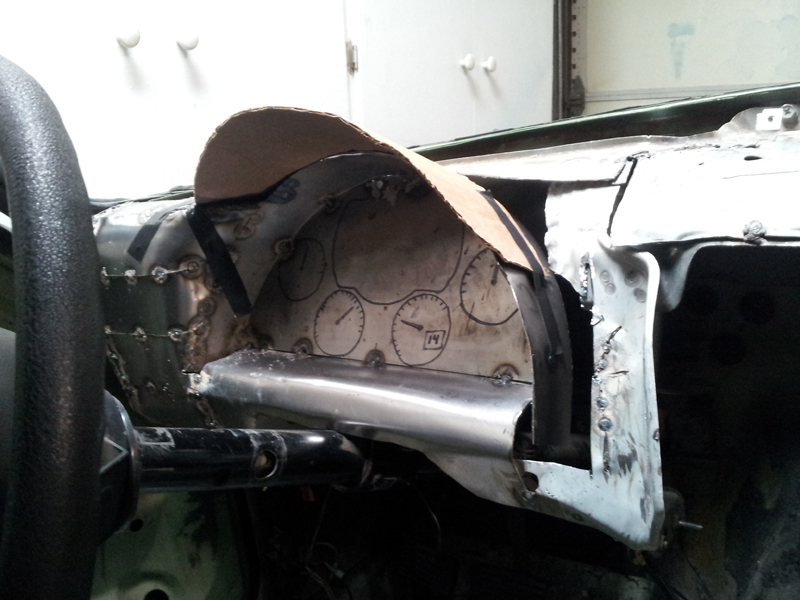
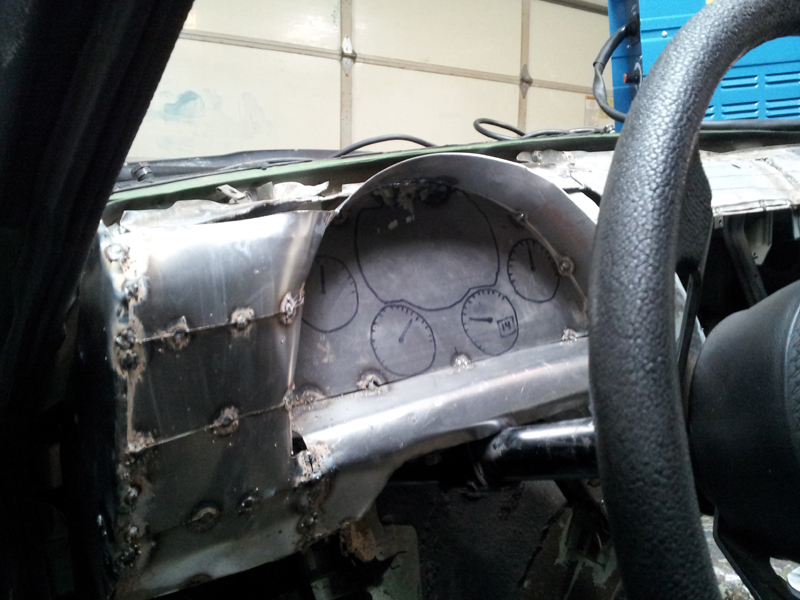
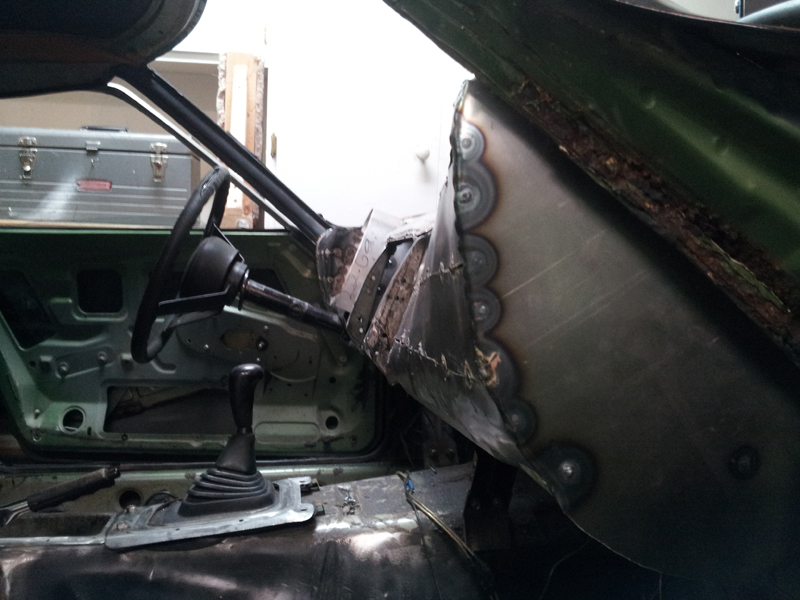
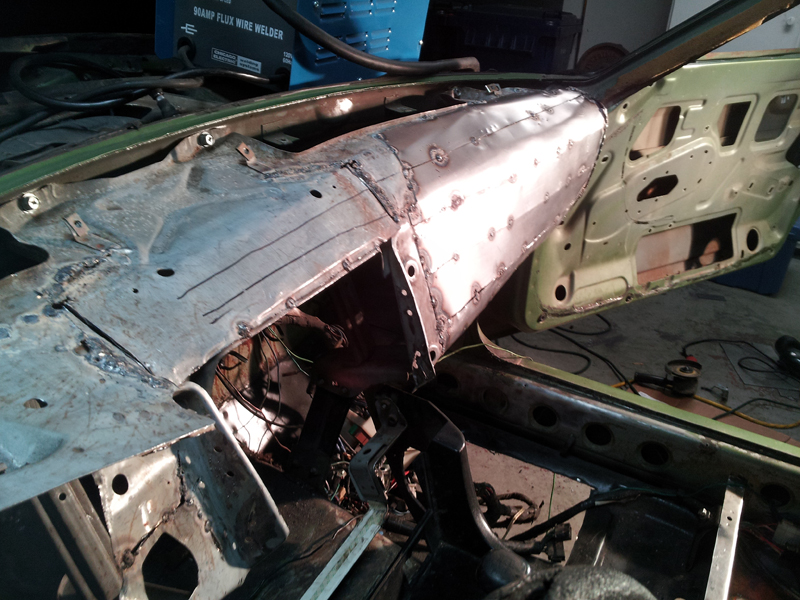
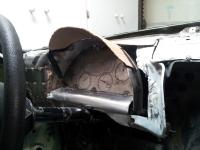
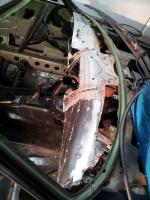
Shroud Comparison 2. Here is where it is finally trimmed and a mock-up made from cardboard is installed. The right side of the cluster shroud is now trimmed further toward the firewall, making the gauge cluster shroud unsymmetrical, but ultimately making the center dash more symmetrical and reducing the need for a crazy angle to meet the right side shroud with the left side center dash. , that was a mouthful. Looking pretty darn good, in my opinion. Ugg... Cardboard looks like crap from this angle. They'll be a lot of foam filling in the left side of the shroud curve. Don't worry, .


-
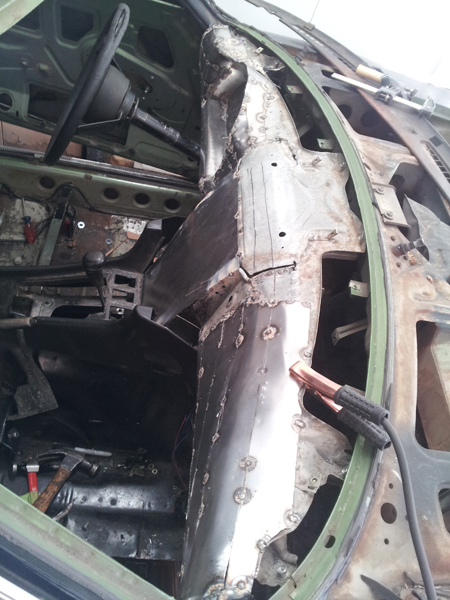
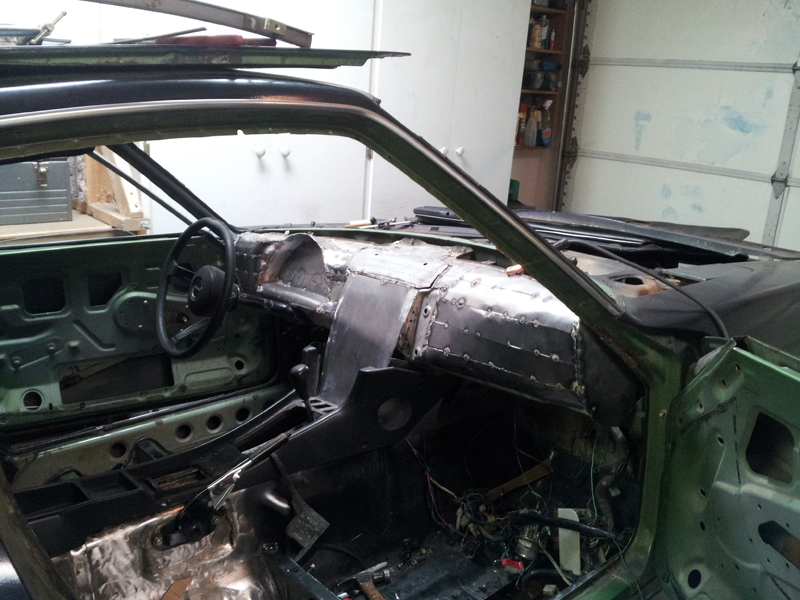
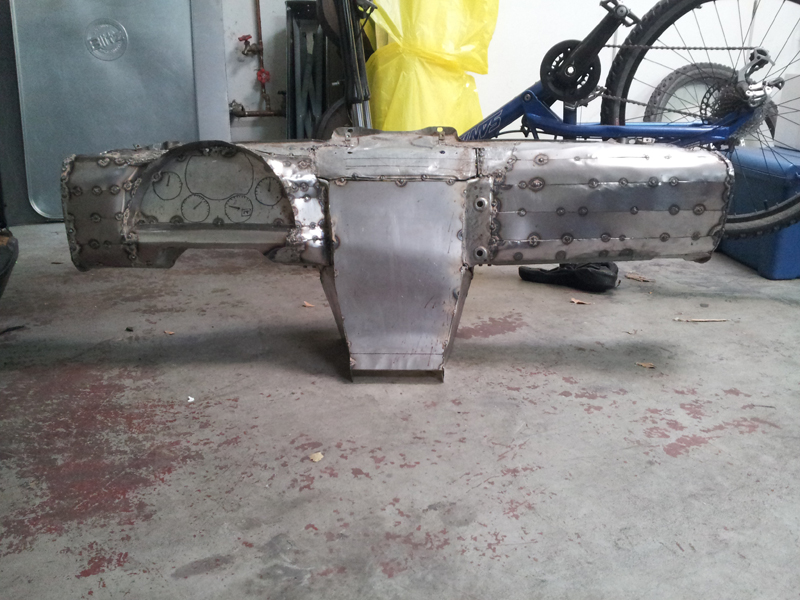
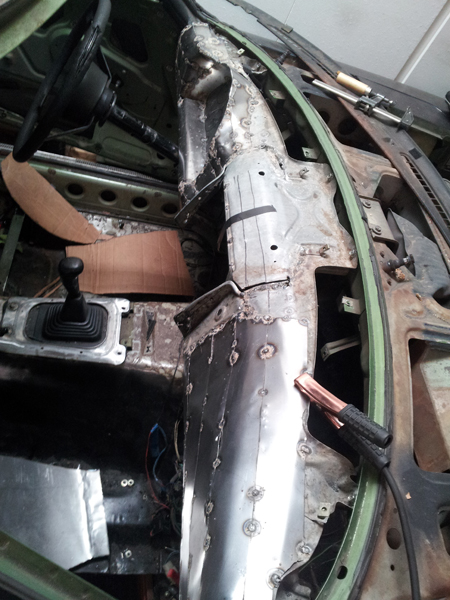
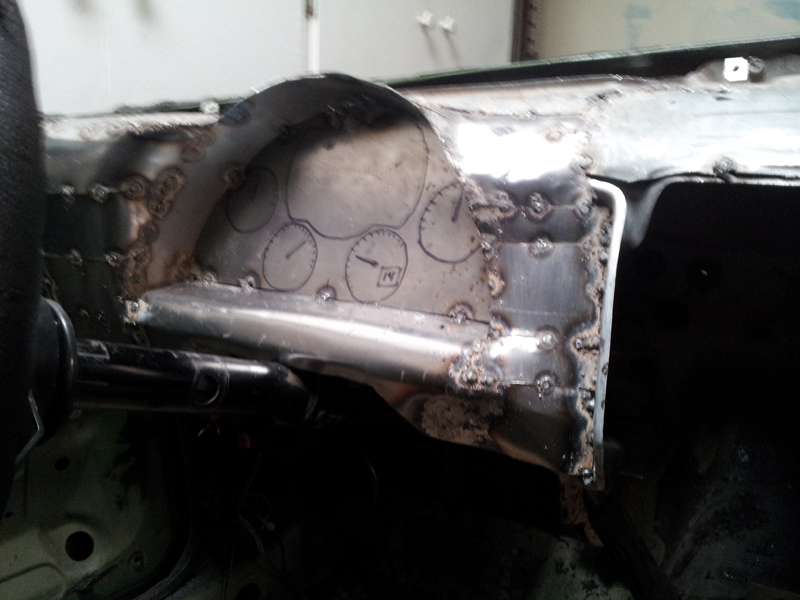
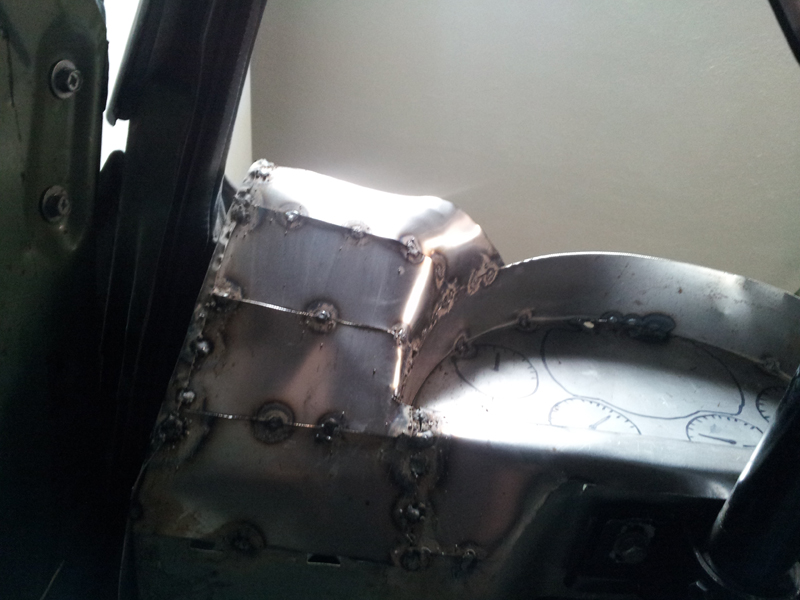
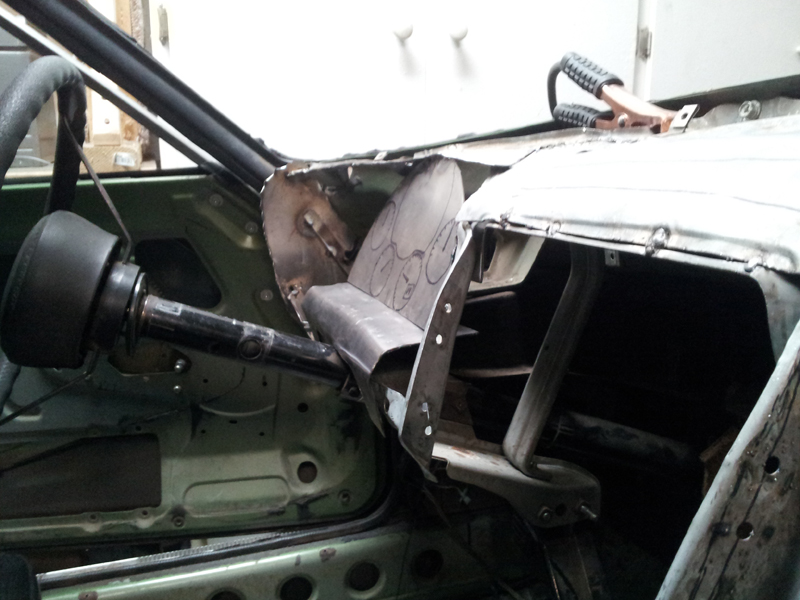
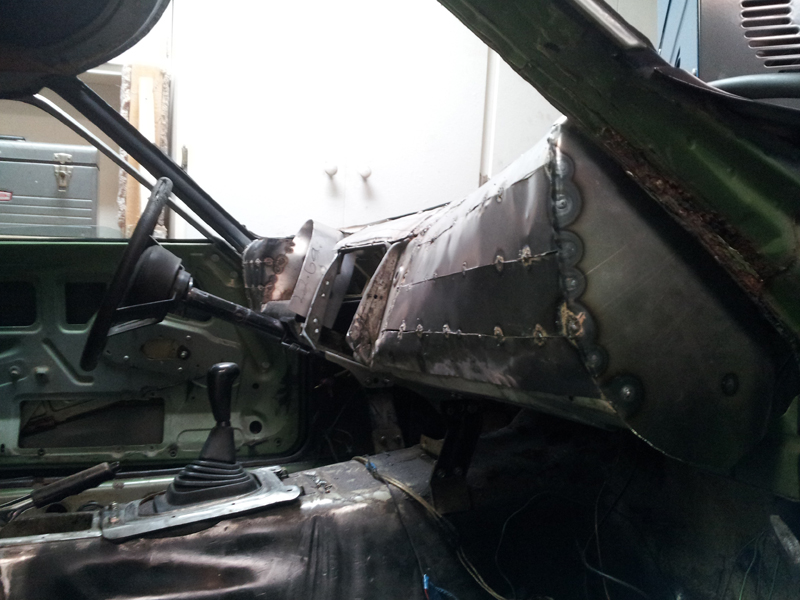
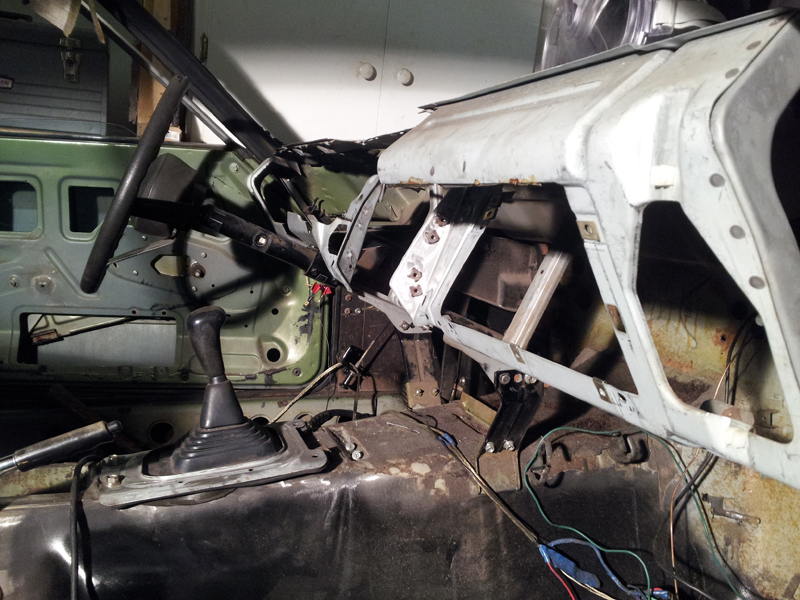
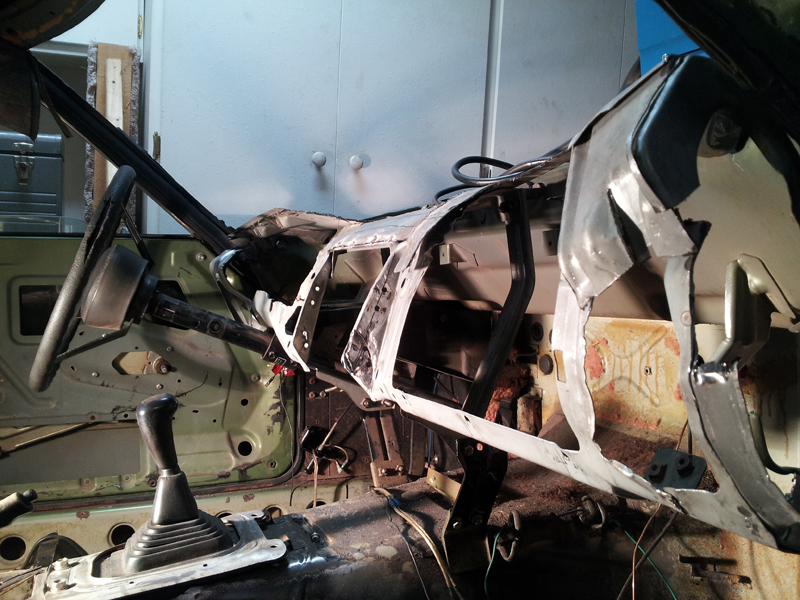
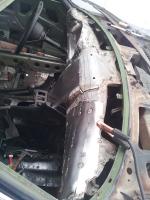
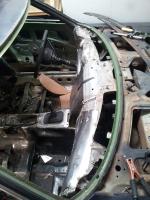
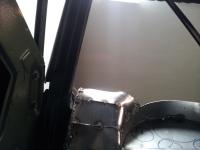
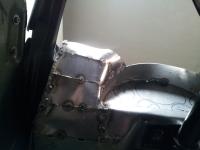
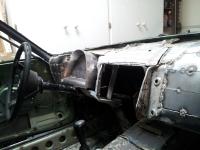
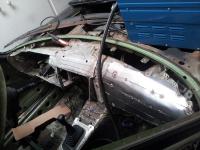
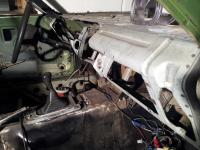
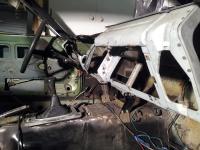
Boom! Driver side panel left of gauge cluster almost done. Space for buttons, and the shroud over the cluster in place to provide a rough base for the foam shroud to follow. Notice on the right side of the shroud/arch thingy that it needs to be cut. This is due to the fact that the dash actually forms a semi circle around the occupants. The gauge panel was welded in at a 90 degree angle (ha.....or thereabouts) to the driver. The shroud was welded in parallel with the panel. But the dash angle as you move toward the center is AWAY from the driver and toward the firewall. So I had to trim down the shroud down on the right to make it meet the left side of the center dash better. See following pics for this. ONE OF MY FAVORITE SHOTS. Really shows the unique curve we through in with the dash. Starts inverted at a negative angle, then ends up positively angles near the middle. Wow! Shroud Comparison 1. Here is what I'm talking about below in regards to making the right side of the shroud end up further toward the firewall than the left. In this picture it is symmetrical, but look at the angle needed to meet the center dash! It would be nearly impossible to do this and make it look good.


-
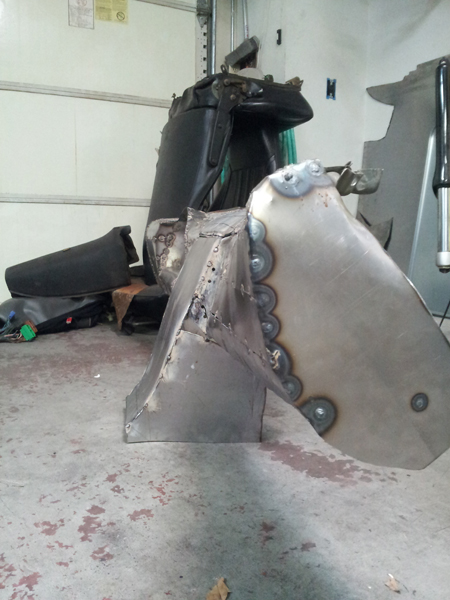
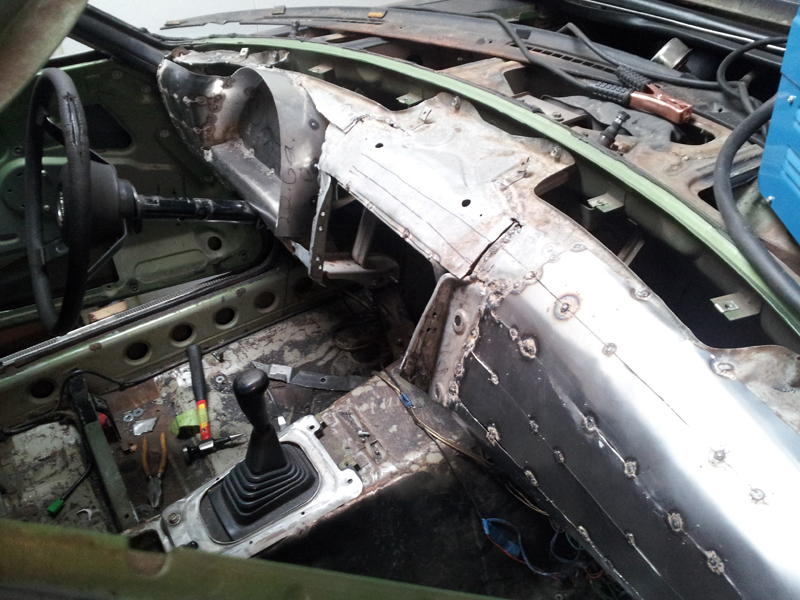
I posted this a day earlier on Hybrid Z because it was the middle of last night, but here it is for you guys now. Basically copied the driver side dash end near the door exactly the same as the passenger side. But it wraps smoothly into the gauge cluster area and finished on top. The design will make the right side of the dash cluster stick out less near the bottom right because it molds into the center dash area smoothly. Unless you guys think this is a big mistake, in which case some foam and more metal can remedy it. I just felt like a unique, more styled curve near the center dash part of the cluster would make the center dash feel more uniform, but of course, at the expense of symmetry in the gauge cluster . I figure it's a small price to pay, and really gives the dash a uniqueness. Look close at the pics near the end and tell me what you think. Cheers! Overview of the dash on the driver side all cut out. Starting to cut out the instrument cluster. Notice on subsequent images that the lines marked with a sharpie are not actually a fair representation of the gauge size since they are outlines. Since I will be foaming and smoothing the cluster panel and the walls are bowed out, I will bring the final surface closer to the driver, thus making the total panel size larger. Finally installed in the car. Welded in temporarily. It was a little crooked. >_< Foam and resin, baby!


-
Wow! Very impressed with this bit of knowledge. Thank you for the information E. Hehe, everyone on this forums probably thinks I'm some Chevy loving tweaker.... Dang.....
-
Huh... Must be a lot of Chevy lovers out there. haha. Of course, the whole point of my previous post was as a joke...
-
This is completely irrelevant, but on one of the pictures, I swear there is a crude Chevy logo in that dash. Now...I'm a chevy guy myself, but on a Datsun? :-O ... http://i.ebayimg.com/t/Datsun-240Z-Dash-Reproduction-Foam-with-PVC-skin-like-original-/00/s/OTAwWDE2MDA=/$T2eC16h,!)sE9swmcNCUBQ0oOSBrWg~~60_57.JPG Worth a mention for anyone who might have a huge problem with a Chevy part in their datsun (kidding, of course!) Original ad: http://www.ebay.com/itm/Datsun-240Z-Dash-Reproduction-Foam-with-PVC-skin-like-original-/121041007490?pt=Vintage_Car_Truck_Parts_Accessories&hash=item1c2e9b3382&vxp=mtr
-
Good deal! Looks like you have plenty of spare steering wheels! I heard these are actually a special type of compressed wood composite? Kinda of like particle board with plastic or something? I have no idea, just curious if that is true. Good luck with the restore! P.S. What are you doing with the block in the shop? Just a rebuild? More?
-
Hey all, just threw this on HybridZ, too. Finally got pictures and video of the dash build. So far looks pretty good. I have deleted the glove box for now. Because of the curve of the dash, I will need to add it back in after I have already finished the plug and mold and have dash off the mold. The curvature is too crazy at this point. Plus....I am not sure I actually want to add it in at this point because the dash looks amazing without it. And with the curves, I will have to make the door pretty thick and with special hinges to open, so it would be better to do it on a pull from the mold rather than the mold/plug itself. Great thing about fiberglass is the ability to add stuff in later.


-
Starting welding and modifying the general shape of the dash frame. Dang.... Looks so different and good with modern curves. Will post pics soon! In the meantime, I need opinions. Would you sacrifice a glove box for better dash styling lines, or is a glove box necessary in a dash? If I did include it in the dash, it would be pretty small, but it might be possible to get everything I want in a dash. So torn at the moment. .
-
Someone please get these outta my garage? I'll literally take any reasonable offer. They're in the way right now, and I don't want to have to throw em in the trash. $50? $40? Less??? Also have a lot of 280zx switches/trim/air intake/lights. Ugg, stuff is in the way in my tiny garage. http://www.datsunclassifieds.com/auto-parts/datsun-nissan/interior/260z-seats-80.00-260z-3515.html
-
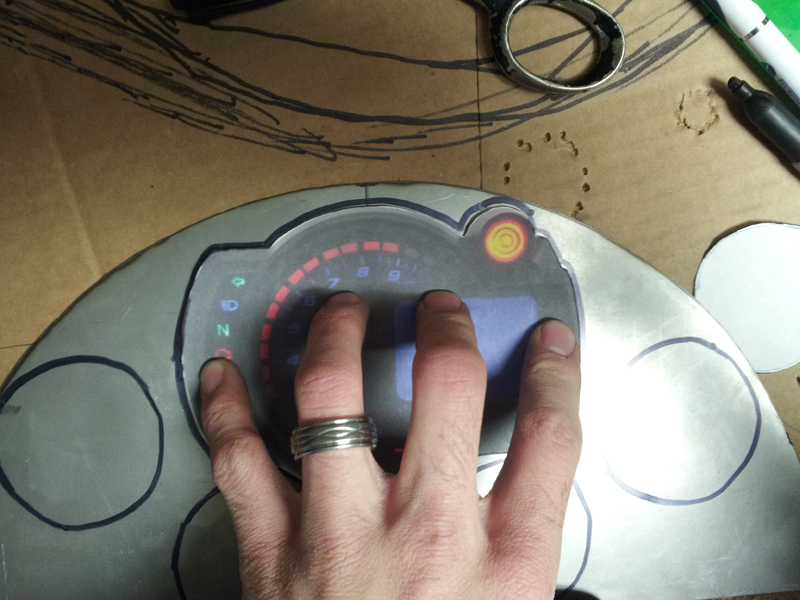
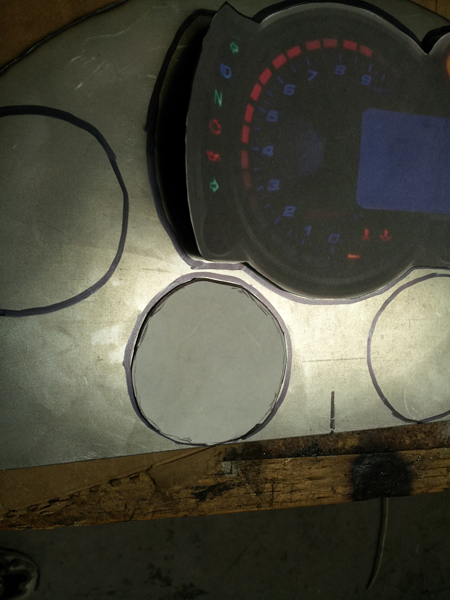
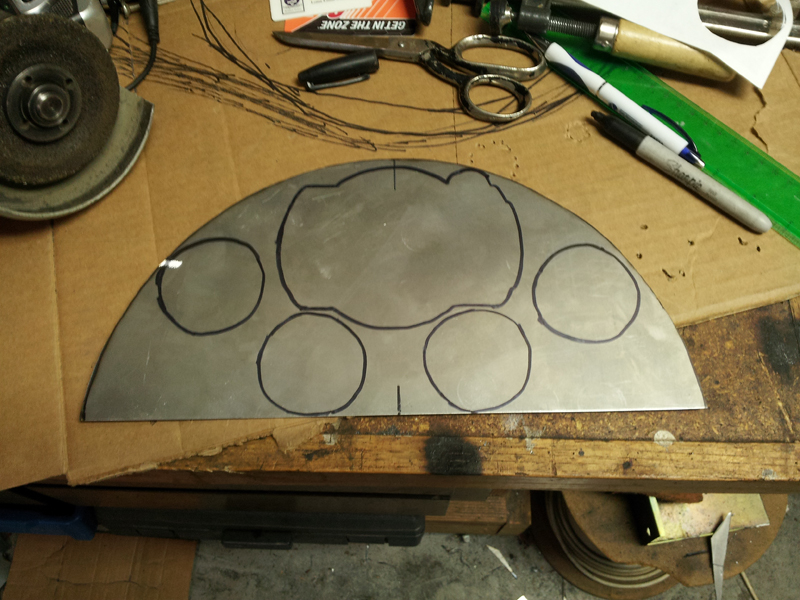
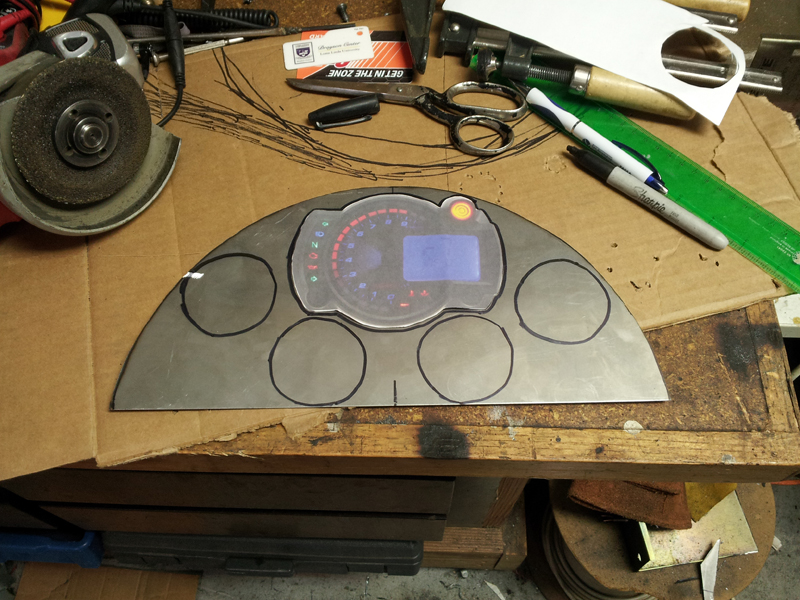
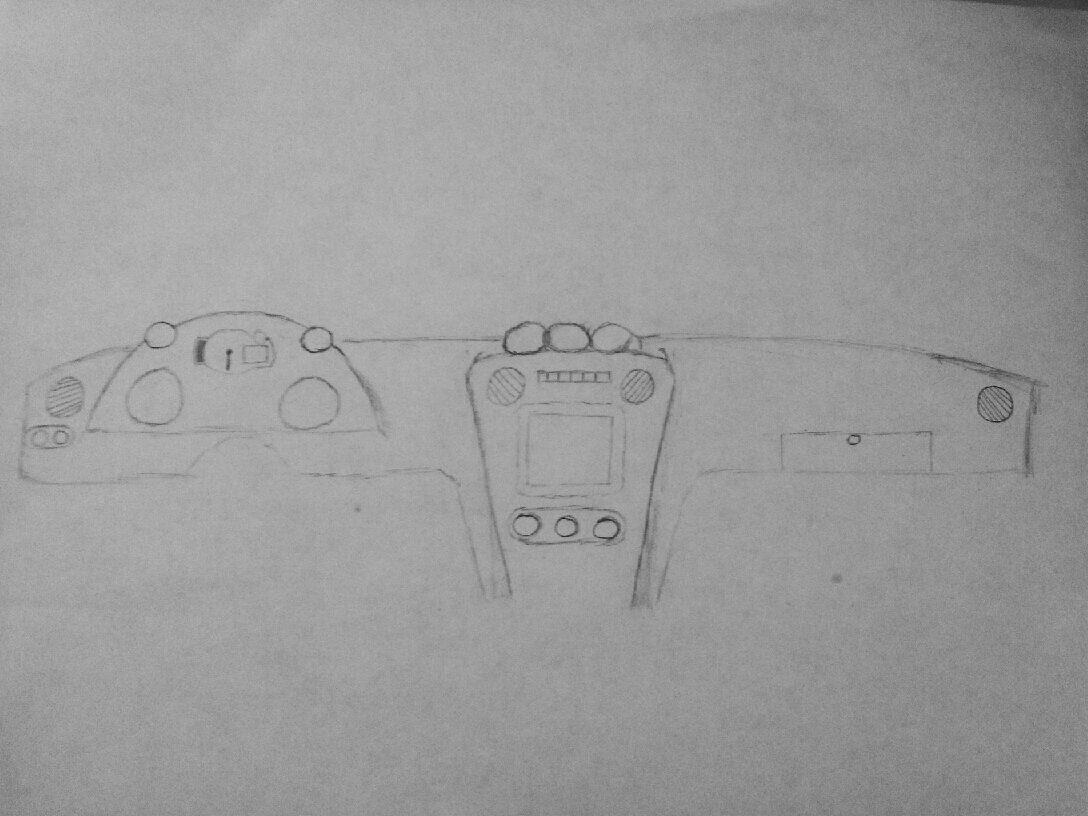
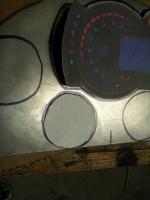
Got the dash sketch kinda finished. Planning to make the instrument cluster look more like a GTO dash like what you see below. The reason the sketch shows a weird center instrument cluster is because I have decided to use a RX-2N multifunction gauge from a motorcycle as the main gauge for RPM and speed. Has nice startup gauge sweep, and looks amazing. Of course, the dash will be flat in back and I'll cut it out after I finish it, that way I can mock-up gauges how I want before cutting out the spots for them in the fiberglass. The design features 3 gauge pods reminiscent ever so slightly of the original design. Below are two bezel vents, and between those are the defrost, hazard, accessory buttons, maybe A/C, recirculation, and on/off button for the car computer, etc. This bar could also be modified to fit a status bar, if one so desired to do something like that. To the left of the driver are for turning the lights on, and maybe mirror control/cruise control if I choose to equip it. Still thinking about the possibility of producing multiple copies of the dash for others wanting to modernize. With that in mind, what suggestions do you all have regarding my design? Why do you like/don't like? Again, instrument cluster will be modified more than what's on paper, but the general idea?


-
I'll admit, it's been a tad cold for me. I'm over here in Loma Linda going to school, and after being spoiled all summer biking in to class, I'm freezing in the morning on my road bike. And I'm from Washington, so I feel like I've kinda let myself go, haha!
-
I agree with keeping it. You have a nice 240z with a little work needed to get it road worthy. I personally would just avoid putting off the inevitable and tear the entire thing down right now. That's what I did with mine. Yes, the time and money kinda suck, but you're going to do it in the end with another 240, so why not start now? Besides, as Arne pointed out, the chance of finding a good 240z in the color you want without having to repaint it anyway is... Err... Not likely. And I disagree with Arne in the fact that I doubt you could sell your car, buy a 240z in the same condition in silver, and STILL come out ahead. Maybe... But unlikely unless you find a shell in good condition, which is also unlikely. Just my $0.02.
-
Bahaha, I like how we're all concerned for his fingers. Having personally shut my fingers in a door before, I hope yours are ok. Fingers are resilient things, but the worst part about injuring them is finding out how much you really use them throughout the day! At any rate, good thing the neighbor was there (I also hope he got pics). I know I would have snapped a few at my buddy's expense before helping out.
-
Yes, December 21 it is. Good luck everyone. Sblake01, I noticed you were in SB, CA. I just moved down here a year ago for school. How you liking the cold [for California] weather?
-
They look sharp! Not my particular style, but I can definitely respect them on a Z car. Like them on the green.
-
Oh sweet! Pictures??? You have a build thread? I'm super stoked to get started on it. As far as "set back," I mean I am actually moving the dash back toward the firewall an inch or two. The distance the dash sticks out now isn't conducive to pulling out the inverted center dash and making it more sloped. Plus, the deep speedo and tach gauges make it possible to push them back a little without worrying about space behind the dash in that area. Ultimately, making the dash "thinner" (pushing it back toward the firewall) may make the space in back of the dash less, but I intend to replace some of the larger, bulkier units with smaller, higher efficiency units (the air motor, air filter, actuator for climate controls, etc). Plus, I just can't pull the angles on the dash out without setting it back. If I did, the center dash would end up over the shifter area. Electric actuators... Huh. That sounds like a good idea. What's the advantage to that over vacuum control? Less chance of vacuum leak problems? I was thinking about that on the way home from class after reading your post initially and thinking maybe electric wouldn't be so bad. Also the testing the custom fitment. If I and up producing the dash, users will have to heavily modify behind-the-dash components, but I do want plenty of space for the A/C components, whatever someone decided to put in. Thanks for the input, it's much appreciated. I need all the ideas I can get because once I get the mold formed, this thing is pretty much goes in stone.
-
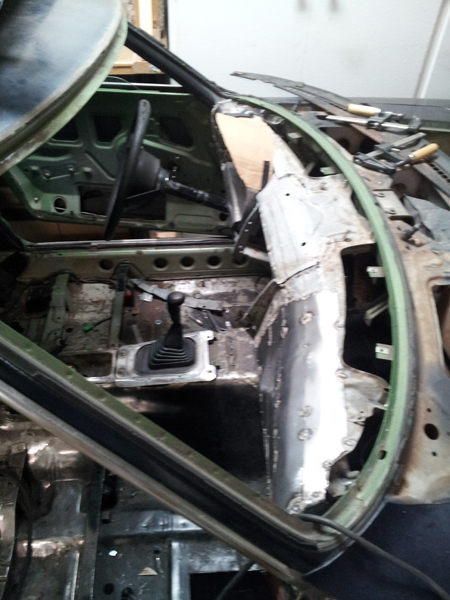
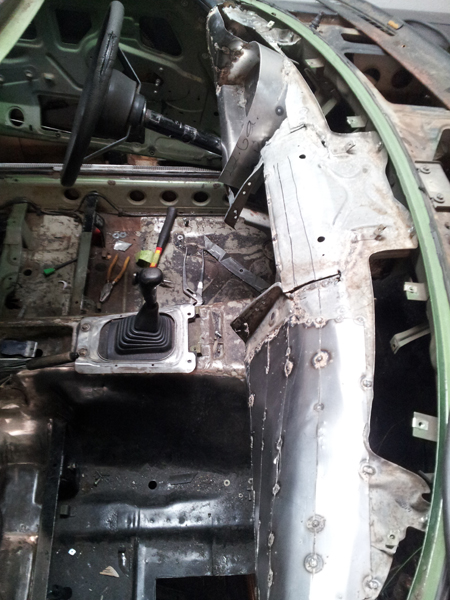
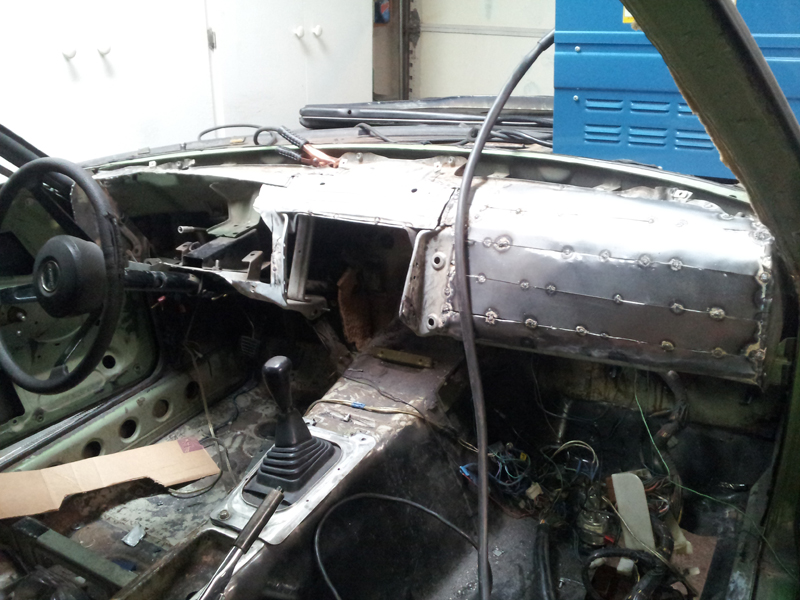
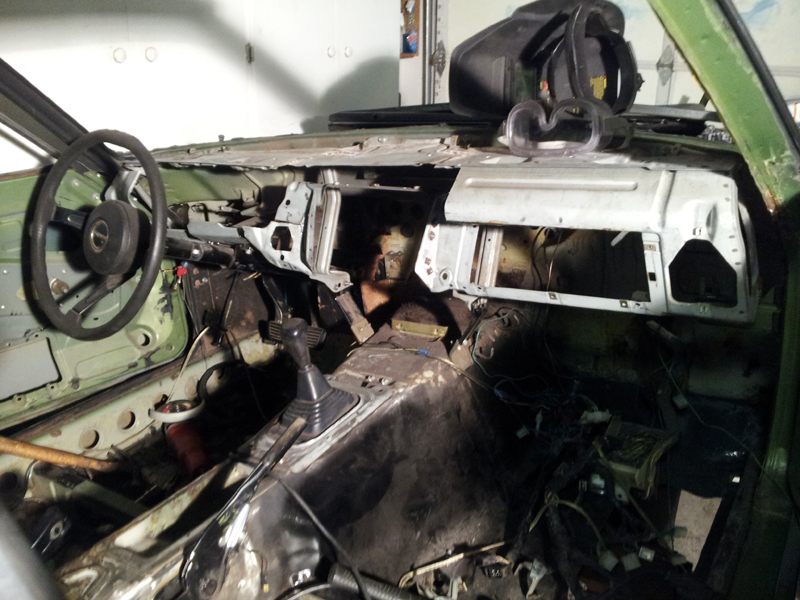
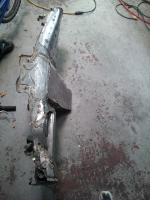
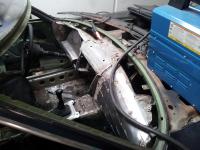
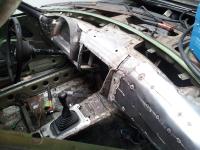
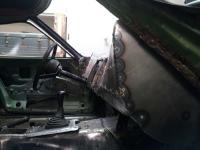
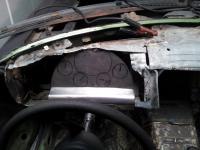
Finally took off the dash Saturday night and am starting to strip the car down to the firewall. I am removing the metal dash frame off the dash, and using that in the car to fabricate a custom fiberglass dash I intend to wrap in PVC leather. The ultimate goal is a dash that: Looks modern (shooting for an RX8/WRX style instrument cluster) Has space for 6 gauge pods (maybe five, we'll see) Has double din for touchscreen. Has upgraded, modern round vents Is set back 1-3 inches compared to the existing dash Can accommodate vacuum actuators for climate control I've been planning this for about 2 years. Finally taking the plunge!
-
Pulled out my entire dash this evening in about an hour. That is a PITA to get out... I'm doing a custom fiberglass dash with more modern curves. While trying to get it out, I removed the driver seat to get better access on my back. Then I realized it: I plan to install racing seats anyway. That said, I have a pair or old and very beat of seats I listed for $80 for the pair on the classifieds. If anyone is in Socal and wants to recover them, have at em and get them outta my garage.