jfa.series1
 Subscriber
-
Joined
-
Last visited
Everything posted by jfa.series1
-
 I don't check regularly but only because I'm no longer in a buying mode. As to selling, I had a restored steering wheel posted for a few months and it was recently purchased by a fellow in Perth AU and targeted for his upcoming work on HS30-0063. I'd say the classifieds are working.
 -
Heater hoses and windshield washer bottle missing, overspray in engine bay and on door locks.
-
Altho it's still a year away, give some thought to all members of this forum that attend to plan for a meet-up to get personally introduced and some group pictures.
-
ZCON 2015 will be in Memphis - be still my heart!
-
Tamo - most auto supply stores carry the closed cell foam weatherstrip material. Often it is available in various widths and thickness. Try Autozone, NAPA, or O'Reilly where you live.
-
Hi Chas, Photos are there to be used, glad mine could help explain the differences. Quite possibly Nissan learned about the fender tops getting deformed from casual pressure and changed the support pad locations and number. The weatherstrip I used was probably about 5/16" thick and 3/4" wide. If I recall correctly I double-stacked it to get good support under the fender. The weatherstrip was adhesive backed. Even BD fails to show the 280Z version correctly. Jim
-
There is a rubber cushion or pad in that area, also available from BD if you don't want to make your own. I used high-density foam weatherstrip material for that pad. Datsun 240Z, 260Z, 280Z, 280ZX & Mazda RX7 iCatalog - Black Dragon Auto
-
Is this the fender seal you are looking for? I bought these from Black Dragon a few years ago - about $40 + shipping. They use a "S" clip to attach to the weld ridge.
-
Mine was an ARA unit installed by the dealer. Big, honkin' York compressor mounted on a frame that surrounded the fuel pump. Altho the A/C is no longer installed, I've kept the console switch and the evaporator unit that mounted on the heater box in case I decide to put A/C back in the car.
-
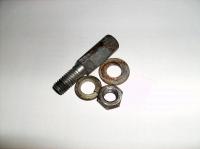
Here's a pic of the locking pin for the spindle. Apply a penetrating product around it, let it sit overnight. Loosen the nut a bit and give it a few light taps - not heavy enough to deform the threads. It should pop out. if you are only replacing shocks, no need to break down the spindle.
-
Getting the correct ratio of beer to product is very important, not easily mastered by all. I'd say you ace'd it!!!
-
A tiny dab of anti-seize on the threads of each flare nut will help them seat easier. Any sideways pressure on the threads will encourage them to quickly cross-thread. As Zed says - get them square to their bore hole! Anti-seize should allow you to finger-start each nut.
-
Check out the plate on the driver's side door pillar above the latch. It will have your VIN and date. You'll find a similar looking plate in the engine bay, right side shock tower - that one will have your VIN and engine block #. The block # on the engine is located just below the head about cyl. #5 right side.
-
+1 on Hardway's welcome. You've already earned an "Exceeds Expectations" rating by including some great pictures on your first post. You'll get a couple of extra "attaboys" for sharing the VIN and build date. Your car has so very many things RIGHT with it that it should be easy to address the aging items. Replacement sill plates for the hatch are available. The very early cars are a treasure to all of us so you will have a bunch of voyeurs following your every move. Stay the course on a conservative approach and you'll fall in love with the results. Everyone here know all the tricks and where to find stuff - all you have to do is ask. Jim
-
Most or all current blades use a small metal spring clip to keep the rubber blade in the frame. That clip will keep the blade firmly locked in your OE frame - been there, done that. I also have OE arms and frames.
-
No such brackets on my car, they may have been added by a PO for ???
-
Welcome to the group. These cars are super simple to re-assemble if you take your time and go after it with a plan. Among the many on this forum who have done this very thing, here are a few thoughts. Are you completely satisfied with the paint, body status (any rusted panels, ...etc.)? If not, get that attended to first. Then look to the suspension - bushings, shocks, springs, brakes, half-shaft u-joints, bearings, ...etc. You can completely drop and reinstall the front suspension as a unit while the engine is out. When all is in order, you will have a really good roller. Then get the fuel tank and hoses back in. Next up, check out the wiring while everything is accessible - especially the engine bay harness. Get your rebuilt or new clutch and brake masters installed and all the small items around the engine bay. Get new grommets for everything coming thru the firewall. While the dash is out, make sure everything is in good shape with the heater, water **** valve, and hoses. Get the dash back in and electricals hooked up, then the steering. Offline you can be working on the engine, clutch and tranny situation - they will be the last items installed and go back in as a unit. The radiator goes in after the engine. This is a highly simplified sequence of reassembly but hopefully enough to give you a bit of an idea on where to get started. Keep us updated on your progress, pictures are always welcomed. Everyone will be glad to chime in along the way to help you stay on a good path. Good luck, Jim
-
His profile lists only a '71 model.
-
Buy generic replacement blade assemblies at your local auto store, strip out the rubber and insert it into your metal blade frame. Toss the unused frame into your recycle bin or bag. Easy peasy!
-
"moonroof" ...really??? All the bids are garbage - one individual placed eight consecutive bids opening at $18k then up to $27.9k. Someone in Beverly Hills is trying to run a bit of a scam and we all know there are always fools with too much money and too few brains.
-
Looks like pretty normal wear for a wheel - either Series 1 or 2. FWIW - I have a completely refinished Series 1 wheel and also a Series 2 wheel for sale. Horn electrical components included but not the horn button. Either one is $225 including ground shipping within the U.S. Detailed pictures available, PM me with your email address if interested.
-
Hey JPW - That's a pretty nice looking ride. Bring it by the Z Club of Texas monthly meeting next week - July 17, in Addison and introduce yourself. Check us out on the web and Facebook (link at bottom of the home page): Z Club of Texas Looking forward to meeting you. Jim
-
Mine is exactly 2 3/4" along the centerline from the bottom of the emblem to the front edge. I think all the cars had this emblem.
-
In the "Teach a man to fish" theme: here's the link to the online parts catalog for the P/N's you need now and in the future. Datsun 240Z-260Z-280Z Parts Manual
-
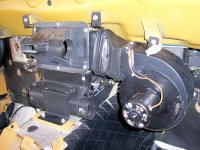
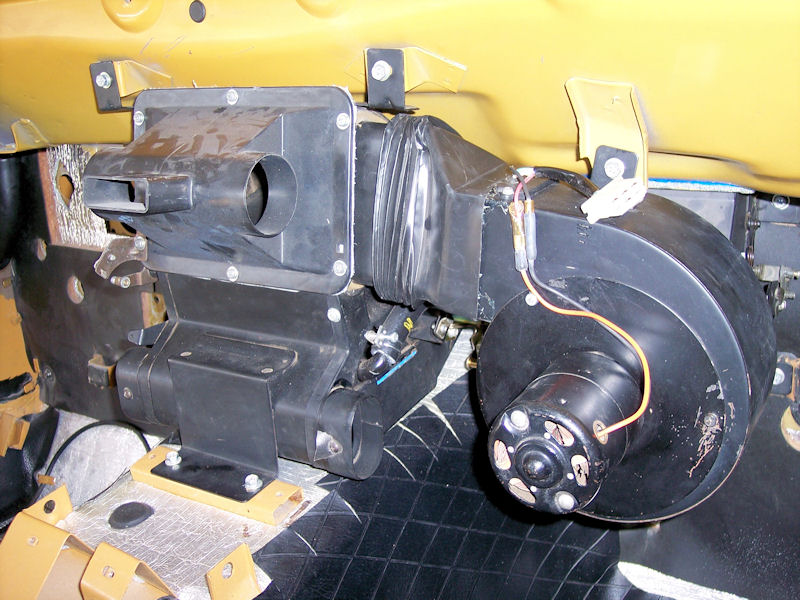
This is what you have to deal with AFTER you get the A/C components out of the way. The squirrel-cage housing pretty well blocks all access to the hose clamps, hoses, and water ****. The housing is bolted to the firewall in at least two places as I recall. As to replacement radiator and heater hoses, stick with pre-bent versions and avoid collapses that will restrict coolant flow. Check out RockAuto for your radiator hoses - excellent values!