


my_mad_z
Free Member
-
Joined
-
Last visited
-
 Thanks for the feedback, appreciate your help! I'll pass the info on the the guy reconditioning my head and see how it goes. Thanks again. Marc.
 -
I purchased a sandbalster to also sand blast my engine bay..... Let me start by saying it's the messiest process I have ever experienced!!!! You will need a full body suit and proper breathing aparatus.... I used the blaster without this protection and I was completely black after a few seconds (I could taste sand for days!) Not only was I covered in sand, my garage was filthy!!! I'm still finding traces of sand and it been 2 years since I used it! Don't get me wrong, it strips the paint well, however it is a messy and slow process! I payed $25AU for the sand blaster and $10AU for 5kg (~10lbs) of sand. I used 10-15kg of sand. Apparantly, it's better to bead blast, not as harsh as sand blasting and it also leaves a protective layer over the bare metal. I ended up using the sand blaster on small sections to remove rust.... I used paint stripper to get rid of the paint..... I was considering getting the whole car sand blasted but was told not to as it was too rough on the metal and also that it can warp panels. My 2c. Marc.
-
Mr Camouflage, Be very careful when attempting to repair rust on the Z doors..... the metal is very thin and there isn't much support behind the door skin. I learnt the hard way; after trying to rust repair small area's in the bottom section of the door, the door warped from the heat..... This was my fault as I didn't use a wet rag to keep the metal cool.... the reason I didn't use the wet rag is because I'm paranoid about putting water on bare metal..... I have overcome my fear as there are a number of good rust prevention products on the market I found that I had to have the MIG set to the lowest setting and I could only tac weld the replacement section; trying to seam weld would generate too much heat and would either warp the metal or burn holes...... You'll also have to be careful when you're grinding the repaired area(s); a little bit at a time with time to let the metal cool down. All the best and Good luck!
-
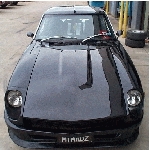
My restoration is in it's 4th year now....... 240Z Build #418 Heres whats been done: Body: - Had to replace the roof skin, previous owner put a sunroof in it and it looked crap! - Replaced 1/4 panel wheel arches due to rust. - Fabricated a new battery compartment. - Replaced the spare wheel well. - Repaired rusted chasis rails. - Tried to make a door skin; all went well until the last 2 inches of welded and the skin bowed.... had to wait 6 months before I could find another set of doors! - Finally got the car sprayed (Black-Cherry Mica) and ended up with a few runs in the clear. Have decided to block the car back and flow coat it..... still waiting for the respray! Suspension: - Shortened struts approx 2" and used KYB shockers. Brakes: Front: 4 spot toyota 4 runner calipers; Peugot 504 vented/slotted rotors Rear: R31 solid discs, R31 calipers (Handbrake works!) 260z Master Cylinder. Engine: L28 F54 block, Flat top pistons, N42 head, turbo 280ZX injection manifold, Megasquirt II ECU. In the process of turbo charging: - Fabricating a turbo exhaust manifold. - Reconditioning P90 head. - T03/T04 hi flow turbo - 42mm Garrett external wastegate Interior: - Custom door trims - Custom roof lining - Reskinned Dash - New carpet/vinyl - Racing seats I think that covers it
-
Hi fellow Z enthusiasts, Does anyone know the valve seat angles for the P90 head? I was curious to know if they have a three angle grind from factory as there appears to be three different angles on the valves/valve seats out of my P90. I tried to find information regarding the valves in the P90 but I had no luck. The Haynes manual only has the listing for the L24 and L26, no L28.... Are there a specific angles I should aim for (turbo application)? Any information would be greatly appreciated. Thanks in advance. Marc.
-
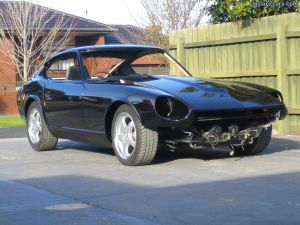 Thanks Kimi...... I've had to rub the whole car back; had a few imperfections in the paint. I've rubbed the whole car back and I'm waiting for a friend to give it a flow coat.... I'm pretty upset that the Z has to get resprayed, but I guess the paint will look a lot better.... Gives me a bit of time to organise the turbo setup that I'm working on at the moment.
 -
Pick-a-part is a wrecking yard that we have in melbourne; you take your tools and remove the items yourself.... I guess that's why it's so cheap! I checked to see that the calipers were in working order before I removed them and they were fine. The good thing about pick-a-part is that prices are standardised across all manufacturers! They charged me $25 per disc and $25 per caliper.... I fitted them and they are in excellent working ordern didn't have to recondition the calipers. You can also cut the skyline caliper mounts to avoid removing the stub axles, I had my stub axles out to replace the bearings so I chose to leave the mounts in-tact. I've also done a brake upgrade on the front, used toyota 4 spot calipers and peugot vented/slotted discs.... only problem is that it wont allow the standard 14" wheels to fit. That upgrade cost me approximately $400; bought brand new discs from dba and bought the calipers 2nd hand and reconditioned them. Good luck. Marc.
-
You can get the bracket from pick-a-part..... I did the rear disc conversion; got all my parts from pick-a-part out if a skyline station wagon (R30 I think).... it was a straight bolt on and only required minimal fabrication to the bracket - had to increase the diameter of the hole to fit the z..... the whole setup cost me $100!!!! That included calipers, discs, brackets, and brakes..... I've got the h/brake connected and it works well.... had to extend the cable slighlty due to it rubbing on the drive shafts. Marc.
-
The ignition leads that run from the distributor to the spark plugs. Cold readings with a multimeter can show that the resistance is within specification, however, a faulty/warn lead can breakdown/fail as its temperature increases. Not sure if there is a performance ignition module replacement, I've only seen OEM.
-
Have you tried to changed the coil? Coils tend to play up when they get warm.... Also, check your leads as they may be failing as the car warms up as well. I had a similar problem; when the engine was approaching operating temperature, it would have a lumpy idle and lose power..... I tried everything but had no luck..... I changed the coil and noticed an improvement but the problem was still there..... ended up changing the leads and she was as good as new; I should have done that in the first place but the resistance in the leads was within spec..... problem turned out to be the leads were failing as the engine bay temperature increased. Check your valve clearances and make sure they are all to speck as well. Hope you sort the problem out. Marc.
-
 Keeps me sane; life's just not the same without my Z..... Hopefully by summer, my 240Z will be ready to hit the streets but until then, I can only zoom around with my 240Z rc car!
 -
With the etch primer, how exactly did you apply it to the body? You should only spray a fine haze, if you rub your hand across the panel once it has been etched, you should feel a little roughness. I would suggest you try and avoid touching the bear metal as the moisture /swet from your fingers will cause the panel to rust. As for the surface rust, get some rust converter and remove the rust.... with the rust converter I have used, you simply apply it over the rust, wait 10-15min and then wipe clean with a damp cloth. It is suggested that you apply your etch and primer asap. If you have rust showing through the etch, get rid of it as it will only haunt you in the future.
-
I'll get that info for you tonight if I can. I've got it written down somewhere, just have to find it!
-
I finally got the jetting sizes that I am running in my Z. These are the theoretical sizes: Main Jets: 142 Emulsion Tube: 7772.6 Accelerator Pump Jets: 40 Idle Jets: 50 Idle Jet Holders: 7850.1 I calculated these sizes based on the information specified in "How to build and power tune Weber and Dellorto DCOE and DHLA Carburetors" by Des Hammill..... very useful book! The selection is based on 466cc per cylinder, mild head work, headers.... Sorry for the delay, hope this information helps! Marc.
-
I did say approximately 10.5:1..... I was told the head would be shaved to give me approximately 10.5:1 comp ratio and it would not require shims to compensate for slack in the timing chain. After the head was shaved, I assembled the engine and I checked to make sure that the timing chain didn't have slack; all of the guide notches lined up! I have had to use cam tower shims on an L26, the E88 head was warped like a banana and required serious shaving..... had to use shims after this was done. The L26 I had was one of those freak motors; would love to rev and had plenty of go..... however it was short lived when I got excited during a drag and over revved it; heard a big bang and then a cloud of smoke came out of the exhaust! It kept running for 2 weeks and then I decided to tear it down and examine what had happened...... I did a comp test and all cylinders were within limit. When I pulled each piston out, every compression ring was shattered into pieces! I counted 26 pieces on one of the pistons!!!! I was baffled as to how the engine was still running and showing good comp readings. It was not feasible to rebuild so I decided to go for an L28 and have never looked back.