Matias
Free Member
-
Joined
-
Last visited
-
 Hello! Read somewhere by accident yesterday that the Mallory Unilite is out of production due to MSDs restructuring. First thought was to try buying one before everybody run out, but then I remembered reading about another even better solution a long time ago. Google helped me finding Ignition123 again, and after reading this very informative thread through it's stupid question time. 1. Understood this Datsun L6 attachment is US developed, at least it isn't listed on the .nl site. However the Swedish dealer that covers the nordic countries list it and I suppose it is the same product all over? Asking because I live in Finland... 2. As I like my car to look as original as possible, but pack a bit more power, I refuse to mount any aftermarket tachs. Also, I think non working original gauges are just as sloppy. What do you guys use? I guess you still need an adapter to be able to use the old original points friendly tach? 3. No ballast resistor with these even if you wanted to right?
 -
Nice!! Good to see another one getting a new life! Keep us posted!
-
Oh good, that should work fine too, a 12-point 20mm will also "fit" but I did'nt dare to put force on it since the plug has so little contact surface on the socket...but that 8-point could work just fine! So you are... Hommaanko sulle adapterin? Laita viestiä!
-
Too bad I live so far away...I might be pursuaded to sell them if enough people were interested but they will probably get too expensive when taking shipping and handling into account...
-
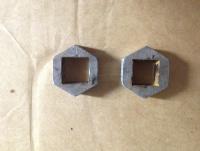
Hi all! Found several threads on the subject of stuck fill plugs in the tran of diff in my search for tips as I made the same mistake as many other people: Draining the trans oil before checking that the fill plug does open... Basic problem seem to be shortage of appropriate tools, you just can't apply enough torque with an open wrench or a crescent wrench without risking rounding the plug and never getting it out. I searched the net and went to a few tool shops but none of them had a female 17mm square socket avaliable. However, there is a quite easy solution that gives you a much bigger, endless really, choise of wrenches, breaker bars etc. I had a friend of mine cut an adapter out of 12mm steel that fit a normal socket (in my case 30mm). Then you can just apply necessary amounts of force safely with anything from a simple 1/2" wrench to a strong 1/2" air gun without risking rounding the plug. Another tip might be to let the trans cool down before putting the plug back if you drained it hot to avoid future problems...
-
Question for you: how much space does the sensor require straight outwards from the bung? I already got the bungs welded in the best possible place as far as access is concerned, but I'm a little worried that space might be a problem...
-
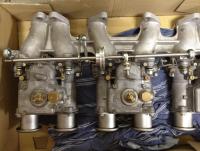
Good to hear that there is progress. Your carbs are calibrated for an otherwise stock 2.4 right now right? I'm a littele bit behind, but it shouldn't be long now since I got the last piece of the puzzle today, the new double exhaust from Spirit Garage in Japan. My god it's a nice system, having mixed feelings about putting it under the car...should probably just put it in the living room and just sit and admire the craftsmanship...
-
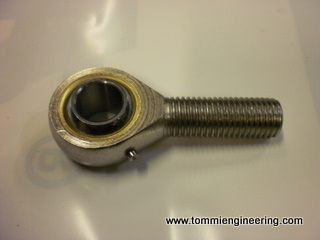
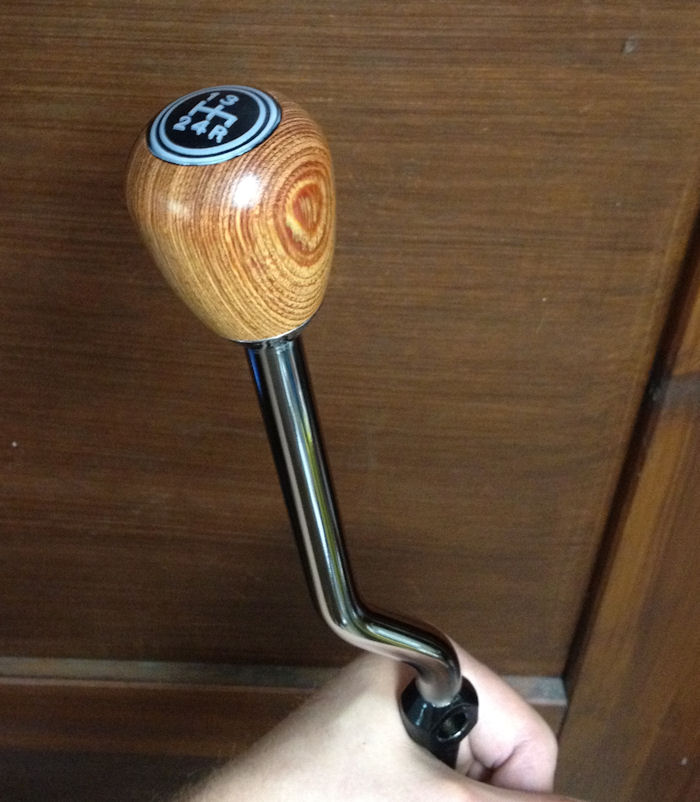
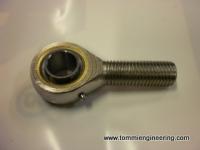
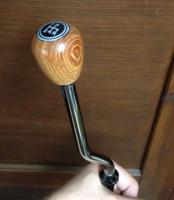
Decided to fit my shifter tonight, since it started bugging me that it might be a bad solution...it went on quite easily although I had my doubts about the construction. Only issue was that I had to dig out my inch-sockets and wrenches... Wonder if my poor old Nissan feels violated now that it has strange foreign non-metric internals... First impression is that I like the feel, it really shortens the throw a lot as my old shifter was longer as well...might need some getting used to as it is very tight, changing from second to third in hectic situations initially might result in second to first instead...? However it is in good relation with the geometry of my throttle pedal, the first centimeter of its travel has most of what you ordinarely use... One need to have thin driving shoes or just drive barefoot for the ultimate experience... I also took a bad photo of my throttle linkage to continue yesterdays discussion. As you can see it is locked in place with two c-clips on each side of the left rod end or heim joint as someone suggested. It could do without the center one but flexes a little more. My friend insisted on adding it and it sure made a difference, the rod wont budge at all when everything is installed even if you pull hard on it. The middle joint attaches to an "elbow" we made that connnects to two of the intake manifold bolts that also doubles as the mounting point for the throttle cable. With the the detachable third joint you can dial in the perfect rod alignment with its two nuts after everything else is mounted.
-
Look for something like this: Then they don't have to be perfectly aligned since they move "sideways" if you know what I mean. You could have the whole linkage assembled on an angle and still get no binding... EDIT: Your "review" of the MSA short-shift kit got me a little worried, since I havent mounted mine yet, just modified it a bit regarding looks: Hope it works out ok.....
-
First of all I have to thank you for a nice and informative read all the way from the start! At this stage of you build it is kind of watching my own project through a mirror or something like that, even though we have different cars...but our engines are kind of the same. I haven't pulled my engine since it has been done recently according to the previous owner. I guess I'll find out the hard way in future if the internals are as good as they should. The engine ifself is supposed to be built by an engine builder but it has been mounted in the car "half arse, and fast". Main thing was clearance between the brake master cylinder and triple webers, that was solved by the stupidest linkage system the world has ever seen welded to the inner fender an firewall. Lots of planning and parts ordering followed by custom machining by a good friend with a machine shop as well as making new holes and welding old ones shut to make the new brake system work. Hoping it will work as intended in the end. I decided to skip the power brakes and go for the shortest double Wilwood cylinder setup I could find coupled with the modified original brake pedel (now sporting a balance bar etc). Lots of parts waiting to be mounted but I can't proceed until I get my new header installed and that can't be done until I finally get my new exhaust system delivered from Japan. The exhaust system won't fit my header so I need to start by hanging the exhaust to be able to set up the needed header modification. After header is installed I can mount my freshly rebuilt triple webers then I can get to the brake system..... Oh, and removing the old rusted out header revealed that the new headers flange is the correct thickness in relation to my intake, which was not the case with the old header flange. Therefore the previous owner has grinded down the intake manifold flanges to be able to mount it properly. Felt kind of backwards to bring my newly rebuilt triples already mounted to the intake to my machine shop friend and have him weld on new material on the flanges and grind them smooth at the correct thickness....:stupid: Regarding the throttle linkage I had kind of the same problem. I have no idea who made my intake but I guess yours have the same basic problem; the rod ends should work kind of like bearings and they can't be adjusted/aligned in relation to each other. My friend and I solved the problem by building our own linkage from scratch out of stainless steel. The solution is to throw the existing rod ends in the bin and get normal universal uni-balls instead that can also pivot thanks to the balls. We also made the center on adjustable so that fine tuning it results in a perfectly straight rod with no binding. It can also be removed in minutes and is held in place by the center uniball and a small lock washer in front of the front uni-ball. This probably sound incredibly difficult, I meant to attach a picture of it but it seems I haven't taken one single picture of it yet and now it's in pieces.... Can't wait to see you finish you project (and get my exhaust...) Matias