Willoughby Z
Member
-
Joined
-
Last visited
Everything posted by Willoughby Z
-
 http://www.partshotlines.com/?phl=howtofind&a=fuap
 -
Thanks FastWoman. There are two screws at the bottom of the box- covered as you described. I used solvent (carefully) to disolve the glue, also removed the collar and gaskets so as to be able to tap the plate outward from the inside. There are no exploding parts. I took photos that I will upload later. I found the source of the sticking (previously posted). The corners of the vane were overtraveling in the chamber, jamming at full travel there were shiny spots as a clue. I thought about deburring them but I gently took some of the arc out of the end of the vane- a tiny bit. Seems counter-intuitive but when looking at the shape of the vane and where it was rubbing, that seemed to be the answer. And it worked. Having the plate off and the innards exposed, allowed for a thorough cleaning, particularly the backfire valve, which was corroded enough to stick badly. With the plate off, I decided to re-create a post for a spring/bumper, working from the inside. I drilled a small hole from the electronics side, countersunk from the chamber side, so that a small diameter flush head screw wouldn't interfere with the edge of the vane during it's travel. Washer, locking nut,finished. Cleaned plate, box edge, reassembled with silicone... Searching my "MacGyver" box, I found a hi-temp silicone rubber sleeve that fit tightly over the portruding bolt, allowing for a "soft stop" against the shoulder of the counterweight. Sealed plastic cover and re-installed AFM. Lo and behold, it started! FWIW, replacing the fan clutch really quieted things down and raised my operating temperature by 10 deg (by dash gauge). Replacing a nearly seized idler piulley with the NAPA 38038 groove pulley cut out some racket that I apparently gotten used to.. One last thing, I don't know how every other fan shroud is assembled, but the two halves (upper/lower)of mine were attached to each other by three screws and threaded clips-screw heads facing down. before re-installing, I reversed the clips, placing them on the lower shroud so the screws face up. End of debriefing.
-
esmit208: Appreciate your thoughts. So you're saying that a mechanical fix, like substituting for the return spring absorber to protect the counter-weight wouldn't be worth the effort? It's not the adjuster spring or anything electronic. I intend to reseal the cover against dirt/ moisture. I thinking that other than the broken bracket which is only necessary to bring the counter-weight to a "soft" stop the AFM is working perfectly. I fear introducing new issues with a reman unit, more than what I have. I hear you on the warranty issue and the mean-time-to-failure life of a new(er) part.
-
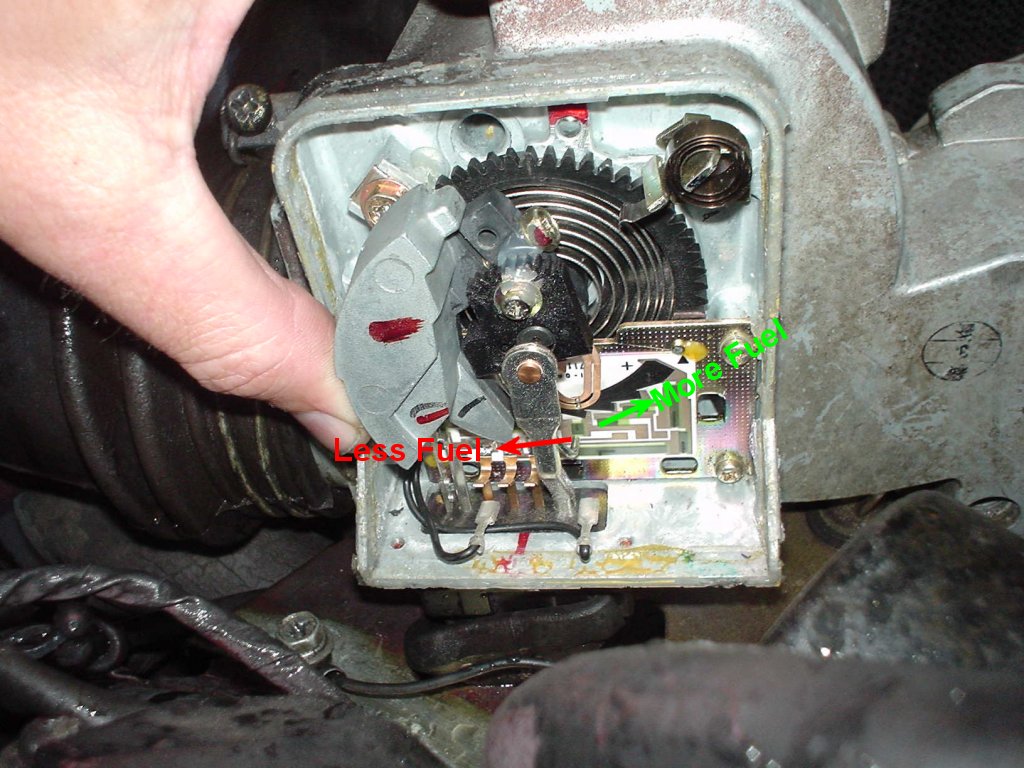
BTW, the second photo is from the AFM worksheet ( for reference) The yellow arrow in my photo points to the gray blob of epoxy(?) and the red arrow points to the tab (no spring) which is bent downward. The AFM looks otherwise, pristine and unmolested. Obviously, someone's been in it but there is no evidence of repairs/tampering/adjustments.
-
Some background: I had a recent "event" where the engine shot nearly to WOT at turn of the key (without using accelerator pedal). I shut down the engine, restarted and the car ran like cr*p. Low,rough idle. Missing,poor throttle response. Exhaust smoke like a crop duster. I was only a few miles from home, so I gambled and drove it home, bucking and complaining the whole way. Next day, long story short, I discovered the vane in the AFM was stuck in full open. Touched it and it closed by it's spring power. Cleaned it carefully and it seemed to operate smoothly over the range of movement but it would occasionally stick at the full open position. I put everything back together, installed fresh plugs and cap/rotor. The car has been starting well, running smooth and strong. Today, while replacing the idler pulley/ belts/water pump and fan clutch, I removed the AFM- for better clearance and access. Having read practically everything on this site with regard to the EFI system, I thought it might be a good idea to remove the black plastic cover of the AFM and do a visual check while it's on the bench, of the internal components and reseal the cover. I had a copy of the AtlanticZ AFM write-up and I discovered that watch spring coil or "return-to-zero shock absorber" is missing and the tab mount is bent. After I took photos, I also realized that part of the bracket for the spring is missing-the "keeper" or "stop", if you will. It looks as if a PO or even a reman. tech may have tried to repair the broken bracket with an epoxy. [ see photos] I assume all components are there for a reason, some for better reasons than others. I am thinkinking of a way to fix it. Haven't come up with an idea, perhaps a rubber bumber to soften the return of the counterweight. Open to any thoughts on the problem. Thanks for reading.


-
Excellent point. And part of the explanation why relays are used.
-
There are real, legitimate, verifiable brokers and not. Do your homework. I have nothing to gain from suggesting escrow.com. transfers, checks, escrow services, whatever. There are fees associated with all options. Cash is good. At the end of the day, you have to do what you're at peace with.
-
My .02: I experienced the same problem as sblake01 when fabricating s.s. braided lines for a motorcycle, clamps loosening/leaking. I solved the problem by trimming back the braid to allow direct contact between the hose and clamp. I was concerned about the fraying, so I slipped a short piece of chemical-resistant shrink tubing over the braid.
-
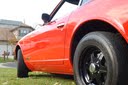
I have one (1977 Code 110) and have this debate/ discussion/argument often. I agree completely with Carl, it depends on who's opinion and where you park it, time of day, etc. From Wiki definition of the color persimmon: "Persimmon is a color that closely resembles the tint of a very ripe persimmon fruit. Persimmon can also be described as a medium orange-red. It is very similar to the tints of coral red and vermilion." Kris
-
Look into escrow.com
-
FastWoman: I learned something from your post on theory. sblake01: Bags would be cheaper...
-
Eh. Yo knock yourself a pro slick, gray matter live performas down now take TCB'in man.
-
FastWoman, Many years ago, I pulled the 5-spd of my 1st '77 and had it repaired by an expert (broken synchro). I used a motorcycle lift to replace the tranny. Getting it out wasn't that bad but having it lay on top of me was a bit claustrophobic. I had two helpers but we had difficulty manipulating it, just decided to go in and act like a human dolly (hey, I was younger and dumber!). You are welcome to use the lift when you're ready, if you choose to go the self-reliance route.
-
Forgive me. Shame on me. It was equal to the 12 minutes gone from my life. I just couldn't stop reading. Somewhere, I thought I'd find something of value. At the least, this proves I've read everything on the boards.
-
So my '77 IM'ed his Bluebird via Outlook, at least that's what she said and they exchanged photos. I think he's just fine. We just don't have the right flux capacitor to translate.

-
Welcome Dan
-
To the question, "What's it worth?"... It depends. Shift knobs are available on several sites. Check them out to establish a competitive price, if your goal is to sell it. To someone who absolutely, positively must have that shifter knob, it will have great worth to them. If you intend to keep it forever and it's not for sale- it's priceless. This my opinion: The worth or value of any item/ object is established when a contract/deal is consumated. Just sayin'...
-
78zcar blue Zed head mgood Fast Woman Thanks to all who replied... It wasn't 'til I looked at the photo(mine) that I realized my CSV is there in the photo <smacks forehead> After posting I was reviewing microfiche <cleaning eyeglasses> and decided that it might be the AAR. Sometimes saying something "out loud" , you find the answer, which is what all of you have confirmed. Now it's back to the books to figure out my buy list and routing,etc. And yes, Zed, it does take awhile to warm up. The idle RPM change is not drastic (500?) but there is a change. Thanks 78 for the fleet feet And Fast Woman, what can I say but "now that's a purty motor"... Sweet! Something to aspire to! On another note, I fixed my vacuum/mode door/heat problem today! All of the info from the site contributed to the solution. Two tubing splits (underneath "magnet" valves bracket) were repaired, it was that simple... And one last thing?, a rough running / missing which appeared yesterday on start-up was resolved by using contact cleaner on all injector connectors. I used the screwdriver/stethscope method to discern that #2 and 3 were not "firing", found corrosion, cleaned them... eureka! Spent most of the afternoon cleaning every connector/connection/ground I could find. Not a method I invented. Something I learned here. You all rock!!! Thank you.
-
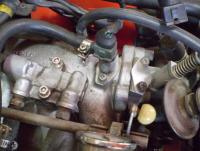
I am trying to identify what appears to be a missing component. I have been searching previous threads/posts and every photo, even the FSM. I have spent a great deal of time over the last two months reading everything to learn as much as I could to resolve several vacuum related issues (heater, mostly) and have been succesful thus far. I thank everyone who has contributed so much info- links, articles and documentation. I am willing to admit I may be overlooking something but I'm asking for assistance. There is a connecter (not connected) and what appears to be a block-off plate (diamond shaped) located on the intake. I am assuming that the connector would be related to a device that has been removed by a PO. The engine and all systems seem to operating well with the exception that I do have to "tickle" the accelerator to start the engine, albeit briefly, but not what I have experienced with most EFI. Is it perhaps the Cold Start Valve? Any help would be greatly appreciated. Kris
-
Lead and pitch are closely related concepts. They can be confused because they are the same for most screws. Lead is the distance along the screw's axis that is covered by one complete rotation of the screw (360°). Pitch is the distance from the crest of one thread to the next