Kurbycar32
Member
-
Joined
-
Last visited
Everything posted by Kurbycar32
-
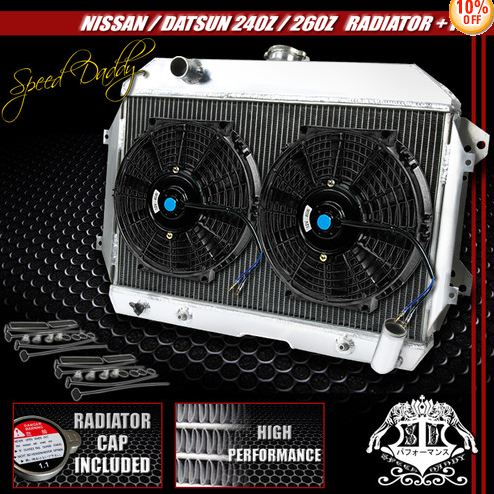
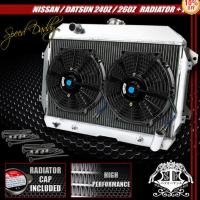
 Does needing (actually wanting) one of these for an early 260z count?
 -
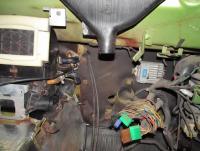
72OJ, that looks nice. I was a bit worried the aluminum radiator would look out of place but it looks great. If it cools your V8 it should have no problems with my L28
-
How about some installed pics? I was looking at the same model but found this one with fans that looks tempting: http://www.ebay.com/itm/ALUMINUM-RACING-2-ROW-RADIATOR-2-X-10-BLACK-FANS-70-75-NISSAN-DATSUN-240Z-260Z-Z-/190659580127?pt=Motors_Car_Truck_Parts_Accessories&hash=item2c643250df&vxp=mtr#ht_5115wt_1397 For archival purposes:
-
Nah its all compatible. Drain, maybe shake it around a bit and refill with oil of choice.
-
Ill be in cabo, im out.
-
Check out my blog about my busted parking brake here: https://sites.google.com/a/thecomputerrehab.com/260z/Mechanical/parking-brake i still have the old one, if you think it has the parts you need let me know
-
You did a good job with the zip ties. Im pretty sure i have a handful of those clips lying around from random trips to the junk yard. Send me a PM with your address and ill dig around the garage for one.
-
I also concur.. But it sounds like your going to flush it anyway, dont use gasoline. If you insist on flushing, ATF has always been my go to flushing fluid. Its a lubricant unlike gasoline, contains detergents in some cases and is sometimes found in manual transmissions anyway. If forced to flush: I would fill with ATF, drive around the block and then replace with whatever oil your repair manual specifies. You would probably get a similar, less scary result by refilling with a synthetic fluid. If your still worried put some high power magnets on the outside of the casing near the drain plug
-
I'm in if i dont get discriminated against for having DGV's
-
I did the same thing, cracked the glass AFTER it was pulled out and before it even got to the bench. I bought a new windshield for $129 and forgot about the whole thing
-
on the 260z the bumper shocks are in the same area so its an easier fit to mount vertically. I dont think it looks bad at all, mount it however you want
-
I had a similar problem from the car sitting for years before i purchased it. My inital thought was also to buy some rebuild kits but at the Kragen/Oriley here in town the complete parts were so cheap i just bought them pre done. If i remember correctly the master cylinder was about 22 bucks, the slave was 12. I remember thinking that i replaced the entire system for about 40 bucks. Instead of a speedbleeder i just had my wife push the clutch pedal. Its not something that gets adjusted often so i didnt consider a speedbleeder
-
proper masking will protect your dash but if given the opportunity i would have painted the interior metal of the car with the outside. I would then install the dash before the windshield as it makes the job slightly easier. Stance/Rims/Tires look great by the way
-
You dont mention what model car, this is my early 260 experience. I cant speak to the failure but there is a device inside the blower housing that looks like a set of resistors that control blower speed. Follow the wire back from your blower motor, it should connect to a Y type cable with one end going to the fan switch and one end going to the resistors. the resistor "panel" can be removed from the blower housing for inspection/cleaning. Mine was covered in ancient red antifreeze (most of the passenger side under the dash was) from some sort of tube bursting on a previous owner. I cleaned mine up with electrical cleaner and its worked since. That answers your question, i would still check fuses first.
-
I vote for rebuilding yourself and many of the specialized tools like the ring compressor and cylinder hone are available for rent from most big chain auto parts stores. You need to own your own torque wrench and a micrometer would be nice. I have rebuilt 2 car motors and here are the tips i can give from an experienced amateur: 1. Reduce as many variables as possible. In this situation i would stick with your stock head and treat the conversion as a separate project to be performed on a known running motor. send the head in for a basic inspection/resurface 2. Buy a complete motor gasket kit. You will probably only use 2/3 of it but the kit will save you a ton of money in the long run and you will likely have gaskets you didnt even know you needed 3. Use new head bolts. The old ones are way too old to reuse 4. Put the nuts and bolts back where they came out. Otherwise you end up with a coffee can full of hardware you cant find homes for, or you put a short screw where a long should have gone and then the long screw ends up without a home. If you cant put the hardware back use zip lock baggies with labels 5. Buy nice bearings, you never want to replace them again 6. Use a tap and die set to chase the threads on any rough looking hardware, replace anything that looks too nasty Hot Rod magazine had an article about blueprinting your own motor last month, you should probably pick up that issue and give it a read.http://www.hotrod.com/techarticles/engine/hrdp_1207_short_block_blueprinting_basics/
-
My gremlins were minor but i was able to clean the heck out of those connectors and now they work fine. Disconnect the battery and open each connector, hose them down with electrical contact cleaner and get a wire brush on all metal contacts. After clean put a tiny dab of dielectric grease on each metal connector and reconnect, repeat for each connector. I did this on every connection and the fuse box when i pulled my dash and have had zero gremlins since, i was even able to remove 2 jumpers the PO had installed and revert to the factory harness.
-
On a turbo motor its significantly stronger than a conventional paper/metallic gasket and resists blowing. For a NA motor i cant see any advantages except it might last forever
-
I have the black dragon complete seal kit. Its functional but not great. The door seals are too fat like everyone else says but everything else seems workable. I am going to adjust the doors to see if i can get them to align correctly with the BD weatherstrip. My situation was a complete repaint with 100% new rubber so as a whole buying a complete kit was still worth it despite its shortcomings.
-
If you just told me that your AC clutch wasn't engaging i would say that you didn't have enough refrigerant in the system and your low pressure cutoff switch was disabling the system. You were right to attempt to bypass the cutoff switch for testing ,only leave it engaged for a moment. If after bypassing the pressure switch the clutch doesnt engage you should start by checking voltage at the AC clutch with the switch bypassed. If you have voltage i would assume bad clutch. If you dont have voltage i would move back to the relay and test that. If the relay tests good move back to the AC switch inside the car. you could also go for broke and just fully charge the system, it could just start working without all the diagnostics but you would be betting the value of R12 on that

-
wow. Who wants to do a 1974? Ill send beer and pizza if needed
-
While Leon and Zed are most likely correct I usually try to do repairs in order of Pain In The arse, or PITA factor. In this situation I would bleed the brakes (or change the fluid entirely if its due) first since its little expense in both time and money and good maintenance in general. I would also assume the PO did nothing correctly: you could have a leaky brake fluid hose, a system full of air, or even frogs stuck in there. You don't know at this point so start with the basics. I would bet that by bleeding the system you either fix the problem or learn something new about it
-
Mine is just above and to the side of the heater hoses
-
I did this procedure on a early model 260z but i think your shocks might be the same. The front was pretty easy, just unbolt and remove. The rear.. I had to remove the fuel tank to make enough room to pull them back behind the body.
-
I would assume that your fuel tank is actually under a vacuum, not pressure due to a clogged vent line as you already suspected. No its not normal. It sounds like you already have it figured out but check your vent lines. If the tank was venting properly it wouldn't be possible to create a vacuum or pressurize the tank.
-
Im doing an AC install and need the vacuum controlled actuators for the ventilation box. There's the water ****, door mode actuator and i think one more. I need all of them. Parts from 260 and 280z's should work. Let me know if you have any lying around, the local wrecking yards have been sparse lately.