cgsheen1
Free Member
-
Joined
-
Last visited
Everything posted by cgsheen1
-
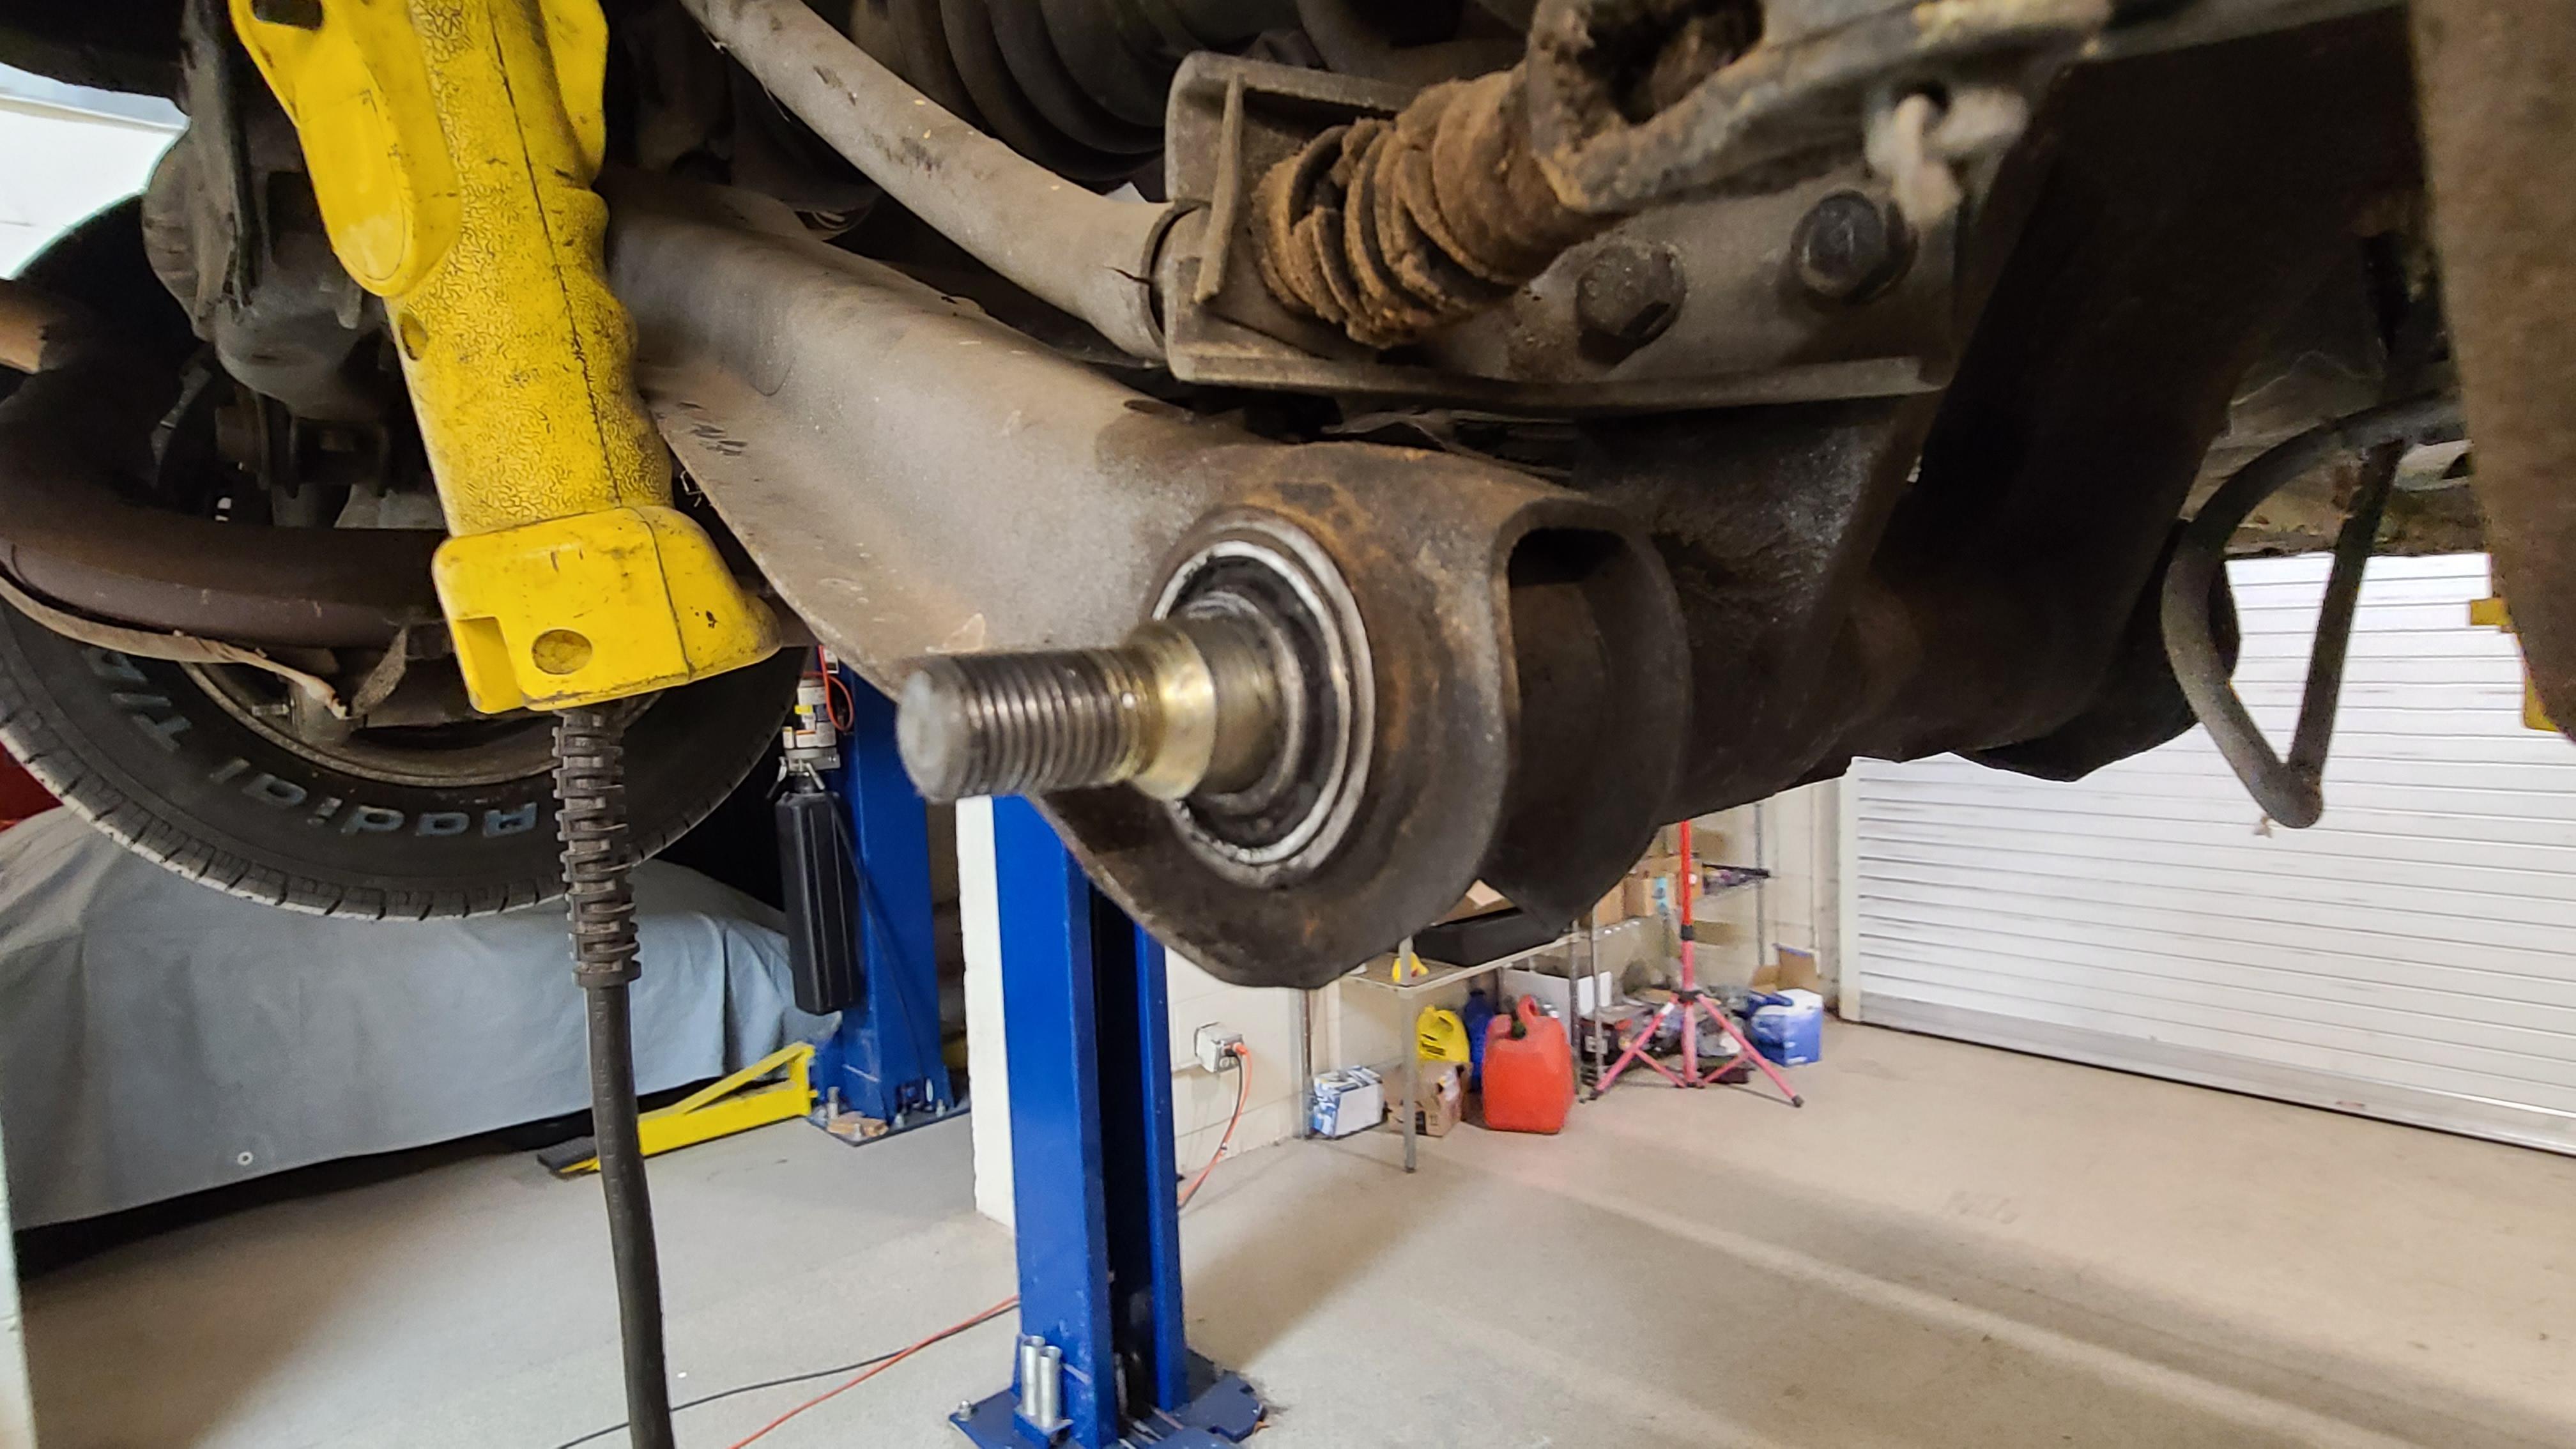
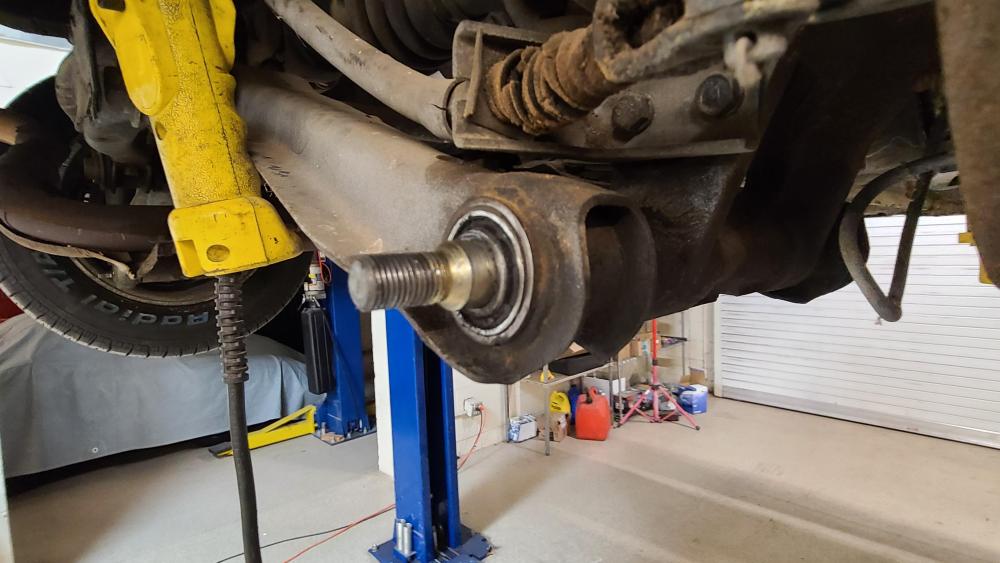
 @zKars & @240260280 Far from my first rodeo. (And, that's as far as I got the pin to move without damaging it - at that point the threads began to give as you can see in the picture. No use going further as they have to be replaced now anyway, so I'll just cut them and press them out.) I guess this is my karma. I did bushings on my 260 before I ever got it back on the road - 12 years ago. My spindle pins pushed right out without much fuss thereby lulling me into a false sense of mechanical superiority... After that I did 8 or 10 pins in the shop that I pulled without destroying them - not all of them easy, but they all came out. I even once or twice bragged about my removal prowess and may have scoffed at those having difficulty. 😏 Then about 4 years ago I had my very first total fail. Couldn't get pins to budge no matter what. Even after I cut those pins up I couldn't get them out of the hub. I had to take them down to the mechanic at the end of our building who had a press beefy enough to push the pins out. This pair will be the third fail since then - so the smirk is definitely off my face. Luckily now I'm in a shop where I have everything I need to cut and press these pins out but it's such a waste, and a royal PITA. Without exception, the pins I've had difficulty with have been mushroomed at the locator notch - and there is no reason for it other than sloppy installation procedure. (Yes, I've seen pins with corrosion that hampered dis-assembly (but this is Arizona, not Maine...) - I can generally get those loose, unless they're also mushroomed.) I'm still gonna look for this guy...
 -
Why... BRAND NEW spindle pin from all appearances - can't get it out. Whomever installed this (these - other side was "replaced" as well): A. OVERTIGHTENED the lock bolt B. A little lubricant would have been nice or maybe some ANTI-SEIZE... Now I'm going to have to saw these once perfectly good spindle pins and press the centers out... I can guarantee you that these pins will be mushroomed in the middle because the installer didn't position the pin properly and OVERTIGHTENED the lock pin! PLEASE stop doing that!! I understand that not everyone knows the value of anti-seize but given the level of frustration the spindle pins usually deliver, it should be used whenever you're replacing them. The center section of the hub should also be checked and cleaned thoroughly before re-installing the spindle pin. If not anti-seize, a good coat of lithium grease should be applied and you should always be able to both move and rotate the pin after it's in place. Try to get the notch in the pin aligned correctly before installing the lock pin. Don't just use the lock pin to bully the spindle pin into position. The spindle pin is relatively soft metal and it's easier than you think to deform it in the notch area. If you overtighten the lock pin it will mushroom the spindle pin on one or both sides of the notch and even with anti-seize, you'll have trouble removing it. There is NO reason to tighten the lock pin like most people seem to do. (For me, this is like the 99% overtightened fill and drain plugs on transmissions!). If you've aligned the spindle pin correctly you can push the lock pin in with your finger and just SNUG the nut on the bottom. THEN follow the FSM instructions and torque specs for the spindle pin nuts. DON'T torque the hell out of one side - especially without snugging up the nut on the other! If you do, you'll drag the spindle pin back tight to the lock pin and... MUSHROOM the spindle! Evenly cinch up the two opposing nuts on the spindle until you get them into proper torque range and finish up with your torque wrench (NOT an impact wrench...). If I ever find the guy that installed these, I'll kick him in the nuts. <end rant> <for now...>
-
I installed a similar inertia switch in Cole Markham's 240Z when I added an electric fuel pump and wondered the same thing. We went over lots of bumps, braked hard, swerved hard - did everything but crash - and it didn't cause the inertia switch to break the circuit. I think there has to be a certain amount of energy transferred through the frame to the switch to pop it. (it's deceptively easy to make it break circuit when it's in your hand though, right?)
-
Dude... You painted your rubber vent air duct... The next guy that's sticks his head up under your dash is gonna see that. What the heck...
-
Let me chime in on the transmission FILL and DRAIN plugs... (begin rant) I have no clue why people tighten these SO TIGHTLY! It's un-necessary. In my former life I was a licensed Journeyman Plumber (Ret.). Actually, I guess I still am a licensed Journeyman Plumber - just not employed as such... What in the crap does this have to do with transmissions you ask?? THOSE PLUGS ARE PIPE FITTINGS (well, they have pipe threads...) So, now that you know that I am eminently qualified to speak on the subject: - Go the Home Depot. Plumbing Department. BUY an entire roll of TEFLON TAPE. - Go home. Properly apply (ya, just wrap that sucker up with tape) the teflon tape following the manufacturers directions to the male threads of BOTH PLUGS - BEFORE you install them. - Tighten the plugs (BOTH PLUGS) ONLY ENOUGH so that they don't leak! There is NO pressure inside the transmission (like there is in your Natural Gas line or your galvanized water pipe) SO THE PLUG DOESN'T NEED 80 FT/LBS OF TORQUE. Seriously, you can practically screw them in by hand if you use teflon tape or good pipe dope (just kidding (exaggerating really) you need to snug them up.) But you really, really can stop over tightening those plugs. How do I know? Come and remove these plugs from MY transmission. Be a plumber - even if you don't want to - for me... (end rant);
-
I actually had once where the engine slipped right into the transmission without much fuss. It's the 12 other times (slow learner) that finally made me: A. Always pull the ENGINE AND TRANSMISSION as a unit. B. ALWAYS reinstall the ENGINE AND TRANSMISSION as a unit. We exclusively use the "Raise The Rear End method" when we re-install. Someone told me once to cut the heads off four head blots and round the ends. Screw them into the block. Now the engine has GUIDES to make a perfect re-alignment into the transmission. He SWORE by it. I SWORE while doing it because it didn't help me at all (I'm obviously not as skilled - it seemed like the perfect method) The one interesting thing about the L-series when installing an engine (where the transmission is still in place) is it's "lean" to the left. If you can't get that lean right (I mean correct - and I'm not talking politics here) it's more difficult to mate them.
-
Mostly, but with most metallics and pearls it's the entire package - sealer, base (mid coats), and clear. Usually the only coat that you can't see through is the sealer. (Don't believe? Seal a panel with a dark sealer, paint another panel with a light sealer, spray the base coat exactly the same on both panels, spray clear coat exactly the same on both panels. Then look. Under certain colors dark sealer really adds depth or character to the tone of the paint because of the contrast that it adds.) I'm not a painter - but I work with one.
-
Awesome, that's looking great! Wait until you pull it out into the sun - you'll be astounded.
-
To my eye, the touch-up color is the wrong tone. And, when you're spraying metallics you need to be very consistent with the base coat. Even though you think paint is "a solid color", it's really not and you can actually see though it. That's why shooting 304 over light gray will look different than shot over dark gray. Also if you shot 2 coats of base over one panel and 3 coats over another panel, they will not match - totally different colors with the same paint. Solid colors don't care so much as long as you get coverage, but metallics do (also with the direction you shoot and how the Metallic flops). When Greg does metallic base he shoots a consistent number of coats to get coverage and the usually a "dust" coat (light even coat with the gun pulled back farther from the surface) to make sure everything looks even. I think you need a little experience to pull that off. Me, I stick to the metal and body work... (BTW, I have always REALLY liked how the paint turned out on my 260Z - it's an awesome color and it looks even better in the sun! My son does a great job and I really like the mix we get from Sherwin Williams Automotive.)
-
Yup, a 280ZX gear reduction starter is the way to go.
-
I use a Fuelab 515 series adjustable FPR with a Pallnet type fuel rail. I can run it with or without a return from the fuel rail. Pretty sure it's lower range is below 30PSI (25PSI sticks in my mind) - up to 90PSI. I currently run 3 bar on my 310cc injectors.
-
What he said. It's a drag but it's the best way.
-
-
Injectors open for milliseconds at a time so wire resistance, oxidation, and/or corrosion in wiring and connectors can have an impact. Follow Zed Head's suggestion, and also double check wiring and connectors - including the "dropping resistor pack" under the left side inspection lid.
-
It's ABS plastic and black ABS cement would have been useful if you hadn't tried superglue first (now that there's superglue on the surfaces the ABS cement would be useless(ABS cement actually creates a weld joint by dissolving the mating surfaces and fusing them together)). But ABS cement wouldn't hold a "butt joint" like that together permanently (unless it had absolutely NO strain ever). It would need a sleeve over the affected area to make a more permanent repair. I'd have to agree with the above mentioned solution(s) if you're not going to completely replace the handle assembly... This should also be a cautionary tale for the rest of us not to put undue pressure on the end of the handle near the release button. And to protect that old plastic from the ravages of time, heat, and sun. If/When that happens to mine, I'll find or craft a slim ABS tube/sleeve an inch or so long that can be glued over the seam of the break. I've been thinking about covering mine with black heat shrink for some time - as it's starting to show some degradation (and, Arizona). I'm definitely doing that asap after seeing this.
-
Oh, SO many detailed threads, but if you haven't changed the engine position at all, you should just be able to stick it back on and bolt it down.
-
Ouch...
-
Transmission difference is irrelevant as the speedometer pinion is taken off the output shaft in every instance. Because of that the only variables are tire circumference and differential ratio. Nissan builds speedometer pinion gears with different tooth numbers to use with different differential gear ratios (because they are assuming you stick close to the stock tire size). I'm dyslexic when it comes to which gear count to use - I don't know if you should go "up a tooth" or "down a tooth" - but some here will know as they're lots smarter than I am. There are many discussions on speedometer pinion gears you can also refer to. IIRC the the 3.54 differential uses a black pinion gear - that would be stock in a manual trans 280Z.
-
But isn't the Z the most excellent automobile from which to siphon gas? There's hardly another that gives you such quick and trouble-free access! (As a side note - I have to emissions check my 260Z every year here in the Phoenix area. The twits at the emissions station have NO WAY to check my gas cap. I love seeing them take it off, scratch their heads, shrug their shoulders, put it back on, and PASS the gas cap because they can't test it! You have to take joy in life where you can find it...)
-
Damn, I have a '77 in the shop right now and I completely forgot to look how it's condenser is wired this morning... I'll look tomorrow. We don't actually have many lates (77-78) in the Phoenix area. Lot's of 75-76 and that's what I'm used to - but they changed a lot of stuff in the lates... I looked at the FSM, it doesn't help much with this particular issue - just the pic similar to what EuroDat posted above. But, having or not having that condenser wired has nothing to do with engine running, speedometer working, It's job is to cut electrical noise that may be picked up by the radio for the most part.
-
But do you have a 1973 4-speed transmission? Some of the Z transmissions have a neutral switch, some don't. The years that do have two sets of two-wire connectors down the firewall into the trans tunnel in the stock harness configuration. One for the reverse light, one for the neutral switch. The neutral switch screws into the side of the transmission just like the reverse light switch. I can't remember if they both have bullet connectors or if one has bullet and the other spade. Probably the latter - even back then Nissan was trying to make it easier "not to plug the wrong things together".
-
It connects to a spade on the distributor. That particular condenser is to help eliminate electrical noise from the ignition process - coil and distributor. (There's another one on the Alternator.) There should be about three or more other wires running from the area of the coil to the distributor area. they have to do with the electronic ignition and a yellow wire to the temperature sender for the coolant gauge in the cockpit. It would normally be bundled with those wires. I don't have the Factory Service Manual right at my fingertips ATM, but it's a good reference - you should download it.
-
I this picture, you're holding the GROUND WIRE. (please don't try to connect it to the ballast in any way!) Notice that the wire on the other side of the condenser is BLUE and connected to a Black/Blue wire coming out of the harness. NOTE: Nissan used BLACK wires WITH STRIPES for voltage! (Black/White B/W) = Battery voltage at IGN ON in all cases, Black/Yellow (BY) = Start Signal (battery voltage to starter solenoid) + bypass voltage to certain things at START, also Black/Blue (BL) and Black/Red (BR). None of these are grounds!) Judging by the length of the black wire you are holding, that may go to a spade on the distributor. I would put a new female spade on the end of that wire personally. (Edit: In the shop, I use Meguiars Hyper Dressing - which is an excellent cleaner and protectant (for all things vinyl, plastic, and rubber (and PVC wire insulation)) - to clean and rejuvenate exposed wiring coming out of the harness. Makes the harness look nice too. But the point would be to clean the wire so it's very easy to tell color and/or stripe.)
-
Ya, look at 110 - fades to orange when the original color was much more red. It's exaggerated here by the Arizona sun and people here with 110 think they have ORANGE cars. They think they want a part shot the original color until I show them what the original color actually is under a marker light - where they can see how it's changed over the years.
-
Don't discount different paint suppliers. We use a few different suppliers and they don't all come out "the same". With some suppliers the color will differ within their own paint lines - the lower cost lines especially do not match what you will get with their premium lines - which is understandable (PPG especially). Most red pigments are pretty cheap but yellows can be very expensive. We have a couple of Z's in town that have been resprayed 918 - they look nothing alike. And, to my mind, they look very little like the original alkyd enamel.