Threehz
Free Member
-
Joined
-
Last visited
Everything posted by Threehz
-
 I thought it was related to the EGR, but had trouble finding any information on the actual pipe piece. Will deleting it cause any performance changes? Thanks for the quick help guys!
 -
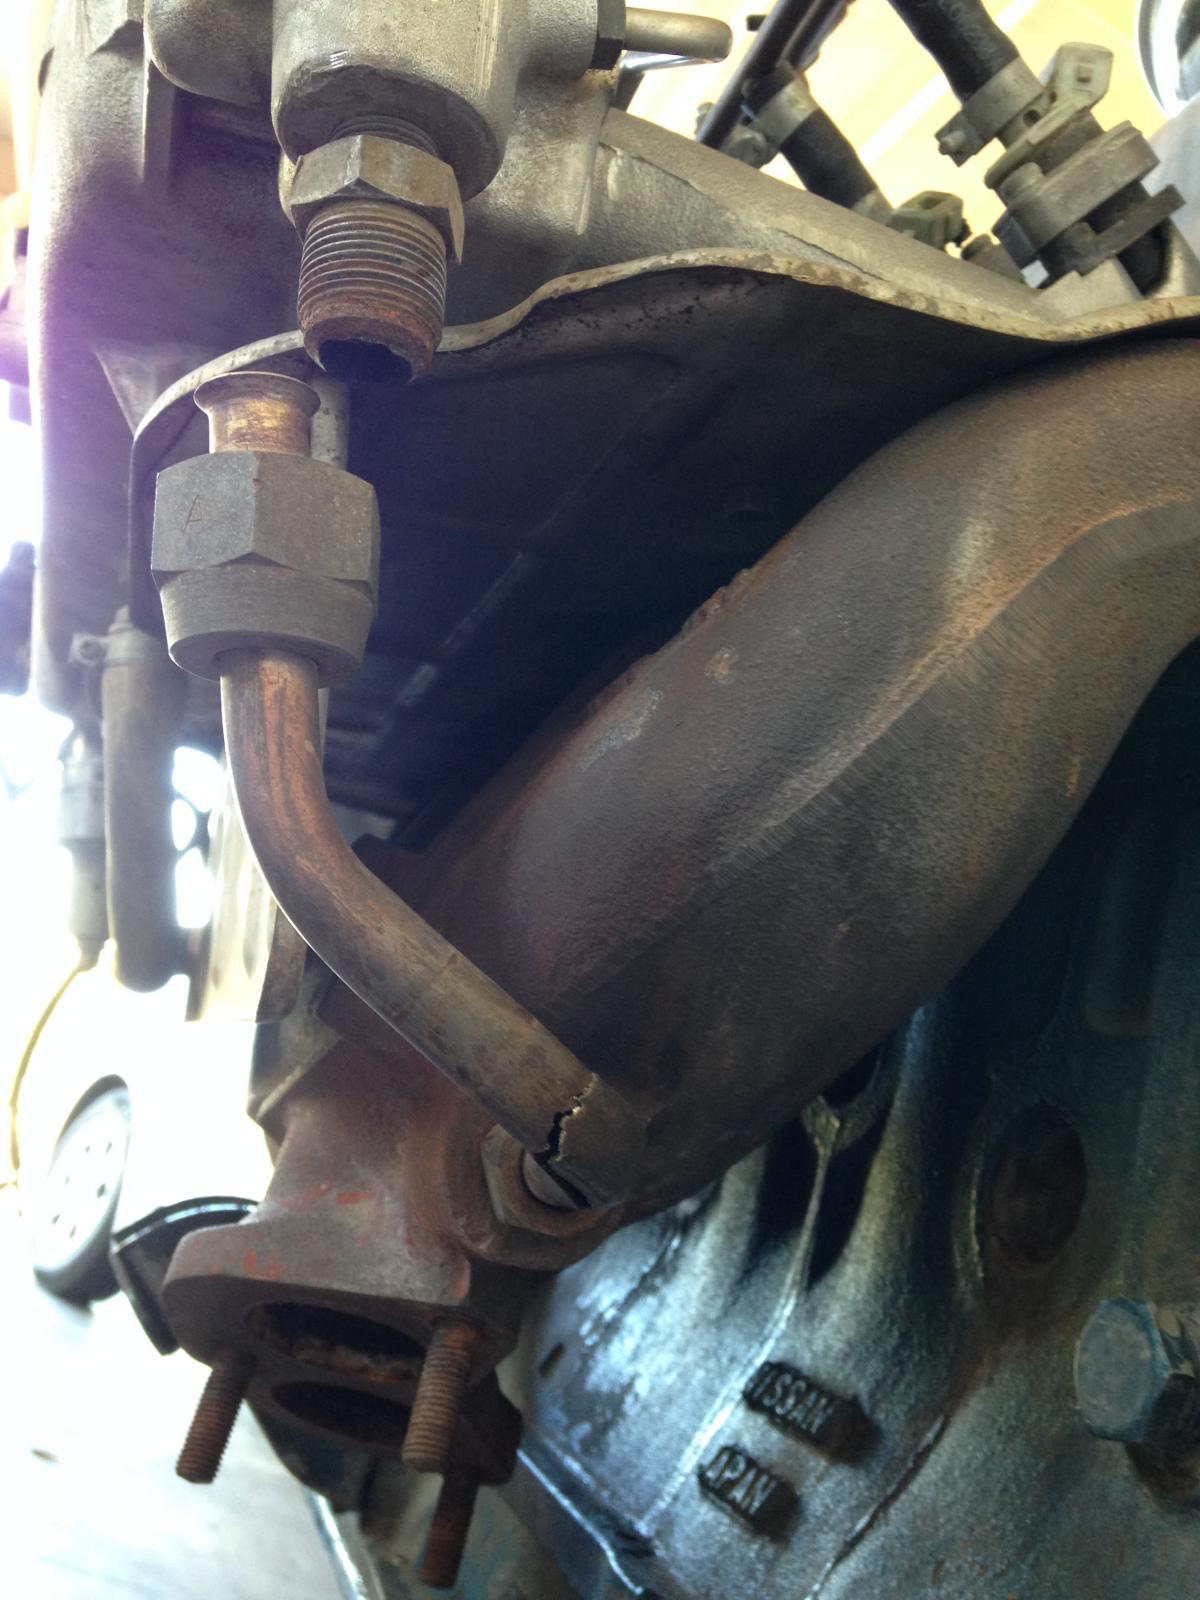
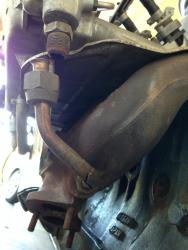
Attempting to reconnect this pipe from exhaust mani to intake mani and I cracked it thinking I could just turn it a little to re-align it. Can I easily (cheaply) replace this, can I weld it, what's the deal with this pipe?
-
You made my day! Knuckle is still busted up from wrestling that coupler...
-
Just got my front suspension all back on and finally got the steering coupler and rod to steering rack to mate up. But, to my disappointment I discovered that the steering wheel is a quarter turn or so off center now. My question is, can I simply unbolt the steering wheel and correct it there? Or is the steering wheel centered with the column requiring me to reconnect the steering coupler correctly? Thanks.
-
Well I got down there tonight and removed the nuts and other hardware from the passenger side, and the bushings actually look perfect. All the spindle pin hardware looks really nice and shiny and rust free, but I've decided I'm not even going to bother. Just doing springs and struts and leaving all the rear end bushings alone for now. I gave the pin a light pull just to test, not that easy, but it appears they won't be the worst ones around.
-
Well, then let's just get into it and see how things look. It's at least exciting to throw the front suspension back on today!
-
Just finishing my front suspension and now moving to the rear. Going to put in new poly bushings, springs, and struts. If I drop the entire rear suspension can I avoid doing the spindle pins? Thanks!
-
Thank you all for the good advice. One of my big fears is opening it up and finding a mess. This isn't a problem in the long-run, but I don't want to have to move with the engine half torn down. Even if I were to open it up and things looked good, I would still want to do some work while I'm there. Anyhow, choosing to clean her up and throw her back in, and see what she thinks after an 11-year nap. Worst case I pull the engine and rebuild post-move.
-
I'm thinking about digging into my engine, but I will be moving soon and don't want to get into a sticky situation. Can anyone chime in on the time it takes to do the jobs listed below? I know times vary significantly between people and engine, but any estimates are appreciated. Engine is out of car on a stand with exhaust and intake manifolds removed. I want to know how long it may take to 1. remove the head and check it and the pistons/rings 2. re-ring the pistons 3. rebuild the head 4. refresh timing components 5. full rebuild. Thank you!
-
Is there an easy way to do that without connecting the starter up to the regular wiring? For instance, could I just connect the starter up to a 12V battery?
-
Yep, put a break bar on that big bolt and cranked her until pressure stopped building. I've looked up her skirt and down her shirt (oil pan and valve cover) and the internals look great for an engine with 177K. Nothing looked odd or out of place or overly worn to my admittedly novice eyes. I can say that the first two cylinders took a good amount of strength to push through, the middle two were pretty easy until I squirted fresh oil in, and the last two took all of my might. I believe the engine is stock, never rebuilt, but I don't know for sure. The high readings on the last two cylinders are probably from being recently oiled.
-
Finally got around to compression testing my engine. Did the compression test manually (engine is out of car on stand). Squirted some gear oil in the spark plugs holes a few days ago. Here are the results: 1 - 125 > 90 2 - 132 > 90 3 - 10 > 30 > 125 (squirted oil in) 4 - 67 > 65 > 150 (squirted oil in) 5 - 215 6 - 210 The > sign just means I redid the test on that cylinder. Anyways, it doesn't look good. My friend says that the improvement after adding oil means it's likely the rings, pistons, or block and not the valves or head that has an issue. Makes sense to me. Car had sat 8 years when I got her, engine has been out another 3 years since then. I was planning to have everything put back together in the next month or so and see if I can get her to start. Where should I go from here? Tear into the engine while it's out? Put it back in and see if I can loosen stuck rings?
-
What are the best ways to maximize the value of a Z car? I feel like the most valuable Z cars are those in concours condition, or extremely clean, unmodified cars. So in restoring my own Z, I've been careful to keep every single original part and the modifications I'm performing are reversible and tasteful (in my opinion of course). So, what type of modifications do the least to hurt the value of a Z, or maybe even increase the value? For instance, I'm upgrading springs (Eibachs), shocks (Tokico HP), and bushings (urethane kit). I would think on a super low mileage beauty these upgrades may actually hurt value slightly, but on my 177k '77 I imagine these can only make it more appealing than the 10 to 37 year old parts she had. Thanks, Kai
-
Well, it appears that site does have them, but they are pretty much the same price as MSA. Good to know about another Z suspension supplier though.
-
I agree, don't sticky this thread, but make a thread with some frequently asked/highly valuable information stickied.
-
Thank you very much John and you as well Zed. Saved me a good deal of money, bringing the Z back to life quicker!
-
Well this all makes perfect sense, I mean it's just a cartridge. The images for both the 3013 and 3012 are identical everywhere I can find them, and the 3038 is about the same as well. I ended up ordering the last two 3013's available on Amazon just in case last night. I'm just going to call Tokico's LA office and see if they can verify if this is all correct. If so, thanks a bunch, saved me a good chunk of change! And, the Z is one step closer to resurrection!
-
The spacer is the metal tube on the bottom (side without the screw)? And, you're saying I can just get two more rears and knock the spacers off and have fronts?
-
Hey fellas, Does anyone know where to find Tokico HP/Blues other than MSA (and cheaper)? I scored the rears on Amazon for quite a bit cheaper than MSA, but I can't find the fronts anywhere. Thanks!
-
Thanks for the great idea, that definitely seems like the best way to do it!
-
Engine is out, bay is pretty naked, fenders off, and I'm pre-repaint. I have the urethane bushing kit and plan on getting Eibach lowering springs and Tokico Blues. What bushings should I install before repainting the bay and putting everything back in? And, would it make the job considerably easier to do struts/springs while the engine is out as well? Thanks, Kai
-
So I should be disconnecting the engine harness from the driver side then? I'll go check it out, thanks!
-
So I'm pulling my wiring harness before I respray the engine bay, and on the passenger's side where I'm disconnecting everything, I've run into a small problem. The passenger's side of the dash has three plugs that match with their corresponding plugs which are mounted to a big white plastic piece near the firewall on the inside of the car. Is there any proper/easy way to get these plugs out of the plastic piece? It appears they must be removed to pull the harness out, but it looks like they are clipped in on every side. As far as I can tell I'm going to be breaking a lot of tiny plastic pieces and possibly damaging them trying to get them out. Just want to make sure I'm not missing something obvious. Thanks.
-
r134a full kit, 941$ new http://www.zcarsource.com/air-conditioning-kit-74-78-r-134-new_8_52904_197295.html R-12 full kit, 650$ new http://www.zcarsource.com/air-conditioning-kit-74-78-new_8_52904_66286.html But both of those are WAY too overpriced... I don't know why you guys are seeing this as such an expensive upgrade? If it was going to cost between 500-1000$ I wouldn't do it right now. For my 1991 BMW 3-series, it was less than 300$ for a full conversion to r134a, and that's with brand new OEM BMW parts. (Including condenser, dryer-receiver, evaporator, expansion valve, pressure switch, around 64 o-rings, and the PAG oil) Wade, You did make me think of something important. You said, "If you've got debris, metal or otherwise floating around your system, let it destroy your OLD compressor or clog your OLD expansion valve, not a nice new one." Flushing any re-used components (evaporator & compressor are the only ones that can be re-used, and evap should be replaced) is necessary. There are special R-12 flushing compounds, however when used properly, mineral spirits will work perfectly. This is just as important as having a vacuum pulled and having the r134a charge done professionally or by someone with the correct tools (Wade in the original article you linked, you explained this pretty thoroughly as well). Now the kit above from ZCarSource is great, but the compressor is a big reason why it's so overpriced. I believe some self R&R on an original compressor will make just as good (seeing as that's what it appears they did). That kit is also missing an auxiliary fan mounted in-front of the condenser (as ZCurves mentioned). These can be found pretty cheap new online in a range of CFMs, not to mention junkyards offer a great solution as well. Thanks for all the great feedback guys, I really would like to make it easier in the future for others to do AC conversions/installs, and my Z happens to be in the perfect state to use as a guinea pig. I'll try and source some of these parts soon (I've been totally bogged down with work and life recently)
-
Wade, I know that refilling an R-12 system with r134a will work, but it is not a proper solution. The main problems being you will have greatly reduced efficiency, and eventually the system will fail prematurely (from everything I've read). Carl, You mentioned that r134a is just as efficient as R-12 in a proper system, that is my entire reason for this thread. Many people believe r134a is not as efficient as R-12. This is mostly due to improper conversions. I'll definitely look into more info on those conversion kits you mentioned. I also totally agree, part of my write-up when I figure this conversion out will include of course replacing all o-rings and hoses (if needed) to bring the system up to working order. ZCurves, You know exactly what I'm talking about, thank you for all the great information! I'll get in touch with you soon about some specifics concerning parts. As for the PAG oil going 50% in the compressor, I found that a great way to do it is by putting a little bit of oil in each component (2oz in condenser, 2oz in evaporator, etc, and the rest in compressor). Thanks for the tip about the heater core, but I literally just took the old one out, and I'm R&R'ing it's other components before I put the new one in. Right now I mainly am looking for item specific input. If anyone knows any r134a components that work in our Z's, please share! That will be the only real hard part. (I'll be researching it as well) Thanks guys!