Captain Obvious
Free Member
-
Joined
-
Last visited
Everything posted by Captain Obvious
-
 Good eyes! Yeah, that's a really good catch! Grab all those D hubcaps you can find!! There might be more up in that car. Just don't get hurt in the process! And watch for snakes!!
 -
Haha! I only mentioned the metal spinning in an attempt to guide you towards that 3 week boondoggle. The forming operation you're currently doing could probably also be done using a metal spinning technique. "It's not the size of the tool, it's how you use it." About the Greenlee punch... All the ones I have require a pilot hole (which has given you difficulties).
-
John, The original struts were not "inserts". They were shafts and rubber seals and valves, etc that actually rode against the inside of the tubes bathed in oil that you will pour out. So if what you're removing are self contained units with the shaft and outer shell and all the oil contained within, then they're not original. The original non-insert styles have already been gutted and replaced with inserts.
-
I certainly don't think that spindly little loosely mounted steel tube will have enough strength to affect how the head itself reacts. It's mounted on squishy cork gaskets and will just squirm on those if necessary. The head will expand more (get longer) proportionally than the bar, so if anything, the bar be in tension when hot with the end bolts pulling against eachother. I'm expecting there's enough slop in the mounting bolt holes such that they won't "run out of clearance" and cause any significant force. However, if the mounting bolts are a precision fit on the bolts when cold, it'll be in tension when hot. Not enough to rip it in half, but tension none-the-less. Note to the manufacturer of that bar if they're reading this thread.... Make the end holes oversized some so that doesn't happen. Do some calculations and slot them if necessary. This looks like a one-off at this point, but I suspect it's a "toe in the water" test to see if there's more demand. The pics show this thing in a home hobby workshop on with home hobby machines. My read is this is a Z enthusiast who's original bar failed (like they all do) and he made two of them. One for his own car, and a second part to see if it would sell. If it sells for a good enough price, I bet he'll make more.
-
As you said, all of this is probably moot, but thought I have some comments. First, the shunt diodes are in the correct place. You're trying to squelch the flyback kick from the relay coil. The relay contacts are on the secondary side and have absolutely nothing to do with that. Many relay manufacturers include diodes inside the relays already (in the correct circuit location), and that's what it looks like the OP was planning to use. Second, the original 10A fuses each powered just one headlight side. But in this new scheme, each 20 fuse powers BOTH sides at the same time. Not getting into whether it's completely appropriate or not, doing the math simply doubles up the original fuse size from 10A to 20A. You did the math and came up with 4A for each bulb... I wouldn't want to run 8A continuous (from both sides at the same time) through a 10A fuse. Lastly. the connection to the high beam indicator is fine. The HB indicator bulb is in parallel with the relay, not series. They both get "drug to ground" through the switch. OK... I'm back into my hole now. Haha!!
-
Again, nice work! You can tell by looking at the stock washer that the OEM was doing it a little differently. You can see the shear line on the outside perimeter showing that they started with a round blank before the drawing operation. They probably stamped out the round blank OD and ID and then used a second stage die to draw the round blank into the cup shape. Someone more clever than I might even been able to do it all with just one die. So now that you have spent all that time on making a die set... Have you ever heard of "metal spinning" on a lathe?
-
It is my belief that differential expansion is what caused the failures of a lot of the original bars. This one would suffer the same stresses, but since it's one piece, I suspect it'll just squirm on the mounting holes and survive. If anything, it'll just leak some at the joints between the gasket and the cam towers. One would hope that even if it seeps a little at those joints, the path of least resistance would still encourage the majority of the oil to make it all the way to the holes. I haven't tested any of this, but that's my read. Haha!
-
@AK260, you had posted a pic earlier showing the timing you're using with your 123 device... The button at the bottom right of the screen "Edit centrifugal curve" indicates that this is what you're running for your mechanical advance. Is that correct? That pic looks much closer to what I posted above than the original stock configuration. Is this just mechanical, or is this mechanical plus vacuum? :
-
Thanks again for the input. I appreciate the discussion (which is clearly academic in nature). You said above "the speed of combustion is reasonably constant." If that's the case, then the same amount of time after a spark would develop the same pressure at the same rate regardless of the rotational speed of the engine. That's the whole point we both made above (and it's the theory behind adding centrip advance at all in the first place). I'm saying don't think degrees. Think TIME. The problem is that "degrees" changes with rotational speed. Time does not. If the burn takes 1.3 milliseconds to develop optimum pressure at 1000 RPM, wouldn't it take 1.3 milliseconds at 2000 RPM as well? And 3000 RPM? And 6000 RPM? Why would the burn occur faster at 6000 RPM that would necessitate backing off the advance* at that speed? If the burn rate is constant (in TIME), then shouldn't it be the same regardless of RPM? In other words, the fuel mixture doesn't know or care what the engine RPM is. All it knows is at what TIME it was lit off. If it burns at a constant rate you should adjust the light off to the same TIME regardless of how fast you're approaching TDC. * I say "backing off" because the speed goes up, but the amount of advance does not. It's like volunteering because everyone else in the line steps back. Just a different point of reference.
-
Looks like someone didn't want to spring for cost of the aluminum extrusion that the other guy uses to make these. Has the same "issue" though. The holes are further from the cam than the stock bar. Might matter, might not. Probably depends on how healthy your oil pressure is.
-
Mine too! Thanks for that! Haha!!
-
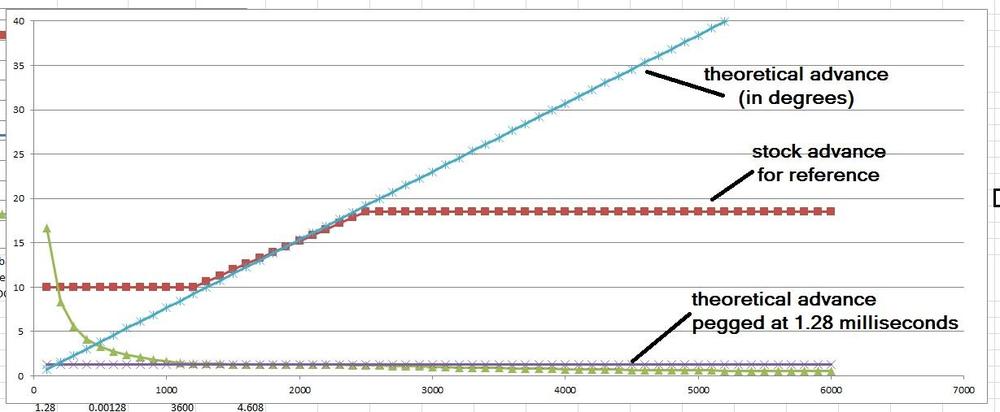
And just because everyone likes pictures... Here's what the timing would look like if you just hard peg the advance at 1.28 milliseconds BTDC. I tried to model the extended curve using the stock slope as a guideline and that's what I came up with. Mechanical only (no vacuum):
-
Using mostly jonbills words (since they were so beauteous)... Since the speed of combustion is pretty much constant, why would there be an upper limit to the mechanical advance? In other words,... Why did Nissan stop advancing the mechanical timing at 2500 RPM? Why not keep advancing the timing mechanically all the way to redline? At first blush, there's no (mathematical) reason to stop. The simple math is the "first order" effect. But things like volumetric efficiency isn't simply math.
-
Yes. That's exactly the question. And thanks for the input into potential answers. I get the need for the advance simply because the engine is spinning faster. That's the easy "first order" part. The more difficult part is "Why is it all in at 2500? Would it be better if it went further?" I guess I'm looking for the second order kind of effect, right? And thanks for that input as well. That website is a good read, but unfortunately, not much info to answer the question about "why did they stop". About the only part that pertains to that question is the table of "Establishing maximum advance requirement" - "Notwithstanding the compression ratio and other factors, the characteristic that determines the maximum advance setting is the shape of the combustion chamber and the position of the spark plug." So it seems that the VE could be a factor. That's one of those "second order effects" I was talking about.
-
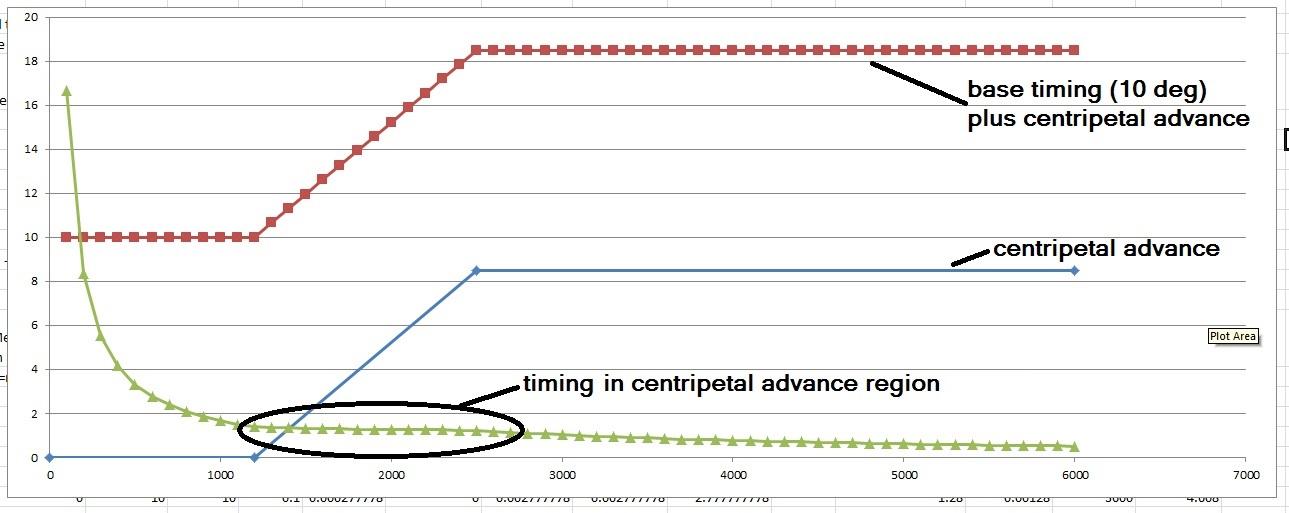
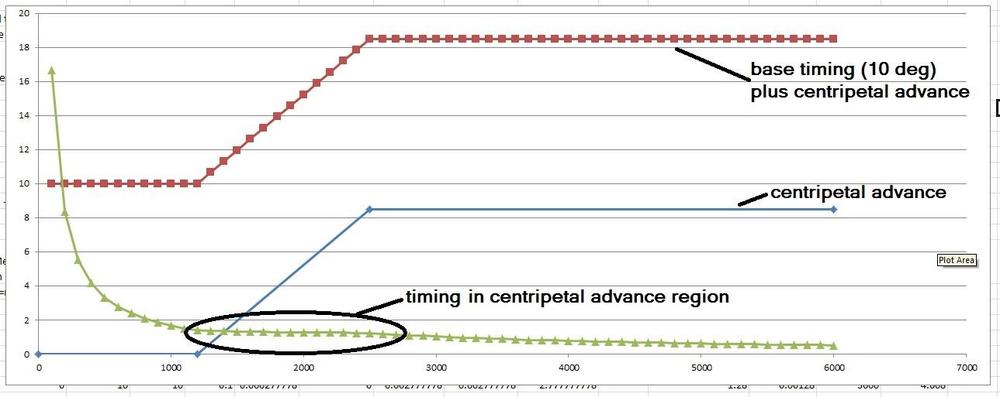
So the recent chatter about timing and distributers has me thinking. The stock distributors include a mechanical (centripetal) advance function and the spec varied some over the years, but as an example here's the spec for 77: 0 degrees at 600 distributor RPM (1200 RPM at the crank) 8.5 degrees at 1250 distributor RPM (2500 crank) There should be no mechanical advance below 1200 RPM, then start ramping up to a max of 8.5 degrees by the time you reach 2500 RPM. Once above 2500 RPM the mechanical advance is topped out and holds at 8.5 degrees all the way up to redline. Specs like this are given in degrees because that's what can be measured and that's what you can see with a timing light. But if you convert the timing specs from the angular domain (degrees) over to the time domain (seconds), it looks like this: At 1200 RPM, the engine is spinning at 20 rotations per second. At 20 rotations per second, each rotation takes 50 milliseconds. If each rotation takes 50 milliseconds, each degree of rotation (out of 360) takes 139 microseconds. So at 1200 RPM, the 10 degrees of base advance provide about 1.4 ms of advance. Doing similar math, if the engine is spinning at 2500 RPM, then each degree of rotation takes 67 microseconds. The 18.5 degrees of advance (10 base + 8.5 centripetal) provides about 1.23 ms. If you go through all the math and plot the results, you come up with something like the following. Notice that the advance value where the centripetal advance is active is relatively flat, but then the advance falls off above that once the mechanical advance has topped out: Studying the numbers, I come up with a relatively constant average of about 1.2- 1.4 milliseconds of advance in the centripetal advance region. So my question is.... Why didn't they continue to advance the centripetal timing above 2500 RPM? Is that just a limitation of the mechanical functioning of the distributor? They just couldn't get the springs, weights, slots, etc to swing a wider range all the way up to redline? Isn't necessary for some reason? Or wished they could have, but just couldn't come up with a cheap enough way to do it?
-
Exactly. You would only need to replace the lower bushing if it's worn. You could hopefully size an upper sleeve such that you could reuse the upper bushing if it was salvageable by reaming. That's why I was thinking that would be a better plan. Less time on the lathe and less risk of introducing concentricity error into the original shaft. Don't run the risk of screwing up the oil distribution spiral groove in the shaft, etc. LOL. So maybe I should go into the distributor rebuilding business? Haha!!
-
Here's what I bought: https://www.ebay.com/itm/25-M8-1-25-Flange-Exhaust-LockNut-Copper-Plated-12mm-Hex/400360273199?hash=item5d3754f52f:g:HJQAAOSwLwBafPRS Copper plated, distorted thread, and they have a force spreading flange on them so you don't need a washer (just like stock). I bought a bag of 25 because I needed them for the broken cam motor and I should have enough left over for my F54/P79 project.
-
I'm sure there are full solid copper nuts available, but most of the ones you'll find are actually copper plated steel nuts. They use the copper plating as an anti-corrosion, anti-sieze coating to prevent the nuts from rusting to the studs. I would recommend using them. They're good stuff. You can also get them in prevailing torque (distorted thread) so you can skip the lock washers and they won't come loose from the vibration and/or changes in temperature. As for the stud portion, I used stainless because that's what my PO had installed there. Just never ever never use stainless on stainless. It's a very hall gall risk unless you know exactly what you're doing.
-
Ha! That's it! Hold it right there! Pronoun trouble... I get it now. It's like helping your Uncle Jack off a horse.
-
Yup. Something just like that. And the plastic part on the bottom should be pretty easy as well. (Says me who's never messed with it!) Haha!!
-
Oh, and BTW, I wouldn't do it that way. I would press (or pin or silver solder or glue or loctite sleeve retainer or something) a 25mm long (or so) cylindrical piece of tubing onto the shaft up where the original bushing wore. Then I would machine that pressed on piece concentric to the shaft leaving it a little larger than the original diameter of the shaft. Then I would ream the upper bushing to fit the larger diameter. Looks like there's plenty of meat in the oilite bushing to make the hole a little larger than stock. That way I wouldn't have to cut the whole shaft down, just the top portion. So what if the holes in the two bushings aren't the same size. Shouldn't matter, right? Of course, never having done it... It's all speculation that plan would work. That shaft goes in from the top, right? Haha!!
-
That's an interesting idea. I bet I could do something with that. Is that where they usually wear? At the top bushing?
-
Yeah, that's really odd. To spend all that time making things flow all nice and smooth and curvy, only to put that huge protuberance thing on the front. Doesn't make any sense to me at all.
-
Body work is about my least familiar areas of expertise, but I was under the impression that anything "silicone" anywhere NEAR bodywork was a really really really bad idea. Big fish-eye risk? Am I overblowing the risk because I don't know what I'm talking about?
-
Send picture of boat and motor.