


Captain Obvious
Free Member
-
Joined
-
Last visited
Everything posted by Captain Obvious
-
 Yup! I Got it! Haha!! So not that it really matters, but that's an AF (Audio Frequency) amp, not an op-amp. Good luck with the repairs. I paid my way through a couple years of college fixing audio-visual equipment. One of the things I learned is that 95% of all failures are blown output stages. Even if the problem does not appear to be a blown output, it might be anyway.
 -
Snorkel.
-
When I'm using sealer, I almost always use a syringe to put it down. I've found that less is way better than more. Without getting into whether you should have used it at all (or not) on a head gasket, I think you used way too much. @Locke Glad to hear you're starting over. I'm needing a head gasket sets for my upcoming projects. What was the Stone number on that gasket set?
-
Yeah, I can't figure out what to make of this car. Strange mix of what looks completely new and other stuff that just doesn't look quite right. That's why I'm looking forward to a copious number of high quality pics.
-
Uhhhh.... That might make sense to someone, but I'm not one of them. Out of curiosity, do you have a datasheet for that part?
-
What he said. @Mike, The above post is setting off my spambot alarm.
-
@Mike, The above post is making my spambot sense is ringing loudly... Five posts to date, all of them are nonsense....
-
Three lids! One. Two. Three. Haha!!!
-
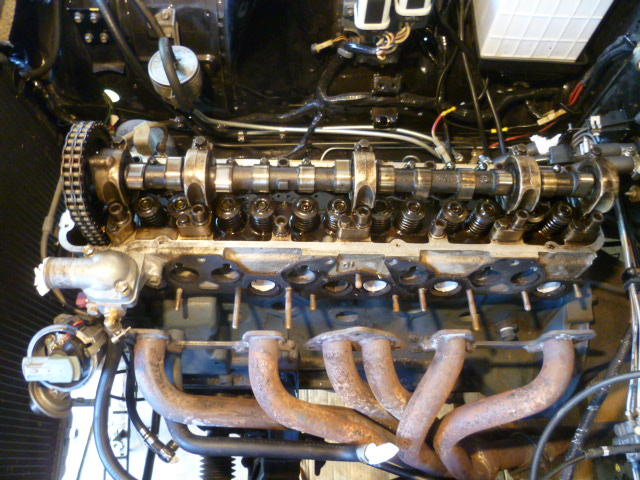
So my valves were indeed AFU. Based on the wear patterns, they were all mixed up, and most of them were not sealing properly. One of the exhausts (4E) was even bent a little and not sealing for squat!. And I can tell by looking at the wear patterns and carbon traces that it's been like that for quite some time. Probably since my PO messed with it. It definitely did NOT just happened when the cam snapped. Today's progress was I got all the exhaust valves sorted out. As best I could, I matched the correct valves to the correct cylinder and lapped them into place. Thankfully I have a set of set of valves at my disposal that I stripped out of an N47 years ago. I saved them, because that's what we do. They were sitting on the shelf, and thankfully I've got 24 valves from which to pull the best 12. So exhausts are done and (barring surprises) I think the intakes will be much easier since they are in way better shape.
-
Haha!! I didn't see stamps on the block for that, but I did see a stamp in the head "F". Here, you can see it to the left of the plug I put in up by the thermostat housing. I'm trying and trying to convince myself that it does not mean "Front":

-
-
Wow. Interesting story. Looking forward to more telling pics once you get your hands on the car. That's right in Chuck's back yard!! @cbuczesk
-
Sorry for not being clear... All of the cylinder are punched with their respective numbers. I didn't take pics of all of them, but here's #4: My issue about "what's the point" is... What possible reason would there be for punching the chambers like that? What's the value add? It's not like they can possibly move around! I can understand it on things like the cam towers where it's possible to get them into the wrong positions, but the cylinders themselves aren't going anywhere!!! Even if you're trying to do something like get the same valves back to where they came from* or something, you don't need numbers. Just look at the head and hope you can count to six? * Side-note BTW - Based on the non-matching wear patterns on my valves and the seats from whence they came, I don't think he did. I believe I've spent the last couple thousand miles re-wearing valves to the wrong cylinders. Working on some of that is the next project on the agenda.

-
So while I'm logged in and asking stupid questions... Anyone understand the point of doing this? Here's number three:

-
LOL. No, they're not all out. I haven't done anything with them yet. They're all still in there. So, basically the answer seems to be... "No, there is no logical reason for the lengths of those studs." and the follow-up info of " However... Mess with them only if I'm willing to accept the possible consequences." Roger that. I guess I'll try gently to pull one and see what happens. If it comes out easy, maybe I'll try two. And so on. If the first one seems like it doesn't want to come out, I'll just cut down the extra longs with a hacksaw and call it a day. Yes, they are all-thread, and cut to custom length by hand. I don't think it was part of a kit. And no, they didn't really cause any functional problem. Other than having to screw the nuts on forever, they worked OK. In fact, the only location that was a problem was the front exhaust nut from cylinder #5. Because of the way the header turns forward so close to the head, getting a wrench on that one was a PITA. Haven't figured out what to do about that one yet, but I need to come up with something better than the way it was done before. Anyway... Small problems compared to the big picture.
-
I got nothing technical to add to this thread. My only question is does it really belong in the "club website" sub-forum? @Mike
-
So here's another question... My PO used stainless studs for the exhaust instead of the original bolts, and some of them are crazy long. And the positions of the long ones seem almost random. Here's a pic I took during the teardown. There's four super long studs... Three of them easy to see in the pic, and a fourth hidden under the thermostat housing: Question is... Is there some logical reason for the length and the positioning? He clearly did it on purpose. Any ideas? I haven't tried to take any of them out (yet). I'm kinda torn between leaving just sleeping dogs lie and poking them. Based on what I've found elsewhere, I'm a little worried that something might be stripped out of the head or (literally) holding on by a thread.
-
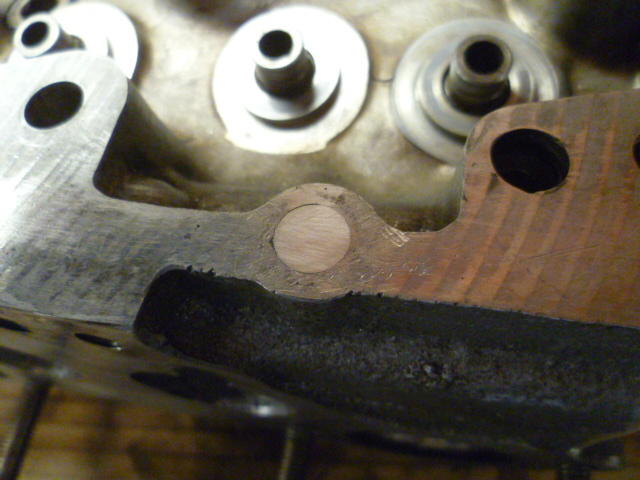
Thanks again guys. So here's that plug where my PO drilled through into the water jacket. Cut off and now flush: I'll drill and tap for the valve cover bolt later. Now that I've got good metal to work with, that shouldn't be difficult.
-
That's good enough for me. If you've seen tape like this on other heads, I'm going to assume it's factory and just let the plugs be as they are. Thanks for the data point.
-
I haven't dug into technical details, but for those of you who are already looking into it... Remember that it's a 78. Might be different than what you are used to seeing.
-
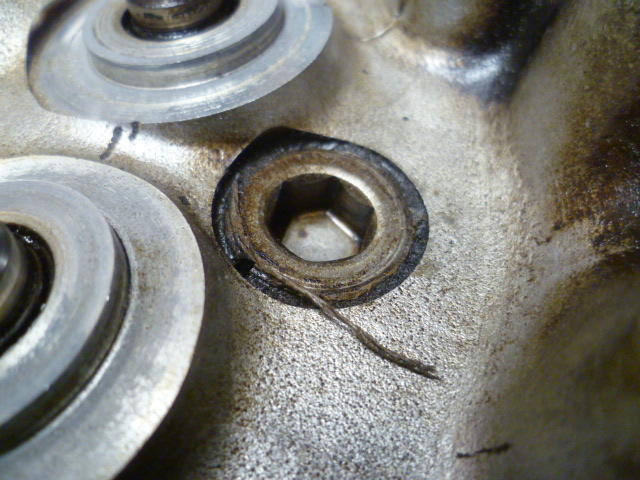
So here's a question for the collective... This is a pic of one of the plugs in the head from the casting process. Looks like Teflon tape sealing the plug. Was this factory, or did my PO have these plugs out and use Teflon instead of thread lock? Here's what I got:
-
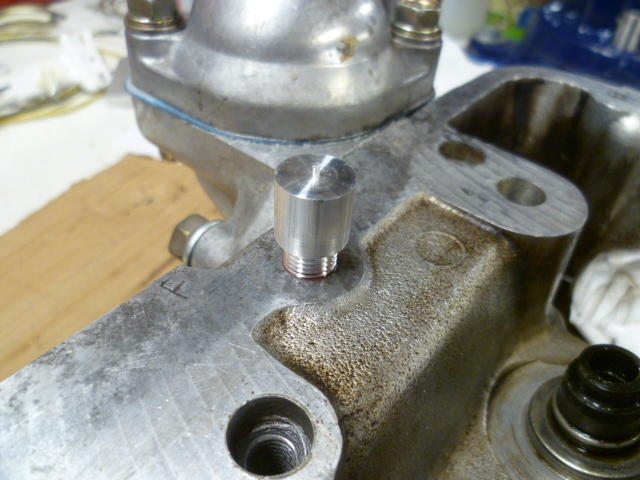
So no steps backwards today!!! I made a plug for the other stripped out valve cover hole up by the thermostat housing. That one was a breeze compared to the other one for many reasons. Mainly because the original hole was in the right place, but just stripped out. That and the fact that my PO had not punctured into the water jacket there too. Anyway compared to the one at the rear, this one was way easy. Red Threadlock on both the plug inserts and screwed them both tight. Here's the smaller, simple one by the thermostat housing: Give the plugs 24 hours to cure and I'll cut them off and flatten the stubs. Today I also took the valve seals off and started cleaning the chambers up. First wave done and no real surprises. Couple small gouges from the PO. Probably from slip-oops while cleaning the old head gasket off. Annoying, but I don't think they are going to cause problems. So, couple steps forward, and no steps back! Much better than the past few days!!
-
Oh, and my donor cam from @jonathanrussell arrived today and looks great! Thanks again for the incredible generosity!!

-
So I know that I'm way past the point of reasonable cost-benefit-labor-hassle... But at this point, it's me vs. my PO. It's personal.
-
I got a couple hours in the shop today. Here's what I started with. You can't really tell from this pic but that hole goes in on somewhat of an angle. It's not square to the top surface. It cuts in towards the center of the head: First I bored out the hole (hopefully close to the correct location) to about as large as I was comfortable with. Here you can clearly see the off-center hole that punctured down into the water jacket below: Then once that was done, I threaded that hole: And made a threaded insert on the lathe: Here's a test fit: I didn't glue the insert in yet. I'll do that tomorrow with a clear head. And then after I glue it in, I'll cut off the excess and machine flat.


