


Captain Obvious
Free Member
-
Joined
-
Last visited
Everything posted by Captain Obvious
-
 Thanks for the additional clarification and I'm really sorry, but I'm still not sure I'm getting it. Is this right? You had the engine rebuilt 600 miles ago and everything seemed perfect including the oil pressure. Then 100 miles ago, all of a sudden, your oil pressure (as indicated on the dash gauge) shot up. But other than the oil pressure, nothing else seemed wrong. Then just a day or two ago, while investigating the high oil pressure, it started smoking badly and that's when you pulled the head. Did I get it that time? I feel so dense. If I don't get it this time, I'm going to just keep my mouth shut and stay completely out of it!
 -
Valve stem seals and/or guides have no effect on oil pressure. Can have impact on consumption, but not on pressure. So just to make sure I understand the issue.... Car had been running great. No problems. Then one day, all of a sudden your oil pressure started running way higher than it used to, and you started blowing blue smoke?
-
Looks great. But whatever process you're using to install new bushings, I think you should get the coating out of the bushing holes first. Even if you're using a hydraulic press.
-
Bummer. So how long until you're back and have a Z?
-
Don't weld anything shut. Just use a threaded plug. You never know if you'll want that O2 bung some time in the future. Yeah, all the bits and pieces add up. Good luck with the project!
-
Well that might explain the square headlight mods that have popped up here a couple times. Evel Knievel started that trend maybe?
-
Awesome. Glad to hear your bush is still fixed!
-
Gotcha. Well I don't have any idea if the two manifolds flow the same, but I "try" to believe that the later manifolds are the same or better than the earlier ones. One thing to think about is that by the time you get to the rear part of the manifold, you're only feeding one cylinder, so maybe the fact that the ZX version tapers down at the rear doesn't have much impact. Or... Maybe it just makes the bean counters happy because it lowers the car's weight ant takes less aluminum to produce. Maybe that's why it's "better". Not being an expert at all in the field, my gut tells me that you won't notice any change one way or the other. My non-expert advice is to use the one you think looks better. At the performance level of these engines, I doubt there's much performance impact. So does your 80 ECU use an oxygen sensor? That hadn't been incorporated yet, had it?
-
So I double checked my measurements on the 77 and 83 throttle bodies, and they're the same ID. They are both 2 in. ID. 77 throttle body: 83 throttle body: The only significant difference I could find was the OD of the input side. 77 OD on the inlet is 2.35 inches OD and the 83 OD on the inlet side is 2.20 inches OD. So the original 77 ducting would be too big, but the inside diameter is the same. I also re-checked the mounting holes, and they are in the same spots. No difference there. And I didn't take any measurements on the location of the throttle linkages, but to the naked eye, they look the same. 77 on left, 83 on right:


-
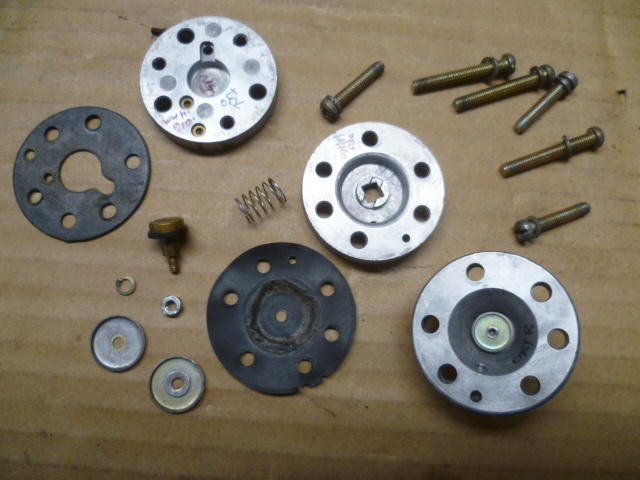
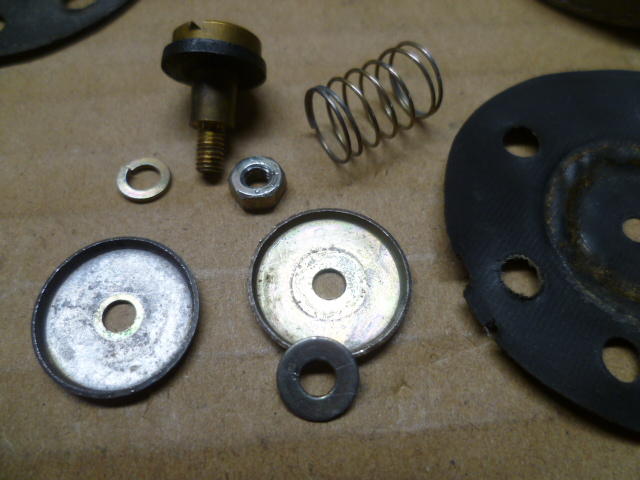
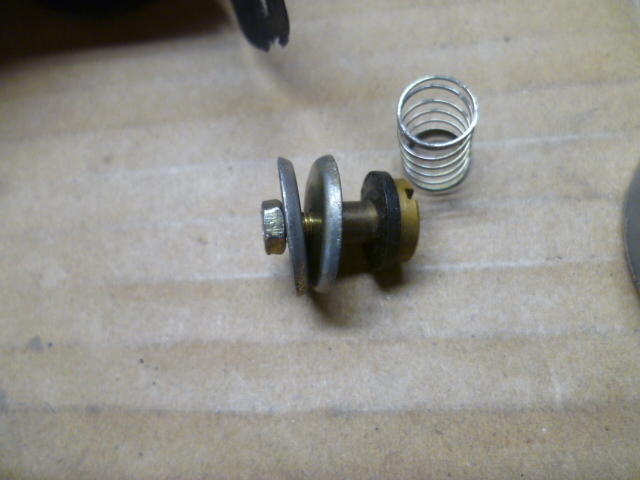
Glad to help. Here's some pics. This is all the parts for the power valve: And here's a close-up of the washers in question: Here's the parts assembled on the sealing bolt sans diaphragm. The diaphragm goes between the two large washers: Good luck!!
-
@Reptoid Overlords, do you have all the ZX parts including the wiring harness and ECU? Or just the mechanical stuff? I wouldn't assume that the ZX intake manifold "has capacity to move a higher volume of air". In fact, might be a fallacy, but I would like to believe that the years of additional research, testing, and development would result in improvements in the overall design. Other than the lack of EGR, what is it about the 76 intake manifold that piqued your interest? My car is a 77, and the ZX system I have is from 83. A whole lot happened in the world of technology in those six years. Might be wishful thinking, but I would hope that the 83 system is "better"? Possibly? Maybe?
-
I measured them yesterday and I do not believe this is incorrect. I believe they are the same size. I'll check again if I get the chance today to confirm for positive sure.
-
What he said. There are two completely separate (identical?) disks. I'll see if I can get a pic of the parts and post them.
-
Haha!! Here's hoping it worked. Datsun cracklin. Still want to see pics if you can figure out how to get them posted.
-
I don't remember where all the attachment screws are for holding the foam onto the steel frame, but once the dash is on the bench, taking the gauges out is easy. I would probably just pull them. Do anything you can to make the install of the more delicate foam portion easier.
-
I've been musing about the same thing. I will hopefully have a F54/P79 combo in my car sometime in the not too distant future and I've been thinking about how I will dress the motor when it's in there. I could redress it as a 77 using just the block and head. That would use my original throttle body, intake manifold, and ECU. Or I could bring over the entire system from 83 including the ECU. The biggest thing there is that I would need to incorporate an O2 sensor. Or I could do something hybrid like use some of the 83 parts (like the intake manifold) but keep the original 77 ECU and wiring. As far as interchangeability goes for the intake manifold... I compared 77 and 83 intake manifolds and throttle bodies, and I believe they are interchangeable. Mounting holes are in the same spots and the diameters of the airflow ports are the same. The throttle butterfly plate is the same diameter and all that, so I don't think there would be any problem mixing and matching them. I don't think the ECUs would know the difference between any of them. The BCDD for 83 does not reside on the throttle body, but is separate and located on the underside of the manifold. So if you're mixing and matching, you would need to pick one. The only other complication I could find was that the inlet side of the throttle body where the ducting connects is a little smaller. It's the same ID so there's no functional change, but the OD is a little smaller. Not the end of the world, but something you would need to address. I don't know about other years, but that's what I found when comparing 83 to 77.
-
You use peanut oil, or motor oil? Pics or it didn't happen.
-
Looks good. Drilling and tapping that phenolic was a treat, wasn't it. I would describe it as "crisp" and easy to machine. Looking forward to hearing how it works when you get the meter on it.
-
I think the phenolic will take to drilling and tapping quite well. I'm with you though on how robust the threads are. I think the threads will be of good form and quality when initially formed, but there just won't be much meat there. Don't over tighten the adapter fitting, and you would probably be OK. I agree that something to seal the threads would be a good idea. You need it to seal, but you don't want to crank it in too tight to achieve that seal. I think silicone sealant would be a good choice too. Doesn't have to be a thread locker. Just something to seal the threads. Good luck with that project. I think it would be cool to try that balancer tool on the Z carbs!
-
All better? And no more hanging brakes? Or haven't you had your nightly spin around the area yet?
-
I wouldn't touch that carp with a ten foot pole.
-
LOL! I should have known!
-
Cool. Never heard of such a device. I like it. I think drilling and tapping vacuum holes to test vacuum would work great. My only concern is that I'm not sure the phenolic spacer is thick enough to do that without cracking it. You might have to go right into the carb body or intake manifold right behind the carbs.
-
What did it taste like? "Sure glad I didn't step in it!"
-
Nope. They all looked like arse. The only one that stood out from the rest was an exhaust valve from a different cylinder. That one looked like bent arse. Of course, there's no telling if my PO swapped the pistons around. Based on the fact that the "45" piston is in the bore marked "4", I don't think so, but at this point, who knows!!

