


Captain Obvious
Free Member
-
Joined
-
Last visited
Everything posted by Captain Obvious
-
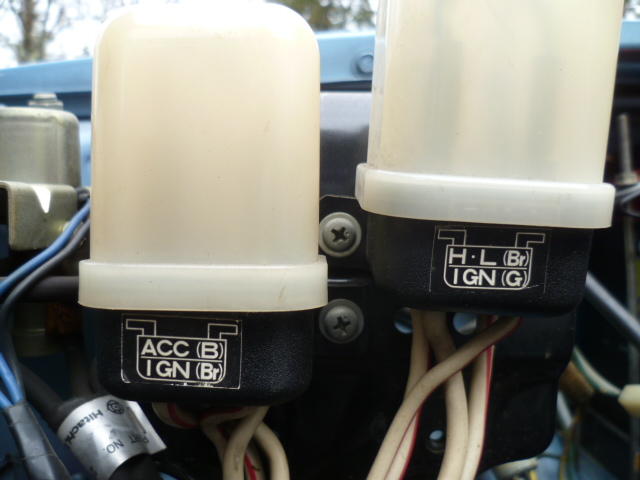
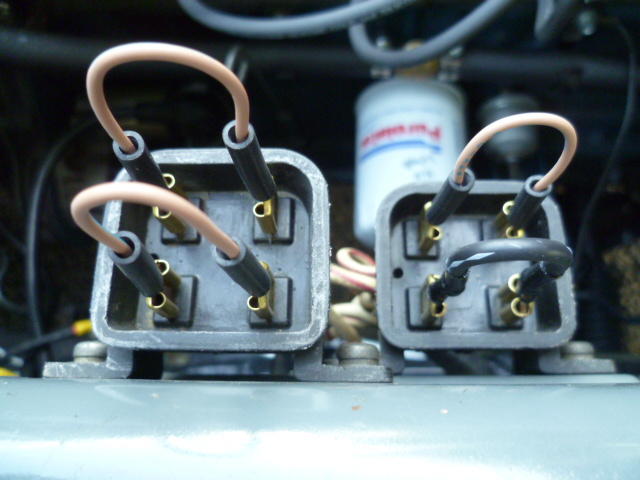
 Yes, I do believe the mis-placement did carry over from 77 into the 78 year. I think the location of the biggest (black) link never changed. I think they got it right on the diagram in 76 (right front), and then screwed it up in 77 which carried into 78. It would sure be nice if any other 77 or 78 owners could verify the position of the links just for additional data points. I know I've checked my 77 and positively determined the positions of the links. And I know that @240260280 did the same on his 77 some number of years ago. But I don't have any hard 78 data points. So for any of you 78 (or additional 77) owners out there who would like to participate? The easiest way to verify the link positions... Turn your headlights on. Remove the link that is closest to the fender and closest to the firewall (right rear) fusible link and the headlights should go out.
 -
@gwri8, excellent! Glad we could solve a long standing issue. But I gotta ask... Did I pull the fusible link caps off your car in Atlanta and have a poke around? I know I messed around with the fuse block in the footwell and the multi-function switch on the steering column, but did I get up into the engine compartment? If so, I hope I would have noticed the links in the wrong positions. At least I hope I would have. I know it was a little drizzly at the time and we were rushed for time, but still.
-
Wow. That's some pitting. Are you sure none of those pits go all the way through? Was there oil in the pan in recent past, or did you purchase it dry? Yeah, that was my reaction as well. @ksechler did specifically say the braided lines didn't clamp well. Maybe the non-braided original lines aren't a problem? Hopefully he'll chime back in with more info?
-
-
Zed Head, The pic you posted from MSA is one of the biggest contributors to the problems with the fusible link locations for 77. This diagram is wrong for the 77-78: I don't know where it started, but it probably started from the FSM wiring diagram for 1977. Nissan (seemingly) tried to lay the components out on the wiring diagrams kinds-sorta in the same positions they are located on the car. Problem is they screwed up the position of the black link. On the factory wiring diagram in the manual, it has the black link on the fender side back position near the firewall. But on the 77 car (I myself personally verified with a meter) that the black link should be on the fender side FRONT near the headlight. So Nissan never really said "This diagram correctly locates the link positions on the car", but it sure can be assumed that's the case. Problem is.... It's wrong. And others (like MSA) have been propagating that incorrect assumption ever since.
-
Chas, This pic, and the associated part numbers are the ones that apply to your 77: It says you need one black link (P/N 24161-A0100) and three "brown" links (P/N 24161-N4200 which has been superseded by 24161-Y0100): Just because the chart on page BE-6 lists the specs for three different colors, it doesn't mean that all three colors were actually used. They just copied that chart from the 1976 manual.
-
-
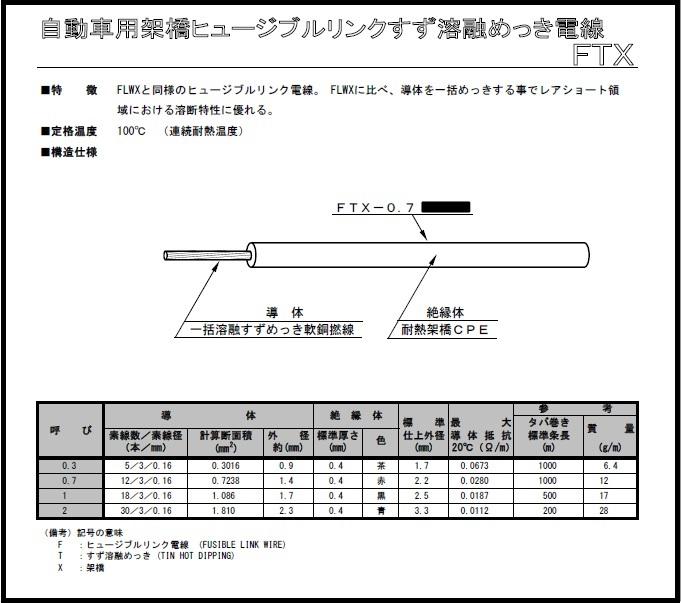
Some backup documentation for the above. Pic from a 76 that has excellent condition original labels. Note the link colors: Pic from my 77 with the links in the correct positions (regardless of the 77 FSM's misleading wiring diagram). I personally used a meter and verified these positions for 77 and 78: I dug into the specs for the links and determined they (like most of the rest of the Z's electrical infrastructure) was made by Yazaki. Here's a link where you can find specs on much of the Yazaki wires, etc, including the link material: http://connectors-catalog.sys.yzk.co.jp/yazaki-web/english/cables/pdf.html And since it's easier to discuss without downloading pdf files... Specs for the FLWX links. Would be cool if someone could translate into English for me: Specs for the FTX links:

-
I dug into the 280 fusible link stuff a little while ago and here's what I determined. First, what the FSM's say... The 75 FSM shows two fusible links and says they are black and green. The 76 FSM shows four fusible links and says they include three different sizes of links (black, brown, and green). The 77 and 78 FSMs shows four fusible links and says they include two different sizes of links (black and brown). Note that the above links are the ones bolted to the passenger fender in the little square boxes with the white plastic caps. There is another one (or two in the case of 78) fusible link that comes directly off the battery and is specific to the EFI system. That additional link (or two) is outside the scope of this discussion. I'm just talking the ones in the boxes on the inside fender wall. Also, I'm not sure what's up with the "brown" color link. Seems hard to find brown ones, or at least it used to be. I'm not sure if the brown was replaced by red or what, but I've seen more red links than I have brown although brown seems to be making a comeback. So about part numbers? When I last looked, the part numbers were as follows: FUSIBLE LINK-1.25 - 24161-A0100 - This is the black one FUSIBLE LINK-0.5 - 24161-28500 - This is the green one FUSIBLE LINK-0.3 - 24161-Y0100 - This is the brown (or red) one (supersedes old number 24161-N4200) EuroDat, for your 77, it seems you want one black and three brown (or red)
-
Excellent. Keep coming to us with the easy issues. We like those. Don't forget to use copious amounts of anti-corrosion anti-seize on your new spindle pins when you slide them in for the final installation. And if you didn't already know.... The location of the notch for the lock pin is not in the center of the spindle pin. It's offset a little bit. (The pin is not symmetric). There is a correct front and back. Point is... If you haven't already done so, it's a lot easier to determine which is the correct installation direction when the parts are off the car and not all slathered with copious amounts of lube. Mark it with a sharpie or something now while everything is clean so you don't have to futz with it while it's all slippy.
-
You should be able to insert the spindle pin all the way and spin it 360 degrees with just two fingers. If you can't do that, then I suspect there's a burr inside that's causing an interference fit. There should be no tools required to get that pin properly into place.
-
Many moons ago (waving hand like "these are not the droids you're looking for"), I worked for a company who made equipment that featured a black on silver faceplate similar in concept to the VIN tags. They were some sort of black coating on a thin aluminum substrate and the black coating was some sort of photo-resist active material. You would lay a piece of film artwork (black and clear) over the substrate and then run the pair through a box which housed bright light of some sort. I don't know if it was UV or what, but fading memory says the light was greenish, not purplish. And then after the light exposure, you would wash the substrate in some chemical and parts of the black coating would come off. I don't remember if the parts exposed to the light came off or if the parts exposed to the light were "set", but clearly it was photo-sensitive in some sort. Anyway, when you were done, you had a black on silver rendition of the artwork you laid over the original all black substrate. I can't remember the trade name of the equipment, but I believe it was relatively common back then. It's probably outlawed at this point due to health risks from the chemicals and the light, but I used it a lot "back in the day". I wish I could remember the name of that system... Not that I want one, just that it bugs me that I can't remember the name!
-
Yeah, I guess I've heard some people have a little trouble squeezing the PU bushings into place, but that's a cakewalk compared to removing an angry pair of spindle pins. Thanks for the info on the wave washers. I have a pair of moustache bar bushings I intend to install into my car some day, but there's really no point to doing so unless I come up with a plan for the washers.
-
Haha!!! And now that you've taken a highlighter to your hard-copy, you need to write a note next to it "This is the wrong position - See page RA-3 for correct orientation!" And putting the spindle pin back IN isn't a difficult job. It's often the REMOVAL that's the royal PITA. Once you have it out and everything is clean, the reassembly is the easy part. And I got another question... Did you replace the moustache bar bushings or wave washers with new parts, or are you reusing the old stuff cleaned up? Pic here:
-
-
Sure does. LOL. That drawing was probably ported from earlier years. That could potentially encourage you to install your moustache bar backwards if you saw that sketch before you saw the one on RA-3. Also interesting to note... My .pdf scanned version of the 78 manual is completely missing RA-9 through the end of the RA section. Get what you pay for, I guess. Thankfully though, it appears that the 77 and 78 manuals are identical in that area and the 77 includes the pages that the 78 does not.
-
-
Yeah, and look what it did... Rust is seeping out of the hood vents!! More pics here: https://www.classiczcars.com/forums/topic/60218-ol-blue-current-status/
-
Here's a previous thread where we discussed damper oil disappearing: https://www.classiczcars.com/forums/topic/44049-su-oil-consumption/ Doesn't appear that it was ever completely resolved, but interesting reading anyway.
-
Yup. I've not messed with those specific COPs before, but that's what I figured. And thinking about the wiring connections a little more... If they're logic level triggered, then the other two connections have to be +12 and ground. So the three connections would be trigger, power, and ground, but not necessarily in that order. It's still unknown if the high voltage side shares the same ground connection or if it snags a separate ground through the mounting bolt. I did a little digging looking for a wiring diagram for how those COPs are connected in-situ (same part on Acura's and Hondas) and didn't turn up anything. And I would take that as good news... Seems reliable enough that not a lot of people are asking questions about the wiring diagram? Anyway, I'm clearly getting into the academic part of it that doesn't matter to the application. LOL.
-
Yeah, I was wondering about that as well. There are three connection pins on the pack, right? Two of them have to be for the logic level signal (sig and ground), but what is the third wire for? I wasn't sure if that third connection was a ground return for the high voltage side or if that is a diagnostic "misfire" detection input back to the controller. It would sure make sense if the spark current flowed through the mounting bolt. The smaller the circle for that current, the better. it's really noisy and I wouldn't want that in any harness if I could avoid it. If the mounting bolt does provide one side of the high voltage coil, you should be able to measure coil secondary resistance by sticking one lead up the coil pack and the other on the metal part of the mounting boss. Without looking anything up, probably along the order of 10K-30K ohms maybe?
-
Another thought about the mounting of the coil packs... In the original application, the coils are designed to be pressed down all the way "home" against the top of the valve cover and the mounting hole comes into contact with the valve cover itself. Probably with a proud standing boss where the mounting bolt threads into. In addition, there is a sealing surface (might even be a rubber ring?) just below the electronics module portion that is designed to seal the larger hole in the valve cover. In your design, the holes you have the coil packs poking through is much smaller than the original design and your mounting tabs are hanging in free space. You don't want to stress the mounting tabs by putting a bolt through them and tightening them up while it's unsupported below the pack. Kinda hard to do without marked-up pics, but here's the issue I'm talking about... See the gap underneath the coil pack where the mounting bolt goes through? That thing is just plastic and you don't want to put a bolt through that and tighten it up. I suggest either using some sort of standoff boss (could be as simple as a tubular spacer) to support the bolt hole, or even better would be to make the holes in the COP bracket larger (like the original application) and have the coils mounting face sit down further (flush) against the plate. Without some sort of support under the mounting bolts, you are going to cantilever the coil pack body with the bolt and potentially crack the mounting tab off:
-
-
I'm still uncomfortable with the bracket design... Six little springs in those coil packs pushing up, and three tiny little aluminum tabs holding the whole mass in place. I'm worried that you hit a certain frequency, and that whole assembly is gonna sing. Stress cracks in the sharp inside corners of the mounting tabs.... Misfiring because the whole thing is lifting off the plug electrodes when you hit bumps... Bedlam. Anyway, I hope I'm completely wrong and I'm not going to bring it up again.
-
Yeah, sorry I couldn't help you out with the RH needles. Good luck with the tinkering, and keep us posted! Short story for the rest of the forum... I went looking for my RH needles that I thought I had and only came up with just ONE instead of two. Not much help there!


