


Captain Obvious
Free Member
-
Joined
-
Last visited
Everything posted by Captain Obvious
-
 Yes, I believe a commercial setscrew type of device would work just fine. But as for the material composition... I believe that brass has a higher density than steel. So if your steel on is heavier, that would only because it's longer: https://www.engineeringtoolbox.com/metal-alloys-densities-d_50.html https://www.engineersedge.com/materials/density_of_common_engineering_materials__15896.htm As for screwing it up into the bottom of the float, that would also satisfy the failsafe of closing the valve instead of holding it open. Only reason I didn't do that is I wanted gravity to have as little effect as possible on pulling the insert out of the float. I figured that gravity would have less of a tendency to pull it out if it were stuck into the side. Not that I really expect that gravity could possibly pull it out, but put it on the side just to be sure.
 -
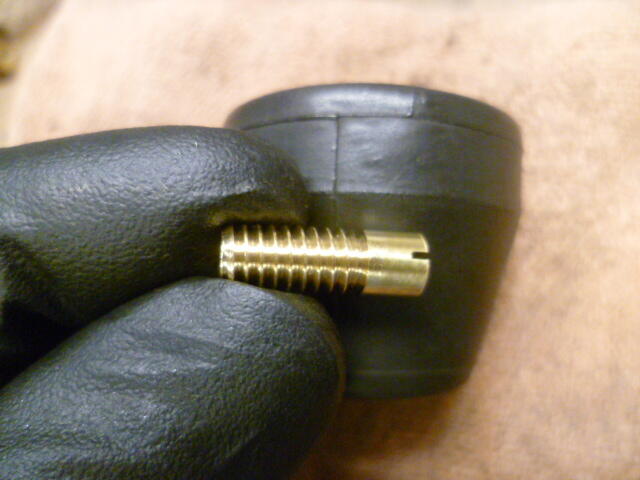
My last incarnation was a 4 gram brass piece threaded into the side of the float. This seemed to work well: And as for position, I put it into the side of the float over by the hinge pin. That way, it it ever started to unthread, it would tend to hold the float up, not hold the float down. My thinking is it's safer for the float to be held up (thereby cutting off the flow of fuel), than it is for the float to be held down (allowing fuel to flow even when it shouldn't). "Fail-safe". You could probably find something generic to use instead of making a custom piece. Maybe a brass wood screw of similar mass? And as for your hinge integrity, I think maybe yours looks fine. Maybe bent down a couple thousandths, but not enough to worry about.
-
Yes, that is the correct spec for 1971. Not sure your issue is the same thing I've dealt with, but I've had issues with the floats in the past. I'm sure you've seen some of this? I started getting involved at around page 8: https://www.classiczcars.com/forums/topic/55190-float-level-advice-please/?page=8
-
In addition to running the nozzles down a little more, maybe try some thicker oil in the dampers. What do you have in there now?
-
Yeah, I should have mentioned that possibility as well. Stuck in the open position will do pretty much the same thing as far as not being able to bleed the rears properly. Glad you got yours working!!! Now I just need to figure out why I can't get mine to work right.
-
That is because of the way the valve works. When the piston is sitting static on the bench, the valve is closed. That's why spraying stuff into the holes didn't go anywhere. It's not supposed to. Goes like this... Valve is held closed by the spring: When you push on the other end of the little rod (it's actually a hollow tube) it compresses the spring and opens the valve. Fluid flows through the center of this tube and out the two small cross holes that you found all rusty like. Here's a pic of the other end of the tube: When the master cylinder is assembled, this little screw runs across the bore of the M/C and opens the valve when the cylinder is at rest. It pushes against this tube to open the valve: So when the cylinder is at rest (and it is important that it IS at rest), that valve will open and allow fluid from the reservoir into the chamber. So.... All that said. Are you SURE your brake linkage and rod sticking out the front of the brake booster are all adjusted properly such that your M/C was actually at rest when your foot was off the pedal? Because if it's not, that valve will never open and you won't get proper operation of the rear circuit.


-
Sigh. You are correct. I accidentally referenced someone else's pic. That's two strikes for me on just this page alone. I think maybe I'll just sit here quietly and watch for a while instead of unnecessarily muddying the waters.
-
Sorry. I somehow missed that detail earlier on. I don't have a smoking gun, but I have a couple interesting observations... First of which is the picture of your airbox clammed together with no filter. It kinda contradicts your thoughts that the ends are bent down. In fact, if you look at that pic, it actually appears that the ends are contacting before the long flat center section: Next observation is that the backing plate pic from ebay is different than what you have. If you look carefully, it appears there is a difference in "offset" between the main face of the backing plate and the surface to which the sealing rubber gasket is attached. Here's the one from ebay. Note that the rubber gasket looks pretty much even with the surface you pointed to with the arrow: While on yours, the gasket is clearly stepped away from that same surface. By about the amount you are struggling with: Is that really the case, or is a trick of the camera angle?
-
Woof. That's no fun at all.
-
OK, so we have seemed to confirm that you have the correct filter. And your housing does clam shut if there is no filter installed. Sp what about the possibility that it's simply a rubber compressability issue with the new seals inside the airbox that squish against the sides of the filter? In other words.... Do you think that the airbox would close tightly if those two rubber seals inside were not present?
-
Time for the obvious question... Does the air cleaner clamshell fit together tightly when there is no filter inside? Yeah, I know. But someone has to do it.
-
Glad to help. Since it's so easy, I'd pull the boots back and do what you can. Small amount of work for the time investment. Just don't split the boots. That would be the typical "reward for being proactive".
-
Getting to the root of the question... No. You cannot get to all of the areas of the rack that need grease without taking the rack apart. As you suggested, you can pop the inboard sides of the boots off and grease what you can see. Doing that will allow you to grease the rack end bushings and the rack gear. And if you have the grease holes in the ends of the rack gear (not sure all years had those), you can temporarily install a zerk fitting into the hole which will allow you to grease the ball and socket joint on the tie rod ends. Install the zerk, pump in some grease, and then take the zerks back out. That's most of the rack, but not all of it. The only thing you won't be able to grease is the ball bearings on the pinion gear shaft. Better than nothing though!
-
Yeah, I had little doubt it wasn't that easy. But I have to ask. Haha!! If you have one of these (commonly known as a layout caliper), you could push the piston in and reach behind the retaining ring to set this thing for the inside diameter. Then take it out and use your caliper to measure the jaw width. If you don't have a layout caliper and are really really desperate, you could use a piece of coat hanger bent into a "U" shape. If you do it right, you should be able to get a reality check quality measurement.
-
And another complication will be that the retaining ring clip will be in the way of taking a measurement. I'm assuming that the master doesn't have the size cast into the outside of the body? Cause if it did, you wouldn't have to go through any of this?
-
The measurement should be at the narrowest part of the taper. In order to get a good reading, you might have to push the brake piston in a little bit to expose the surface on which to put the calipers. Or you might be able to just catch a little bit of the bore at the bottom of the taper even without pushing the piston in. And if you are just "reality checking" to make sure you have the right master cylinder for your car, that might be accurate enough.
-
The master cylinders are usually bored out larger in the area where the retaining clip goes. So if you are measuring the bore with all the guts installed, It's likely that you aren't measuring the actual working diameter of the cylinder. You are probably just measuring the diameter where the lead-in and retainer are located. My guess (from my chair) is that the bore down deeper in the cylinder is smaller than what you are measuring out at the end where you have the caliper.
-
When I was doing that job alone (taking valves apart with engine in the car), I found that working with one hand on the tool at all times to keep the spring compressed is an extra special pain. So I used a piece of nylon cord to hold the tool down so at least I had two hands to work on getting the retainers out and back in. Tie the cord off onto something an anchor. Looked like this: Still a pain, but way easier!!

-
Cool. Sounds like a plan. Hope the retainer shortening takes care of the issues you are having and that's the last hiccup!
-
And while I'm here, I've got a question. You said you were going to pull off the Isky retainers this weekend... What keeps the valves from dropping after you remove the retainers? Rope or compressed air in the cylinder to get the retainers off and then some kind of clamp or feature attached to the stems after you pull the springs off? Maybe temporarily install stock retainers? Just curious, but what's the plan?
-
Gotcha. So "installed height" has nothing to do with the location of the tip of the valve stem. Seems important for valve pressure and bind analysis, but really doesn't have anything to do with the problem you're having. So I poked around a couple seconds and turned up a thread on ratsun that talks some about the isky retainers. Seems the Isky retainers are specially made to work with Isky springs? Something about fewer coils maybe and keeping them centered? But there's also talk about making sure you don't sink a seat, and people have had the same tall retainer problem and have cut down the retainers: https://ratsun.net/topic/42818-l20b-with-a87-head-valve-spring-questions/
-
As long as the springs are compatible with the retainer disk, then I don't think any of the rest of that matters. The tip of the valve will be in the same location regardless if there is a change in exactly where the keepers lock onto the valve stem. In other words... The height of the valve stem tip above the head is dictated by the location of the valve seat (inside the cylinder) and the length of the stem. And since the lash pad sits on the top of the valve stem tip, neither the location of the keepers or the location of the notch in the stem for the keepers would have any effect on the installed height. Unless I'm misunderstanding "installed height" or something?
-
Don't get me wrong. I'm not trying to throw the engine builder under the bus. I'm just trying to make sure I understood what happened. Mistakes happen. So, why don't you just use stock spring retainers? Is there something different about the tops of the Isky springs that makes them incompatible with the stock retainers? Or is there something way better about the Isky retainers that make them a better choice over stock? It's not like people are complaining all over the internets that the stock retainers are inferior. I've never heard of a failure. Ever. Or you're thinking that since you paid for them, dad-gummit, you're gonna use em!! I mean if that's it, I get it! Haha!!
-
I was thinking the exact same thing. If what inline6 posted is a quote back from the guy who did the head, then it really doesn't make sense. If the engine machinist picked the lash pads and declared the wipe pattern "correct", then he must have overlooked a real problem!
-
Haha!!! Thinking about it a little more, if both diodes were dead shorts, they couldn't be camping right to the two rails or the ECU would have sucked a whole bunch of current. There has to be more to it than that.


