Captain Obvious
Free Member
-
Joined
-
Last visited
Everything posted by Captain Obvious
-
 Yeah, I'm in a similar situation with why I'm doing this now. I've got all four corners of the suspension off the car and I've promised everyone some cheap easily available check valve options for the pump, so there's no easier time to mess with the fuel pump than now. Then I figured while I had the whole pump assy off the car, I may as well make sure the insides of the pump looked good, and you know how it goes... Now I'm messing with an elegant mounting of a fuel filter back there using a mounting bracket that will hopefully look "stock" when I'm done. Scope creep. I'm confident in my measurements to about +/- .01mm (a half thousandth over here at this part of the globe). Thankfully O-rings are pretty forgiving about sizing, and I don't think the differences between what you got and what I'm getting are really going to matter. Especially in a static face seal like we have here. I'm going to order some O-rings tomorrow and go from there. Thanks again for your help with this! And you made me chuckle when you mentioned the German standard. That was the first one I opened too. The second was the Japanese standard. And so on. Same thought process.
 -
Chas, Those pictures are perfect. Again, answered my current question, and a few I hadn't asked yet. Thanks much for the help!
-
Thanks Chas. Awesome info. My measurements are a little different, but not by much. I measured the depth of the grooves to be 1.6mm (instead of the 1.5 you got). It was a little tricky to measure because the grooves have a small radius at the bottom corners, and if you get hung up on the fillet on the inside corners, you'll measure a little less depth. I was careful to measure at the center of the groove, and I got 1.6mm. Slightly less crush than what you calculated, but more than enough. I did not measure the groove width, but I will next time I'm in the shop. I see that you calculated ID from linear length, and I was curious... How did you measure that? I measured ID directly with gauges (rods of appropriate diameter) and found the IDs to be 33.0 and 33.5mm with the smaller O-ring located near the motor. Also, I bumped your fuel line insulator thread with a question. I'm guessing you didn't see that? http://www.classiczcars.com/forums/garage-hobbyist/50966-280z-fuel-line-insulators.html
-
No problem. I'm sure I'll end up with a couple extra sets and I'd be happy to share the surplus. I took another very close look at the O-rings last night, and it just may be that there is a small size difference between the two. I'm not sure if it's stretch from application or swell from gasoline exposure, but my two O-rings are definitely different in circumference at this point. Easiest to tell when you swap the two from their original grooves. They definitely fit different in the other grooves, and I don't think it's just from compression set. Still close enough that I think the same size would still work in both locations, but if I'm going to be ordering two different sizes anyway, it just may work out for the best. The two grooves are a slightly different shape as well due to the geometry of the pump ports. I'm thinking they tried to make the two O-rings the same, but missed a little bit? :bulb:
-
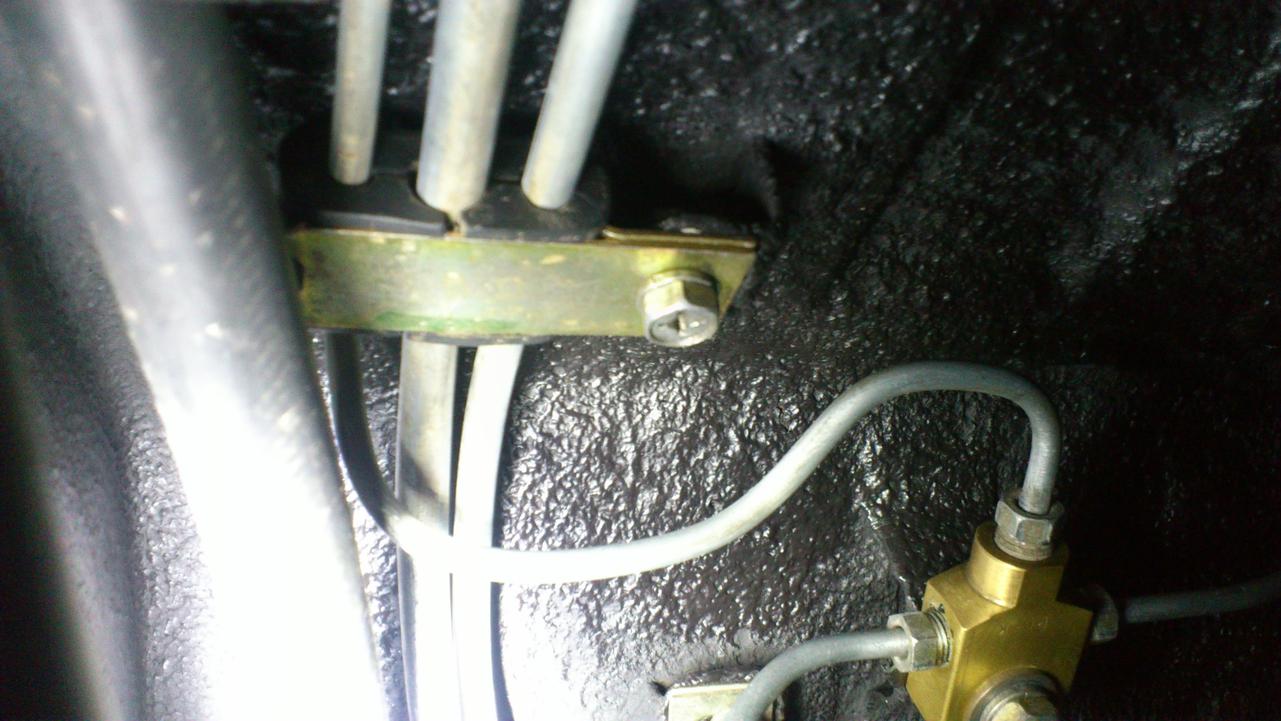
Chas, Your insulators look great. My PO put new hardlines and insulators on my car so the rubber looks OK, but the hardline routing is a little screwy in spots. Not a big deal, but while I've got all the suspension torn off, it would be convenient to make changes now. Have you got a photo of the hardline routing back by the rear sway bar? I'm trying to figure out if those lines are supposed to go above or under the sway bar. Something just about a foot further forward than this one:

-
Hehe. I do. But I'm not young... :paranoid:
-
I've been through O-ring sizing details in the past for stuff that I had a hand in designing, but the easiest thing to do on existing equipment is.... Use the same size that came out. Problem here is that the O-ring has taken a set from years of compression, and the groove that it sits in is not round, so it's not like you can easily measure the ID and OD. Depth is no problem, but anything having to do with circumference is tough. I measured my old O-rings using a gauge of appropriate diameter. I came up with 33 or 33.5 mm depending how much stretch I estimate occurred over the years. I suspect either size would work OK, and if it comes to that, I'll just order both sizes and use the one the feels right. Of course, I'd still rather have a recommendation from someone who's already had success. McMaster stocks the 33mm in both Nitrile and Viton. The 33.5 they only have in Nitrile. Good enough, but Viton is even better. hr369, I can definitely tell you that they are NOT 30 mm. When I get the correct sizes, I'm sure I'll have to buy more than I need, so I'll have extras. In other words, don't buy any yet... I think I'll have you covered. Thanks for the help everyone, and keep the info flowing!
-
I think the normal routing for that sensor wire is to dangle from the straps around the radiator hose (with the distributor wire), and I bet he wanted to route it along with all the other sensor wires up and over the intake instead. My PO did the same thing, although he didn't have to add any wire length to make it happen. Mine was long enough without splicing.
-
Figured you knew there were two of them, but since keystrokes are free, I thought I would just double check. My measurements also show that the two of them are the same size. I agree on the photos. Can't have too many. In fact, that one pic you just posted above with the fuel pump mounted in place under the car answered a few other questions for me... My previous owner replaced all the hardlines (brake, fuel) going from the front to back of the car. And I've had suspicion that not all of the routing of what he did was the same way it came originally. Your photo confirmed that. He used some poetic liscence in the routing. I don't think it's a big enough deal for me to take them out and start over, but at least now I have a pic of how they're supposed to route. Thanks again!
-
Chas The EFI harness does too have a ground. It runs one thick wire right over to the battery negative terminal. That's about as ground as it gets in an automotive application! The ground you highlighted above is part of the engine bay wiring harness, and I've done a little poking around with it as well. You want to see something interesting? Disconnect both ends of that wire and then check the resistance to ground with them disconnected. Still makes connection, right? There must be internal splices inside the engine bay wiring harness that are back feeding through other directions. Same with the other ground connection on the other side of the engine. One end at the alternator, and another on the bulkhead wall near where the heater tubes poke through the firewall. Disconnect all four of those at the same time, and they STILL read to ground. I didn't dig any further than that, but I found it interesting. Don't forget that the whole drivetrain is connected right to the battery negative terminal through the starter cable too.
-
Thanks Chas. When you get a chance to dig through your notes, I'd appreciate any input you have. Mine wasn't leaking, but I took it apart because, well... because I do that. Actually, my input filter has disintegrated, and I wanted to make sure there weren't little bits caught up in the works. One other thing. I'm sure it's nothing, but just to be sure... You keep talking about "O-ring" (singular) instead of "O-rings" (plural). You do know there are two of them, right? One on either side of the rotor housing? Here's a pic of where I am now. You see the my original O-rings have taken a set which makes measurements less accurate:
-
I've got my 77 EFI fuel pump torn apart and when I put it back together, I want to use new O-rings to seal the rotor section. Anyone know the sizes that are used there? Are they available as a replacement part? I looked through the parts docs and I couldn't find an exploded view of the fuel pump. I'm thinking they aren't available separate? I measured the old ones that came off, but they're deformed from over thirty years of service. They are no longer round, nor are they circular in cross section. By this time, they are oval in cross section, and are shaped like the groove they came out of. However... Doing the best I could, I get 33mm ID and a 2mm cross section? I know others have been through this (EuroDat) but I never found closure on the O-ring size.
-
Thanks for the input and that was my thinking as well. So the plan is to go with the ZX style unless someone has a compelling reason not to. I'm not worried about the concourse... I did extra credit with my spindle nut rubber washers.
-
So, any input on which retaining nut to use? Z or ZX?
-
Woo Hoo!! Extra points!! I keep learning little details about these cars... What did we ever do without the internets?? If I'd had this kind of resource back when I had my first Z, I'd be an expert by now!
-
The most intricate part of the rack work was probably getting the lower pinion bearing out and back in. I used a "blind bearing puller" from HF. This tool uses an expanding mandrel that pushes outwards against the inner race and a slide hammer to knock the bearing up and out of the rack housing. And I used my hydraulic press to put that lower bearing back into place after cleaning and greasing. Other than that lower bearing, everything can be handled with traditional hand tools. What if you don't want to go through that much effort? You can grease the two bronze bushings at the ends of the rack housing by slathering the rack gear with grease and running it back and forth a bunch of times. You can grease the rack gear teeth (and hence the pinion gear teeth) by slathering the exposed rack teeth that poke out of the end when the steering is turned all the way to one side. The sliding faces of the tension shoe will also get grease by slathering the exposed rack gear. What you CAN'T do is get to the bearings on the pinion gear shaft without pulling the pinion out of the housing. So you can do a decent job of getting to maybe 75% of what needs grease without taking anything off the rack at all. In fact, that 75% can be done with the rack on the car without even disconnecting the tie rods. However, that last 25% requires pulling the pinion gear.
-
Actually, at the top of my list is heat dissipation. The strut converts kinetic into heat, and that heat needs to get completely out of the strut assy. Air is not a great conductor. Now granted, I'm not autocrossing the car and I don't expect that I'll be overheating my struts, but that's why I asked about the downside. If there's no downside, then why not just fill the void? Corrosion prevention would be important as well as I've heard reports of inserts rusting into place inside the tubes. I'm not worried about hydraulic vacuum locking the insert inside the tube. Just take off the gland nut and pour it out. That's what I did when I took the previous inserts out.
-
My thoughts as well. I was thinking the bevel would leave room for inconsistencies in the rubber portion of the bushing. That's how I installed that one for the pic. I guess I'll just do them like that and call it a day. So I get extra points at the concourse by virtue of actually having these washers? :laugh:
-
My pleasure. Let us know what you find. I got my rack back on the car and it looks great. I don't have the rest of the suspension back together yet, but at least the rack part seems to have turned out well. Much better looking bushing fitment than I used to have!!
-
Another suspension question. I'm putting new strut inserts all around. I went with the KYB's. Question is... Should I fill the void in the strut tube with an oil or not? I know there are lots and lots of discussion about such things, but what's the current prevailing thoughts? I know that KYB says not to, but what's the downside? Other than voiding potential warranty returns (which isn't going to happen anyway), what would such downside be?
-
Doing some more cross referencing, it appears it might also be the same as: Beck-Arnley P/N 103-2679: New Beck Arnley Rack Pinion Bellow Kit Gear Boot Cover 103 2679 | eBay MEVOTECH P/N MK6299: New Mevotech Steering Rack Boot Front Chevy Pontiac Fiero Chevette T1000 MK6299 | eBay ACDELCO Part # 45A7011 All the above numbers are on Rock Auto as well. They don't seem to have the EMPI number, but they've got Beck-Arnley, Mevotech, and ACDelco. Remember however, that the farther you move away from the source, and the number of times you cross reference to competitor, the confidence in accuracy decreases. For about $15, you could buy any of those off RockAuto and confirm fitment though! Probably others, but that should get you started.
-
Actually, I got mine from Amazon. They were $8.99 each and free shipping (because my wife has the "prime" something). However, that said... I've apparently created a run on these things because I went back to look at the page where I bought them, and they've run out of stock on the 88-1509. I didn't look local, but I would assume anyone who carries EMPI could get you any number they make. Actually, EMPI is in your neck of the woods, right? Maybe you could just stop in? :classic: On edit, here's one on ebay from JC Whitney. New Mevotech Steering Rack Boot Front Chevy Pontiac Fiero Chevette T1000 MK6299 | eBay They say the brand is movotech, but if you look at the pics, you can see the EMPI 88-1509 number molded into the rubber at the large end. They say it fits Fiero and Chevette, and the EMPI catalog agrees. Might be cheaper if you go to JCW direct instead of getting it from them off ebay.
-
It's a cheap POS, but it worked for me:
-
Actually, the ID of the rubber washer is a bit larger than the spindle pin. It's just about the OD of the metal cylinder running through the middle of the bushings. As a matter of fact, in the pic I've fitted it over the little stub of cylinder sticking out of the bushing with the beveled side towards the bushing. I agree in that it probably doesn't matter a whole bunch. Especially since I've never even seen one of these things before. They've always been removed from any Z I've had contact with, and the universe hasn't imploded. They can't be that important. I was just figuring that since I plan for these things to never again ever see the light of day, I might as well get them on right.
-
Speaking or rear wheel bearings... I've got my bearings in, but I haven't finalized the retaining nut. What's the consensus at this point? Use the peened over style like original stock, or use the self locking ZX style? Thanks to Blue's writeup at AtlanticZ, I got pics. From http://www.atlanticz.ca/zclub/techtips//rearwheelbearings/index.html Here's the peened style that was originally on the car: And here's the self locking ZX style they went to in later years: Is there anyone who thinks the original style are still better, or is everyone using the newer self locking style from the ZX?