


Captain Obvious
Free Member
-
Joined
-
Last visited
Everything posted by Captain Obvious
-
 OK, I promised to describe how the gauges work... Not sure it should be here in this thread, or if I should start a new thread for this. I'll put this here for now, but if people think it should be separate let me know and I'll start a new specific thread about gauge theory. So in order to understand how the gauge system works, I think it would be a little easier to first understand how they DON'T work. I think everyone already has a good handle on this simple system, but it's an important place to start. Here's a pic of a simple (uncompensated) gauge design. Wrap a heating coil around a bimetallic strip and mechanically attach that strip to the linkage of a gauge needle. Flow current through that heating coil and to a sender unit who's resistance reflects the level of whatever you're trying to measure (temp, oil, fuel, whatever). As the resistance of the sender unit changes, the current through the heating coil changes and that changes how hot the bi-metallic strip gets. The lower the sender resistance, the higher the current. The higher the current, the hotter the bimetallic strip gets The hotter the strip, the more the needle moves. Here's a pic: This simple uncompensated gauge system does "work", but it is subject to a few real-world outside influences that can affect the accuracy: First, since the whole thing works on the temperature of the bimetallic strip, the gauge will read differently on a hot day than on a cold day. And second, since the gauges are powered by the battery system of the car, changes in that system voltage will affect the gauge readings. The gauges would read differently sitting with the engine off than they would with the engine spinning at 3000 RPM when the alternator has kicked up the voltage a bunch. The system voltage can vary from about 12V to over 14V and the gauge readings would change as the voltage varied. So the basic gauge system above sorta works, but these two real-wold effects are undesirable. If the above basic gauge system makes sense, I'll get into how they compensate for those two real-world effects.
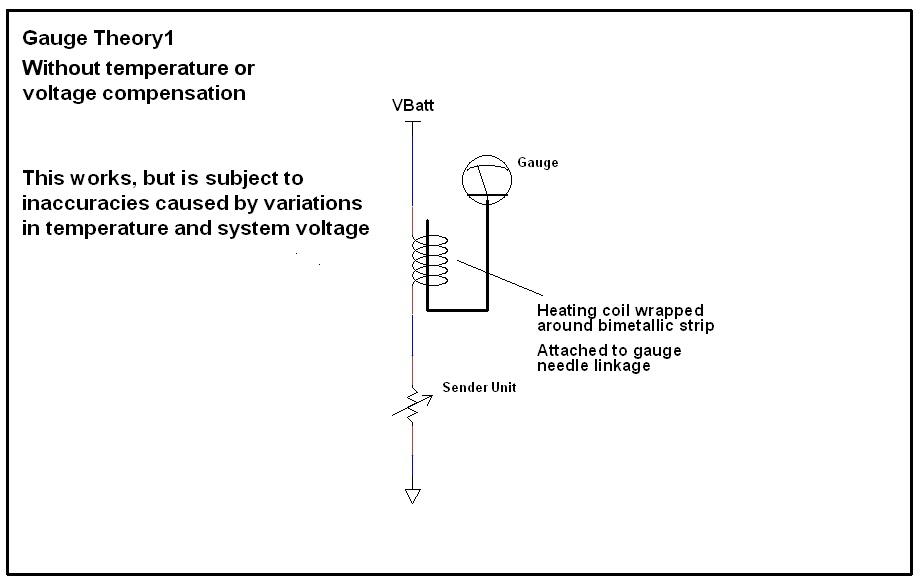
-
LOL. Maybe he's polishing? Or waxing?
-
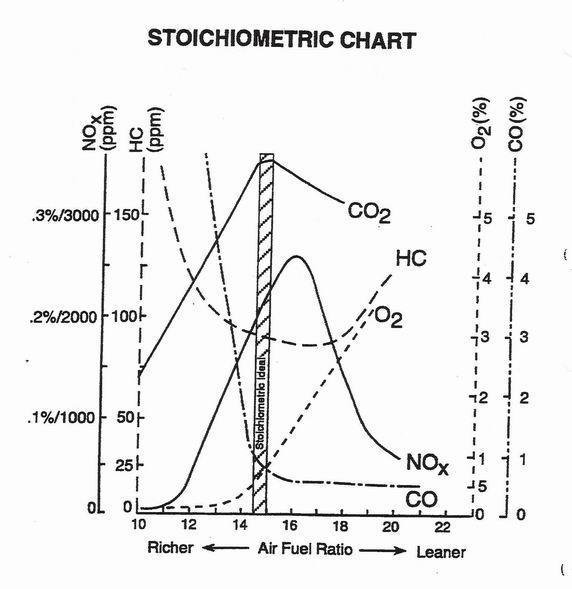
Here's a pic showing some general emissions levels with respect to mixture ratio: I don't know who created that diagram, so I can't credit the author. I do know that Hoover @240260280 posted it a couple years ago. Thanks Blue!
-
Glad you're doing better. If you're running rich now, it might be because of that messed up needle (at least at idle). For the cost of a pair, I'd replace them. That one has clearly seen better days.
-
Awesome! I'm so happy!! Stainless can be a PITA sometimes depending on the grade and what you're trying to do with it. Run into any issues there? And I agree with the above. Pics of the little fella!!
-
You're right. That does look pretty close. If you bought that can three years ago, it's probably the older formulation. I don't know if it was intentional or an oversight, but the newer cans (from that same source) are different than the old cans.
-
Only in jest! My local Z buddy here painted a block a couple years ago with that custom blue can from CA Datsun. Looked great compared to the stock color (when compared to other things like the harmonic balancer from that engine). Then he bought a second can about a year ago to do a second block and now it's a lot darker that it used to be. Doesn't match the stock color very well. Too dark and not enough green. sfm6s524, It's hard to tell from just a pic, but yours looks like the darker batch. There might be some overspray on the plate between the block and trans for a comparison?
-
I hate people. Glad the Z is looking like it wasn't all that serious.
-
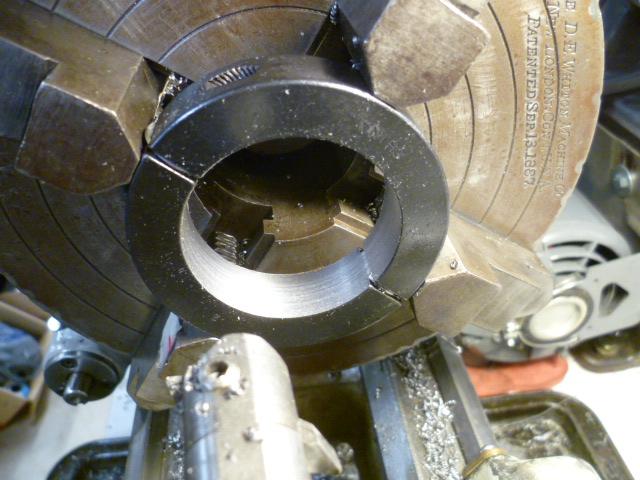
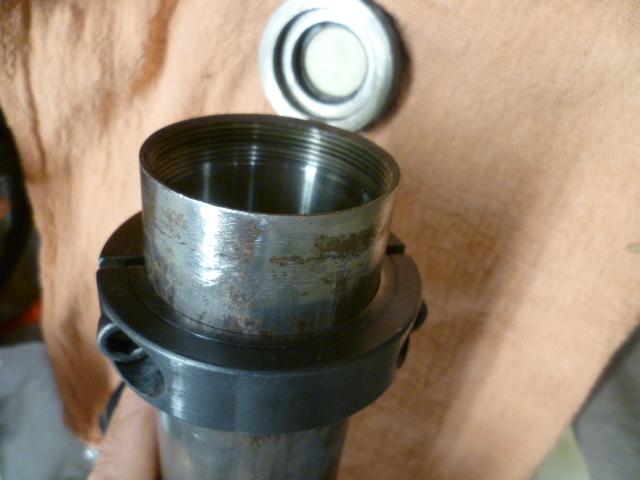
So I had mentioned above that if you are going to do the split collar perch support concept, you need to pay attention to the collar size. This is what happens when you impulse buy 2" collars for your 280Z because you assumed they were the right size. They aren't. The 2" collars are too small and won't fit around the 55mm (2.165) diameter 280Z tubes: Not wanting to admit defeat, I aligned the collars and chucked them up in the lathe and bored them out to fit the 280 strut tubes. Looked like this on the lathe: In the end, I had to take off so much material that they got a little Swiss-cheesie, but good enough for the temporary use that I plan for them. Would have been better to start out with 2 1/8 collars instead of 2". I would still have had to bore them out some, but not as much and they wouldn't be quite so holy: But in the end, here's what the bored out collar looks like on the 280 tube. Should be "good enough." :

-
Will do! Thanks for the support!
-
That one needle looks like it's seen better days. I don't know if that's contributing to your issues, but it takes a really small change at idle to make a big difference in the idle mixture. Those dents and other signs of mishandling of that one needle would concern me.
-
AK260, thanks much for the additional info. I'll look into those to see what I can find on my side of the water. And on a related note... The 74 FSM says the strut tubes OD is 2 inches (50.8mm). After that, (in later years manuals, they greatly reduced the amount of detail about the suspension members. Starting in 75, they stopped listing the OD of the tubes as well as much of the info about the corner springs. Why is this related? Because all the tubes I have here are from various years of 280's and they are all 55mm OD (2.165 in), not 50.8mm. I'm assuming this was part of the beefing up of the suspension stuff that occurred for the 280. Unfortunately none of this is documented in the manuals, but it needs to be taken into account when looking for things like those strut tube bellows / gaiters. It also matters when you're trying to size split collars to use as temporary spring perches to hold the springs in place for locating. If you buy 2" collars, they won't fit:

-
Yeah... Don't do that. Haha! ! Good luck with the project and here's hoping it all goes smooth.
-
-
M6 x 1.0 is used extensively all over the car, and while I did not look up that bolt specifically, I believe that's what it is. As for the official pilot drill size necessary, I'd have to look into that. There are rules for metric taps (that I never committed to memory), but it would be easier for me to instead just see what size drill bit fits snug into the threaded hole of a couple M6 x 1.0 hex nuts and just use that. Edit - You made me look... My crib notes says I use a 3/16 (.1875) drill for my pilot when tapping M6 x 1.0. It's probably a little undersize according to the rules, but that's how I roll.
-
I think the oil pressure on the mechanical gauge looks fine. Seems like an electrical issue with the dash gauge.
-
You won't be able to push the bolt back out that way. You need to turn it. Pushing it straight won't do anything good, and if you push too hard, threads somewhere (either on the stub you've got stuck in there or the bolt your using to push) will give way and tear out. However, if you do have access to the other side and there is some exposed threads on the back, you can use that hole on the back side as a guide for a drill bit to get it centered. You want something that is the minor diameter of the threads (do you know what I mean by that), and then you should be able to use a tap from that back side to clear out the threads. Are there enough threads exposed on the back for you to catch a tap on to get started properly?
-
My pleasure!! And I second the Loctite ban. If you use the distorted thread ZX nuts, you won't need any thread lock. And if you use the original style, you'll just peen them. In either event, you won't need any Loctite.
-
Crapsticks. That's not the answer I wanted. I really thing the original design (with the bellows and the retaining ring at the bottom) is pretty slick. @AK260, you mentioned in another thread that you were using the bellows from the front of a dirt bike or something? How did that work out?
-
OK, so there are a whole bunch of votes that say the spacer I described isn't there. And admittedly, I did not go out to take a look at my car. It's quite conceivable that I was mistaken and simply describing how I THINK it should be designed. In any event, you're in good hands. Ignore me.
-
-
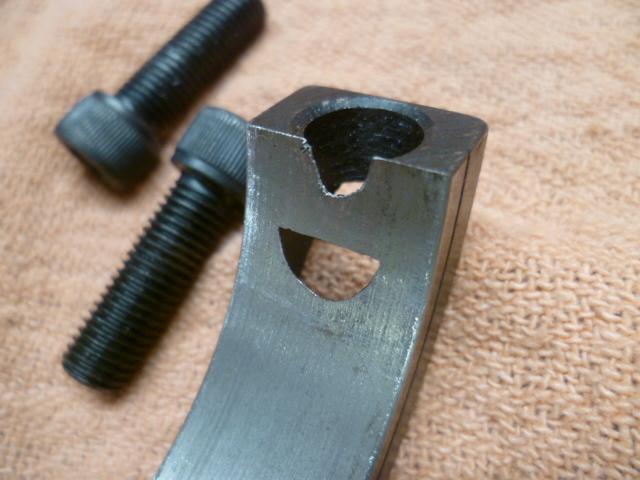
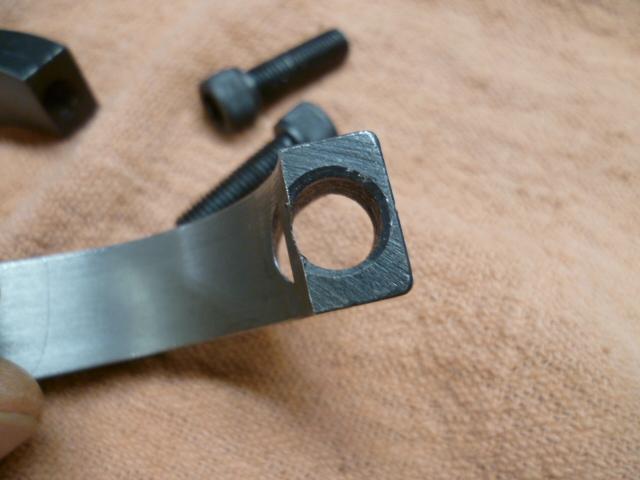
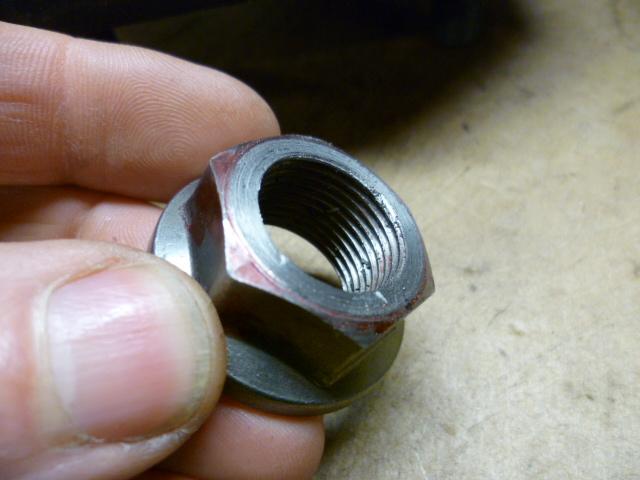
LOL. Commitment issues. Here's what I did: After I got the original peened nuts off, I completely removed the shoulder where the peening was originally located. I cut mine off in a lathe, but you could do the same thing with a file or grinding wheel. The end result was a "test nut" that I could install and remove any number of times without damage to anything. Using test nuts, I could put everything together and make sure it all worked the way I wanted it to. Here's what my nuts look like: Then when I was completely convinced everything was done right, I took the test nuts off for the last time and replaced with the one-time-use ZX nuts.
-
I believe the poly should operate the same way the originals do. Meaning... There should be a metal sleeve that runs through the center of the bushings. You're supposed to tighten the nut down until there is metal-to-metal contact between the washers and that sleeve. The compliance of the bushings is supposed to compress until that point. In theory, you should be able to feel the tightening torque shoot up once all the play has been taken up.
-
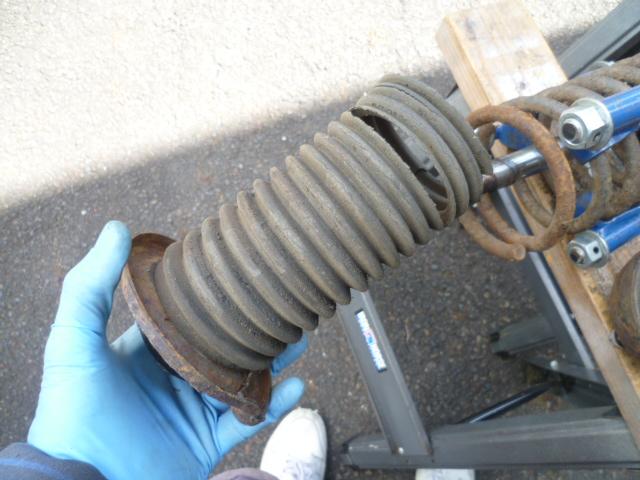
So today's question... Does anyone have a good manufacturer and specific details for a bellows set that fit's well on the 280 struts? I bought a pair of KYB's couple years ago when I was into the struts last time and they were too big. Couldn't get them to fit right. No surprise, but the bellows that came in my donor strut assemblies were worn out and need to be replaced. Anyone got something that really does fit well?
-
I was thinking the same thing. Manufacturing fixturing only. That, and you can't tell 70's Japanese welder on the line "It doesn't matter... Put it anywhere." He would likely self combust from the internal ambiguity. And on a related note, I found a pic of the plastic spacers they use in the rear (instead of the bearings). I think I might make some steel replacements to use when I put mine back together. Might be able make them a little thinner than the originals for more lowering:


