


Captain Obvious
Community Member
-
Joined
-
Last visited
Everything posted by Captain Obvious
-
I had originally thought there was simply some dyslexia going on here, but now I'm not so sure... The original bulb spec is 3.4W, but the one in your pic (and part number) appears to be 4.3W instead. If that bulb really is 4.3 instead of 3.4, that might be part of the problem. Do you have another (known to be correct) bulb you can toss in there just to see what happens? My original bulbs were Toshiba A12V3.4.
-
Ha!! Made you look! So the only thing they can muster is "It's resistance is different". Not much help! The whole thing is a balancing act... The thermistor in the tank is a NTC and the bulb filament is a PTC. You need the current through the thermistor high enough to achieve the desired power dissipation such that there is self heating when not submerged in fuel, but never enough power to damage it. And when the thermistor does heat up and it's resistance drops, you need the resistance low enough to get the bulb filament to glow.
-
I got no silver bullet. The only explanation I have is what you already mentioned... Sounds like the thermistor is not quiiiiite right for the application. CLOSE, but not enough headroom for tolerances and environmental stressors like ambient temp and system voltage. And as Zed mentioned, why it only happens when the engine is running is probably because the system voltage is higher then. That extra volt-n-a-half matters. Thermistors come in all sorts of base resistances and with all shapes different curves. For this application, you want one with a "knee" in the curve as opposed to linear, and you want the knee to be at the correct temperature. I'm thinking that it's too close to the limit most of the time, and the combination of ambient temperature and system voltage (when the engine is running) puts it over the edge. @Dave WM, Did you find any specs at all about the thermistor? Anything at all? I didn't look at any of the FSM's, but I bet you did. I wonder what thermistor ZCD picked for their unit. And why.
-
Haha!! Could be! I'll crawl back under my same as it ever was rock now.
-
@siteunseen, what's the deal with the goofy new pics? You get a new toy or subscription to something?
-
This recent thread: https://www.classiczcars.com/forums/topic/64260-240z-hls-30-42277-restauration-colombia-southamerica/?do=findComment&comment=603098 Includes some pics of what looks like the same transmission: Kinda dark inside the bell housing to get a real good look at the pivot ball post, but maybe @Mazinga Z would be willing to take a closer pic for you.
-
I find the parts documentation confusing. Even though the new pivot number says no interchange, note that it DOES list that it superseded the old number. I did some internets searching for info on the part numbers and turned up very little about the old one. I agree that it would be very enlightening to see a pic of the old pivot next to the new one.
-
So it's a bummer when your old un-rebuilt carbs are in better shape than "rebuilt" ones you paid (I assume) good money for. That throttle shaft is a disaster. I kinda wonder what other issues are lurking with those "rebuilt" carbs. I guess if they work OK (the rear one at least), one could assume any other mishandlings are minor enough to keep using them. Only suggestion would be to make sure you check the float bowl levels.
-
That's a good video. Thanks for that. So good luck with it, regardless of which way you decide to proceed.
-
Haha! Well played!
-
And please tell me you weren't the one that painted the carbs, right? That was the PO?
-
LOL. I hear ya. But looking back at your pic, you've already cleaned off the grease AND pulled the rear cover off, right? No chunks of metal came out? No missing or damaged looking teeth? Nothing looks blued from heat? I still say Put it in and run it. If you're energetic, put new seals on the output shafts first. I think they're the easy ones, right?
-
"Collector".
-
Bingo. Thanks Patcon. So the bottom one in my pic is turbo. The overhang shields the oil line out the side of the pan.
-
My completely unsupportable opinion? It's fine. Clean the grease off put it in the car and run it.
-
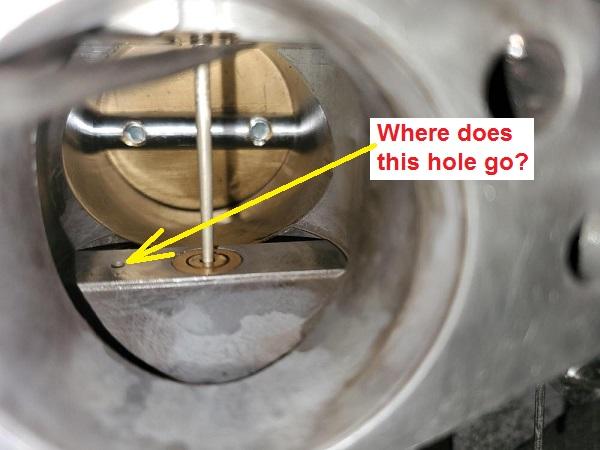
Wow!! That's some fine PO workmanship you got right there! Yeeesh! So when you said you swapped over to the old carb... Are you thinking you're going to repair the PO hammered one, or just keep running the other? Is there something wrong with the other one that made you want to run this one instead? And thanks for the pics of that mystery hole, but unfortunately I'm still unclear where that hole goes. It's definitely a 72 specific thing and unfortunately I don't have a pair of those here to poke around with. Thanks again though!
-
No, why? Is that what that motor runs on?
-
Well I'm satisfied now. I was hoping the story behind the pic was as good as the pic itself, and you came through my friend!
-
AAAAAAAAAAA!!!!! I am not happy. This is NOT the smoking gun I was waiting for!!! Seriously though. I hope it works and you can move on with the project!!
-
And I would suggest that investigation be done outside of PM conversations. Investigations like this benefit other users in the future who are looking for solutions to similar problems.
-
As Patcon mentioned, the "hole" you are seeing in that pic is simply the jet needle dropped down out of sight. It's normal operation if the choke is on or if the nozzle has been adjusted down to affect the fuel ratio. It's not the problem here. But while I'm in here there are a couple things I wanted to ask about... First, what's the deal with that one carb with all the gouges and marks on the venture bridge? That thing is hammered!! Like the slide piston was stuck down at one point and someone stuck a screwdriver in there and tried to pry it up or something?? Probably doesn't make much functional difference, but those marks really show evidence of mistreatment in the past. Other question is... There are small (1/8 inch-ish?) holes in the bridges that are intentional. I assume they are 72 specific. Where do those holes go? :
-
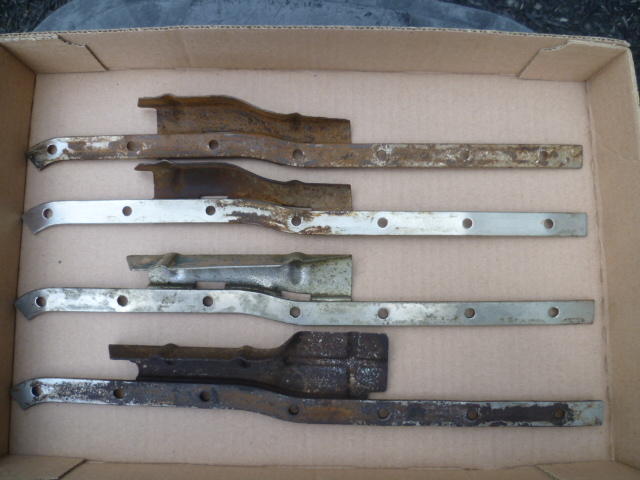
Site, the shield in your pic is the top two in my collection. It's the only one that pushes inward towards the front to follow the contour of the pan. The others in my pic don't do that. AZDatsun, My 77 also has that top two design as well, so with your data point and Site's, it appears that style was used at least on 77, 78, and 79. According to the documentation, all the 240, 260, 280 used the same part number for that support - 11123-N4200. There is another part number listed for the 240 and 260- 11123-N3300, but I suspect that was for the very early cars and was quickly superseded by the later number. So they may have changed the shape of that heat shield on different years, but they never considered the change to be significant enough to warrant a change in part number? Form, fit, and function, they are all interchangeable apparently? I have no visibility into the part numbers for the ZX stuff... Does anyone know if they used a different version on the turbo? I ask, because one of these may be from a turbo motor, but to tell you the truth, in all this excitement, I've kinda lost track myself.
-
That's a fantastic pic!! Is that the summer that Bryan Adams talked so much about?
-
Another question while we're talking about such things... I've noticed that they used a number of different designs for the heat shield between the pan and the exhaust. I've got three different versions here. Top two are one style, third is different, and bottom is different again: Question for the Z trivia guys... Anyone know the lineage? What year(s) used which style?
-
Jeff, That's what I was thinking as well. For ease of installation (and raw material yield), I don't think I would make it all one piece, but I can't come up with any reason why you wouldn't (or couldn't) want extra support for every oil pan bolt. I'm also thinking that it wouldn't need to be exactly like the original two pieces. There are geometry options that would make it easier to produce. Anyway, I'm just musing here and wishing I had access to a water jet too! Haha!


