


Captain Obvious
Free Member
-
Joined
-
Last visited
Everything posted by Captain Obvious
-
 Right. Her - "Hey, honey... The zombie apocalypse is coming. What should we do?" Me - "Well I don't know what you're gonna do, but I'm gonna stay home and work on my Z."
 -
Can you post a pic of a working one and also post another pic of what yours does instead?
-
Absolutely. That would be an easy part for 3D printing. My only concern would be how durable would it be? I'm not sure how brittle that stuff is. My SWAG would be that the original part is glass reinforced nylon. So @jfa.series1, the original parts all snap off where the handle meets the spherical section, right? Another possibility would be to just make a "handle" and drill out a hole in the original sphere and glue a new handle in place? Tricky tooling setup, but might take less time than making a whole new piece from scratch. I still think that painting a metal one flat white would be the best all around solution. I'll just have to carry a magnet with me to shows in the future so I can tell originals from repros and judge the cars appropriately.
-
Nice. I did the same thing with the Dremel. Cut out the peened section enough that I was able to get the old nuts off without smearing any threads. The post-process lathe work was gilding the lily just to clean everything up and make it look all nice and purty.
-
I get you bro. !! And I agree with your assessment about the rising VE. And also agree that would be very difficult with springs and weights. Maybe I could whip up some little programmable device to try that. With the state of world events, I guess I have the time to work on projects at home...
-
Yes we do. That would be quite cool. And thanks for the info links as well. I dug into the one from ls1tech and it led me to another one on that same forum which led me to another good one. Here's what I found: https://ls1tech.com/forums/advanced-engineering-tech/254868-ignition-timing-101-a-4.html and the original article it was based on: http://www.contactmagazine.com/Issue54/EngineBasics.html
-
Someone with a properly tooled lathe could make this:

-
Perfect.
-
That's exactly what I did. I chucked up one of the old nuts in the lathe and turned off all the distorted threads and then used that nut as a "non-locking test nut" to make sure I could torque up the stub axle nice and tight without any binding. Then once I was convinced everything was OK, I took that nut off and replaced with the distorted thread version from the ZX and torqued it till my eyes bugged out. I'd post pics of the nut in the lathe, but I think it's pretty self explanatory.
-
Nice! I bet that works great on the thrust bearing cap. How easy does it work on the rear cap? Mine rear cap(s) took quite a bit of force to pull out.
-
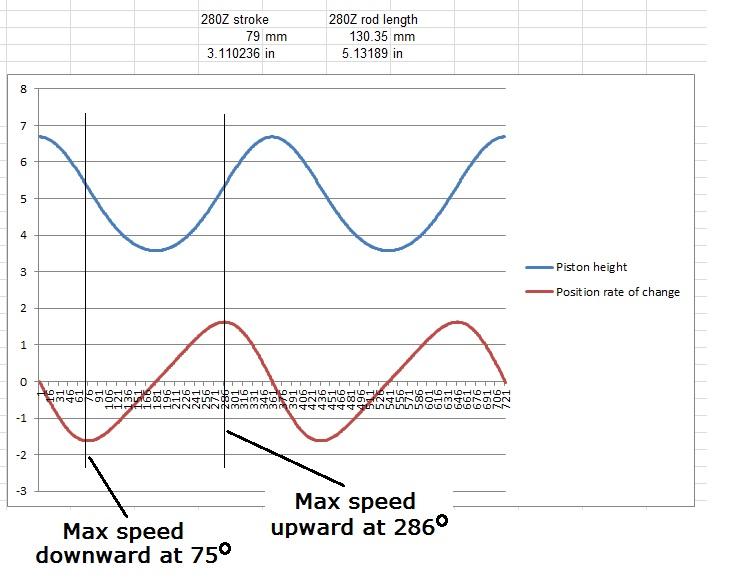
Searching through my stack of old CD's was fruitless. I was able to start over though and here's what I was able to whip up so far. Using the 280Z stroke length and center to center rod length, I get the following: Note that for my calculations, I used everything pointing straight up (TDC) as" zero degrees". So the maximum piston speeds occur at 75 degrees off vertical. About 75 degrees after TDC when going down, and about 75 degrees before TDC going back up.
-
Same thing cannot be said. The bigger the L, the higher the spike, but the same physics still applies.
-
No kidding!! I actually did go out to get beer yesterday as soon as we got the news. Then went to pick up some toilet paper and they were sold out. But at least I have the beer!
-
Thanks for the input guys. I'll look through this a little and also see if I can find my old piston speed study.
-
If that happens, don't come crying to me!
-
Haha!!! Seriously though, I'm on lockdown at home. Governor has put our entire county on lockdown for two weeks.
-
Two things. First, stay away from the Borg Warner stuff unless you can get all the parts. It used a different driveshaft and shifter assy and everything. It's not that simple of a swap. Second, they changed the differential ratio when they went to "the close ratio" transmission design and I'm not sure how well it would pair with your original diff. Honestly, I wouldn't worry too much about it now. From the looks of those cars, they'll still be there in a year. Get your car on the road and put some miles on your current trans and see what happens.
-
Make sure the end mounting holes have some slop towards the outside when you mount it up cold. The head will expand more than the bar will and tend to pull the end bolts away from eachother. You want to make sure you have tolerance for that to happen without causing a problem. Blue Loctite would be good. After you get it mounted, you should also make sure you have enough oil pressure for the streams to actually reach the lobes at idle with hot oil. If the oil reaches the lobes at idle, it should be fine at higher RPM when the pressure is higher. And as far as getting your other one fixed... If it's the original stock style with the aluminum distribution boxes, forget about it.
-
Suppose I come at you with a banana? How about a pointed stick?
-
You mean too shiny and the wrong color? Ducking the incoming...
-
@240260280 Thanks for your input too. All that stuff would certainly have an effect, as does VE changes with RPM. With all your research... Have you come up with any curve that shows VE versus RPM for our motors? Any idea where it typically peaks?
-
Many moons ago I calculated piston speed in depth when I was poking around with header designs. I've got a file around here somewhere the documents it very well. It was a couple of computers ago and exists on a CD ROM somewhere. I'll see if I can dig that up. Right. So is there a timing number that you think is "optimum". Pick an advance at a specific RPM that you think provides the perfect 22 ATDC pressure peak and I'll plot that out. @AK260, you suggested two of them... 28 degrees @ 3500 rpm - your tuners numbers for your 10.5:1 motor. 34 degrees @ 2800ish - From "the Z world" Also when I get a chance, I'll back calculate your mechanical advance degrees into time measurements and see how that looks on a curve.
-
LOL. Glad to help. Here's one more. The only time you need to suppress the arcing from a load is when you have a load that creates an arc. Headlights aren't typically one of them. The most common load that causes a problem is an inductive load. That's the exact reason they put that diode across the relay coil. That coil is an inductive load. Headlights are not.
-
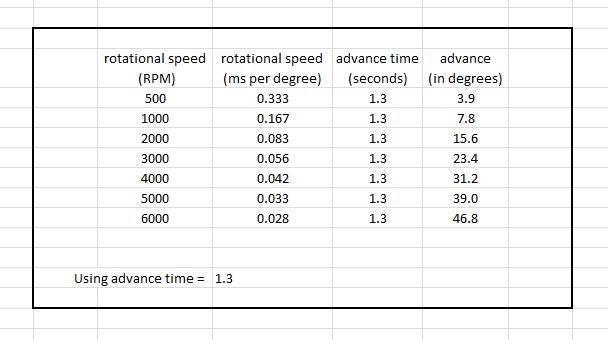
I know that the combustion doesn't proceed linearly and it grows. That's the whole reason the mechanical advance exists in the first place. The mechanical advance is supposed to account for the fact that the burn doesn't all happen at once. Takes time to build. (Note my point here is that it takes TIME. It doesn't take "degrees".) And about the rest of your note above... I'm not sure I get the point of your examples, and I don't think the math is right. At 1000 RPM, the engine is spinning at 0.167 ms per degree*. So your example of 15 degrees of advance at 1000 RPM would actually light off the spark at 2.5 ms BTDC. And at 1000 RPM, 1.3 ms of combustion is only 7.8 degrees of rotation, not 37. Here's some hard numbers using 1.3 ms as a fixed advance BTDC: The question isn't so much about the down low range. In fact, those numbers are pretty much exactly like stock up until 3000 where the original mechanical advance tops out. It's back to the question about "why does it go flat?" above that and "would it be better to continue to advance?" if you had reliable means.
-
Good eyes! Yeah, that's a really good catch! Grab all those D hubcaps you can find!! There might be more up in that car. Just don't get hurt in the process! And watch for snakes!!

