Captain Obvious
Member
-
Joined
-
Last visited
Everything posted by Captain Obvious
-
 Gotcha. And a couple comments about that spot / glazing putty: It's solvent based and because of that, it shrinks a lot as the solvent evaporates. Thin coats only to build up a deeper wound. Also it will likely etch into the PVC that the center console is made out of. That PVC is low on the chemical resistance chart. And lastly, be aware that filler has no mechanical strength on it's own. Think of it as "spraying a whole bunch of coats of sandable primer". (If that makes sense. ) I've found that JB weld sands OK with the correct low load paper.
 -
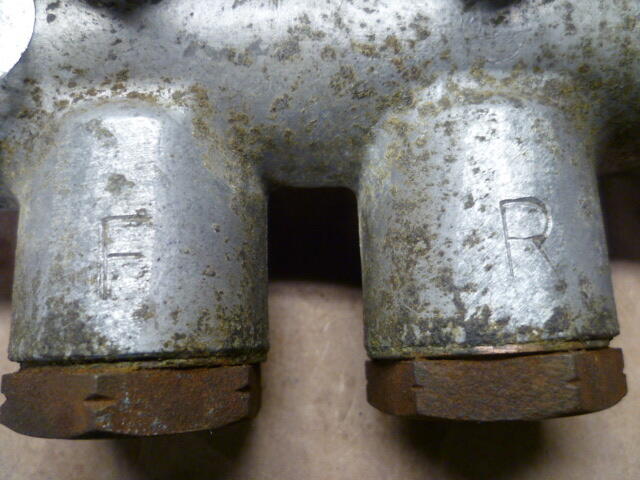
Thanks bluez. So it definitely looks like between 7/70 and 12/70 they changed the markings from stamped-in to cast-in. Haha!! Another detail to look for on the early cars for authenticity. Stock class judges be aware! "It's got an early style M/C." "Yeah, but it's not an early early style."
-
I like it. It's not a particularly stressed part. I say use whatever to make it hold together. Out of curiosity however... If you found a donor, why not just use the whole donor? Was it damaged in a different location or something?
-
Got it. So it sounds like choices to fill that large visible joint after welding was either lead or plastic filler? And they chose the lead.
-
Gotcha. So what is the fixing method? Are there spot welds that do the mechanical joining? I (thankfully?) haven't been in that deep into the body.
-
Awesome, thanks. So it seems the F&R markings were stamped into the masters early on, and then sometime between 7/70 and 12/70 they changed the mold to cast the F&R markings directly into the body. Makes me wonder what was on those early castings before Datsun ground it off. I'm thinking that the circuit locations were stamped with the original "R" being towards the radiator and the original "F" was towards the firewall. Then for some reason (safety or testing of some sort?) they decided at the last minute to change it. Would have been an interesting decision making process. Would have loved to be there to hear part of that.
-
Anyone with an early car have any input into the stamped vs. cast-in "F" and "R" markings? I have strong evidence that this master cylinder was on the car when it left the factory in mid-1970. Or has everyone else had their master cylinder replaced somewhere along the way?
-
Agreed. I wasn't there when they designed it, but I don't see that soldered joint as "flexible". I'm thinking they needed to join two major assemblies in an area that is extremely visible. An area where spot welds would have been unsightly. Maybe they thought the solder joint would not only be strong enough, but it would be much easier to hide? Maybe they just couldn't come up with a way to do a spot weld there because of access? But who am I to say? I wasn't even there.
-
And for comparison, here's the one bought on ebay by @inline6. Note that the "F" and "R" markings are cast into the cylinder body as opposed to mine which are stamped. Now, there's no telling where in the chronology this ebay body came off the assembly line, but it was clearly at some time after they decided where "F" and "R" should really be: I'm thinking that Datsun changed their minds very early on? And then there was a revision to the casting to cast the "correct" locations into the body without having to grind and stamp?
-
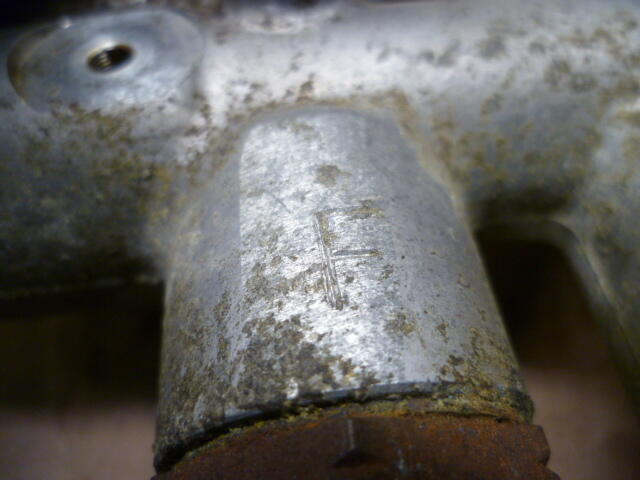
And while I'm posting pics.... Anyone have any info about the markings of "F" and "R"? I have high confidence that the master cylinder I have here is the original one that came from the factory mid-1970. Note that the "F" and "R" circuit markings are STAMPED into the cylinder body, NOT cast in. In fact, if you look close, you can see that there was some sort of grinding that took place before the "F" and "R" were stamped. Like they ground off the original marks and restamped the master with the front and rear as documented on the early cars. Here's what I'm talking about... If you look closely, you can see the grinding marks and the stamped "F" and "R":
-
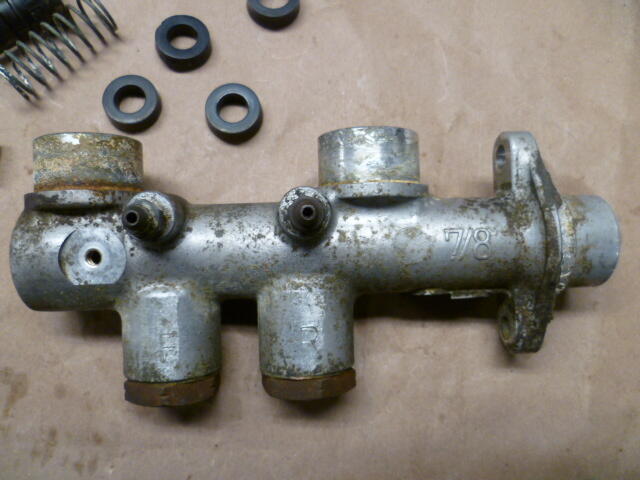
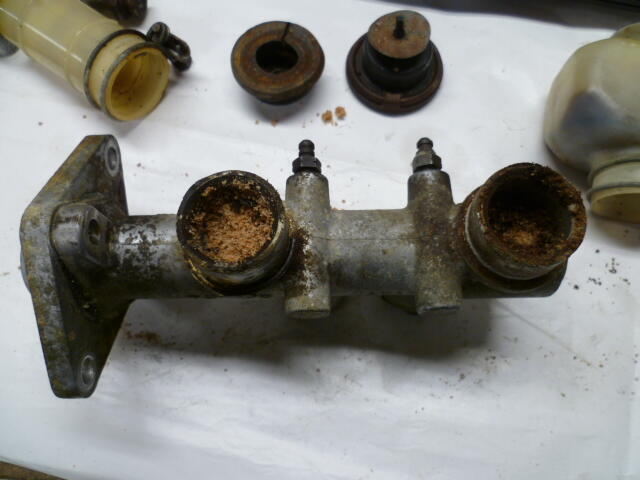
I'm looking for some of the guts from a master cylinder that looks like this. Note that it has the two output ports located between the two reservoir tanks: Hopefully one that comes apart without a permanently disfiguring fight because it doesn't look like this inside:
-
No, no. No apologies necessary! When you posted up a pic of that master cylinder, my immediate thought was "Weird... Why would someone switch the plastic reservoirs from F to R?" Well the answer is "They didn't. It's a new style master that has the "F" closer to the firewall. Duh." Couldn't see the forest through the trees! Oh. and the hardware arrived over the weekend. Looks great. I'm sure there will be something in there I can use for my starter. And the level of patina is perfect! Thanks again @Terrapin Z
-
So I talked to @Terrapin Z in PM about this cylinder, and I completely glossed over the fact that........ It's the later style and is completely different inside than what I'm working with. So unfortunately, I'm out of luck. And a little embarrassed that I didn't notice it until now.
-
Got it. Thanks guys.
-
So pardon my ignorance on the early cars, but how do you read / interpret the date codes on the glass? I'm assuming it's the "M-214"?
-
I saw him with his band. Maybe ten years ago? RIP.
-
Got it. Well, that may be how your life goes, but that's not how stuff works for me. Hahahaha!! I'm gonna toss the master in the ultrasonic cleaner and see what happens after that. If I can't get those valve seats out, I'll just leave them alone. As long as they are clean, they don't seem to be causing any trouble.
-
Ummmm... The rust?
-
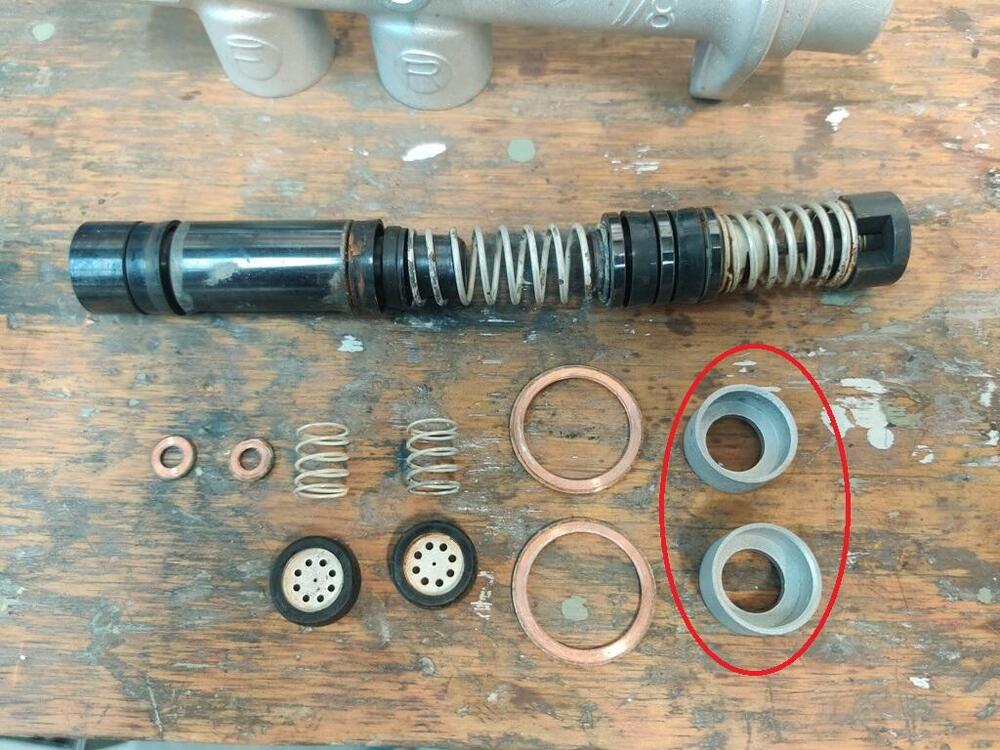
Thanks for the input everyone. @Terrapin Z, I'll reach out about that cylinder you have. And @inline6, did you have to pry those valve seat sleeves out, or did they pretty much fall out after you had cleaned everything up?
-
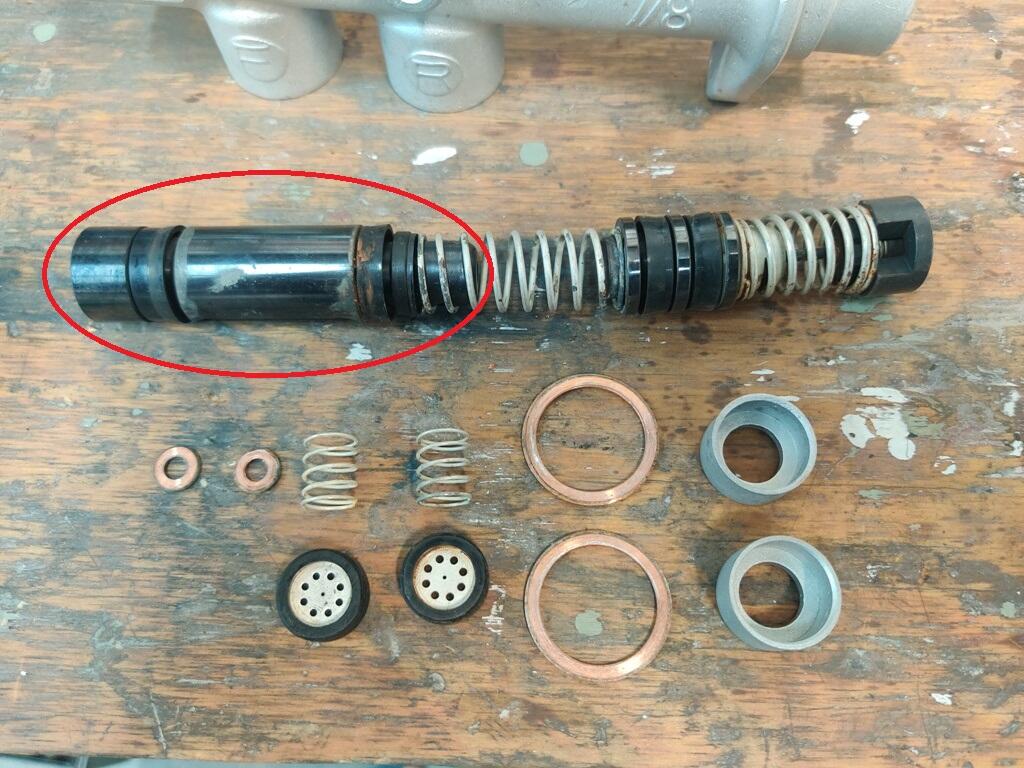
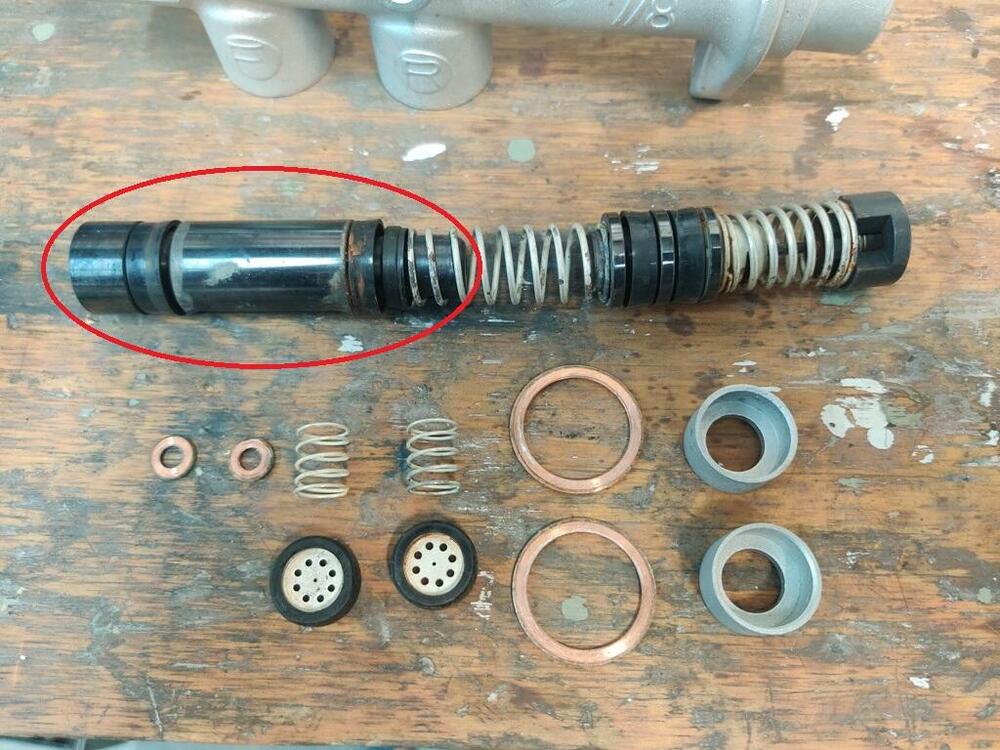
I'm working on an early master cylinder now. @inline6 How did yours turn out? I had to resort to drastic measures to get the rear circuit piston out... Anyone got a half dead early master cylinder around they would offer up as parts? I could use one of these: Also, the valve seats for the output check valves... Mine are stuck in there. How did you get these out?: And just to make searching easier, here are a couple master cylinder related links: https://www.classiczcars.com/forums/topic/68100-master-cylinder-anomaly/ https://www.classiczcars.com/forums/topic/66276-brakes-dragging/ https://www.classiczcars.com/forums/topic/66168-brake-master-cylinder-identification/ https://www.classiczcars.com/forums/topic/21826-brake-master-cylinder-240z/
-
My understanding is that the tapered hardware used elsewhere on the Z's is BSPT. So my expectation is that the original plug on the diff is BSPT as well. That said... I sure wouldn't fault you if you decided to use NPT instead of BSPT for a full custom part of your own design. I probably would.
-
Does it smell like gauss? You know... When you tell someone to smell your finger?
-
What he said. Nice work!
-
LOL! That one looks like the snapped off lower bolt that came off the car! So I think I already have that one!
-
Looks like I got here late and the good ideas are already taken! That idea of a spacer ring inside the tail housing sounds like a great way to mitigate the damage. It looks like there is enough of the original circumference to locate the spacer ring, Some epoxy or sleeve retainer loctite to hold it in place, and you're good to go. Do you have a lathe to make the spacer ring? I don't remember who has one and who doesn't anymore.