Captain Obvious
Free Member
-
Joined
-
Last visited
Everything posted by Captain Obvious
-
 I think he knows. His wife hasn't figured it out yet, but HE knows.
 -
-
-
-
-
My only input into the turbo/NA discussion is that I have no experience at all with turbo stuff. If you go turbo, other than generic "applicable to any engine" stuff, I won't be of any help. Not saying that's a decision factor, but just sayin.
-
-
-
-
Yup. Just like that. Get yourself some thin sheet and cut some narrow strips that you can fold over into a "V" and fit over the ends. At this point, you're almost there!! The big advantage I see of using brass over the stainless is sealing the seams and attaching the end welts. If you have access to a vacuum furnace, you could braze the stainless mesh. (But I still think soldering brass would be easier.) https://www.mcmaster.com/brass-wire-cloth
-
I think I've got some of those injector filters in a box somewhere around here. If I get a chance, maybe I'll mess around a little. I still think the ticket would be to solder up some new brass screen repros. What? Not comfortable enough with a soldering iron or something?
-
I suspect the rest of the car looks fantastic for it's age, so with all due respect, I'm not sure I would consider those seat covers to be an "upgrade". Looks very geographically (regionally) appropriate, but if it were me, I'd go back to stock.
-
If you've got a hot spark at the coil wire but nothing at the plugs, put the rotor back in.
-
My pleasure! That adapter should work fine. Or (if you haven't ordered it yet), I could send you my 1/2 NPT tap and you could just run that into the hole. The trick for me was that I wanted my ninety degree fitting pointing in the correct direction (down) when I was done. So I chased the threads in stages until I was convinced the fitting would get tight at the right location. For you, if you're just running a straight axial adapter, you wouldn't even have to worry about that. Been a while since I looked into it, but I think the only difference between the NPT and BSPT is a small change in the thread form. NPT uses 60 degree threads with a flat at the tips of the threads, and BSPT uses a 55 degree form with rounded roots and crests. Going from BSPT to NPT is easy... Just removes a small amount of metal here and there. Going the other way (from NPT to BSPT) requires more metal removal. Let me know if you would like to do that. So what CHTS did you pick up? Stock Nissan, or something aftermarket?
-
Oh, and you're killing me with that. We just got four inches of heavy wet slush.
-
I'm not sure that filter is going to work, but it's worth a try. The original filter is designed just a little bit too long on purpose so it is crushed some when you screw the plug home. That's what seals the ends. You can see that injector filter is significantly longer than the flat top filter, and I worry that the plastic carrier on that injector filter will just shatter when it's crushed to length. I betcha with a custom cap it could be made to work though... Custom machined brass plug/cap with a small recess in the center that accepts the blind sealed end of that injector filter. In other words, change the cap to be an innie instead of an outie. With an innie that's a snug fit around the outside of the blind end of that injector filter? I bet they're pretty consistent. Just thinking out loud.
-
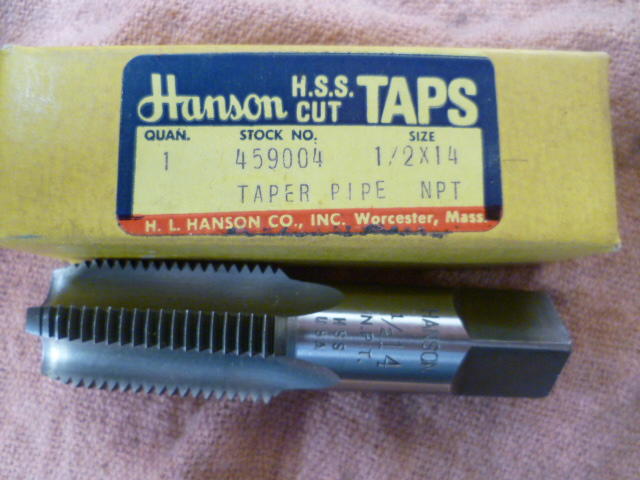
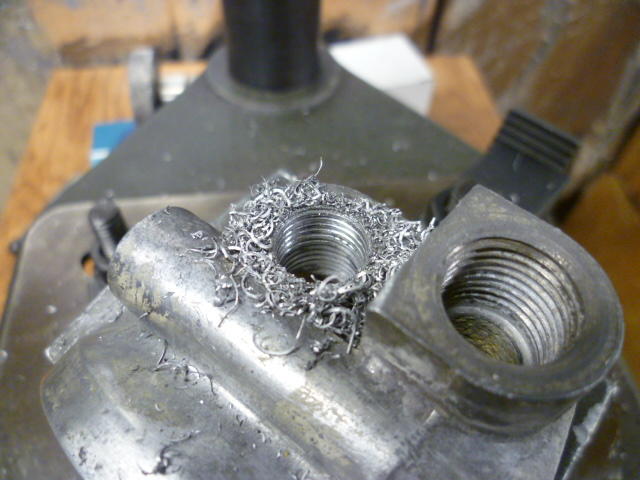
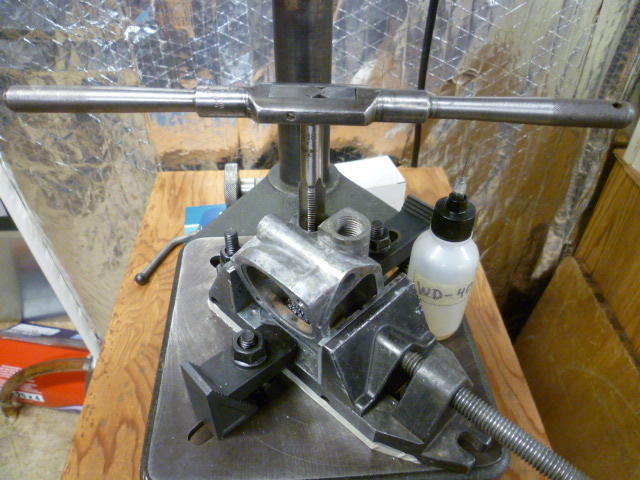
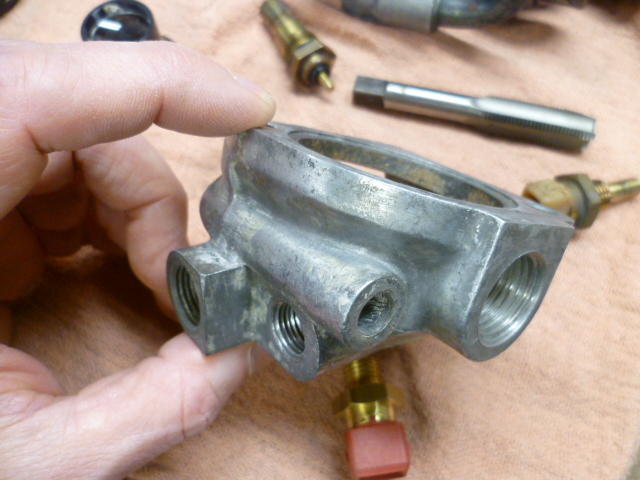
OK. I got sizes. FIrst, the large hole in the 260 housing is 1/2 -14 BSPT. I re-tapped that BSPT hole to 1/2-14 NPT which was really easy since the thread pitch is the same between the two. After I did that, I was able to use a common US NPT fitting to duct hot water to my throttle body. Here's the pipe tap I used: And here's the fitting I used when I put the 260 thermostat housing on my 280. It's a 90-degree PEX fitting. 1/2 NPT on one end, and the ability to use rubber hose on the other: In-situ, it looks like this. The other side of the throttle body goes to the metal hardline around the front of the engine and ties into the water pump inlet: And here's a pic of the 280 EFI temperature sensor. Now hopefully I'll remember off the top of my head what threads it uses:


-
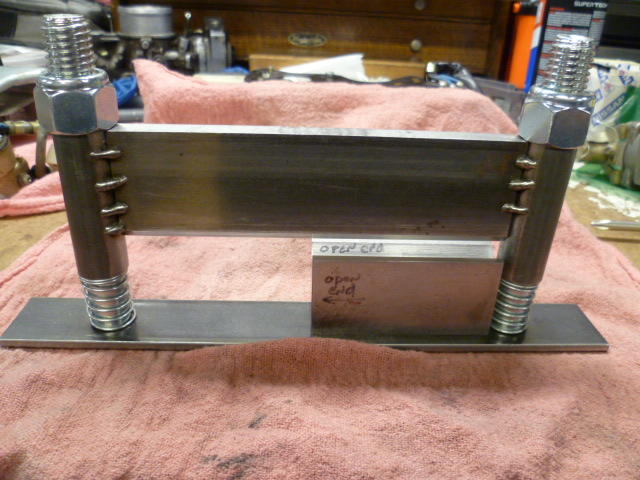
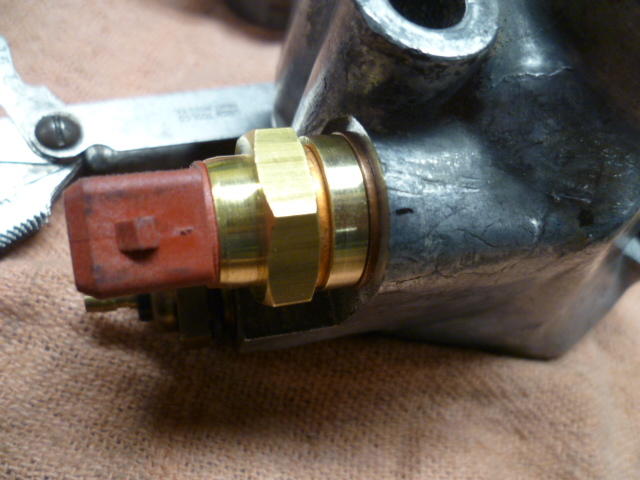
No, unfortunately the 280 temp sensor did not fit correctly into that hole.. And that's one of the things I did to the 260 housing was to figure out a way to make that sensor fit. The temp sensor is straight threads and seals with a washer, so not only is the thread pitch wrong, but the sealing style is wrong too. I wasn't thinking this at first, but my project is actually relatively applicable to what you want to do, isn't it? So here's what I did to get that sensor to fit... First, I drilled out the original hole some: Tapped it to a straight thread. 5/8-18 I believe: And them made a brass adapter to bring the hole size back to what is necessary for the temp sensor: A little blue threadlock so the sensor will turn before the adapter will, and glue the adapter into the housing. Then thread the sensor into the adapter: All that said... That's why I think it would be easier to just use an adapter to the other larger hole. That option was not available to me because I had plans for that other hole. I use the larger hole to supply water to my throttle body. I'll check all the sizes when I get a couple moments in the shop.


-
Don't think so. Last I looked, there were a couple people out there in the ether that make aftermarket replacements, but I think the design of the factory parts (the newer version at least) are better. There were two revisions from the factory... The early ones (like what you have on your car) sucked because they fell apart (like what yours is ready to do). The later version (like the one on the far right in that pic) were put into service to replace the early ones and do not suffer the same fate. I actually don't know if they are still available at Nissan new. I think you should check and report back.
-
"It's a COOKBOOK!!" Fantastic. I was also trying to make a reference to Soylent Green, but it got kinda lost in the wash.
-
@z8987 if it's still available, you should buy the (newer design) oil spray bar all the way on the right in this pic: Parts for sale by @madkaw in this thread: https://www.classiczcars.com/forums/topic/60915-various-datsun-engine-parts/
-
The only hole on the 260 thermostat housing that is NOT tapered threads is the one closest to the head where the temp gauge sender unit goes. Everything else is BSPT. Now as for the sizes... I don't remember offhand. I did a whole bunch of modification to a 260 housing and adapted it to use on my 280, but like many of my projects (when I don't think anyone else could possibly benefit from the details), I didn't keep good notes. The project is done and it worked out great, but I don't have the sizes documented. I can tell you, however, that there is nothing 5/8 BSPT in the 260 housing. That's too big. I believe he largest hole in the 260 housing is 1/2 BSPT which is great because it's the same thread pitch (14 threads / inch) as 1/2 NPT. So I just ran a 1/2-14 NPT tap into the original BSP hole and converted mine from BSPT to NPT. Then you can use easy to find adapters to change from there if necessary. At least that's what I think I did... I'll double check the sizes and let you know for sure.
-
Haha!!! I'm not posting any pics of me from 1980.
-
-
That's Logan 5. It's a cheesy movie considering today's special effects, but it's a classic sci-fi story. How do you maintain utopia? Step one: Don't have any old people. At least they didn't eat them. You know... To serve man. (how many other references can I stuff into a few short sentences? )