


Captain Obvious
Free Member
-
Joined
-
Last visited
Everything posted by Captain Obvious
-
 madkaw, sorry to hear you aren't up to the travel. I wouldn't assume the tune up was a failure though. Might just take some time? bpilati, glad to hear you're making the trip anyway. On final countdown! Bought emergency road beer yesterday. Backup just in case all other options fall through.
 -
I'm not sure that production is really a good idea... I worry that would just encourage people to mess with their AFM's when they probably shouldn't. My AFM came to me already messed with, and the glue blobs completely removed from the inside. Even with bright light, magnification and careful study, I could never determine where my AFM started. My PO removed all traces of the original calibration marks. All I knew was that my car ran very rich, has aftermarket injectors, and my PO messed with everything including the AFM. I had exhausted all other avenues and came to the back-hand conclusion that my PO messed up my AFM. It would certainly have fit his MO. He was after "more power", and I think someone told him that "more fuel makes more power" so he tweaked the AFM. I have since re-tweaked my AFM and it runs waaaaaay better now. So about the tool... I do have a milling machine, but I didn't use it for the gear teeth. I did the teeth on a "shaper". I'm sure you know what that is, but for those who never heard of one, the shaper is the predecessor to the milling machine. Old school. The saying is "You can make anything you want on a shaper. Except money." One tooth at a time and then rotate the workpiece to the next position using an indexing head: Here's a shot of my ancient indexing head. From the late 1800's or very early 1900's: Sorry for the thread-jack!
-
That tube should make it's way to the engine compartment and connect to your "flow guide valve". It's a predecessor to the carbon canister and is intended to store fuel vapors inside the engine crankcase while the engine isn't running.
-
What he said. Don't mess with the AFM until you have exhausted all other options. But speaking of such things... I just finished my handy-dandy patent pending AFM adjustment tool. No more risk of SPROING-ing my spring anymore! Looks like this: And here's how it's used. The tip fits in the little hole and the tool gear meshes with the AFM gear and allows controllable adjustment without worrying about losing control. I wasn't there when they calibrated the AFMs at the factory, but I suspect they used something like this:
-
Well you guys who can't make it will sure be missed. @madkaw So what's the latest with you? How's the spine? Good enough to travel or are you definitely out? Gary and I are planning to get to town sometime maybe late Wednesday morning. Will probably go straight to the judged show (since that's the direction we will be approaching from anyway) and then head to the hotel area after that. And I don't think there was anything nefarious or spy worthy going on here. Or was there...
-
Well that's too bad about the two of you! @bpilati Brian, what are you gonna do? I'm not officially registered yet as I'm going as a guest, but if there are no provisions for a refund from the committee, I could maybe use your registration and send you some $$ to help recoup the losses? @siteunseen What's the latest with you? Bucket list houseboat trip, or Zcon Atlanta? @240260280 What's the latest with you too? New job still shackling you home, or is there a chance you and your co-pilot could make it?
-
Good eyes Zed Head. I wasn't even looking for details yet, just big picture stuff. That atmospheric vent on the valve cover will certainly throw off the mixture some, especially at idle. Can't see it in the pic, but I assume the hole on the rubber duct between the AFM and throttle body is capped off. There will be a small amount of air pulled out of the block through the PCV which would be unaccounted for by the AFM.
-
Great story so far. Everything, with the exception of the potential compression issues, is completely typical. Valves are out of adjustment. Timing is out of adjustment. Wheel cylinders and calipers are frozen or leaking (or both). Power booster has sucked down brake fluid and is a rusty mess inside. Whole bunch of little vacuum leaks throughout the EFI system. Whole bunch of corroded connectors throughout the system and most importantly, the temp sensor in the thermostat housing is probably not making reliable connection to the ECU. Throttle body is worn and sticky. AAR probably doesn't work reliably. Junk in the fuel tank, and if someone bypassed the fuel filter, you've probably got clogged or partially clogged injectors. If the car had been in the hands of "experts" in the past, they may have incorrectly adjusted the AFM. Questionable fuel pressure. Leaky (or bypassed) heater core. Empty A/C system. All the tubes in the HVAC system have turned to dust (they may "look OK", but in reality they are dust still holding the shape of a tube). Shall I go on? The little ray of sunshine that I am? Not even mentioning electrical modifications from previous owners or mechanics in the past. It may sound daunting, but all that stuff is really pretty simple. You just have to know where to look. It appears everything is there, and you sound enthusiastic and knowledgeable enough to bring it back to the realm of reliable! The only thing that concerns me at this point is the compression... Did you remember to block the throttle wide open while performing the compression test? Looks like a great project to me!!
-
Kats, Here in the USA, each state governs it's own inspection process. And as you could imagine, the strenuousness of those inspections vary wildly from state to state. Some states have even decided they do not need any inspections at all. Here in Pennsylvania where I am, there is a once per year inspection that I consider very thorough. For example... Lights, glass, fuel system, body and frame integrity, tires, safety equipment are all inspected. Put the car up on a lift to check the suspension, steering, and exhaust systems. Remove wheels to check the brakes, etc. And we also have an emissions test as well depending on the age of the car and the mileage it has driven per year. But one thing they do NOT check is the alignment. If everything looks OK and the bearings and suspension are tight and there is enough depth to the tire tread you're good. So if nothing is loose or worn and the car feels fine during a short on-road test drive, then a suspension out of alignment will not be flagged as part of the inspection.
-
Welcome aboard. Looks like a nice car for a project. If I'm ever in the area, you can kick my butt at Cricket. Just make sure the Z is out of the way!
-
Hi Kats, Thank you for the information on the side slip test. It looks like a fast "drive over" alignment test to check the toe settings. I've never seen that before. Thanks!
-
Diaphragm pumps like that require two check valves. One on the input, and one on the output. If either of those check valves aren't working properly, the pump won't. I gotta believe the answer would be in this thread somewhere: https://www.classiczcars.com/forums/topic/50679-rebuilding-the-nikki-fuel-pump/
-
Kats, Great inspection results. I've always believed that if an engine is tuned and running properly, the emissions numbers should look pretty good even without todays emissions controls. Of course, it won't be as good as running through a modern catalytic convertor, but you should be able to do OK like you did. I have a question... What's the "side slip test"?
-
-
Yeah, I was wondering about mechanical deformation as well. If you would crush in the end where the spring seats, you would increase the spring force, and hence, increase the operating pressure. But I think it would be an obvious significant deformation. How about just plugged up with crud? I'd be hard pressed to be convinced that it would provide a constant offset, but crud could certainly raise the equilibrium pressure. How about a 40 year old diaphragm that is stiff and doesn't flex as easily as it did when it was first produced? Now it takes more vacuum to pull the seat off the outlet orifice? In any event, a six psi offset is something that should be taken care of.
-
Gauge looks like it works great. Isn't it nice to see pretty much rock solid numbers there even when you goose the throttle? So, as for the numbers... It's definitely looking like a faulty FPR. Running the return line into a bucket is a good idea, but I'd be surprised if a partial blockage there would result in such a constant deltaP on the gauge. Easy to check though. However, like you, I'm having a hard time coming up with a way the FPR would run high though. Anyone got theories on that?
-
Flat tops ftw.
-
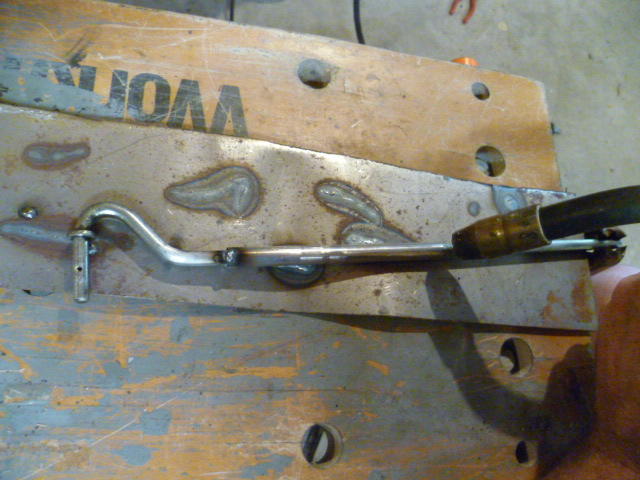
I would replace the brass tube with a piece of steel tube and tack weld it in place. Would look like this:
-
-
-
Well I've kinda lost the pea on where the vacuum measurements are being taken at this point, but I've easily seen 20inHG when measuring on the port vacuum source at the throttle body. You get the throttle plate in the right position and that vacuum really spikes. Depending on how it's running and if you need the throttle open far enough just to keep it running... Interestingly enough, I don't remember if I ever measured a non-ported source on the main intake manifold log on my car. Not sure I ever needed to.
-
I know I would. I know beauty is in the eye of the beholder, but if I had one of those in my stable, you'd have to pull me out of the garage every night.
-
The manual says it exists to prevent hysteresis in the advance mechanisms. No idea... Makes me think they were having some small issue in the field and management went to the engineering department and said "Don't care how, but fix it". No idea if there really was a problem, but that's what it smells like to me.
-
Wait!! I knew you looked familiar!! You're D-Day, right? You almost ran over me one night while I was playing guitar on the stairs!
-
I believe that is the "contactor". We discussed it some in this thread a number of years ago: https://www.classiczcars.com/forums/topic/42650-distributor-question-the-contactor/?tab=comments#comment-384319 Unfortunately the pics are gone, but I can reload them if it would help. I don't know if the page numbers are the same in everyone's FSM, but in mine, the contactor get's mentioned on pages EE-25 and EE-26.


