


Captain Obvious
Member
-
Joined
-
Last visited
Everything posted by Captain Obvious
-
 Looks like a bullet hole to me. Is there a matching hole in the door panel?
Those two gauges share the same ground connection, but so do a whole bunch of other things. I don't think that's going to be the issue. I'm having a hard time coming up with a common denominator failure between the fuel and temp gauges that would cause the symptoms you're experiencing. So if the accessory in the lighter doesn't yield any insights, then try this... Turn the key to ON and see what the gauges do. If the temp gauge stays at "cold", go out to the engine compartment, pull the single wire off the temperature sending unit (should be yellow/white) and connect that wire directly to engine ground. That should run the TEMP gauge all the way to HOT.
The little box on the back of the speedo does not contain the voltage regulator for the gauges. That box contains a "speed switch" that disables the throttle opener system below a certain speed (FSM says 13 mph). This is done with the help of a small set of contacts built into the speedometer that closes at low speed. Basically... They don't want the opener system to be actuated as you are coasting slowly to a stop. So the voltage regulators for each gauge are built into each gauge. In other words, the temp/oil gauge has it's own built in regulator, and the fuel gauge has a different regulator built into it. But getting to the root of your question.... If you lost both temp and fuel at the same time, it's probably something other than the regulators both failing at the same time. Are you sure you didn't lose temp and OIL (not fuel) at the same time?
Well without a doubt, this guy is an order of magnitude more crazy than I am. I bow in honorable appreciation to the ridiculousness. The electro-etching of the number onto the head of the bolts and making your own nyloc style nuts. All I can say is "wow"!!
Hmmm... Should have picked up oil by now. Do you have the spark plugs out? It will spin a lot faster with a lot less load on the starter with the plugs out. Also, the positive displacement style oil pump probably doesn't do a great job pumping air, so I've always primed it before I put it on. Just pour oil into the pump before you stuff it up into place. Not full to the brim, but just enough that you can tilt the pump during install without the oil running over the sides and making a mess. I also pre-filled the oil filter a bunch. Lastly, I've got my oil prime rod that I can send, but I bet you could make something for a lot cheaper than the shipping.
And that's important for your cars too, not just your body.
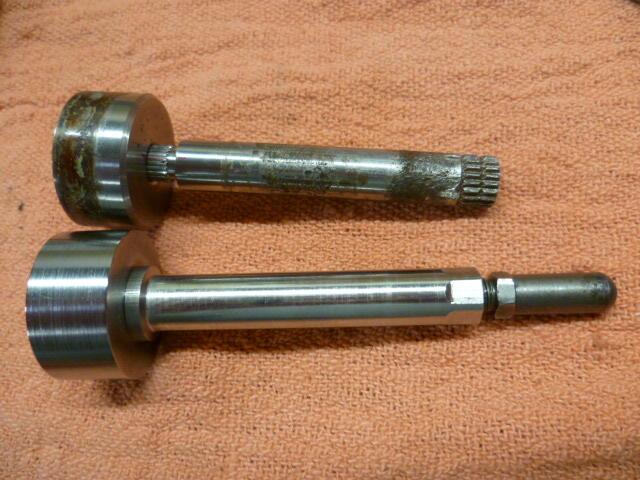
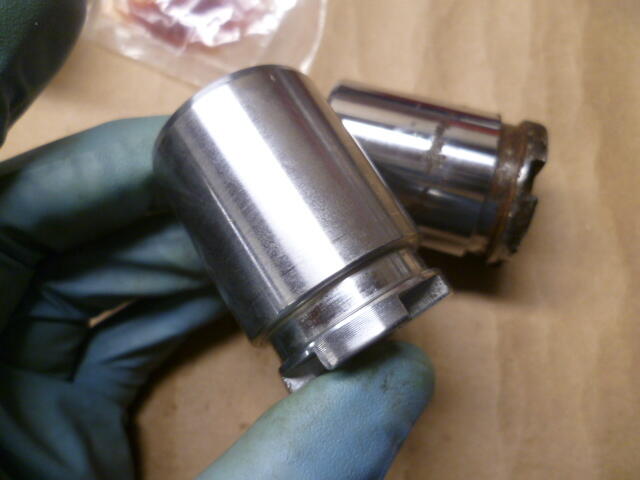
Day late, but... Yes, it is splined and pressed in. I made a new one that threads in instead of pressed in with splines. Made it out of stainless so it wouldn't rust next time Here's old and new: And save the rounded tip piece. It's special because it's hardened. Or if you do have a new tip made, make sure you have it heat treated to a similar hardness.
Looks like a bullet hole to me. Is there a matching hole in the door panel?
Those two gauges share the same ground connection, but so do a whole bunch of other things. I don't think that's going to be the issue. I'm having a hard time coming up with a common denominator failure between the fuel and temp gauges that would cause the symptoms you're experiencing. So if the accessory in the lighter doesn't yield any insights, then try this... Turn the key to ON and see what the gauges do. If the temp gauge stays at "cold", go out to the engine compartment, pull the single wire off the temperature sending unit (should be yellow/white) and connect that wire directly to engine ground. That should run the TEMP gauge all the way to HOT.
The little box on the back of the speedo does not contain the voltage regulator for the gauges. That box contains a "speed switch" that disables the throttle opener system below a certain speed (FSM says 13 mph). This is done with the help of a small set of contacts built into the speedometer that closes at low speed. Basically... They don't want the opener system to be actuated as you are coasting slowly to a stop. So the voltage regulators for each gauge are built into each gauge. In other words, the temp/oil gauge has it's own built in regulator, and the fuel gauge has a different regulator built into it. But getting to the root of your question.... If you lost both temp and fuel at the same time, it's probably something other than the regulators both failing at the same time. Are you sure you didn't lose temp and OIL (not fuel) at the same time?
Well without a doubt, this guy is an order of magnitude more crazy than I am. I bow in honorable appreciation to the ridiculousness. The electro-etching of the number onto the head of the bolts and making your own nyloc style nuts. All I can say is "wow"!!
Hmmm... Should have picked up oil by now. Do you have the spark plugs out? It will spin a lot faster with a lot less load on the starter with the plugs out. Also, the positive displacement style oil pump probably doesn't do a great job pumping air, so I've always primed it before I put it on. Just pour oil into the pump before you stuff it up into place. Not full to the brim, but just enough that you can tilt the pump during install without the oil running over the sides and making a mess. I also pre-filled the oil filter a bunch. Lastly, I've got my oil prime rod that I can send, but I bet you could make something for a lot cheaper than the shipping.
And that's important for your cars too, not just your body.
Day late, but... Yes, it is splined and pressed in. I made a new one that threads in instead of pressed in with splines. Made it out of stainless so it wouldn't rust next time Here's old and new: And save the rounded tip piece. It's special because it's hardened. Or if you do have a new tip made, make sure you have it heat treated to a similar hardness.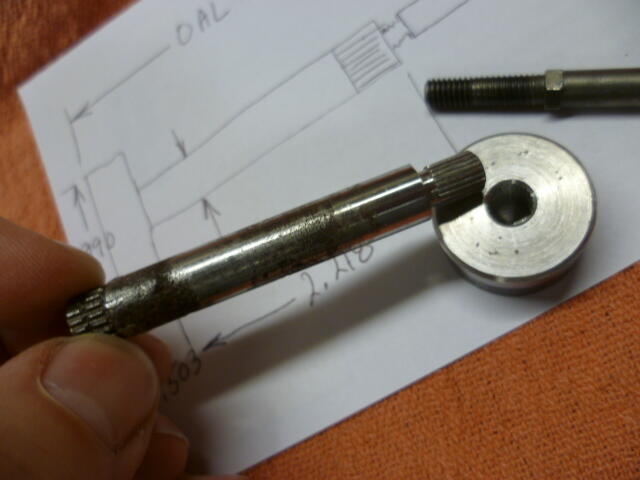
 Late to the party, but that's what I've seen as well. Water bypass pipe closest to the engine, then engine sling next outboard from that.
I don't have any input into identification of what would be the correct advance canister, but I'm a little puzzled by the reaction you had with the one you tried. At idle, the vacuum advance should be doing nothing. In fact, you should be able to connect or disconnect the vacuum line from the canister with no noticeable effect. The vacuum source is a ported source, and there should be no vacuum in the hose when the engine is at idle. I'm not sure why your engine wanted to rev and then die.
That'll do it. That's the same issue that inline6 had with his master. Stuck open. Cars really don't like to just sit. You need to get in and push the pedals a couple times a week just to keep stuff moving. Make "vroom-vroom" noises if it seems appropriate.
Paid attention while driving my 77 yesterday. I think it's just the rubber boots that pushes my shifter away from 1-2. I don't think there are any intentional springs on that side.
@zKars, Were the bushings correct for the 240 or the 260/280? I'm guessing they are focusing on the earlier cars since that's where the money is.
The 1972 FSM says the ET is 15mm for the 5 inch wide wheels. I did not find documentation of what the earlier 4 1/2 inch wheels had for ET (offset), but I took some quick crude measurements comparing the 4 1/2 inch to the 5 inch wheels and it appears they added 1/4 inch to each side. If that is the case, then the ET would be the same for the 4 1/2 inch wheels.
My 77 5-speed shifter does rest in center 3-4 position if you aren't pushing it to one side or the other. There is something pushing it away from 1-2. The spring pushing away from 5-R is much stronger than the force pushing away from 1-2. Might just be the rubber boots and linkage stuff, but there is something.
I haven't used them, but I'm not sure about the validity of the fitment claim... The later cars used a different (wider) bushing than the earlier cars. I think the 240 used narrow and 260-on used wider.
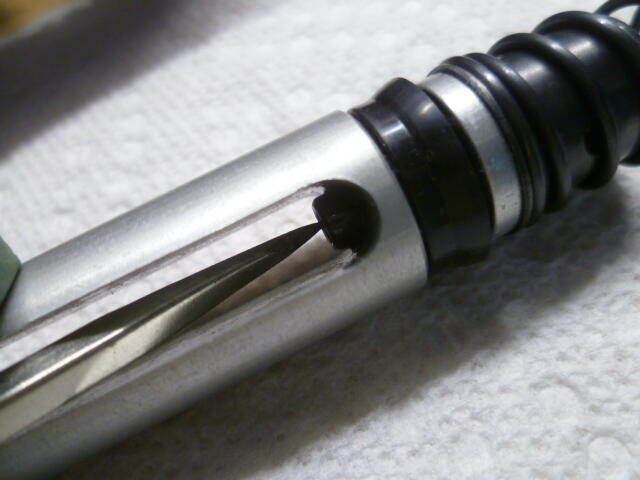
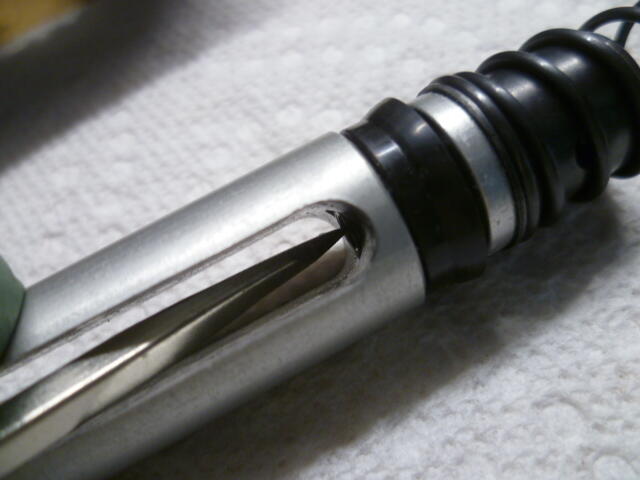
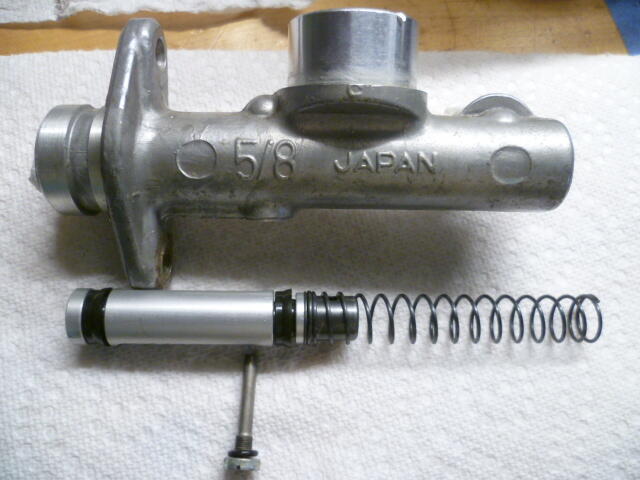
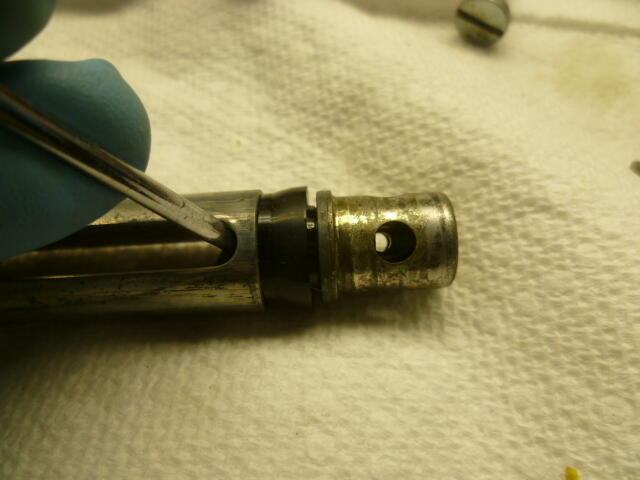
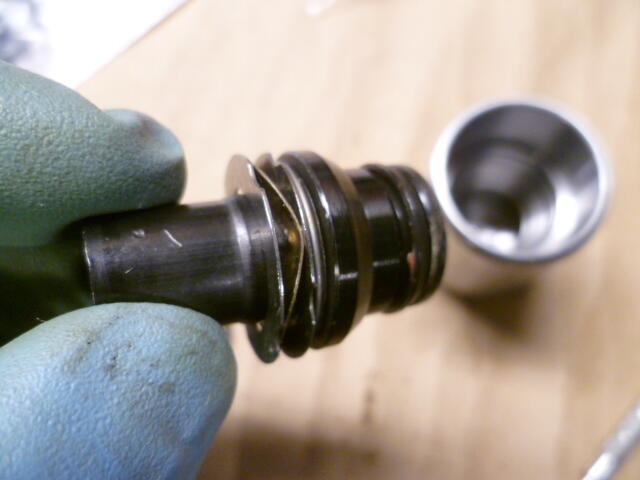
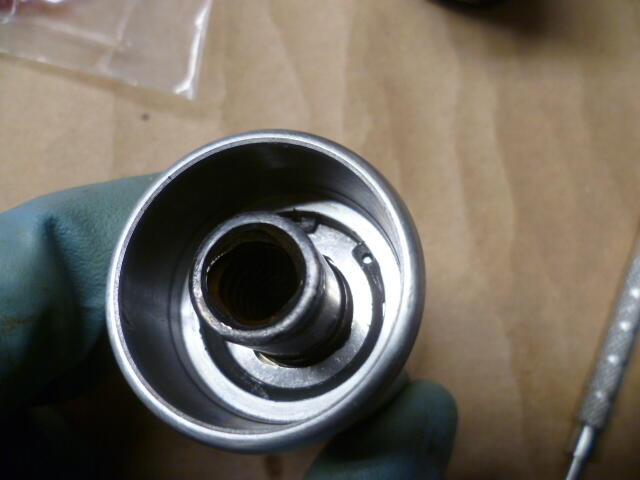
I posted some pics in that other thread detailing the valve in the brake master cylinder. The later clutch master cylinder is the same concept. Here's a couple pics. Looks like this: This screw cuts across the master inside and opens the valve when the clutch master is at rest: Opening the valve with the tip of a screwdriver: You can see daylight through the valve when it is pushed open:
Late to the party, but that's what I've seen as well. Water bypass pipe closest to the engine, then engine sling next outboard from that.
I don't have any input into identification of what would be the correct advance canister, but I'm a little puzzled by the reaction you had with the one you tried. At idle, the vacuum advance should be doing nothing. In fact, you should be able to connect or disconnect the vacuum line from the canister with no noticeable effect. The vacuum source is a ported source, and there should be no vacuum in the hose when the engine is at idle. I'm not sure why your engine wanted to rev and then die.
That'll do it. That's the same issue that inline6 had with his master. Stuck open. Cars really don't like to just sit. You need to get in and push the pedals a couple times a week just to keep stuff moving. Make "vroom-vroom" noises if it seems appropriate.
Paid attention while driving my 77 yesterday. I think it's just the rubber boots that pushes my shifter away from 1-2. I don't think there are any intentional springs on that side.
@zKars, Were the bushings correct for the 240 or the 260/280? I'm guessing they are focusing on the earlier cars since that's where the money is.
The 1972 FSM says the ET is 15mm for the 5 inch wide wheels. I did not find documentation of what the earlier 4 1/2 inch wheels had for ET (offset), but I took some quick crude measurements comparing the 4 1/2 inch to the 5 inch wheels and it appears they added 1/4 inch to each side. If that is the case, then the ET would be the same for the 4 1/2 inch wheels.
My 77 5-speed shifter does rest in center 3-4 position if you aren't pushing it to one side or the other. There is something pushing it away from 1-2. The spring pushing away from 5-R is much stronger than the force pushing away from 1-2. Might just be the rubber boots and linkage stuff, but there is something.
I haven't used them, but I'm not sure about the validity of the fitment claim... The later cars used a different (wider) bushing than the earlier cars. I think the 240 used narrow and 260-on used wider.
I posted some pics in that other thread detailing the valve in the brake master cylinder. The later clutch master cylinder is the same concept. Here's a couple pics. Looks like this: This screw cuts across the master inside and opens the valve when the clutch master is at rest: Opening the valve with the tip of a screwdriver: You can see daylight through the valve when it is pushed open:
 Did you try loosening up the flare nut on the back of the caliper and seeing if that would relax the caliper grab? Rebuilding that style of caliper is usually a pita. Different car, but probably similar in concept. Complex internal guts in the rear pistons:
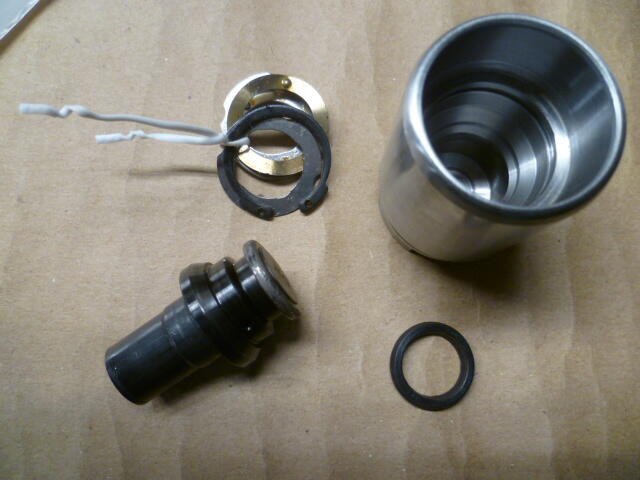
 And that clutch M/C is the later type. You can do a kinda-sorta bench bleed of the clutch master by loosening the flare nut on the outlet and just let it gravity bleed into a rag. If fluid doesn't flow, I suspect it's a problem with the linkage. If you loosen the nuts that hold the clutch master onto the firewall, does it a) push away from the firewall, b) remain pulled tight against the firewall, or c) it's kinda neutral? It should be neutral with a tiny bit of slop in the linkage. If it pushes away, you need more play in the linkage and may not be opening the internal valve.
Well if you are simply looking for a test, I would do something like this: Hit the brakes and confirm that the rears are locked up. Let off the brakes and confirm that the rears are still tight. Reach behind a rear caliper and loosen the flare nut. Let some fluid bleed out. If the rears relax when the fluid bleeds out, then you were holding pressure. If they don't relax, then it's probably something in the caliper itself that's sticking. And if the rears DO relax, I would repeat the test, but this time let some fluid bleed out from the flare nut on the underside of the master cylinder. That will help identify where along the path the issue is. If it's holding pressure, I would expect it to be right there at the master cyl. And if that is the case, I might be able to help walk you through removing the check valve.
And as for your clutch... Which style clutch master are you using (early or late*)? Have you got a pic? And same thing goes for the clutch as goes for the brakes... When you're foot is not on the pedal, it is important for the master to return to un-actuated "at rest" position. If it does not return to "at rest" it will not bleed or work properly. * Early has the reservoir in front of the output hard line connection, while the late style has the reservoir behind the hard line output connection. Both have a valve inside, but they operate differently.
Just because you are using a later master cylinder, I wouldn't assume it doesn't have check valves. In fact, I would stand by my original belief that there is one. Let me put it a different way... Every master cylinder (70-83) I've messed with has some sort of check valve built into it. Some of them do more "checking" than others, but all of them had some sort of device inside that either stopped, or at least slowed down, the fluid back into the master. Some of them had a "residual pressure" valve built into them that would hold some small amount of pressure (couple psi) in the lines, and some of them had a device that did not HOLD any pressure, but would allow much faster flow OUT of the master than back INTO the master. Does that make sense?
The check valve (if there is one) is built into the master cylinder. Not all master cylinders I've messed with have a check valve. Some of them have a "slows down the return valve", but it's not a full stop. Others do have a full stop below a certain pressure. On the earlier 240Z, there are two "brass devices" under the right rear*. The first is a proportioning valve, and the second one is just a dumb "T" junction point. The feed comes from the master to the proportioning valve, and the output of the prop valve goes to the splitter "T". The part that zcardepot sells is the dumb "T" splitter junction. However, neither of those brass devices contain a check valve. *Closer to the right than the left.
And that clutch M/C is the later type. You can do a kinda-sorta bench bleed of the clutch master by loosening the flare nut on the outlet and just let it gravity bleed into a rag. If fluid doesn't flow, I suspect it's a problem with the linkage. If you loosen the nuts that hold the clutch master onto the firewall, does it a) push away from the firewall, b) remain pulled tight against the firewall, or c) it's kinda neutral? It should be neutral with a tiny bit of slop in the linkage. If it pushes away, you need more play in the linkage and may not be opening the internal valve.
Well if you are simply looking for a test, I would do something like this: Hit the brakes and confirm that the rears are locked up. Let off the brakes and confirm that the rears are still tight. Reach behind a rear caliper and loosen the flare nut. Let some fluid bleed out. If the rears relax when the fluid bleeds out, then you were holding pressure. If they don't relax, then it's probably something in the caliper itself that's sticking. And if the rears DO relax, I would repeat the test, but this time let some fluid bleed out from the flare nut on the underside of the master cylinder. That will help identify where along the path the issue is. If it's holding pressure, I would expect it to be right there at the master cyl. And if that is the case, I might be able to help walk you through removing the check valve.
And as for your clutch... Which style clutch master are you using (early or late*)? Have you got a pic? And same thing goes for the clutch as goes for the brakes... When you're foot is not on the pedal, it is important for the master to return to un-actuated "at rest" position. If it does not return to "at rest" it will not bleed or work properly. * Early has the reservoir in front of the output hard line connection, while the late style has the reservoir behind the hard line output connection. Both have a valve inside, but they operate differently.
Just because you are using a later master cylinder, I wouldn't assume it doesn't have check valves. In fact, I would stand by my original belief that there is one. Let me put it a different way... Every master cylinder (70-83) I've messed with has some sort of check valve built into it. Some of them do more "checking" than others, but all of them had some sort of device inside that either stopped, or at least slowed down, the fluid back into the master. Some of them had a "residual pressure" valve built into them that would hold some small amount of pressure (couple psi) in the lines, and some of them had a device that did not HOLD any pressure, but would allow much faster flow OUT of the master than back INTO the master. Does that make sense?
The check valve (if there is one) is built into the master cylinder. Not all master cylinders I've messed with have a check valve. Some of them have a "slows down the return valve", but it's not a full stop. Others do have a full stop below a certain pressure. On the earlier 240Z, there are two "brass devices" under the right rear*. The first is a proportioning valve, and the second one is just a dumb "T" junction point. The feed comes from the master to the proportioning valve, and the output of the prop valve goes to the splitter "T". The part that zcardepot sells is the dumb "T" splitter junction. However, neither of those brass devices contain a check valve. *Closer to the right than the left.


Important Information
By using this site, you agree to our Privacy Policy and Guidelines. We have placed cookies on your device to help make this website better. You can adjust your cookie settings, otherwise we'll assume you're okay to continue.