


Captain Obvious
Free Member
-
Joined
-
Last visited
Everything posted by Captain Obvious
-
 The input filters could certainly become intermittent if vibration has taken it's toll. You could put meter across the visible wire coming off one side of the input choke coil and it's corresponding ECU connector pin. Should be pretty easy to figure out which pins they are filtering. Many of them are dead shorted, but the few (three?) that have the coil installed should be easy to determine. Looking at the approximate positions of the filters on the board and the pin functions of the ECU I/O connector, I'd guess that the filters are on pins 7, 27, and 13. Those would be inputs to the ECU that would be susceptible to noise. Those pins are 7) the AFM slider, 27) the air temp input, and 13) the water temp input signals respectively. But of course, that's a guess from across the interwebs. Here's a crude sketch I whipped up bunch of years ago. I know this info is available in other forms, but this form made sense to my brain: So about the failure mode for the Darlington outputs... No, they would probably not fail in the mode you are seeing. HOWEVER, the solder joints TO those transistors could fail with the symptoms you are describing. Any solder joint on the board could potentially go intermittent over time, but it would be unlikely for most of them. Vibration, stress, and temperature would be the risk factors. So about those risk factors... The reason those output transistors are so big and bolted firm to the chassis is that they get hot. There's your heat risk factor. And the I/O connector gets mechanically stressed every time you move the wiring harness or attach/detach the harness to the ECU. There's your stress factor there. Bottom line... If I were looking for a failing solder joint, I would start at the I/O connector and the output transistors. However, all that said, if I'm placing a bet at window #3, I'm betting the root problem is not inside the ECU case.
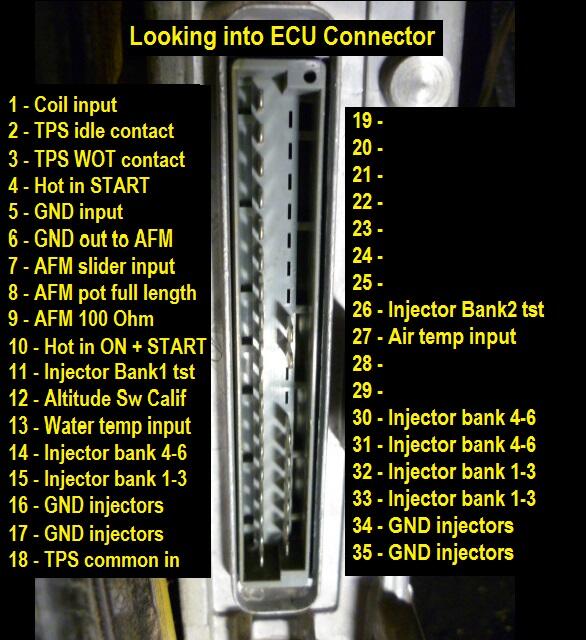
-
Wow. I wish I could nap a set of pistons/seals/springs/washers for $85. If you see another one of those, please send me a quick note to let me know? Nobody will see the pistons after they are installed, so it's not like you're going to be judged on whether that coating exists or not. And I understand about polishing it off... The decision which is better...Keep some of the original failed coating, or just remove it all. Totally understand. If you do decide to look into it, there is probably nothing very special about that coating, It's a black oxide coating on steel. It's a controlled rusting kind of coating. Similar to "gun blue". Any coating shop should be able to reproduce it, but cost prohibitive for a single piece. As for the changeover point between the stamped lettering and the cast-in lettering? In that other thread it appears that point is between 7/70 and 12/70 when they changed the markings from stamped-in to cast-in. I got the chance to mess with a 9/70 car and it had the cast in lettering. So with a sample size of one, I could narrow the date window down to between 7/70 and 9/70. However: 1) It's a sample size of one. 2) I don't know if it was the original brake master on the 9/70 car, and... 3) The 9/70 car was an automatic, and some of the stuff on the autos is different than the manuals from the same month (valve cover for example). All that said, I think your MAY car should have the stamped lettering.
-
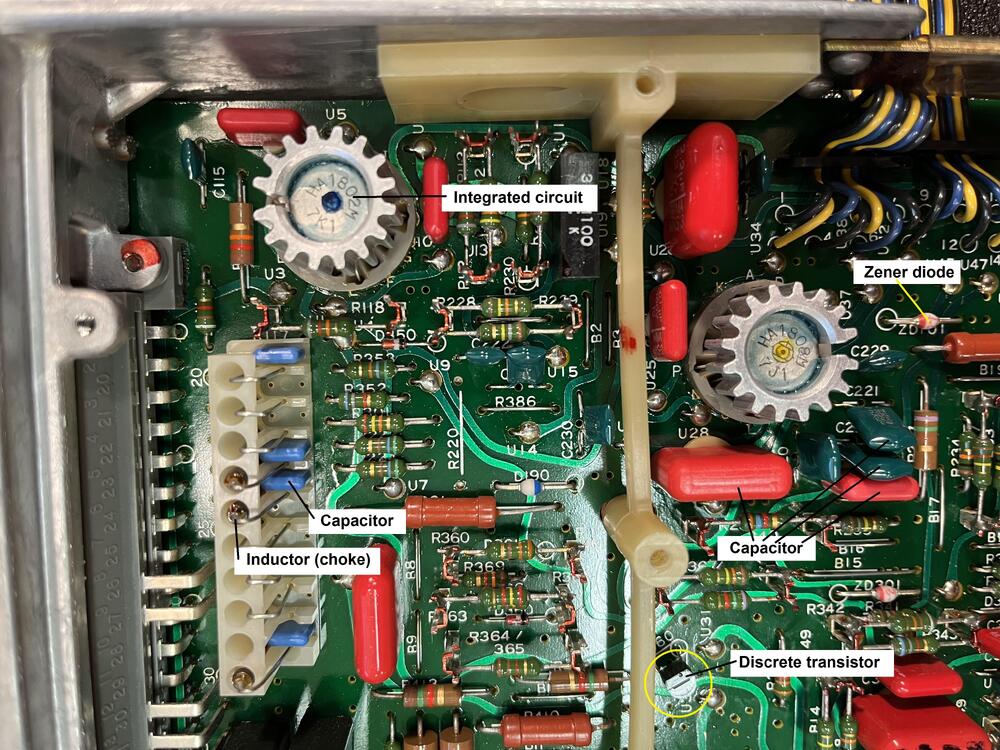
The large cans bolted to the outside of the chassis.... Labeled NEC D411A... Those are discrete transistors, but are a unique pair in the design. Those are the final output transistors that drive the injectors. There are only two of them, and they are known as "Darlington Transistors" because of the internal construction. The discrete transistors I was talking about are the much smaller black plastic bodied things with three legs. I whipped this up labeling some of the components: And you had asked about the copper tower and blue things near the connector... The copper towers are coils (aka inductors or chokes) and the blue Chicklet things are capacitors. Those two components in conjunction act as a filter on the incoming signals to the ECU in an attempt to eliminate high frequency noise. They originally designed the ECU with provisions to put those filters on many of the signals going to/from the main connector, but it appears they decided somewhere along the way that they are not all necessary. So they only populated a couple of them by the time they got to the end of the run. Most of them are just shorted across with a piece of wire. Hope that helps.
-
Most of the components in the ECU would be available generically. Caps, resistors, discrete transistors... No problem. The integrated circuits, however... Nada. You should be able to get pretty much anything but the ICs at Arrow and Mouser. But before you condemn the ECU, I would suggest try to isolate the problem. Even if it's an electro-mechanical issue, it would be important to know if the problem is in the wiring or connector to the ECU, or inside the ECU itself. So, the first thing I would try, would be to slowly and gently wiggle the wiring harness to the ECU and see what happens.
-
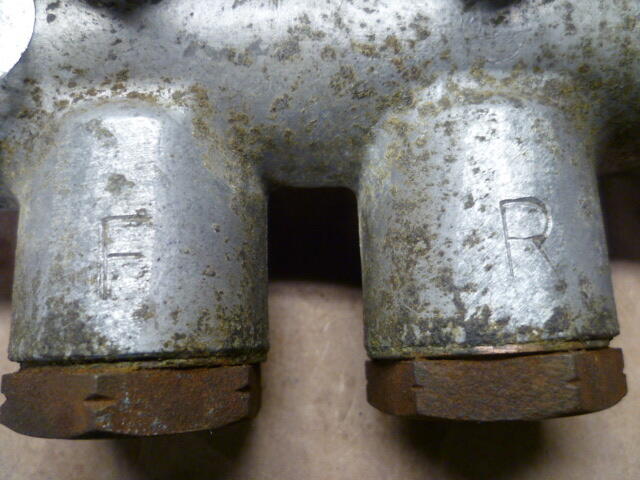
Roo, Nice work on the brake stuff. I have a couple comments / questions about the master cylinder: First, where did you find the rubber seals you used to rebuild the master? Second, the pistons originally had a black oxide coating presumably for friction reduction and/or corrosion protection. It looks like you hit the pistons with a wire wheel and burnished that coating off? Any thoughts about having them recoated? And last, a little pedantic, but I'm thinking that is not quite the correct master cylinder for a 5/70 car. I'm no expert on the early cars, but I think you should have the one with the ground and stamped "F" and "R", not the cast-in markings. The correct one I believe would look like this: There was some discussion about such matters here >> https://www.classiczcars.com/forums/topic/65579-brake-master-cylinder-46010-e4602-up-to-91971/?&page=3
-
Hahaha!! I love you guys! ❤️
-
I suspect the reason for those two photos was to point out the differences in the positions of the wheels in the two wheel wells. Yikes.
-
I have dealt with dust boots on master cylinders like that in other applications and have sometimes had troubles getting them to fit through the hole in the firewall. Not sure if that's because they had swelled over time or if they were poor fitting aftermarket items. Bottom line? Maybe measure the hole in the firewall and see if you even have room for a boot in there before you scour the universe looking for one?
-
Well the reinforcement strips weren't as expensive as that aluminum pan! I'll re-run the numbers when I get the chance. I've never seen one of those pans in person, but if it's stiff enough, a gasket should seal without goop. In thoery.
-
Oh, and the last time I did an oil pan, I did things a little different. First the same: I bought a cork/rubber combo gasket like Datsun used originally and I used permatex gray (a very tiny bead) on both sides of the gasket. That tiny bead hopefully will not make it very difficult to get the oil pan off again if I ever need to. Hope I never need to, but hoping it won't be a battle if I ever do. After applying the tiny bead, I I torqued the pan into place and let the sealant cure. That much of the process is pretty much what I had done in the past. Then I did something different... After giving the sealant a couple days or so to cure, I went back, and ONE BY ONE, I removed the bolts, put some blue thread lock on them, and torqued them in again. My thinking on this is twofold: First, the gasket had time to compress and take a set. This was confirmed as I was taking the bolts out because some of them were looser than they were when I put them in couple days before. And second... The torque spec on those oil pan bolts is so small that It barely even compresses the lock washer. I'm thinking that maybe not even enough to prevent the bolts from loosening over time. So my theory, which is mine, is that the blue threadlock will keep the bolts torqued (even at such a low amount) while giving the gasket a day to take a compression set before final torque will keep the gasket under pressure. Won't know for a while how successful that whole thing was, but I'm hopeful!
-
I made up a CAD file for better / longer reinforcement pieces and ran some quotes. The costs were higher than what I was willing to deal with at the time. And that was before covid. If there is interest, I can open that can again and get a fresh quote?
-
They all are, my friend. They all are. ☺️
-
Glad to help. And hope your clunk is gone for good!
-
You can do final torque to the center nut after installation of the strut assy on the car. That way, the three insulator studs are held firm by the car body and you can get a good torque on the enter nut. So keep an eye (or ear) on it and if the clunk develops again, it's quick and easy to snug those center nuts while on the car. If if happens again and torquing those nuts takes care of the issue, it might be time to get some new vibration resistant center nuts. Replacing those nuts is easy with the car on the ground... The weight of the car will keep the springs compressed and you can take that center nut completely off and replace it. Buzz one off, buzz new one on. Easy peasy.
-
Glad the clunk is gone. I assume it was the strut nuts. A small amount of play in there can be tough to discern with gas struts and spring pressure helping hold things still. But if it went away with some torque on the nuts, I'm guessing that's what the issue was. The fact that it appeared gradually over time is still a little disconcerting. Are they nyloc style vibration resistant nuts on the tops of the struyts?
-
Both of those plates are for 72, so it wasn't the very early cars. Maybe the GVWR wasn't increased for the car itself... Maybe they were increased for the change in American drivers. 😄
-
Oh, I totally get it and agree completely. It's just odd that Datsun put out a document that seemingly delineated the timeline. Sounds like they were trying to differentiate between the two and put a stake in the ground as to "when". So here's a thought... Maybe that VIN of 21001 would be better interpreted as "We've been making changes over the past couple months, and as of VIN 21001, here's a list of what we've changed so far. Moving forward, all the cars will have these changes incorporated." Maybe that's a better way to think about it instead of "As of this VIN, we will be making all of these changes from this point forward." and changing all of them overnight at that VIN.
-
Interesting that you two guys @Johnz1971 @w3wilkes both have the hooded map light. Poking around a little, there was a doc put out by Datsun in Feb 1971 that described a bunch of changes to the 240Z for "1971 late models", and that map light hood was one of the changes listed. But according to the document, those changes went into effect at VIN 21001. Seems that was not correct?
-
At the top of my list is that it does not have the 2400 valve cover. Did they talk about if the engine was original or not? Between the over 100K miles, the carbs, the fan, and the valve cover, I'm thinking not. So it's a historic car, but it would be a huge project. And the biggest hurdle to getting it to top level would be if the engine had been replaced and the original is not available.
-
My bad. Still a discontinuity, but I had it in the wrong spot: 16530 has the black - inline6 17486 has the yellow - w3wilkes 17770 has the black - Johnz1971
-
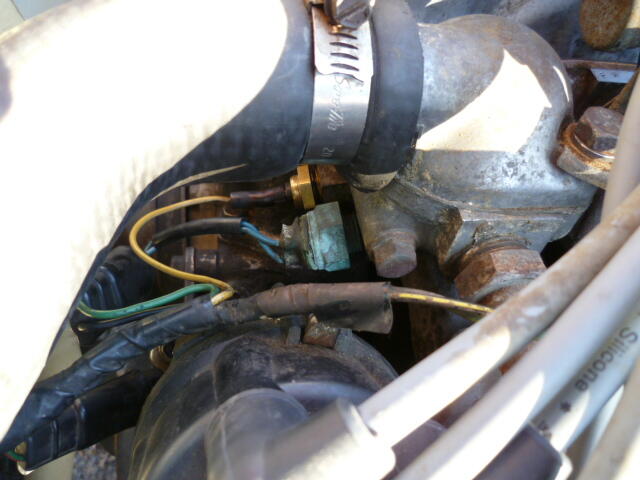
Actually, looking at that thermostat housing you have on your 1/70 is not from 73... It's from couple years later than that. 75 at least. It's got a thermotime switch and temp sensor for the EFI system.
-
I believe that hole on the 73 was used for the temperature switch for the EGR system. This pic is from 74 260, but 73 had the same thing:
-
Amazing enough to dig up a six year old post just to say that? @Mike Looks like a bot.
-
Haha!! Unfortunately, it's not yet clear: inline6, when you get a chance, can you double check what you have on your 16530 car?
-
Yeah, I would start there. Remember that you need to compress the springs to the point where you could remove that center nut on the strut, just like when you are replacing strut inserts. With the springs that much compressed, you will be able to check everything in that top mount assembly. The nut tightness, the plastic spacer, the integrity of the rubber, etc. Do you have a rear sway bar? Another location that can easily produce clunk noises on small road bumps is the sway bar end links. But that's easy stuff... I assume you checked all that already.


