


Captain Obvious
Free Member
-
Joined
-
Last visited
Everything posted by Captain Obvious
-
 I think the plan is sound. KYB's all around. Rubber bushings pretty much everywhere you can get them. I used poly on the front side of the T/C bars even though I could get rubber. Other than that, I put rubber wherever I could. That's what I have in my 77 and I love it. It's not a track car, but it just performs like it's "supposed to".
 -
Honestly, I'm not sure. It appears that way, but the specs in the manuals are all kinds of screwed up. I dug into it a bunch in this "steering effort" thread: https://www.classiczcars.com/forums/topic/61176-steering-effort-differences-between-years/ but never completely confirmed most of the numbers. In that thread, we nailed down the lock-to-lock is different on the 240 vs. everything that came after (but just because the L-L is different does not guarantee that the ratio is different). We also nailed down that the 240 used a different pinion and rack gear than everything that came after (but just because the gear and rack are different part numbers, does not automatically require that the ratio is different). So, I would defer to rturbo.
-
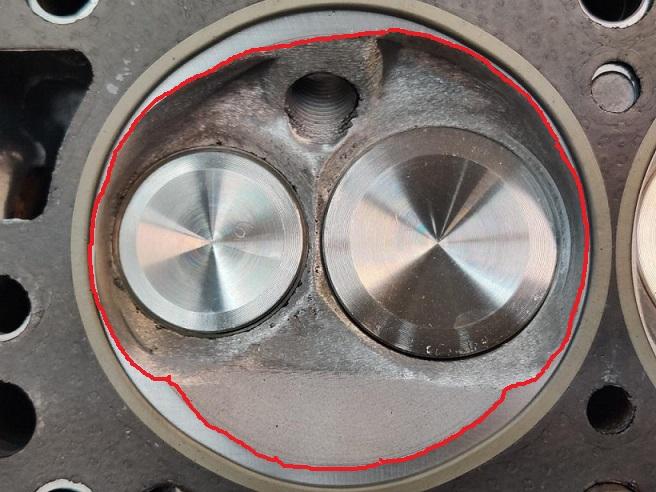
Agreed. I guess now that you have moved the chamber edge back on E1 and I2, if I were you, I would do something similar to the rest of the valves, but making sure I didn't push it to the hairy edge and left a little material to guarantee that the head gasket ring didn't squeeze out past the material. Other than that, the only other thing I would do is make sure I broke the sharp edge where the new head planing surface meets the chamber. And I wouldn't even use power tools... Some fineish (400?) grit sandpaper ought to knock down any burrs and put a small radius on that edge. In other words... When they plane the head, they usually use a large cutter spinning in one direction. Because of that, it usually results in a burr (most prevalent on the downstream side of the cut). I would take some fine grit paper and work it around the chamber something like this to knock off any smeared burrs and/or make sure there aren't any sharp edges:
-
The bushing width on the 280 rack is wider than the 240. There are also other differences beyond that but I don't think they would affect form-fit-function. Stuff like details in the design of the inner tie rod ends. Different, but would be unnoticeable in application. But the only form-fit-function hurdle I can come up with quickly is the bushing issue.
-
I'm sorry, but you completely lost me with your description stuff above, but I will throw out some general notes that may be applicable. First, any material you remove from the chamber area in the head will reduce your compression ratio. You could gain that back in other ways, but not sure you were planning to do any of that. If you like the compression numbers where they are, you might not want to remove any more material than you really need to. Second, Not sure it matters, but I've measured a couple head gaskets, and I've found that the hole in the gasket is not round. Not sure it was an anomaly (or just a 280 thing), but they were oval-ish. Have you checked yours to see if it's oval or round? Third, when you're removing material from the head to bring the edge out to the fire ring, keep in mind that the metal band portion of the gasket will squeeze out into the chamber area a little as the gasket is compressed. If it were me, I would want the entire fire ring area to be supported on both sides by engine metal. In other words, I wouldn't want to ever have any portion of the fire ring hanging out unsupported (on either side) into the chamber area, and because of the extrusion that occurs on compression of the gasket, I would probably leave a small amount of extra material there to be sure that would not happen. I believe the gasket you have there is the one that was already compressed once? That may minimize that effect? I'm no engine builder expert, but those are my thoughts. Hopefully someone who actually knows what they're talking about comes in and provides better guidance.
-
LOL. Well there's your reward for tuning your mixtures in so well. It's certainly possible that there was a slight change in engine temp that aggravated an "already close to failing" piece of injector hose, but I suspect it's more just dumb luck with maybe a little bit of Murphy's Law thrown in there just for comedic value. And if one of them is leaking, I bet the other five aren't far behind.
-
What is the range on the meter set on when you are taking these readings?
-
My thought is If the A/F numbers look that good, I wouldn't worry much about the plugs being light. I've heard (read on the internets) that the old method of reading plugs doesn't work so great on todays fuel using leaner ratios. Burns so clean that lighter colors often result. That toasty brown doesn't happen as much as it used to? How many miles you have on the plugs? I guess if you're thinking it might be a relic of a previous situation, you could buy new plugs and have a fresh read. As for the ignition box, I don't know anything about it. Hopefully someone else can chime in.
-
That's exactly what they did starting in 77. They went back to vents on both sides (as opposed to 75 and 76 which only had the vent on the right side) and changed the intake location from the front of the car to inside the cowl area instead. Just another reason why 77 is better.
-
Well (in theory) the only change you would/should see with the CARB system connected is that it should run leaner at the low end of cruise because that's where you should be pulling air through the can into the manifold. 1/4 pedal maybe? Somewhere around there. It should be a pretty tight spike as the ported vacuum that actuates the system cuts off pretty rapidly when the throttle plate isn't over the port hole.
-
Those numbers look great. I'm sure you're happy with that! I'd love to see how your engine dynos. Did you ever put your CARB system back together? Are those numbers with the system connected using the valve in the cap? Also, out of curiosity, can you see a distinct change at the upper end of cruise when the WOT switch closes and the enrichment kicks in?
-
Well I haven't gotten the insulators off the intake manifolds yet, so I don't know which side the gaskets will end up on. I do, however, have the situation with gasket material petrified onto the manifolds where the balance tube goes. I've done some work with the paint scraper razor blade, but got skittish the second time I dug in. The first time you tell yourself "OK, I slipped once... Let's not do that again." And then you do it again. I believe the aluminum is softer than the gasket material. So I haven't caused any unmanageable damage yet, but just wondering if there's a silver bullet. Granny says "no", but I'm hoping he's just not hit on it yet. Maybe I'll try the shallow pan Mr. X suggested, and maybe put the whole thing in a bag just to see what happens. Thanks guys!! So before I crawl back to my hole... There ARE concoctions sold on the open market that are named "Gasket Removers". Is this just snake oil?
-
@Racer X, Any clever suggestions for how to keep the gasket wet with solvent for a couple hours for it to soak? I've tried the saturated rag on top method in the past, but it dries out too fast. I don't think I want to drop the whole manifold pair into a full tub of the stuff. How have you kept stuff like that saturated?
-
-
So I took a couple minutes (which is what I should have done first instead of asking) and Stoddard solvent is basically what they use for dry cleaning. Kinda like white mineral spirits, but not exactly. Smells (and they say tastes!!) like kerosene, but not exactly. I'll see if I can turn up a small quantity here and see how it goes. Thanks for the input!
-
You can reuse those spacers just fine. As mentioned above, maybe hit them on a sanding surface a little to see if they're badly warped, but other than that, run 'em. If you think they're bad enough to risk not sealing, you could put a little gasket sealer on them as insurance. For those, I'd use a non-silicone type like Permatex Moto-seal. It's MEK based and (in theory) is resistant to gasoline. So I got a question for the collective... Has anyone come up with a good "solvent" to loosen the old petrified stock original gaskets? They're hard as rocks, stuck like the dickens, and probably harder than the aluminum they're stuck to. I've got the same job ahead of me (getting spacers off intake manifolds) and I've tried the typical methods with little success. I'm looking for a silver bullet without having to completely powderize what is probably asbestos laced old gasket material. All these years of experience and I'm asking how to get old gaskets off... Kinda embarrassing.
-
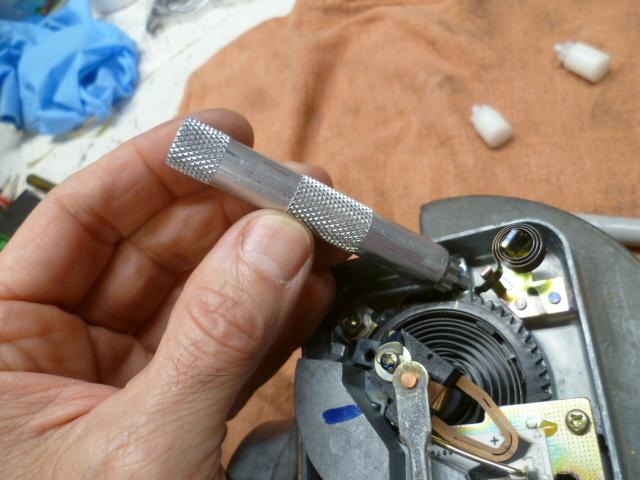
Excellent!! Glad to hear you're getting good numbers. And remember that you're getting those numbers from a completely open loop analog voodoo box that was designed 50 years ago by some genius from Germany. Seal up all the vacuum leaks, clean the electrical connections, get the fuel pressure where it belongs, tune it (as best you can with limited options) and put it on an otherwise healthy engine. Guess what... It can work! So what's the bottom line? What general numbers are you getting for idle, cruise, and WOT? And also... in the end, you moved the AFM gear about 15 teeth from where it started? That's a lot. Do you think the AFM was messed with at some point in the past thereby changing the calibration? Or do you think that other things have just shifted so much that 15 teeth was required to bring it back to where it belonged? I should have let you borrow my AFM adjustment tool:
-
Well, as long as it's holding position, lets hope it's OK. So when do you get out on the road and see if that takes care of the richness at the high end of cruise?
-
Man.You gotta stop it with this crap. New day, new issue. I mean... I understand the phenomenon completely, but it just sounds so preventable when it's happening to someone else.
-
Well from the A/F test results you had from before, I don't think you bent it too far. You'll know for sure when you get out onto the highway again and get some new numbers. If it's too far, you'll start to run lean at the high end of cruise before the switch closes and adds the WOT enrichment fuel. I am a little concerned about the not holding position though... Do you think you fatigued the metal in the bend area?
-
Woooooo Hooooooo!!!!!
-
Well the "works" part is it's possible to remove that pivot point without severely messing up the rest of the firewall. So, yes, you have proven that!
-
You and me too, my friend!! I wish we could spend way more time together. Maybe next time, it'll be at your place.
-
Yes, you want to bend the arm you have labeled #2. Leave #1 alone. So by moving the actuation spot, you were able to get it out to about 3/4 full pedal? That's significantly farther then stock. Good luck with the numbers run. Hoping they look great across the board!
-
That is exactly what happens if the key slips out of place when you install the damper. The key rocks the wrong way in the slot, gets jammed in there, and if you keep pressing and force the pulley on anyway, it cracks the brittle cast iron pulley. Since some dampers are really hard to get onto the crank snout anyway, you might not even notice the force required to get the pulley "home". If you use the large bolt through the middle to jack the pulley into place, you'd never know. And (as it sounds like you found out) it won't necessarily affect the running of the engine like that. If the pulley slips, it will screw with the timing marks, but if it's timed correctly, you may never know. So if your PO did that and timed the engine when he put it together, it may have been like that (seemingly just fine) since then.


