


boro92
Free Member
-
Joined
-
Last visited
-
Hey Arne, Thanks again for the help on this matter! The tach doesnt go past 4.5K under hard accelleration, but the engine continues to pull and revs will continue to climb as expected. Not sure what's causing the tach to go all funny.
-
Is there any play in tie rod bushings or anything of that sort? Alignment spec can be bang on, but any worn bushings will cause misalignment under load.
-
FWIW, I just put in a Pertronix and experienced the same issue upon install. Note: Prior to the Pertronix install, I had the car tuned on a wide band and carbs synced as appropriate. Timing was re-adjusted and put back to factory spec post install. Hesitation occured at around 4.5k RPM as you noted. On my car in particular, the vacuum advance was disabled. For fun, I just hooked it back up and the hesitation went away. It now revs hard (though power band sucks post 5k rpm) to 7k. Unfortunately, my tach wont read past 4.5k under hard accelleration now...but that's another problem all together. Are all vacuum lines hooked up on the car? What's the timing your'e getting under full advance?
-
I just installed the Pertronix Ignitor with their 3.0 ohm coil and bypassed the ballast resistor. The car actually runs very well after a timing adjustment. However, I noticed that the tach doesnt rev past 4.5k under hard acceleration. Any idea what would cause this and what can remedy the situation? The tach operated fine when I was using the original points and ballast. No bouncing, no nothing...just reliable. Now it's all funny! Is something going wrong in the electric circuit?
-
Yup. Try spraying pb blaster or something similar first to loosen the bolt. That way we don't run into the broken bolt problem again
-
Thank you! This is perfect. I'll get going on this and make it happen. Thanks to all who contributed.
-
Yup, I found a good write up here: http://www.classiczcars.com/forums/showthread.php?37452-Pertronix-Ignitor-1761-install-and-coil-evaluation The problem is that I have 2 black wires left, and as I understand it, one of them needs to be connected to the (+) on the coil. This will be powering the coil. Without a volt meter, it's not possible for me to check polarity. Both black wires have spade ends, and one of the spade ends look deliberately bent. Is it safe to assume that the bent one is the (+) I need?
-
Thanks for the response! I have a green and a black wire that was on the ballast. This needs to be connected to the coil? Just want to be certain here, because in Arne's first post, it was mentioned to connect the wires on the ballast to each other. Right now (maybe hard to see from the image), I have the 2 ballast wires connected to each other. I also have 2 free hanging black wires (that used to be connected to the oil coil). I believe these 2 freehanging wires used to be the + and - on the old points? I don't have a volt meter, so I can check for voltage I also happen to have a free hanging black wire by the dizzy. I believe used to be connected to the condensor.
-
Hmm car wont start. I suspect I'm not getting a spark. Any input appreciated
-
Silly question: I know stock tire size is 175/14...but what is that in modern day standards? I understand that your chart converts this...but just curious. Was the stock tire an 80 profile? And why not include 195/55r15 on your chart Lots of good tires in that size
-
It's actually quite easy. I too removed my bumper over-riders. To do this you will need to fully remove the bumper. You can do this by loosening the brackets in the grille area. If memory serves, there are 4 bolts total for the 2 brackets, and 1 bolt on each edge of the bumper. Sounds to me like you are removing the bumper from the bracket itself. Leave the brackets on the bumper, but instead remove the brackets from the car. Let me know if that makes sense!
-
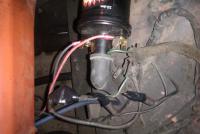
Thanks, Arne! i appreciate the help. Just to dot my i's and cross my t's, I included an image. As per the noted instructions: 1) The ballast resistor is removed 2) the 2 wires originally going to the ballast resister are joined (that mound of...electrical tape) 3) The 2 original leads going to the coil are disconnected. In their place, 1 red and 1 black from the pertronix ignitor are going to their respective polarities 4) That green wire going to the positive terminal....not sure what that is, but it was connected that way originally, so I've retained that connection Am I good to go once I have my coil mounted?
-
Hi Arne, Your quick response is much appreciated I'm sorry, I always seem to forget to post the car. It's a '70 240z. I am using the 3 ohm kit, so I can bypass the resistor. Just wanted to make sure and not fry anything.
-
A quicker response to any pedal input. This is especially noted on rev matches and heal toe. My results were from 2 cars which had very restrictive airboxes (despite K&N dropins), however. Lastly, since it seems that the 280 doesnt have a resonator, the difference may be negligeable or simply non existent.
-
This is correct and very important - the disc, bearing, collar and release lever are specific to the clutch being used. So do not re-use the ones that came with your 5 speed (despite them being in potentially better condition or whatever). Also, if you have an early model Z, you'll want to retain your early shorter driveshaft. Otherwise, a later model car will utilize the same longer shaft. On an early model, you'll notice that the shifter is close to the edge of the cut out on the tranny tunnel. For this to work, you'll have to use one of those bent shift levers...straight ones wont work.
