


Jason240z
Free Member
-
Joined
-
Last visited
Everything posted by Jason240z
-
Datsun Spirit and Spirit Garage are not the same place, one is a well regarded garage in Japan that make a twin pipe exhaust system, lots of other parts, has a great reputation. The other isn't any of the above!
-
-
-
Like this... http://www.apracing.com/Info.aspx?InfoID=75&ProductID=30 I might have got the pic the wrong way round.
-
-
as in the direction of the internal vanes look wrong? might be me looking at the car the wrong way.
-
I might be wrong, I think your discs are on the wrong sides?
-
I just stumbled across this news today. 5th may release date.
-
Its difficult finding the right looking ap caliper. The group 4 look period correct(i'd guess they are) however they're ugly looking things.
-
I've taken all the panels off, they're now hanging from the garage roof while I start getting it together. Its already collected some 'patina'!
-
As a thread revive..... Its now painted... I've no idea where to start, I've removed the panels, they're hanging safe. A couple of bits to sort out. I'm thinking...... protect the box sections with dinitrol prep and paint chassis subframe parts Sort suspension Fit the above Run loom's Fit glued on interior parts fit fuel and brake hoses tidy and fit tank Sound about right?
-
Its now getting some paint on Etch/primer/stone chip/paint/lacquer etc etc. Loads of seam sealer, really hope I don't have to do all this again! I love the colour when its out in daylight
-
Dam and blast. Managed to find someone local who still works with sand!! She looks lovely now.. Its now sat at the painters where I've got to go Thursday armed with a dyson type device and to move some old Austins out of the way. Mr Painter was very happy with what he's got to work with, its due to start getting worked on on Monday, do "depending on how my OCD" is it should be fully dressed in paint about 3 weeks after that. A question for the forum, I'm tempted to have the front of the slam panel black as it was when I got it and when new. Any reason not to?
-
I would think you'd be better off with a bung, so for the times you have it standing inside you could remove to allow it to breathe? Not sure how else you'd do it. Well actually in hindsight, you'd put a hole in the inner sill return that goes behind the dog leg, that would mean air could get around but you'd still need a drain of some sort.
-
I'm going to put a drain hole in it with a rubber plug/bung, also seal on the rear of the badge where water can get in to run down. It'll be full of dinitrol. Rust Prevention Waxes and Oils
-
Well time for an update Its had all the metal work done, Dogleg repairs, inner wing behind doglegs, a couple of bits on the floor, floor rails(were damaged due to jacking in the wrong place). Other little bits and bobs also done. A bit of work done on the panel gaps. Really pleased as the cars still 95% original metal and should stay like that for the next 40 years.
-
why are you lap welding? that's asking for trouble.
-
Thanks, it was the most honest I could get here at the time, before the strip down it looked very very solid however it seems if you look you will find it. It made sense to start with the best I could find/afford at the time.
-
Well a slight thread revival! I had some rails made up, cleaned the floors underneath. found a few more bits of rust.... Marked them up with tape! As i'm getting a pro to do the formed bits and doglegs Joined the ends of the old rails onto the new ones, I've decided to go over length as the rails were long enough. I'm still not 100% sure if this was the right thing to do. I also made a jig using the drain holes in the floor to pull the floor flush. Jacking damage has all been repaired also. Just to be 100% the floor was painted and the rails on the inside to stop any rust traps forming Also found the right colour orange to paint the car in, this was the best of the samples I got Now both rails are sorted and floors are straight, smaller patches are done. I'm now reeling really motivated again. I've got to finish getting the car 100% bare, remove the last of the underseal from the rear of the car. It'll then go to a fabricators to be shot blasted, zinc primed, then have the dog legs fitted and the floor holes where the formed shapes are repaired. From there its going straight for paint, inside out and upside down.
-
Good move, also feel how much easier the subaru diff turns compared to your old diff, less drivetrain losses. I've got a 4.44 plated subaru r180 LSD to go in mine with the beta motorsports output shafts, combined with the s14 gearbox it should be a nice combo. Good thread
-
 yes then the colour on top
 -
Can I ask why not the the same colour underneath? Is this the way these were from new?
-
I've a set going spare if you're interested.
-
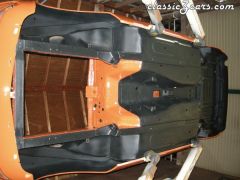
Alan Thanks again for the link and thanks to your friends for sharing. Its interesting looking at that and a normal 240z to see how they're constructed. Lovely colour too.
-
Are they webber DGV carbs? The dizzy is worth about $150 on its own. Doesn't sound like much as the accessories are worth more than the block.
