z boy mn
Free Member
-
Joined
-
Last visited
Everything posted by z boy mn
-
 SUCCESS!!! :-D Just wanted to let everyone know that I got the carbs back on today and the car started and ran beautifully! The mixture screws were right where we put them during the last real tune and before I over-tightened them. Final tip here, to make sure it never happens again, I found it next to impossible to find the "bottom" with the spring, washer, etc., so with the carbs off the car so I could watch from the inside, I removed the spring, rubber o-ring, and washer, and found the bottom. I marked the screw (ground a bit off that side) and the carb, so now I know where not to go past in the future. Worked really well--especially for a novice like me. Hope this is all helpful to someone else! P.S. Blue, I've been reading your posts on tuning...maybe I should take back "beautiful" and just say it ran as well as it ever did...you really have some impressive information posted...I'll look it over more carefully now that I have the car running again! Wahooo!
 -
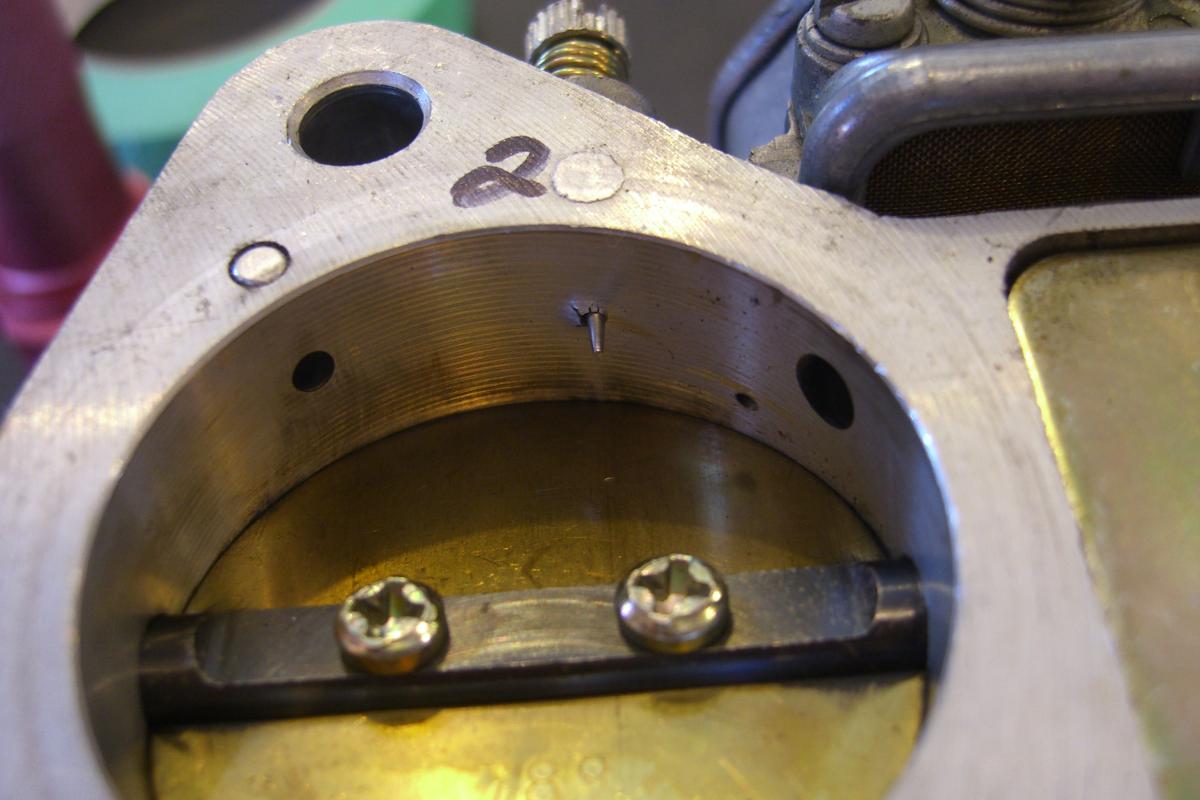
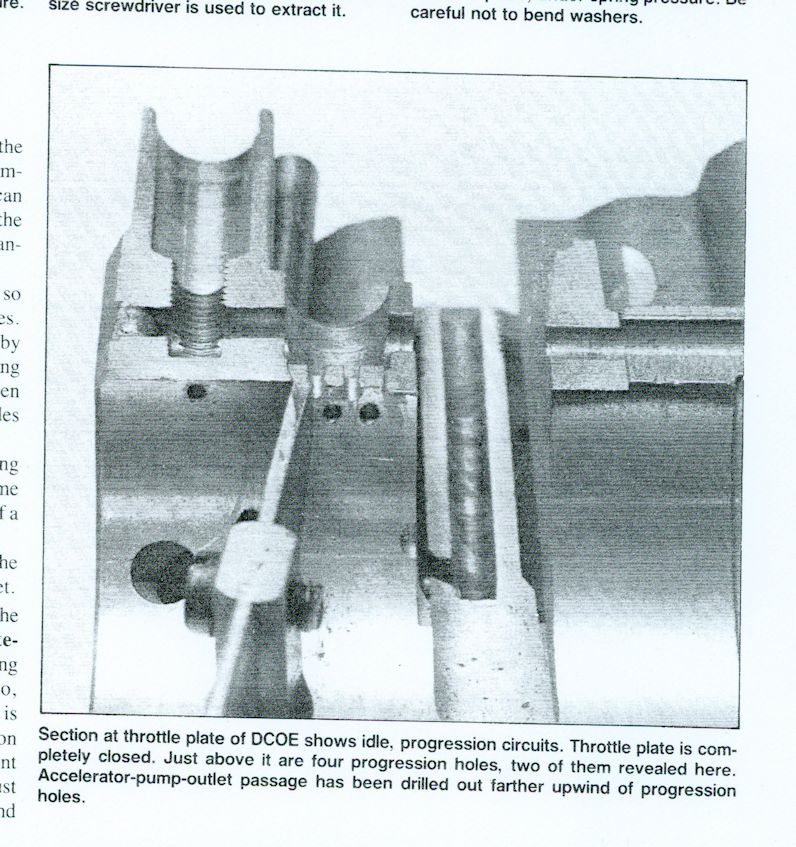
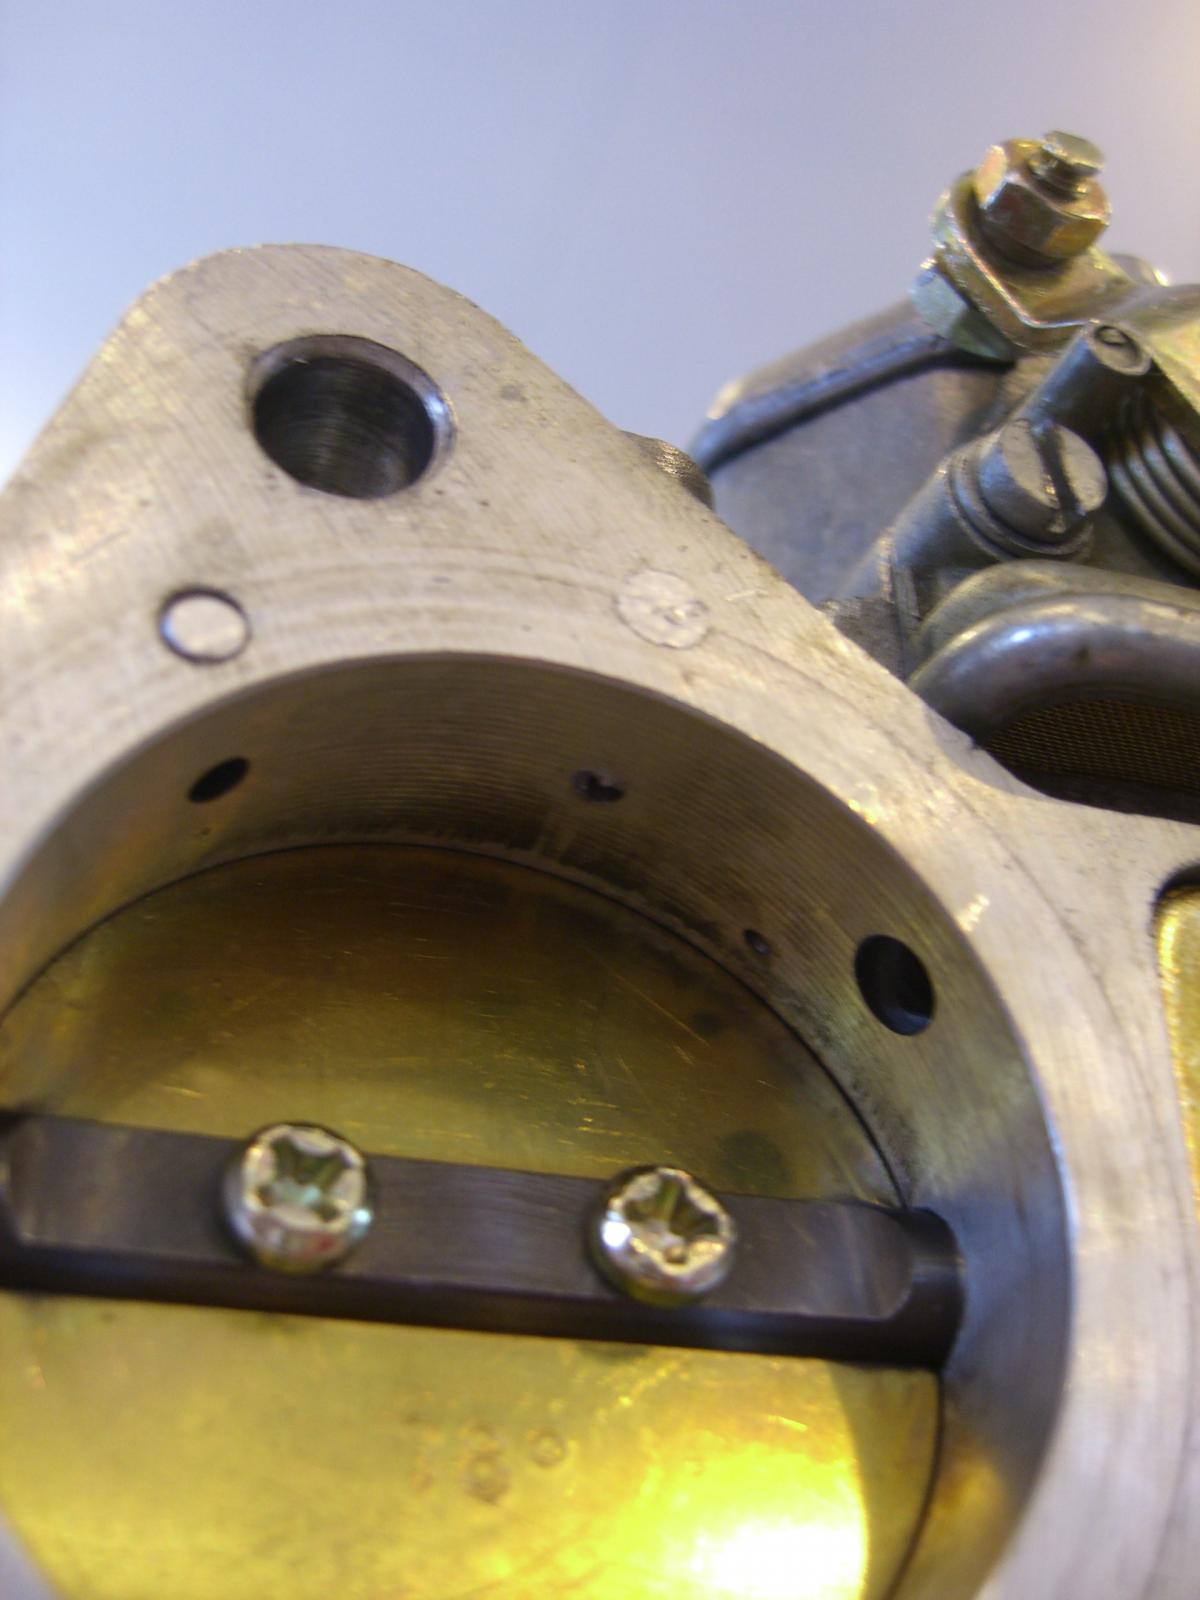
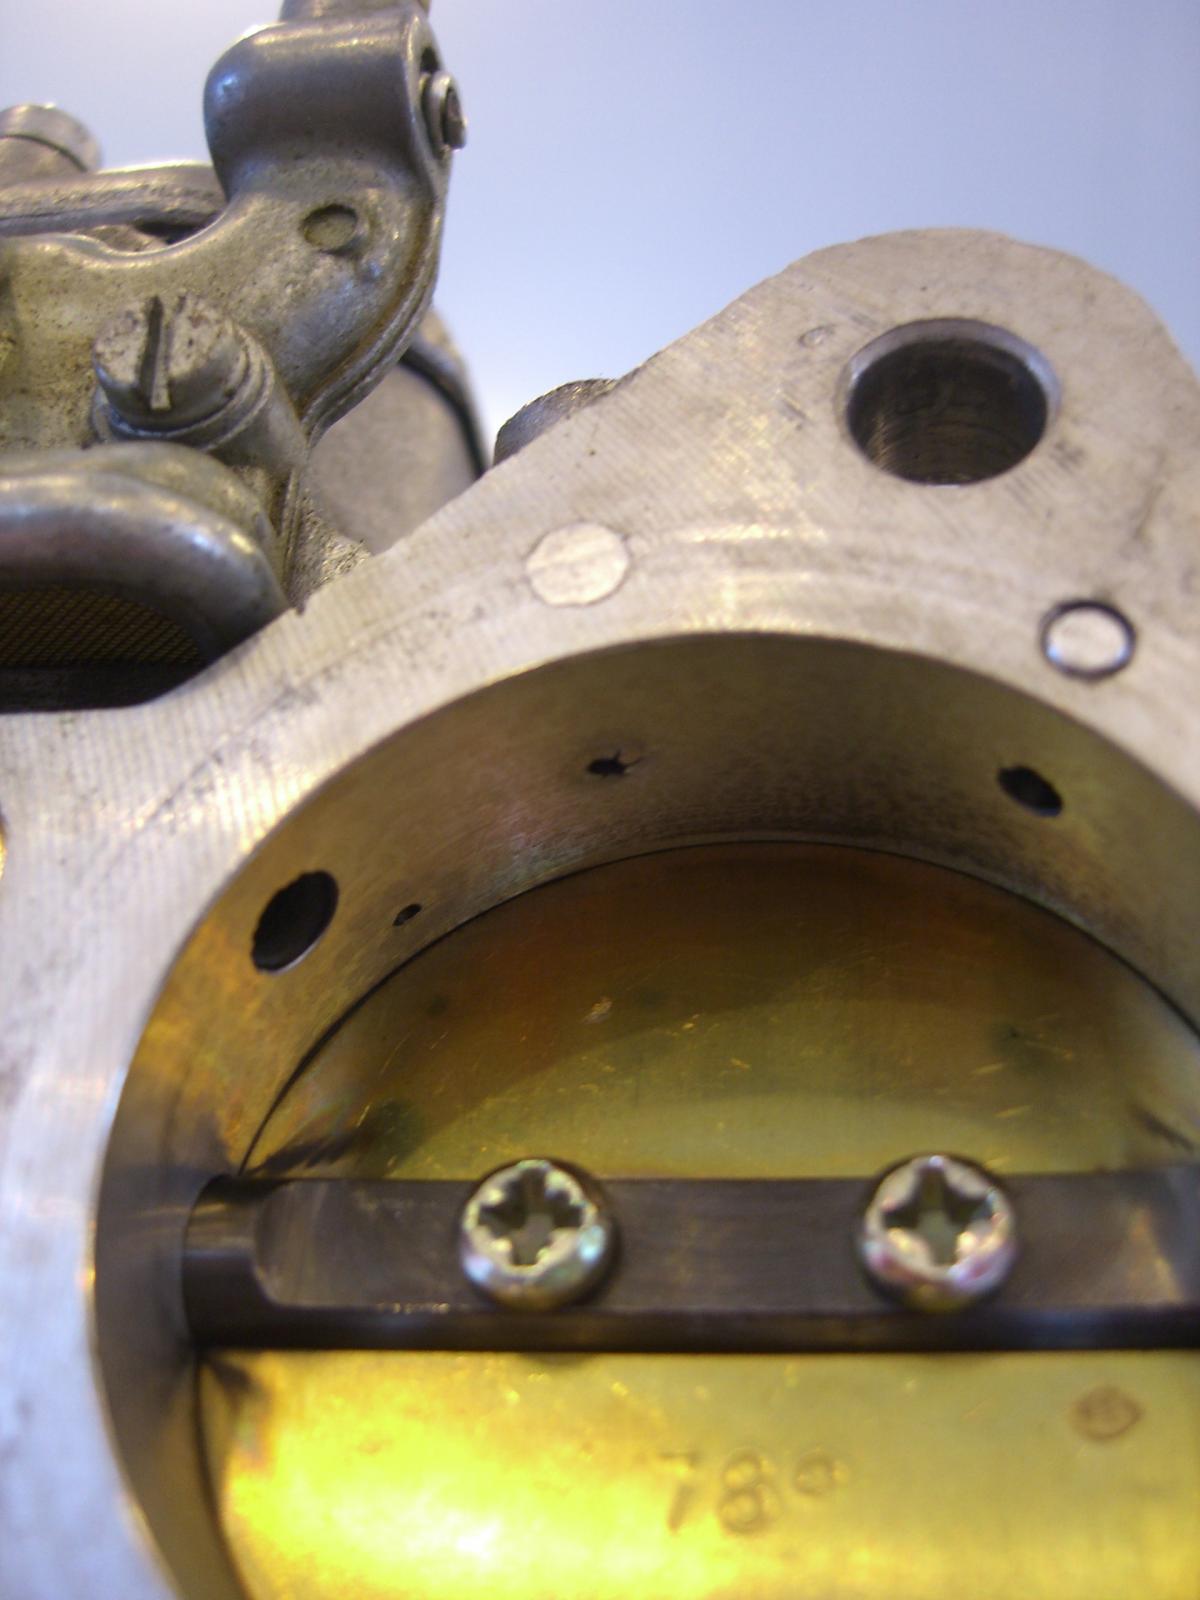
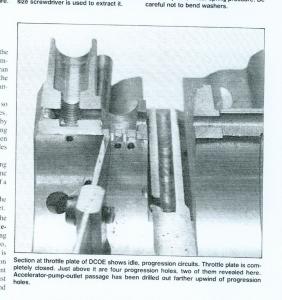
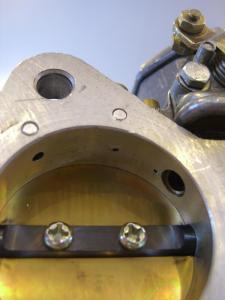
Thanks for your comments everyone--I just wanted to provide a final update here with information that might help others. I met with a fabricator/welder and we looked over the carbs, the damage, and the cutaway I've attached here (it was in the Weber book). We considered JB weld, plugs, bushings, etc., but in the end decided a very light weld over the hole would do the trick as long as it didn't overheat the carb or fill the void completely so we couldn't use the original hole (from the inside) to re-drill the hole. We measured the original hole and it is somewhere between .052" and .055". They don't make bits in the middle size, so we went with the smaller one thinking it's easier to make it bigger, holes are always a hair bigger than the bit, and the reference hole we were measuring was probably enlarged anyway. .0535" would probably have been perfect, but we went with .052". I've attached photos of the before, the after, and the cutaway image. Hope it helps!

-
I"m not sure if this is helpful, but because I had bad luck with insurance companies in the past, I was extra careful with my Z. I do use it as a daily driver, and I had a long talk with my agent. What we did was get it appraised professionally by a body shop. I brought in all my receipts and we did the math on what it would cost to build it again. They charged $200 for the appraisal, but I brought the document back to my insurance agent, took lots of photos, and we insured it for that amount. If something happens, they can either repair the car at a cost up to the appraisal value or they can write me a check. Either way, they have to "make me whole" according to my agent (in other words, they can't drop off any 71-ish Datsun-ish 240z-ish and call it a day). It has to be equivalent to what I have now. I keep the car covered and parked in the winter, and during that time I keep comprehension on it. When I put it on the road, I verify the appraisal amount, the insured amount, and check. The cost has been very reasonable ($250 per year), but it's probably because I have everything (house, cars, etc.) through one company. Of course, I can't verify this will work if something goes wrong, but I feel OK about it. My agent is an insurance broker, and my policy is through a major US company (Traveler's). Hope this helps!
-
Ballpark costs for 3 carbs (if you get good deals) runs just over a grand from a place like http://www.webercarbsdirect.com/45_DCOE_p/19600.060.htm. If you go with Top End Performance/Redline, though, the same three run more like $1,200. http://www.racetep.com/webcarb.html#webcarb A set that includes linkages, etc., is about $1,600, but I have all that worked out so I would just need the carbs. I called all the places to see if I could buy just the carb body, but no one sells them that way. New ones, unfortunately, come with stock jets, etc., so I'd need to transfer the ones I have over anyway. I think you're right as I understand it...with enlarged holes, the proportion of adjusting the screws will be different for each one. My thinking is once I get the air/fuel gauge in, I watch the mixture through the rpms. My guess is it goes lean at the progressive circuit and then runs rich once it gets to the main. If that were true, I'd try to richen up the lower end (slowly) and maybe try leaner jets in the main. More consistent means smoother, yes?
-
Captain Obvious, thank you for your comments and the photo. Siteunseen, thanks, too. I'm also hoping at the very worst, it'll act as a cautionary tale. And, the photo helps a lot---it does look like a simple volume issue, and maybe if I slowly adjust from the baseline for the mixture screws where they are now, I can make it work? I'm hoping others have had/solved similar issues...I'll keep crossing my fingers! Also, you're right, some of the worst of it is knowing the mess is inside my engine bay...and it's completely my fault. The metal there must be incredibly thin as I didn't turn the screws with very much effort....one hand, small screwdriver...it wasn't like I put a breaker bar on them!
-
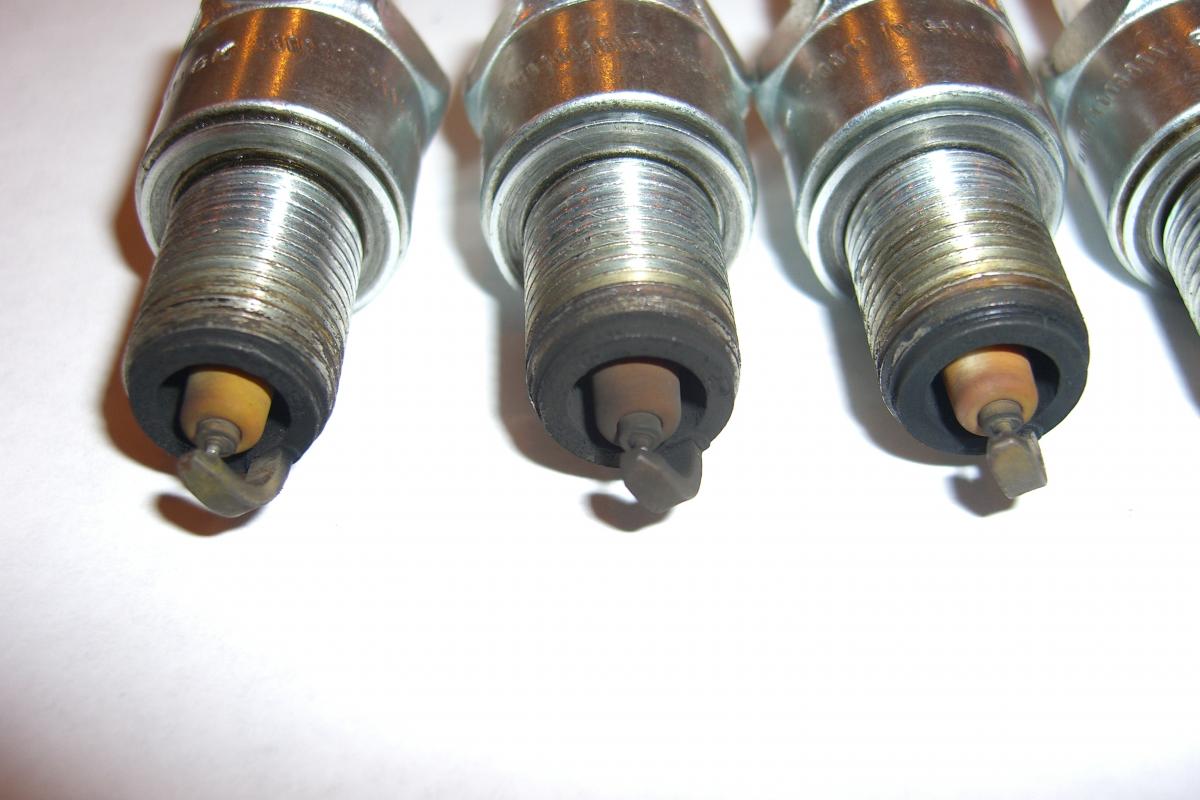
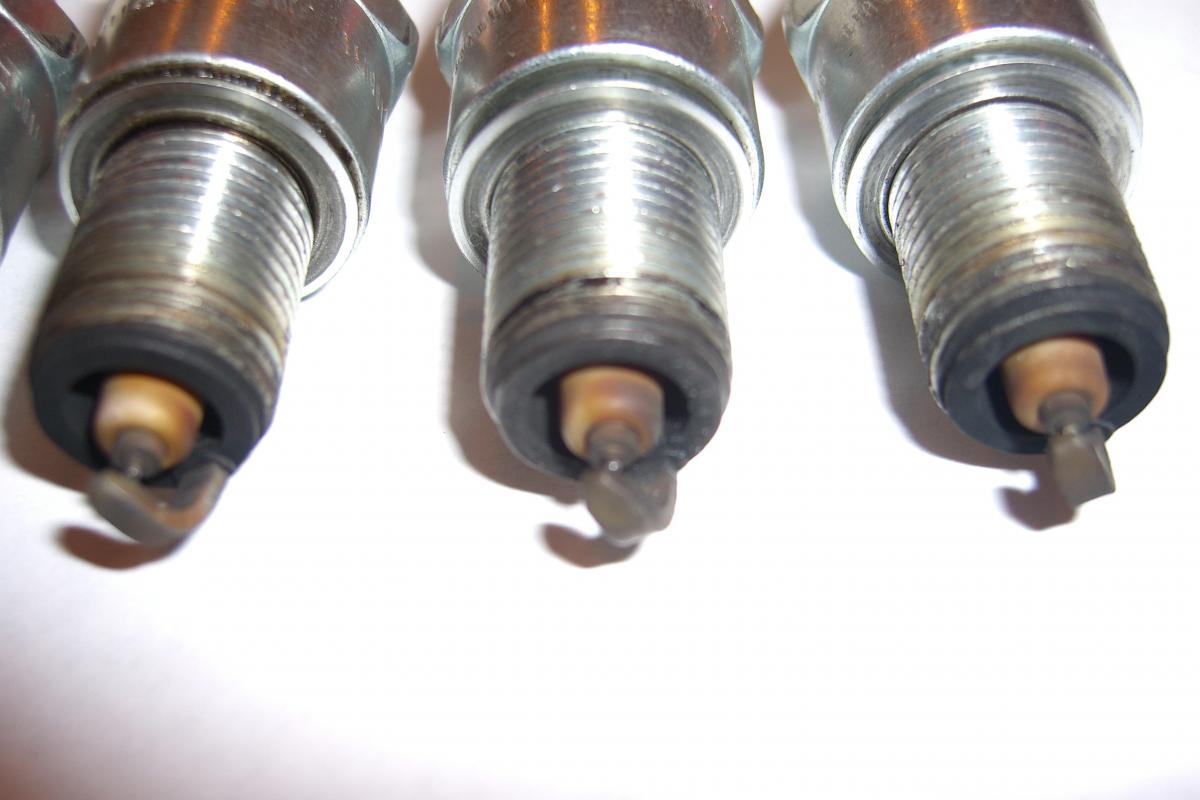
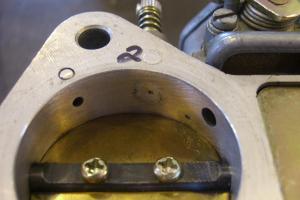
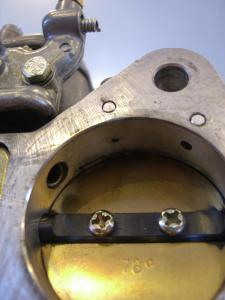
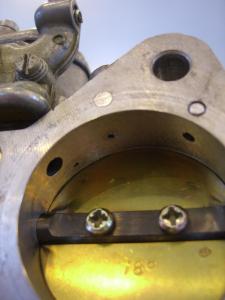
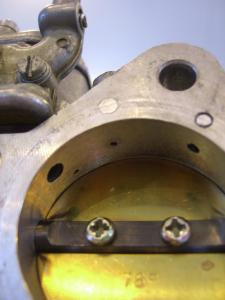
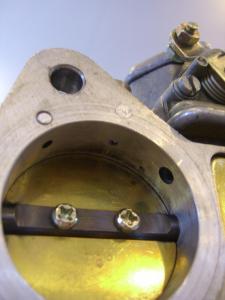
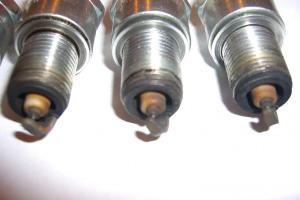
Hello everyone, this is going to be a long post with many pictures, but I'm at a crossroads with my triples and I'm hoping someone here can suggest the best way forward. It's a long story, so here goes... A while back, a friend and I took a lot of time and tuned up my engine from top to bottom. I have triple Weber DCOE 45's, and we tweaked the idle jets until it hummed. Bottom line, when we were done the car still ran rich, but there was no hesitation, plenty of ooomph, and all was good. The mixture screws were set at 2.25 turns out when we were done, and we were happy. Very happy. (Before this, by the way, I had dialed in the float, seals, etc. and done a complete overhaul on the carbs. Before that we managed timing, valve adjustments, etc.) Over that winter, I tried to go from "happy" to "perfect," and this is where I got into trouble. I decided to make sure all the mixture screws were EXACTLY the same, so I removed the springs, took off the rubber washers at the base, and turned them all in, marked the spot, and turned them all out exactly 2.25 turns and marked that spot as well. I remember feeling like it was "hard" to tell where the "bottom" was, but didn't worry too much about it. Later, when assembling a new airbox, I took out one of the mixture screws and realized it was now mishapened. I took them all out and they were all damaged. Clearly, I had overtightened them. No worries, right? I just ordered 6 more. Then I wondered about whether or not I had damaged the carb bodies...so I took the carbs off...and sure enough. The mixture screws had all poked through making the hole bigger, cracking it around the edges, etc. See photos (number corresponds to cylinder). I called Top End Performance (all the repair kits and jets had come from them) and asked what I should do. We talked through the function of the mixture screws, which are really just "volume screws" yes?, and they suggested that I would need to set each mixture screw separately from now on. I wasn't too worried as I could just look at the plug, adjust, and keep everything else the same as I know the carbs were tuned properly before. Top End Performance also said some people drill out the damage, fill with JB Weld, and drill new holes somehow. It sounded risky to me, so I spent last summer re-fiddling with the mixture screws in order to get the plugs the "right" color. But now the screws are all wildly different. To give you an idea, here's where they sit: 1) 2-1/4 (about where it was before) 2) 0-3/8 3) 0-7/8 4) 1 5) 0-7/8 6) 0-6/8 I got to these by running the car, pulling the plugs, and repeating. It took about 30 times, mostly to get #2 to go tan-ish instead of black. Here's what the plugs look like now (from 1-6): I think the plugs look pretty good overall, much better than they did when we first tuned it (they were pretty black/dark even then), but the car now hesitates pretty badly right at the 2,000 mark and it didn't do that before. Over the winter, I've spoken to folks who suggested I try the repair option. Another suggested just buying new carbs, but that's out of my reach for now. Others have suggested that the new mixture screw settings are going to throw everything else off regardless of the "volume" function and that the carb body and the damaged mixture screw holes are functioning as mini, secondary jets, so the idle jet circuit won't be tunable. I've read every book on Webers I can get my hands on and posts here as well, especially this one, which is excellent: http://www.classiczcars.com/topic/41332-understanding-a-weber-side-draft-carburetor-through-a-fictional-supposition/ My understanding from that post is that the main circuit doesn't use the idle circuit, and the progressive circuit uses only some of it, so I'm thinking there's hope....but I'm very new to carbs...especially Webers. The last part of the story includes me buying a wideband air-fuel gauge (per Top End Performance's suggestion) thinking I could at least make sure the whole system isn't going lean. It's not completely installed yet, and I know the reading will be an average, but I'm hoping I can use it and the expertise here to find a way forward without having to replace the carbs themselves. I'd love suggestions or tips. I won't be able to drive the car on the road for another few months, so I have time to consider, select, and test options if I can find some. Thank you in advance for any suggestions/help you can offer!


-
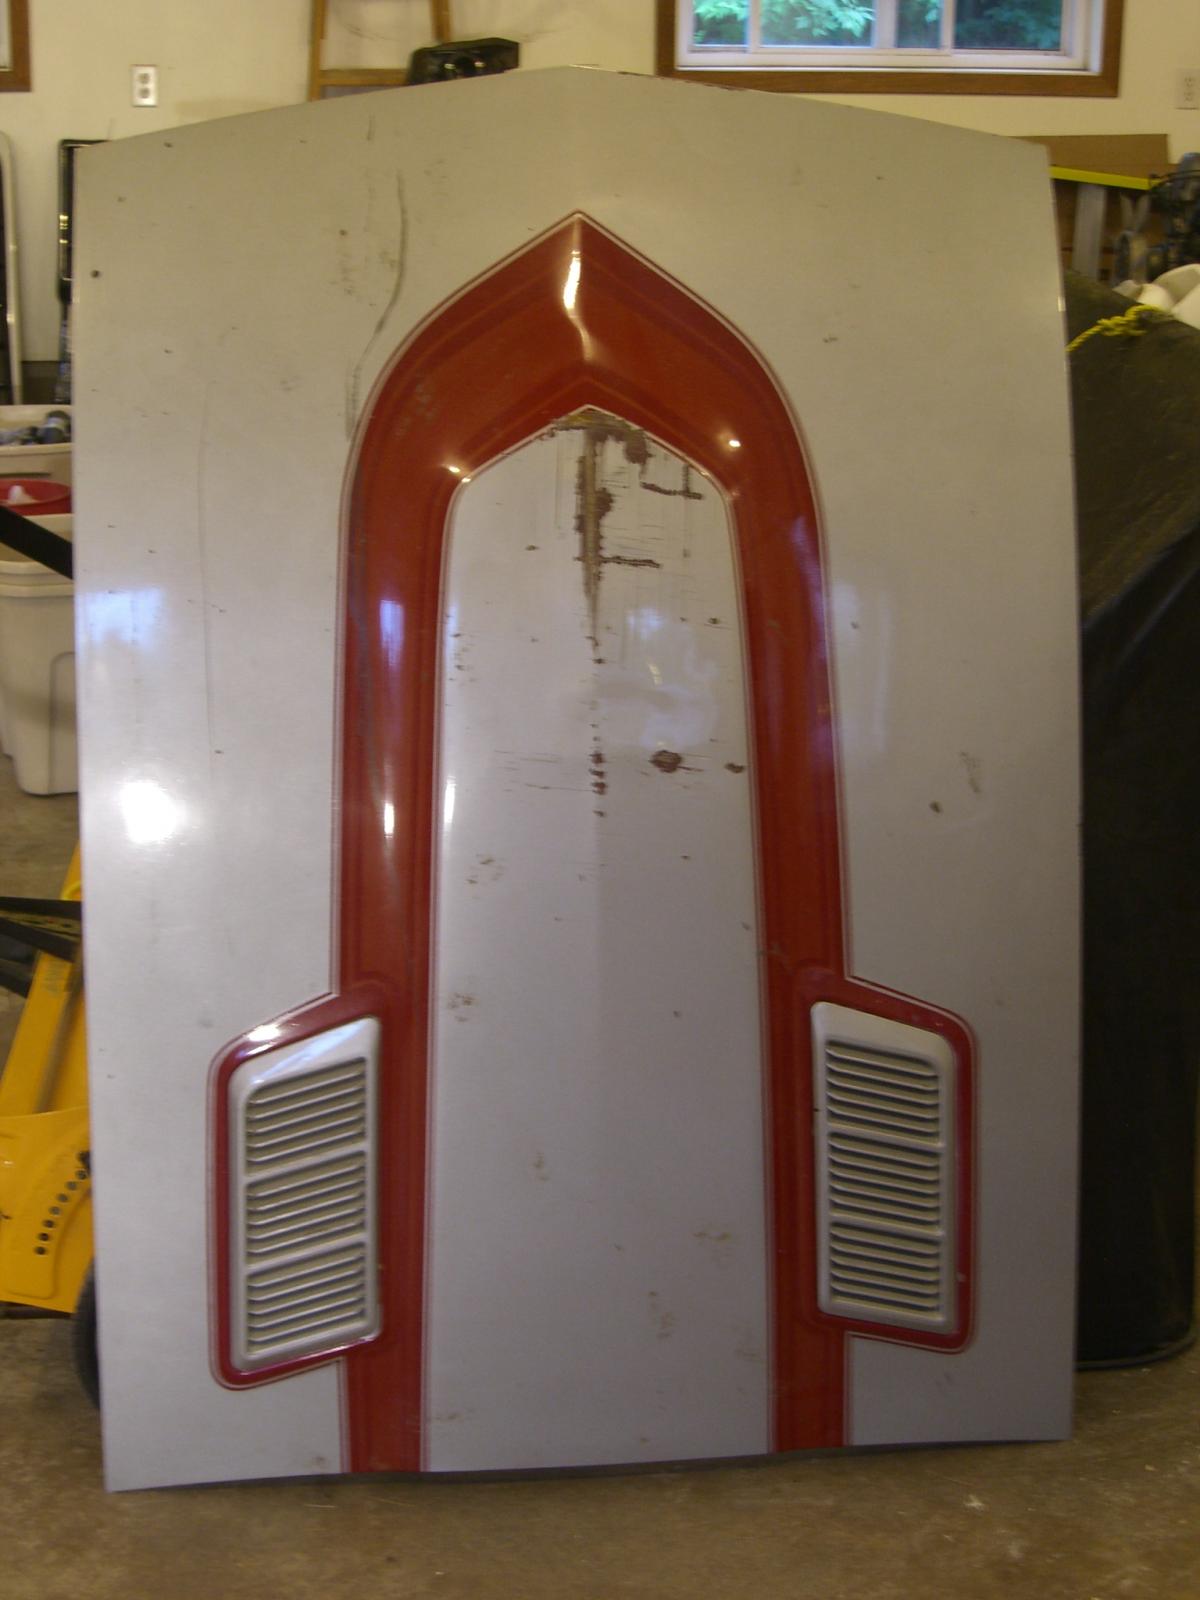
Good morning. I'm looking at a list of fun winter projects, and I thought I'd tackle modifying a hood. I have a 1971 Datsun, but I have a spare 280Z hood (no louvers anymore) that was damaged in an accident a few years back. I was thinking I'd have some fun with it...maybe cut out some windows for Lexan or add some louvers or stainless trim...I'll have to sandblast it and do some repair work, but I was wondering if anyone's cut into one before or made modifications and wanted to share ideas. (I had even thought about painting it with chalk board paint so people could write on it at car shows.) All suggestions are welcome! In addition, it doesn't have a latch, so unless I fabricate something new, I'll be scouting around ebay for one... Thanks in advance!

-
Hmm...very interesting! I knew people here would know how to correct the problem. Thanks for your help, looks like I've got some fixing to do!
-
Hello everyone. I have race seats in my 1971 Datsun, and I like them fine, but they're a bit hard for a daily driver. I do have the original seats, and someone has already recovered them in fact! But, the seat (bottom) portion of the driver's seat has some long tears in it. Has anyone tried to repair vinyl before? Recommendations for products? The other 3 pieces are in excellent shape...so I hate buying a whole kit for this one piece. It's a daily driver, not a museum piece, so it doesn't have to be perfect. I was thinking of some kind of glue? Thanks in advance!
-
Hi Chas, that's what I was thinking, too...that if the gear was too tight, it would do bad things. When I put it in, though, the new o-ring was tight enough that I couldn't spin the carier by hand (couldn't even get it back out), so I couldn't "feel" when the pinion was in contact with the cog inside the tranny...I could just spin it counter clock-wise a smidge. If I go to far, the teeth won't contact and the speedometer won't work...or, it will strip the gears. Hmmm. Maybe I should figure out how to get it out and put it back in without the o-ring and mark it on the outside somehow, so I know where it should be. The other problem is I am one-handed at the moment. I had shoulder surgery a few months ago, and my right arm is still pretty useless, so I'm having trouble feeling how things are (or getting them out).
-
Happy to give an update on the new site--seems like a huge improvement (and I liked the old site, too!)! Got the new pinion in, and as far as I can tell it's right. The housing had two slots ground into it so the tab on the tranny could hold it into place, and I was able to use one of them keep it in place with the tab. I'm not 100% sure if it's too "tight" (i.e. turned too far), as it turned a bit when I was tightening the bolt on the cable. I called MSA and they said once it snugs up against the gear inside the tranny it won't turn any further, so it should be right. With only 1 pinion gear with 21 teeth left in the country, though, I'd like NOT to burn this one up. Is there a way to test this? Also, I did manage to save the "pin", though for me it was a split pin that was VERY hard to get it out. It didn't really look like the one in the photo, so I'm not sure it's original. I took the car for a run, and the speedo looked terrific. No jumping...all very smooth. I tested it against a GPS and it's only about 2% off (high), and I'm happy with that. After all, the difference between 100 and 102 isn't that big a deal! ;-)
-
Wow--those are GREAT pics with labels and everything. I do have the seals (I got them from MSA) and will swap them to make sure I don't have any leaks with the new gear. Still waiting for the pinion gear to come in from Nissan--I'll keep you posted!
-
Thanks for the tips everyone...I'll definitely try to save the pin. When I had the diff done they swapped from a 19-tooth to a 20, so things have been loosened recently so I hope they're not too stuck. I just want to make sure I don't wreck anything as it doesn't sound like the parts are possible to replace easily. I'll let you know how it goes when the part comes in!
-
Hey everyone, I've combed through the archives looking for directions on swapping out the speedo pinion gear, and I found some information but I'm a bit nervous taking on this task as I don't want to wreck anything (cable, gear, etc.) as the parts are so hard to find. I have a 1983 5-speed in my 1971 Datsun, and I finally finished the 4.11 LSD diff (which works great). The speedo gear I have now is 20 tooth, and it's about 10% off, so I'm moving to the 21-tooth version (they don't make the 22 anymore). (FYI, when I contacted Nissan to order the part, there were only 2 left in the country and it's being discontinued, so if you need one, now's the time to get it!) My plan is the following...any suggestions? 1) Lift up the rear of the car so I can keep the gear oil in the tranny. 2) Remove the plate and speedo gear housing. 3) Remove the cable from the gear housing. 4) This is where I get fuzzy...will the old pinion gear just come out if I pull on it? I noticed in one of the posts with a picture there was a small pin and the writer said not to lose it...but what does it do? Will it fall out? The link for the post is here: http://www.classiczcars.com/forums/engine-drivetrain-s30/36199-speedometer-o-ring-replacements-tips-needed.html and it's post #4. 5) Put it all back together and drive like crazy as we'll have snow soon! Thanks in advance for any help you can offer for step #4...
-
I'm not sure folks will like my solution, but I'll post a pic anyway. My seals leaked both water and exhaust fumes, and I got tired of fiddling with them. I was also worried about the hatch getting wet on the inside as it is a daily driver, so I decided to seal off the holes altogether with some custom stainless trim pieces. There's a local guy here who works on Corvette emblems, so he made these from a file I sent him. They were super inexpensive (I think $40 for both) for what they are and they stick on the hatch with 3M tape (I siliconed from the inside to be sure). Since then, no fumes, no water...and if someone asks me what the car is I can just point!

-
Thanks for the suggestion, Patcon, let me see what I can do to fill in the blanks. 1) I started looking for the attachment to this post...it's a close diagram for the LSD I have, I think it may be out of the 240SX Turbo--or thereabouts. 2) Then, from there, I went to www.nissanparts.zone to get the full part number and check on availability. 3) I used a 1979 Datsun 280ZX as the diff is similar and I needed the part 38453-XXXX. The link to that is here: 1979 Nissan 280ZX Rear Final Drive - NissanPartsZone.com. 4) After doing some measurements on the diff, the shop and I figured we needed to move the carrier over so that on one side it was 2.03MM and on the other it was 2.45mm. We ordered the shim for 2.05 and 2.5 knowing we can sand them slightly on a stone to make the thinner. The backlash started out as .0025, which was WAY too tight. Stock is in the .012-.015 range, and the new shims should get us there. 5) I ended up ordering the shims from the local Nissan Dealer, who found them around the country. They were $20 each, which is more than nissanpartszone, but this way I know they're genuine parts. They should take about a week to arrive--at least that's what they said. Hope this helps! :-D z31diff_clutch.pdf
-
Thanks for your help, Zedhead, I just started calling around Nissan dealerships and actually found someone who's good at hunting down parts and cross-referencing parts numbers. Turns out he can get the shims we need--it'll just take a week. I wonder if the shop looked hard enough, but as long as they come in I don't care! :-)
-
Hey everyone, I'm looking for (and having trouble finding) side bearing shims for my renovated R200 LSD. I have new bearings, etc., but the backlash is WAY too tight so the shop needs to move the carrier over some. It seems that all the places they contact don't have the ones we need and it's been a month with the car in their shop. Their next best option is to make some, but that will get spendy. It's a guess, but the shop is estimating we need a .80 and a .96 shim. I've tried MSA (of course), and a few Z shops in CA, Nissan doesn't make them anymore... Any ideas?
-
Wow, that's a very complete post. I love th idea of making things simpler and maybe it would help with the fumes. I'll have to look it over a couple more times though and make sure I understand which hoses I'll need to leave on as well as make sure I have a vented gas cap.
-
My hoses are in pretty good shape all in all, but if I fill up the tank and store the car (in a tight garage), it smells of gas for a week or two while things "settle." (I'm not sure why, but it stops after a while.) Anyway, I was actually thinking of removing the expansion tank altogether and just weld up the gas tank so it only has an "in" and an "out." Anyone else done this?
-
I saw that one, too, but didn't know if the "heavy duty" would throw things off. I'm all for cheaper options, though! :-) I'll be making my order tonight!
-
Thanks, Steve. I love Amazon and found this one which seems like it would do the trick (I'm running incandescents all around still)...will it work OK? I'm not sure what the reviews meant when they said "it's not really a no load flasher." Amazon.com: Keep It Clean FF552NLF No Load Fixed Flasher: Automotive I love the idea of keeping the power more steady when the flashers are on.
-
Hi Steve, my flashers still work but I like the idea of upgrading to electronic flashers for the hazard and turn signals. (I've already made all the other typical upgrades--fuse box, alternator, headlight and taillight relays, etc.) Do you have any suggestions for particular electronic flashers? Also, I noticed the flasher jlex used was labeled for hazards only...will the same one work on the turn signals?
-
siteunseen, thanks for the note. I have a 79 FSM and I checked again and there it was. I must have been blind! I'll order 5 quarts to be safe for both--I'd rather have a little extra than run short. Thanks again! :-D
-
I have an R200 LSD Diff and a 82/83 5-speed tranny, and I'm going to be swapping out the gear oil in both with Royal Purple before I pack the car up for winter. But, I must be going blind as I can't find the gear oil capacity for the tranny in the FSM or in a forum. I know the diff is 1.5 or 1.6 quarts, but how much does the tranny need? I'll be ordering it on Amazon and I don't want to run short. Thank you in advance!