Hardway
-
Posts
1,332 -
Joined
-
Last visited
-
Days Won
16
Content Type
Profiles
Knowledge Base
Zcar Wiki
Forums
Gallery
Events
Downloads
Store
Blogs
Collections
Classifieds
Everything posted by Hardway
-
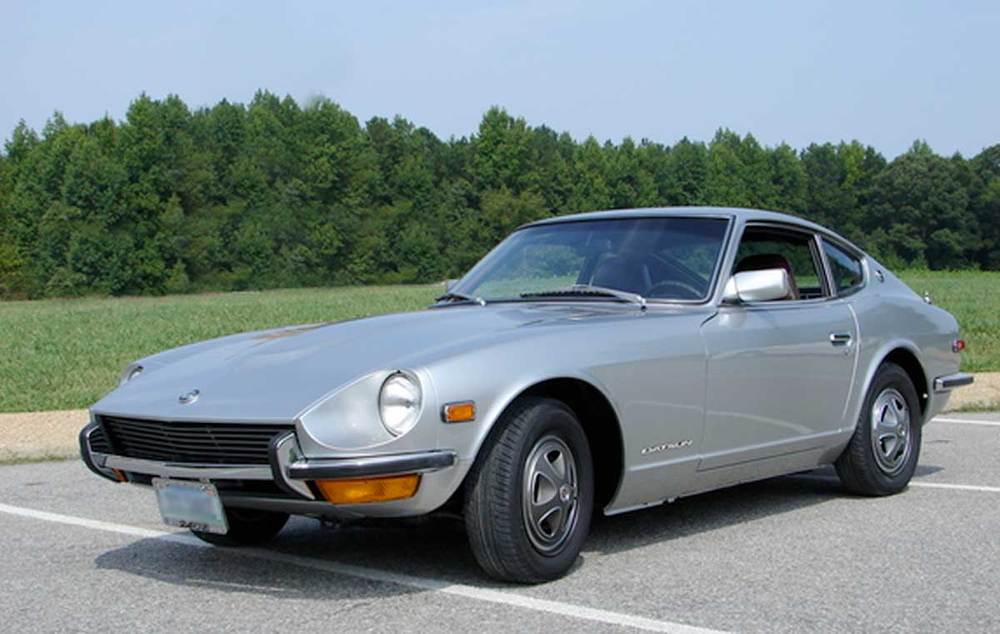
My '71 240 has a replacement stock style muffler with an exhaust tip that ends below the bumper. I would like to add a longer exhaust tip to make the exhaust exit further away from the car without looking ridiculous. How far beyond the bumper does your exhaust tip exit? Pictures are welcome! This all part of an effort to reduce the exhaust fumes come in my car. I already have new tail light seals and the Kia hatch seal installed and will be working on sealing up my hatch trim panel. Being a series-1 car I am unsure how much difference it will make due to the flaps that in it so thinking beyond sealing and looking at the root of the problem.
-
I bet I don't put 500 miles a year on my 240z. I primarily take it out to Cars and Coffee and other local shows and then drive it back home. I never daily drive it because I don't want to roll in to work smelling like gas and oil, only if ever so slightly. I have a Scion FR-S that has been my daily driver for the past 3 years but it's lease is up next month and I will be in a 1999 Camry V6 XLE. Nothing exciting for sure but comfy, looks decent, reliable on all fronts, and more importantly it is paid for!
-
Dmoralesbello, your whole interior looks great and seems like a very comfortable place to be. Love the door panels and seats! From the pictures you seem to have all the modern amenities like power windows, a Retro-Sound radio, and more. I like how you trimmed your dash gauges in white or silver. Really helps to tie everything together. Great job!
-
Dealers have all kinds of resources at their disposal to paint and prep vehicles for sale. Many work with local shops for paint, interior, etc. and supply regular business to them while others may have their own in-house departments to do various work. There is a small paint and body guy I have worked with in the past that does work for all the local "tote the note" lots. For the money, his work cannot be beat. He offers lots of options depending on your budget and has very reasonable turn around. I do find it surprising that the seller put the car up for sale with the chip on the front edge of the hood. No one will know what kind of profit the seller made but at $25.5K, given the state of the Z market, it seems to be a decent deal for a great looking car. Hopefully it runs as good as it looks.
-
I think I know the answer to your front bumper issue. Based on the location of the holes you have a '73 240z or '74 260z bumper. In '73 and '74 the vertical guards were closer together and the bumper stuck out further from the car. '70-'72 240z front bumpers had the vertical guards spread wider apart and the bumper was closer to the car. Check out the pictures below, '73 on top, '72 on bottom.

-
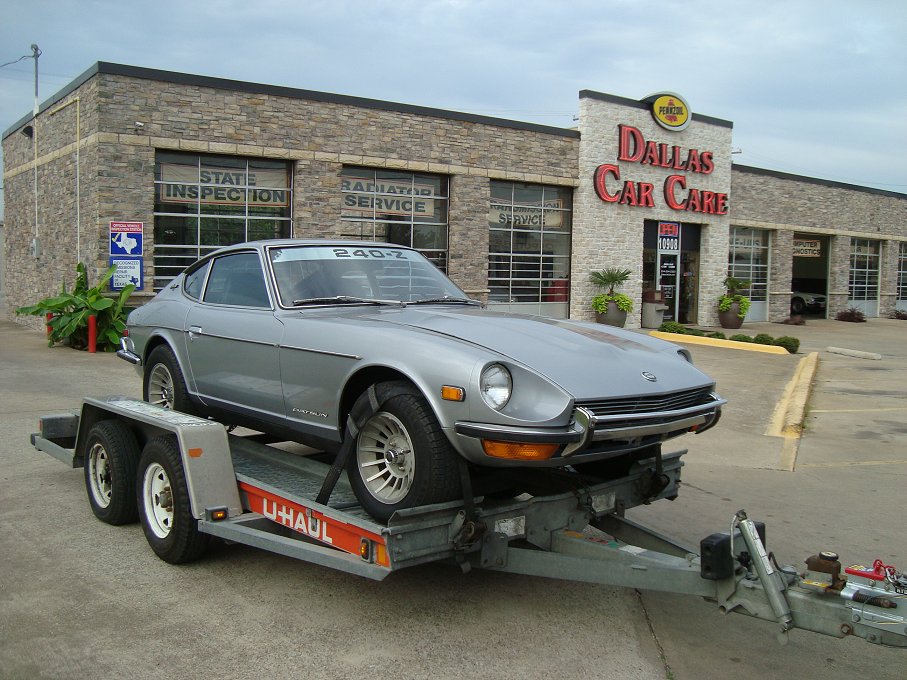
On the driver side of the trailer the fender is hinged and folds down so you can open the door of the car. This way it is easier to get in and out of the car when it is on the trailer. There are two rubber T handles that you simply pull up out of their attachment points and the fender simply folds down.
-
I saw this thread and wanted to add on my personal experience with the U-Haul car haulers. They really are the best and make moving a Z safe and easy. The fold down driver side fender is a true blessing, Here is my 240z on one when I purchased it in June 2014.
-

Hardway's 1971 240z #8011 - Build and Repair Thread
Hardway replied to Hardway's topic in Open Discussions
Mine is number 8011 so it is a four digit vin. It is not super low like two or three digit vin but it is well under 10,00. -
Hardway's 1971 240z #8011 - Build and Repair Thread
Hardway replied to Hardway's topic in Open Discussions
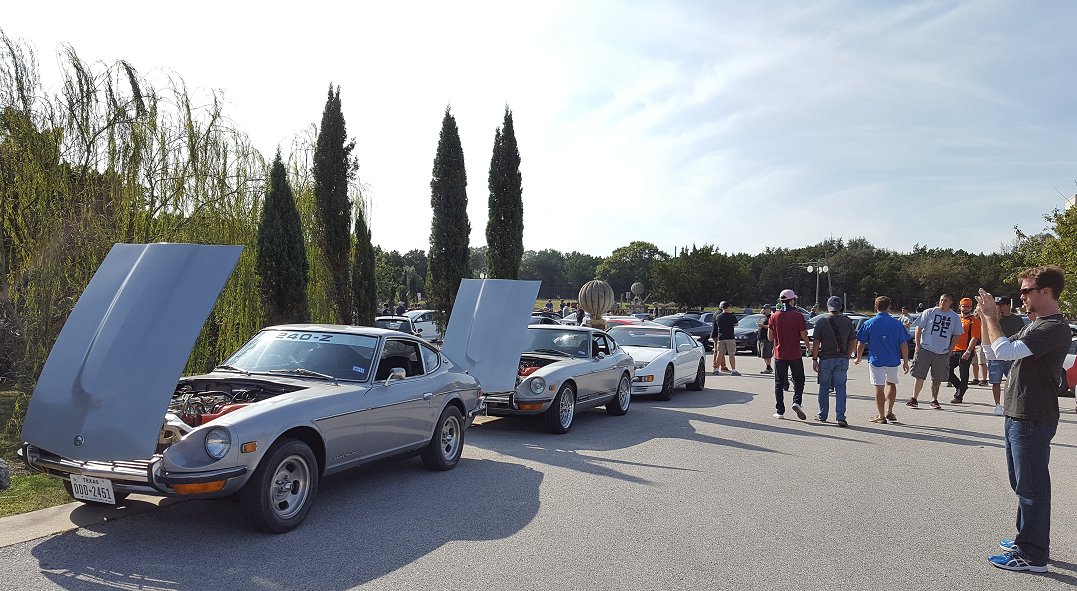
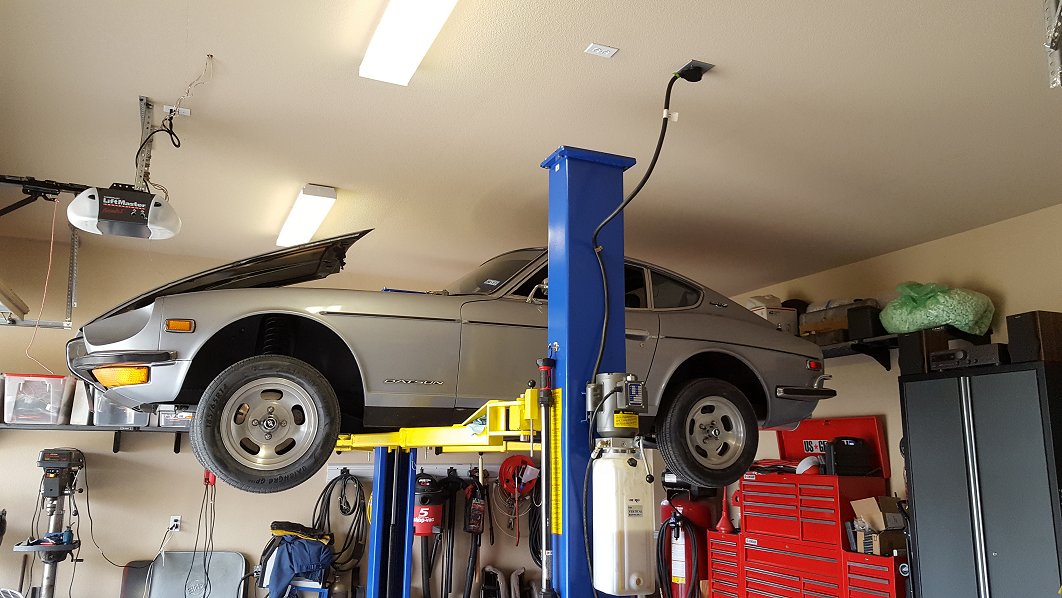
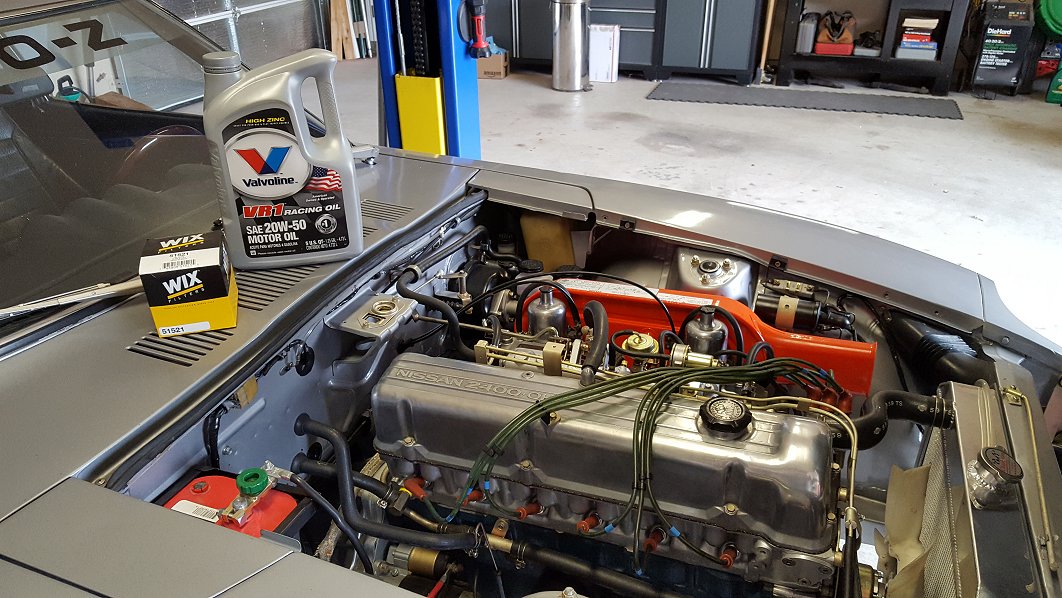
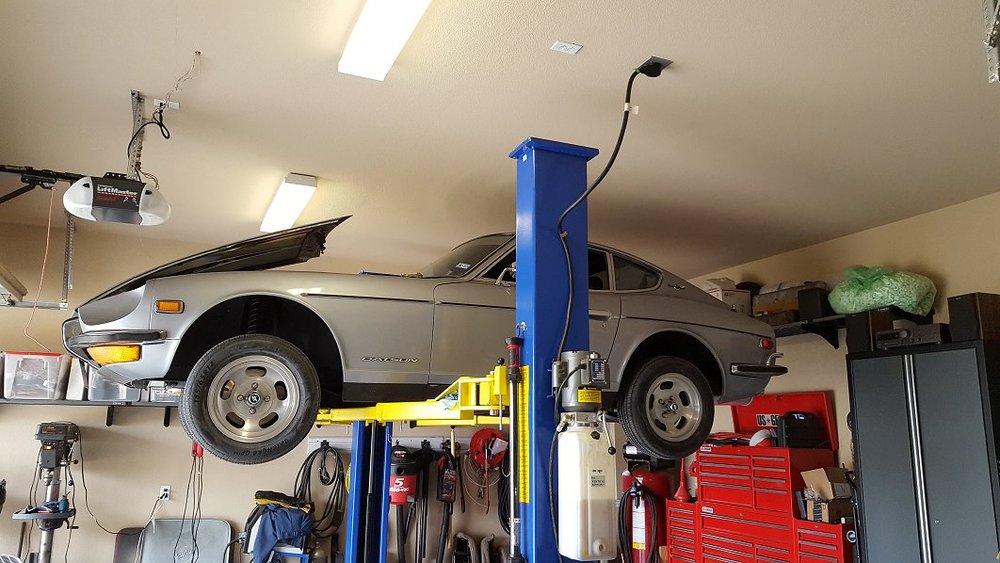
As an added bonus a local Z owner name Doug Masters and I headed out together to the November Cars and Coffee. As rare as it is to see one 240z at C&C, it was even more rare to see two and both in the same color. We had no shortage of people taking pictures and asking questions. We could have started a consulting business that day! With the end of 2016 in sight it was time for an oil change this past weekend. This is a breeze with a lift and as always I use 20w-50 Valvoline VR1 and a Wix filter. I have no more plans for awhile for the Z other than to drive it since this time year is great for enjoying classic cars in central Texas.


-
Hardway's 1971 240z #8011 - Build and Repair Thread
Hardway replied to Hardway's topic in Open Discussions
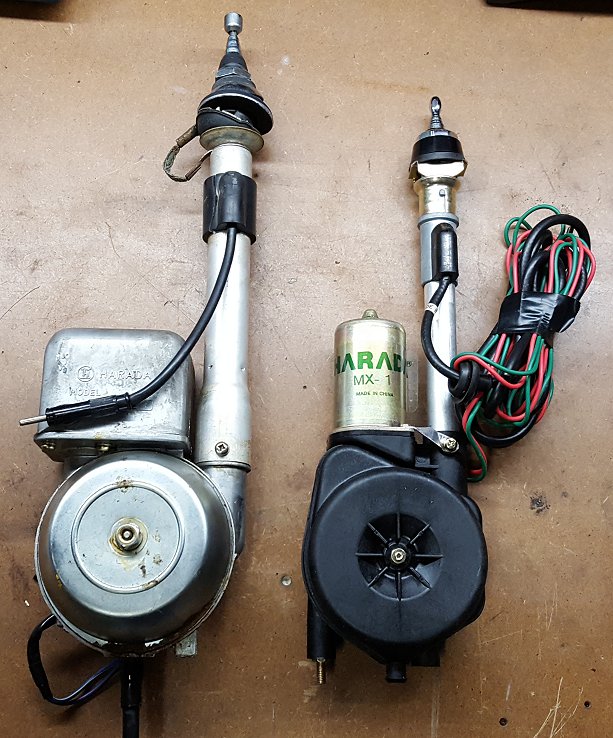
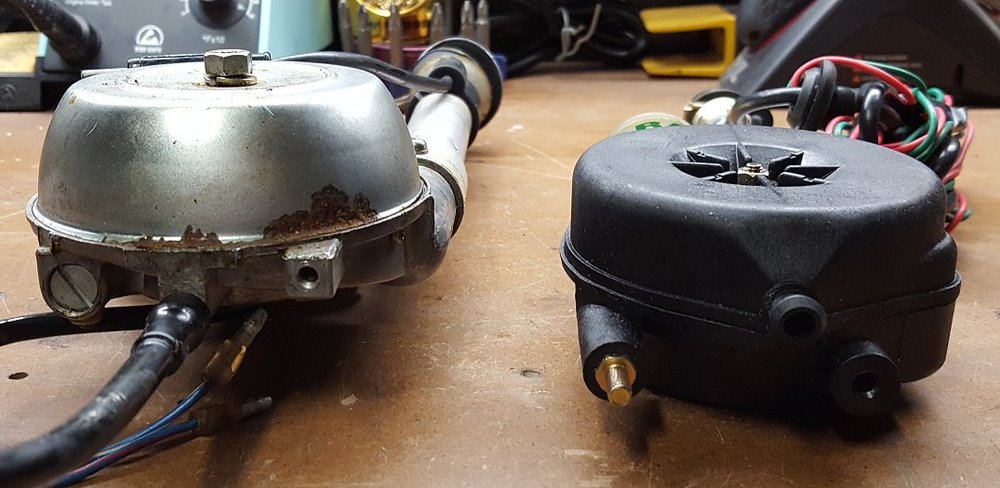
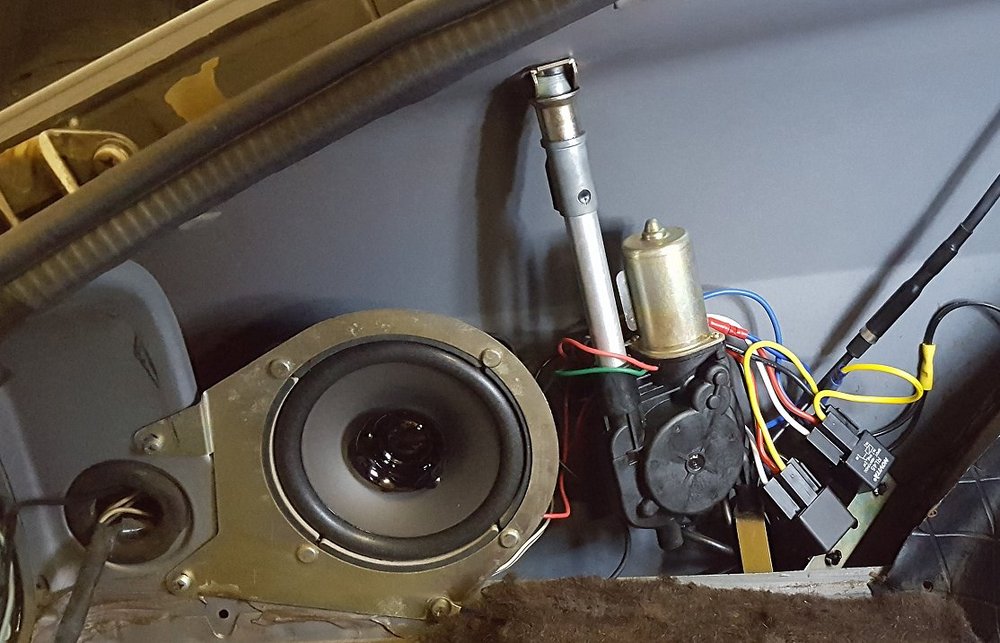
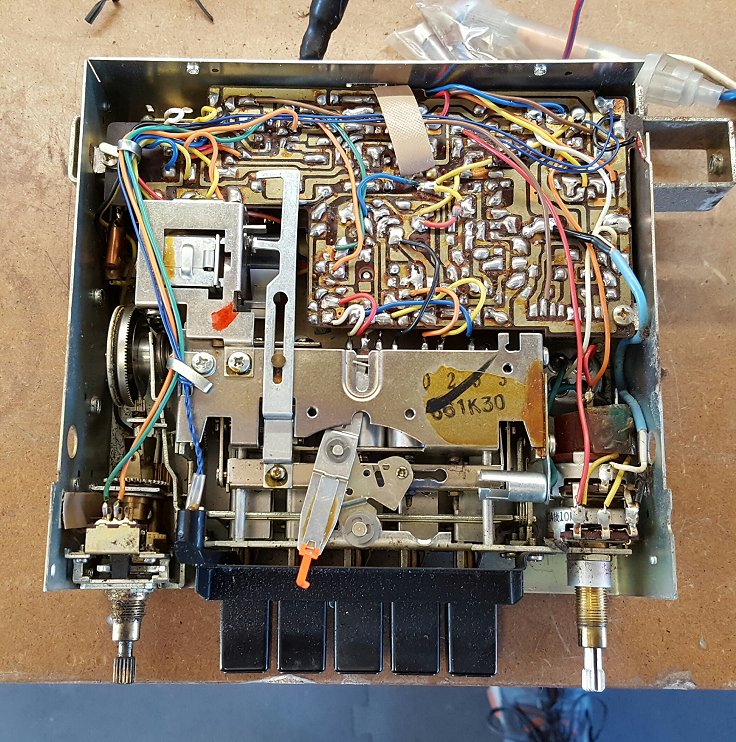
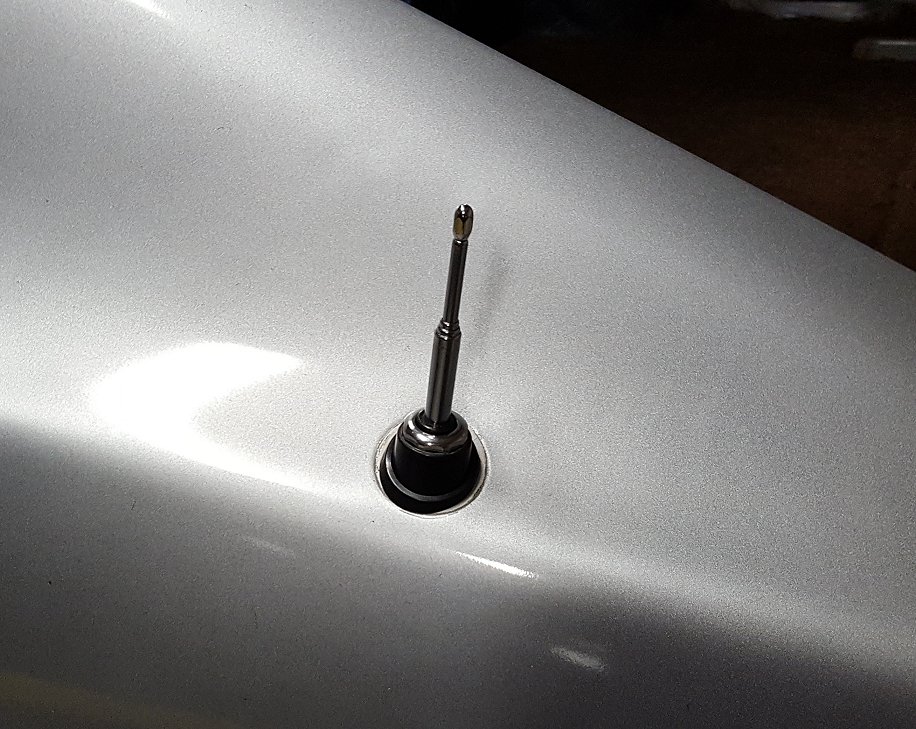
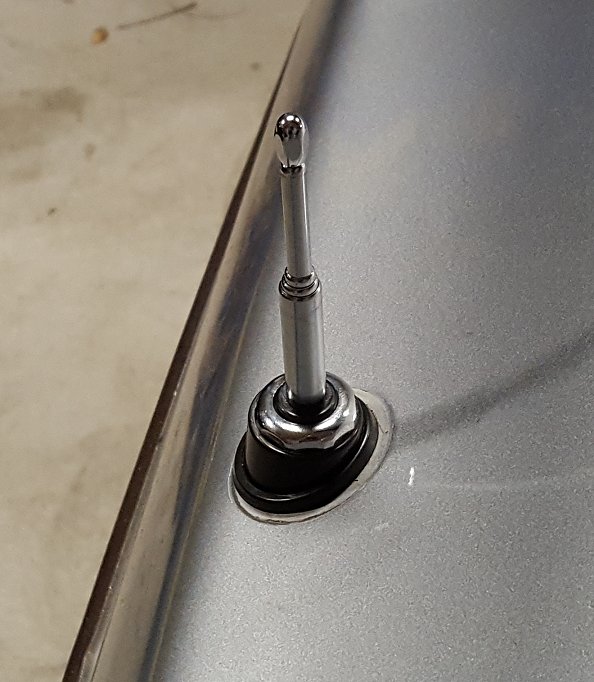
The third part of this trifecta was the installation of a new power antenna. The original Harada antenna had never worked since I purchase the car and has been stuck at about 1/4 all the time. When I removed it from the car I cleaned it out hoping the motor would come back to life but it would not. I found a Harada MX-1 semi-automatic antenna on Ebay for $35 shipped. Using information provided by other owners in the Electrical forum on how to make this type of antenna work with the factory switch I ended up using two relays to achieve the complete control of the up and down motion of the antenna. Very few cars have this feature and it was a hit at the next Cars and Coffee I attended with the Z. The original brown paper speaker was still in the car but had a small tear in the cone. I replaced it with a 5.25" Metra speaker from the parts store as it was the lowest wattage speaker I could find. I deeply regret never testing the original speaker and regret even more throwing it away.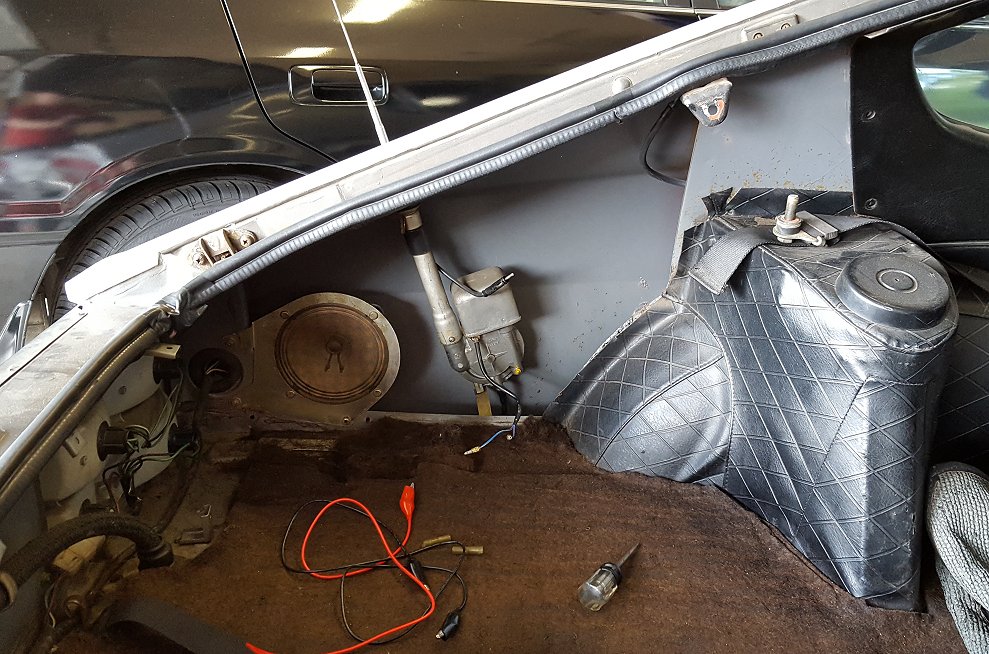


-
Hardway's 1971 240z #8011 - Build and Repair Thread
Hardway replied to Hardway's topic in Open Discussions
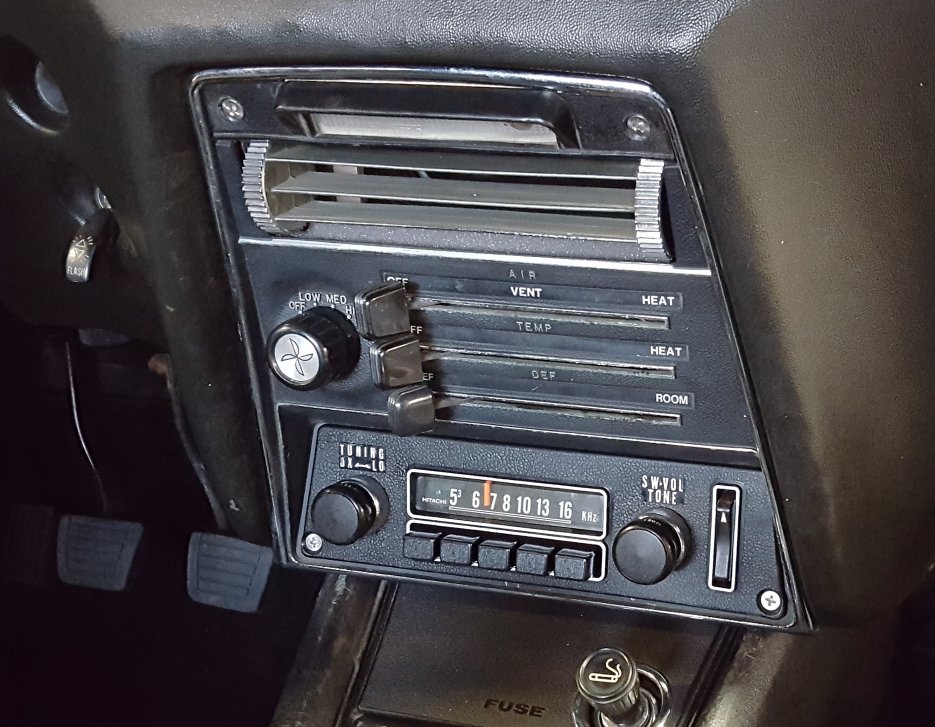
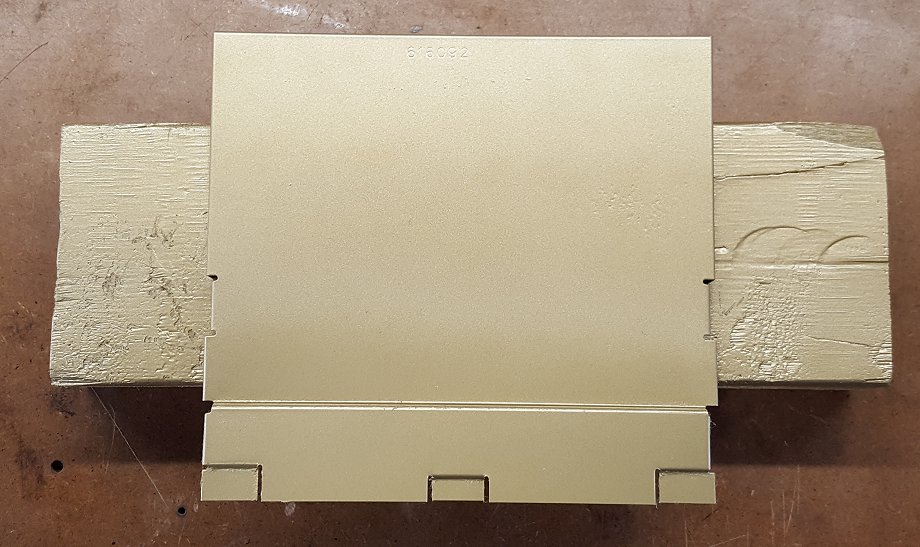
For the part you will see once the radio is installed, I took extra care in cleaning and repairing the face plate. The bottom right corner was cracked so used some JB Weld to build it back up and sand it back down. I then brush painted the corner flat black to cover the gray JB Weld. Then with a very steady hand I painted the lettering of the face and around the trim. I used Testors Chrome Silver. It is not chrome but a very bright silver. It only costs me my time since I had all the materials on hand. After some posts in the Electrical forum on the correct order to install the radio parts, it was hooked up and everything was working. Unfortunately some of the silver paint on the lettering came due to handling it so much and the small incandescent bulb is not illuminating. It worked on the bench both times I tested it so it either the bulb or the socket has a bad connection. Oh well, it will have to be tackled at a much later date as I have no plans to take it all apart again any time soon.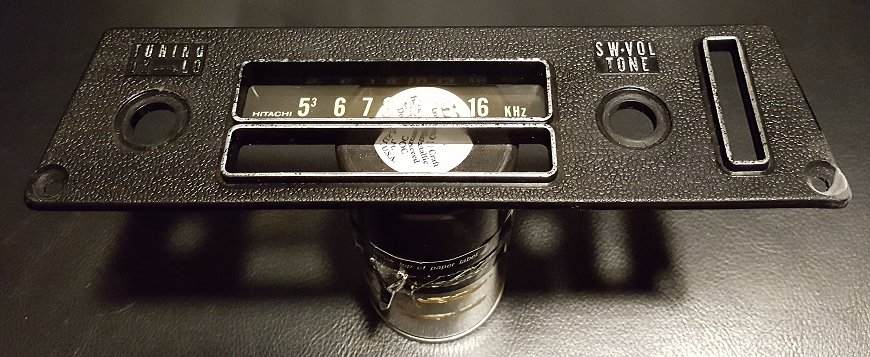

-
Hardway's 1971 240z #8011 - Build and Repair Thread
Hardway replied to Hardway's topic in Open Discussions
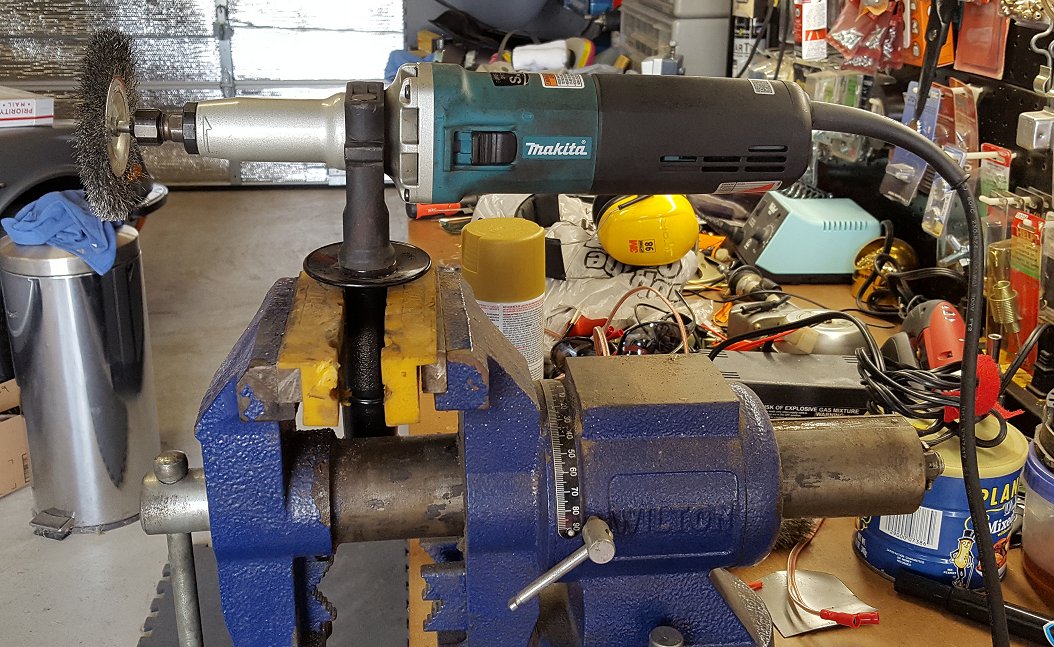
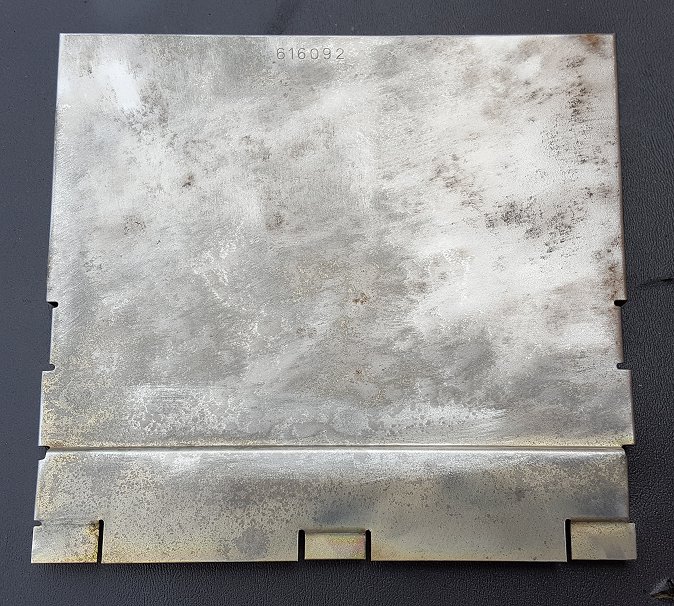
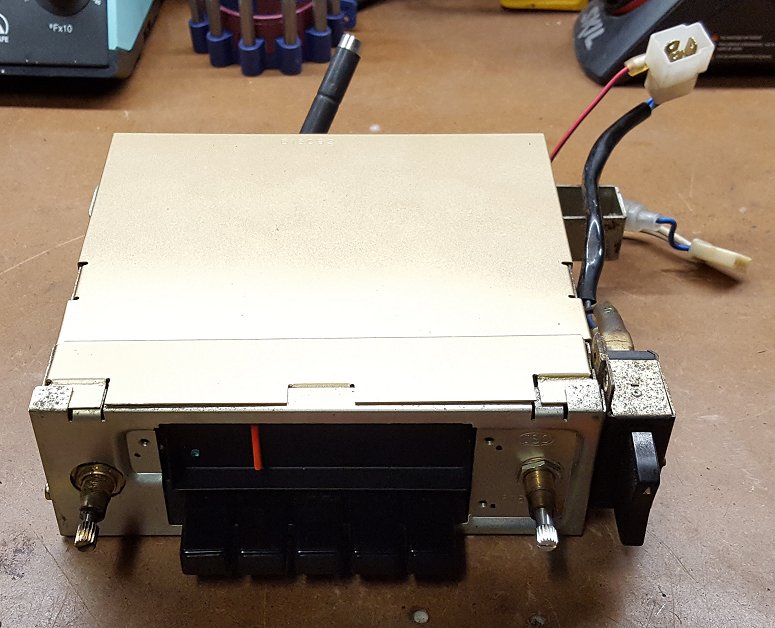
Earlier in the year I purchased an original Hitachi Signal Seeking AM Radio from a friend of mine that was parting out a 240z. I had bench tested it and everything worked as it should. I was surprised how well the signal seeking feature worked as it easily pulled in sports radio, news, and a local gospel station. Since I was going to go back to an original radio I also wanted to use the original power antenna control switch. Before getting started I decided to remove the top cover of the radio to remove the rust and paint it. My trusty Makita rotary tool mounted in my vice made quick work of remove the rust. The cover was originally yellow cad plated but since no one would ever see the radio I opted to strip just the top side and paint it gold. Not too bad and anything beats leaving it rusty.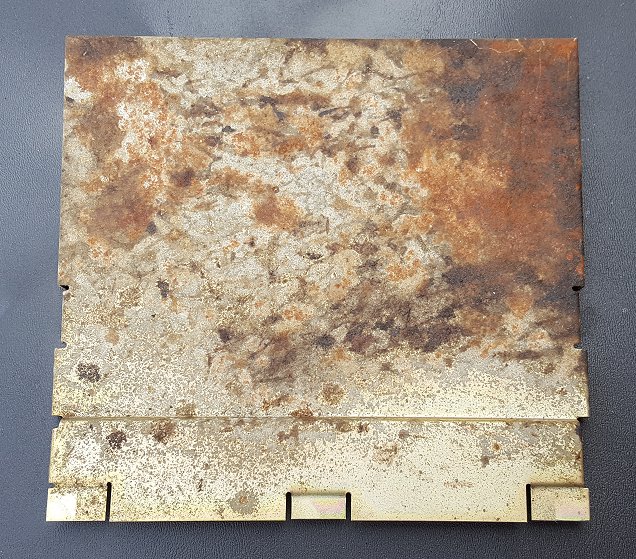

-
Hardway's 1971 240z #8011 - Build and Repair Thread
Hardway replied to Hardway's topic in Open Discussions
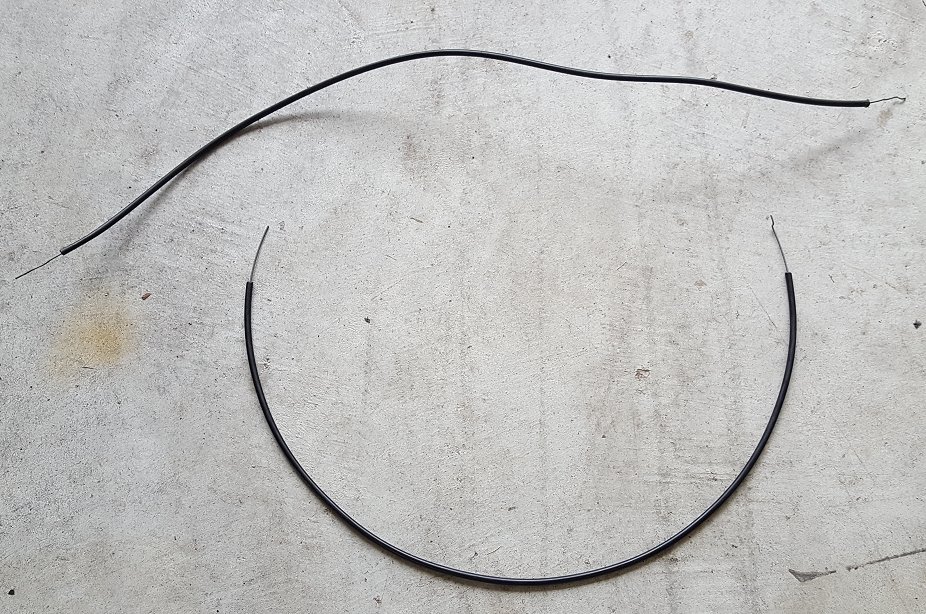
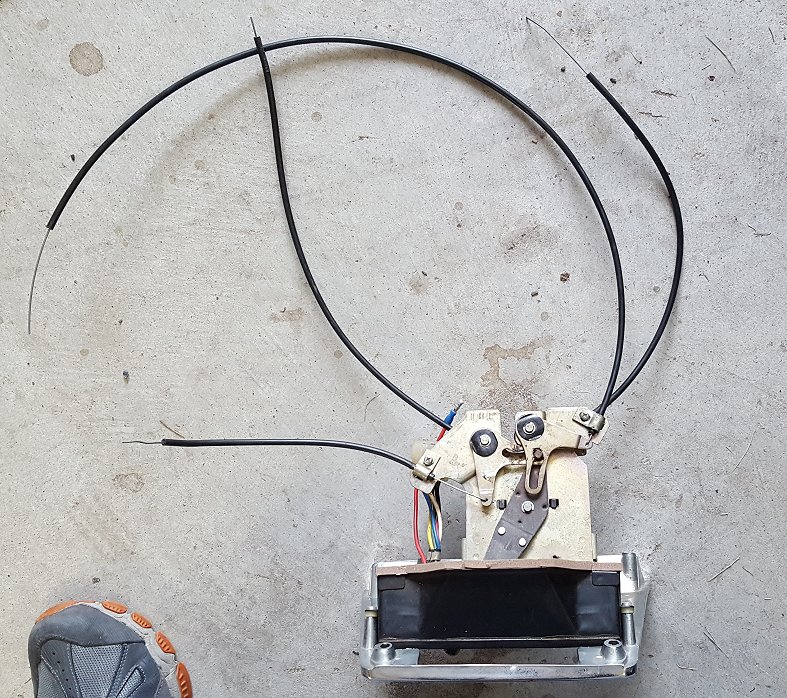
It has been a few months since my last post and wanted to share some updates. Ever since August I have been tackling 3 projects at once – heater control cable repair, AM radio install, and power antenna replacement. Since all of these items were related it only made sense to do them at the same time. When I drove the car last January to Cars and Coffee on a very cold morning I pushed the control levers too aggressively in an effort to get heat in to the cabin. I knew it as soon as the cable bent behind the panel and it has haunted me ever since. Knowing the panel had to come out at the same time to do the radio install I was going to fix it once and for all. With the old Alpine deck out and the panel pulled out some I quickly discovered the issue. Two cables had bent and would need attention. Through my post in the Interior forum I learned from other owners that once the longer cable had bent, it would never be strong enough again. Add to this, Nissan issued a TSB about the cables being too weak in the first place and provided a solution to dealerships at the time. Based on other owner experiences I ended up buying a roll of Precision Music Wire, part# 21051 from Grainger. The wire is 1.295mm versus the original 1.0mm wire. It’s cheap enough at $5.76 for 144 feet. I also purchased 6 feet of Teflon coated 1.5mm inner diameter bike cable housing from a local bike shop. After some cutting and bending I had a new cable. If I had to do it over I would have paid more attention to the direction of curl/arc of the cable so that it was pointing the other direction. However, since it all worked correctly in the end I am very happy. Now that is it in the 40’s in Austin, it will be nice to have working heat should I decide to drive the car on a cold morning.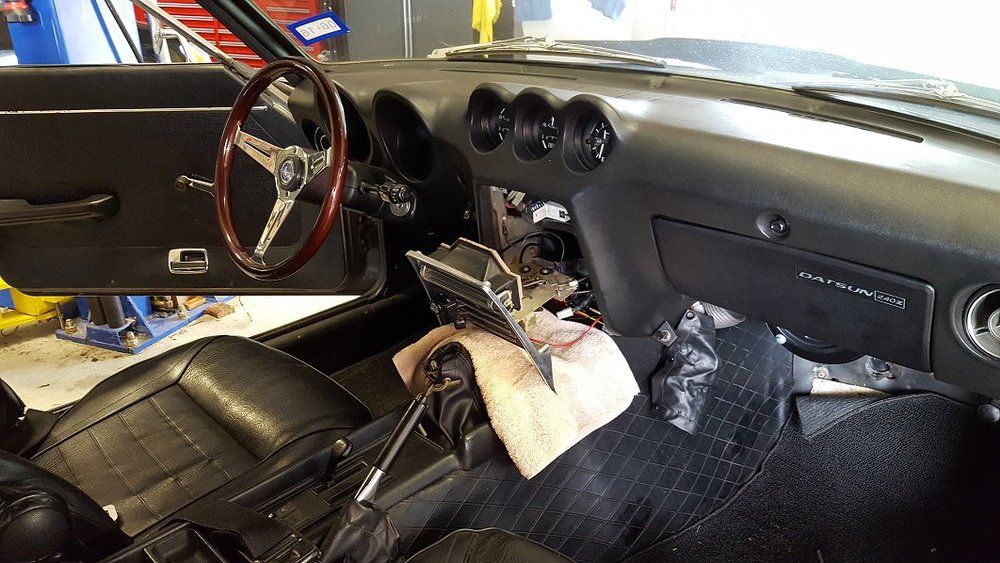


-
Mounting Aftermarket Power Antenna - How Did You Mount Yours?
Hardway replied to Hardway's topic in Electrical
I have been researching this some more and there are no shortage of antenna gaskets/grommets on Ebay for various cars. They run $5 - $10 shipped on average. Once I get some measurements of some of them I will order a few and see what works best. Once I have some results I will post them for everyone to see. -
Mounting Aftermarket Power Antenna - How Did You Mount Yours?
Hardway replied to Hardway's topic in Electrical
Good to know a grommet can be sourced but $20 is a bit steep when you can buy a whole antenna for just a little more. I will keep it in mind though. -
Unfortunately it is the illumination bulb that is out. The green LED that lights up when a station is tuned in still works. Good to know the LEDs above can be used to replace the original LED. In the grand scheme of things I am not too worried about the illumination bulb being out. One day I will everything out to redo one of the heater control cables and I will either tackle the bulb then or if I am tired of AM only I may try to find a Datsun AM/FM radio to go in its place.
-
Good news! I picked up the piano wire from Grainger on Thursday. Sure enough, it was the right size at 1.295mm. It said so on the box and using my digital calipers measures out at 1.295 to 1.300 so all is good. I pointed this out to the guy behind the counter that they need to review and correct their website. I also picked up 6ft of 1.5mm ID bike cable housing from a local bike shop. It is really nice stuff and is Teflon coated on the inside. It took me a few minutes to fab up a new cable and then literally a few hours to get everything together and back in to the car. After much thought I installed the long cable for the fresh air door on the top right connection point. This seems correct as Namerow illustrated in his picture. When you move the top Air selector to the right towards "Vent" it opens the fresh air door. As you continue sliding it to the right it opens the door in the heater box to allow heat in. It is supposed to be colder this weekend so I plan on testing it one night to see if this all truly works. Really hard to get motivated to test a heating system when it is in the low 80's here. My only regret was not paying attention to the direction of the arc of the wire when I was making my 90 degree bends for the lever connection. The lever is still pretty hard to move but it does move the door as intended. I think if I had done it the other way the wire would not be so stressed. I am getting good at taking this apart so when I have a free weekend I may tackle it. For now, I am just glad to have everything buttoned back up. Thank you again to everyone for all of your information, help, and guidance.

-
Mounting Aftermarket Power Antenna - How Did You Mount Yours?
Hardway replied to Hardway's topic in Electrical
I used Jarvo's write up and I am happy to say the antenna install is complete. I was able to use the original metal bracket/strap to secure the antenna so I secured the relays to the universal strap that came with the antenna and secured it using the stud and wing nut that holes the original strap in place. It works just as expected. The only compromise I made was I am pulling the switched 12v power source off of the parking lights. So, the parking lights have to be on the power antenna to work. It is cheating a little bit but the antenna draws next to nothing when it runs so I figured it won't hurt anything. I really wanted to use the larger original antenna grommet/seal with the new antenna to cover up the ring of paint but I just could not get it to work. As I look at the pictures I am now realizing I did not install a drain tube as the new antenna did not include one. I never drive it in the rain but I probably need to put some sort of plug in the hole of the body where the old drain tube stuck out. Next time I have it all apart I will address these issues. For now, I am glad to have it all back together as I was able to take it to Cars and Coffee on Sunday. Thank you to everyone for all of your help and advice!
-
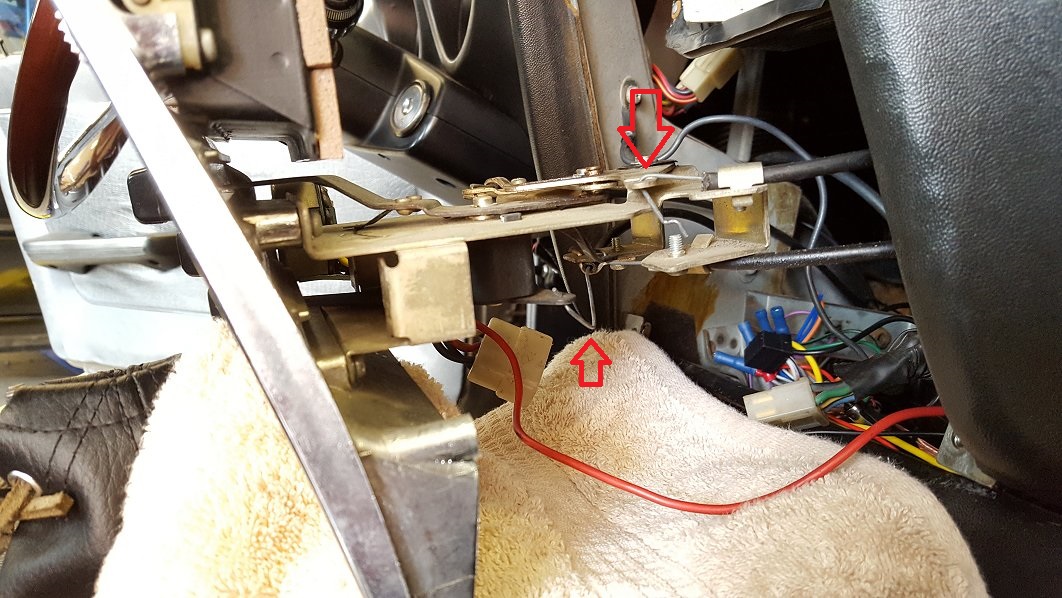
I actually got lucky and was able to pull the panel out a little bit and very carefully maneuver the plate in to position. Everything looks and functions as it should except the small light in the radio is not coming on now. When I bench tested it the light worked but now it doesn't. Oh well, if I pull it again I will replace it. Here is a picture of what success looks like! Thank you again for everyone's help.

-
Thanks guys! While I was waiting for this I moved forward with the install and based on the pictures I have done mine wrong. I did figure out that the hat of the nuts go towards the radio. I will see if I have the energy to take it back a part and fix it later today.
-
I am currently in the middle of trying to install an auto seeking AM radio in to my 1971 240z. I did not remove the radio from the car it was in and do not know the order in which everything came off. I am trying to figure out if the metal plate goes in between the heater control panel and the plastic radio face plate or if it sits behind the heater control panel. When I have the metal plate in between the control panel and face plate there are not enough threads on the shafts to screw the nuts on to. Having the metal plate behind the heater panel does not seem to make much sense but I just don't know. I Googled this several different ways and cannot find the answer and the FSM does not provide this much detail. If anyone has recently remove the original radio from their car and remembers how everything went I would greatly appreciate any guidance you can provide. Thank you!
-
Yeah, I would pull the stranded cable out and just use the housing. Work has been so busy I have not been able to pick up my music wire from Grainger. I am hoping to do that today. I am taking my digital caliper with me to measure before I take delivery of it.
-
Thanks for all the info Namerow. I only plan on making a new cable for the fresh air flap as that is the one I have always had an issue with. You are right, it will take a little trial and error to get it just right but it is do-able. Good idea Jonathanrussell. I actually bought a Dorman choke cable at the auto parts store but returned it as the wire did not look any bigger than the one I had. I am going to purchase this set of cables at Wal-mart as their really isn't a bike store close to me. I am going to take my calipers with me and measure it in the parking lot after I buy it. If the wire is really small then I will return it as the cable housing will not be big enough. Then a trip to a bike shop will be in order. https://www.walmart.com/ip/Bell-Sports-Cycle-Products-7015886-Basic-Tune-Up-Cable-Kit/17619556
-
I spoke to Grainger's tech support. They said the specs on their website are provided by the manufacturer but they agreed that .051 inches and 10.295mm are vastly different. The manufacturer's part# for the wire is 21051 that is .051 inches on their website which equals 1.295mm. I went ahead and placed my order, it will be here tomorrow. $5.76 total for 144 feet. I am going to stop by some bicycle shops to see what they have regarding cable sheathing. Maybe I will get lucky.
-
I live in the Austin area and there are small pockets of industry but nothing like Dallas, Houston, or San Antonio. The few smaller hardware stores we have do not carry music/piano wire. When you ask if they do they have no clue what you are talking about and direct you to picture hanging supplies. I have browsed a few in person and come up empty handed. Many years ago I bought some music wire from a Michael's aka. MJ Designs. The big box hardware stores do not carry it, heck, just finding metric bolts can be a pain in this town. I called Hobby Town USA since they do lots of R/C stuff, they have 0.87mm and 1.4mm, so no dice there. I am going to call Grainger back since they show they can get stuff to their local store the next day.