Hardway
-
Posts
1,332 -
Joined
-
Last visited
-
Days Won
16
Content Type
Profiles
Knowledge Base
Zcar Wiki
Forums
Gallery
Events
Downloads
Store
Blogs
Collections
Classifieds
Everything posted by Hardway
-
Had the hood and fender always been dull? If so, it sure looks great now! What is the story on the Z in the background with the cover on it?
-
A few other things to keep in mind and this goes for owning and driving any vintage car. Keep a small tool kit, jumper cables, and a good fire extinguisher in the car at all times. Things can happen and they do. Better to have it and not need it than the other way around. Since you want to drive the car I echo what everyone else has suggested. Do a complete bumper to bumper fluid change, pull the gas tank, clean it it out, inspect and replace all rubber lines for all components, and don't get in a hurry. You will have to order parts, wait on parts, things won't go as planned etc. At the end of the day you want the car to be safe and not present a danger to you or others around you. Getting the basics taken care of will be a great education and provide a solid foundation for your restoration plans moving forward.
-
First off, you are making awesome progress with your build. I love the attention to detail! Keep the pics coming. I have a ZX 5spd in my '71 240z and it still has the stock R180 diff in it. I don't know what gears are in it but I know its not anywhere near 3.90. However, cruising around town and even fast sprints on to highway on-ramps are no problem whatsoever. The car makes plenty of power and doesn't strain the motor. I personally like it as it lets me take advantage of the full power range of the engine.
-
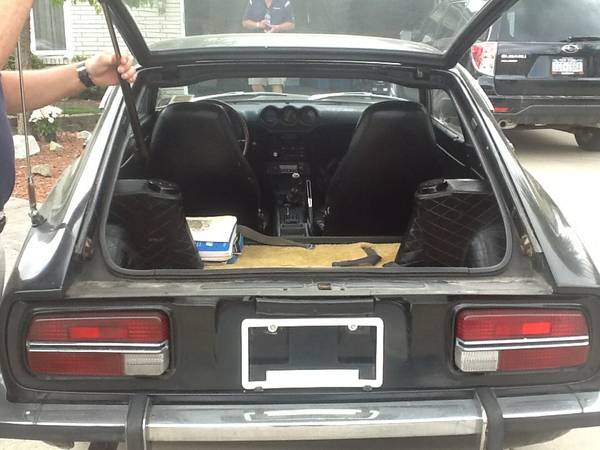
First and foremost, welcome to the club! Second, congrats on being the proud owner and caretaker of a somewhat rare Z car. Best of all, you know its history, have access to the original owner, and got it for the best price, FREE. It appears to be 97% complete with only a few small odds and ends missing but obtainable. Just as it sits the car is pretty valuable so please keep that in mind wherever you store it and drive it. It is definitely YOUR car so do what you want but I, along with many other members will be glad to hear you want to keep it relatively stock. You are correct on the rust and how it got there. Luckily there are repair panels available and you will no doubt learn a lot as you go down the path of restoration of the car. I would encourage you to read over as many build threads as possible as a lot can be learned from others who have been down the same road. Keep us posted and keep the pictures come too!
-
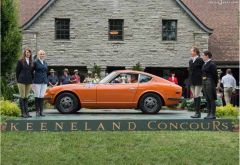 This is a great picture. Congrats on your win!
 -
I actually picked up another finishing panel set that was still in its original satin black finish. Seeing that the silver paint on mine is so nice I figured someone else might want it as-is and make some $ back on selling it. I will be waiting until the fall to install it as it is HOT in Austin right now.
-
I have seen that episode along with the Dodge Charger episode they did. It is entertaining in my book and safe to say I would not go the same route with any car I owned. However, the concept of taking nothing and making it in to "something" is not new as there are tons of other guys doing the same thing to other cars and Z's alike. Before I found my current 240z I was feeling the Z itch really bad and had figured if I found a rusty Z for dirt cheap I would just fix what was needed for it to be safe, throw some triple Webers on it, and just have fun. If the objective of owning and working on cars is to have fun then those guys are winning in spades.
-
Good idea on the home made tap Blue! I will definitely keep that in mind for future reference. I had thought about getting some 3M emblem tape to use and not mess with the pins. But I really did not want to stick anything to the car with adhesive. The car will never see rain under my ownership so I am not too worried about it.
-

Hardway's 1971 240z #8011 - Build and Repair Thread
Hardway replied to Hardway's topic in Open Discussions
One of the great things about older cars is the opportunities they present in bringing parts back to life. One such part for my car is the Datsun script emblem that goes on the hatch. I did a refurb job on a used emblem I got off of Ebay. It came out so well I decided to post a thread about it here -> http://www.classiczcars.com/forums/body-paint-s30/52715-diy-datsun-script-emblem-repair-refurbishment.html#post460651 -
Hardway's 1971 240z #8011 - Build and Repair Thread
Hardway replied to Hardway's topic in Open Discussions
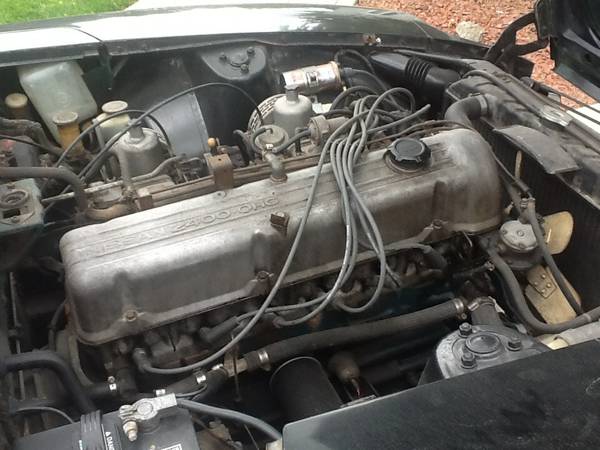
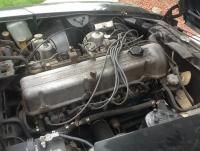
Over the past few weekends I have had some time to work on the Z but unfortunately no time to post any updates. With a free Tuesday night on my hands I wanted to let you guys know what I have been up to. First and foremost, to everyone’s relief I addressed the issue of the aluminum radiator being bolted directly to the car. I knew there no shortage of options out there as many owners have used strip of rubber to various grommets and other things to use as a spacer. Knowing I did not want to use anything with adhesive on it I knew using a piece of foam rubber weather stripping was out. I then turned my focus to using some sort of grommet and then it hit me. I remembered when I repaired the toilet in one of our bathrooms that the bolt kit included some rubber reinforced washers. I figured the size should be pretty close to the size of the bolts holding on the radiator. A quick stroll down the plumbing aisle at Home Depot revealed the perfect parts kit. At $1.62 per kit I bought two so I had a total of 8 rubber washers. Each kit comes with everything you see and take note that 2 of the washers are slightly thicker than the other 2. After about 20 minutes of working on it all the washers/spacers were installed. The fit snug around the bolts but not so tight that they were pain to install. For less than $5 my problem was solved and the best part it is nothing permanently attached to the vehicle. With the radiator wrapped up I turned my attention to installing my new fan clutch. With the fan off I installed some new water pump studs along with a dab of thread locker on each. The studs are part of a Dorman water pump stud pack and included all 4 studs, lock washers, and nuts. The fan clutch swap took just a few minutes. The difference between how tight the new clutch is compared to the old one was night and day. A few minutes with my 10mm box wrench and the fan was back on. With the spacers installed it brings the radiator closer to the fan. I did not have any issues installing it and based on how close it is I am going to run without a shroud and see how things look. I drove out to the local Cars and Coffee meet the next day after doing this work. Between plenty of toll-way driving at 75mph and stop & go driving the needle never reached the half way mark. Job done! -
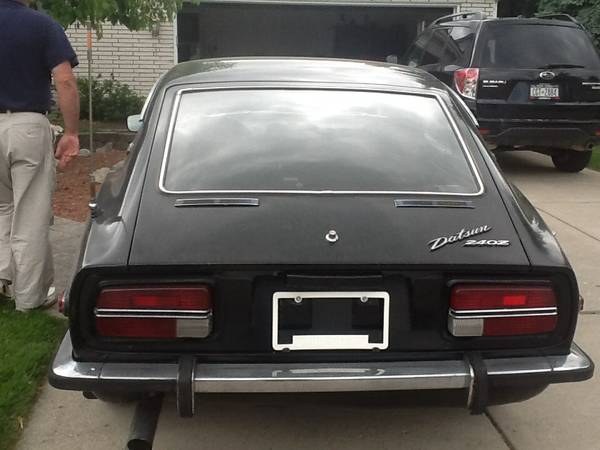
Like any vintage car NOS parts usually carry a premium price and our cars are no exception. One thing that our cars seem to suffer from is emblem breakage either from age or damage when being removed for a paint job. When I bought my Z the Datsun script emblem on the hatch was missing but the small capture clips were still in the body with paint on them. My only guess is the old emblem did not fare well when it was removed. I actually have a NOS emblem sitting in my display case but with NOS emblems now at $60 and knowing I would eventually be painting the car in the future I did not want to install it on the car. However, I also did not want to look at the void and the 3 holes in the hatch either. So I started watching Ebay for a used one to come up in need of some love. Sure enough it did not take long for one to pop up with all of the pins broken off. I won it for $8.64 shipped. It arrived just as expected and was indeed in need of some refurbishment. On the plus side it had no physical damage besides the pins being broken and some minor pitting on the edges. More importantly, the original silver aluminum finish was still intact but with a layer of black over spray. To start I took a small flat head screw driver and removed all the left over gunk and residue that was around the pin locations. I also marked off the 2 pins I would not be using. After that I gave it a good scrubbing with some soap and water and a soft parts brush. I followed that up with a good once over using some super fine steel wool on the aluminum finish of the letters. This helped remove most of the over spray and lightly polished the letters. It was already look 10x better! Before doing anything else I did some test fitting to see what would be best to serve as new pins on the emblem. After a few tries I settled on a #4-40 x 1 machine screw. The diameter was perfect and I figured the threads would give the tangs in the capture clips something to hang on to. On the back of the emblem I used a punch to provide a point for the 1/16 drill bit to start. This is crucial as I did not want the bit to walk as there was little room for error. I drilled very slowly since the soft plastic takes no time to drill in to. I followed up with a 5/64 drill bit so I could ensure the screw would not crack the plastic as I screwed it in. Next, I carefully screwed the screws in to the holes making sure to stop once I felt they were seated. With the long screws to serve as handles I used some Testors flat black paint to touch up the black around the emblem. Once dry I applied a dab of JB Weld epoxy to all the studs. Once dry I used my Dremel tool to cut off the head of the screw plus a 1/4 inch. Looking back on it I think this was over-kill since the screws were wound in to the emblem with several threads. Seeing how the JB Weld setup around the pins I knew it would create an issue in not allowing the emblem to sit flat on the hatch panel. To correct this I used a small mild sanding cone on my Dremel tool and knocked down the JB Weld. As I said before, if I did this again I would not put any epoxy on the screws since I probably removed 80% of the JB Weld. In my opinion, the end result is fantastic. The emblem fits perfectly and from even a few inches away it looks like a newer emblem. It sits flat against the panel which something I was concerned with but the fit is no worse than the newer 240Z emblem right below. In total I have around $10 in parts since the screws cost me $1.50 and I probably have 2 hours of time invested. To save $50 and proudly put the emblem back on the car where it belongs is priceless!
-
If 280's use the same calipers as 240's I got some really nice rebuilt front calipers from Advance Auto Parts. I think they were like $25/ea when I got them several years ago. They worked perfectly and saved a ton of time and money in the end.
-
How to make hand brake cable for nissan 240SX caliper on 280Z
Hardway replied to denturo's topic in Wheels & Brakes
Check out the link below. He essentially made a connector to go from the U bracket of the parking brake cable to the U bracket of the calipers. 240Z Rear Disk Brake Conversion If you need to make a new parking brake cable check out my thread starting with post #70. It should give you some ideas and tips. http://www.classiczcars.com/forums/open-s30-z-discussions/47863-lime-green-machine-restoration-thread-1972-240z.html -
Great work Sean! As others have already said, I love your boxes too. Putting the tweeters in the dash definitely give it a more finished and refined look. If the original was already in sad shape I would not feel bad one bit either. Thanks sharing all the info and pictures.
-
I had emailed the seller asking about the wheels and if the car had lowering springs or cut stock springs. Below is his reply. I agree, someone may really want it and wanted to get it to a point of reserve met. However, I would never guess in my wildest dreams that the reserve would be so high in the first place. Good luck to the seller and future owner, maybe we will hear from them once they take delivery of it. wheels are 16X8 konig... suspension has coil over shocks and springs, urethane bushings, and bigger front and rear sway bars... coil overs allow easy lowering and raising of the car... all pro components and installation. stock springs and shocks are included... Unfortunately I am not near the car and dont have those underneath pics... its clean and rust free...
-
That is good to know! I think all radiators come with the auto. trans coolers in them these days. I paid $215 shipped for my 3 row Champion Alum. radiator but I actually like the black over the polished alum. Nice to see that the drain **** points straight down instead of towards the engine. Post up some pics of it installed when you can.
-
That guy has been selling classic Z's and other old cars for awhile with decent feedback. He is in the right part of the country to find these cars in good shape and flip them. Personally I have never seen a Z with a power sunroof and to be honest, I dig it. Yeah the car needs a few small items here and there but overall it looks like a car that is ready to drive and enjoy. Plus it has a somewhat low VIN. For someone wanting to spend more time driving their car than wrenching on it and they love the British racing green along with the rare sunroof, $28K may be a good deal in their book. If the same guy has been bidding up their own bid then I will agree, it is kinda scammy. In the end, if it sells it sells.
-
Good work on the patch job! Glad to hear the car will be going to a new owner to enjoy and be a part of the Z car community if he or she is not already. Thanks for the update and good luck with your other Z.
-
If you are in to guns or have just ever wanted to shoot a fully automatic piece of hardware check out The Gun Store. Its a bit pricey but definitely a bucket list item for some. It is on my to-do list next time I go back. Best Machine Gun Range -The Gun Store Las Vegas
-
Thank you for the update Blue! Good to know where its headed. Hopefully we will hear more about it in the near future.
-
Thank you for the update Steve. I too emailed Dave and got the response back below. Whoever buys that car will be getting an awesome deal. Don't get me wrong, I love the silver Series-1 I just bought but the opportunity to own a '69 build car is also dream-like for some reason to me. "Car was originally British racing green and was painted black before I purchased it in 1977(black was not available in 1970 models). Car was built in 11/69. Engine and transmission run great and are original. All numbers match. There is some bondo on rear wheel wells done in 1980. Before I bought car, driver side floor pan was patched and rails were patched at stabilizer bar support. I put on about 35000 miles since 1977 and odometer is at 86000 original miles. haven't put on 1000 miles in last 25 years. Garaged stored since I owned it and I run it monthly. Thanks for your interest. Always wanted to have it restored but life got in the way."
-
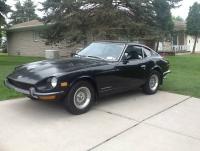
Congrats JPW and welcome to the club! That is a great looking Z you have, especially for your first one. I see you are in Little Elm. The Dallas area has quite a number of classic Z car owners so lots of opportunities to network and make new friends. What is the story on your Z? Where did you find it? We love pictures so show us more!
-
I don't represent this car but truly hope someone on here buys it so we can see it and hear more about it. Based on the pictures it looks like a great car as it sits. I don't see any rust around the hatch or wheel wells and the bumpers appear to be good too. Whoever buys it please keep us posted on it! https://buffalo.craigslist.org/cto/4561721918.html Dave - 716-984-6871 1970 Datsun 240Z I am selling this car for restoration, not a parts car. I have a black, 240Z, with 86,000 miles, all parts original, and is a 4 speed transmission....built 11/69. The car still runs. This was one of the first cars made in 1970, number 198. Note: Of the first 543 Left Hand Drive, DATSUN 240Z Cars produced in Oct., Nov., and Dec. of 1969, an amazing 28% (152 cars) have been found to be still in existence at this point. For more information related to the 1969 Production 240-Z's see "Locating The Remaining 1969 Production Year Z Cars"


-
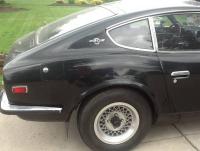
Datsun Z Series 240Z | eBay For the record, I am posting this up as a reminder to do your due diligence when shopping for a classic Z car. If you are looking at this car or any car, always ask for a lot more photos. In no way do I mean to bash the seller or discourage anyone from bidding on it. I just want to share what I know about it as I do not feel it represented 100% accurately in the auction. Also, please keep in mind the seller I was speaking with in early June may not be the same guy selling the car now. This silver 240z was a car my wife and I were seriously planning to go look at and buy just a few weeks before I bought the 240z I have now. The car was on Craigslist and located in Biloxi MS. He had sent me plenty of body, interior, and engine photos and for his asking price of $6500 it seemed reasonable as he told me the previous owner had rebuilt the suspension and the car was from Texas and virtually rust free. When I asked for pictures of the underneath I was quite shocked and disappointed. Its safe to say if the suspension was rebuilt it was a long time ago as all of the visible bushings are cracking and everything is covered in a layer of scale and rust. Knowing that a full suspension rebuild was ahead of me I quickly passed on the car. Below is a link to my Photobucket containing all the pictures the seller sent me. Seeing that the car is already at $8K the seller seems they will do pretty well with the car. One a side note, the car appears to be a transition car as it is has vented B-pillars and the speedo starts at 10mph but it has all the series-1 bolt on stuff like seats, steering wheel console, and gas door knob/lock. Pics -> 240z Biloxi MS Photos by camaroguy1969 | Photobucket
-
Bringing strong money so far, $8K. Emblem holes filled, blacked out engine back, and roof damage is a bit disappointing. For someone wanting an early series-1 car with D wheel covers and that has room for improvement it is a good buy for less than $10K.