Hardway
-
Posts
1,332 -
Joined
-
Last visited
-
Days Won
16
Content Type
Profiles
Knowledge Base
Zcar Wiki
Forums
Gallery
Events
Downloads
Store
Blogs
Collections
Classifieds
Everything posted by Hardway
-
I don't know if the metal would stand up to brazing on to it. Let me see what kind of wire I have and go from there. Maybe a case where my wire is too thick and just need to scale down to a thinner wire.
-
Good question. The label was torn off the spool. I know it is copper coated steel wire but that is all. I will mic it tonight and see if I can tell. If not it might be time to buy a new spool.
-
I love the wheels! Hopefully someone on here can at least check it out and report back with their findings. True '69 Z's almost never pop up anymore.
-
I pulled apart my driver side seat a few weekends ago and discovered the sheet metal that makes up the seat back was cracked in several places. Judging by the wear on the seat cover a previous owner had the seat reclined and it was hitting the edge of the package tray rail. The metal is 22ga or 24ga, very thin stuff! I tried welding it back together after watching several videos on Youtube but even with my Hobart 150 on its lowest setting, using CO2/Argon mix, and a copper heat sink behind it I am still blowing holes through it. Has anyone else run in to this when recovering their seats? If so what did you do to fix it? At this point if I can't weld it back together I am considering epoxying a piece of sheet metal over the cracked and damaged area. Once it has the foam and cover on it you will never detect it, I just want to make sure I am doing right by the way I want to repair it. Any thoughts or suggestions are greatly appreciated it.
-

Newbie needs help with 12/70 Series I 240z
Hardway replied to djwarner's topic in Suspension & Steering
Congrats on your purchase DJ and welcome to the forum. There could be several reasons why the front is sitting high. The rear shocks could be shot and springs sagging causing it to sit nose high. To properly troubleshoot it I would pull the wheels, inspect everything which it sounds like you have done some of that already, and see what is in there. Could be mismatch springs or something else. Some pics are always good too. If the bushings are shot and you plan to replace them that will give you a good opportunity to investigate the issue and uncover any other issues as well. -
Made 4 new air cleaner intake gaskets yesterday evening, 2 out of black gasket paper and 2 out of cork. Cost me $7 for the full gasket material set and around 30mins of my time. I still have enough material to make 10 more gaskets. Beats spending $15/pr online. Sometimes its the little things in life that give you the greatest sense of accomplishment!
-
Congrats on the purchase Ninja. Based on what you shared with us about the car and the pictures you have a great car to start with. What part of the country are you in? Did you find your car on Craigslist, Auto Trader, through a friend, etc? At $4700 I think you did really good even with the car needing the items you listed. It has TONS of curb appeal and will always draw fans at the local gas station and car show/meet up. You mentioned the car smells like a boat, does it smell like fuel or wet/mildew? If it smells like fuel read up on replacing the vent lines going to the tank. You will have to drop the tank to properly access them but it needs to be done anyway since you said your fuel gauge is not working. Check the tank for any damage as you may have several sources of gas fumes coming in. If it smells wet or mildewy get all the carpets up and inspect your pans. Hopefully they are in good shape and you can either clean or replace the carpet in the car along with whatever weatherstripping might be needed. This site is a great resource with tons of topics and issues already covered. Keep us posted with your Z as we will be looking forward to your updates and pictures.
-
Good job Blue. I don't know why I could not find his site when I googled him.
-
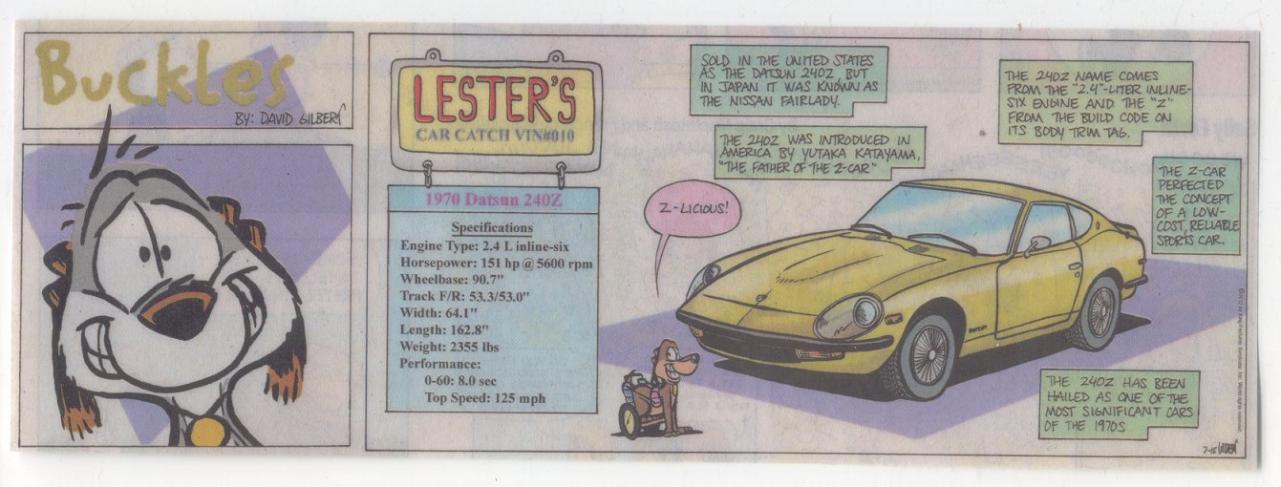
My neighbor was kinda enough to think of me when he was scanning the funny pages in the newspaper a few weeks ago. I liked it so much I had it laminated so I could hang it at my desk at work. After a good search on Google I could not find this comic online so I scanned it and wanted to share it with everyone. I think its pretty cool. Enjoy!
-
I pulled my driver side seat apart over the weekend. Most of the foam looked original including a thin layer of foam that was glued across the back of the seat. When you guys recovered your seats did you place a new layer of thin foam across the back, use the original, or just leave it off? Mine was pretty nasty feeling so I tore it off and I am considering putting new on after I clean up the metal.
-
where's Les now?-Classic Datsun really a business?
Hardway replied to madkaw's topic in Open Discussions
I bought my seat foams from him and they arrived exactly when he said they would, about 3 weeks from the date of order. I am hoping to install them soon but in the box they look and feel great. -
Congrats and welcome fellow Texan. Looks like you are off to a good start on your 280z. This is a great forum with a lot of knowledgable members. We look forward to more updates!
-
I don't know the code but this looks like a 240z that was for sale in the Corpus Christi area? Is this from that area or somewhere else? Just out of curiosity.
-
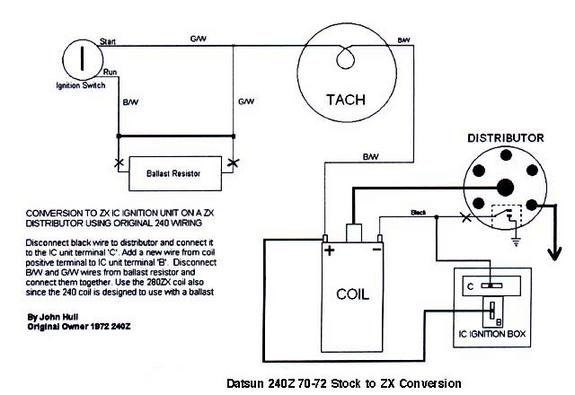
Okay, so I did a quick test, I dont think my resistor is resisting. I have 11.9v on each end of the resistor. In order to wire the resistor out would I take my switched run 12v b/w wire, connect it to the pos. side of the coil along with the g/w wire and the other b/w wire? In order to power the distributor would I also connect it to the pos. side of the coil since that is where my 12v source is connected to? I just want to make sure I don't mess up my tach.
-
He is a parts guy, very nice, usually picks up his phone. I already inquired about the Panasports that can be seen on the silver Z in one of the pictures, they are not for sale :0(
-
Interesting but that article really only points to nearly stock and good to great condition cars. We all know what a rust free 240z is worth, even if it has a 280z engine, 5spd, etc. As Jarvo just pointed out above, there are still examples out there at bargain basement prices. BTW Jarvo, congrats on your purchase. What kind of resto work are you planning to do on your '72? Have you started a thread for it yet? What kind of NOS goodies did you get? You know we love pics!
-
I actually kept the ballast resistor. Since everything works now and sounds strong I will leave it as is. If I experience a drop in performance once I get to drive some I will take the resistor out. Just to confirm if I did so, would I connec the the 12V b/w wire to the g/w wire directly? Will this hurt the tach by doing so?
-
Thank you Steve J. I followed your diagram and presto, working tach! Not only does it work but according to my dwell/tach box its pretty spot on.
-
I know this has been covered a million times and I have spent the last 1.5 hours trying to find an answer but so far have not. The PO installed a 280zx distributor Accel Super stock "yellow box" coil in my July '72 built 240z. The car ran and the tach worked. The resistor was also being utilized. Once I got all my projects on the car done I went to start it and had no spark even though I had not touched any of the underhood electrical components. With my multi-tester I determined I was not getting any power to the coil or the distributor. So I went about unwrapping the electrical tape from all the wiring. Everything was in pretty bad shape so I started over. I got the car running but now the tach does not work and I cannot figure out why. Below is the wiring I have. B/W wire that gives 12V w/key turned run that is connected to pos. side of the coil. B/W wire that gives nothing w/key turned to run and currently not connected to anything. G/W wire that gives nothing w/key turned to run and currently not connected to anything. B wire from the C terminal on the distributor connected to neg. side of the coil. Y wire from the B terminal on the distributor connected to pos. side of the coil. Does the tach need the resistor under the hood to operate? If so how do I hook it up? I used the diagram below and tried connecting the B/W and G/W wires together that are currently not connected to anything but no response from the tach. I also tried connect them to the pos. side of the coil and nothing either. If connect any of them to the neg. side of the coil it kills the engine. My fuses are good and all my dash lights and other gauges work fine. Any guidance is greatly appreciated.
-
I used a 4.5" die grinder and a file as well. Take off a little material at a time as the grinder will cut in to the aluminum if you dig in to it. A note about safety, make sure you wear gloves and safety glasses that completely seal against your face. The aluminum comes off in very tiny pieces and creates an aluminum dust as you can see in my pics. Most safety glasses do not seal against your face. A few pieces got past my safety glasses and I instantly knew it. If your safetly glasses dont seal well then a pair of swimming goggles might be a good idea.
-
As promised, here are the pics of my trimmed bell housing. As you can see no strength is lost by grinding the ear down. My trans is a 5spd out of a '82 280zx.
-
Lets hope you live a long time Montezuma! My wife tolerates all my car stuff but I am selling some model kits as now as I have come to realize I will never get around to building all of them. I have one of the 1/18 black 240z die cast cars. I think its made by Sun Star. Found it at one of the discount toy stores years ago for like $15 and could not pass it up.
-
No enemies or ex-wives. There was a corresponding hole in the trunk floor right above it. I am guessing someone mounted a speaker box or something at one time and went too far with the drill bit. The shop did a great of brazing on a small brass patch along with repairing one of the vent hose ports. They pressure tested it for me and it passed. Luckily since my car had been the PO's daughters daily driver the tank was super clean on the inside.
-
First I want to say thank you to everyone here on the boards for all of the help, support, information, and guidance you have given me over the past 5 months. It is the passion and a true sense of community that keeps these great cars running. What started off as a addressing a leaking exhaust manifold gasket and vent hose replacement snow-balled in to one of the more severe cases of "while I am at it" syndrome that I have experienced in quite some time. Below is basically a list of what I ran in to and what I did to resolve it. Leaking exhaust manifold gasket - pulled carbs, intake, and ex. manifold off. Ordered a new MSA 6-1 ceramic coated header and stud kit Oil pan leaking - before putting the header on I knew I needed to change the pan gasket first. Dropped the pan, found a bunch of plastic, determined it to be chain guide material. Cleaned it all out, stripped the pan, painted it, cleaned all around under the engine removing at least 1 pound of oil soaked grime, reinstalled pan with new gasket. I thought about swapping the chain and guide but decided to roll the dice for now. It’s not making any noise and the engine runs good. Transmission ear interfering with header - grind ear down, header installed! Gas tank vent line replacement - dropped tank and pulled all the vent lines. Gas tank had a small hole drilled in the top of it - sent to tank to be repaired at local radiator shop. (While I am at it) Need to make gas tank pretty - stripped gas tank and straps, coated with black POR-15. This took the course of several weekends to do. (While I am at it) Want a quieter fuel pump - installed Carter with all new rubber fuel lines and filter. (While I am at it) Tank has original sending unit in it - lets install a new one! Rewired everything (while I am at it) as the existing wiring looked a bit rough. Reinstalled the gas tank and vent tank - what a BIG PITA for both. If you have been there you know what I am talking about. Reinstalled the carbs, replaced all rubber fuel lines as well plus a new filter. Installed new oil filter and poured in fresh oil. Turned the key, pump comes on, after 5 seconds fuel starts pouring out of the intake/air cleaner side of the carbs. - Troubleshoot, float needle assemblies are shot, fuel pump does not shut off until 4psi. Installed new needle assemblies, adjusted floats, and installed a Holley AFPR Turned the key tonight and she not only started but purred like a cat at idle. No leaks! Up next - drive it a little, do a tune up on it as the plug wires are a little rough and install a new MSD Blaster 2 coil. After that I am going to address the brakes as they pull to one side a little and replace some of the easier to get to suspension bushings.
-
Awesome! I look forward to updates on the site and posts about your Z. Once I have some free time I will check out your profile info as well.