Hardway
-
Posts
1,332 -
Joined
-
Last visited
-
Days Won
16
Content Type
Profiles
Knowledge Base
Zcar Wiki
Forums
Gallery
Events
Downloads
Store
Blogs
Collections
Classifieds
Everything posted by Hardway
-
I agree with Patcon. The cost and complexity of the re-creating a early hatch plus all of the duct work and parts can be very expensive. Depending on your plans for the car you could run a regular hatch for now and keep on the look out for a S-1 hatch, preferably complete. Due to their rarity you may be looking at the possibility of having to buy an entire car just to get the hatch and parts. Hopefully it does not come to that. Take a look at my thread from earlier this year. It has lots of information and pictures regarding the series-1 hatch and related parts. http://www.classiczcars.com/topic/57001-series-1-hatch-vent-duct-clips-restoration-info-needed/
-
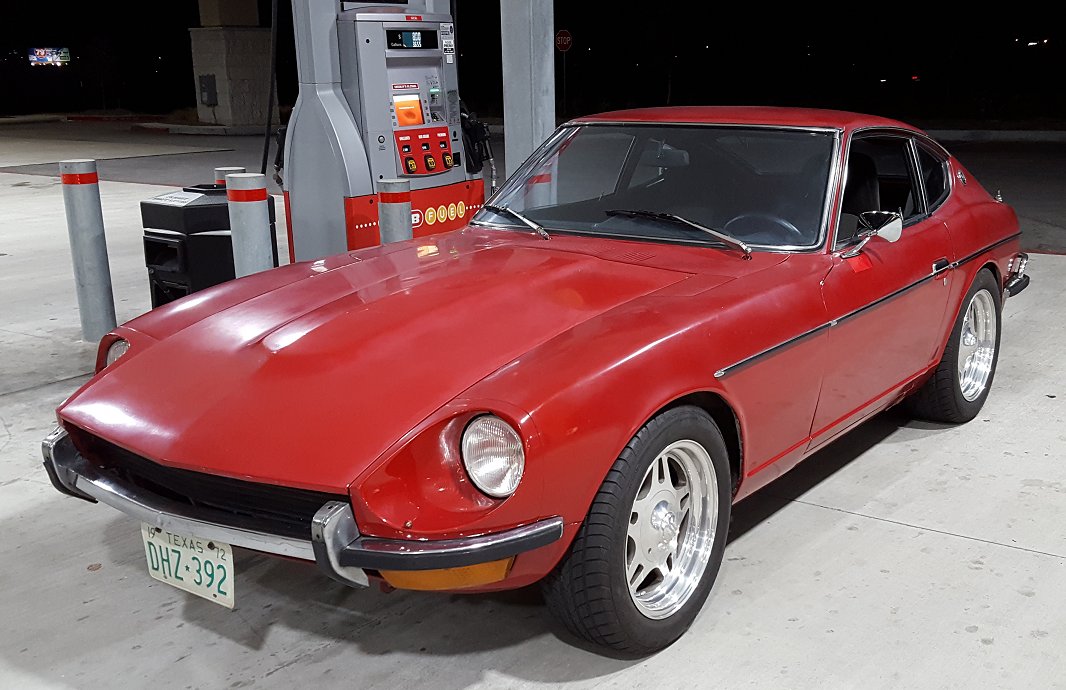
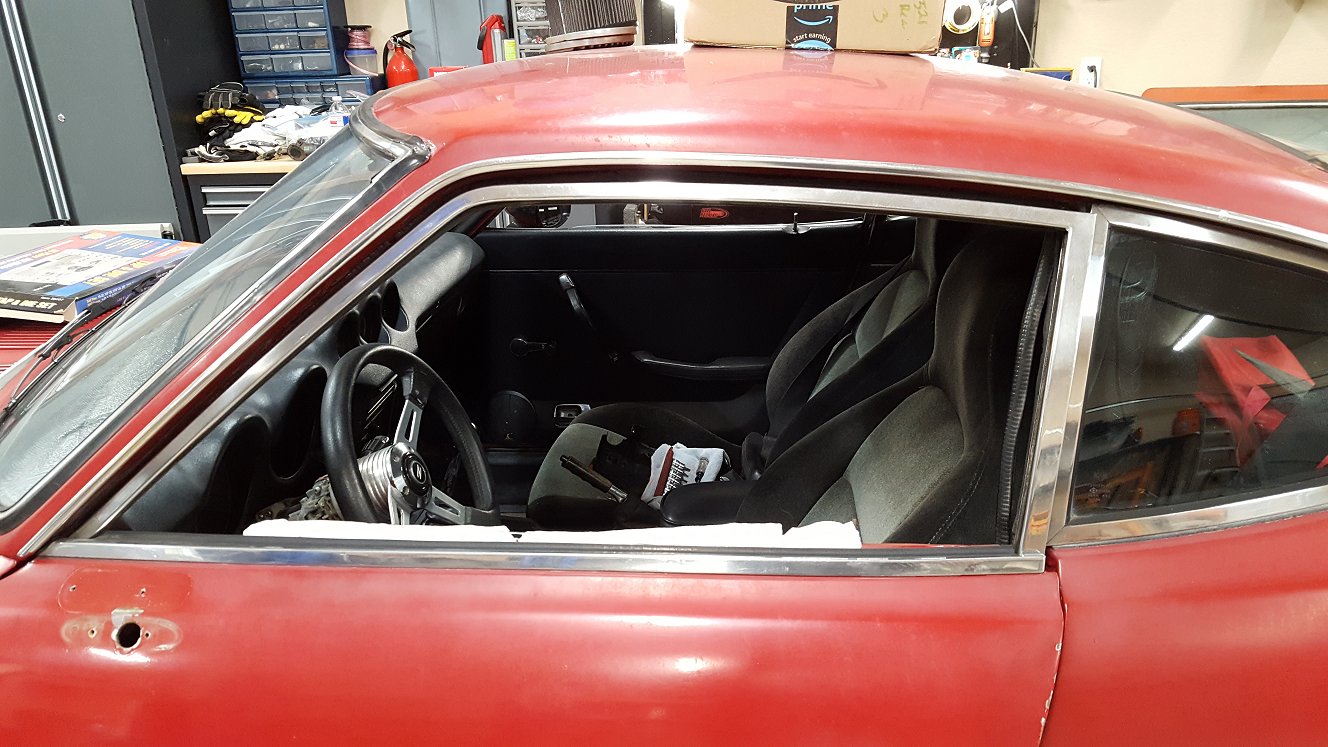
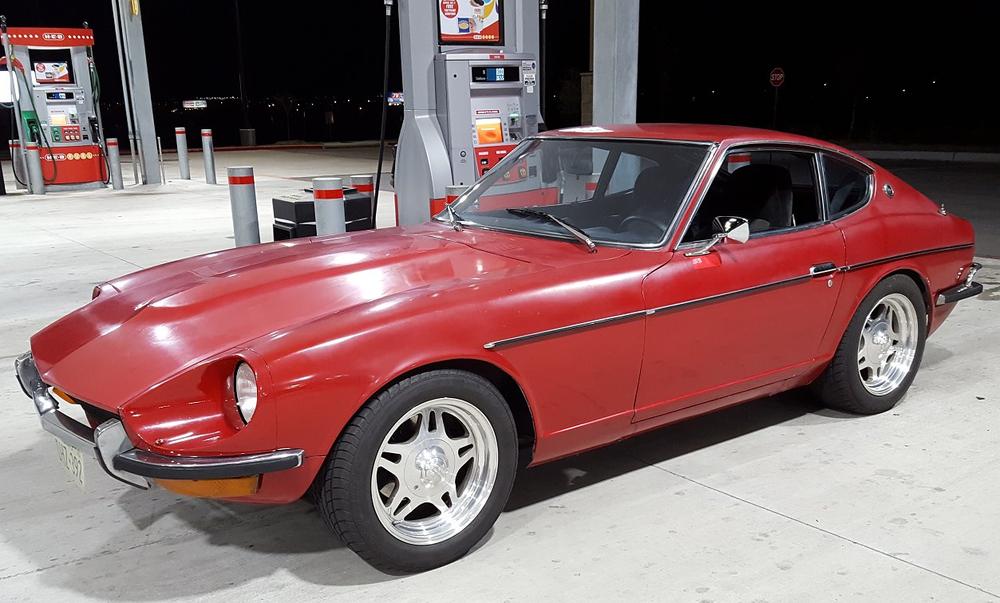
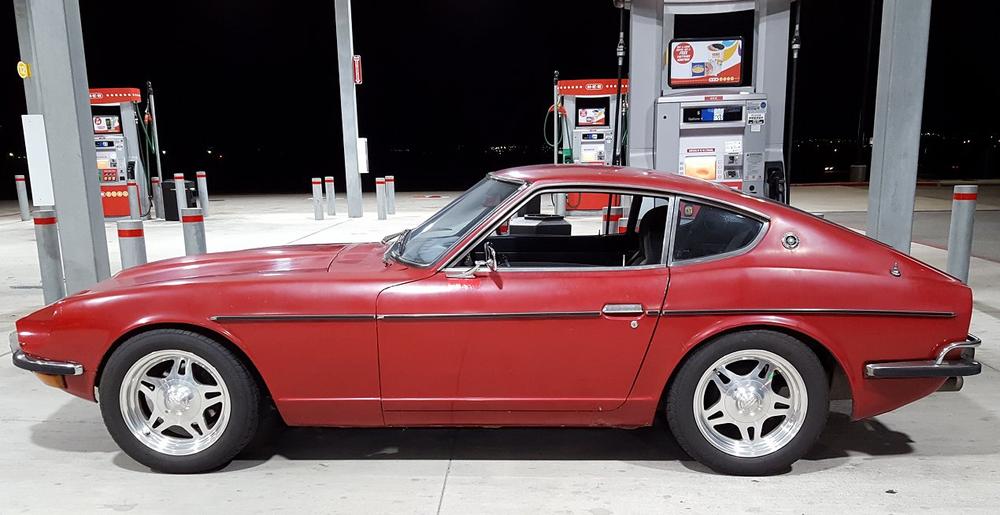
Thank you for the compliments guys! I would never put any Ferrari badges on it but I think a set Borrani spoke wheels would look killer! Unfortunately a set probably cost more than what I paid for the car. The wheels currently on the car are cool but they also date it somewhat to the 90's or early 2000's. For now, I have no plans to replace them as they are in excellent condition and will polish up well. That is interesting on the shims. I honestly can't remember what my previous 240z's had in the way of brake shims but i do not remember them looking like that. Might be later shims like you said. My long term plans for the car are still TBD. I don't see myself doing a restoration of any kind on it but at some point it will need a paint job. Before that there is some rust that needs to be addressed in the rockers as well as the holes in the door that are currently covered by red duct tape (I mean speed tape) Silver is the original color but the red is really growing on me. Even on the short shakedown runs it turns heads at almost every stop light. I am hoping some careful buffing and polishing will give me a year or so of life out of it. My goal is to have a fun Z car to rip around in but also shows well at meets and informal shows. I am certainly achieving the fun goal right now and that alone makes me very happy. Moving in to 2018 the Z will receive a RT diff mount, new steering rack gators, headliner repair/replace, odds & ends, and a lot more cleaning. I am going to try and source a better condition original front bumper and guards as I like the stock look but there is no rush on this. I would also like to have the seats recovered in some black leather with some nice stitching and vents so they look more vintage. The velour screams 1990 but in their defense the seats are super comfy and supportive. If and when the engine comes out to address the sloppy timing chain I would like strip everything out and paint the engine bay as it is currently a mix of black, red, and silver. And the list goes on and on.
-
Your posts with all the pictures and details is so satisfying to read. Your thread does a great job of showing everything that goes in to truly restoring one of these cars. The devil is in the details and you are executing everything so well. I agree, this is a Pebble Beach worthy car and congratulations to you and the owner for what you have accomplished so far. Keep up the good work!
-
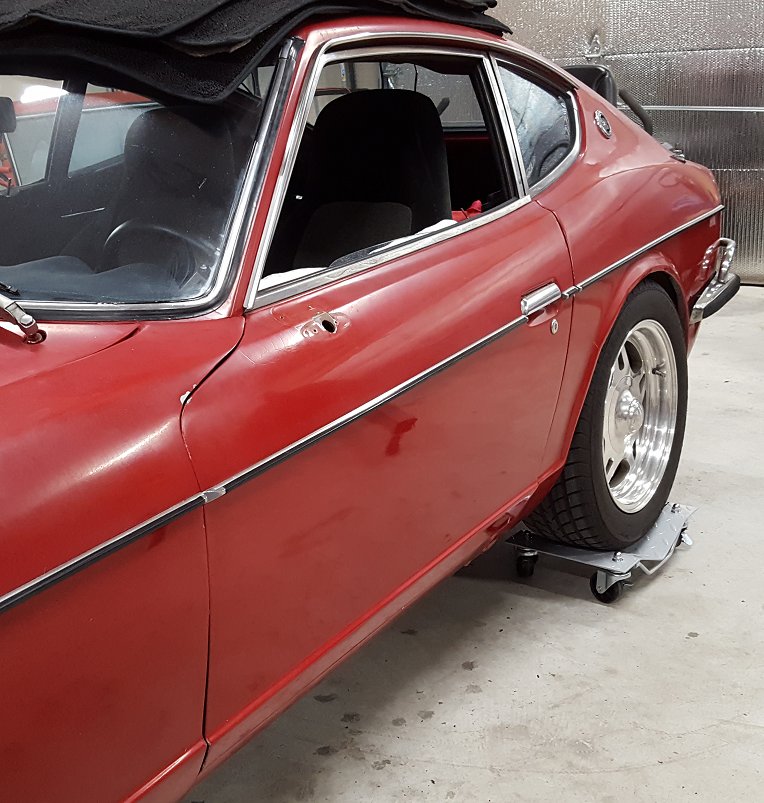
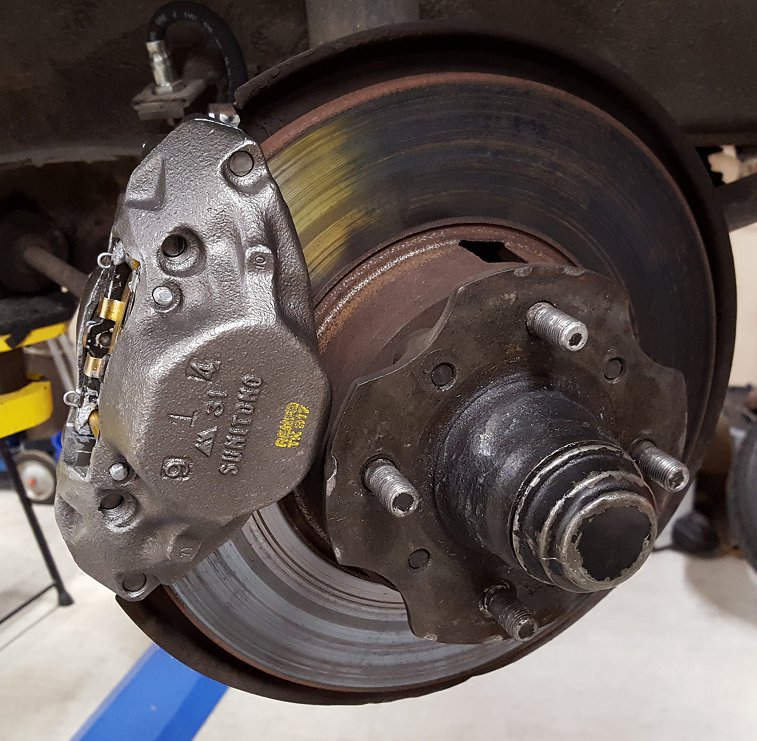
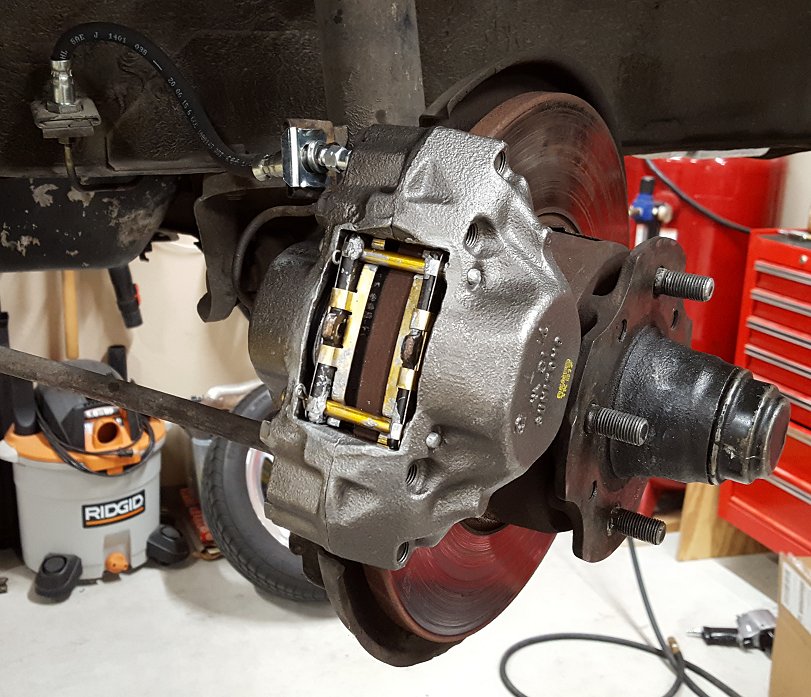
This evening was very productive. I installed the new rebuilt caliper and hose after work. The old components came off with little fuss and in the grand scheme of things they did not look bad. I know the car has sat off and on for the past few years and either the caliper was sticking or the hose was swelled up inside creating a blockage. I bought the caliper at O'Reilly auto parts for $29.99 and the hose was $17.99. They were the only store that could get me a caliper in a day or two. They are the same price on Amazon but I prefer to buy local when I can in the event I have an issue. A friend of mine gave me a new set of pads so they were free. When I took everything apart there were some nice stainless steel shims in between the pads and the pistons. I have never seen this type of shim before but I took a few minutes with some fine steel wool to clean them up. The before and after is night day. Everything was reassembled and lubed where it needed to be with some anti-seize. Most people would have pulled the rotor and had it turned but despite how the rotor looks it was not grooved and I really did not want to mess with the bearings to pull it. A quick bleed session confirmed everything was sealed up so the wheels went back on for a test drive. The new caliper and hose did the trick as it tracked and stopped straight while driving it. Tonight marked a major milestone for the car as it is now at a point where I feel confident taking it up to highway speeds and to this weekend's Cars and Coffee event. Its been almost 3 months since I bought the car and many projects to get it here. However, it has all been worth it as the car is a blast to drive! The triple Dellortos, ZX 5spd w/Hurst shifter, the LSD, and full suspension make it a great car to toss around and wind out getting on to entrance ramps. I drove it so much I had to stop and put some more gas in it. Seemed like the perfect opportunity for a few photos!

-
You are correct NapaBill. The series-1 hinge with the interleaved stop has a larger spring but it is weaker than the later spring. Your theory is correct, the driver side hinge was replaced either due to a collision or the original hinge getting worn out. On my series-1 240z the driver side lower hinge interleave was worn out and would lock/bind up with the spring in place. I ran it without the spring but included a used passenger side hinge to the new owner when I sold it to rob parts off of.
-
I have never seen the pin itself for sale but I have not looked that hard yet either. A quick Google search indicates that the pin for American cars is very easy to come by. If worse comes to worse, you could buy another hinge and rob the pin from it. If I had thought about it I would have taken some measurements of my pin when I had it out to see if something could be bought and possibly modified if needed.
-
Not sure to be honest. It is a lot of slack and the tensioner only provides so much pressure due to how much travel is allowed. Thank you Philip! I like doing the work and documenting it for many reasons as I am inspired by the many other build threads on here and around the net. You are correct, I am turning the engine clock wise and the chain would have slack when the engine rotated counter-clock wise as it backed off the rotation due to compression. I didn't even think to look inside the valve cover. Amazing what slips in your mind when you are "in the zone" Next time I have it off I will take a look. I inspected the valve train and everything looked good, no spare parts were sitting the valley of the head. Good point on the compression check. I already know pulling the motor will be a slippery slope as I would like to do a cam upgrade that would really take advantage of the carbs. I also have the original engine to the car along with all the complete dual SU carb setup and air cleaner. It needs a little work but I may try to get that engine running first before pulling the current engine.
-
I worked on other stuff too but it was not really picture worthy. This included installing some used door panels that did not have any speaker holes cut in them. With the door panels off the doors were vacuumed out, lock and latch mechanisms lubed, and the window tracks were greased. I installed some new side mirrors and adjusted the rear brakes shoes as they were a little too tight. I did get to drive the car on a short shake down run and it performed very well. I love the sound of the triple Dellortos, the transmission shifted very nicely with the new fluid, and everything seemed to be humming along quite well. I did notice the car tracking to the right a little and as I drove it some more it only got worse and I could smell brake material. Once I was home and the Z back on the lift I confirmed the right caliper was sticking. I am picking up a new/rebuilt caliper and hose tomorrow so that should be resolved tomorrow night. With the carbs running so good I put the air filters back on them which is 30 minute job due to their design and limited space. All in all, a very productive weekend! The final Cars and Coffee at the Oasis is next weekend and I plan to be there even if I have to tow the Z up there. Hopefully it won't come to that as I am really looking forward to making some runs down the toll way in it. Stay tuned!
-
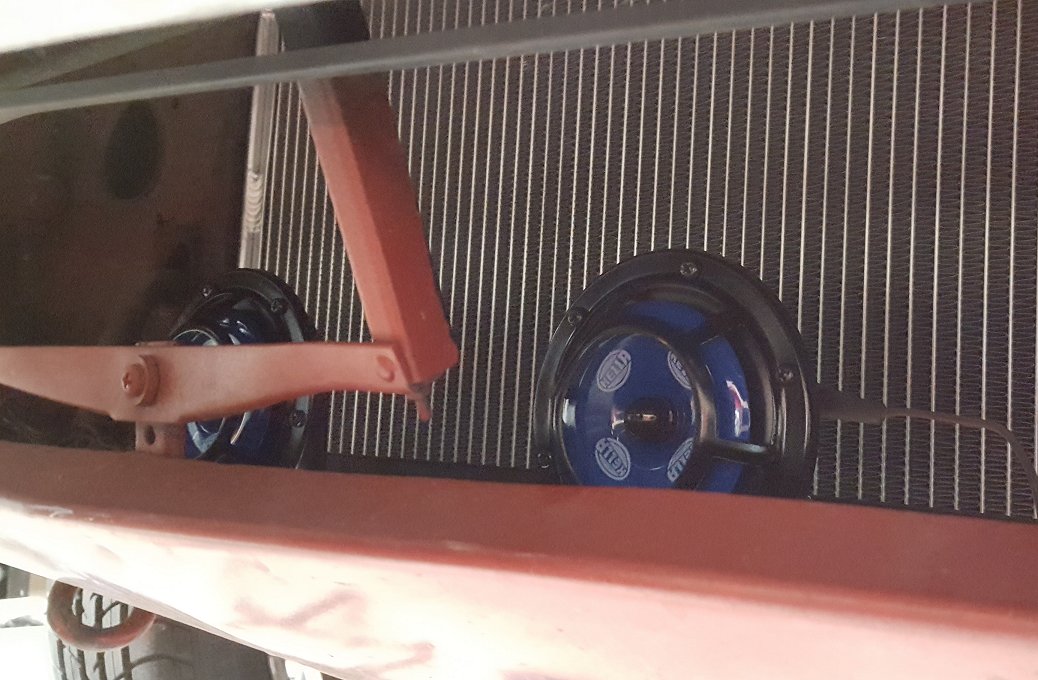
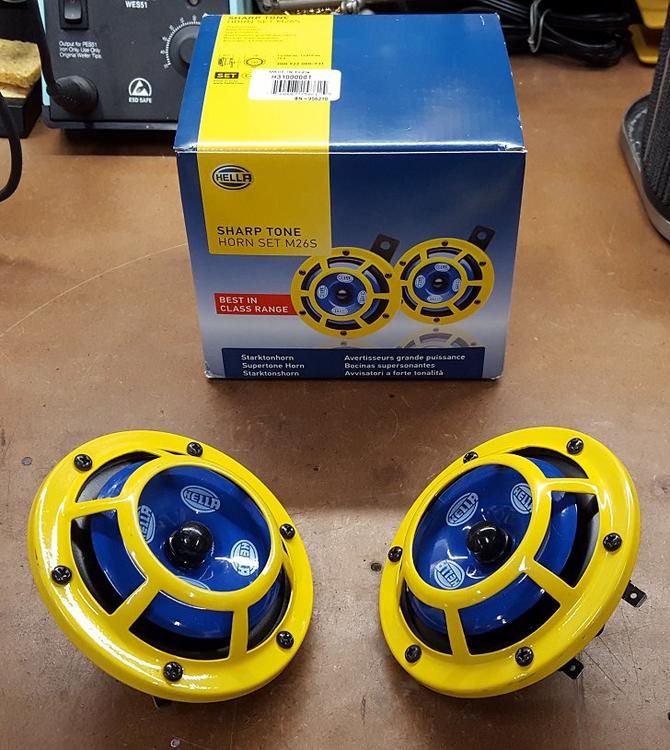
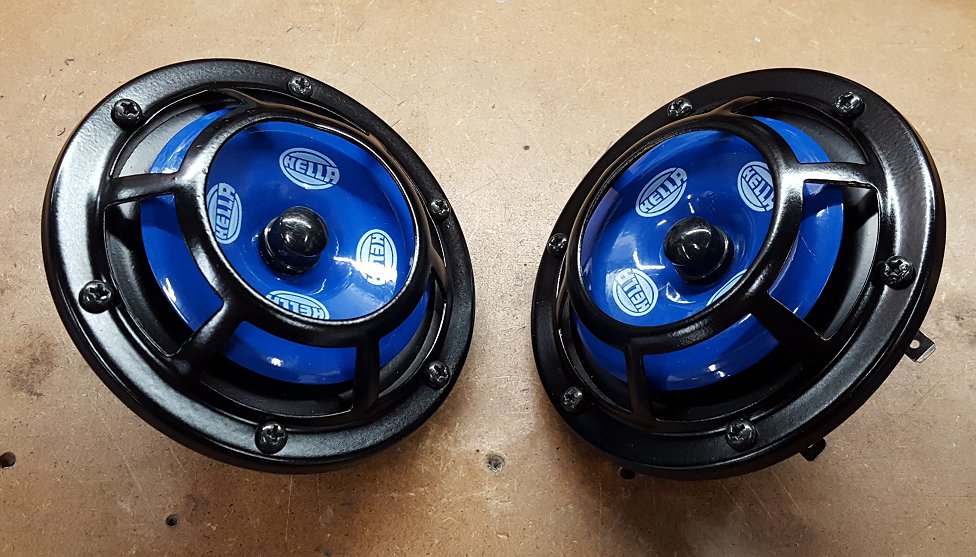
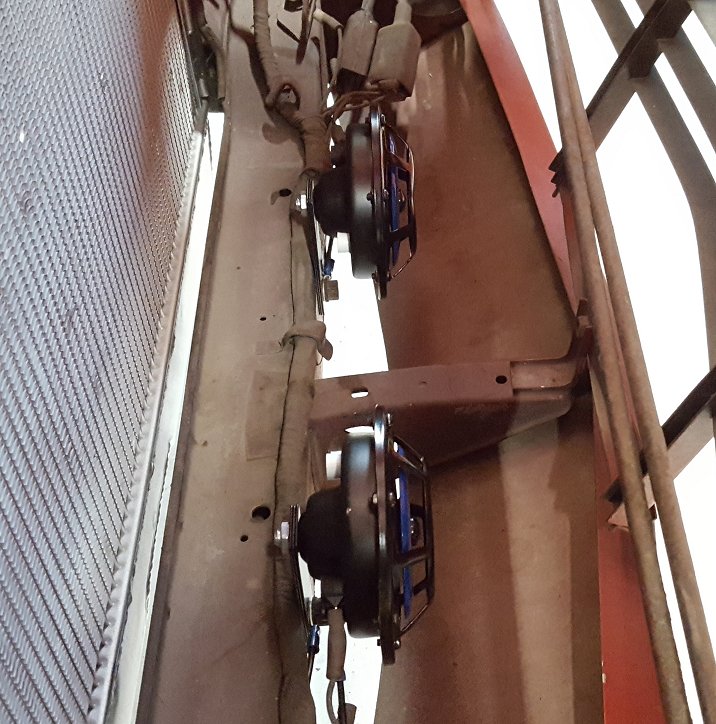
As previously mentioned one of my horns was not working properly and I have purchased a restoration kit for them. I want to get the car on the road as soon as possible so I decided to run some after market horns for now. After some research and YouTube comparison videos I settled on some Hella Sharp Tone horns for $27.99 shipped off eBay. Don't let the name fool you, they sound like modern loud vehicle horns. They come with yellow cages on the front which would make them stick out from the rest of the car so a color change was in order. After a once over with some steel wool to knock the shine off the paint I put two light coats of satin black on them. Painting conditions were not ideal this weekend and but they look much better and on the car you don't really notice them, which is the point. With the horn button pressed everyone in the immediate area will take notice!

-
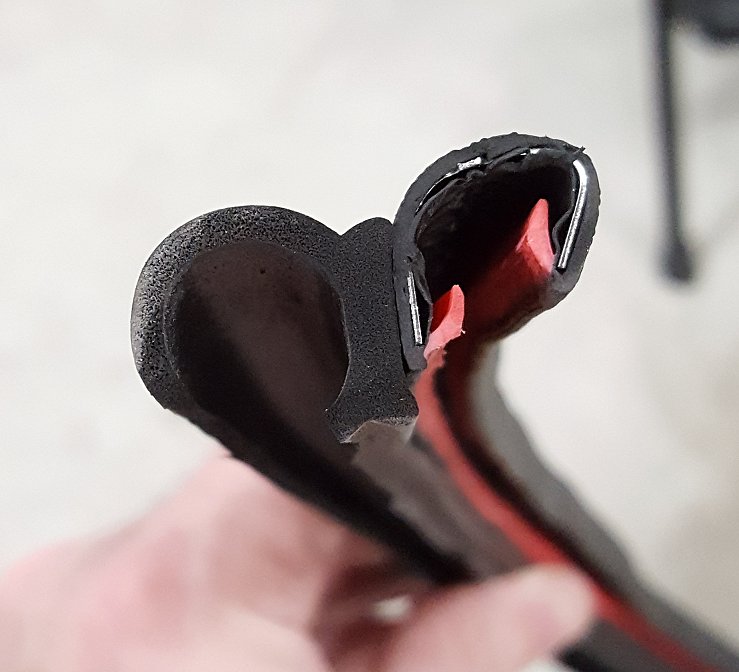
With the valve adjustment done I turned my attention to the driver side door. With the rebuilt hinges the action of the door was much more solid but in order to close it required slamming it hard as I could. Knowing the new weather stripping was a bit big I removed it to ensure the door was aligned properly. With the weatherstripping off the door closed like butter, effortlessly latched, and opened with almost elegant satisfying sound you expect and want in any vehicle. Since the door was spot on I took a risk and cut the bottom third of the weatherstrip off along the lower half of the door opening. This helped a lot as now the door only required a good push to close all the way. However this is not what I want to have to do to close the door every time so I am looking at the Kia Sportege seals and taking a long look at the McMaster-Carr weatherstripping. There is already another recent thread on this topic and I will be following it as well.
-
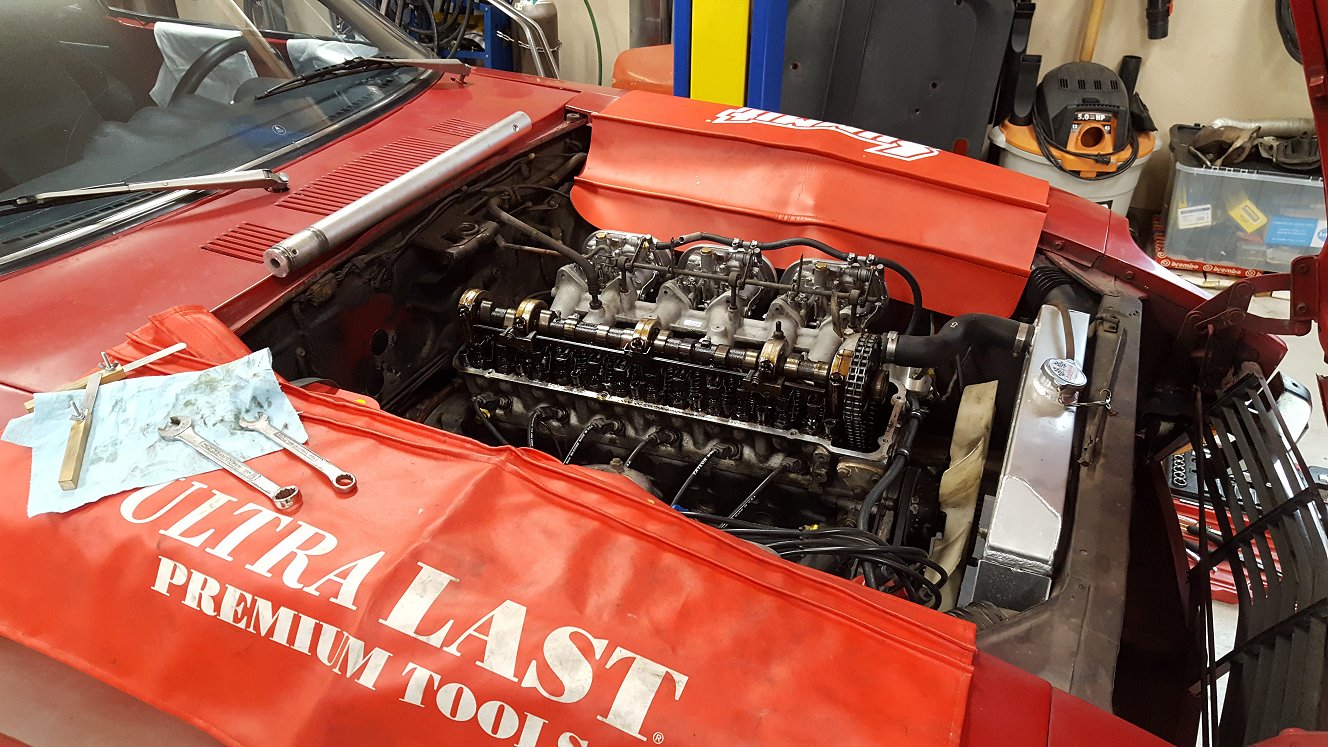
Thank you Philip! Unfortunately the hits keep coming with the Red Rocket. I decided to do a valve adjustment since they were tapping pretty good on the last test drive. Some of the locking nuts were so tight I had to use a cheater bar to break them loose. Thankfully they all saw things my way and everything went in to spec. It is a stock cam so I set it stock specs. As I was turning the motor over by hand I kept hearing this tap but couldn't figure it out at first. Then out of the corner of my eye I saw the timing chain tap the inside of the head. I almost thought I was seeing things but my fear was realized when I moved it with my hand. It is stretched for sure and warrants a replacement sooner than later. Luckily I have a new chain kit in the box and all the gaskets already from the lime green Z when I thought about doing it on that one. I will pull the engine to do it as I would like to clean everything up, possibly paint the engine bay, and inspect the clutch. For now, here is a video. Feel free to weep with me.

-
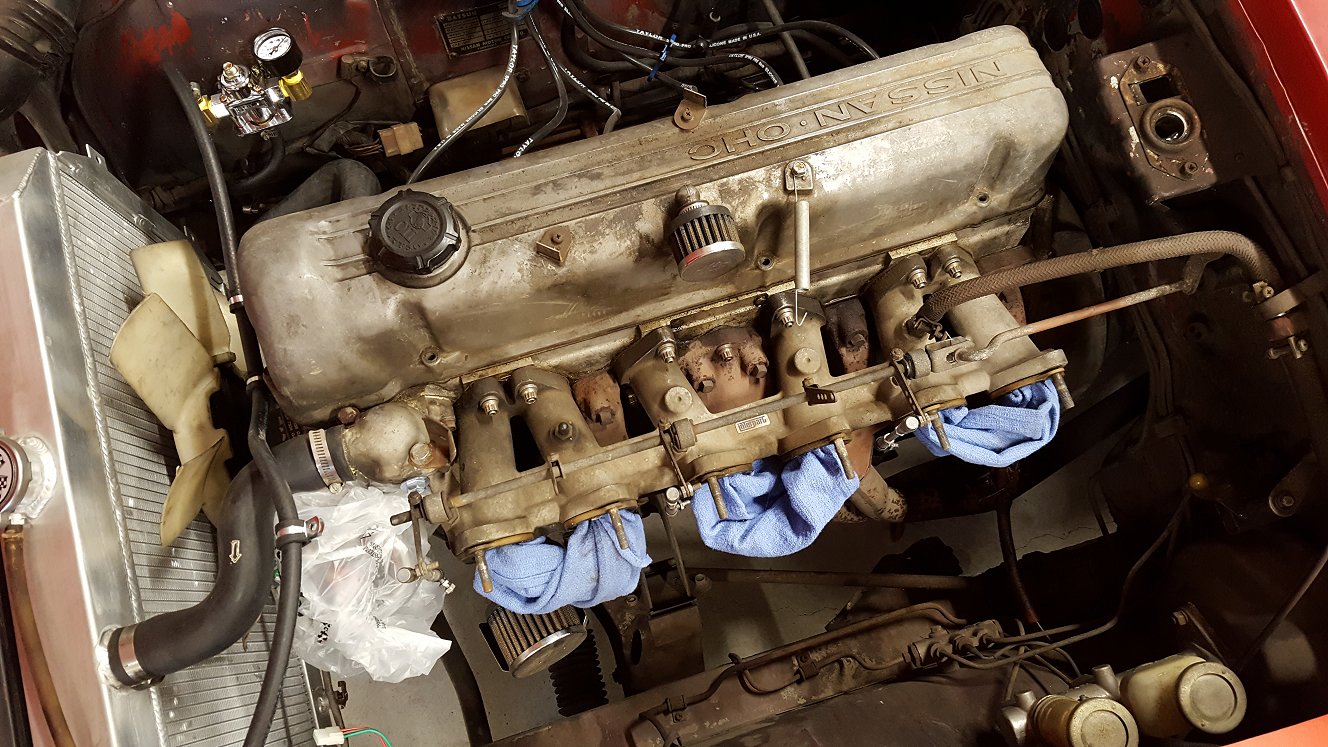
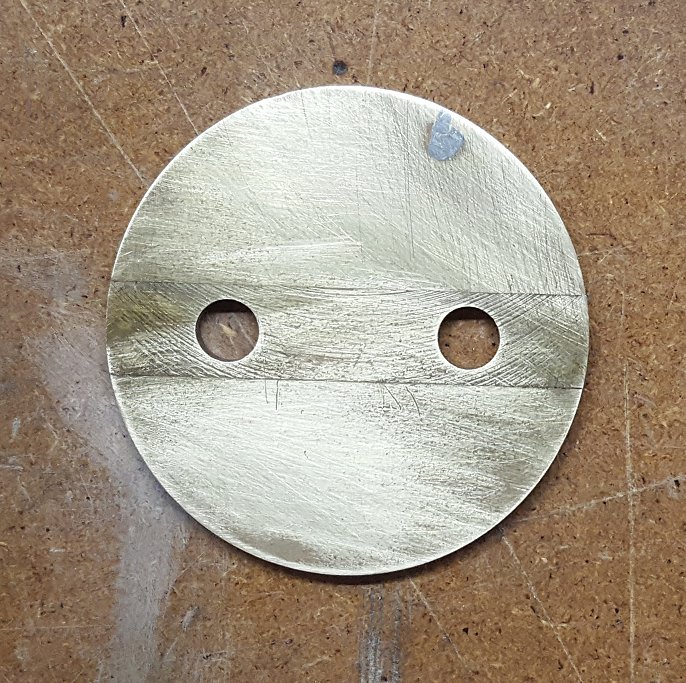
Per everyone's input and suggestion I took a stab at filling the hole in the old throttle plate. Using my soldering iron and some rosin flux paste I let it really cook in the crevice the hole. With it still hot I added solder to it. Once everything cooled I started sanding the solder down with some 600 grit sand paper. I followed the up some 1000 grit and then some super fine 0000 steel wool to clean up the plate. The surface is super smooth despite the visible scratches. I paid attention to maintain the taper of the edge of the throttle plate so that I only flattened the solder and did not disrupt the angle of the taper. All in all it came out better than expected. I really kick myself for not doing this first as it would have saved me $15 and 2 weeks of time. Oh well, need to take more changes in life! I swapped out the throttle plates and after studying the new one some more I could see the taper on the edge was not as steep as the taper on the original. I checked the bore for any grooves and could not see or feel any. With everything re-installed and buttoned up I fired the engine back up and at idle I am getting a solid 5 on my sync-meter across all six bores. Throttle response all seemed the same as before but I rest easier knowing the right part is in the carb.
-
Gotcha! No problem. It is a $5 savings so $50 for the set. Once they are ready I will make sure all forum members get the sets they want first before putting the remainder on eBay.
-
Okay, after reading the post that Philip provided you guys have convinced me to take the carb off and take a closer look at the throttle plate. I do not want to risk any damage the bores in the carb body. Tonight I will attempt to fill the hole and smooth out the outer edge. Seems do-able with some rosin flux and solder.
-
Thank you for all the compliments and questions everyone! Yes, I plan to make it to ZCON in 2018 in Atlanta. I had so much fun at ZCON when it was here in Austin and Atlanta seems like it will be just as good. If a spot opens up to go to the moon, count me in! I wonder if I can bring my HF press? In all fairness, without the press I would not have been able to do this project. So far I have not had anything that the press could not push out or push in, even very stubborn spindle pins. The door drop was was noticed immediately upon opening the door when I went to look at the car for the first time. Seeing how bad it was I made it one of my price negotiating points. With the door open it could be moved up and down almost two inches. That is a lot of travel so when it came time to close the door you had to lift it up and push at the same time. This was taking its toll on the striker as well so it needed to be resolved sooner than later. As far as mileage, the car served as the previous owner's daily driver for 4-5 years and was a weekend cruiser for the next 5 years, seeing less and less use as time went on. Before him I don't know other than the car came from California. I would have to look at the speedo again for the miles but I can confidently say the car has well over 100K miles and would not be surprised if it had closer to 200K miles. At this point, any of these cars with a good deal of miles need this kind of service. They may not be as bad as mine but once they start to go it never gets better. The question of the lower hinge pin and possible quality issue, I don't know. With the upper hinge off you could twist the halves and the metal would knock against the pin. With the lower hinge stripped to just the main pin, it still felt solid with almost no play in it whatsoever. That is why I was surprised to see the condition of the pin once I had it out. When I sold my 1971 Series-1 240z #8011, the upper hinge was starting to go. You could tell when you open the door it would drop a little and closing it required lifting up on a little so it was in line with the striker. I am unsure of the lower hinge but seeing they sell these kits to rebuild 2 hinges and you have gone to the trouble to remove the door, you should really rebuild both at the same time.
-
The tooling is designed to work with their machine and is not something I have in my personal possession. However, it belongs to me and no one can simply call up and ask for clips to be made using it. The company specializes in both large and small quantity sheet metal fabrication and will not destroy it without consulting me first. They recently moved to a newer facility and the tooling went with them. Domestic small quantity manufacturing is not cheap but its the only way to ensure high quality and the added benefit of performing the QC in person with relative convenience. Please let me know if you have any other questions.
-
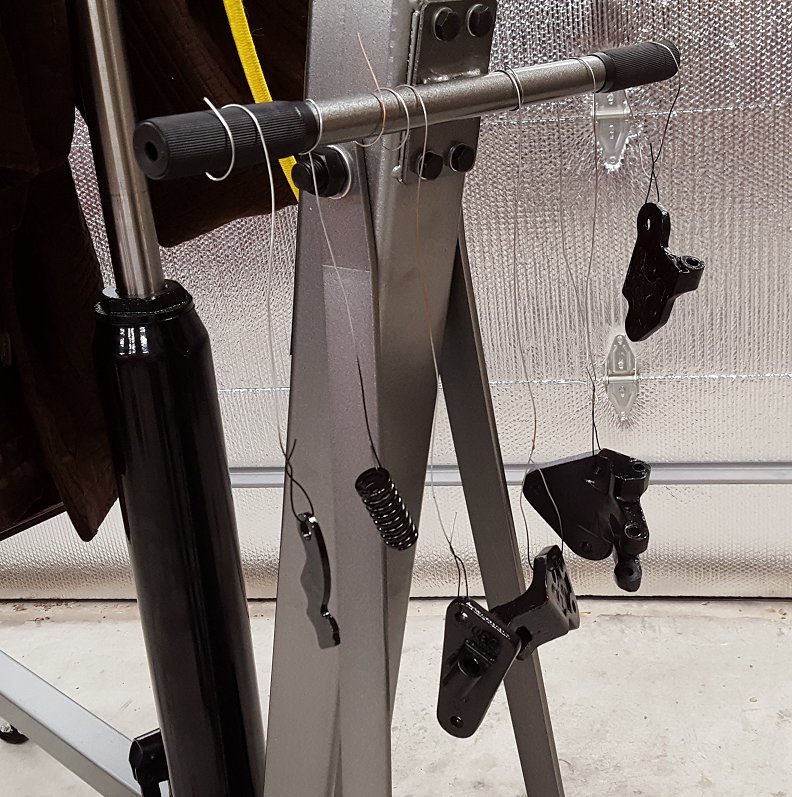
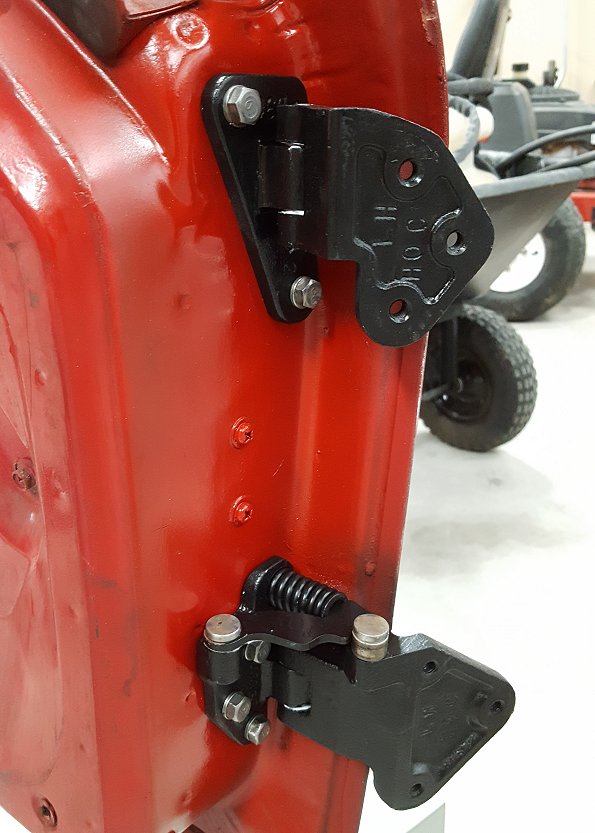
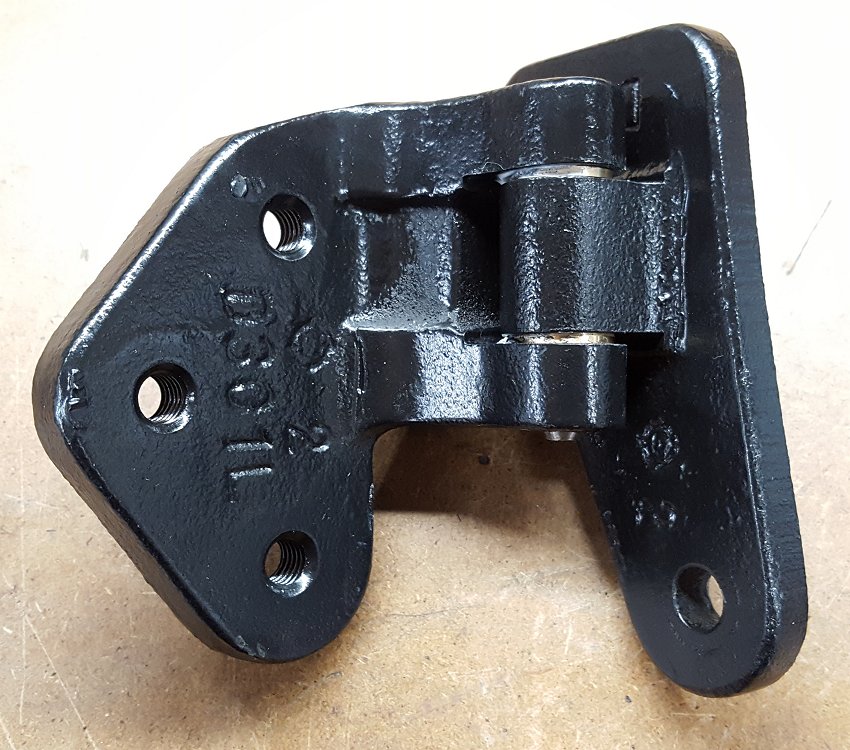
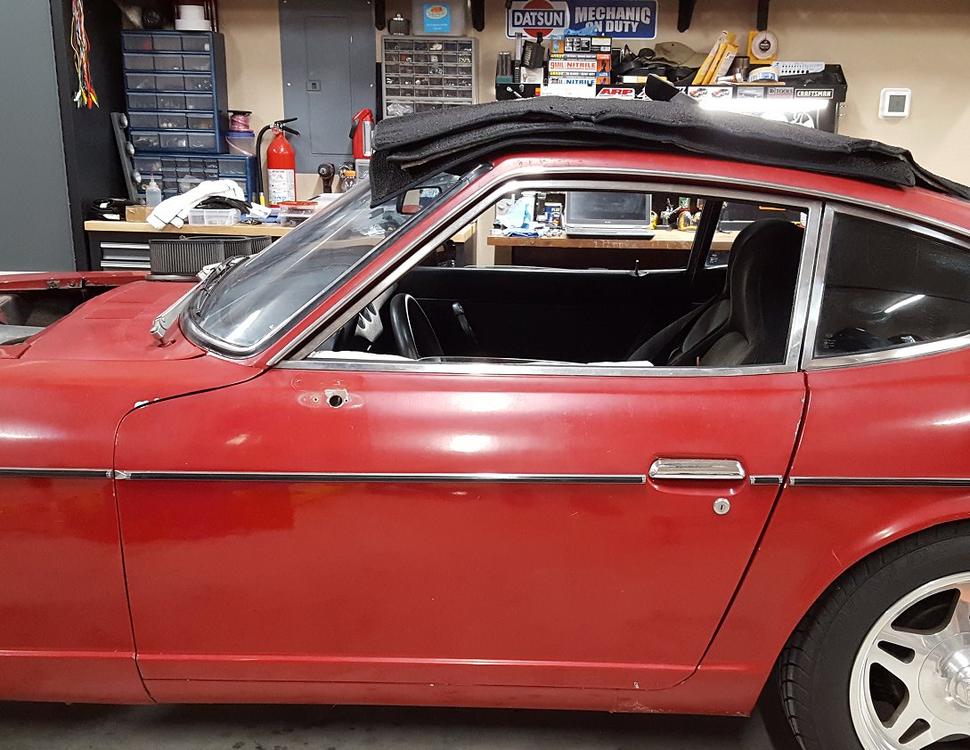
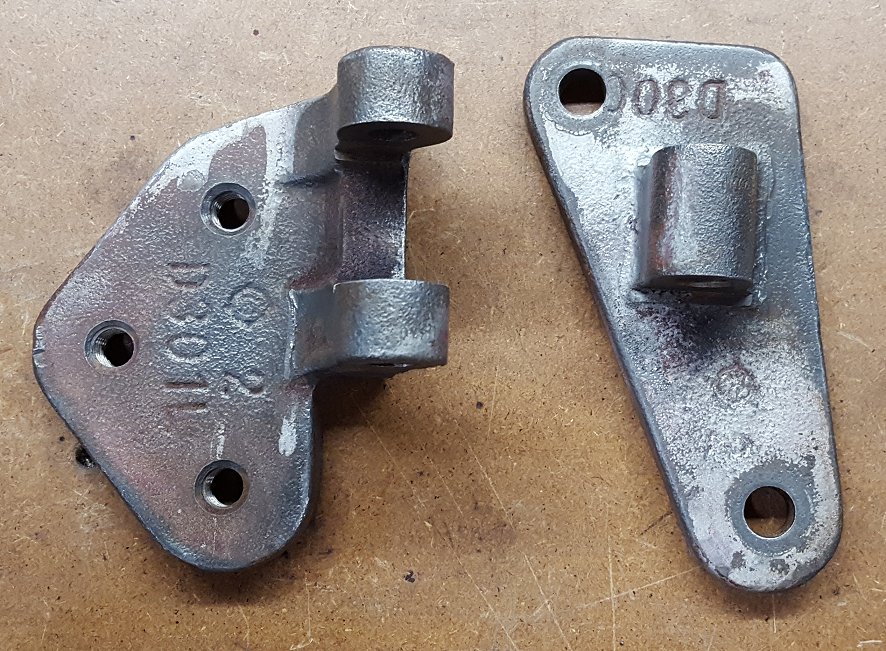
With all the parts wire wheeled I covered them in some Rustoleum satin black. The car is red but I didn't want to paint them red as the car may not be red all of its life so black it is. With everything cured after 7 days I started the reassembly process. The upper hinge was first. Using my bench vise I pressed in the brass bushings. They went in perfectly. Since the brass bushings were thicker than the originals I had to use the metal lips of bench vise to spread the side of the hinge a part just a little. I lubed all of the contact surfaces with lithium grease. Once I got the hinge halves together I used my 20 ton press to install the new hinge pin. The end result is nice and tight upper door hinge. The reassembly of the lower hinge was the reverse of the disassembly. The bushings in the lower hinge looked good and felt really good with the new pin so I opted to leave them. Just like the upper hinge, everything lubed up with some lithium grease. The inside of the door received some clean up and fresh red paint. The fasteners were treated to some wire wheel action to clean them up as well. With the help of my wife we got the door with minimal damage to the paint. I had taped a thick towel to the top of the door but still managed to pull some paint off. The end result is a door that functions like new again. Seeing that there are no new hinges to be had and there is a service on eBay charging $100 - $150 to rebuild each hinge, the is a lot of value to be gained by doing this yourself. It does take an investment in some specialty tools like the HF press but it will pay for itself over and over just as mine has over the course of many projects. I welcome any questions or feedback.


-
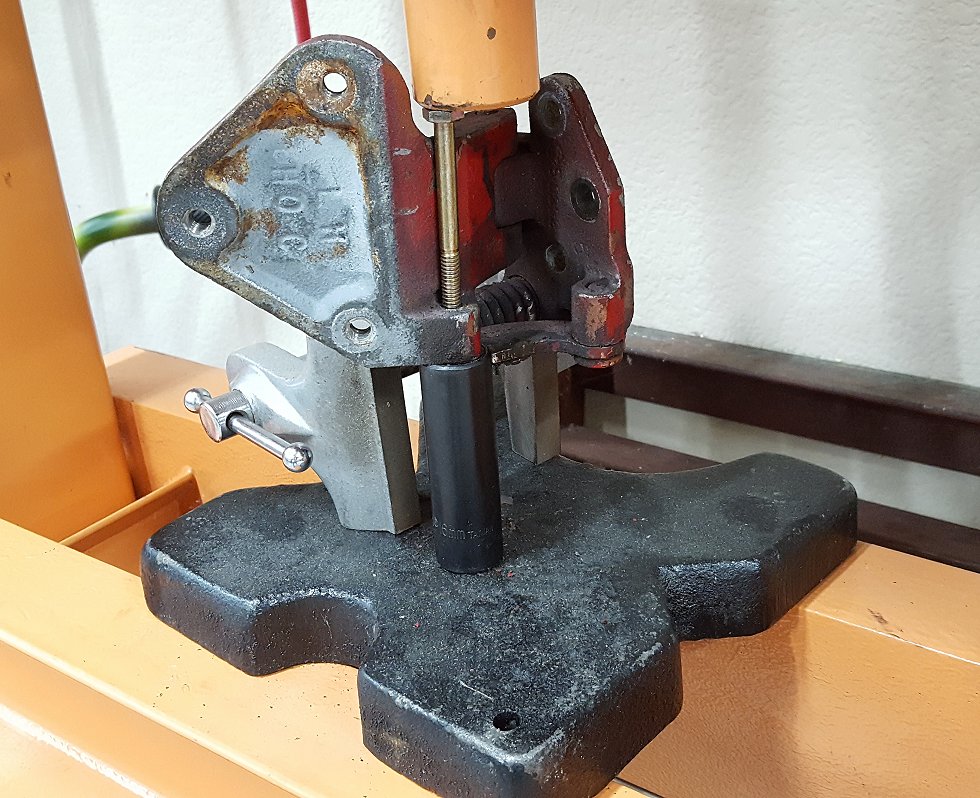
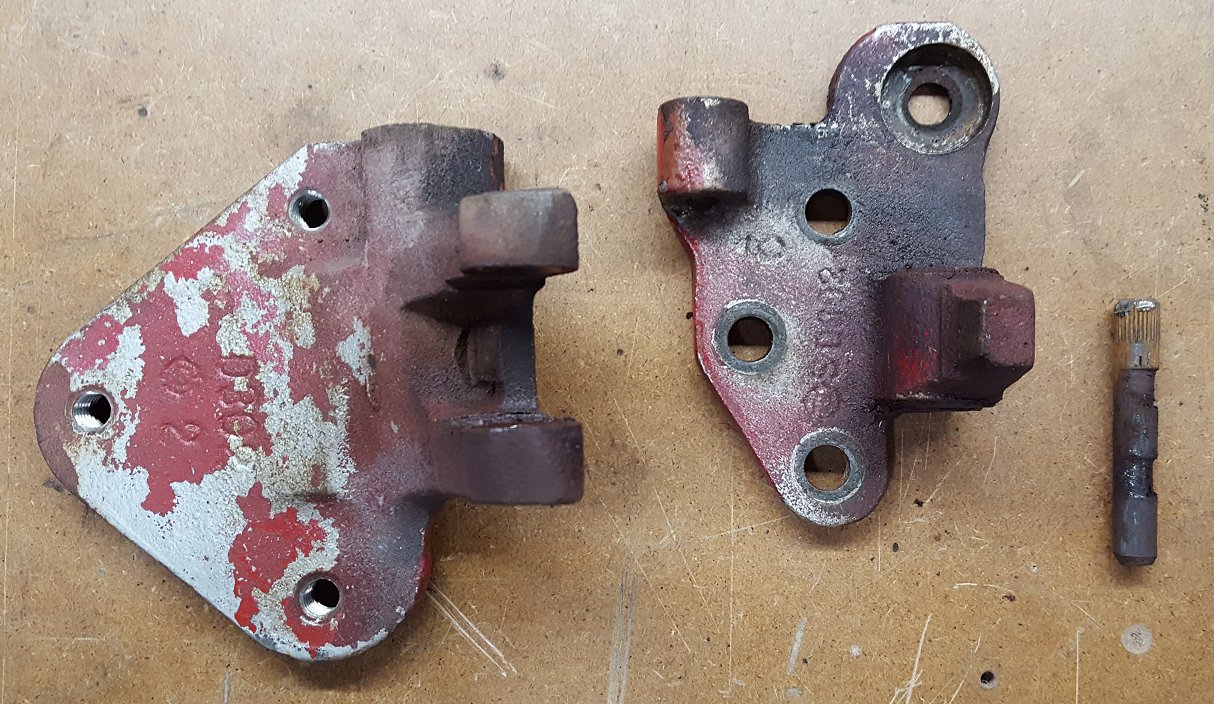
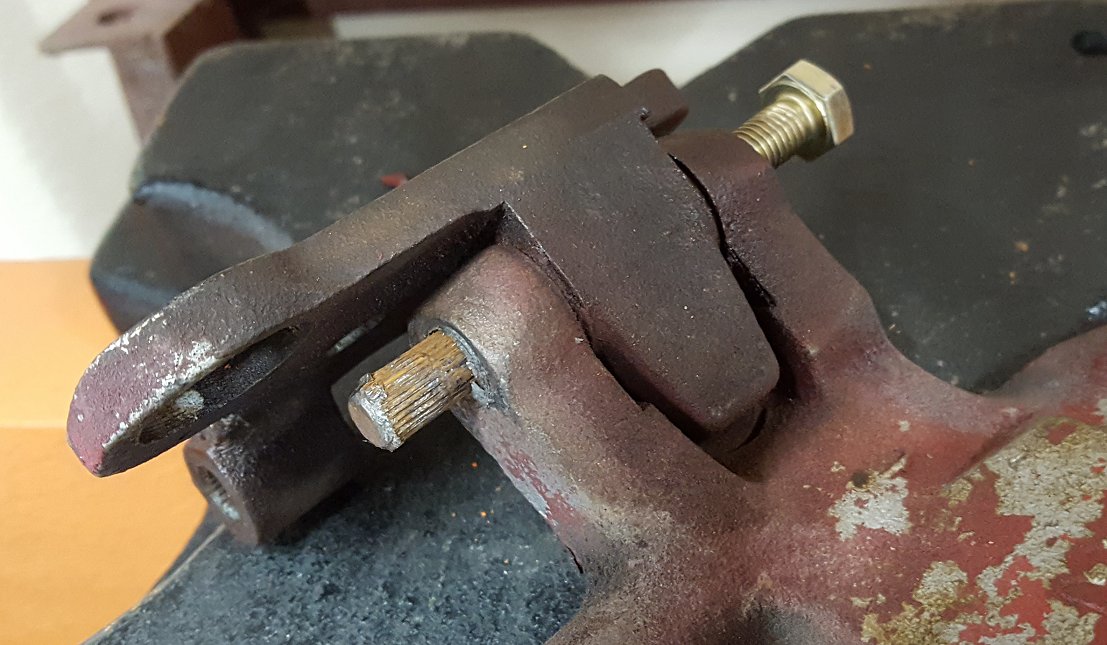
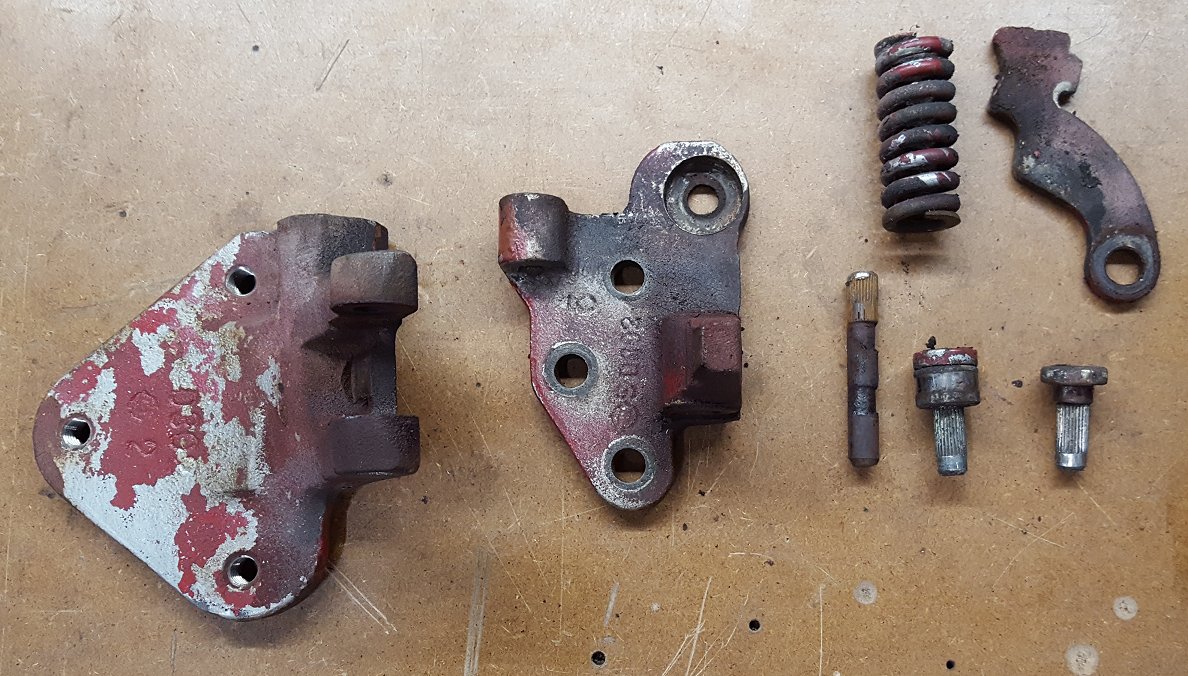
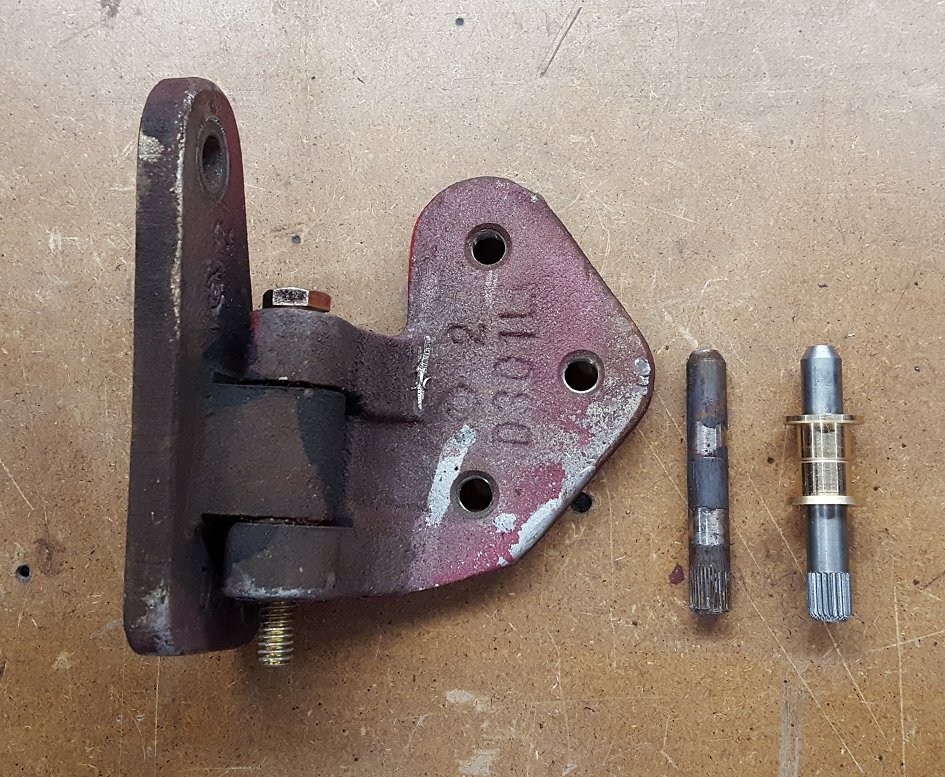
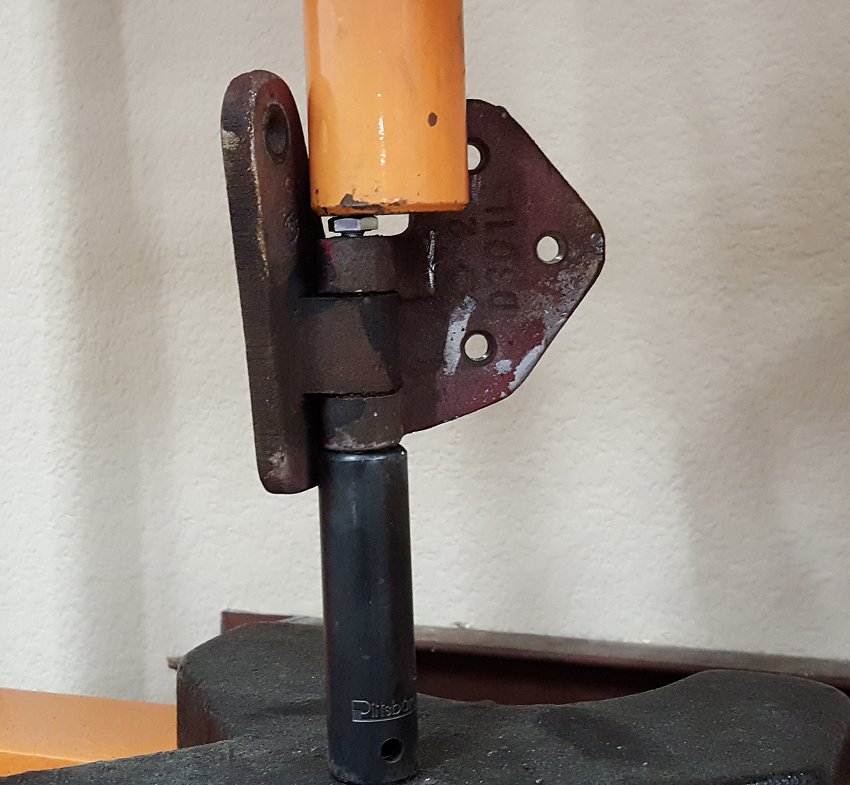
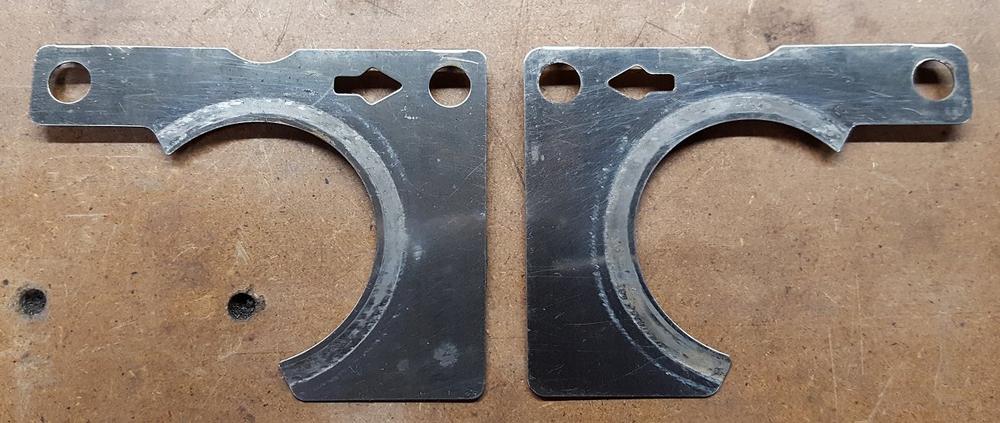
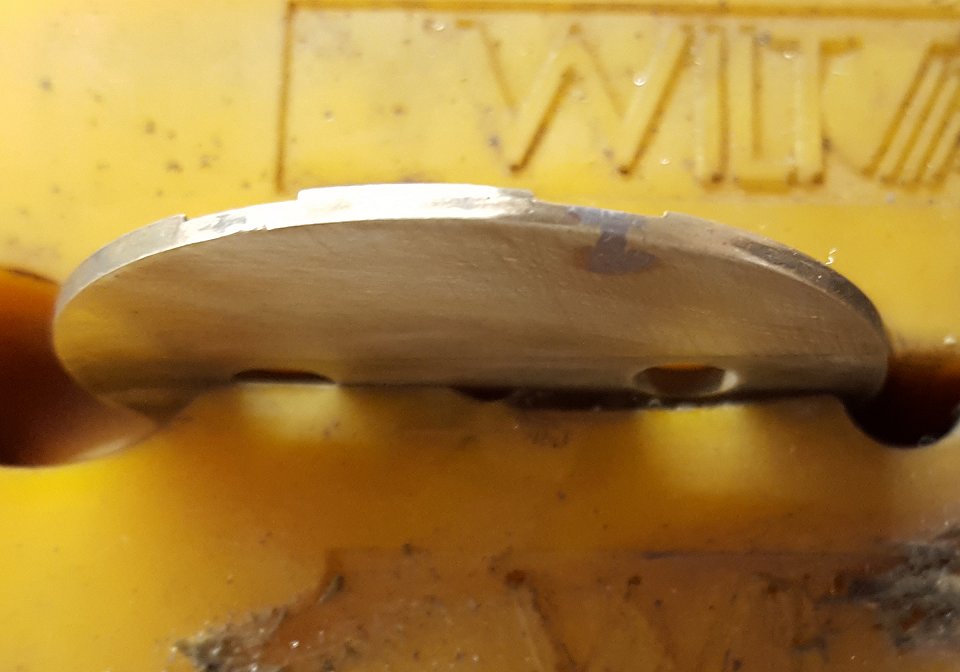
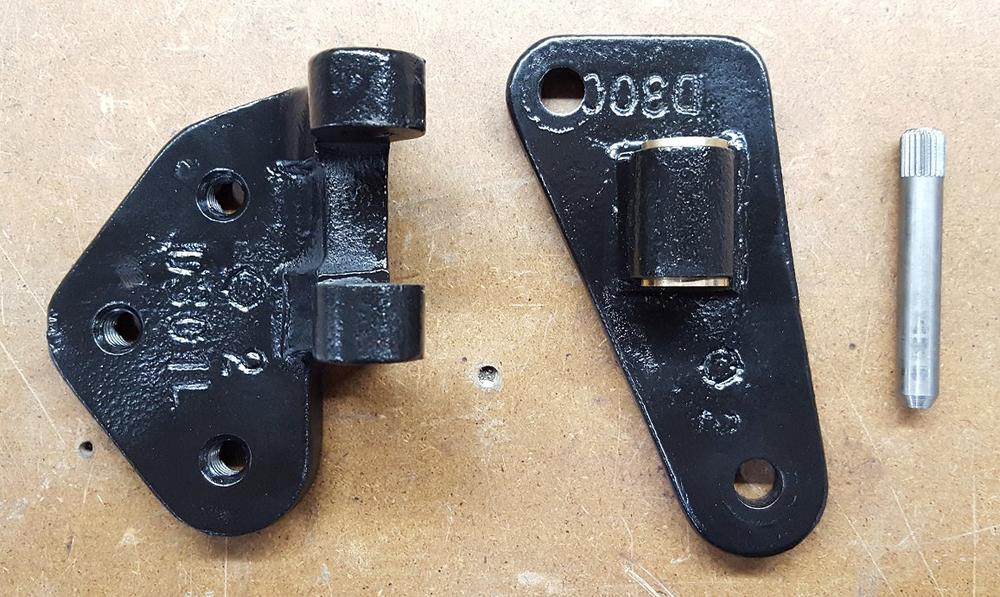
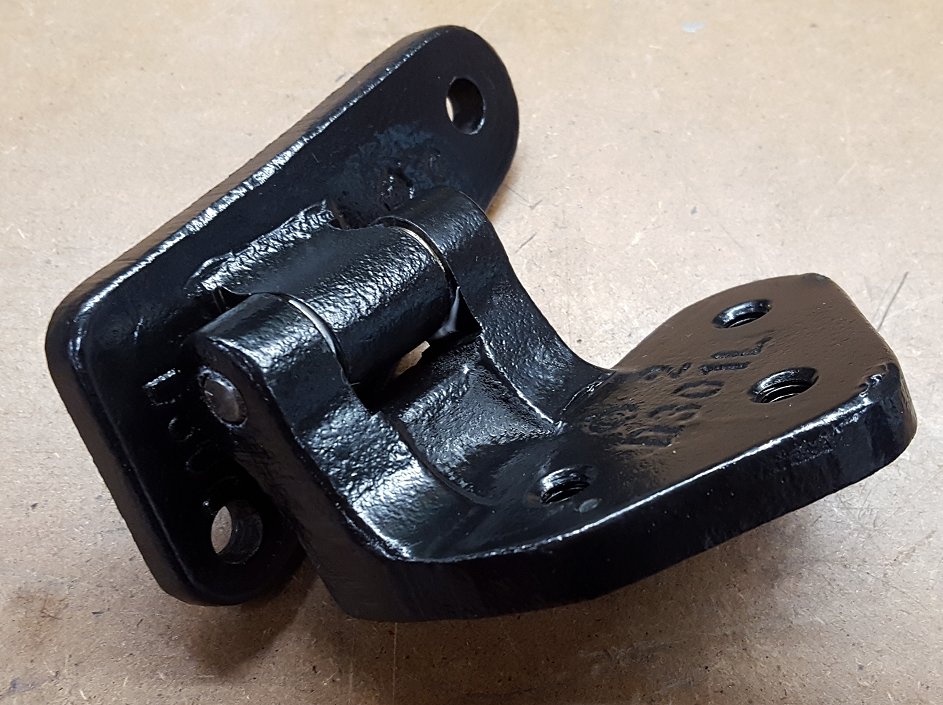
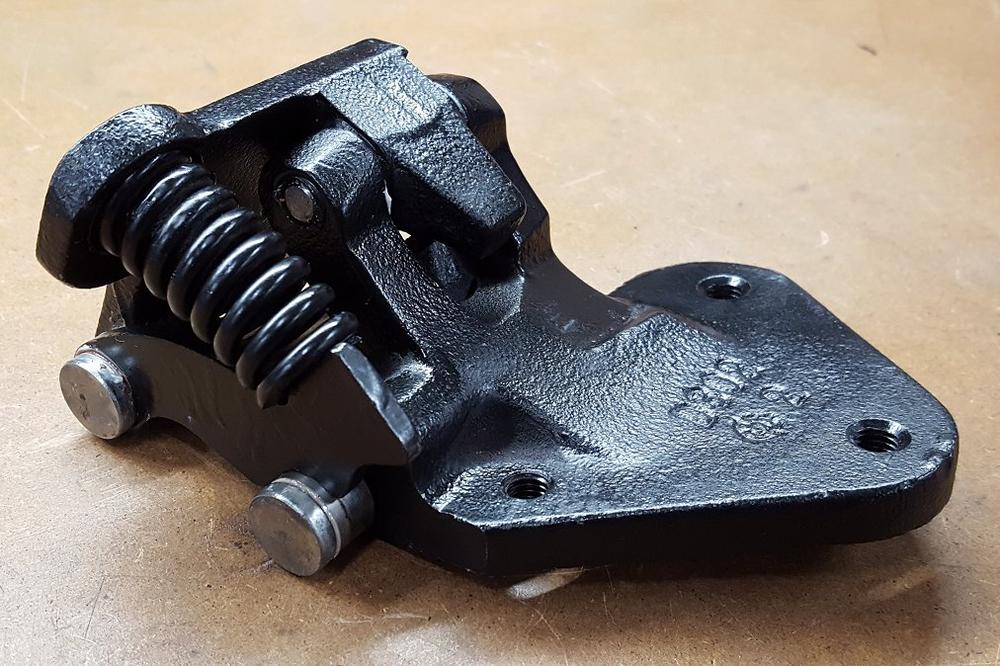
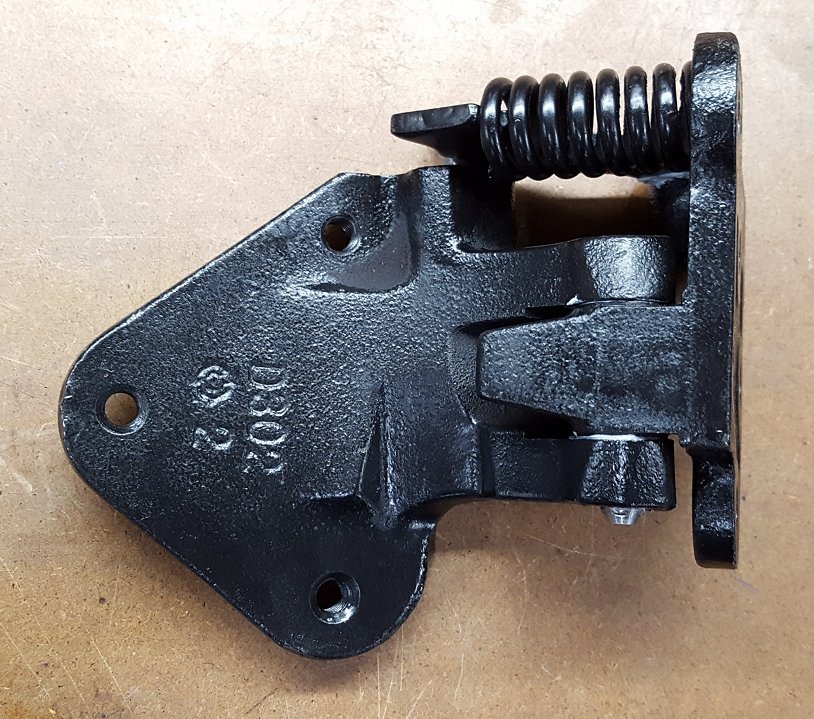
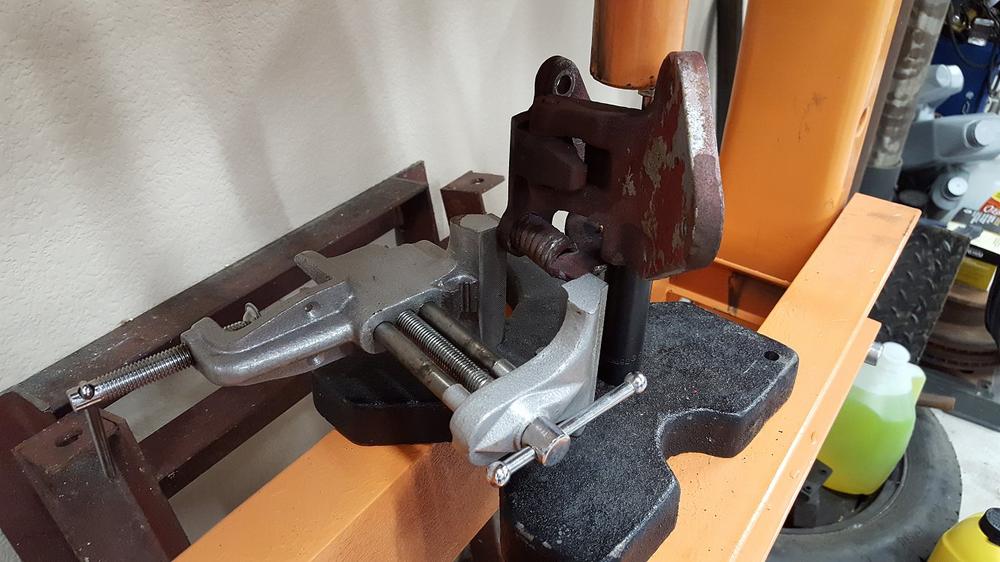
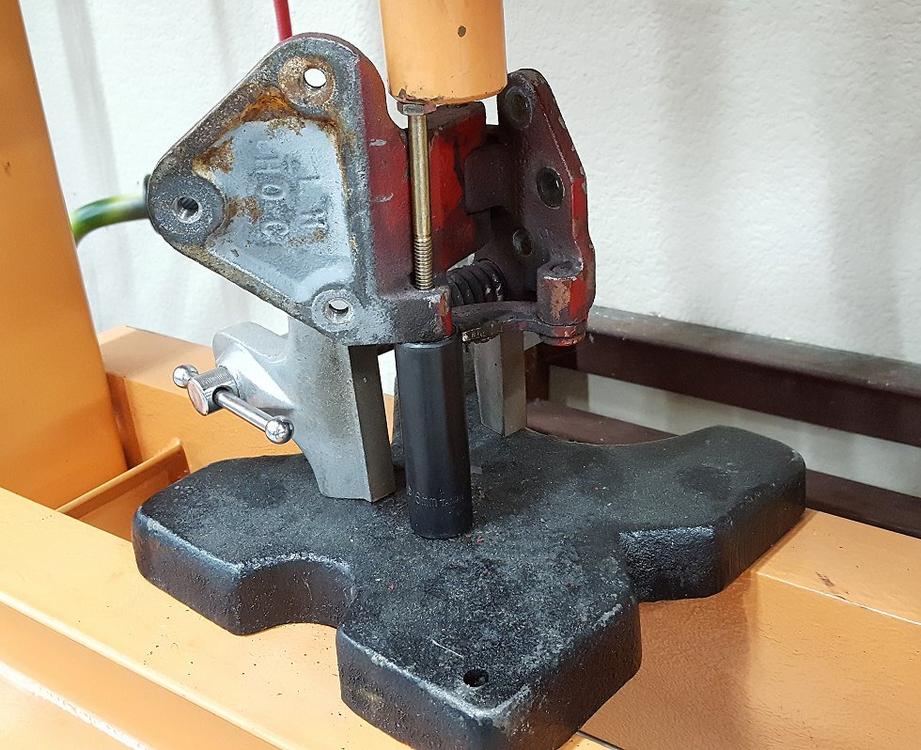
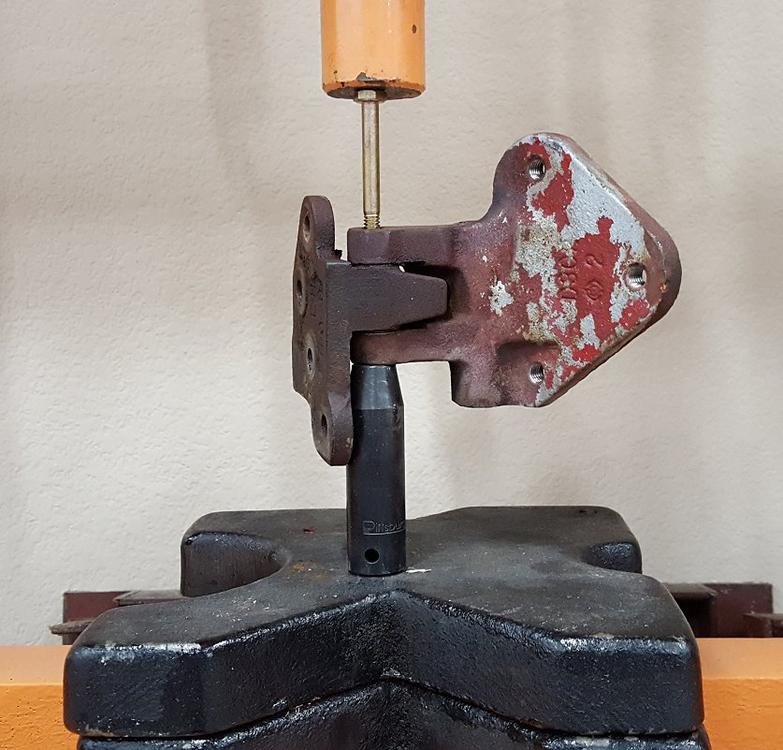
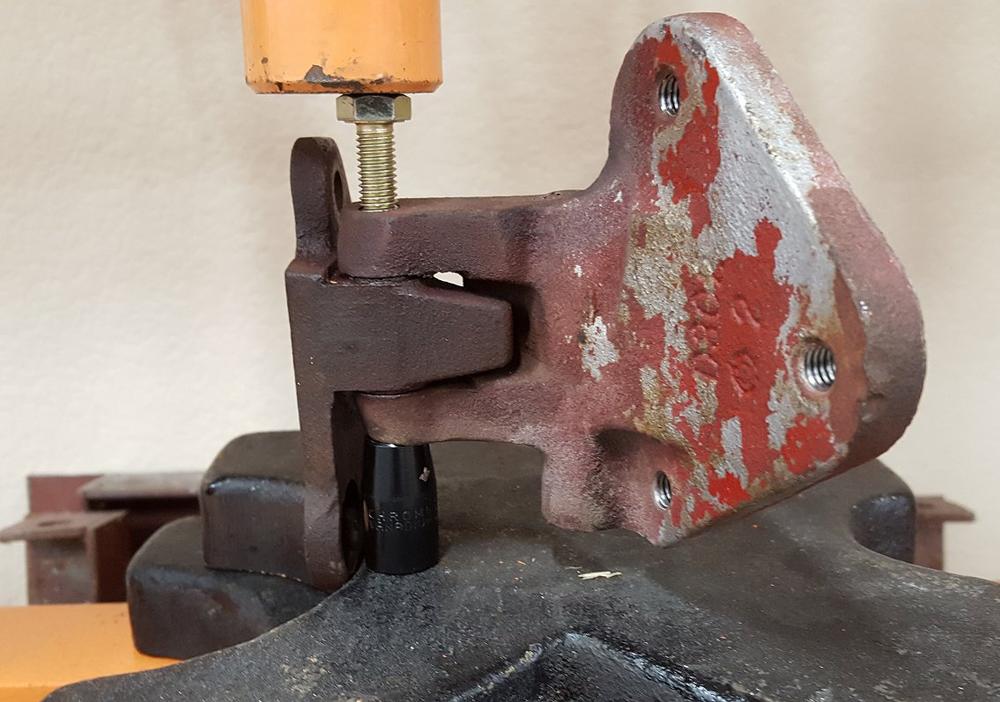
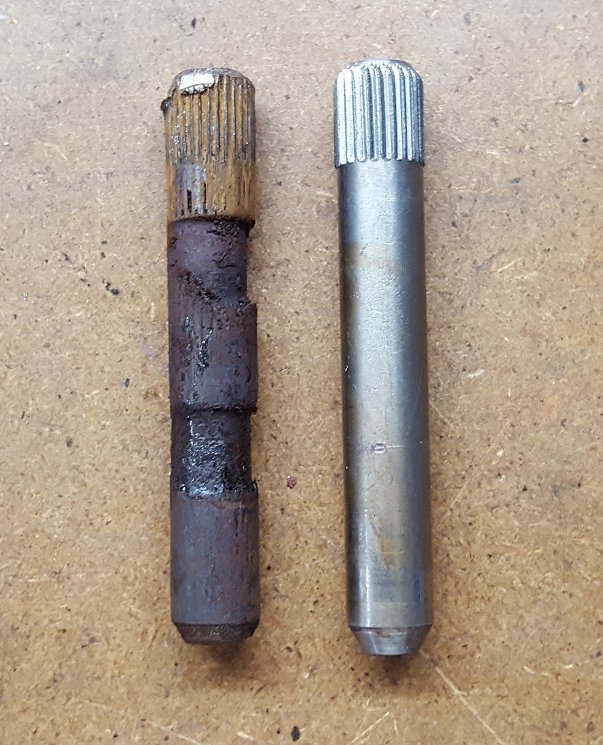
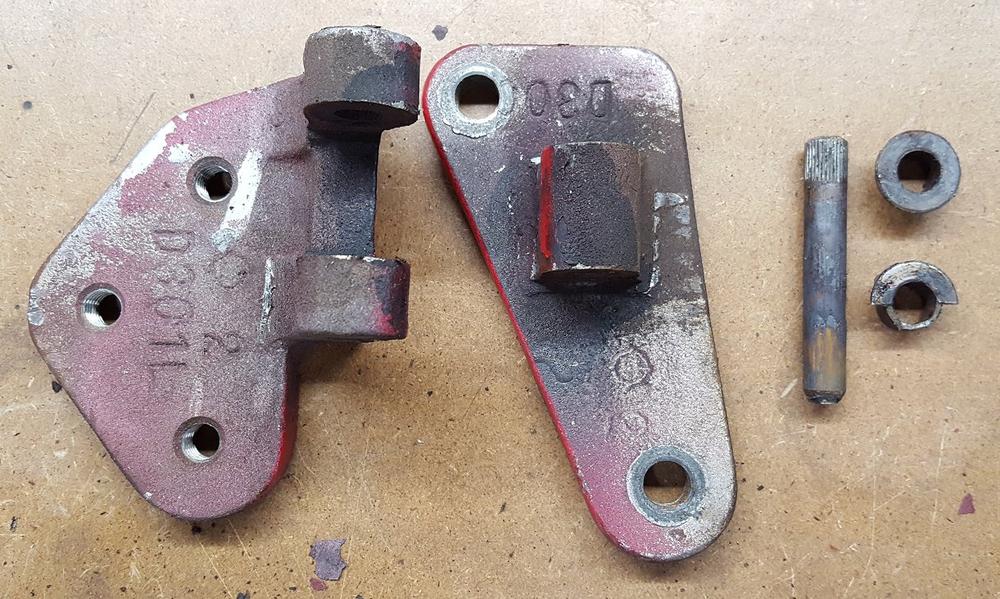
Next up was the lower hinge. The first hurdle is to safely compress the spring so the detent roller pin can be pressed out. My hinge spring compressor was too big to fit in to the coils of the spring so I used a small bench vise. I must add this disclaimer, SAFETY is paramount here so proceed at your own risk! This is really when you need a second set of hands to help hold everything in place while you work the press handle. The detent pin itself was straight forward in removal. Removing the main hinge pin took some creativity to get the press setup. There is not much material around the pin so you have to use a small socket or other component that will not allow the edge of the hinge to sink while you are pressing on the pin. People that do this kind of work for a living have built a jig to quickly and safely position the hinge. After a few tries I got it figured out. Checking my progress as the pin bottomed out in the shallow socket. On to the deep socket. The pin tells the tale. To be honest, the hinge had very little play in it. I was shocked by how bad the pin looked. A comparison of the old and new pin. Night and day! Ready for the wire wheel.


-
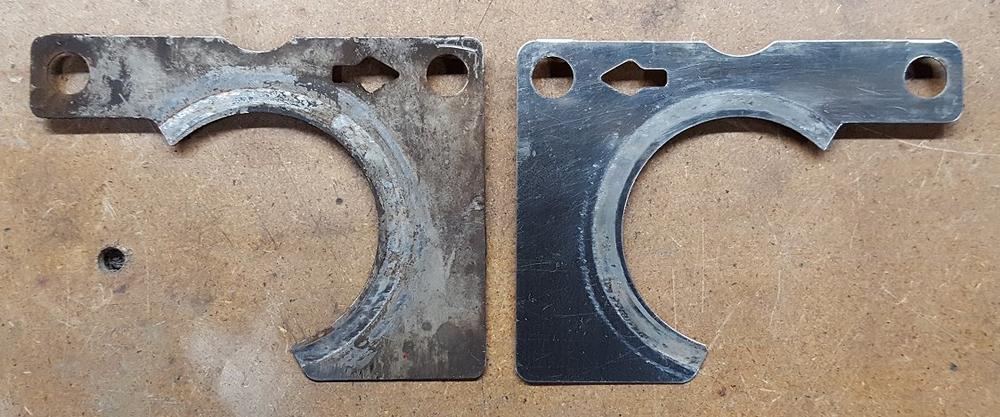
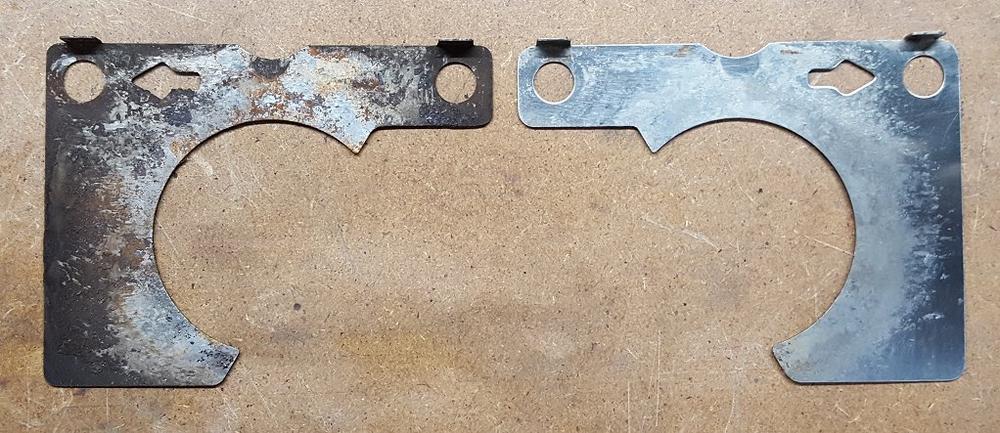
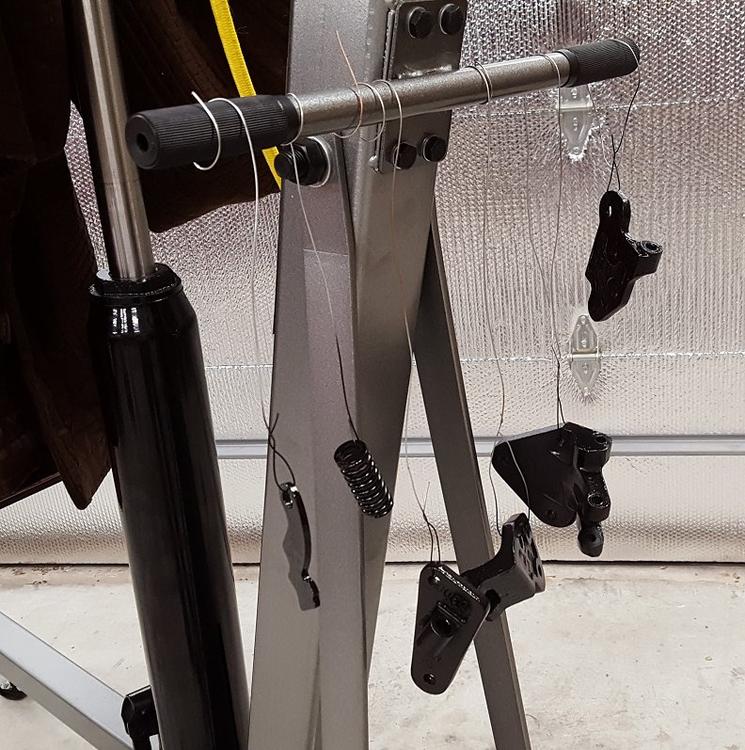
The driver side door hinges on my 1972 240z were beyond shot. The door had significant drop when it was opened and this presented all kinds of problems. A rebuild is in order! This has been covered a few times but wanted to share my experience with rebuilding my 240z's door hinges. I used Vernon Husk's write up on Atlantic Z to get a good idea of what I was getting in to. It can be found here -> http://atlanticz.ca/zclub/techtips/body/doorhinge/index.htm I did not like the nail head pins Vernon used so I purchased a set of pins and bushings from Leon Cutajar in Qrendi Malta. He sells them on eBay for $50 pair shipped and they take a few weeks to get to you. They are well worth it in my opinion and give an almost factory original appearance. You can find a set here -> https://www.ebay.com/itm/DATSUN-240Z-260Z-280Z-Z-CAR-Door-Hinge-Brass-Bush-Pin-Rebuild-Bushing-Kit-Set/322668159056?fits=Model%3A240Z&hash=item4b20856050:g:XVgAAOSw0UdXsDsX&vxp=mtr I started with the upper hinge as it was the easiest to work with. Some owners have been able to tap the pins using a hammer or press them out using a bench vise. My hinge pin would no budge so it got to see the business end of my 20 ton HF press. The pin pushes out from the bottom of the hinge since the top is splined. Using a grade 8 bolt the pin came out with no drama. Hinge up side down to show pin orientation when pressing it out. Now right side up with the bushings knocked out. Using my variable speed rotary tool and a wire wheel I cleaned off as much of the paint as I could. A sandblaster would have been better but I do not have one so this was the next best thing. The end result was quite good. A quick wipe down with Acetone and they will be ready for paint.


-
Good news everyone. I spoke to the fab company and have placed an order for 100 which equals 25 sets. Materials cost has gone up some so they will be $55/set with free shipping in the continental US. There is a 4 week lead time at the moment. Once they are ready I will let everyone know.
-
Yes, the shiny one is the new one and I agree, it could be better. At the moment it runs good and a short test drive proved all my hard work and waiting was worth it as the car pulls very well. If I feel there is something to be gained by soldering the hole and installing the original throttle plate I will. No worries CO on your feelings on the quality of the part. If you do decide to venture in to the carb parts business please let me know!
-
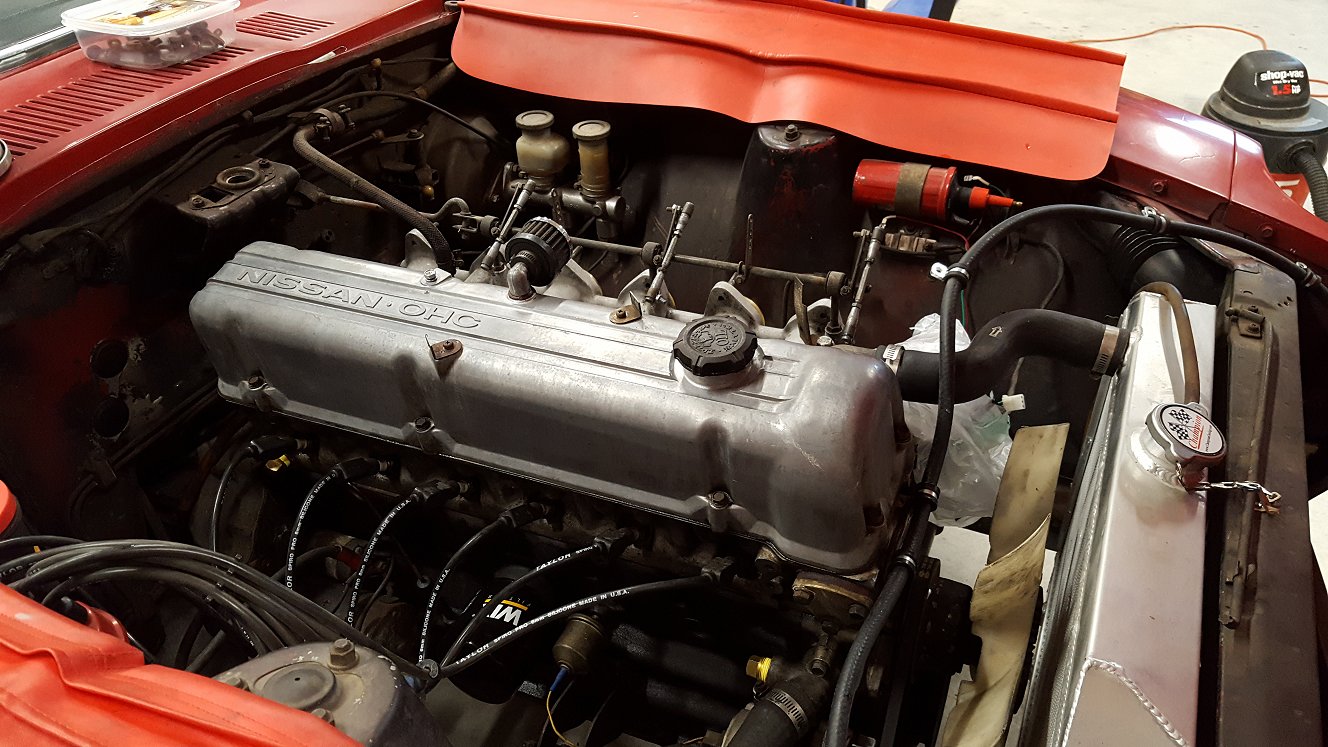
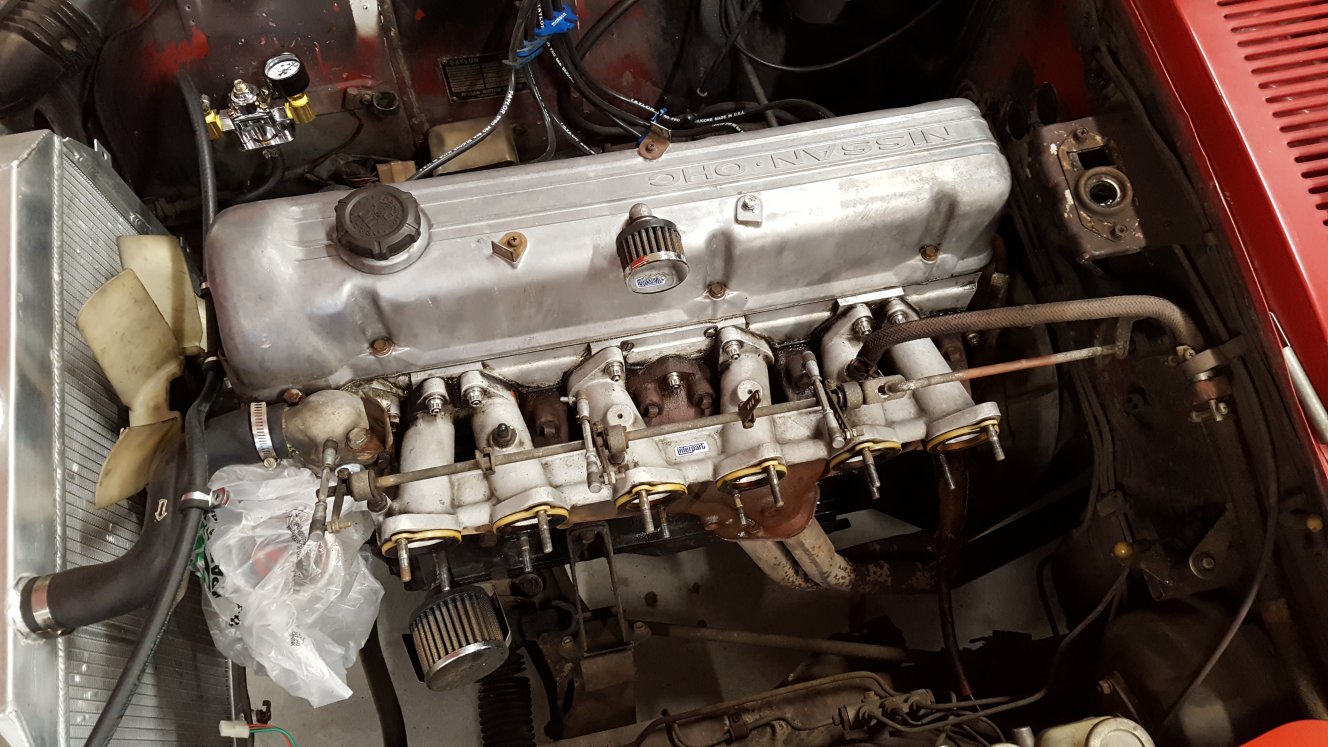
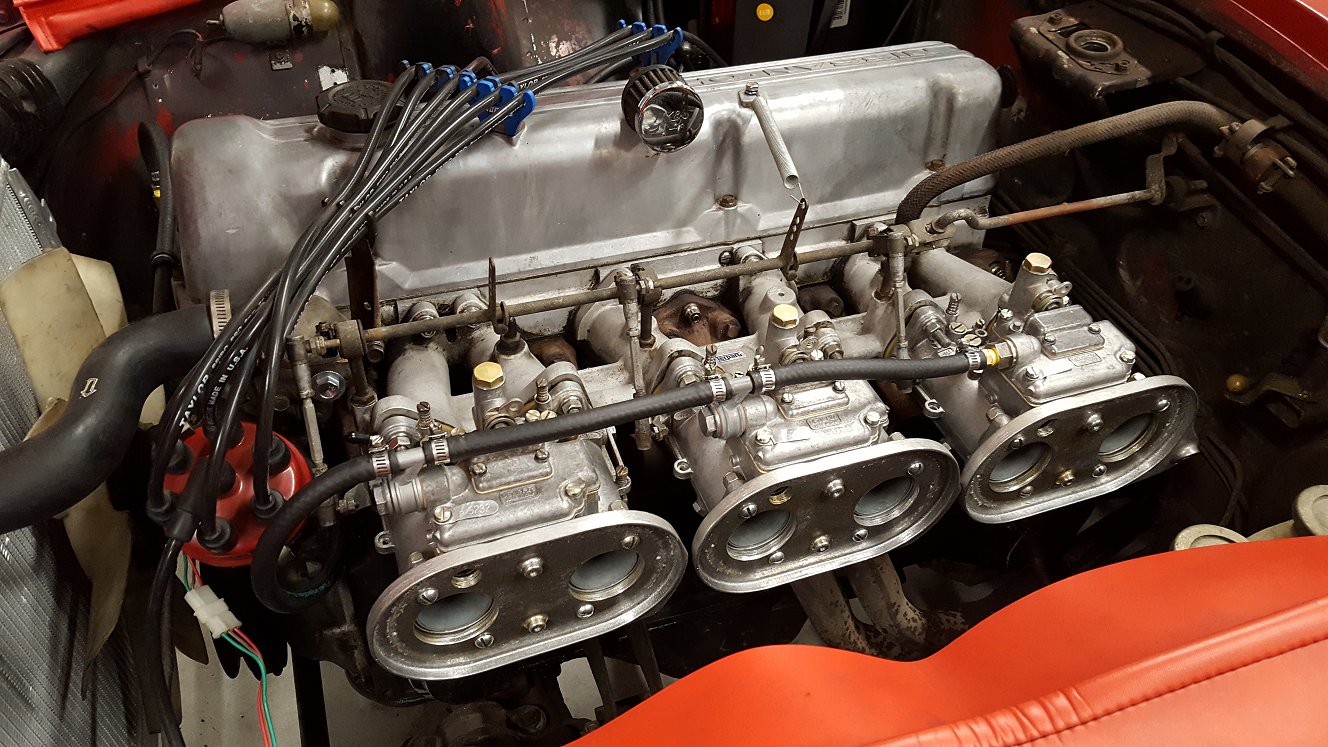
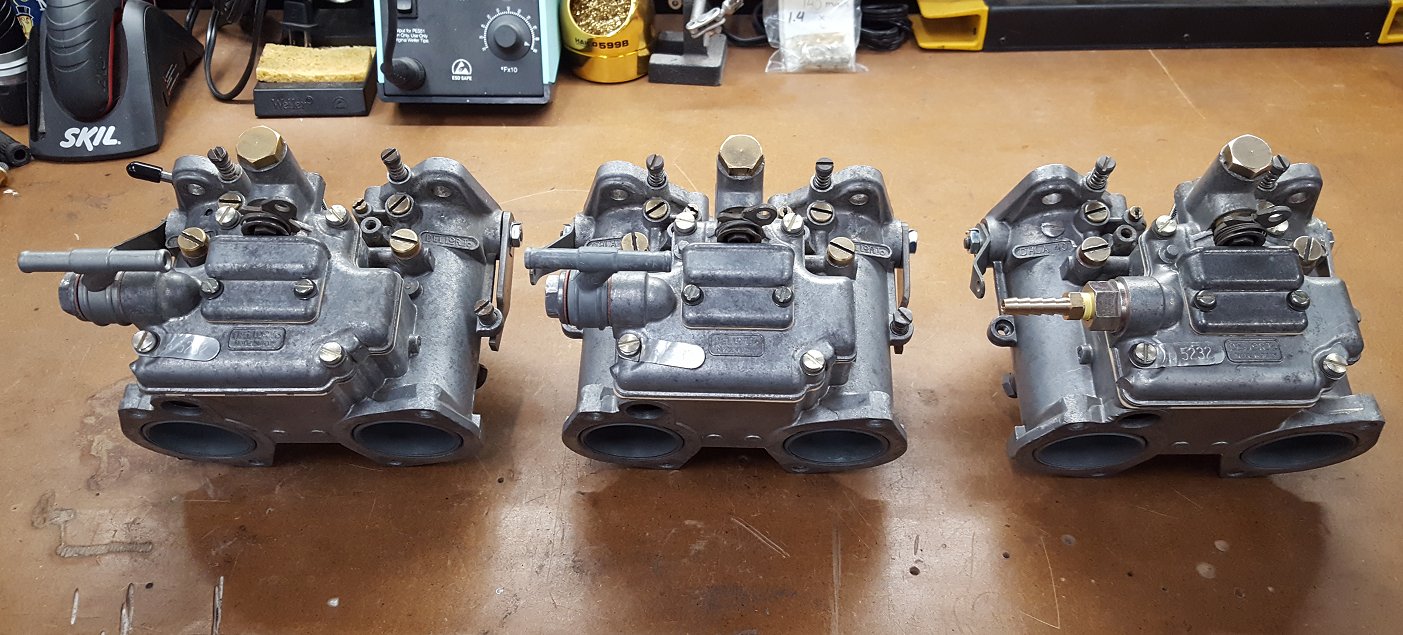
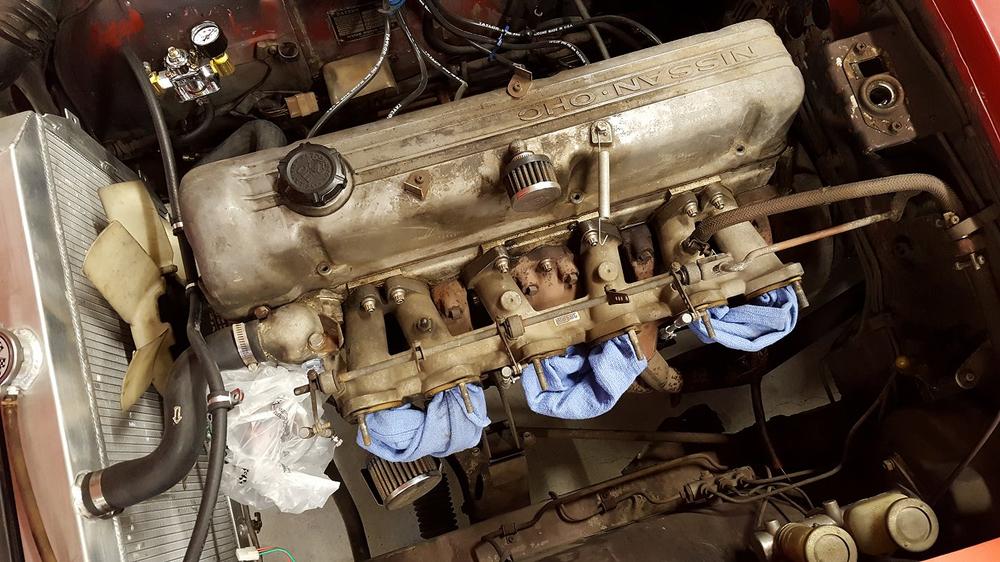
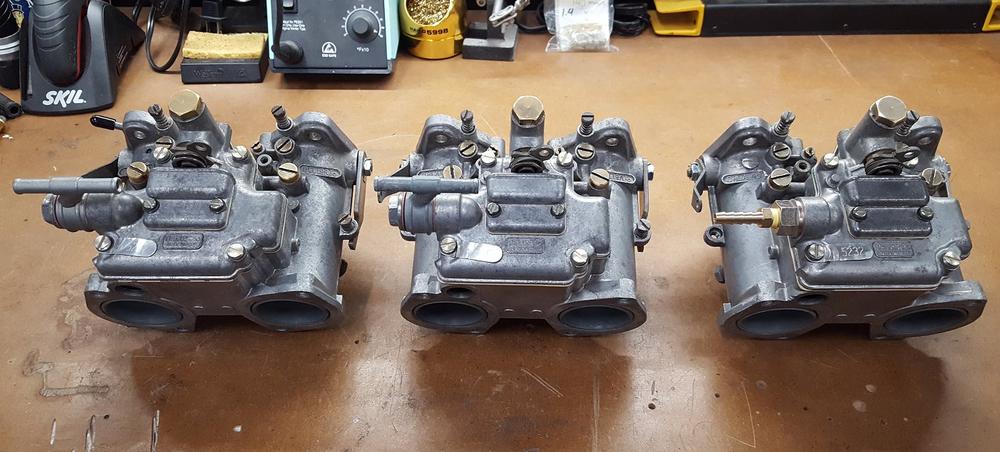
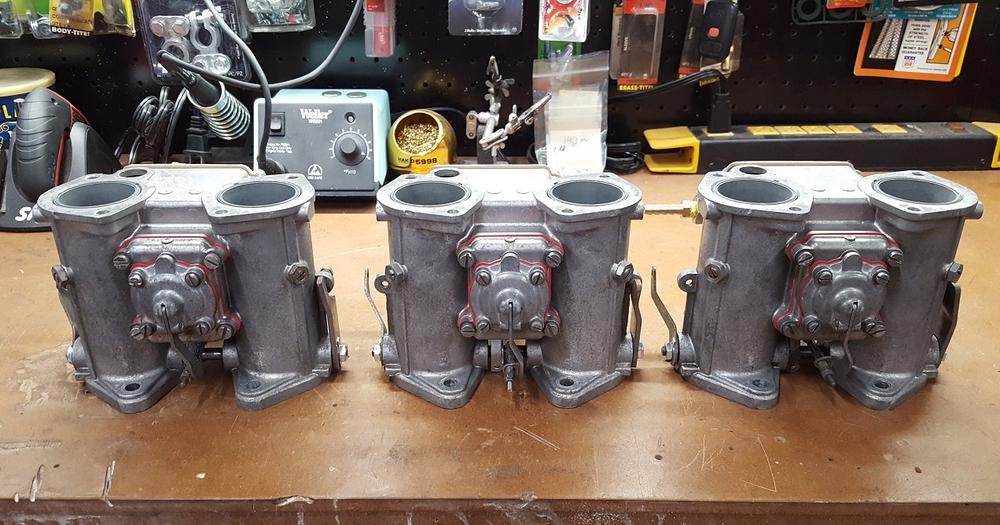
Before I set about reinstalling the carbs I took some time to clean up the intake and valve cover. Since the carbs looked so good there was no way they were going on the filthy engine. Some Castrol Super Clean and elbow grease helped clean things up. Eventually I will clean up the entire engine bay but for now it already looks a lot better! Next went the carbs along with some new stainless fasteners. They were originally held on with lock-nuts but since it is hard to get a wrench on them I opted for stainless split-lock washers and nuts. Another change I made was the fuel line routing. Dellorto and Weber carbs cannot share their fuel fittings so I bought an adapter for carb #3 that allowed the fuel to enter at carb #1 instead of carb #3. It should provide several benefits in addition to looking better than the previous setup. With a turn of the key to let the fuel bowls fill up and the system pressurize I checked everything for leaks. All looked good so I turned the engine over and after a several revolutions it fired up! With some small adjustments it settled in to an idle around 1100 rpm. I still need to get them sync'd and make some more adjustments but I was thrilled to hear it run again.


-
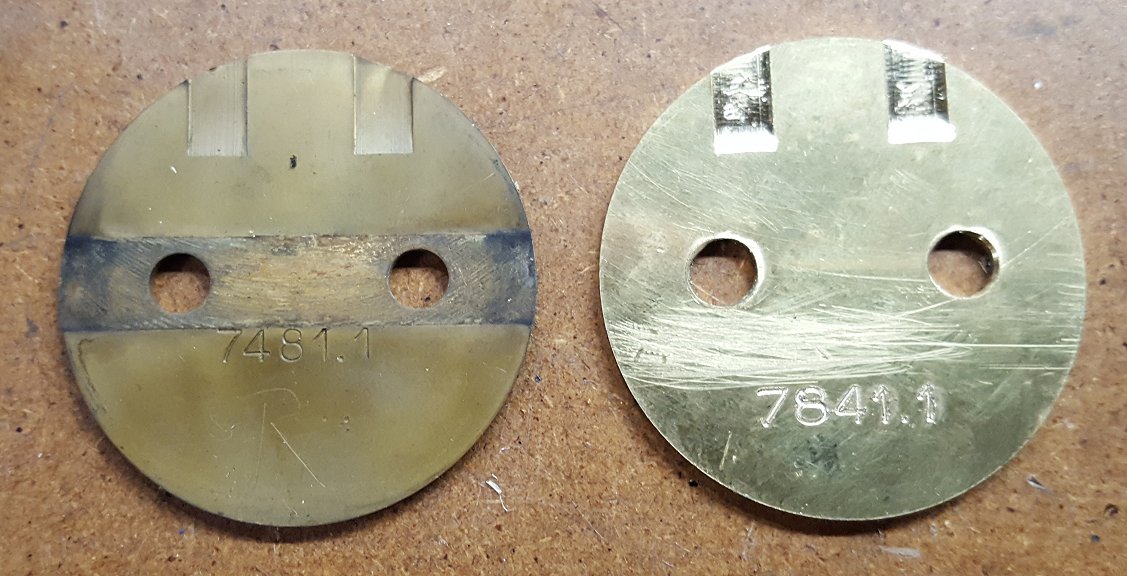
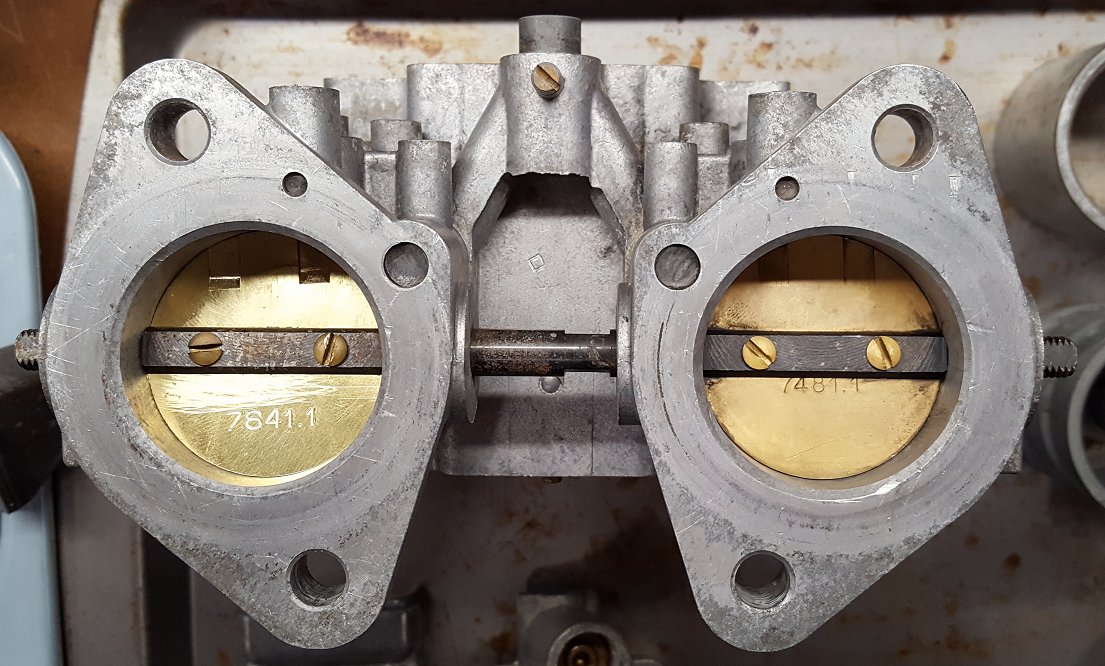
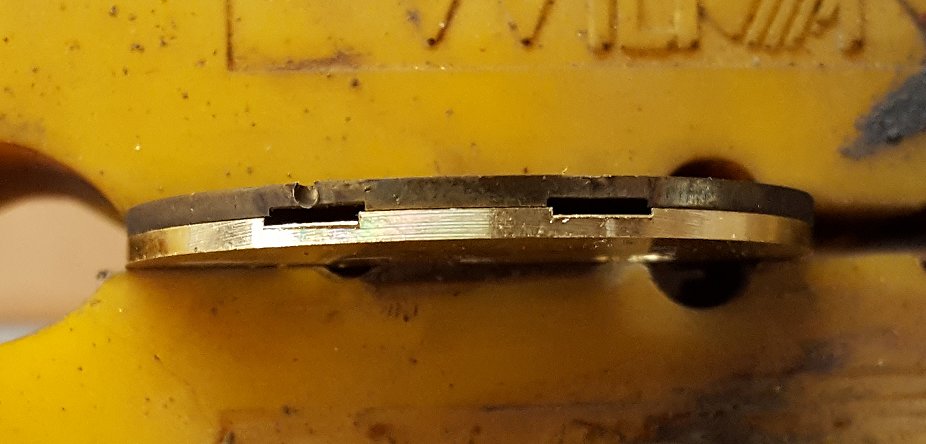
I hope everyone had a great Thanksgiving holiday. With a 4 day weekend I was able to get Saturday all to myself to get some work done on the Z. I was thrilled to have the replacement throttle plate and other parts arrive on black Friday. The tracking through the shipping company provided no delivery date so I was quite surprised to find them there. A quick comparison of the old throttle plate to the new one provided a small shock. The part number on the old one is 7481.1 and the new one is stamped with 7841.1. I doubled checked my communication with the seller and I requested the correct part number. I some more comparisons and they appear to be very close but not exact copies of another. Before I started to panic I tried to see if any Dellorto carb had a part with the number 7841.1. Thankfully I could not find one so I believe the numbers are just transposed so in to the carb it went. The third carb went together like clock work and finally completed a major phase of the project. They are so pretty!


-
I have had a few people reach out to me about the clips on eBay. I am going to reach out to the fab company after the holiday weekend to get a quote and lead time on having another run of 100 clips made which would be 25 sets. If anyone is interested just let me know.
-
Thank you Captain! The cost was very reasonable, $11.80 plus a few bucks shipping. I had thought about trying to solder up the hole and shape it back using some fine sand paper but decided a new one is the better way to go.