Hardway
Free Member
-
Joined
-
Last visited
Everything posted by Hardway
-
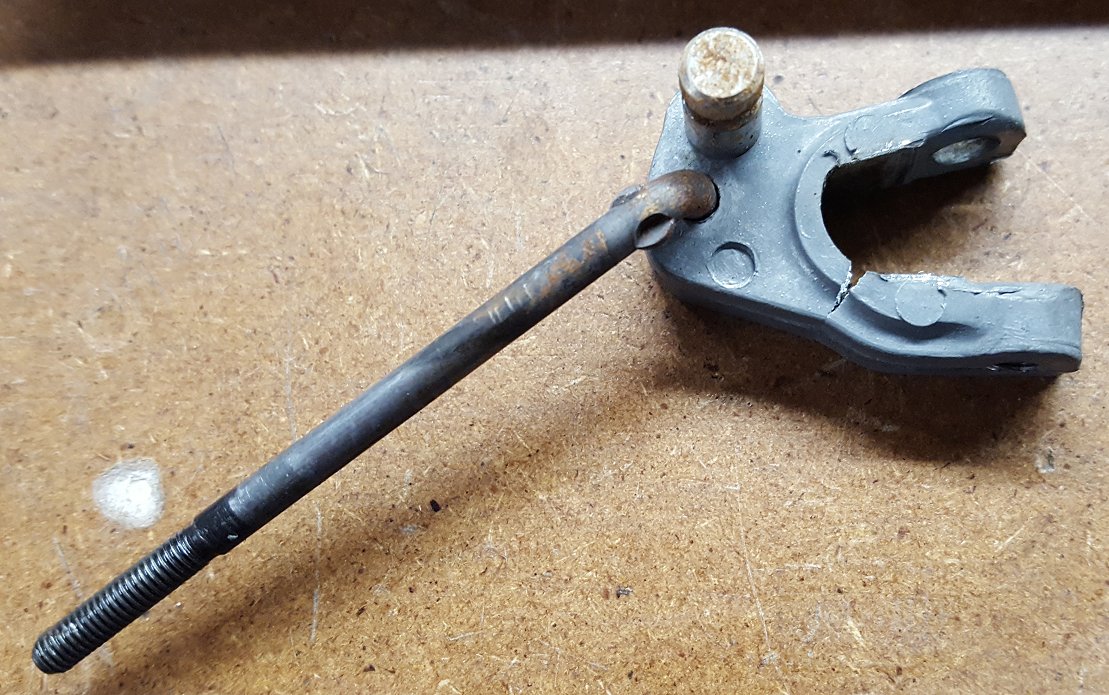
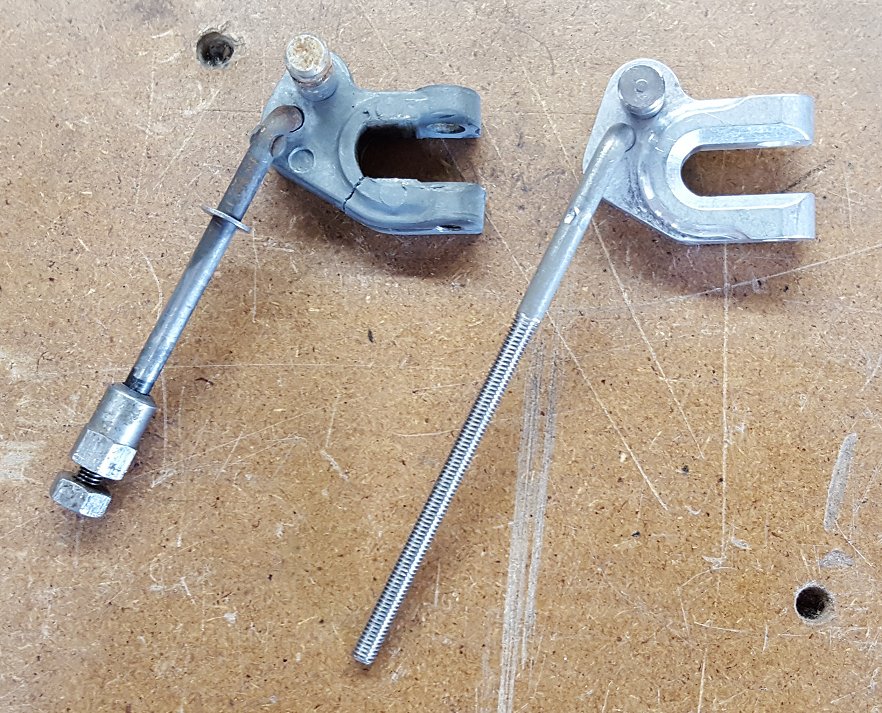
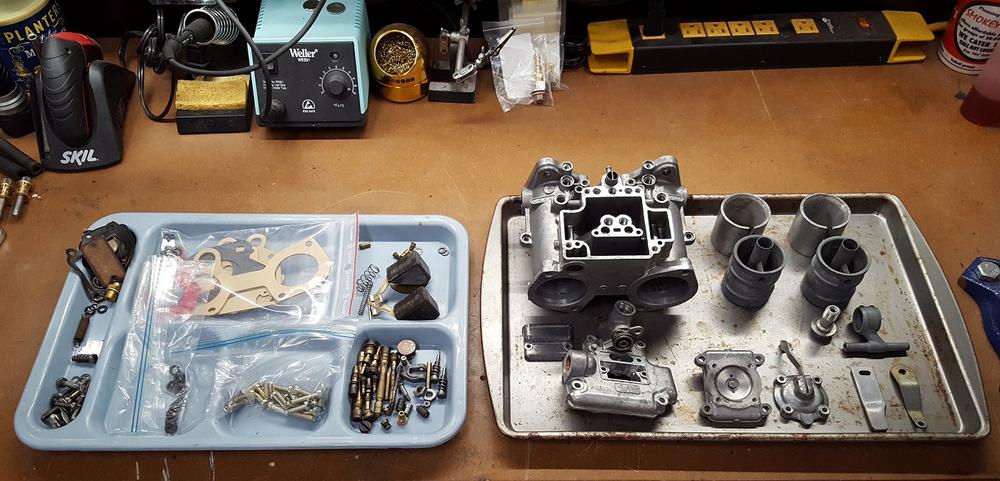
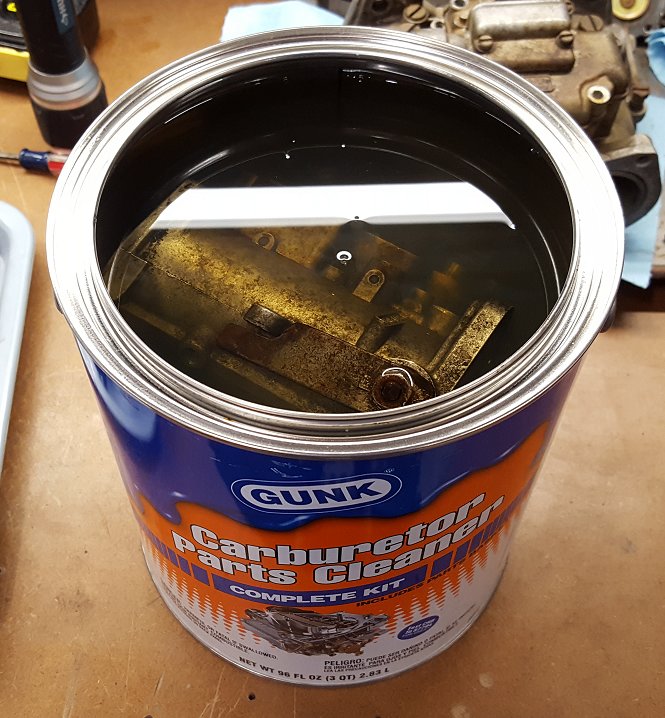
 The replacement accelerator pump rod assembly arrived from the UK and it is better than I expected. I cut the excess threaded rod off but was happy to finally make some progress. Since carb #2 was already clean it went back together very quickly. Getting the float set went quicker too! It looks so good next to carb #1. With carb #2 done I disassembled carb #3 and as I did my heart sank when I saw this. I finished the disassembly and pulled the throttle plate out. I don't exactly know how this happened but I have a theory. I think this throttle plate was on the other bore and as a previous owner attempted drill out the progression holes and they drilled too far and went in to the soft brass of the throttle plate. Recognizing their mistake they swapped the throttle plates. When taking a long look at it, the hole may not present much of an issue but this project is a full refresh of these carbs and that will include addressing and repairing all issues. With that, another order was placed to Italy and the part along with a few more idle jets are on their way. With carb #3 fully torn down the large body parts went in to the pale of cleaner. As you can see, I am putting some mileage on this stuff but it is still working great. After an overnight soak of the body parts and another overnight soak of all the small parts, now its just a matter of waiting. With any luck I will get everything and reassembly the carb over the Thanksgiving holiday weekend.
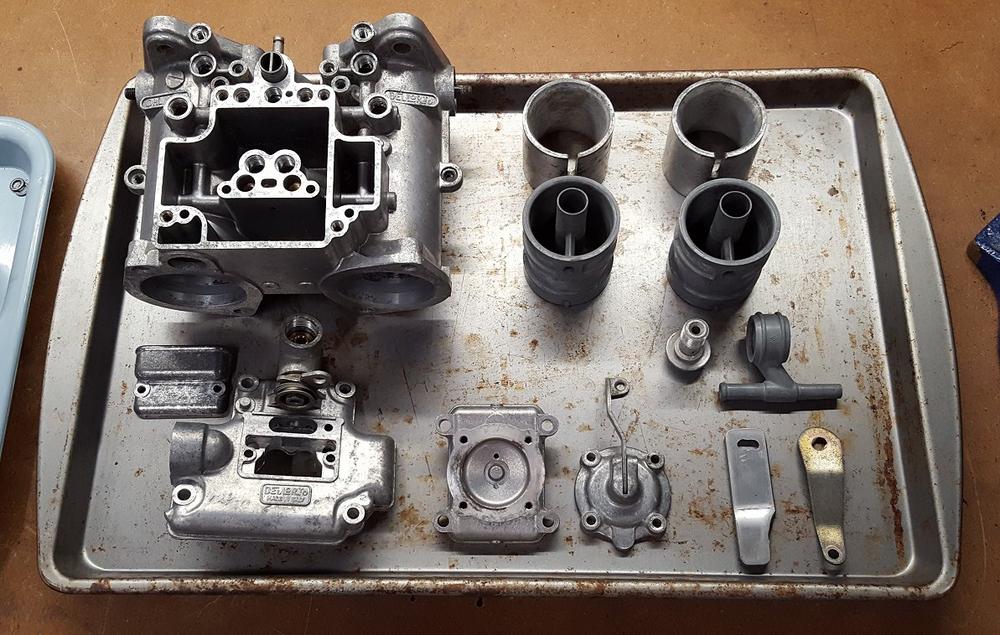


-
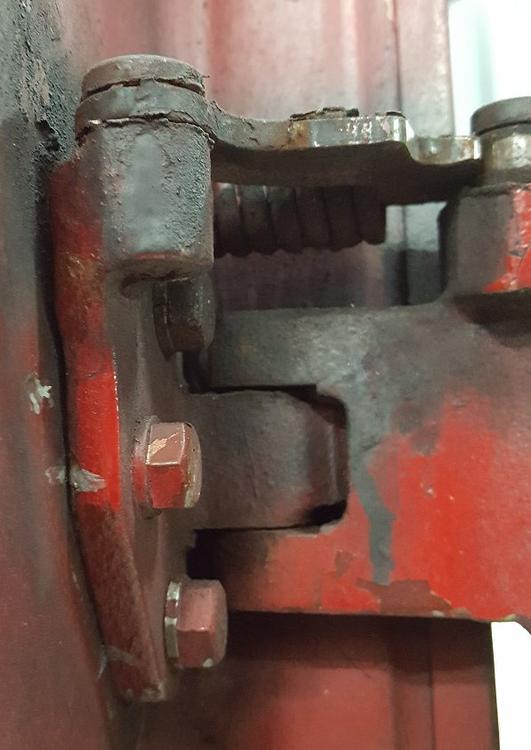
I don't have the door back on the car yet due to rebuilding the hinges. The paint is drying on them as I type this. The piece I put on the driver side has been on there for 2 weeks and does not have any type of smell to it. I will post my results once I get everything back together.
-
It happens. I bought a '69 Camaro Z28 clone that way several years ago. Was on CL for $13K and was 3 hours away. Rush to the bank on a Friday, ended up having to go to two banks to get all the cash, go to the address he gives me, turns out its not his house. I call and after several attempts he finally gives the correct house and street several blocks over. I pull up at the same time another guy does with a truck and trailer. I am looking it over with like 7 other guys at this point and I just say, I will take it without even hearing it run. Another guy pops up and says he wants it too and the seller instantly and on queue turns in to an auctioneer. After several rounds I come out on top at $15K. Several guys including the guy with the trailer drove further than I did and were rightfully pissed. The seller did this by design and should consider himself lucky the other unhappy parties did not come back and give him a real piece of their mind. Just not cool.
-
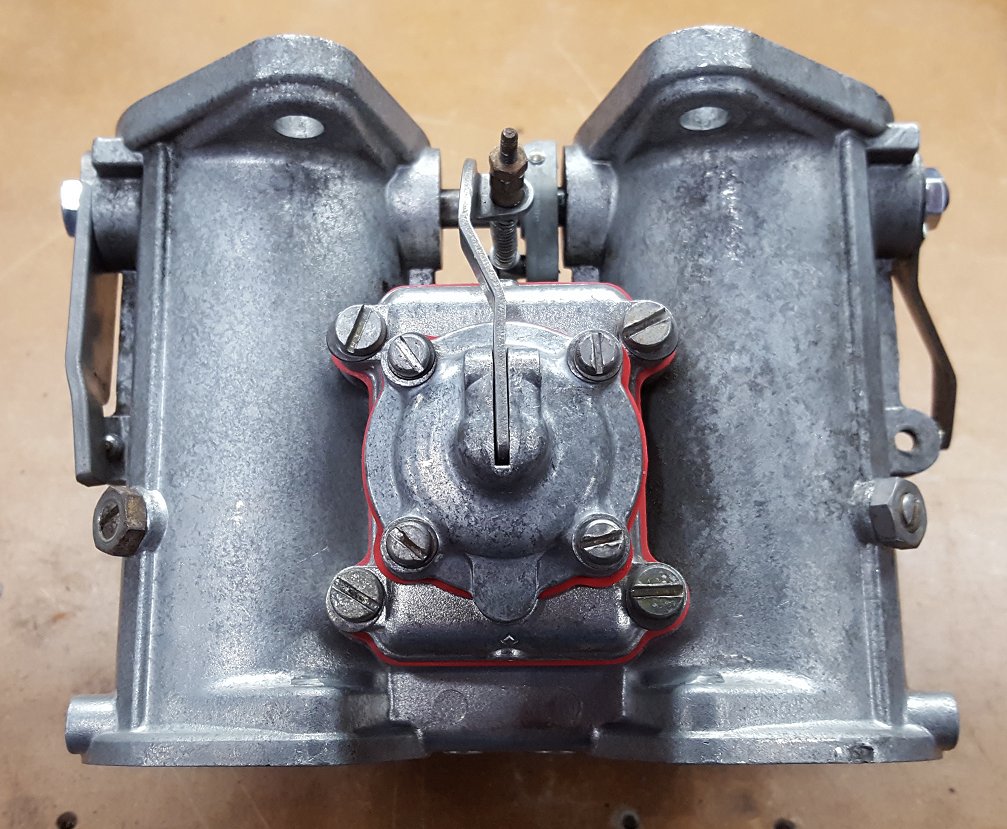
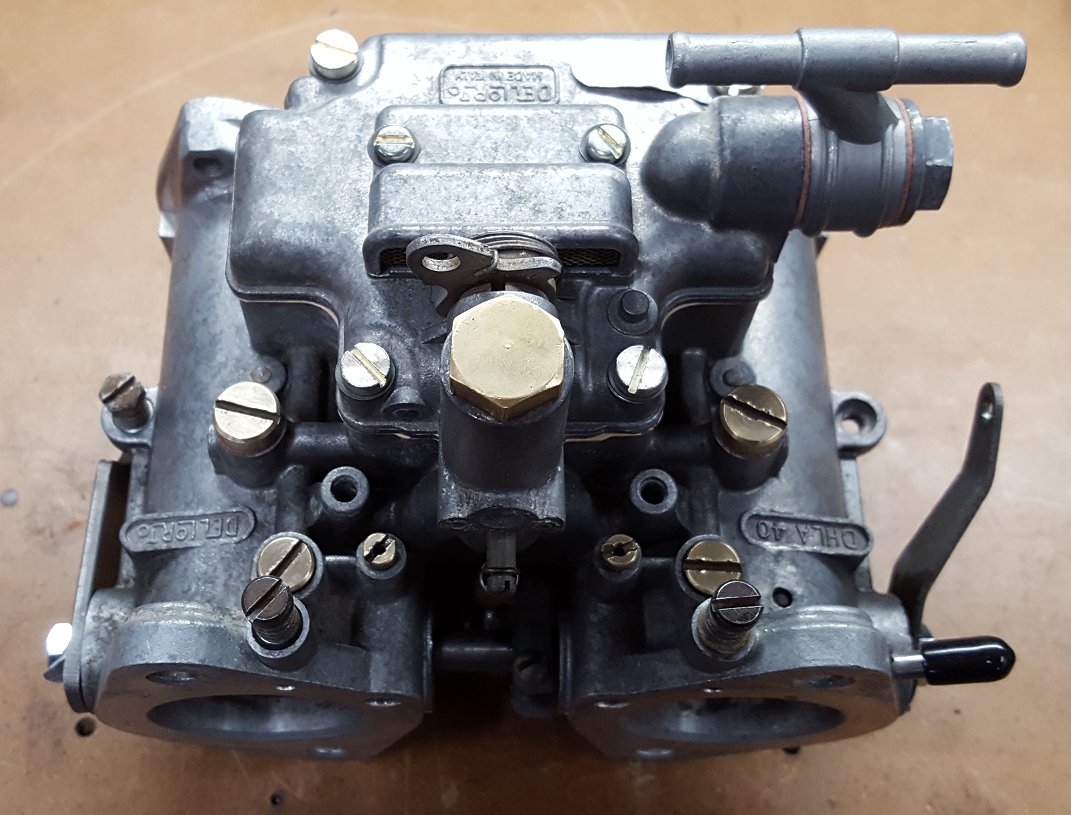
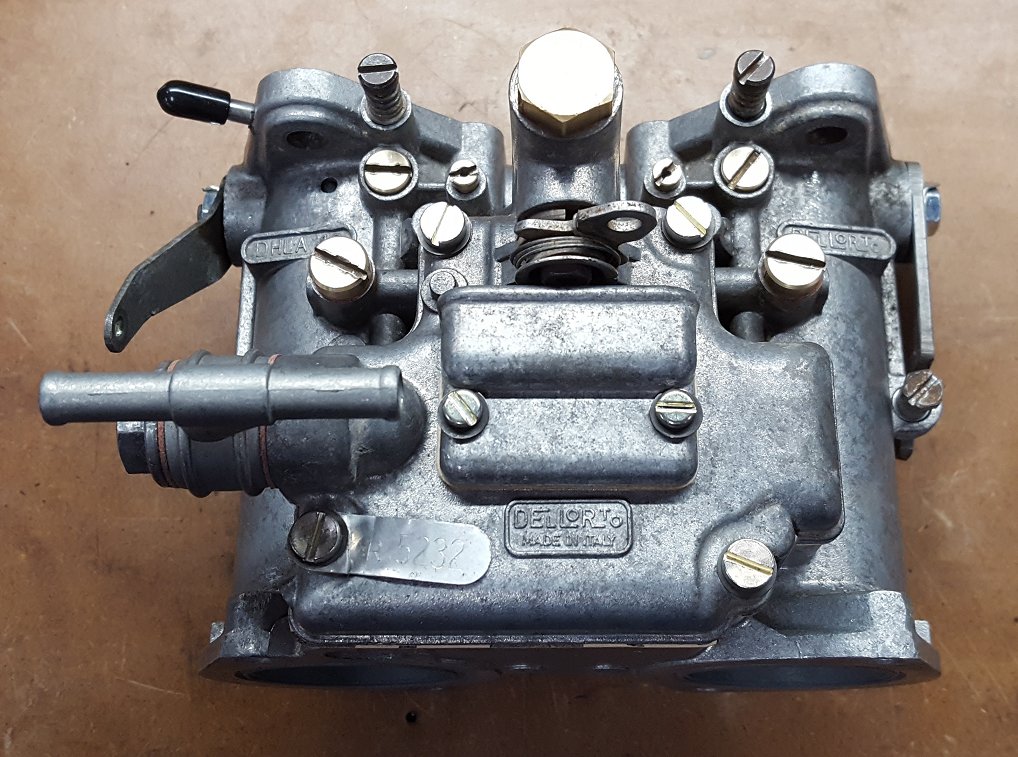
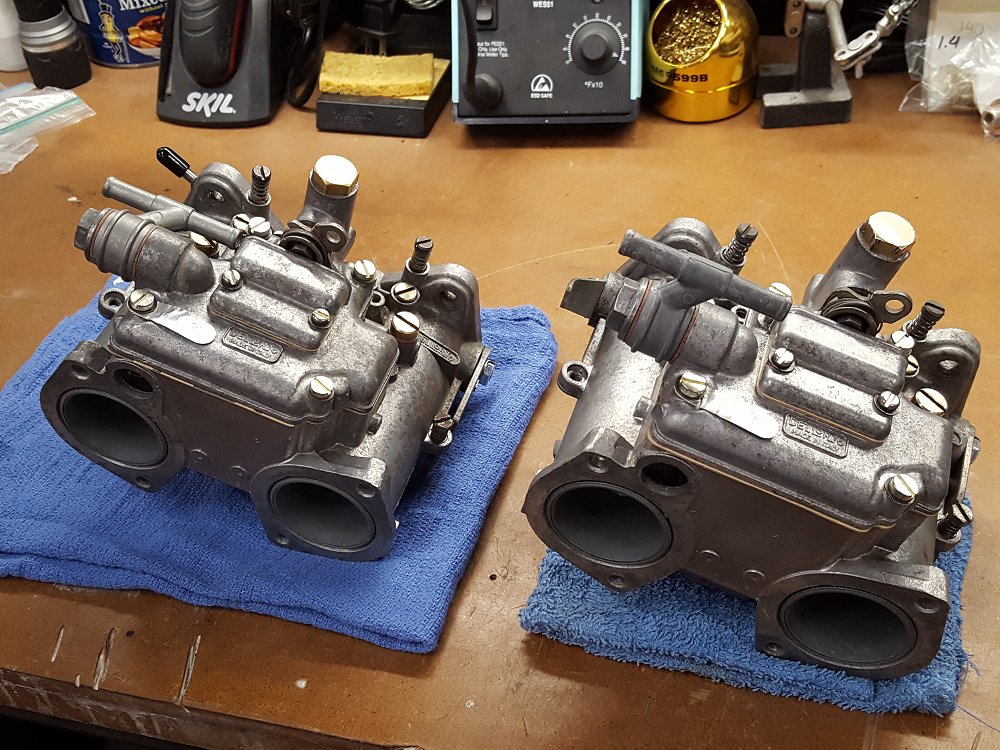
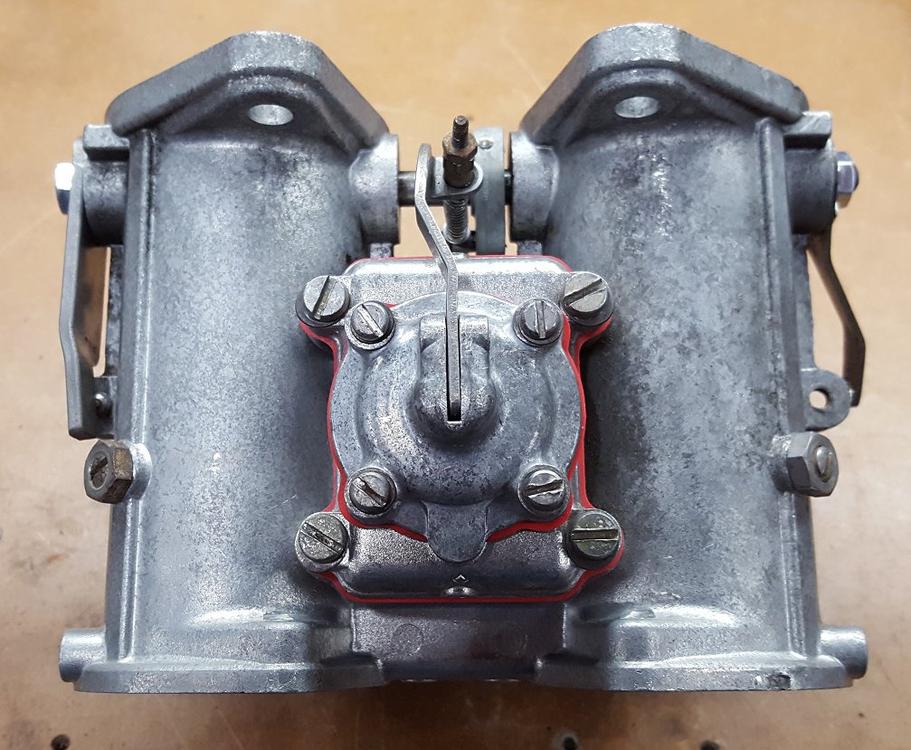
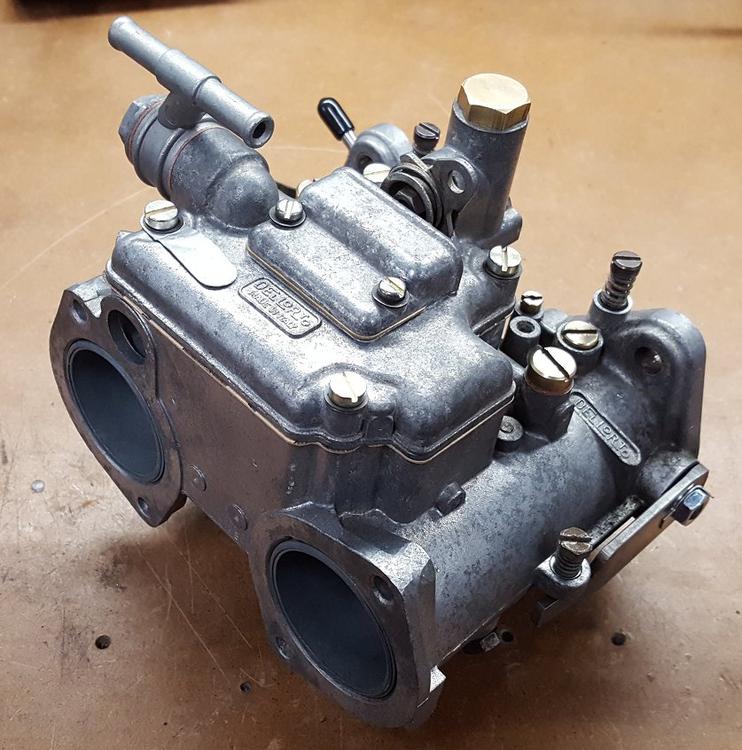
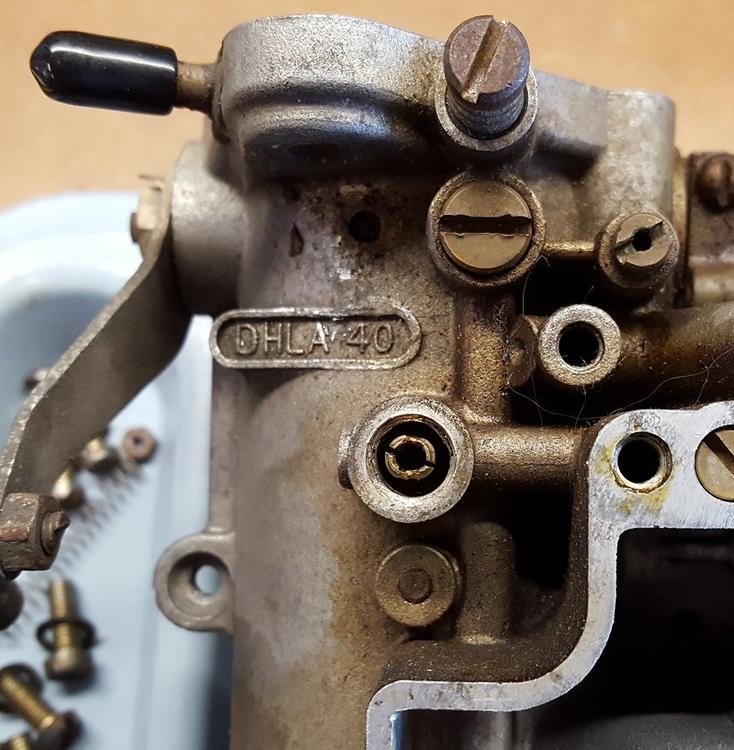
As previously mentioned, I am waiting for the replacement for a part I broke on one of the Dellorto carbs, the accelerator pump rod assembly. I wanted to remove it so I could spin the butterfly spindle around over and over to clean the bearings. Unfortunately I did not know my own strength and managed to break it. It is just pot metal but was definitely a "face palm" moment. Thankfully a supplier in the UK makes new ones and it is on its way. Seeing that it could be weeks before I receive the replacement part I carefully removed an assembly from one of the other carbs and pressed on with the reassembly. I just wanted to get one carb back together as have the same one apart for so long was bothering me. Using several references along with the other carbs everything went back together with ease. I also cleaned up the threads from the damaged pump jet on the left side of the carb. They are M9X1.0 if anyone needs to know. Setting the float took some trial and error but I got it to spec. Using some fine steel wool I cleaned up the brass screws and caps. This along with the new top cover screws that came with the rebuild kit really make it look new again. If it runs as good as it looks I will be thrilled. One down, two to go!


-
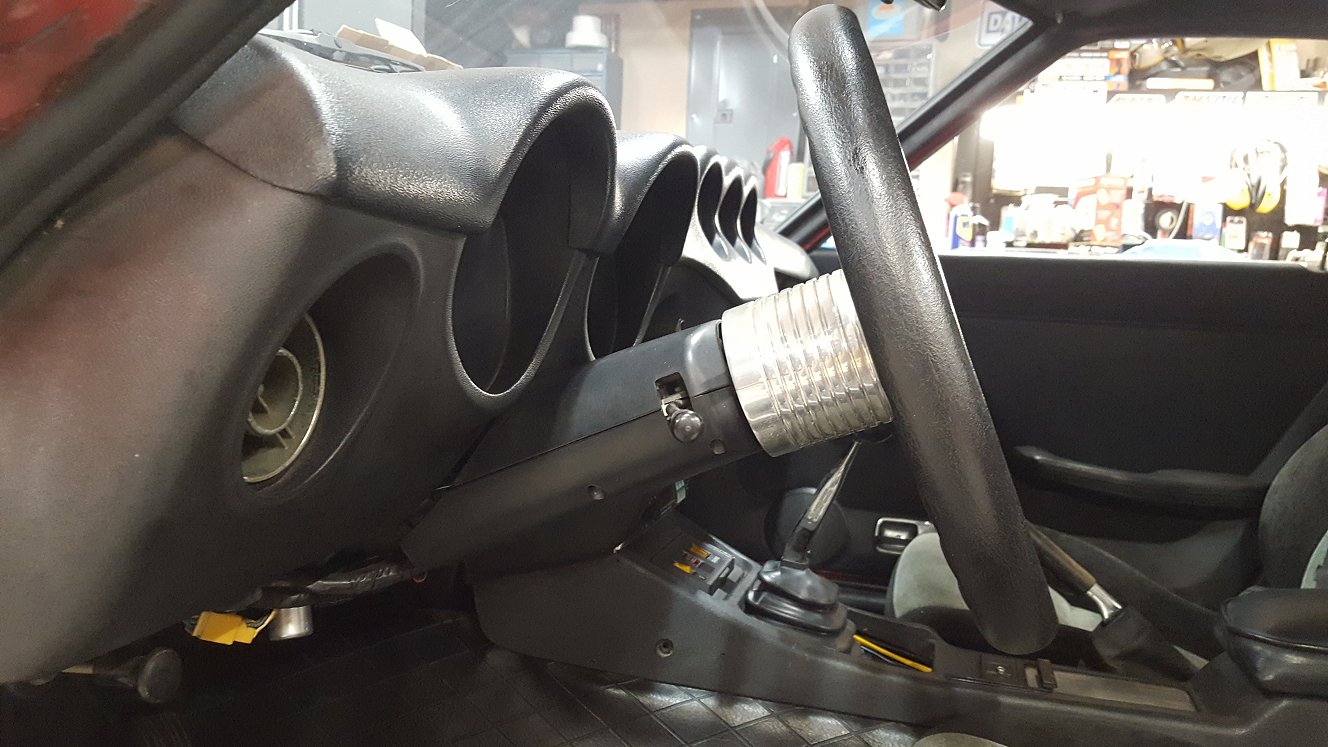
Happy with the end result of the weatherstripping project I turned my attention to something that has been bothering me since I bought the car, the missing steering column cover. Turns out it was in a box of parts that I received with the car and un-damaged. I believe I also discovered why it was off, the previous owner was trouble shooting an inoperable horn. A quick visual inspection revealed there was no copper wiper arm touching the back of the steering wheel hub. I pulled the turn signal assembly off and the remains of a broken arm were present. I quick dig in my stash uncovered a nice copper wiper arm that was easily installed. With a little careful manipulation of the copper I now had functioning horns, or should I say a horn (more on that later) A quick check revealed that everything else working properly so the installation of the cover began. It took a few tries to have the correct length screws but it is now installed and helps bring up the appearance of the interior one more notch. A some point I will probably paint the hub satin black but for now, I have bigger fish to fry!

-
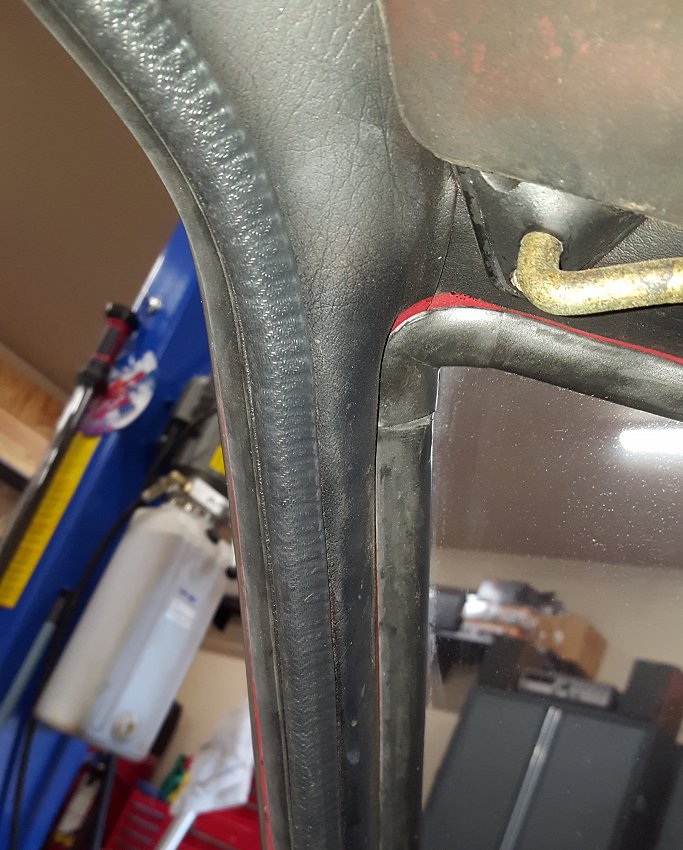
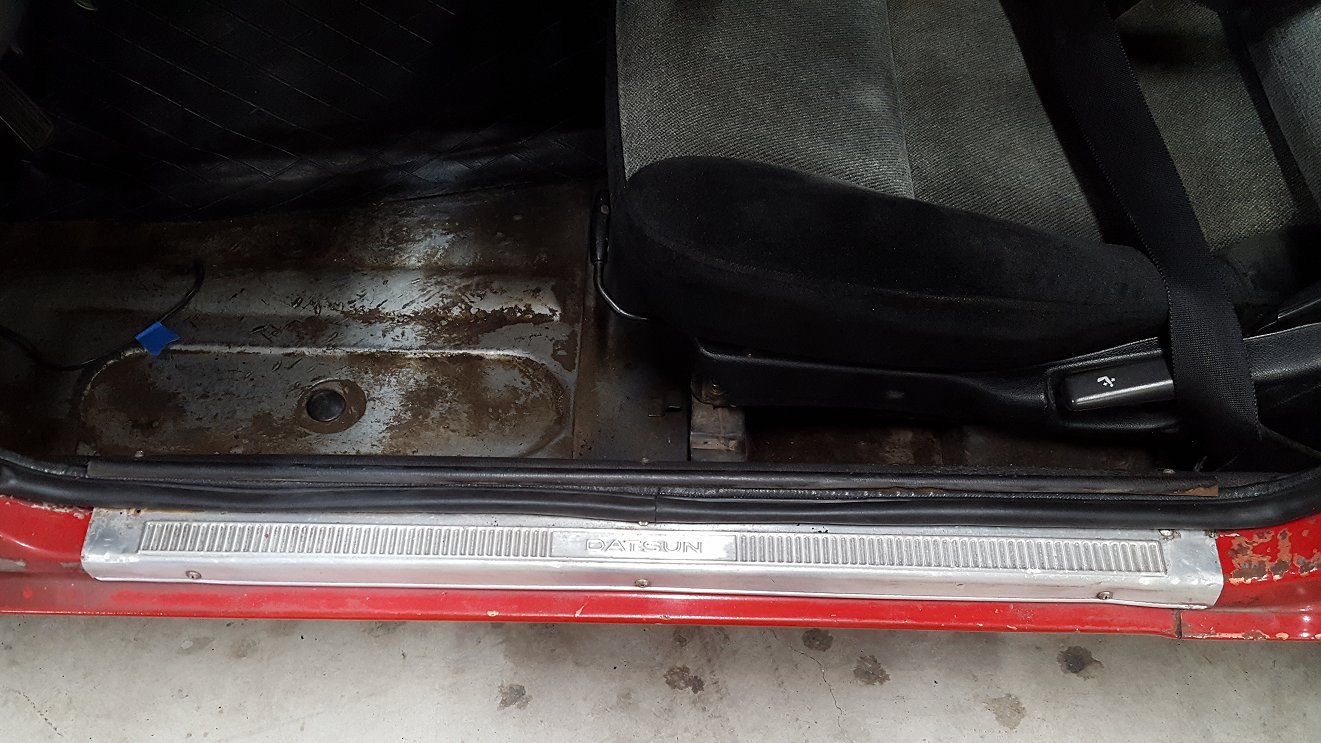
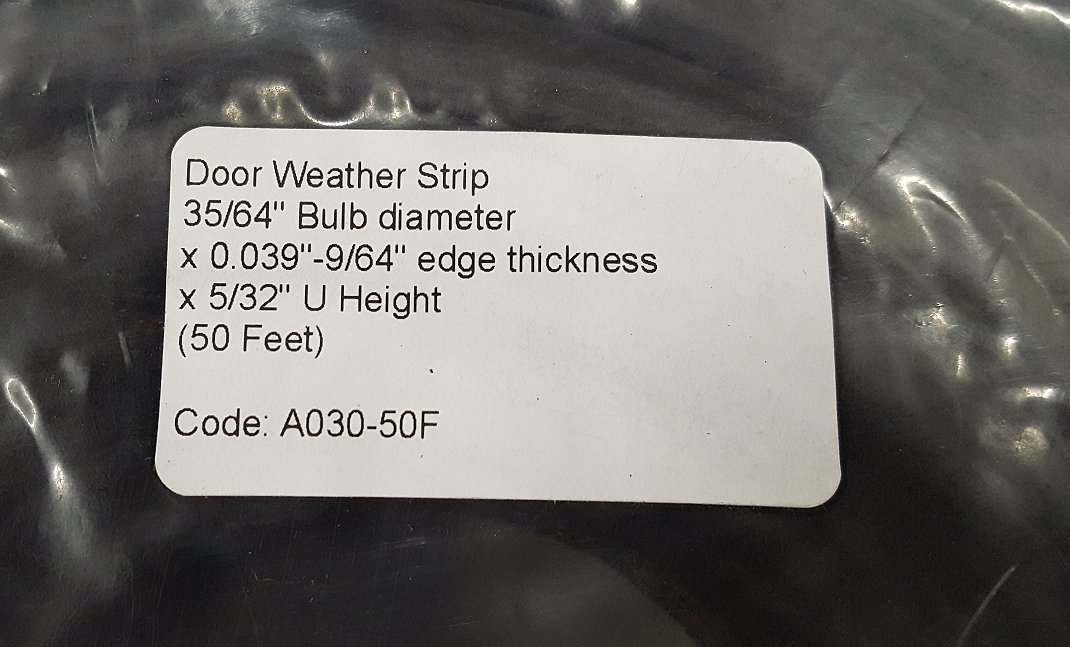
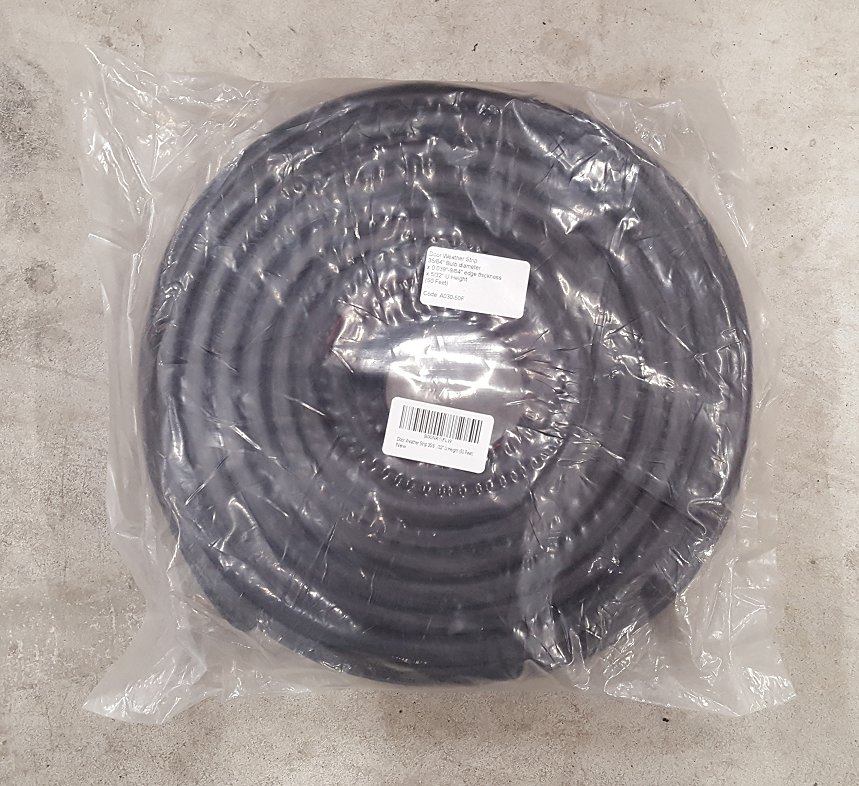
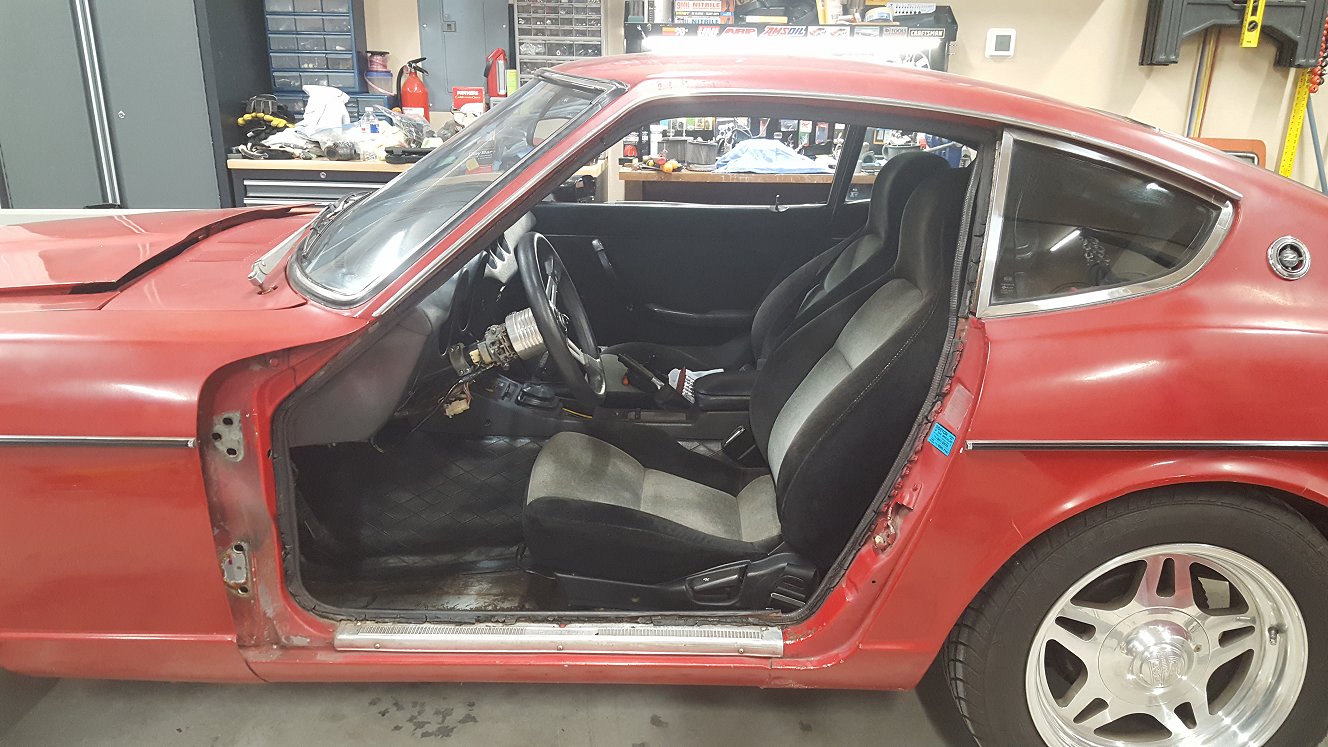
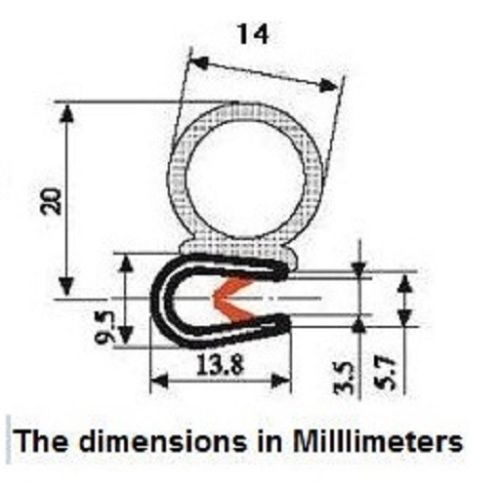
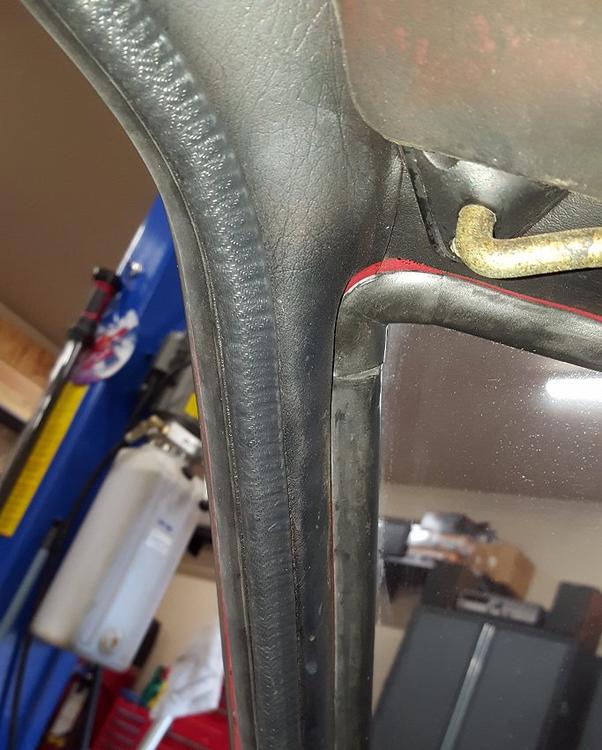
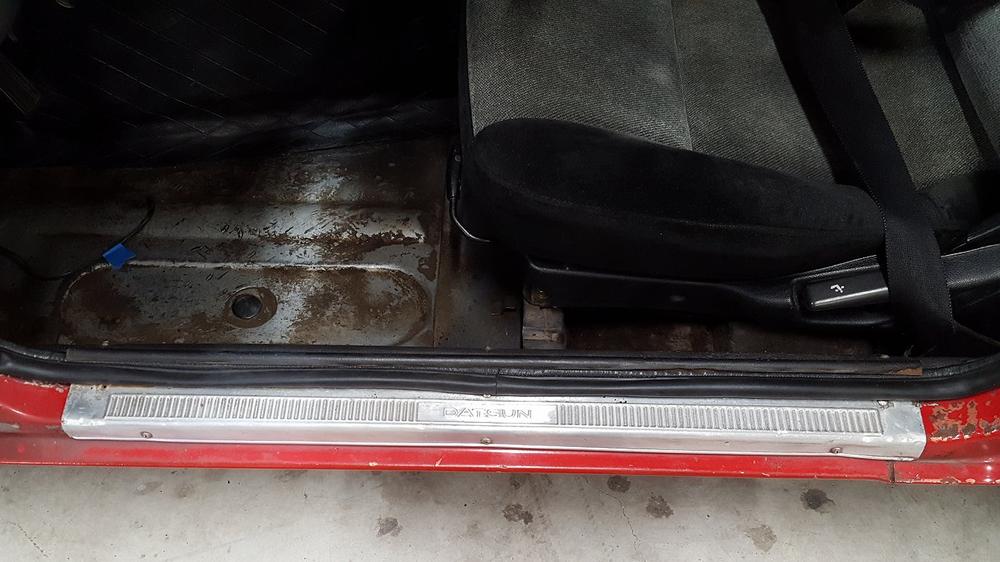
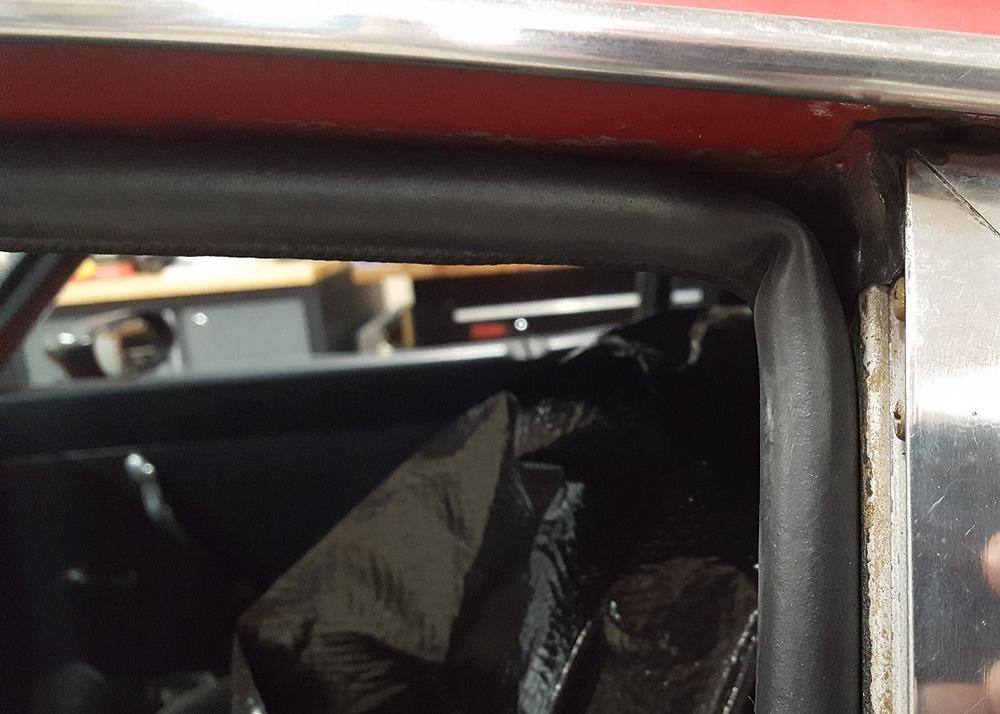
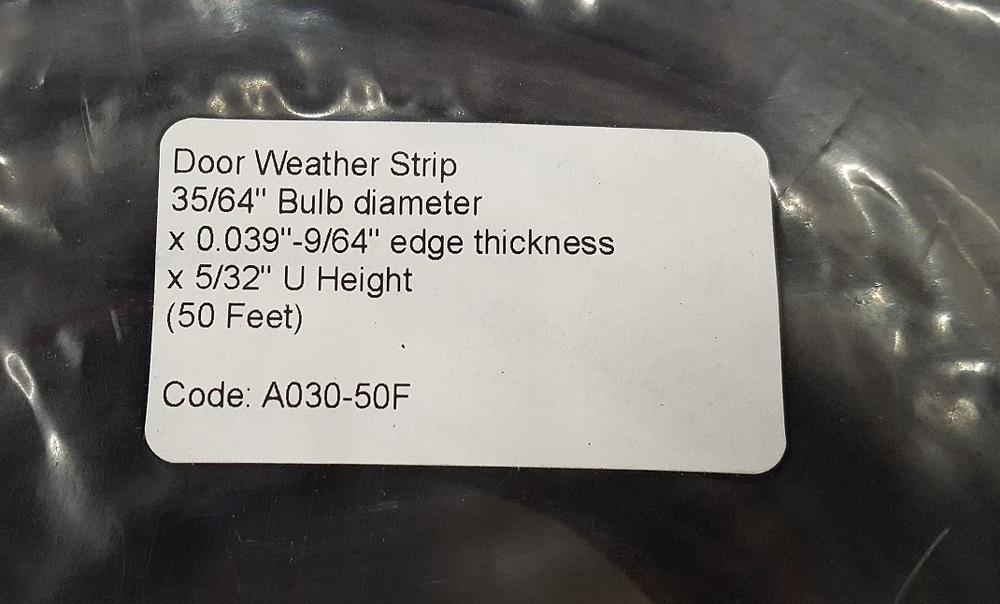
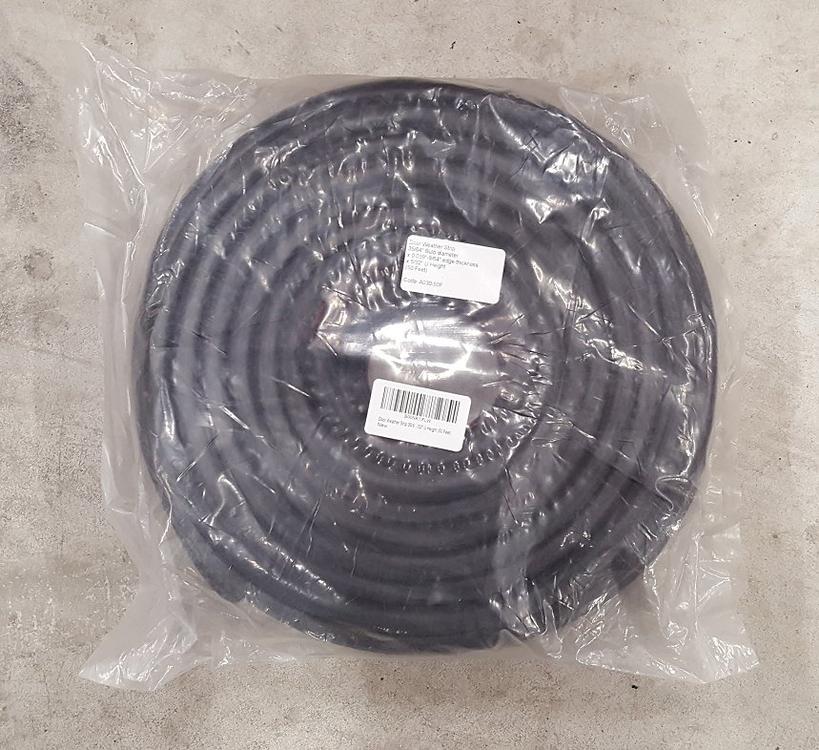
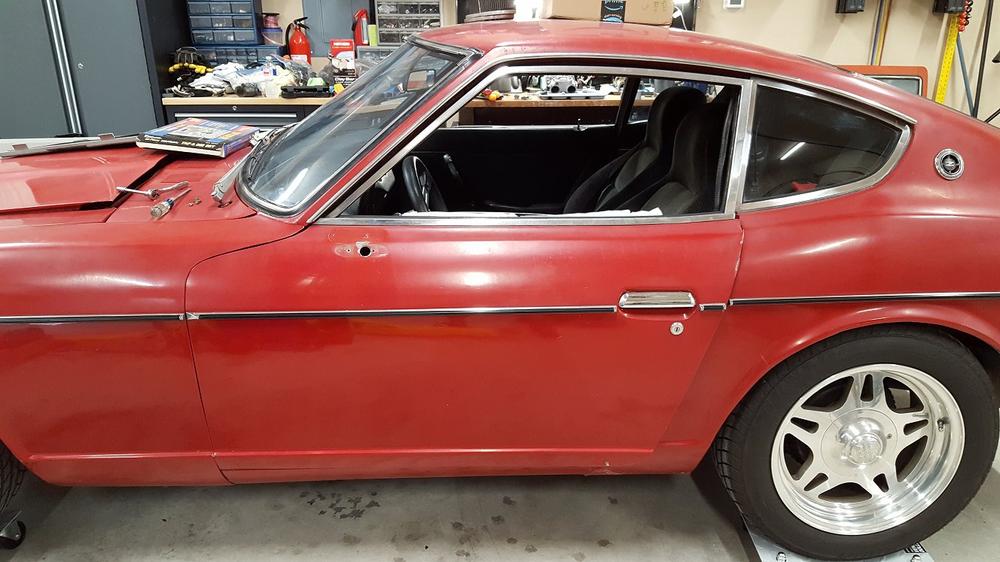
My direction for the weatherstripping was to simply replace it with something that could get me by for awhile as anything was better than the rock hard crumbling stuff that I pulled off. Used KIA Sportege seals are no more due to age and new ones after shipping from Korea run about $50/each. I started researching some universal options that was not too big as the pinch weld is right at 13mm tall. I found some universal bulb type weatherstripping on eBay from a seller that sold it by the foot. I wanted something that including the U-channel and I didn't want to glue it on so I ordered 35ft from the seller. At $1.50/ft + $3.00 S&H I was in it for $55.50. To my surprise when the box arrived it was from Amazon and had an entire 50ft roll in it. For anyone that is interested the seller is m.m-rubber and the item number is 141008758040. The rubber bulb is very soft and easily collapses. I won't know if its too big until I get the door back on but for now it looks miles better than before. Below are some pictures from the eBay auction that give a close up and tech specs of the weatherstripping. I really had to work the weatherstripping to make it turn at 90 degrees at the top. It seems tight but only time will tell if it will stay. While I had the door sill plate off I took some fine steel wool to remove the red over spray and give it some shine. I also located the missing screw later in the day. I had to work the sill back on as it kept getting caught on the weather stripping. Once the door is back on and closed everything should even back out along the bottom.


-
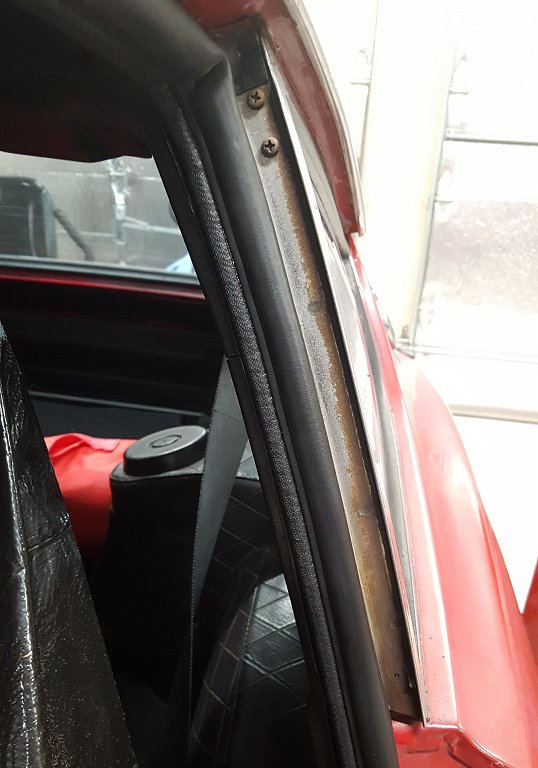
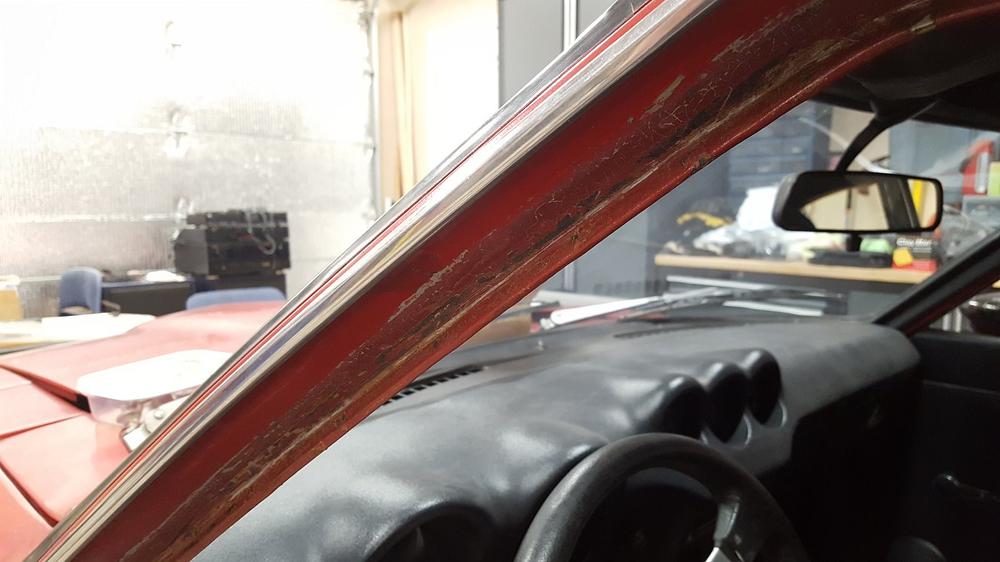
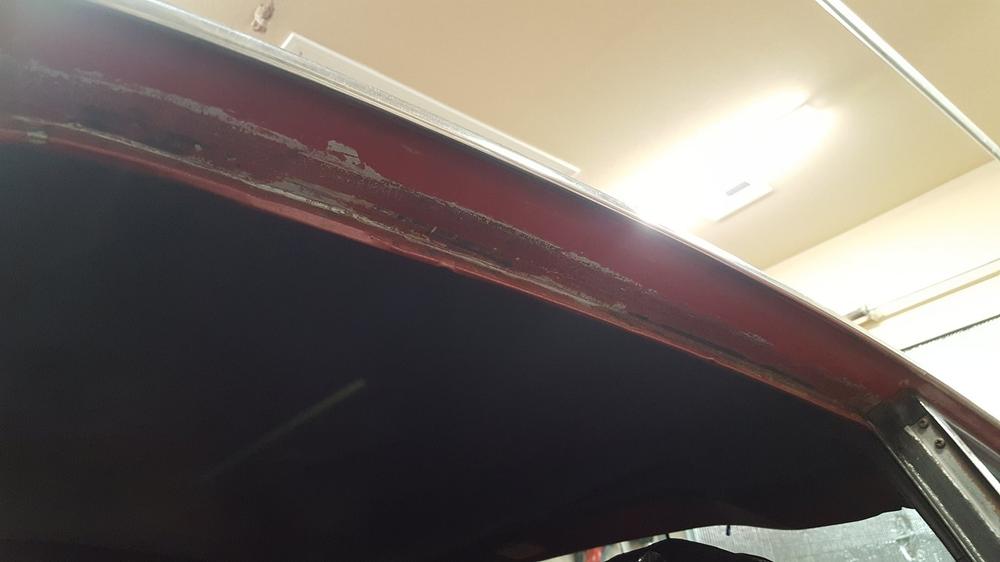
As I waited for a carb part that I broke I decided to finish up the driver's side weatherstripping. I got all of the old stuff off along with the adhesive residue. I had to be careful around the top as the car's interior was originally red and the headliner wraps around the pinch weld. With everything off it was nice to see that everything was in good shape.


-
I swear this is the second or third 240z I have seen recently with the bumper guards or the entire bumper on upside down. Still, its a pretty color combo with the red and black vinyl roof.
-
Looks like the CL ad was updated. It is now an auction to be held on 11/18/2017. Shame so much was modified on it.
-
I agree with SiteUnseen, once they are blasted you need to get some primer and paint on them sooner than later. Depending on your tool setup you may not be able to use a HVLP gun. Not only do you need a good compressor but you need a good air filtration system to keep water out. Besides the wheels, how many other parts need to be refinished? If you just have the four wheels, a rattle can will be the most affordable way to go. If you do it right they will come out looking good. If you have suspension pieces and other stuff you plan to do, then investing in a HVLP gun and the equipment to support it is worth it. Additionally, powder coating is done by the lot so if you do everything at once the cost per part goes down significantly. I used satin Rustoleum spray paint when I re-did all of the suspension components on my lime green Z. Even with no primer and using a wire wheel to clean everything, all the parts came out really good. Check out my lime green machine link below for lots of pictures.
-
Rob totally hooked me up. I reached out to him just as you suggested and he posted a kit for me. See link below. I think I may still buy some Hella Sharptones and paint them since I will have to deal with Austin traffic when I take the car out. I will restore the original horns and have them for safe keeping. Looking forward to getting the kit! https://www.ebay.com/itm/New-Datsun-240Z-260Z-Roadster-Horn-Rebuild-Screw-Gasket-Kit/152768263718?ssPageName=STRK%3AMEBIDX%3AIT&_trksid=p2060353.m2749.l2649
-
I bench tested the horn using a 2A trickle battery charger that puts out 12.27V consistently. The FSM states testing should be done between 12V and 12.5V at 3A so I am a little short on amperage. It also indicates more testing and volume adjustment can be done using 14V - 15V but I do not have any type of equipment that provides this output. I was able to easily free the lock nut and adjusting screw and test from one end of the range to the other. The best sound I could get was a some what mid to high pitch "whaaaa". The car currently does not have carbs on it so I cannot run it but the battery tested at 12.57V and has no problem powering the low tone horn at full volume. With the help of my wife I measured the voltage at the high tone connector and a good ground. With the horn button pressed and the low tone horn giving off full sound, I was getting 11.10V at the high tone horn connector. For a comparison I tested the voltage at the low tone horn connector while unplugged, with the horn button pressed and it gave 12.31V. Intrigued I went back to the high tone connector, this time with the low tone horn unplugged and it gave 12.31V with the horn button pressed. So it appears both horns are getting equal power and my issue is with the horn itself. I see the gaskets are made of paper but I am sure they are a certain thickness as they are part of what is essentially an electric musical instrument. Granted one that only plays one note. At this point, sourcing another high tone horn or just running a set of aftermarket horns is going to be the easiest route. Once I find out more on the gaskets maybe I can take a shot at rebuilding the horn and possibly restore both. Any other ideas or suggestions are welcome.
-
Thank you Namerow! You are correct, in my 1971 FSM it is page BE-23. I will work it some tomorrow after work. In addition to tuning, I think some clean up is in order. Unsure if I want to take it apart since the gaskets are not available but I will see I can get some of the red paint off. It deserves it!
-
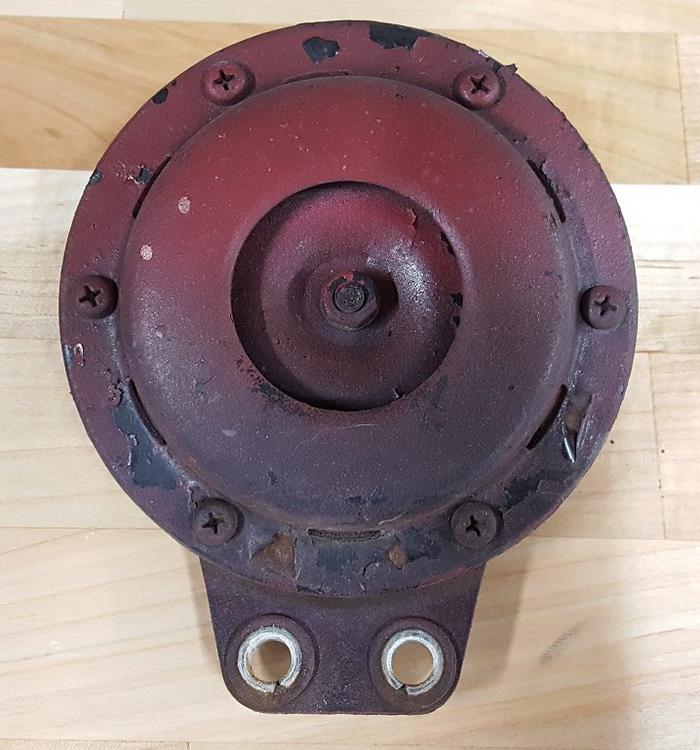
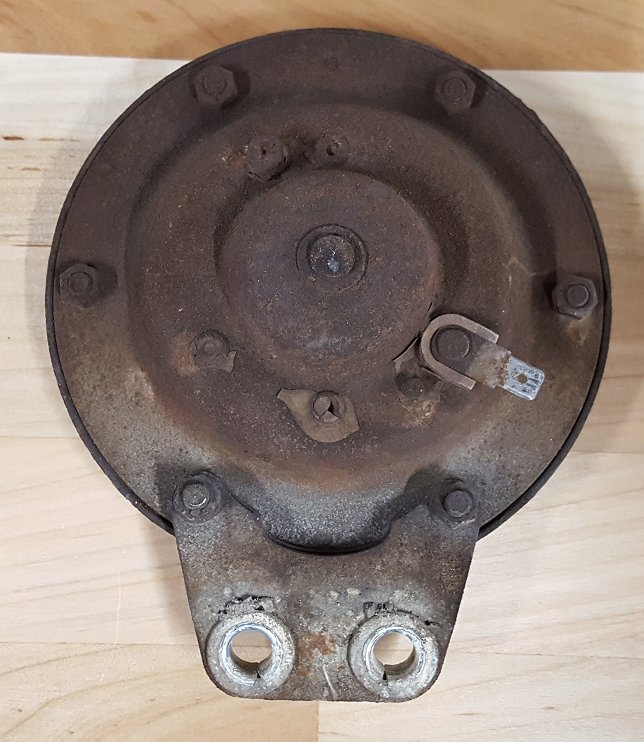
After a little trouble shooting I got the horn system working on my 1972 240z. The low tone horn works fine but when I isolate the high tone horn it just makes a "dink" sound when the horn button is pushed. It is obviously getting power so I pulled the horn off for a better visual inspection. It has some over spray on it from when the car was painted but it is not damaged or rusted. I have read several articles on rebuilding them but can see the gaskets and hardware are no longer available for them. Is there any other tests I can perform to make it work before taking it apart?
-
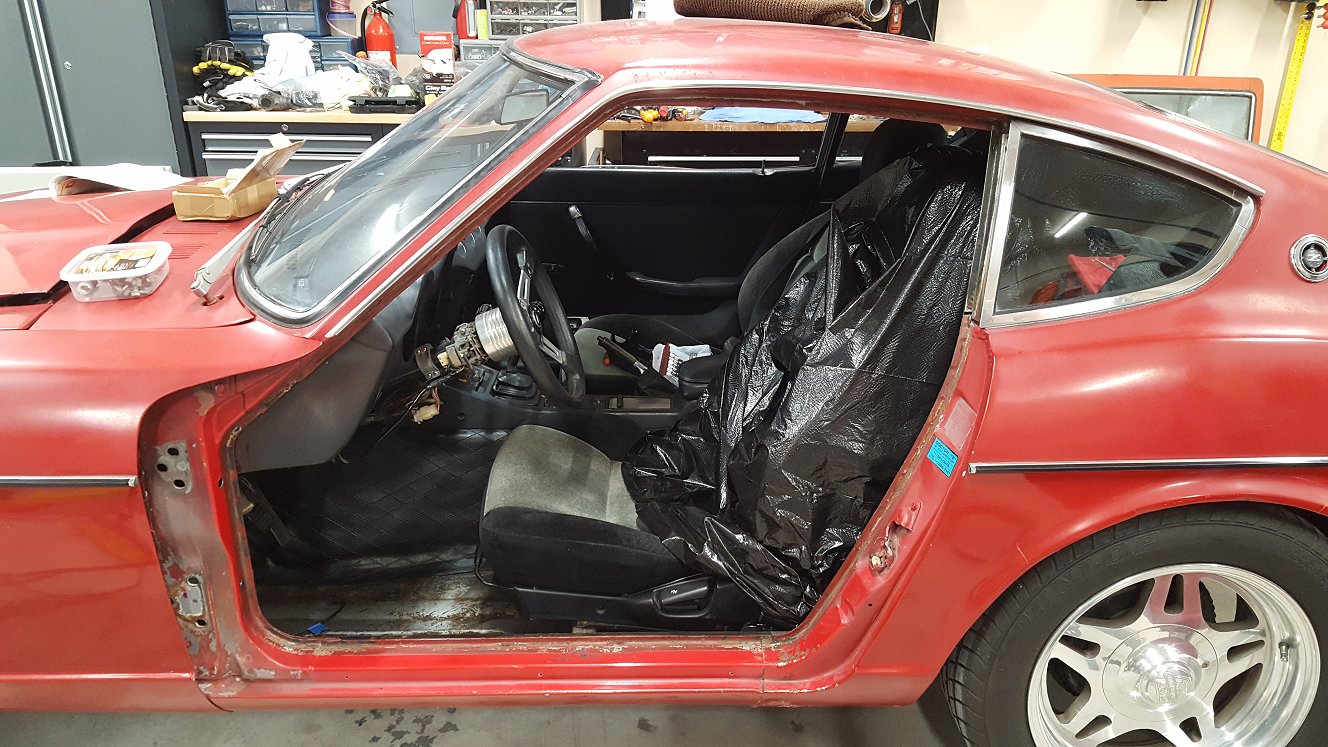
With the door completely out of the way, now was the best time to attack the weatherstripping. Some patience and persistence is getting off. The outer strip is petrified like it was subjected to a lot of heat and just hardened. The thin rubber covering the pinch weld is still soft and easily pulls away in some sections. Luckily everything appears to be in good order so far. I have some universal weatherstrip that I will be installing. Once I finish the removal and clean up I will provide more details on it.

-
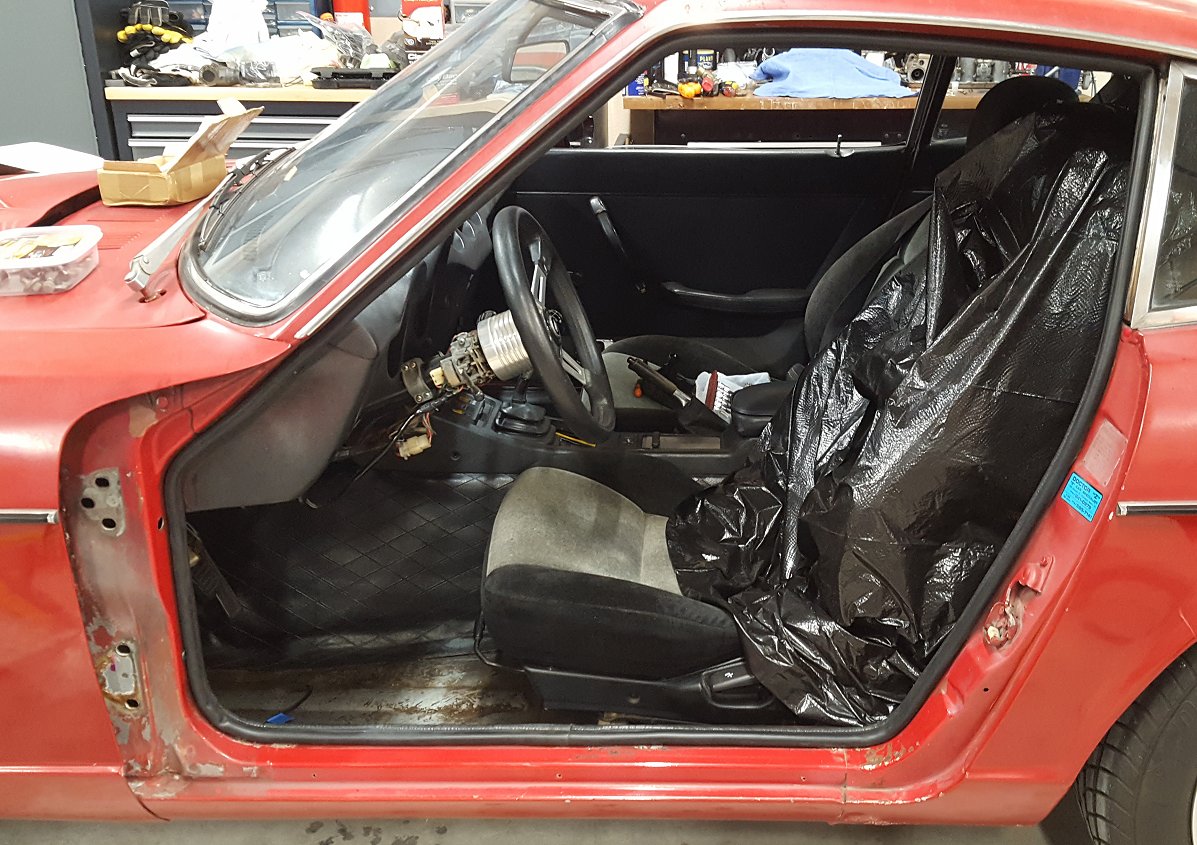
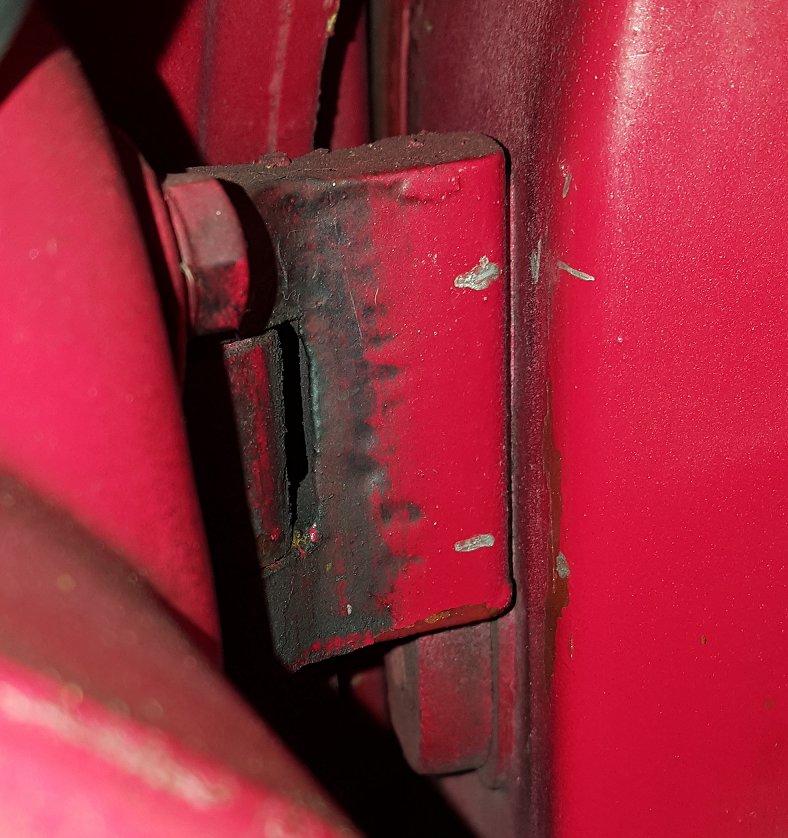
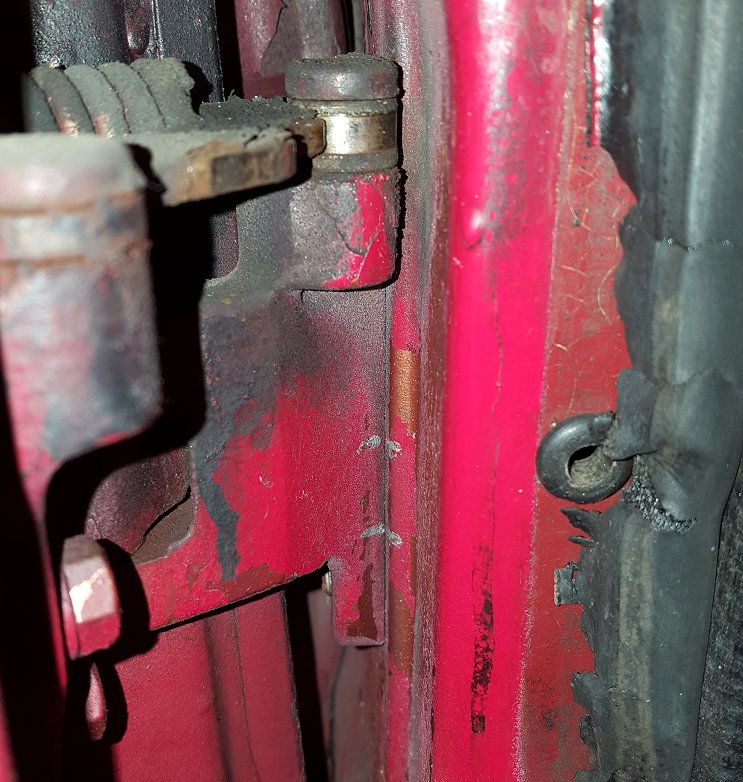
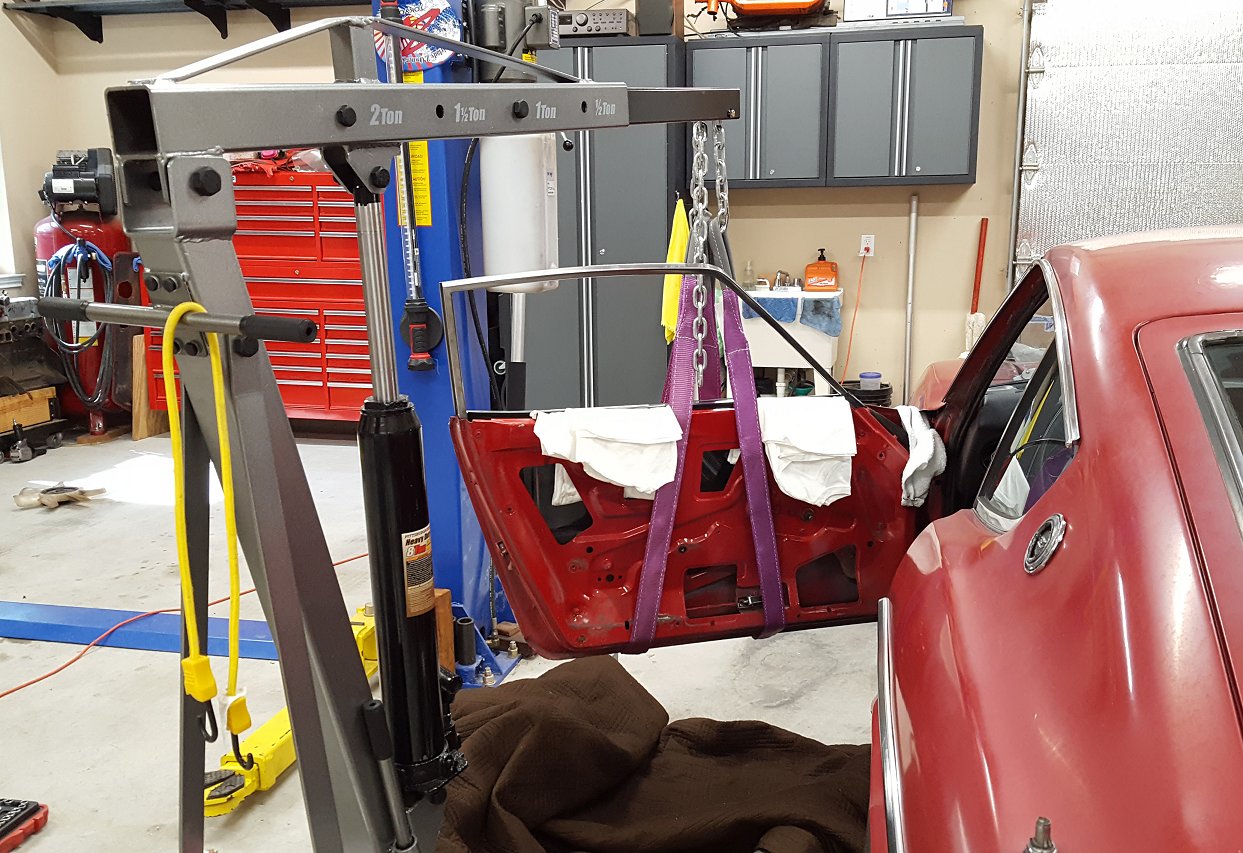
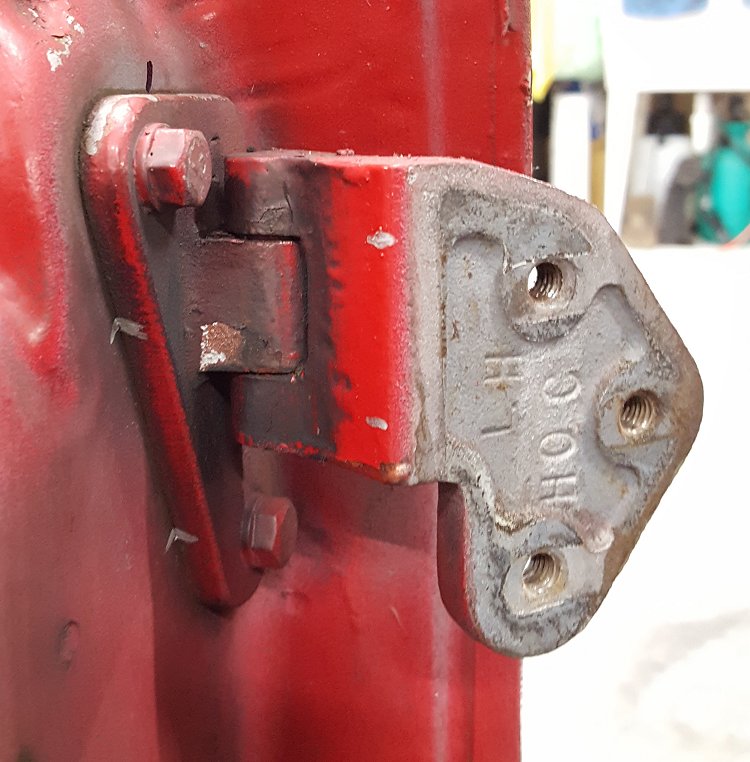
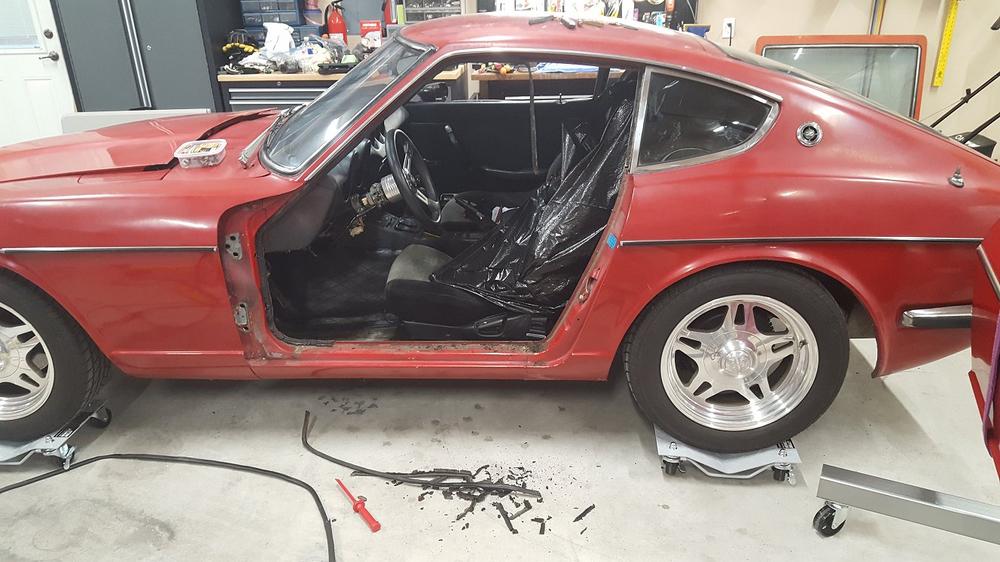
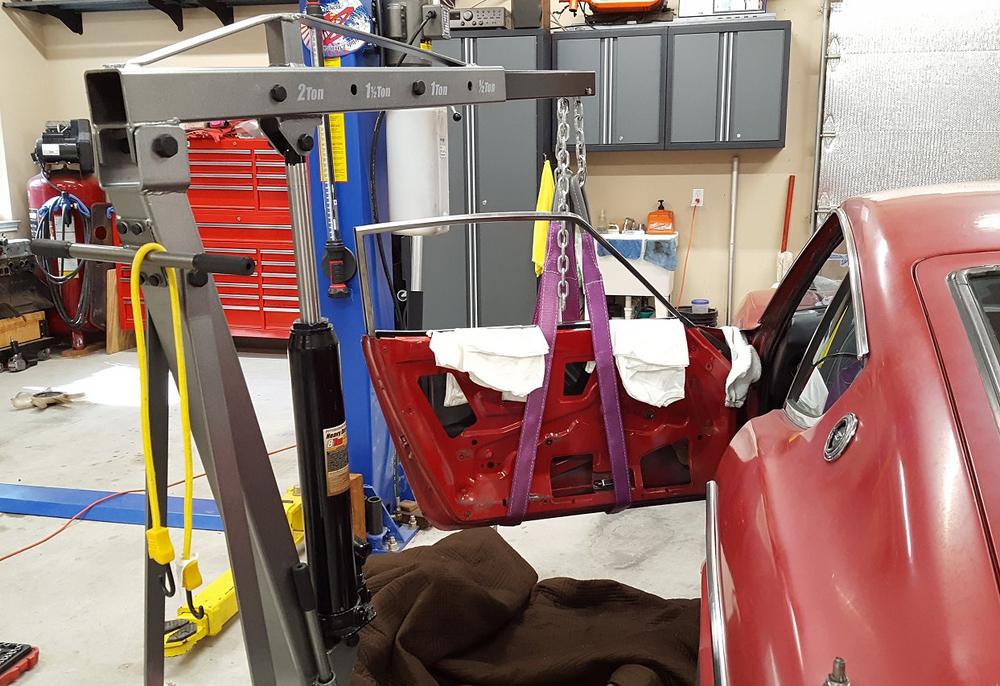
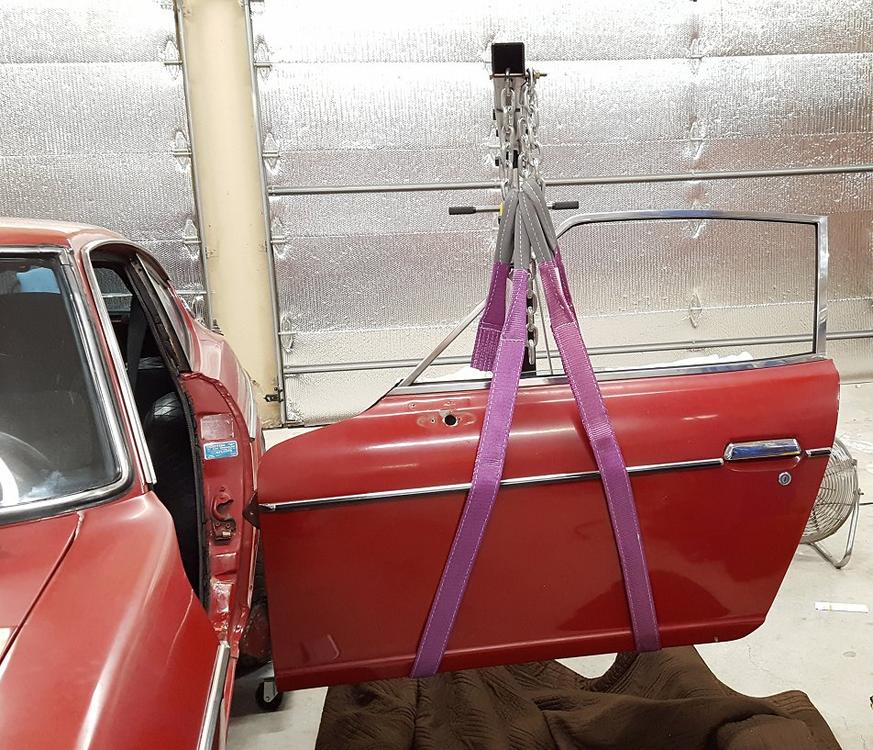
Instead of just waiting around for the carb parts I started addressing the worn out driver side door hinges. When I bought the car I knew this was a big item on my to-do list so no time like the present. The pictures below give an idea just how bad it is. I had removed the door panel and outside mirror as I wanted both sides free of obstructions. Using a silver sharpie I made some marks on the hinges where they met the body. I know these won't survive the rebuild process so I go back over them with a scratch awl or possible make some slight marks with my Dremel tool. I placed some old t-shirts in between the glass and the door just to protect it. Using my engine hoist, a pair of straps, and a chain I supported the weight of the door while I unbolted it from the car. The bolts came out and the door gently swung away from the car once it was free. Before I unbolted the hinges from the door I made the same type of alignment marks. Once they are made in a slightly more permanent fashion they should provide an excellent reference point when I re-mount the door. With any luck it might be spot on. I found this write up on rebuilding the hinges http://atlanticz.ca/zclub/techtips/body/doorhinge/index.htm I am not a fan of the large nail head sticking up by using the Nissan pin so I have ordered some rebuild kits that use a new original style pin along with new brass bushings. They should be here in a few weeks.


-
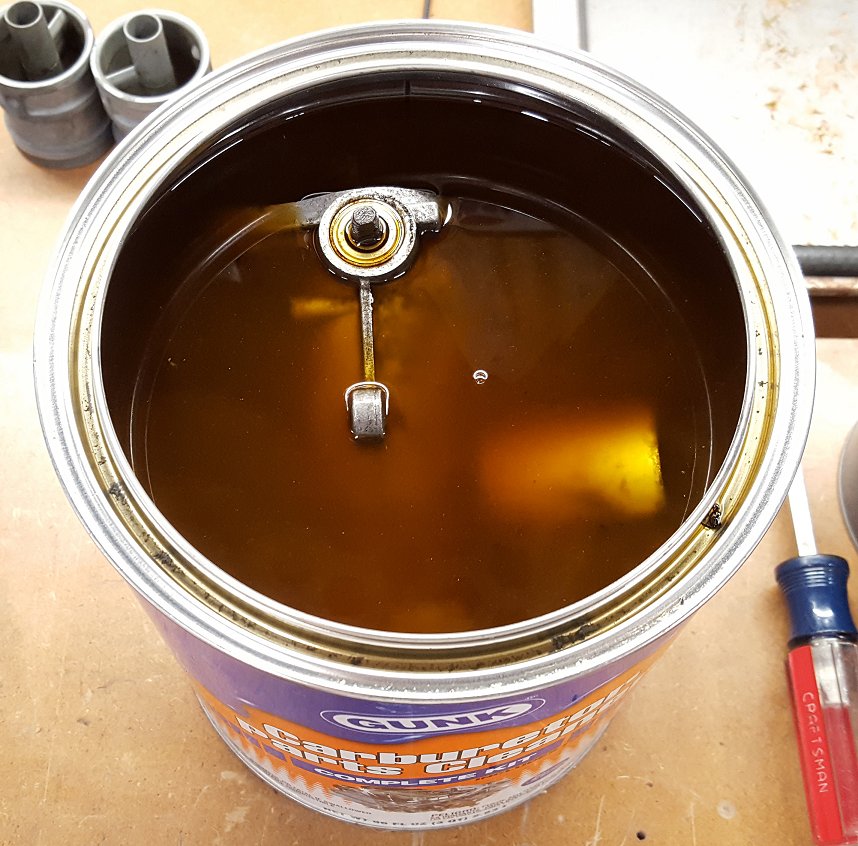
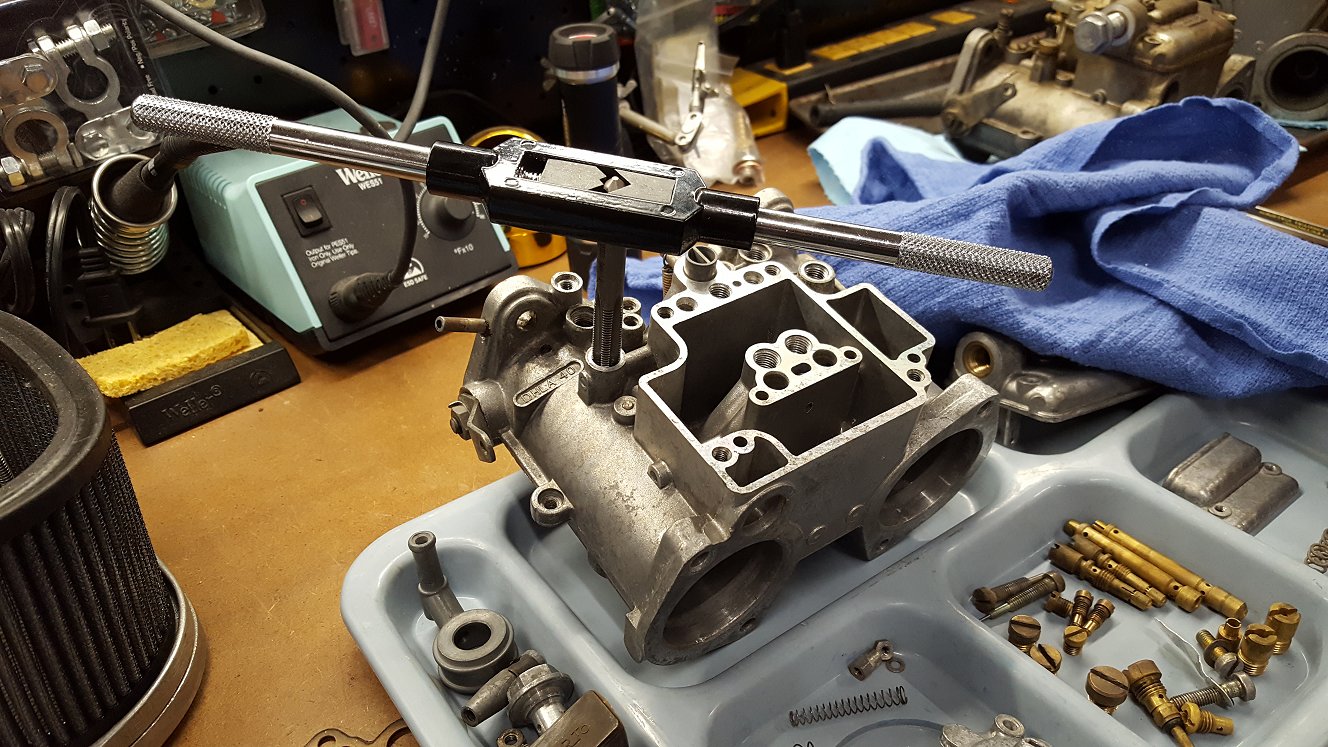
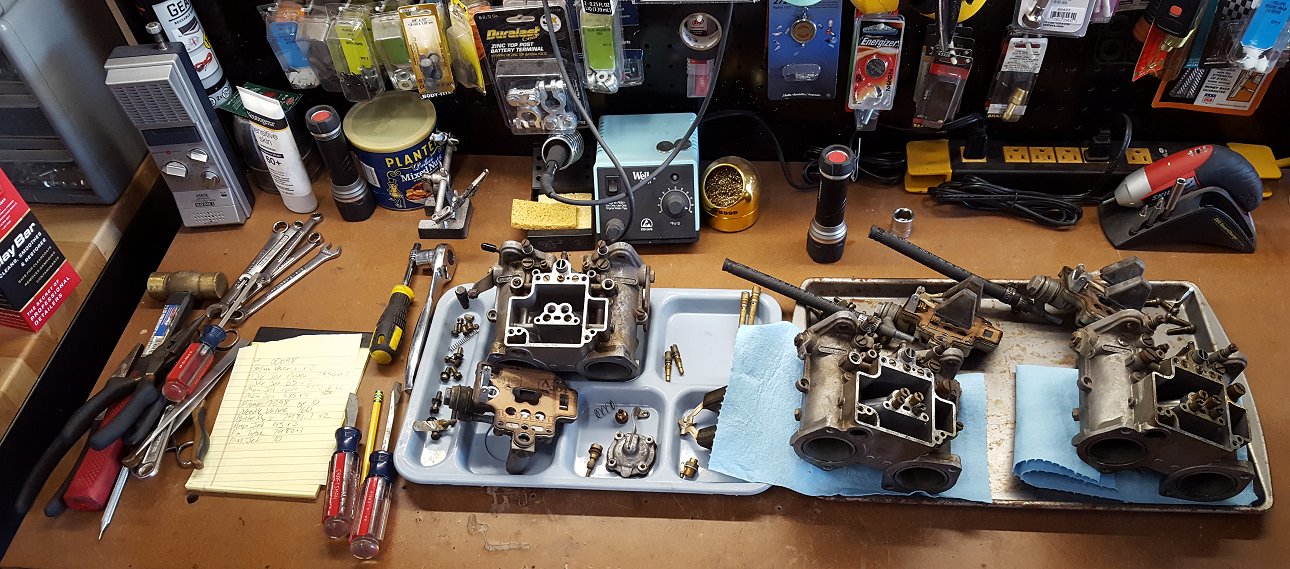
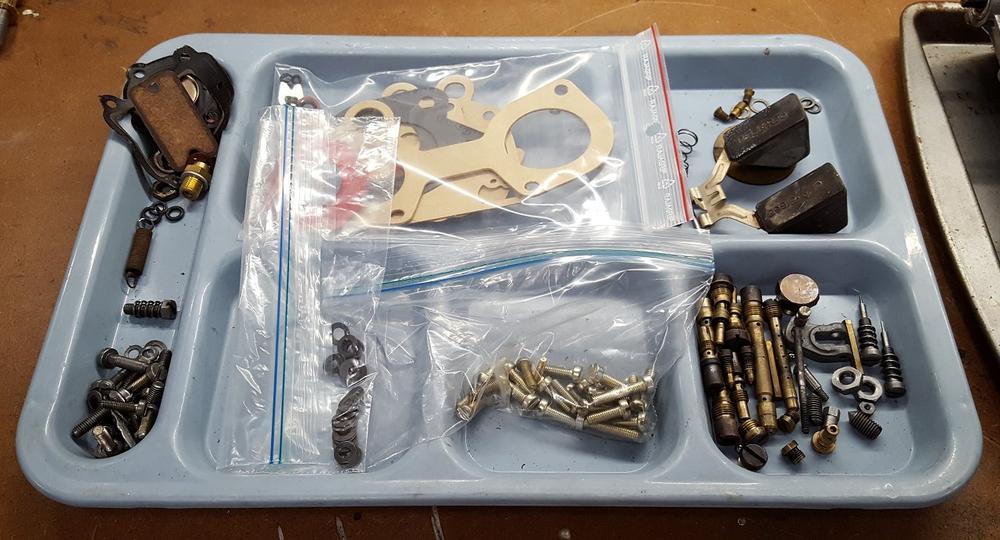
Got a few updates worth mentioning. I picked up a carb parts cleaner and the body and aluminum components soak overnight. The one gallon pale is just big enough to work the main body of the carb in to. A quick clean up with warm water and compressed air yielded really good results. I am going to try and clean off some of the other mild staining with some fine steel wool. All of the jets, fasteners, and other hardware went in for a few hours in the basket that was included with the carb cleaner. Again, after a warm water rinse and blow out things look pretty nice. I received the rebuild kits from Italy earlier this week but unfortunately the new screws and spring washers did not make it in to the box. The seller has already shipped them to me but now its just a waiting game. I could use the old screws but the new ones will make it pretty and I actually need one new screw to replace one where a bolt had been used in its place. I will cover more of the actual assembly later on. I am leaving the other two carbs assembled so I have them to reference when I put everything back together.

-
I will add my .02 to this. The seller is Robert Jackson, a dealer in Oklahoma. He is on FB and posts on all the Datsun Z pages about what he is working on and about to put up for auction. He is a dealer and has like 8 or 9 240z's. He sold a blue w/white interior car several months ago for around $27K. I spoke to him about it after the sale and he indicated he lost money on it. $38K for the silver 240z seems good but also fair. Not too long ago a very correct nut and bolt restored 240z went for $60K at an auction in Hungary so $38K for a not so correct but ready to enjoy 240z seems right. I watch the market all the time, BAT, eBay, CL, FB, etc. Prices are going up but supply is starting to meet demand at the lower and mid price levels. However, really well restored cars do not come up that often and Robert's silver car checks a lot of boxes for a lot of people. I don't agree with everything they did but it was what it was and was well documented. Based on all the pictures he provided he and his crew did a ton of work to that car. At the end of the day the right buyer bought the car and paid what he thought it was worth. From "looking to the future" standpoint, these kinds of prices work in everyone's favor. More cars will continue to come to market at all price levels (remember, cash is still king when you go hunting), current owners will continue to see their cars appreciate, and hopefully more parts will become available.
-
WOW! That is a ton of info! I see where the Weber and Dellortos have a lot in common due to their history. Unfortunately, none of the links at the bottom work, I get an error 404 when I click on them. I also did not see one for Dellortos.
-
The company that I had make them still has the tooling. If the demand was high enough again I could inquiry about having another run made. Hopefully it would be a little cheaper the second time around as I do not have to pay for the tooling to be made.
-
That is excellent work Namerow! Now that you have the buck made, how long does it take you to make one clip? Looks like you might have a side gig there. Thank you for sharing!
-
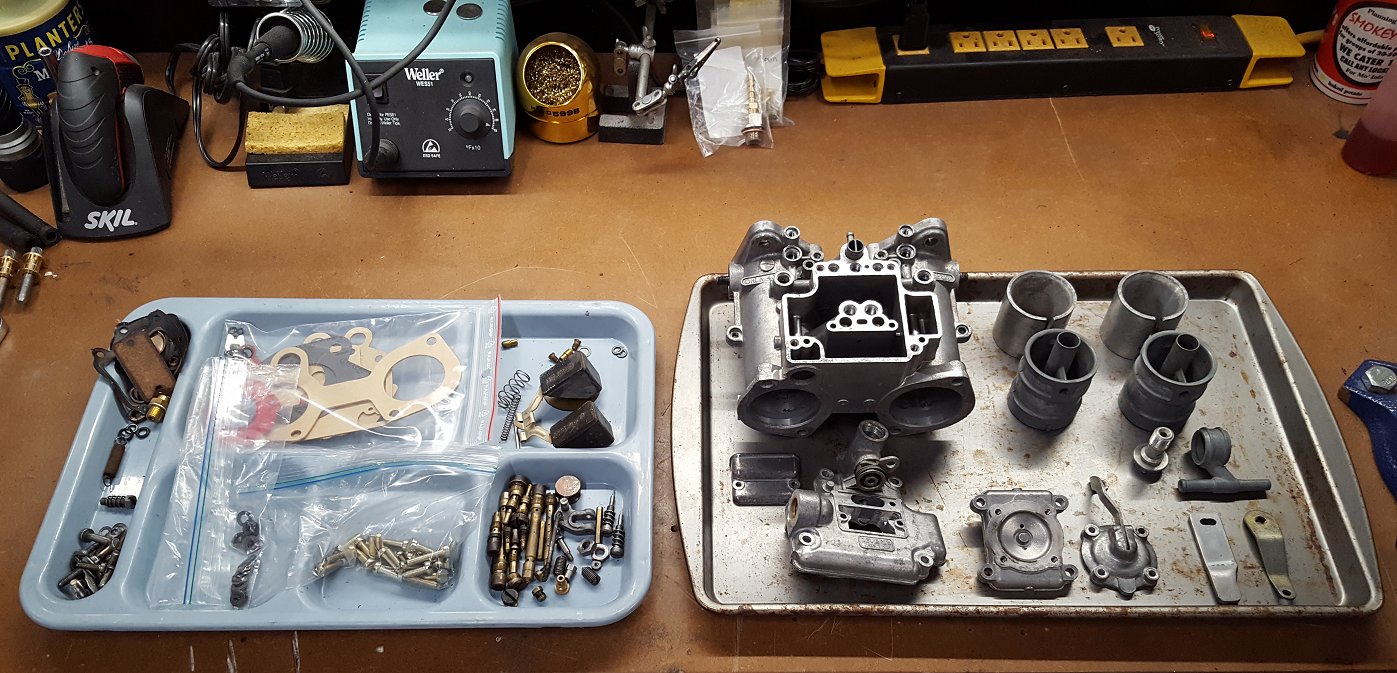
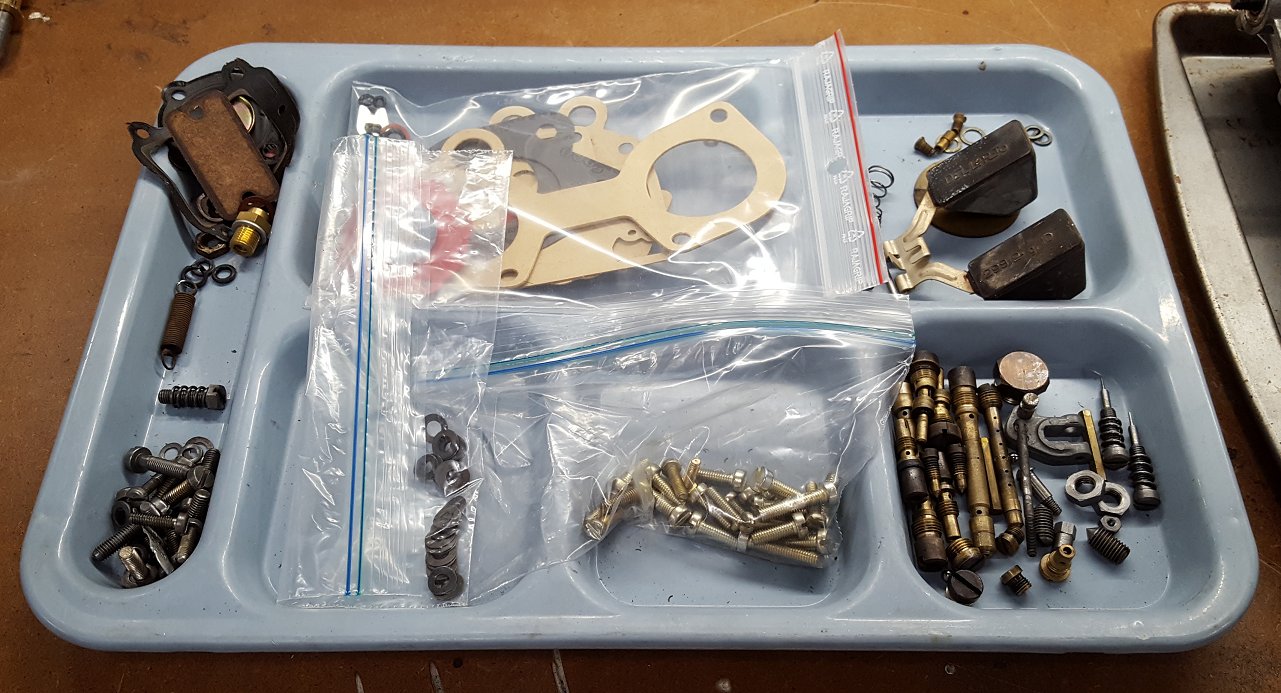
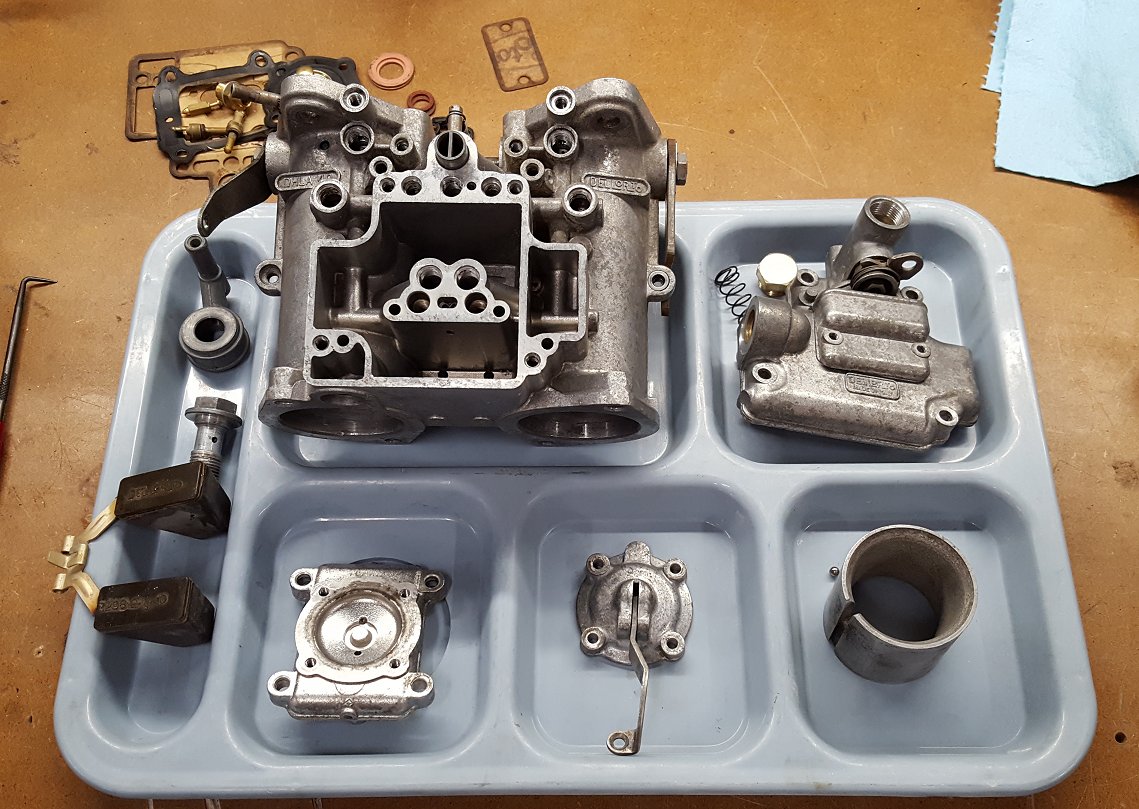
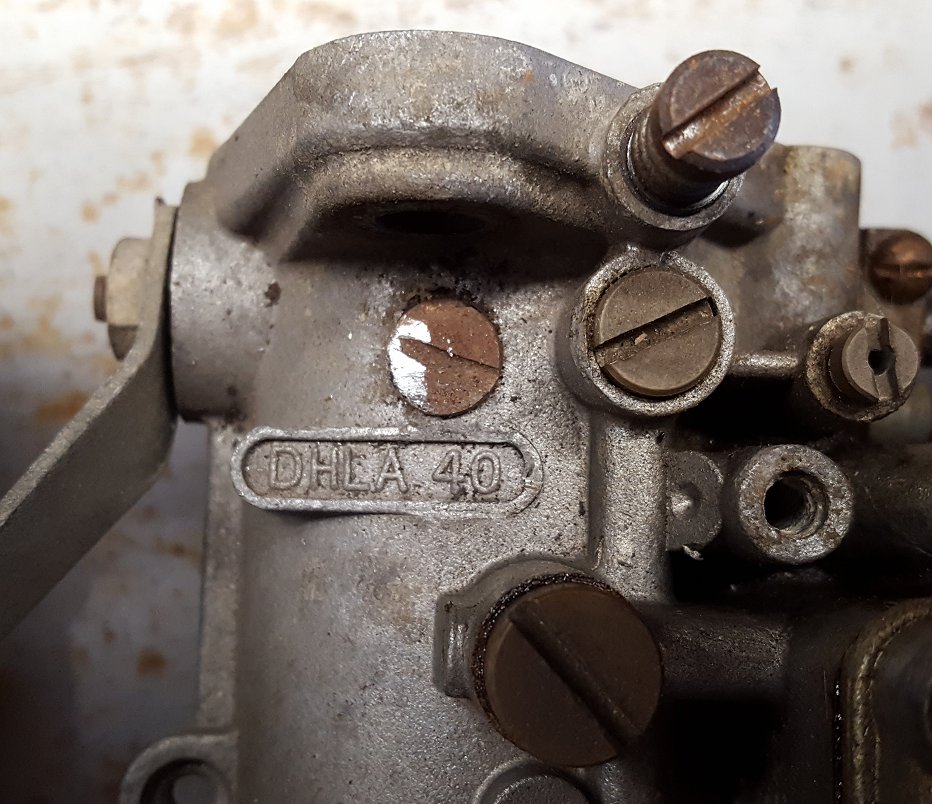
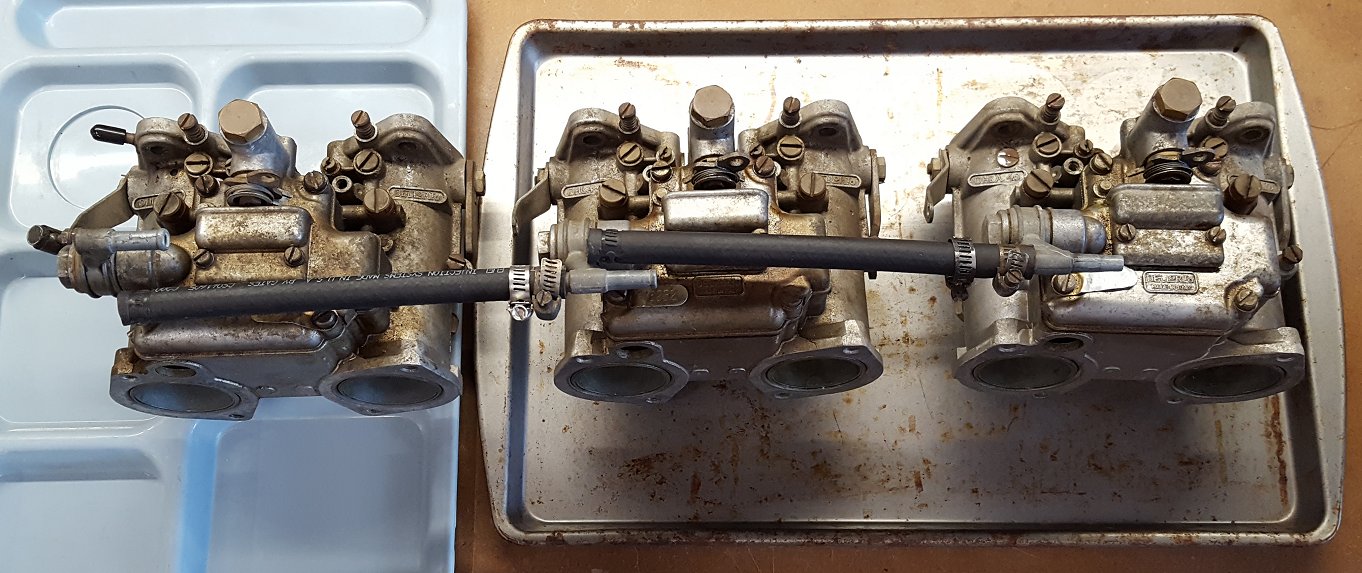
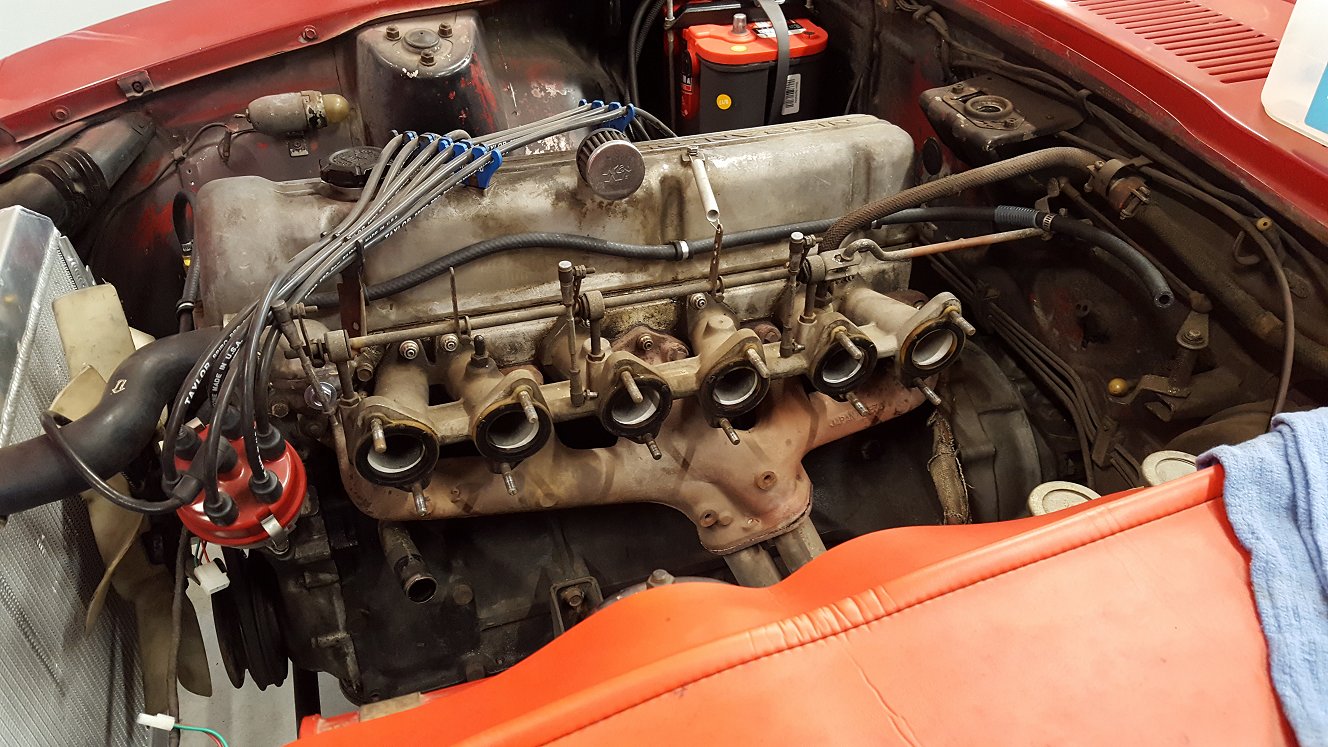
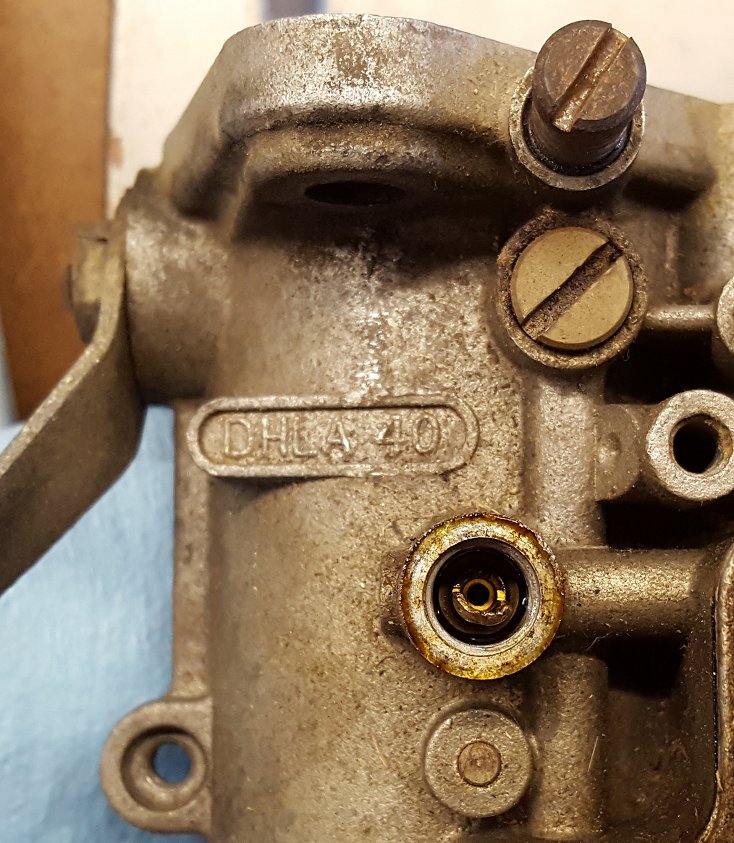
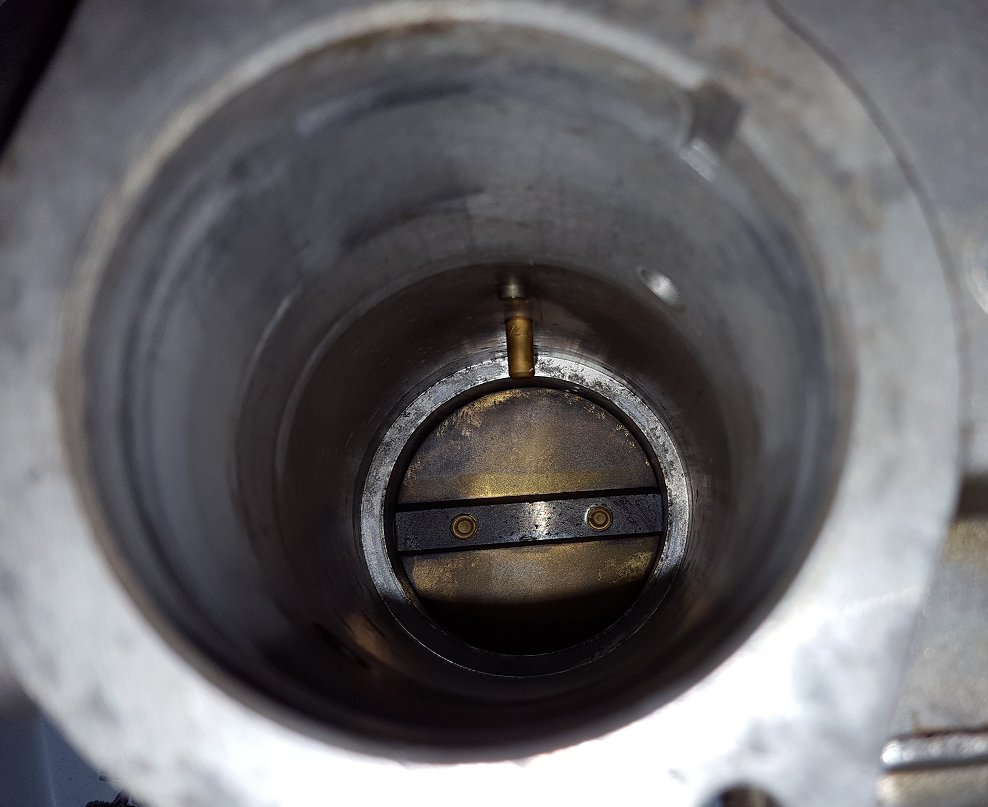
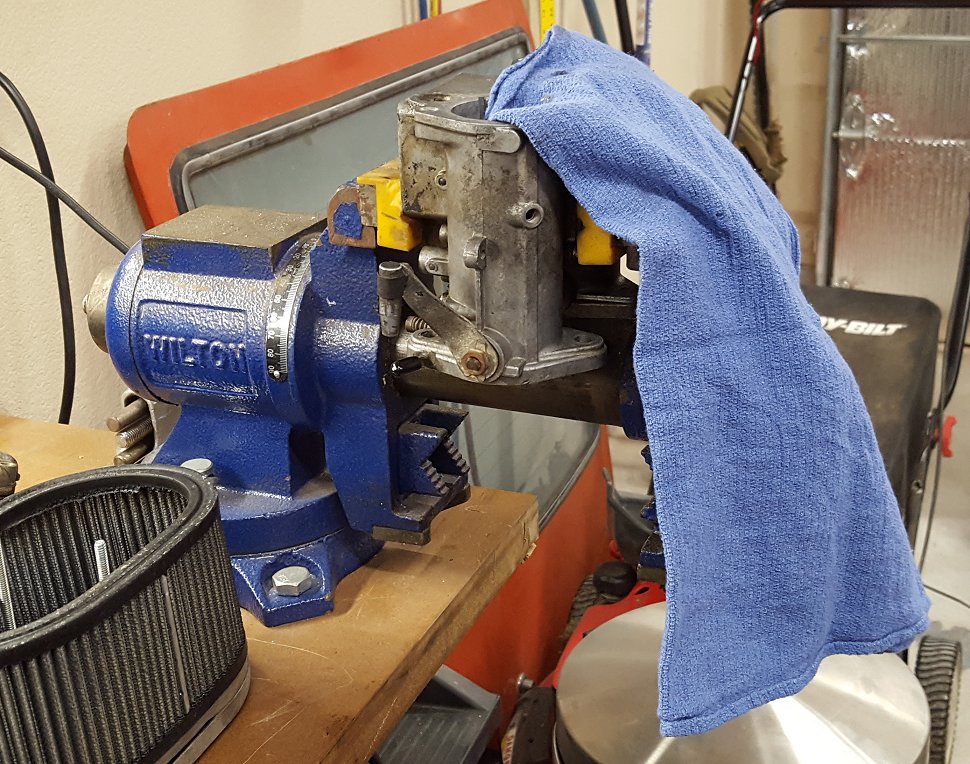
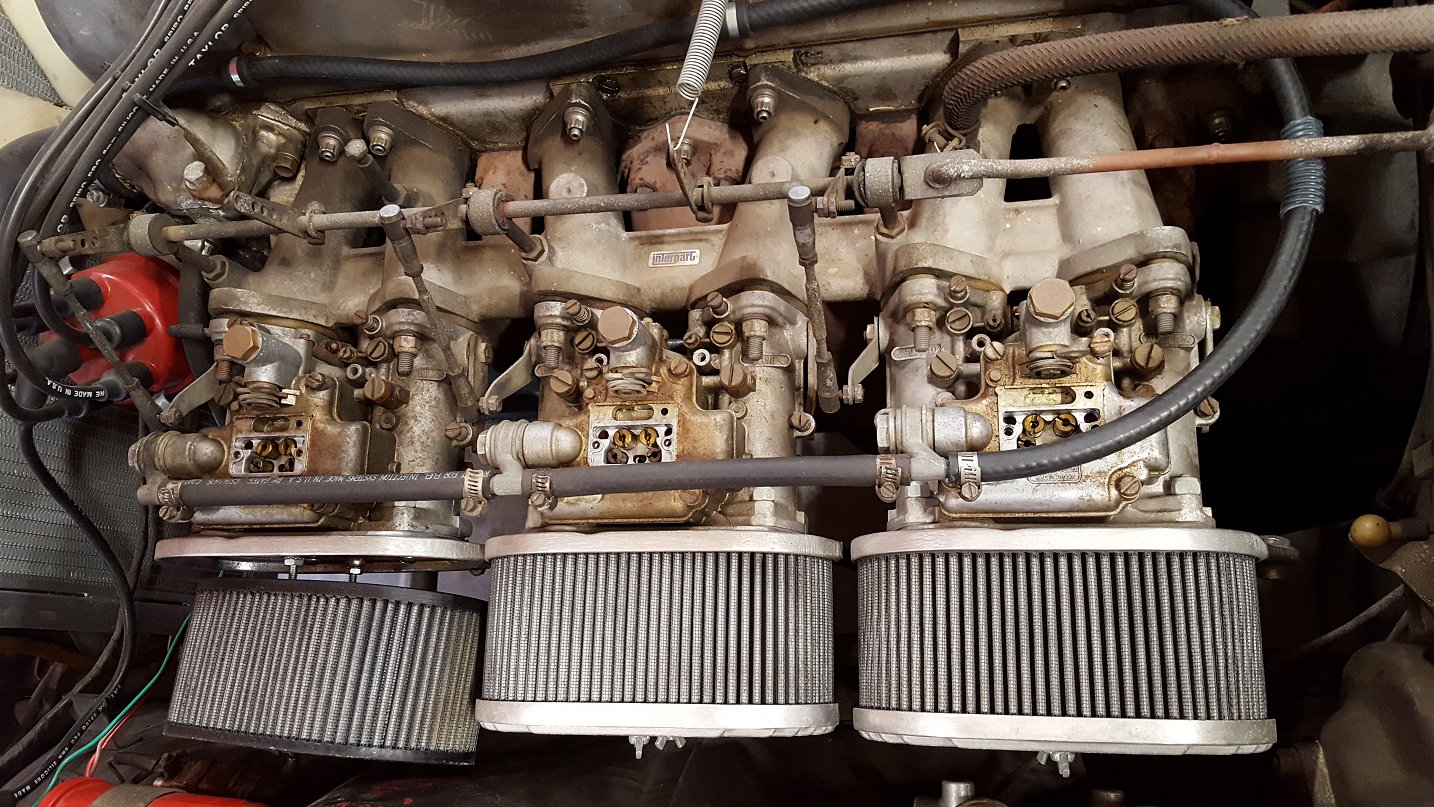
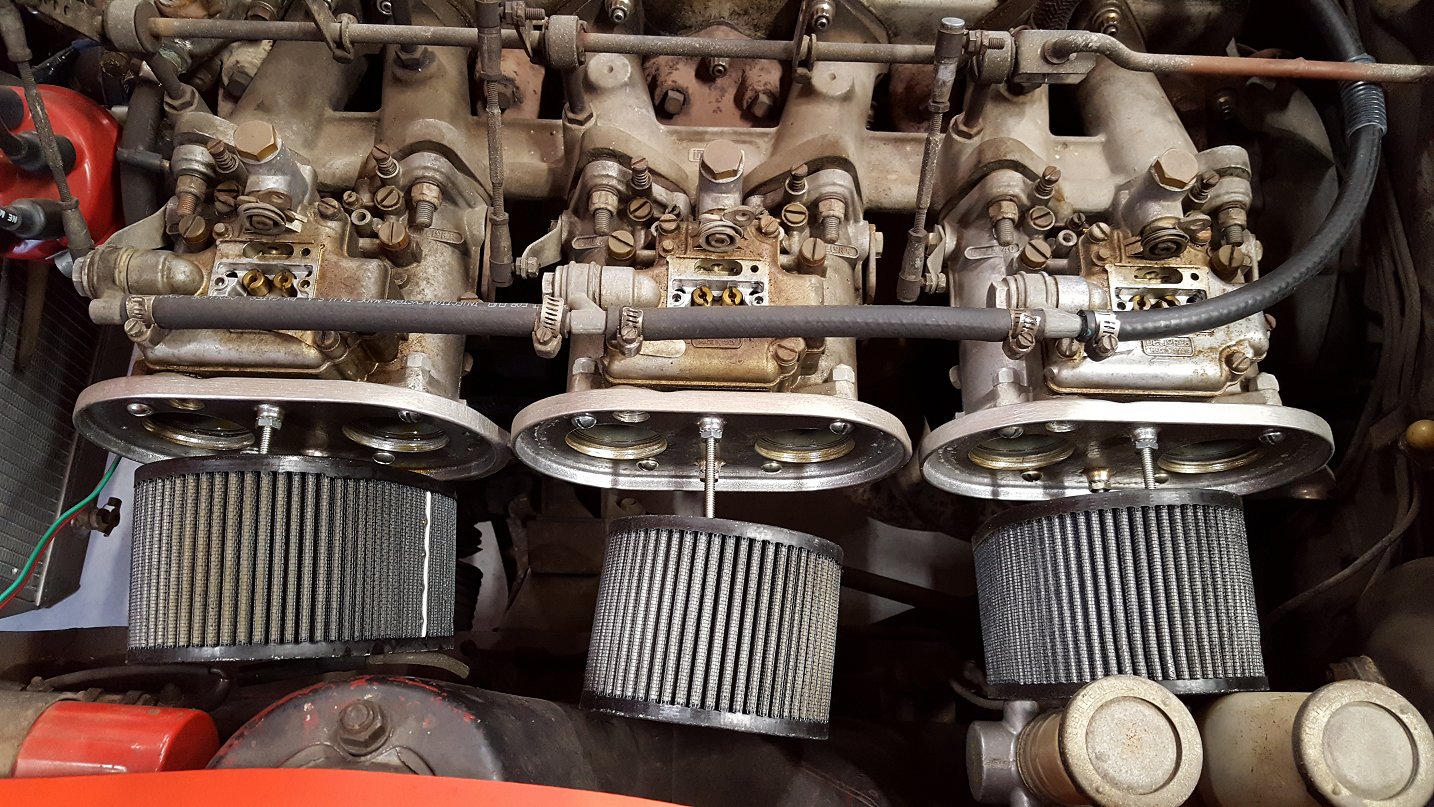
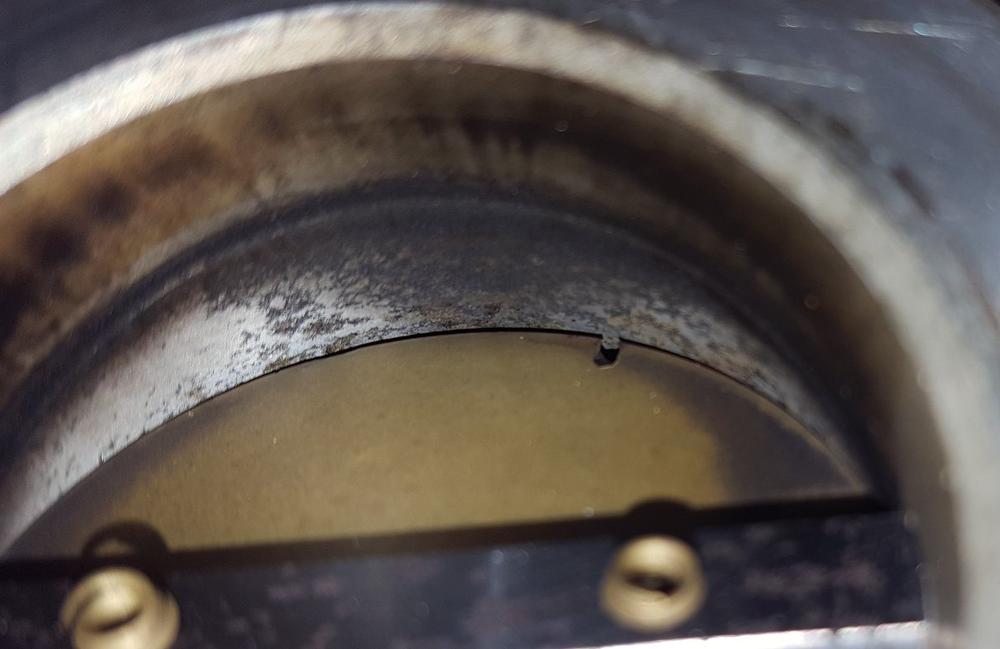
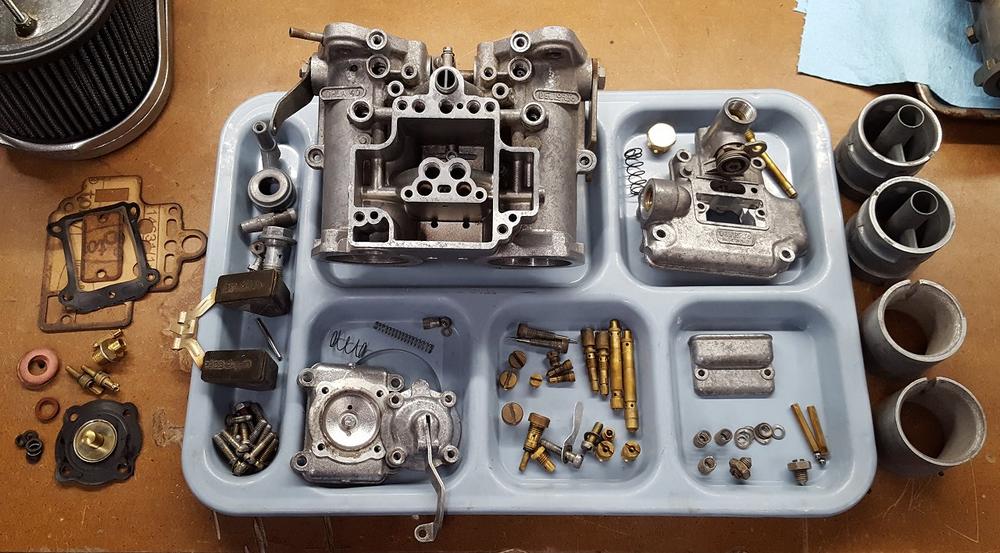
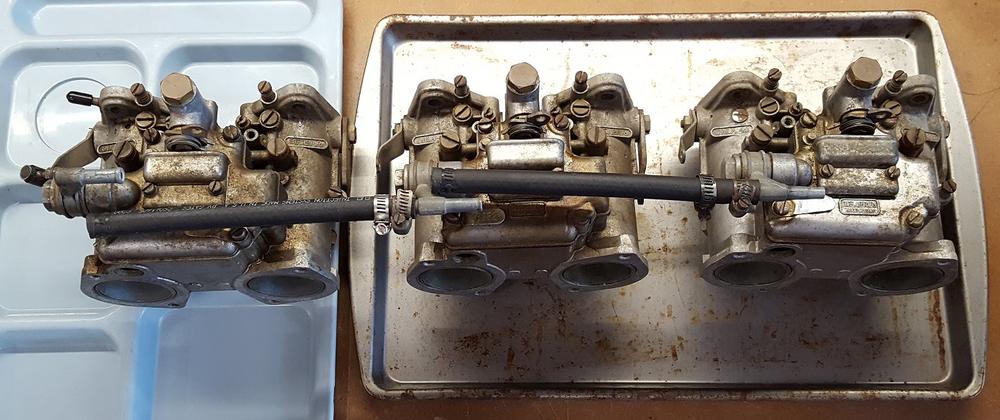
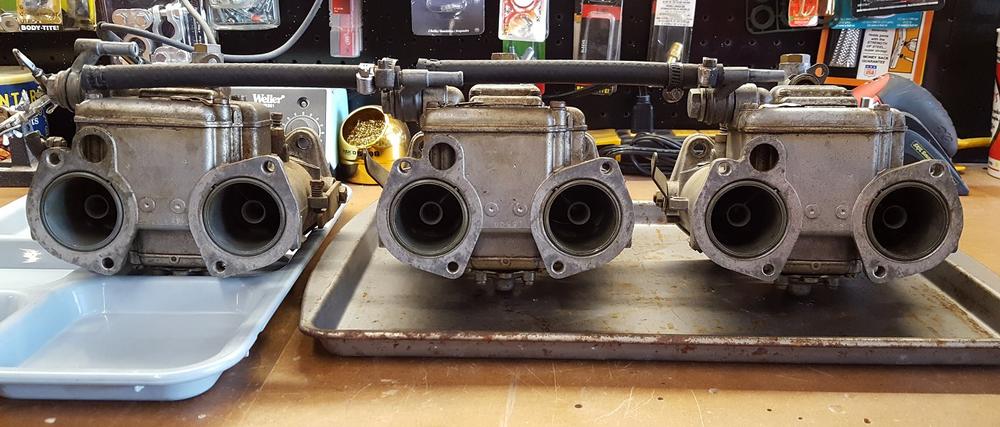
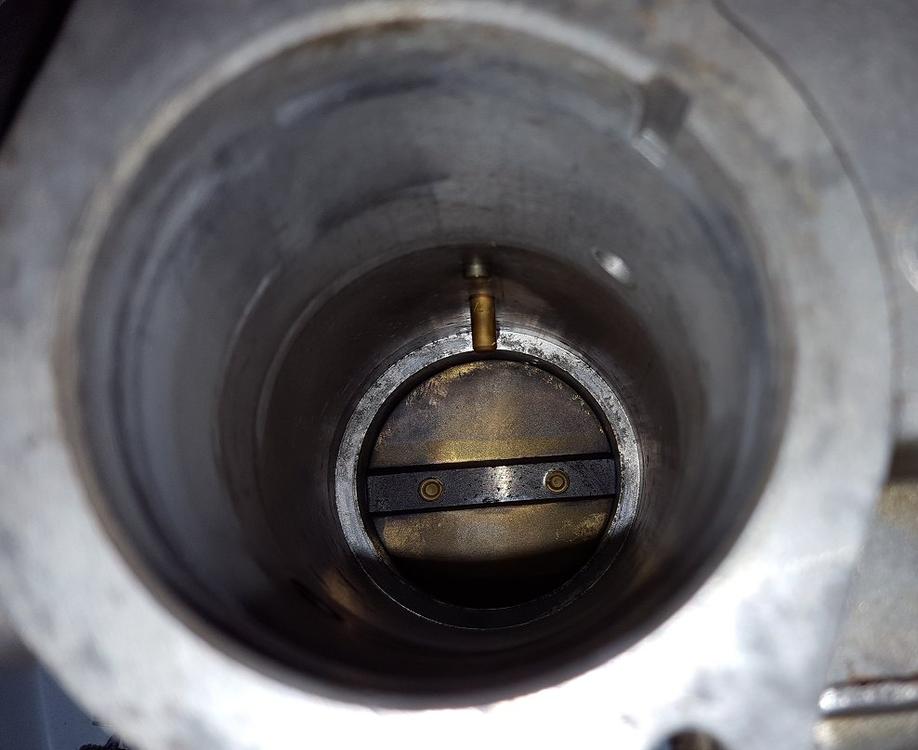
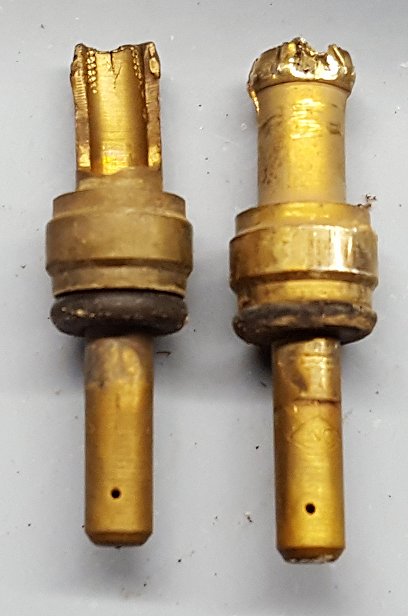
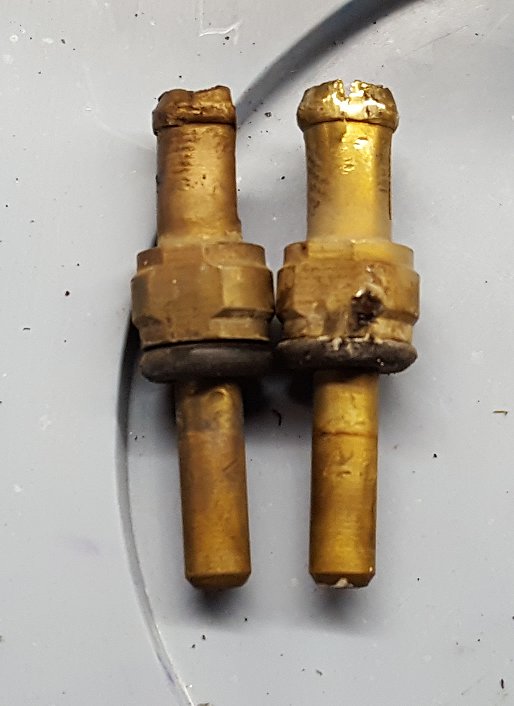
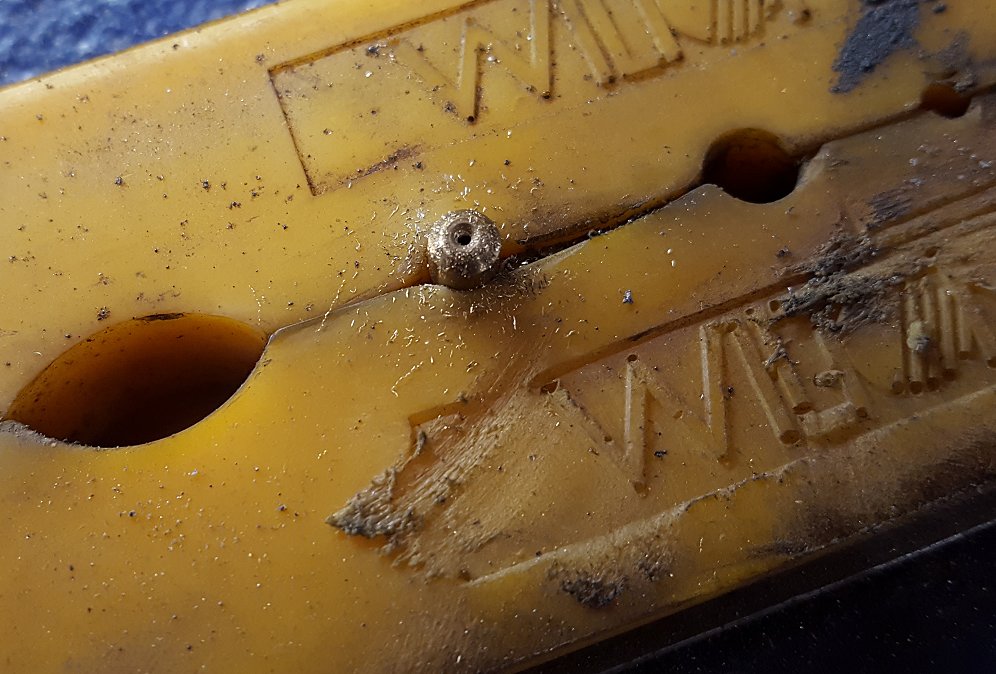
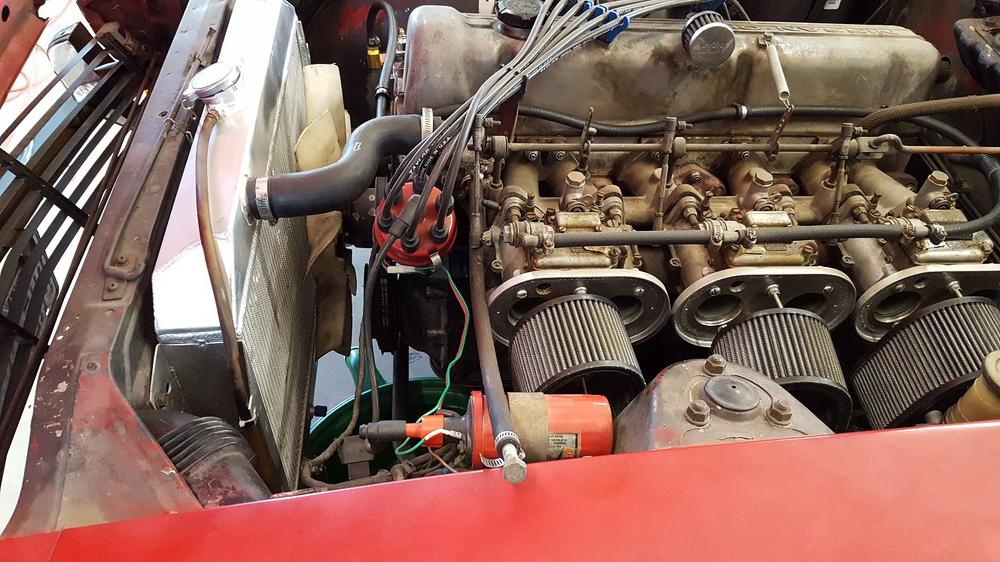
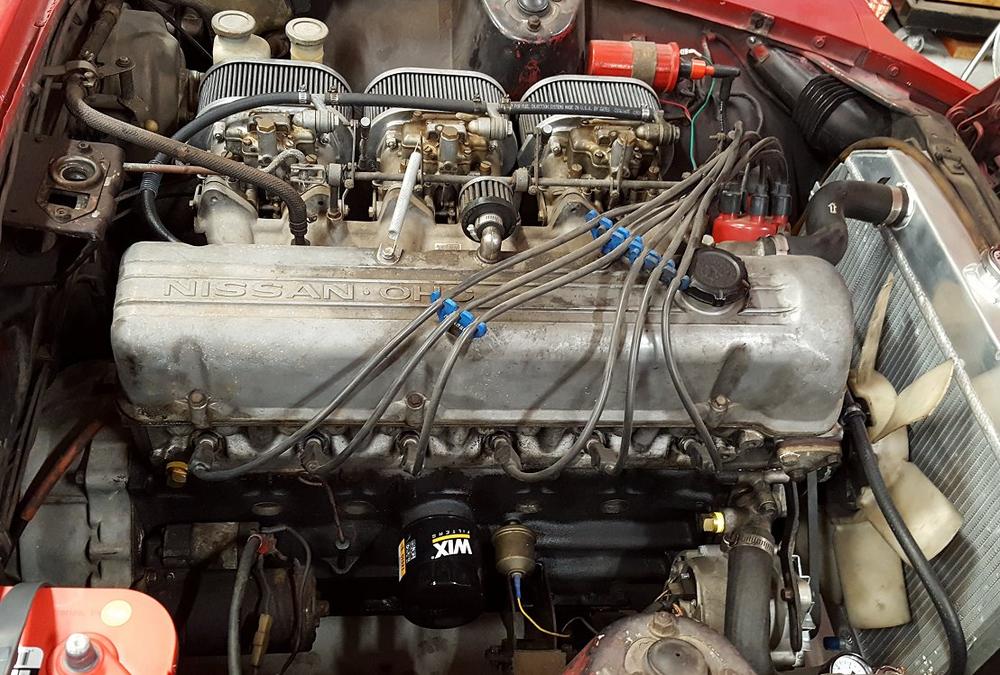
Since the car has sat for some time and I had noticed while under the car that the center carb had fuel leaking from the accelerator pump, I figured a rebuild of all three carbs was in order along with some larger idle jets. However, before ordering anything I wanted to take a full inventory of all the jets, tubes, valves, and other components in the carbs. This will give me a baseline and keep me from ordering duplicates of what I already have. Like any good project manager, you document everything. An Excel spreadsheet would do nicely! With the carbs off a visual inspection could begin. Right away I noticed something odd on the #3 carb that could not be seen well when they were installed. A flat head screw that does not exist on the other two. I am still investigating why it is there before I try to remove it. In the picture below you can see the oil pan drain plug installed in the side of the thermostat housing. Next I disassembled one carb completely and left it as-is. As I disassembled the other two I put some components back on so I would have a reference of how things go back together. I also took a lot of pictures and I have Dellorto book at my side. The good ol' interweb is a good reference too! As the inspection went on I found a major issue. On the left side bore of carbs 1 and 3, the pump jets were stuck in their holes. The jets have a small flat that is easy to miss but should become evident as the jet will not drop in to place in the carb body and the small brass cover will not go on. Some how, someone in the past screwed up here and managed to get the jet stuck. To make matters worse, someone realized this and tried to get them out but only made matters worse but destroying the top of the jet. I tried once or twice with some needle nose pliers but quickly determined that was not going to work so I walked away and posted up on my car club's Facebook site Capital Z of Texas and asked for help. A member named Joseph Chotiros suggested that I pull the venturi and chokes out to see if I could access the jet from inside. A quick turn of the wrench to remove the lock nut and screw and I could see the other side of the jet. I placed the body of the carb in my vise and protected the bore with a wrag as I used a pry to push it out. It took more force than I expected but it shot out and hit my peg board. The other carb was easier as once I pulled the venturi out a little the jet just fell out. Thankfully the holes in the body look okay but a new pair of jets will be on the parts list. Since these two jets were not facing the right way, this has probably added to or has possibly been the root cause of why the car had such high idle jets installed and still would not run right. Conversations with other 3x carb setup owners indicate I should not need such a high idle jet in the first place. I think a full clean and rebuild is in order along with two new pump jets installed correctly is a good place to start. I have a set of 60 idle jets and may try those and work my way down. If I discover I really need higher idle jets I will order some. I put the car on some vehicle dollies to free up the lift in case I need to use it while I am sorting all of this out. The findings and events of today were turned in to the spreadsheet below. That's all for now!


-
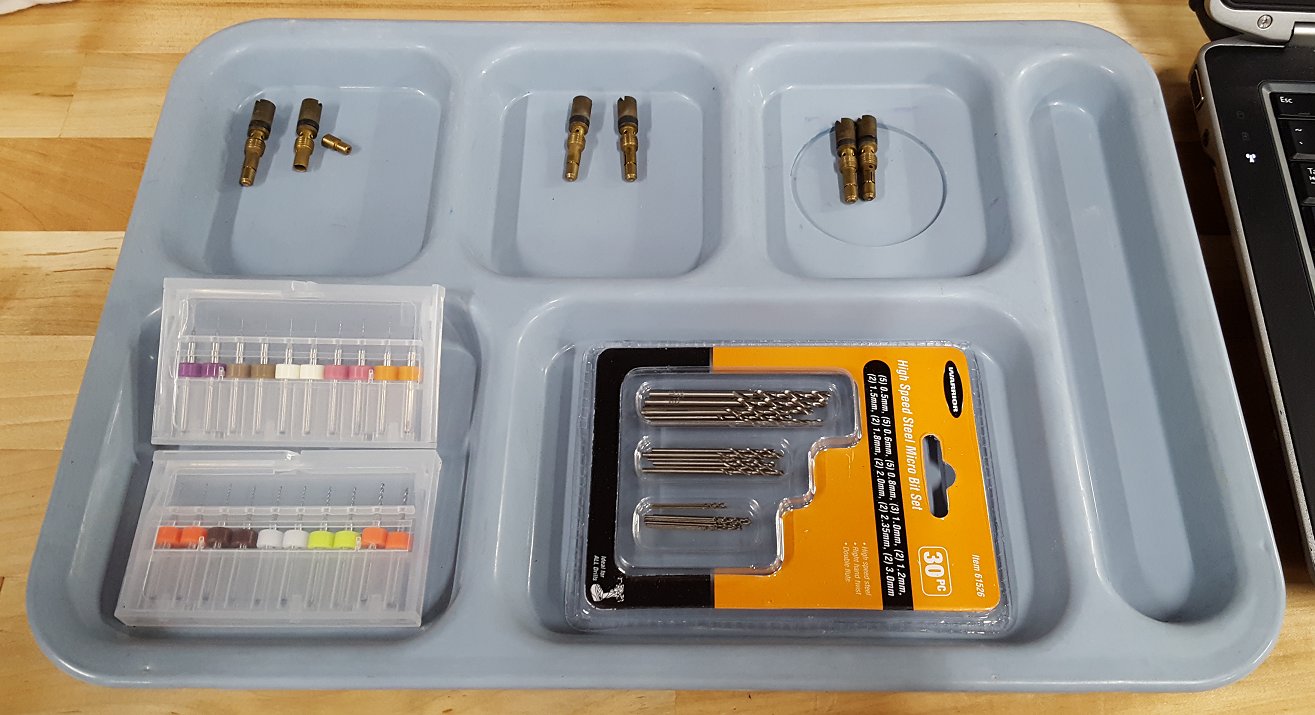
My replacement fuel pressure gauge arrived so I installed it and a quick test confirmed it was working properly. When I test drove the car and when I drove it home the power would break up and the carbs would cough really bad around 2700 - 3000 rpms. This pointed to the need to go up on the idle jets of the Dellortos. The previous owner gave me several bags of jets that were all labeled and we both felt confident moving up to the next size should do the trick. So I decided to dive in to the carbs and see if I could cure the carb coughing and power break up. I pulled the idle jet holders out and saw they were 65's. A quick check of all the baggies revealed the biggest idle jets were already in the carbs. Some online research showed the ability to drill the jets using micro drill bits. A quick trip to Harbor Freight yielded two sets of bits. I ended using the ones in the plastic case since they had a 1/8 shank. I use an old school lunch tray to keep everything organized. Using my variable speed rotary tool on LOW I drilled teh jets using the smallest bit that just bit in to the brass. After re-installing them the car would not only idle well but I could smell raw fuel. I think the drilling of the jets was too big of a leap for the carbs. I went ahead and pulled the other two air cleaners away and could see the front and center carbs had fuel flowing out of their bores. At first I thought it was a pressure issue and turned the pressure down from 3psi to 2psi but that did not help. Since the front carb was leaking the worse I pulled the top cover and tested the needle valve. Using a vacuum tested connected to the fuel port, under vacuum and at full upward pressure of the floats, it would seal and hold. However, just the slightest drop would cause it to let go. I tried cleaning the seal with some brake cleaner but to no avail.


-
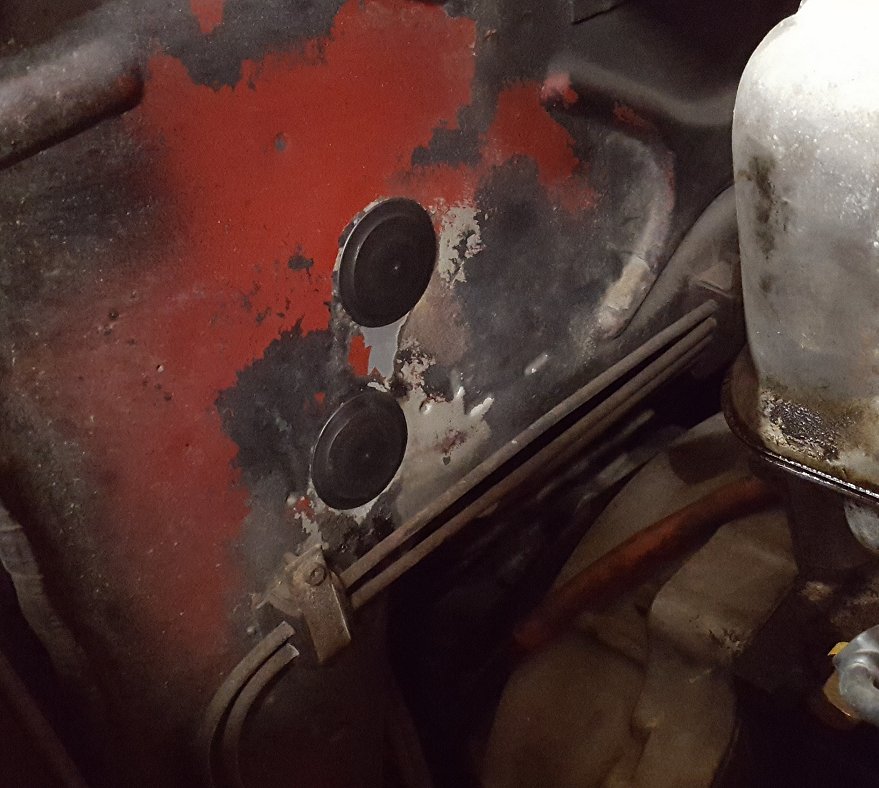
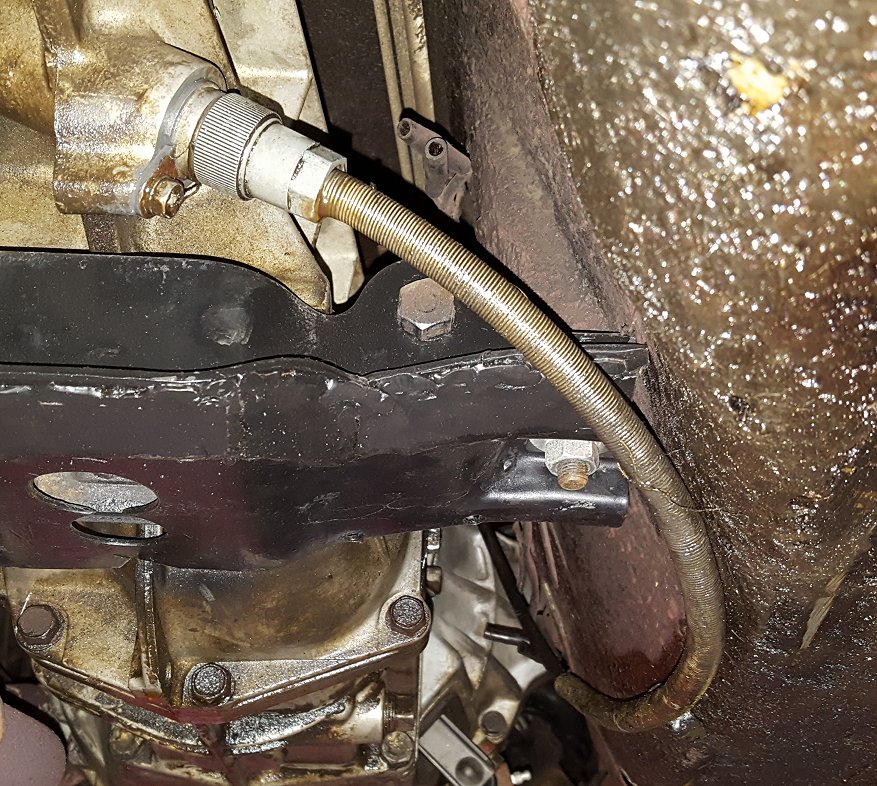
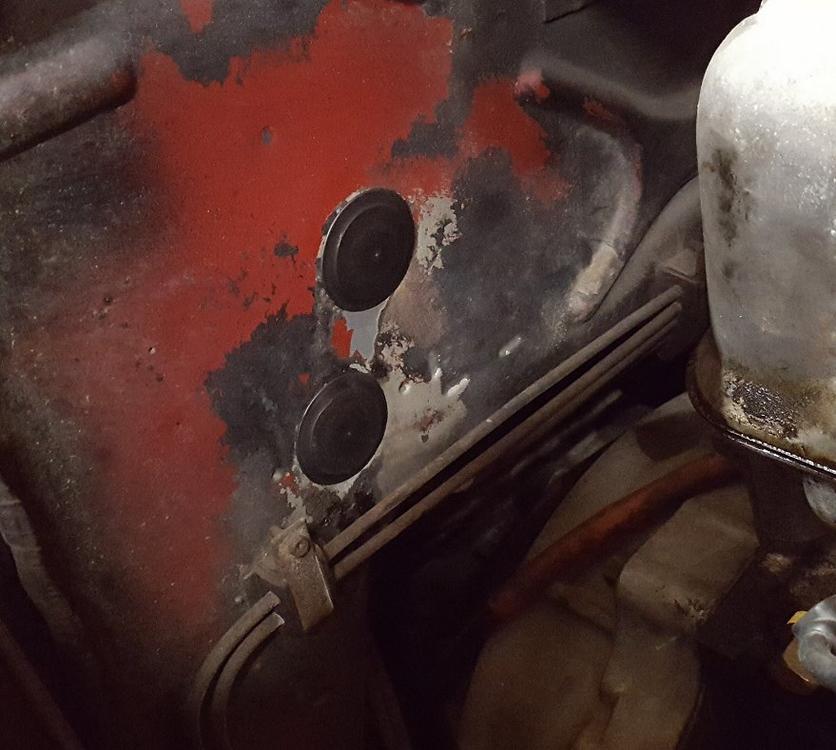
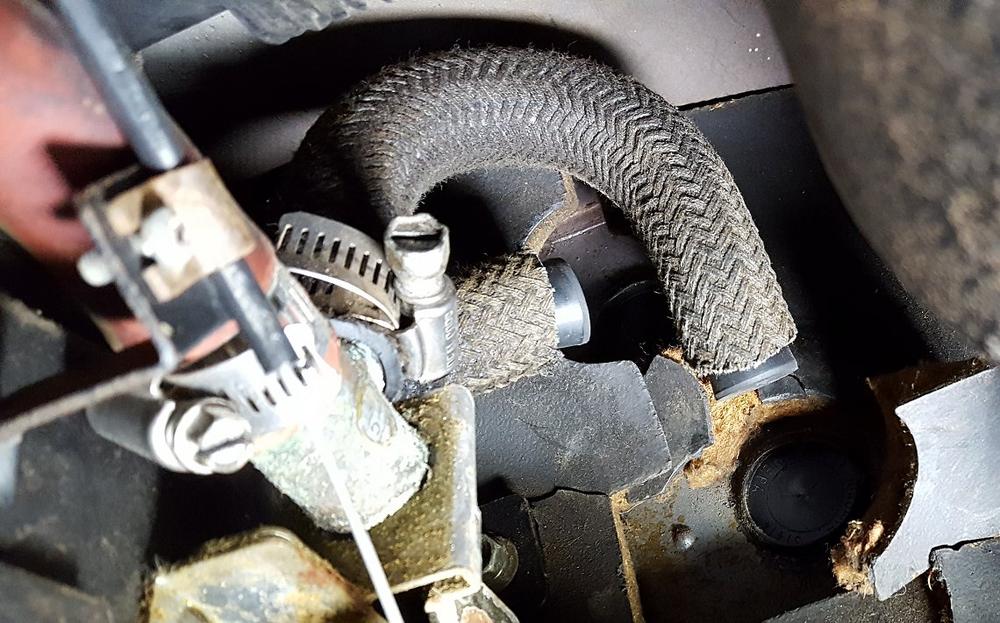
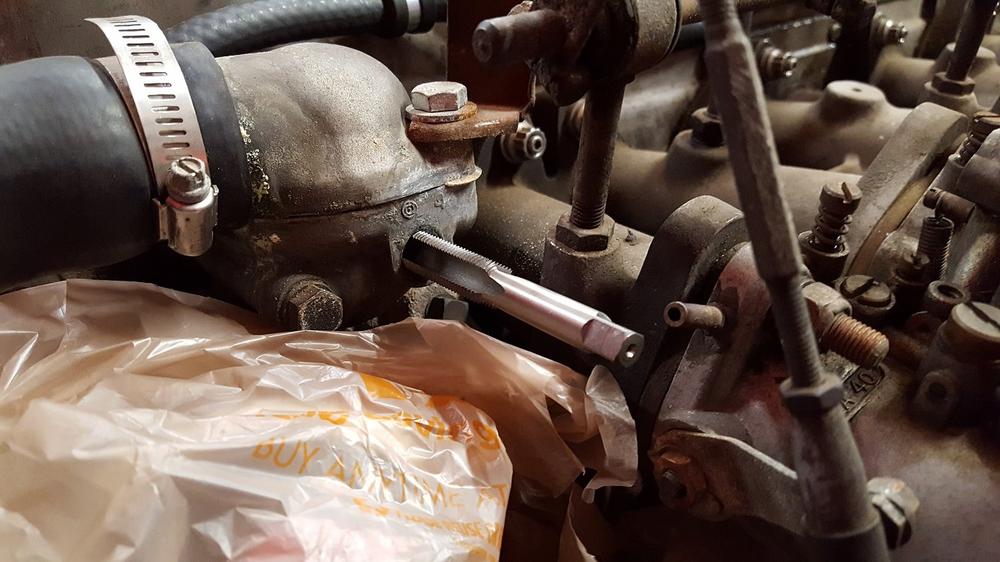
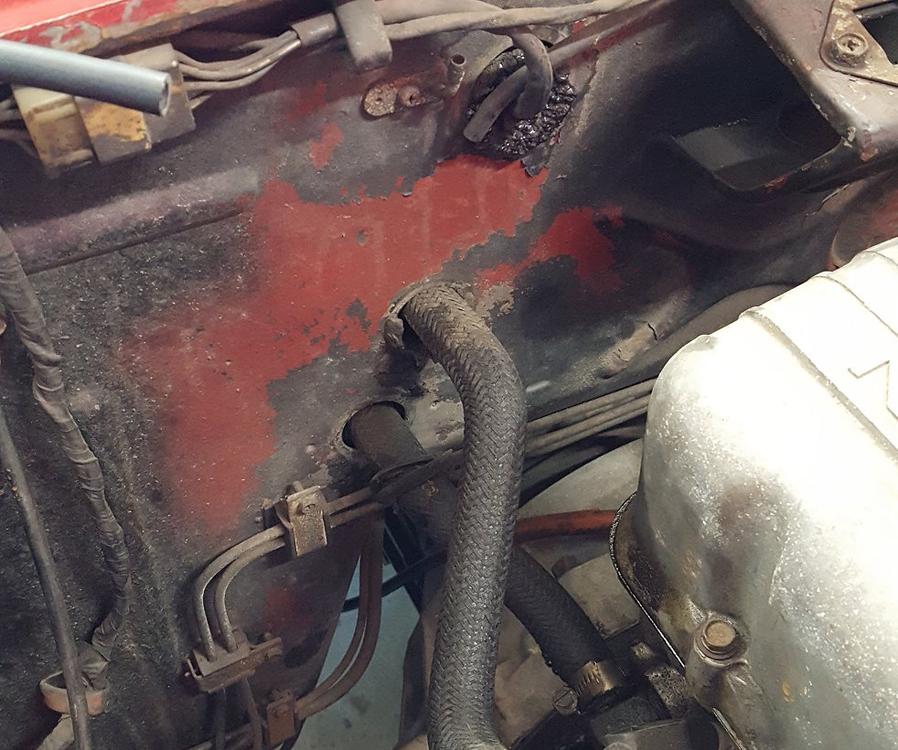
Next up was the cooling system. I knew when I originally looked at the car it had some odd bypassing done with various pieces of hardware. Upon closer inspection I discovered that every end point had a bolt, lug nut, or random hardware and was under pressure. I started on the driver side with the port what was originally used to run coolant through the manifolds of the SU carbs. With the hose and brass barb removed I cleaned out the threads with a tap. They are 1/2 - 20 fine thread in case you are wondering. This is also the same size and thread pitch of most oil drain bolts and that is what I used to fill the hole. A pipe plug would be a better alternative but finding one in 1/2 - 20 fine thread has been elusive so far. You can see the bolt in another shot of the engine bay further down with the carbs off. The passenger side was a bigger challenge and a decision had to be made whether to keep the heater core in the loop. The hoses were not in the best shape, their grommets had deteriorated, and when I removed the lug nut from the outgoing hose I discovered the rubber had hardened and turned to plastic. With this in mind I made the decision to bypass the heater core for now. Under the dash I cut the hoses as there was no way I was going to be able to get to the hose clamp on the back side of the heater core. Knowing there is still some coolant left in the core I used some rubber corks from Lowes and pressed them in to the remaining hose as hard as I could. This should keep what little coolant that is in the core from sloshing out. The dash will come out one day in the future. When it does I will hopefully have a plan for what I want to do regarding AC and heat. To cover up the holes in the firewall I used a pair of 1-1/4 inch plastic body plugs. They took a fair amount of persuasion to get in to place but they eventually saw things my way. The end result is as good as can be expected for now. The other heater hoses were fairly simple to address as a pair of 1/2 in pipe plugs were used to fill the holes. Thankfully the old fittings came out with little drama.

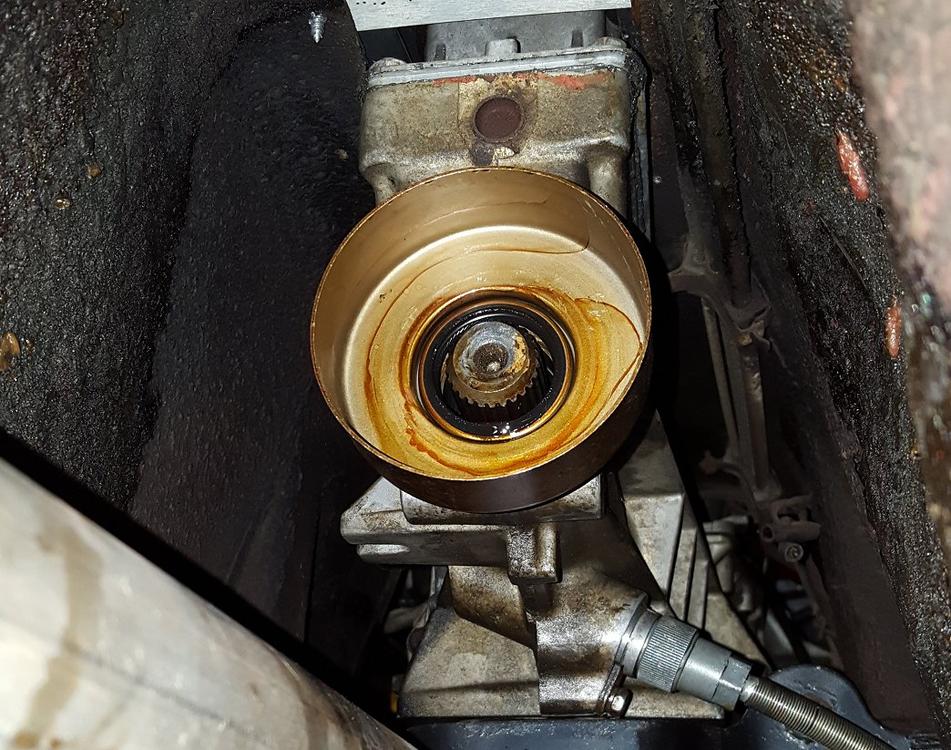
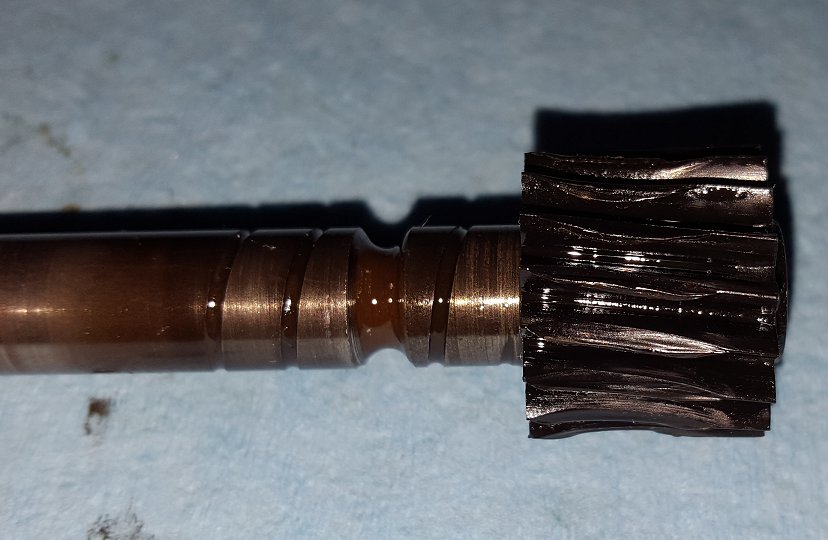
-
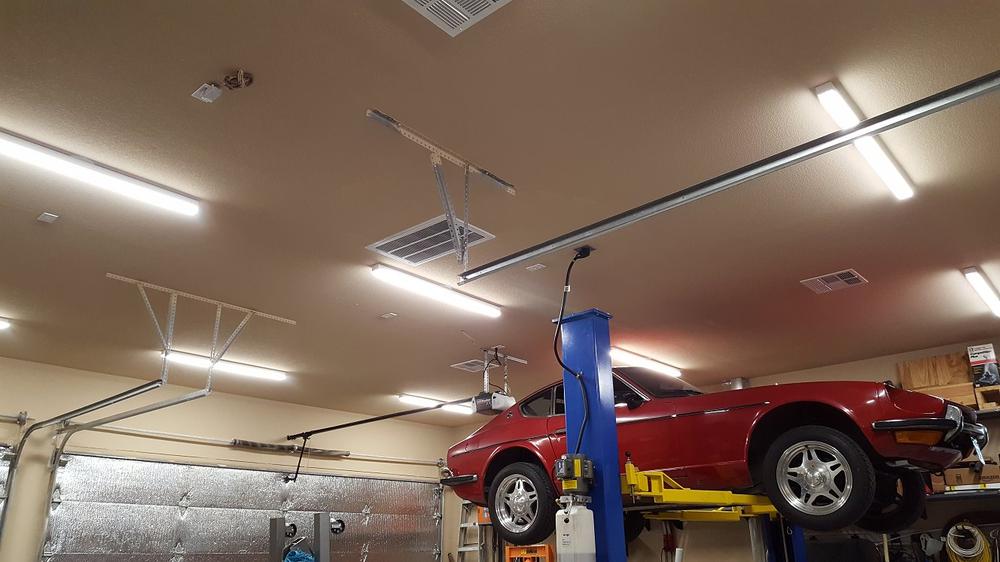
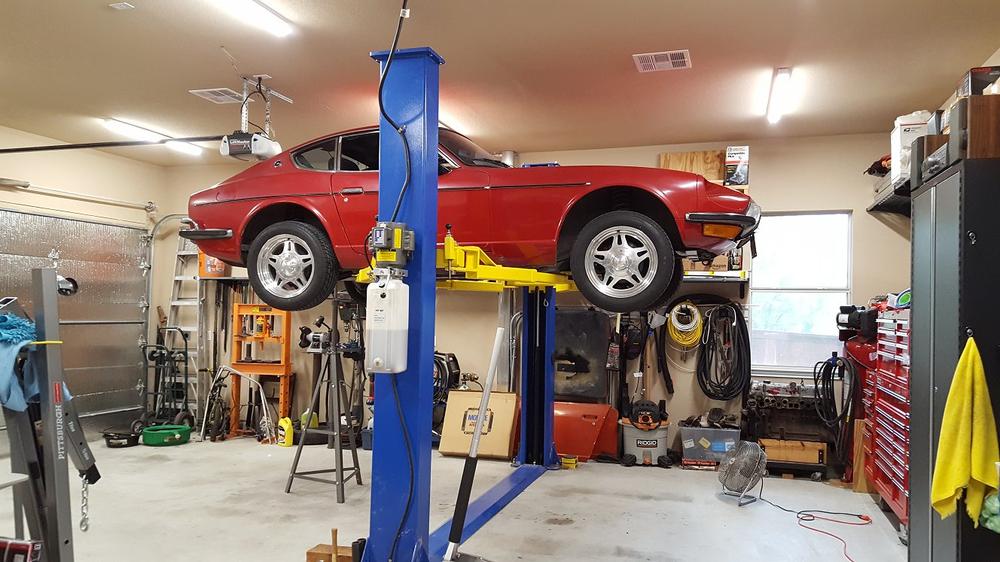
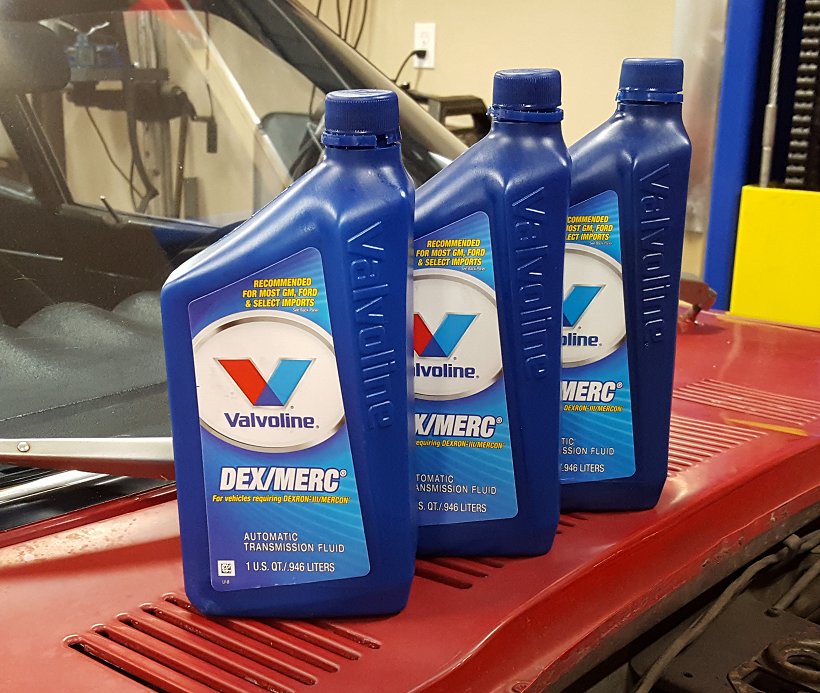
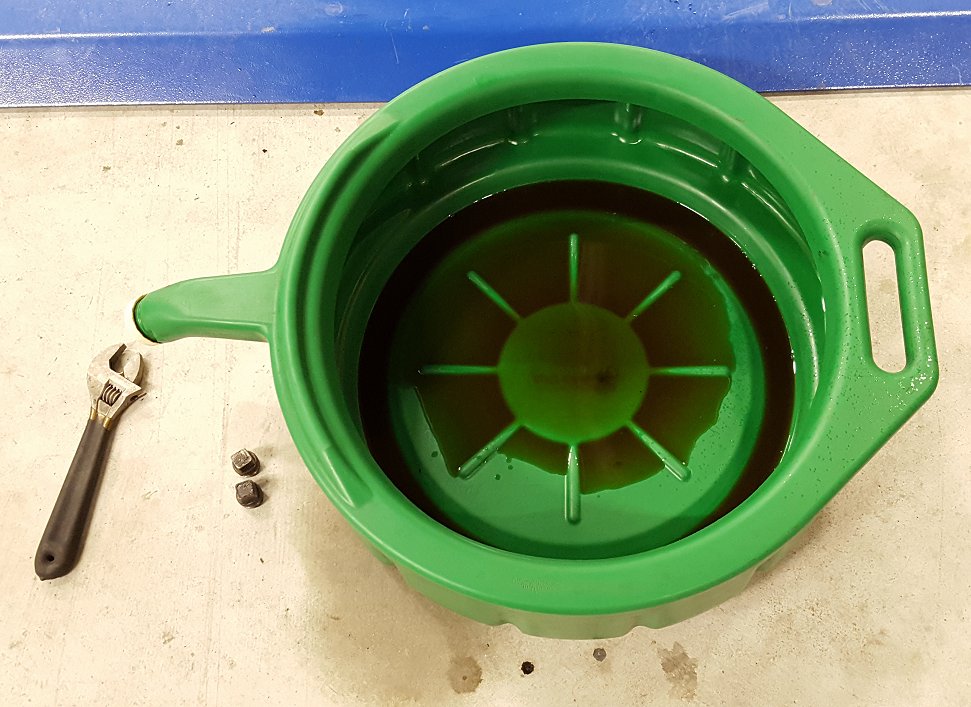
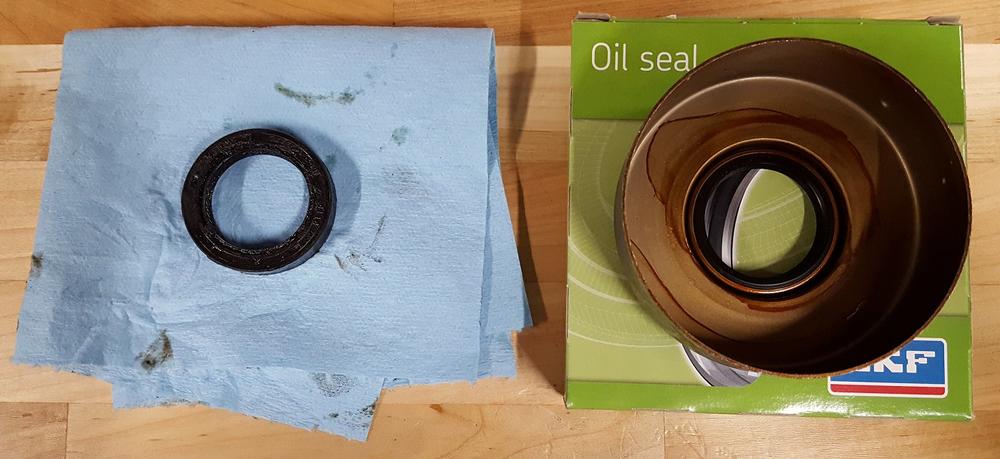
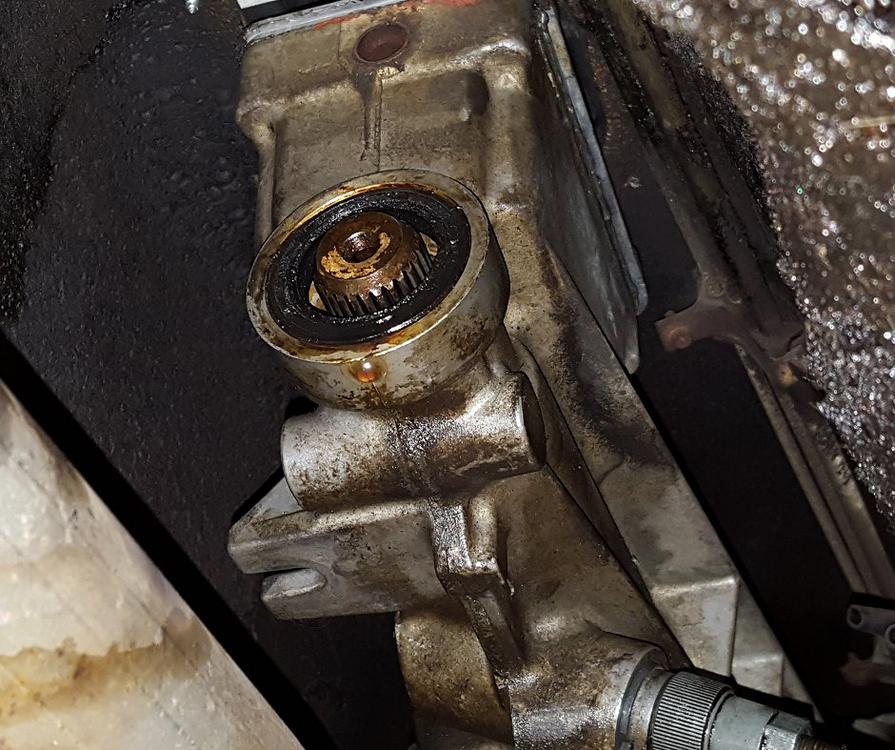
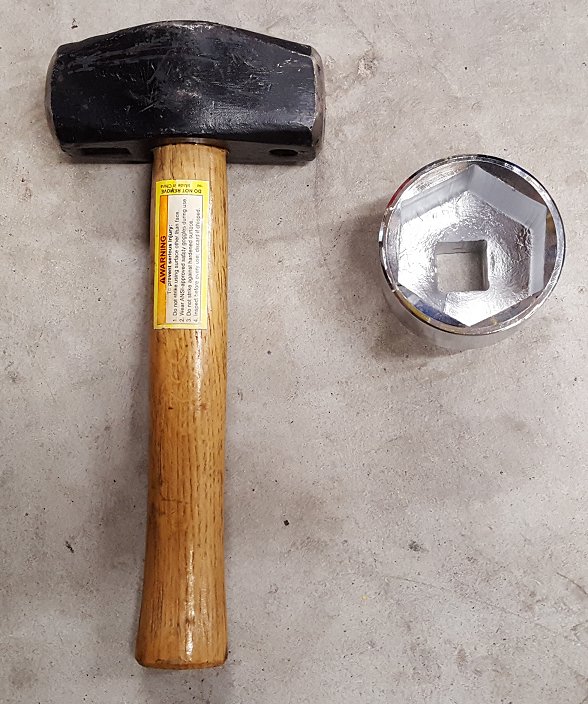
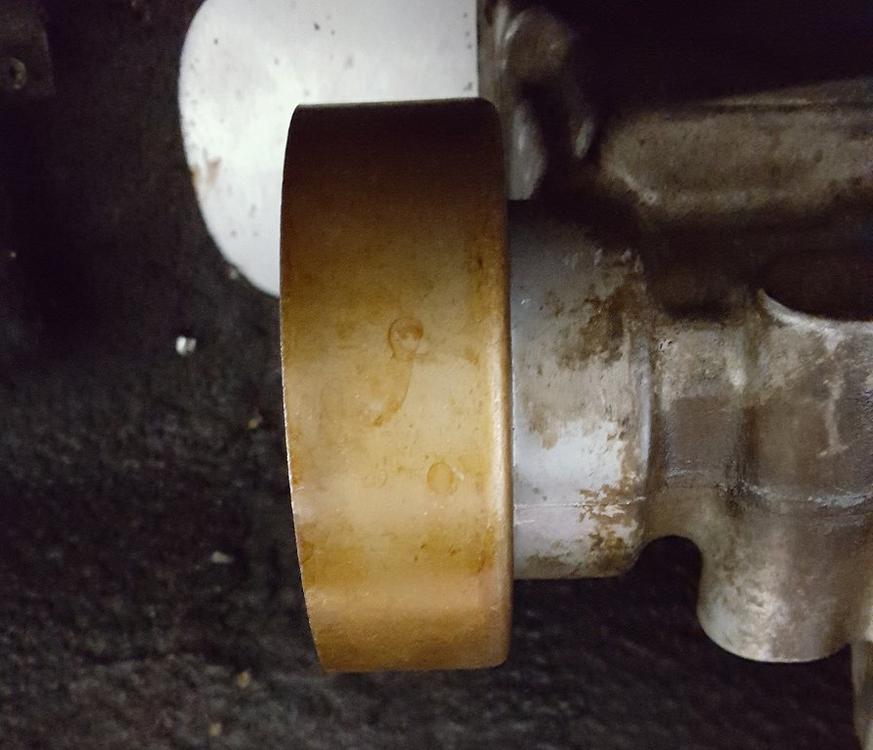
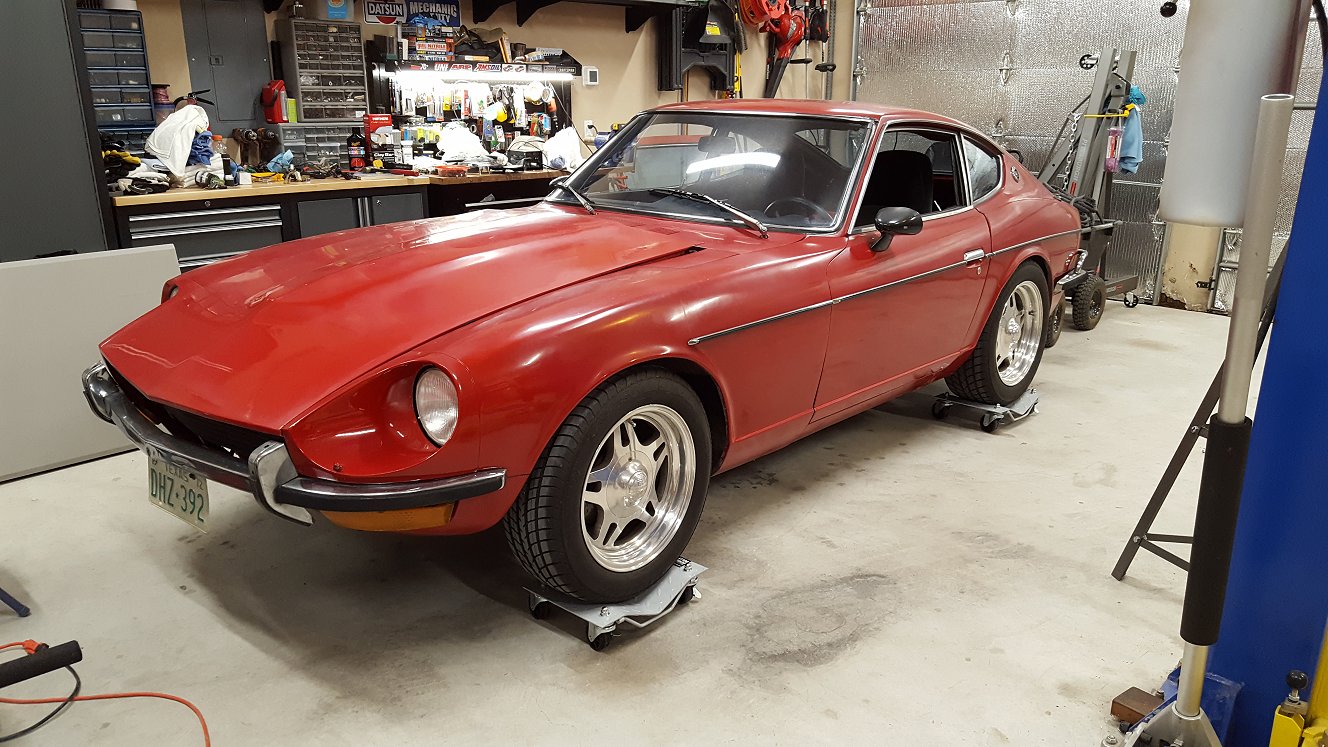
I have been putting in a lot of work on the Red Rocket over the past two weekends. In addition to the Z, my shop space has received a fair amount of work as well. The weekend before I got the Z I had a 3 ton AC unit and heat installed. Weekend before last I replace the two 4ft shop lights with nine 4ft dual LED shop lights. With the AC I can keep everything comfortable while I work, especially driving out the humidity. The lights... it is like an operating room now! I really love it and this kind of stuff is a true investment. The sale of my series-1 Z helped make all this happen. Plus, a loving wife! With the shop work all wrapped up I dove back in to the Z with the hopes of making it to Cars and Coffee. I started with the transmission as previous experience has taught to check all fluids from end to end. Removing the fill plug on the transmission I discovered I could not feel the fluid level. Once I drained it, I am sure glad I did because there probably was not 4 tablespoons of fluid. With the fluid drained I knew I wanted to change the rear transmission seal. It was leaking and based on my research was not the correct seal even though a lot of places say it is. With the driveshaft removed you can see just how deformed the top of the seal had become. A little work with a pick and it literally fell out. The correct replacement seal for this transmission is the SKF 13958. As you can see it is worlds different than the old seal and should hopefully keep the fluid in the transmission instead of on the ground. Installing the new seal was just a matter of using my 2 inch socket and a 3lb mini sledge to drive it in to place. A little finesse to make sure it went in straight followed by a couple of taps from the sledge and everything was in place. Before I installed the seal I gave the driveshaft seal a skim of fluid to lubricate it. Since I was under the car and at the transmission I took the opportunity to pull out the speedo pinion to replace its seals. It was looking about the same as the transmission seal. I followed the write up below to install the new seals. All in all it only took about 20 minutes. http://www.nicoclub.com/archives/manual-transmission-leaking-speedometer-drive-lets-fix.html When I had mine apart I noticed the speed gear was in a sad state so a new one will be ordered. I went ahead and put everything back together and cleaned up the speed cable sheathing as best I could. No pictures unfortunately but imagine a very clean speedo cable under the car! Finally I filled up the transmission with new fluid. I went with Dex/Merc aka Dexron III ATF. This is the correct fluid for the transmission as it is a 280zx Turbo 5spd. I have not had a chance to drive yet so I will post a report later on. It took 2.25 quarts to fill it up.