Hardway
Free Member
-
Joined
-
Last visited
Everything posted by Hardway
-
 Overall I think it is a very nice car and based on the info above and latest pics $15K - $20K is very attainable. Do you have more pictures of the work in progress or have a photo album you can share? I think when buyers see the effort it took to reach this level it makes them appreciate it even more and thus open their wallets a little wider.
 -
Congrats Joey on the purchase of your 240z! Siteunseen already posted my Lime Green resto thread above. The most important part of documentation is accuarate recording of everything before you even start. This means taking lots of pictures of all components, both close up and at a small distance. Make sure to capture how things are assembled as it will make your life much easier when you go to put it back together. Write all the numbers donw that are found the block, head, and anything else with a visable part number or part of the VIN. I wish I had take more "before" pictures before I dove in to my 240z. Work In Process pictures are always good too and help point out the details you are paying attention to. Last but not the least take plenty of "after" pictures and if possible, take them from the same angle you took the corresponding "before" picture so you can show many side by side comparisons. I am sure others will jump in as documenting our work is some times more enjoyable as the work itself. In regards on which websites to use, that really comes down to your personal preference and what makes your life easier. I have been using Photobucket for years to host my pics and even though I do not like their new interface I have too much invested to switch at this time. Some restorations are documented on a blog which you could do but after several conversations with other enthusiasts on the subject I think having a thread here on the site gives your work more traffic and provides a better access point for other members to ask questions and post comments. On the topic of organizing your restoration, you may want to start a spreadsheet in Excel or download one from the net. This will help you keep track of what needs to be done, parts that need to be purchased and ones that have been, and help you maintain focus on your project. Another idea would be to hang a white board in your garage to keep lists and other info about your project in front of you. I am a project manager by trade and must admit I have not done the best job of this. I do however keep a running Word doc that I use to type of everything before I post it here and try to update it once a week if I did work over the weekend. I am one year in to restoraing/rehabbing my 240z and about to be complete with Phase 1 which has included a full suspension rebuild, fuel system rehab, and engine repair and updates. I look forward to seeing more about your 240Z!
-
Thank you for all the replies guys. Most KYB struts include a tall and a short gland nut. My Z had KYB struts on it and used the short gland nuts so I did the same when I installed the new ones. Good call Beermanpete on putting the washer in the bottom. One washer or at the most 2 would do it for sure. EuroDat... of the spindle pin saga. They still haunt me to this day. You make a great point Captain. We should be thankful the aftermarket came up with a product that is a good work around from the factory setup. Having to make up 1/8 of an inch on one strut is definitely not the end of the world in my book. This issue will come to pass and soon the Z will be back on the ground and ready for the road.
-
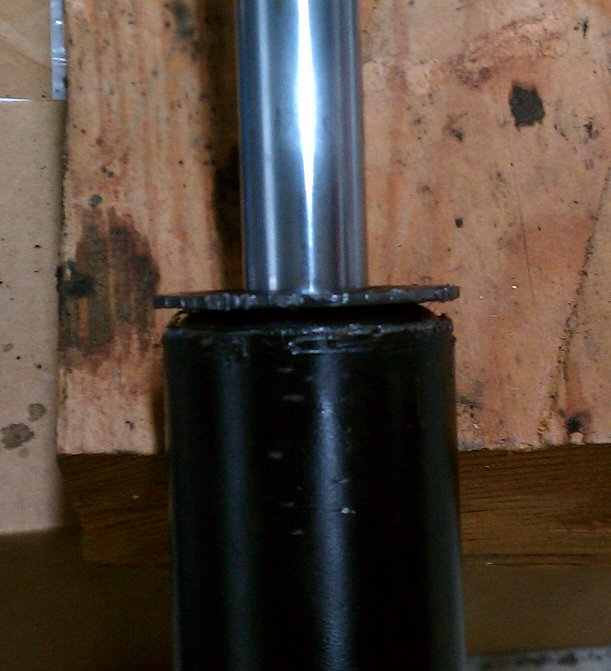
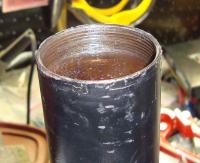
Hey Captain, those are all good questions and I understand what you are asking. No threads are showing and based on my other strut intalls the gland nut is as far down as it will go as the curve along the top is sunk in a little past the top edge of the tube. The gland nut has a ring welded in to it and on the old one that ring looks thicker than the other new one I have. I have included a picture below, apologies for the crappy cell phone pic. Don't worry about the chew marks on the gland nut, those are from the tech and I using channel locks and the 4x4 hub to move it back and forth to clean up the threads. It is really not as bad as the pics make it look.
-
Thanks Chuck. I found some washers at Home Depot. The outside diameter is perfect but I need to drill the inside hole out some with my step bit. Hopefully it won't be too much drama and I have plans to tackle it tomorrow after work.
-
I agree, those don't look like lowering spring but I don't see a bump stop on there either. That is not the end of the world per se but not good as it should ahve one. If the springs have become weak it may still be bottoming out and letting the spring hat hit the top of the gland nut for the strut tube. I would say get the whole car on 4 good jack stands and inspect everything in the rear. Sounds like you have a busted bushing or mount somewhere.
-
First off, did you install a bump stop at the of the strut under the spring hat? When car is on the ground, how much of the shock piston is exposed? Does it look like this below? If it does then you probably have some sort of lowering spring or the stock springs have been cut. What color are your springs? Sounds like you have or possibly two issues at play here. No bump stop, lowering springs, or both.
-
Good news, the gland nut is now on. Bad news, looks like it has to come off. Even with it all the way down the strut cartridge moves up and down in the tube about 1/8 of an inch. My other rear strut assembly went together just fine and I did not run in to this. I am thinking I need to put a large washer or something under the gland nut to hold the strut in place. On the bright side, the shop I took it to, Japanese Motorsports in Round Rock was great. One of the master techs, Scott used a large stocket for 4x4 hubs that fit the gland nut perfectly and used one of the old ones to reshape some of the threads that were damaged. He also used a small Snap On tool for correcting threads. Best of all, only cost me $20. I will post up my results on getting the strut tightened up in the tube.
-
! Yeah, need to add in there that Andy might need to buy a slide hammer with all the attachments since one of my struts refused to come out of the tube.
-
Since the strut assembly was secured to the car I went about installing the drum brakes with all new hardware and components. Everything went together well until I attempted to reinstall the original brake hard line. I had not noticed when I was installing it but the hard line attachment point on the back of the wheel cylinder is different than the original. Below is a picture of the passenger side hardware to illustrate this. See on the left the line goes in at the front of the wheel cylinder where as on the new one it goes on the back. This required a sharp 90 degree bend to be put in to the hard line. Unfortunately the original line was not up to the task so I went about bending a new line. This is the very first piece of tubing I have ever had to bend in my life and it took the better part of an hour for me to do it. I have a decent little tubing bender from the parts store but also used just about every round thing in my garage to help me. The column that is part of my floor standing drill press provided the most assistance. After a lot of triple checking, fitting, and bending I ended up with the piece below on the left. It is not the prettiest piece on the car but it works and is hidden once installed. More importantly it fits and rather well I might add. Plus it was great to have all new fittings as the originals were a bit gouged from their removal. With that task complete I went about installing the rest of the brake hardware, springs, and shoes. Job done! Since I was at a stand still for the passenger side of the rear suspension I switched gears and moved to the front to swap out the yellow King springs with a pair of cut Chevette springs. Everything was straight forward with no surprises. The end result makes everything look like it is all stock replacement components.
-
It has been a busy week so I am just now getting around to posting an update. I got a lot done this past weekend but not everything was photo worthy. I crossed items off the list like re-attaching the drive shaft and some other odds and ends. As others have reported the lower control arm must spread open a little to get the hub assembly in place since the new poly bushings are thicker than the originals. A strong piece of threaded stock along with some nuts and washers made quick and easier work of this task. I also opted for new hardware from Nissan to secure the new spindle pin. I made sure to lube the pin with anti seize in an effort to make it easier to remove should I have to in the future. When assembling the passenger side strut I ran in to an issue with the glad nut which I have started another thread for here -> http://www.classiczcars.com/forums/suspension-steering-s30/49279-new-gland-nut-refuses-screw.html Once I had everything together on the driver side I did a mock test with the wheel on to see how far the suspension would compress. Using the Chevette springs in an un-cut state did not allow the rear suspension to compress at all. So I pulled it apart, cut 1.5 coils off, and put it back together. The second mock looked good but the real test will be once its back on the ground and has some time to settle.
-
The one that is giving me trouble is the passenger side rear. I have some leads on some others if I need one but hate to go that route as I have already replaced the bearings and seals in this one and there is no guarantee another won't be a bigger pain to get apart thus leaving me in the same position. I got the new gland nut in and plan to go to the machine shop this afternoon.
-
Buyer beware for sure on this one. Seller has not sold anything in a long time. All of the pictures are close ups with no "full car" shots on the auction. As others have noted the exhaust is not original. Funny the seller claims 7750 miles but does not take a picture of the odometer. Its at $27K now with the same 2 bidders going at it for the last 3 days according to the bid history. For a car with so few miles you would think they would have tons of pictures of every detail. I would not be surprised to see the auction ended early. Just my .02.
-
I second everyone;s encouragement that you try it yourself. Another tool to buy that you may not have is a propane torch. If the gland nuts are stuck really good you may need to heat the top of the strut tube to get it loose. When you buy a set of spring clamps/compressors, get a good set! I paid $40 for mine at AutoZone, same kind they rent out for loaner tools. When you use it make sure you oil the threads and go slow, no impact guns or air tools to speed up the process. If you are just not comfortable with it then fact $200 +/- for labor and at least $170 in parts and possibly more. If the Z is not your daily driver then do it yourself, go slow, and if needed take pics of everything before you take it apart. The FSM is good to have on hand too. The #1 one thing to keep in mind is safety since if you do something wrong it could result in serious injury very quickly. However if you take your time you should be just fine. If you are still uncomfortable doing it yourself then definitely have a shop do it. The bonus there is that you don't get dirty and you may get a warranty of some sort.
-
I have not seen an update to this thread and was wondering what the latest was. If your pans are solid that is definitely a huge plus for you. You could definitely get away with clean all the rust off around the drain hole with a wire brush and shoot a some rust inhibitor on it to keep it from rusting more. To plug the hole as is, get a small sheet of rubber from the hardware store, cut out 2 pieces that are roughly the shape plus a 1/4 inch around the edge. take the 2 pieces and glue them together but not getting glue around the 1/4 inch edges. Once it dries stuff the plug in to the hole. The edge that is not glued will act as a lip to hold it in place. In my opinion you have bigger fish to fry than the small rust on your floor pans but if you are wanting to attack it, the above is what I would do for now.
-
Thank you for all the replies guys. When I took the strut out I used 2 pipe wrenches to get the gland nut off, one to hold the tube and the other to turn the gland nut. I have tried it many times with the strut out and insured the gland nut was not bottoming out on the strut when it was in. I still had the old gland nut, found it in my pile of parts. The nut/hat on top was pretty chewed up from getting it off but the threads were in good shape. I tried putting it in and it has the same problem. I am in agreement that the tube is oval'd ever so slightly. I also believe that even though the threads look good, something else is not right with them. The other 3 strut tubes and their gland nuts went on very easily and required just a little effort to snug them down. This one should follow suit but it is not. I could trial and error this until the cows come home but once the new gland nut arrives I am going to take it to a machine shop and have them figure it out. Their tools and expertise will help solve this and I do not want to permanently fubar the tube either as replacing it will not be cheap. I will keep everyone posted!
-
I used a decent sized c-clamp and it did help but its not perfect, at least not yet. I am sure the tube is tweaked since you can tell by all the jaw marks it was a complete pain to get off. Once the new glad nut arrives I am going to work on it some more.
-
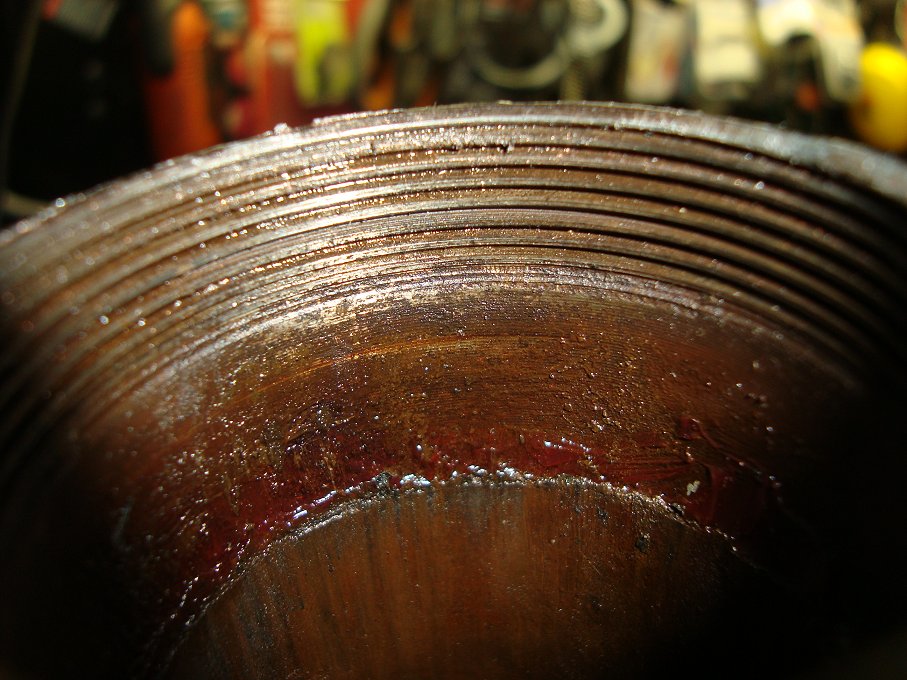
I took a pick with a 90 degree tip on it and cleaned out the threads really good. When I ran the pick around it did not get caught on anything. I did not compare the threads or pay a lot of attention to them when I pulled everything apart. Now, all I seem to do is stare at them. Below are some pics of what they look like. Hopefully the new gland nut from KYB will come in tomorrow.
-
Good job E-tek!!! Your work and attention to detail continues to inspire us all.
-
Unfortunately not Madkaw. There is just not really any threads to clean up at this point. After looking at it for awhile I have come up with an idea to work around it. I am going to try it tomorrow evening after work and post my results.
-
After some digging I found one of the gland nuts I took off the car. The threads were in perfect shape and I cleaned it up really good before attempting to use it. I took a big c-clamp and pressed the the ends that were pushed out back together. It acutally helps as the gland nut would now sit nicely on top of the tube and no rock back and forth. It would now screw in about 2 threads and then require my wrench to turn it. It got progressively harder to the point there were still 4-5 threads showing and I could not turn it anymore. Upon closer inspection it appears a PO cross threaded the tube at one point. The threads are flattened and it just does not appear its going to be usable. Once the the new gland nut arrived from KYB I am going to take the tube and gland nut to a machine shop to get their advice on it. In the mean time I may need to start shopping for a new strut tube/hub assembly. A disappointing end to an other wise productive day.
-
So I can see the light at the end of the tunner with my rear suspension rebuild. I am putting KYB's on and all 3 of my other struts went back together fine. However I cannot get the final glad nut on the right rear strut started on the tube. I put some anti seize on it to help give it some lube and hopefully make things easier should I need to take it off again. The threads on the inside of the tube appear to be okay and not cross threaded or anything. But when I think the nut is started and looks straight I start turning it with my wrench and it just pops back up out of the threads. Also, due to my many attempts from of the threads have become damaged on the glad nut so KYB is sending me a new one. If I just sit the gland nut on the strut tube it will rock back and forth if I push on it. This leads me to believe the tube may be slightly out of round and maybe causing my problems. I am finding a lot of things were torqued down on this car by the PO as I remember every glad nut on the car being a complete PITA to get off except 1. Any ideas on how to go about correcting this and getting the glad nut on? Should I try using my vise to squeeze the tube a little on the ends that appear too far out?
-
Other manufacturers use electric power steering too, Ford, Honda/Acura to name a few. I have driven a newer TSX with electronic power assist and it took a little getting used to, and when I say a little, maybe 3-5 miles of driving. Overall I liked it and I like the whole car too. The steering wheel is small but with a very thick grip. If you went with a system like the in the link a small steering wheel maybe in order or as it say you can turn down the level of assist.
-
Thank you Red. I am a big believer in doing it right the first time. Documenting it while I am it is a bonus as I get a lot of enjoyment out of it. Plus it helps other owners and members of the community. Doesn't hurt either should I choose to sell it on one day as it is easy to prove what has been done and how.
-
I'm using an R200 differential. Really, they had to cut off 3 layers? I'm going to run mine as is for now. If I need to cut off more I can do it later as the effort will be the same at this point.