trogdor1138
Free Member
-
Joined
-
Last visited
-
 My '71 240Z is leaking gas from the filler, specifically the actual port. I can fill the tank just fine with no leak to the ground. However, after sitting for a few minutes at home (and I believe even probably while driving) fuel begins to seep between the tank cap collar and the filler neck, sending fuel down the side of the car. Today it was bad enough that a puddle formed. I believe that the cool gas from the pump is heating up and expanding as I drive home. The question is how can this be dealt with? I'm guessing a return line blockage? - The tank was boiled out and cleaned at a radiator shop a few months ago - Rotted hoses from fuel tank to evap tank were replaced - Carbs were cleaned and rebuilt with new valves - Fuel is not leaking from carb bowl overflows - Gas cap is new part from MSA - Fuel pump is warm/hot after car has been running, even with spacer installed The leak has gotten bad enough to bubble and lift pant on the rear quarter panel. Not a huge deal since the car needed new paint even if I decide to restore this one, but it indicates that this is a problem that needs to be fixed. Thanks all!
 -
You've already received a lot of feedback, but I'd chime in to say you should definitely have a shop check the block. I just finished my engine rebuild and you can see that I have a couple of recent threads about problems after finishing. My issues were self-inflicted mostly, but the point is that a rebuild deserves the best you can do/afford and requires slow, methodical work. This engine is at the least 30 years old; the L series are pretty bullet-proof but if you're already taking it apart there's no reason not to have it done. If you take the block, it's generally a good idea to take the crank itself and the main caps. The shop can then also check those for roundness and machine those surfaces too. I know my shop has flat rates for these jobs, so in the grand scheme of things it's really not that much. Also, +1 for the painting mentioned above. This adds further value to the car as part of a restoration and makes it easier to spot any fluid leaked after reassembly (heaven forbid). I used Tower Paint for mine and it turned out great. If you do paint, be sure to also get a quality metal prep/etcher since you'll be painting bare metal after the hot tank.
-
Thanks guys. My first thought was valves from the wrong year or head type, but my research shows that all valves are the same length as noted above. I can't see how timing would be off either. The chain in there has two dark links for the purpose; the cam and crank were timed with the shorter length between the sprockets on the tension side. I also don't exactly figure how they could goof something up, but everything keeps pointing to something done during the latest machine work. I started her just briefly yesterday to test and everything sounds fine. No clacking, no metal on metal, etc. I do plan to take it to the shop tomorrow to discuss the situation and possible causes.
-
Thanks, but I'm not sure of the intent? I know how to check valve lash; as I mentioned all of the intakes were set successfully. Maybe I wasn't clear enough in stating the problem. The exhaust rocker arm studs are bottomed out but still have no gap. This means that the valve stems/lash caps are too high. I set the valves just after the initial rebuild no problem. The only thing I can figure is an overly aggressive valve seat grind at the shop this last time. Anyway, returning to stock lash caps on the exhaust valves from the thicker .175 caps I had installed resolved the problem and allowed adjustment.
-
Sounds ghetto, but with the exact same springs and retainers on my head I used a "custom" tool made from a socket and C-clamp. Get an 8-inch clamp and an old socket and cut a ~1 inch high hole that's half the circumference at one end of the socket. Sit the socket on the retainer then clamp against the socket and valve head. I did all 12 valves this way this morning in about 20 minutes. Free if you already have the parts, less than $20 if you have to buy them.
-
I posted recently about a timing "incident;" you can read about that here: http://www.classiczcars.com/forums/thread46029.html I've finally gotten the head back from the machine shop and everything back together. The shop replaced two intake valves and all six exhaust valves, as well as the valve guides for the exhaust. My problem now is that I can't get any gap at all between the cam and the exhaust rockers. I was able to adjust the intakes successfully, so I know I'm not stupid. What's going on here? My father is visiting just to help me finish up and drive it, and now it's looking like a no-go. The valve adjustment was fine after I rebuilt the engine and before dropping off the head for repairs; did the shop goof up? Timely help especially is appreciated. Thanks everyone
-
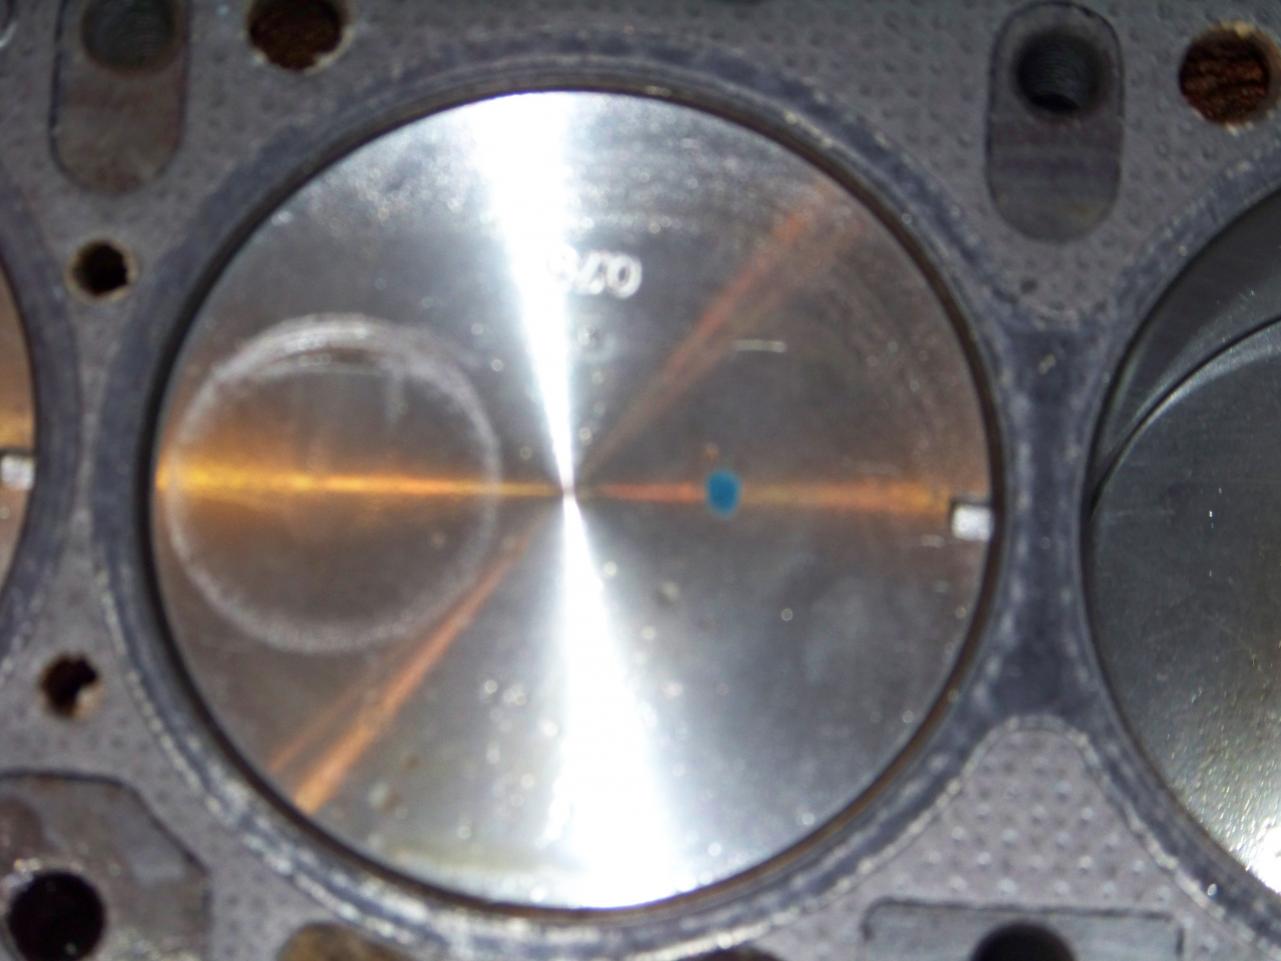
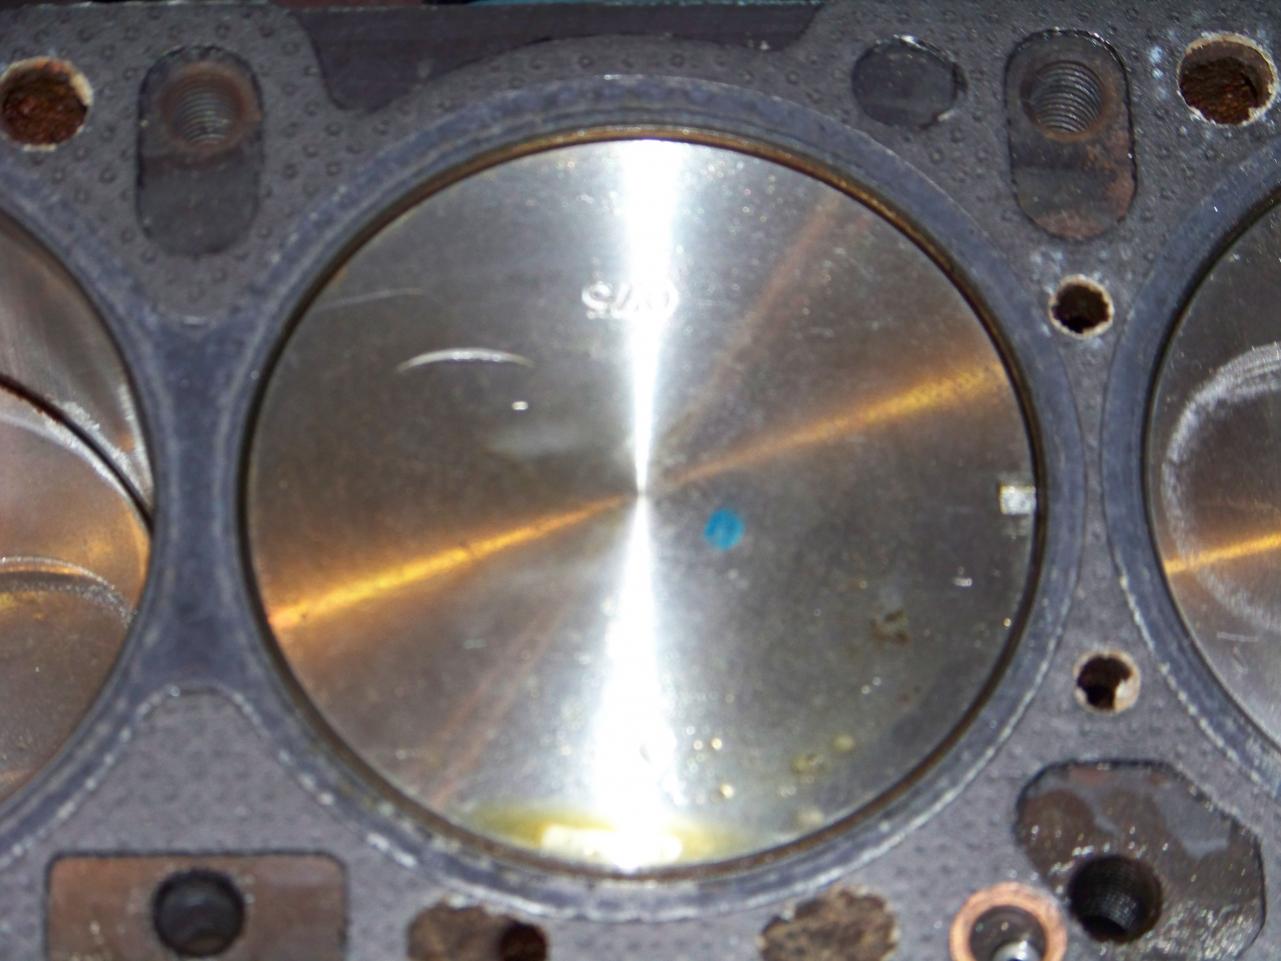
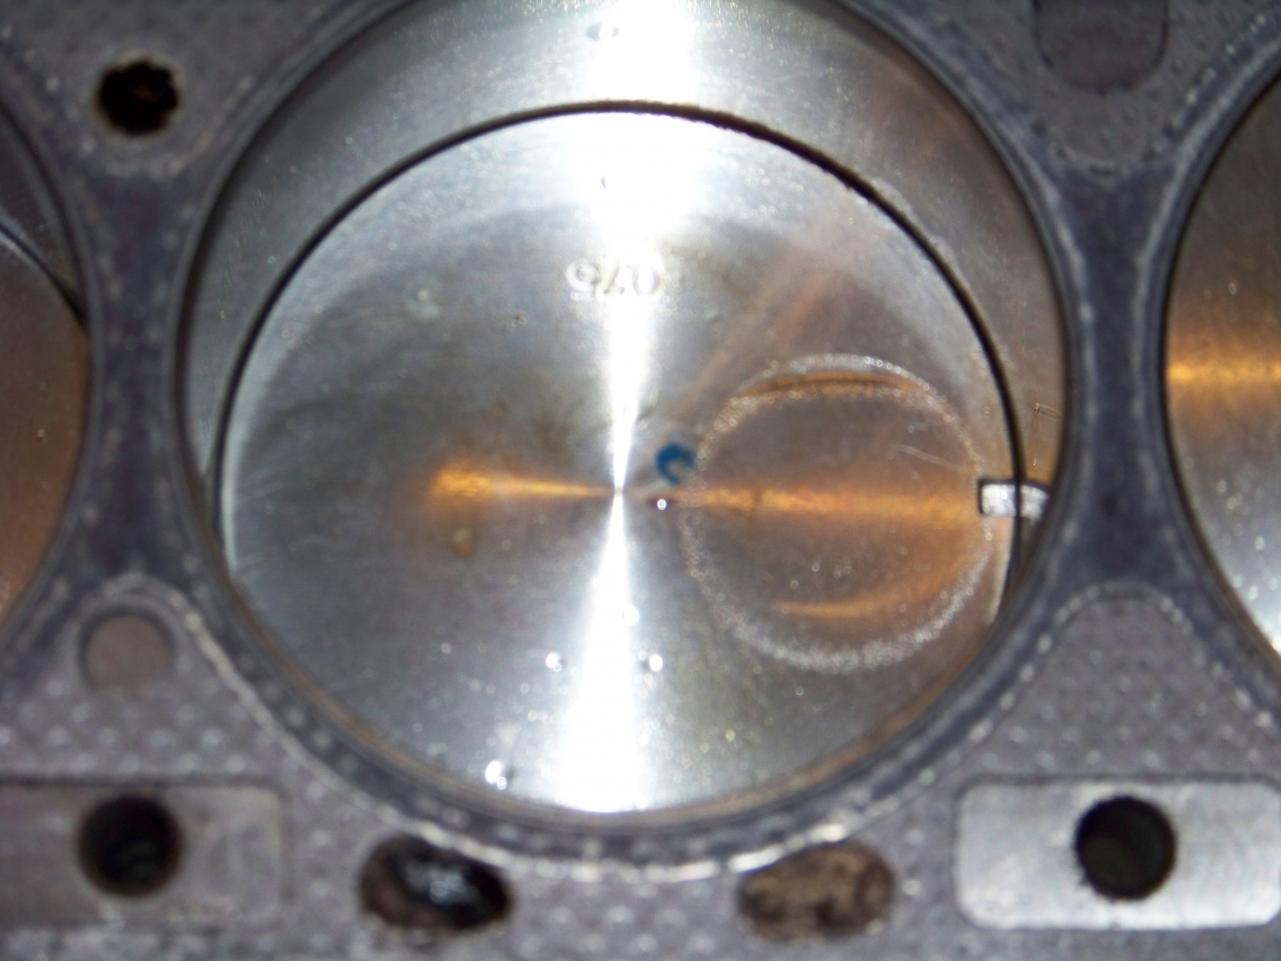
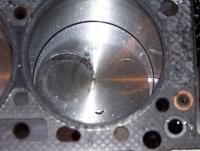
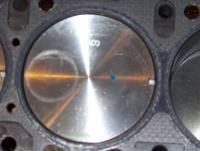
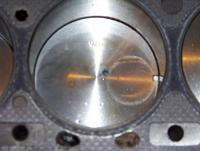
Thanks everyone for all the feedback and sympathy. The piston face damage ranged from a slight kiss to some minor gouging. I dropped off the head with my machinist this morning, and he feels pretty good about the shape of the pistons. Sorry for the bad quality, but it's really tough to photograph something very shiny in a dim garage. As you can see, the pistons aren't in too bad of shape. My plan right now is to bring each to its top center, then tape over the gap between piston and cylinder, coat with grease, and lightly smooth out the nicks. Irritating that I have to do this, but it could have been much worse. Besides, I now have custom eyebrowed pistons

-
So, I pulled the head tonight after dinner. The sum total of the damage appears to be: - 3 piston heads where valves made contact - 4 valves that are bent - A few valve seats that have cracked Also, one of the lash pads popped off its valve stem and was just sitting in the oil channel. Two of the pistons only have very light nicks; I feel fine keeping them in service. The third, however, has pretty bad gouging. I think its bad enough to warrant replacement. I'd like to simply resurface the head of the piston, but I hate the thought of shavings getting into the oil or embedded between a ring and the cylinder wall. It's a pain that I'm going to have to break down the block again, but overall things could have been much worse. Actually, don't some people claim to have done ring jobs with the block still in the car? I only need to pull cylinder 1, so if I could avoid pulling the whole block that would be nice. It seems like I might be able to remove the oil pan in the car... any thoughts?
-
I recently rebuilt the engine in my 1971 240Z. The relevant parts: L28 N42 block L24 E88 head (earliest "notched' chamber design) Overbore of 0.030" F54-type flat-top pistons from ITM Isky Racing Stage 2 cam (.480 lift, 280 duration, 232 @ .050 lift duration) New Schneider performance valve springs and hats New rocker arms and lash pads New oil pump for 81 ZX turbo engine As part of the machining the head got a valve job (head already had steel valve seats retro-fitted) and new valve guides. I'm running 91 octane gas (highest we have here in Utah; high altitude) and Valvoline VR1 racing oil. The new camshaft is internally oiled and I installed a new spray bar made for me by Captain Obvious on these forums. Everything in the block was assembled with Permatex's assembly lube while everything in the head got Isky's assembly lube included with the cam. All the bolts and nuts I could find a spec for got torqued to spec. When I first fired her up the radiator was open and had a hose constantly running water. I immediately brought the engine up to ~2000 RPM and let it run for 30 minutes while I monitored oil pressure and temperature. Temp was right in the middle of the gauge while oil pressure was about 80 PSI. She sounded great. A day or two later I took her out for the first drive. Engine revved nicely and was very responsive. I stayed in first gear initially, bringing the engine up to ~3000 RPM and then letting the engine brake the car to help seat the rings. I did this about 10 times, then took her out on the road. Just a minute or two after shifting into second a clunk sounded under the hood. I immediately pulled off the road, popped the hood. The gauges still read in the normal range, but the sound was markedly different and idle was terrible. I head back home when another clunk sounded. I immediately killed the engine and coasted to the side of the road. I tried cranking a few times, but the sound was wrong and the car wouldn't start. Through all of this, no smoke, no leaking fluids, and no extreme gauge readings. The next day I had the car towed home. I pulled all of the spark plugs; none of them show anything unusual and definitely no signs of collision. I pulled the valve cover; camshaft looks good and well-oiled and all friction surfaces appear to be mating nicely. However, the cam timing sprocket had slipped off the cam snout and was no longer engaged with the dowel on the snout. The sprocket hadn't fallen into the abyss of the front cover, but it was riding on the bolt. I didn't see oil at the top of the radiator, and no frothiness in the oil on the dipstick. I figure that the clunks I head were the cam timing sprocket slipping off. I must not have done the final torque to spec on the bolt as I thought I had. I can't turn the cam enough to engage hole 1 on the cam timing sprocket so it appears that the valves and pistons did run at least some interference. However, nothing on the top side of the head shows any signs of trauma. I'm pulling the head tonight and will be pulling the front cover and re-doing the timing this weekend. What specifically should I be checking? I figure the most likely damage is bent valves; what do I need to do to check for this? Any other advice?
-
My engine's out for rebuild at the moment, but I figure that with a "new" engine I may as well go to electronic ignition at the same time. My '79 N42 block came with the electronic distributor and E12-80 module intact, so I plan to use that when I install into my '71 240Z. I also found a CraneCams HI-6 ignition at a great price and I'm using this unit. I want to keep the engine bay as original as possible though and so I want to setup the control in the cabin. I don't keep much in the glove box so I was thinking that would be a great location; out of sight most of the time with easy access when necessary. My only concern is the heat output of the module when in use, especially since it looks like the casing is also intended as a heat sink. Can anyone with this unit, or similar MSD-style ignitions, comment on their operating temperature? I'd hate to install it inside the box only to destroy my dash or the unit.
-
Thanks kenobi for setting me hunting further. I believe (hope and pray) that I am suffering from a bad PCV valve. If I understand correctly the oily fumes from the valve cover are the result of blow-by. This is generally caused by a bad PCV valve, or by wear of the pistons. One is less than five bucks at AutoZone, the other is a weekend project. From what I know the PCV valve is very susceptible to bad oil and engine sludge. This would be in line with the unknown maintenance history of the car and the apparent age of the oil filter. To that end I plan to add some Sea Foam to the oil before driving tomorrow morning, then change the oil and filter on Saturday. Can anyone verify this line of reasoning? Also, I've seen referenced in several places hooking the crankcase breather to the air cleaner box and the valve breather to the PCV valve (example: http://www.zcar.com/70-83_tech_discussion_forum/240z_pcv_hose_routing_622748.0.html) Why would one do this; what are advantages and disadvantages? Also, can anyone help with the vacuum lines of mystery? As I understand it, and from reading the fiche, the three-way vacuum valve should be connected to the crankcase breather, the air cleaner, and the line to the fuel expansion tank. Instead, mine is connected to the distributor, the intake vacuum tap, and the expansion tank. Where the crankcase breather tap should be there's only a hole left. Should I figure out a way to get vacuum pulling on the crankcase breather again, or is it no big deal?
-
I'm a new owner of a '71 240Z; I've posted on here a couple of times. While the car was in the process of restoration by the previous owner there were periods of long sitting and I am getting everything up to snuff. To help others help me here's what I've done so far: - Rebuilt transmission with new gaskets, bearings, synchronizer rings, and oil seals. Temporarily refilled with synthetic 75W-90 GL-5 (ouch; I know now), now has Red Line MT90. - Replaced clutch friction disc, pressure plate, throwout bearing, and slave cylinder - Replaced distributor cap, rotor, O-ring, breaker points, condenser, and ignition coil with OEM-spec Beck Arnley parts - Replaced plugs and wires with NGK BPR6ES and NGK wires, gapped per FSM specs - Dropped fuel tank and had it boiled at a local radiator shop; replaced fuel filter and am currently running a can of cleaner additive through with premium-grade fuel - Disassembled, cleaned, and rebuilt carburetors with the aid of the ZTherapy rebuild kit and video - Checked dwell, measured at 37 degrees, timed at 5 degrees (second notch from bottom on crank pulley when viewed from passenger side) with electronic multi-function light I'm now driving the car daily to and from work, ~40 miles round-trip. I do my best to keep the engine in the 3000 to 3500 RPM range while driving. The car starts well with the now-functional choke, but the choke/fuel nozzle assembly sticks and I'm planning to re-adjust and calibrate this weekend. I know that I've got an exhaust leak under the hood where the twin pipes meet the manifold; it's missing the flange gasket which I've ordered and will also be installing. The rear hatch also doesn't seal quite right and the original bad gas made quite the odor in the car, so I usually drive with my window down. Although the blower motor/switch don't work the control levers are functional and I can get forced air venting through the ducts into the cabin. This week as I've been driving I've noticed faint white smoke rising from the hood vents (the car has a 280 hood on it.) This morning while making a left turn I also noticed the smoke entering the cabin through the blower vents. I have not noticed smoke from the tail pipe while driving, neither while under load or idling at lights. When I got to work I popped the hood and took a look. I know that I have coolant seepage around the thermostat housing; I'm replacing the thermostat, both its gaskets, and both radiator hoses. I also saw that the frame was wet where the radiator filler neck hose rests near the front driver's side of the engine bay. Finally, there was faint smoke/steam coming from the valve cover breather and where its hose connects to the air cleaner box. Removing the hose cause condensation and puddling of what appears to be oil. I do get some hesitation/lag when starting from standing in first gear. Once it gets past that point the car will accelerate fine up to highway speeds through the other gears. Deceleration, whether in neutral or gear, often includes one or several backfires or pops, I believe from the tail pipe. If you've made it through all of that you now know what I do. I've been doing a lot of reading and searching through the forums, but I still have a few questions: - First and foremost, what should I be looking at for the above circumstances? - What is the "best/proper" way of setting float adjustment? I do believe that I am running too rich. The video shows the float horizontal at .55 in. while I've read on here about holding the lid vertical and tilting while blowing in the fuel inlet to measure. I sent Bruce an e-mail; maybe they've been busy but I haven't heard back. - What are common locations for vacuum leaks? The car has a later N33 intake manifold on it with the corresponding emissions-control balance tube. However, no air pump is installed and there aren't any devices installed on the balance tube. Perhaps related, the vacuum tap on the front carburetor is not there. The hole is not plugged, but the residual broken tap appears to be in place in the carb. Instead, a line runs from the manifold vacuum tap to a three-way join, then a line runs to the distributor advance. Does it make a difference which location vacuum is tapped from? Are there any good images showing definitively what needs to be plugged on the balance tube? - The engine no longer has the coolant line running around the back (firewall end) from the manifold on the driver side to the three-way joint on the passenger side. Instead, the line runs through the manifold and is then capped, with a corresponding cap at the 3-way joint. I am planning to remove the residual line and plug at the thermostat housing instead to eliminate the dead zone; are there any problems with not running coolant through the manifold? The carburetor spacers don't have cut-outs for water flow. As always, all help is much appreciated.
-
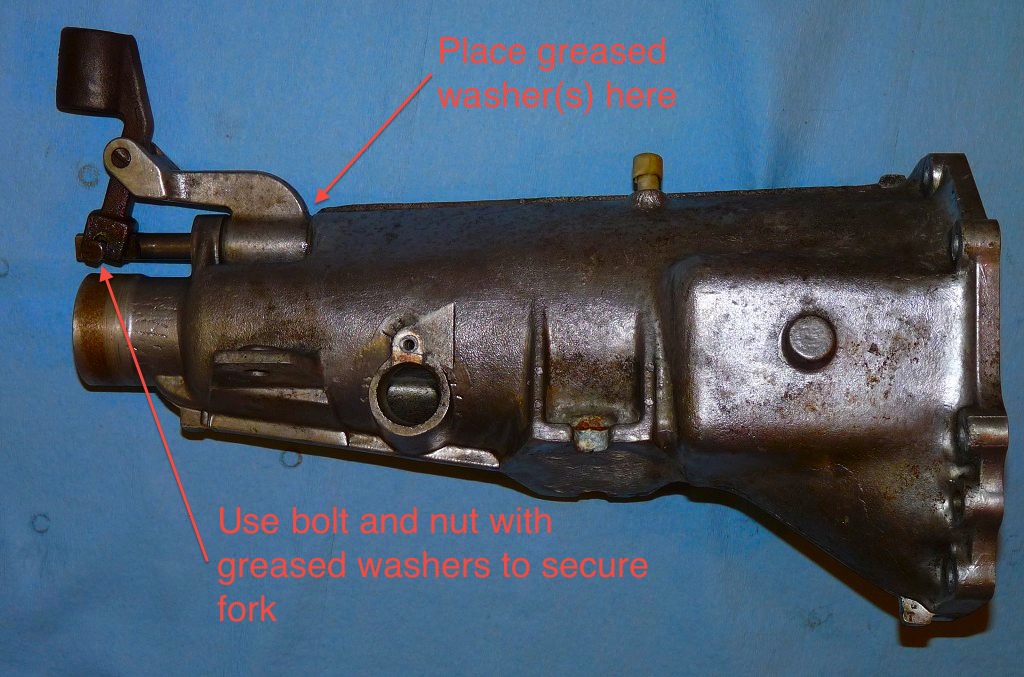
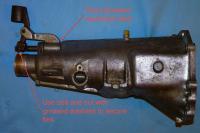
As mentioned in my earlier threads, I recently purchased a '71 240Z with shifting issues (F4W71A 4-speed manual transmission). The transmission would not reliably shift into 3rd and the lever was so loose you had no idea what gear you were in or shifting into. Getting into reverse required slamming the lever to the right against the plastic console before pulling back. My plan was to replace the clutch disc and pressure plate and to rebuild the transmission. From the beginning I planned to drop it myself, but I called around for quotes to rebuild at shops, in part because I have never done this before. The lowest I found was about $1000 if I dropped it myself and brought it in; many shops said they couldn't/wouldn't work on something this old. I'm not doing a factory restoration so this was something I could not afford. Besides, I want to do as much work myself as possible. Let me again state that I had never rebuilt a transmission; I had never even removed one before. Due to this fact I had some trepidation about taking on this project. However, I did a lot of research before starting. AutoZone has the basic steps outlined on their website for free (requires registration on their site). The Haynes manual for the Z cars also explains the procedure and has illustrative diagrams and pictures. There's also this thread here on the forum: http://www.classiczcars.com/forums/showthread.php?42884-FS4W71A-Transmission-Assembly-Photos-%28Jan-1971-240z%29 The final clincher for me was speaking with my grandfather. He's always tinkered with cars; his first car was a 40's Packard and he's been working on them ever since. He told me that the first time he opened a transmission he was terrified, but it turned out that it actually wasn't that bad. For parts I started with the transmission rebuild kit available from AutoZone, with synchronizers. However, I must warn anyone who reads this in the future: THIS KIT IS WORTHLESS! While the synchronizers are correct, an extra fifth is included and only one of the six bearings (why? this transmission only has four) is the correct size. The single gasket included doesn't fit anywhere, but the needle bearing for the input shaft is correct. The oil seals are also correct. AutoZone was kind enough to let me keep the correct parts while issuing a refund, but I still needed the missing parts. I needed the bell housing and adapter plate gaskets, a new clutch fork dust boot (mine was hard and so it crumbled during removal) and a transmission breather (I snapped mine when trying to remove the rear extension housing). All of these parts are interchangeable with the Roadster 5-speed transmission, so I ordered them from datsunparts.com The applicable part numbers on the site are 2194 (clutch fork dust boot), 2203 (breather), and (2481) gaskets. Dean was very helpful, verified that the Roadster parts would work, and expedited my order. I would highly recommend his site and will be ordering from him again. I ordered the missing bearings by their Timken part numbers from Amazon. This was a good solution because the bearings are carried by Amazon and are thus Amazon Prime-eligible (free 2-day shipping or cheap next-day). I also wanted to replace the spring that retains the clutch fork on its ball pivot since it was worn, and it's a good idea to replace the output shaft lock tab washer whenever you remove it. These two parts were ordered from ZSpecialties. They aren't listed on their site, but if you call them up they can get a hold of them. In this manner I managed to cobble together a transmission rebuild kit. If I was to do this again I would purchase a kit from a business specializing in Z cars. While my methods may have resulted in lower monetary cost there was much hassle and wasted time. The above-listed sources detail the rebuild process step-by-step. I'll just name a few pointers for anyone in a similar situation who finds this thread in the future: - You'll need two floor jacks. A transmission jack or a large adapter plate might be helpful, but I didn't have or use either. A floor jack instead of a jack stand under the engine block will allow you to tilt the engine to make mating easier. - If the bell housing doesn't come off easily check if you missed any bolts. I missed two on my first pass; they were completely covered in friction material dust, grease, and road grime. - While everything is apart you'll want to clean it. Any bearings to be reused should be cleaned only in clean gasoline. I cleaned other interior parts and surfaces with gasoline and brake parts cleaner. My wife scrubbed the casing exterior with steel wool pot scrubbers (isn't she great?). Any surface that came in contact with water I wiped down with alcohol to ensure no moisture remained. - The adapter plate needs to be secure in order to drive out and install the shafts. While a bench-mounted vise would be easiest, I don't have one. Instead, I screwed the adapter plate to a piece of 2x4 through its bolt holes and then clamped the wood to the edge of my workbench. - Take apart the gear and shaft assembly over a container. There are a number of easily-lost parts: three detent balls and springs held in by plugs, four detent balls between the shift rods in the adapter plate, a ball under the speedometer worm gear, and a ball under the thrust washer adjacent to 1st gear. Placing these parts in labelled baggies would be wise. - Test the shifting performance of the transmission repeatedly at the various stages of re-assembly and installation. You'd hate to get it in the car only to discover a synchronizer assembly had dislodged. - The clutch pressure plate fits on the flywheel in a specific orientation. There are three dowels on the flywheel; each dowel mates to a specific hole on the plate. If the plate doesn't press on easily, rotate the plate and try again. This wasn't mentioned in any of the instructions or the clutch kit. - Before re-installing the transmission you can make a few modifications to tighten up the shifter. You can insert a greased washer next to the shifter bracket on the striker rod, and use a bolt and nut assembly with greased washers to secure the fork to the striker rod. (see attachment, original image credits to Blue's thread linked above) - It may be helpful to have an assistant hold the transmission by the shifter bracket from the cabin through the cutout in the tunnel; this will assist in getting the right tilt to mate the transmission to the engine. - The transmission should slide in easily. If not, drop the transmission, loosen the pressure plate bolts, and recenter the clutch disc with the shaft centering tool. - While re-installing the clutch slave cylinder check the dust boot on the piston and rod for cracks and tears. New slave cylinders are only $20 on Amazon. Remember to tighten up the rod so there's no play in the clutch fork. - The A-series transmission can't use the brass bushings commonly referenced to improve shifter feel. Instead, you need machined conical bushings to go in the bracket. ZSpecialties sells the appropriate bushings; I'm sure others do too. - There are two easy ways to refill the transmission (use synthetic 90-weight gear oil) without any sort of pumping device. Many stores sell a valve and tubing assembly that connects directly to the oil bottle. My wife held the bottle in the engine compartment while I directed the tubing into the fill hole. Had this not worked I also purchased a length of aquarium tubing in order to fill from the side. The transmission is now back in the car. I hit 3rd gear every time and the shifter is much tighter (some play will always exist as a result of the "monkey motion" assembly). To anyone wondering whether they can do this on their own, I would say go for it. While there were a few tense moments I learned a lot, had genuine fun in this project, and can claim something few people have done. Next weekend's project: rebuild the carburetors with a ZTherapy kit.
-
Thanks for the suggestions; I've actually got her up and driving now. The fuel tank and lines overhaul is on the to-do list. I've actually ordered the ZTherapy rebuild kit, so that's the next weekend's project. As far as I can tell the carburetors have been woefully neglected and the choke is not correctly set up at all. I actually start better with the choke pushed all the way forward, even on a cold Utah morning. To get her started right now I have to lightly tap the accelerator while starting and then continue to do so for about a minute. Then I have to wait about 5 minutes at idling before being able to drive. It's a pain, but at least she starts!
-