grannyknot
Free Member
-
Joined
-
Last visited
Everything posted by grannyknot
-
 Zed Head, modern windshields and the sealant they use now do make the glass a stressed member of the unibody, not sure if our old windshields could handle the strain. Tomo, your idea about the stress gauges is much better then my loony laser plan, stress gauges would give us some real data, But then I'm not racing the car, I'm happy with minor improvements.
 -
Mike, I never get tired of looking at your engine bay
-
Not Z related but I stumbled on to this site today and it's pretty fantastic. http://www.earlydatsun.com/index.html
-
I changed to an electric pump for a few minor reasons, they are cheap, reliable, offer consistent flow, I wanted to change the route of the fuel line so it wasn't taking a tour of the engine bay. Now it comes out of the trans tunnel, straight up the firewall and dead heads into the carbs. I eliminated the return line altogether, also there is parasitic power loss from a mechanical pump, granted it's not much but all of these items together were enough reason for me. Chris
-
This is what I ended up with, http://www.fuelpumpu.com/vehicle-search.aspx# 2.5-4psi, mine measured out at a solid 3psi and that is better then what I had, hopefully I can finish the 1/4 mile this coming season. Chris Electric Fuel Pump E8016S Attributes Type Solenoid Volts 12 Inlet Type Strainer Outlet Size 5/16 in. Outlet Type Hose Bead GPH (Free Flow) 30 Max Pump PSI (Not System) 2.5-4.5 UPC 080044089940
-
Mark, now you have thinking about a neat little visual experiment that wouldn't be too difficult pull off. Two pieces of sheet metal bracing secured to the top of each shock tower with cheap red dot laser pointers mounted and pointing directly at each other. Then somehow suspend a piece of thin tracing paper (perhaps mounted in a frame so that it is taught) between the two laser pointers then aline the red dots so they shine at the same point on the paper. Mount a camera and take that Z for a serious rip. With luck you would be able to see the single dot separate into two dots depending on how the frame of the car was being stressed. Vibration could play real havoc with the camera and the mounting of the pointers... there is a way to do this just got to give it some thought. Chris
-
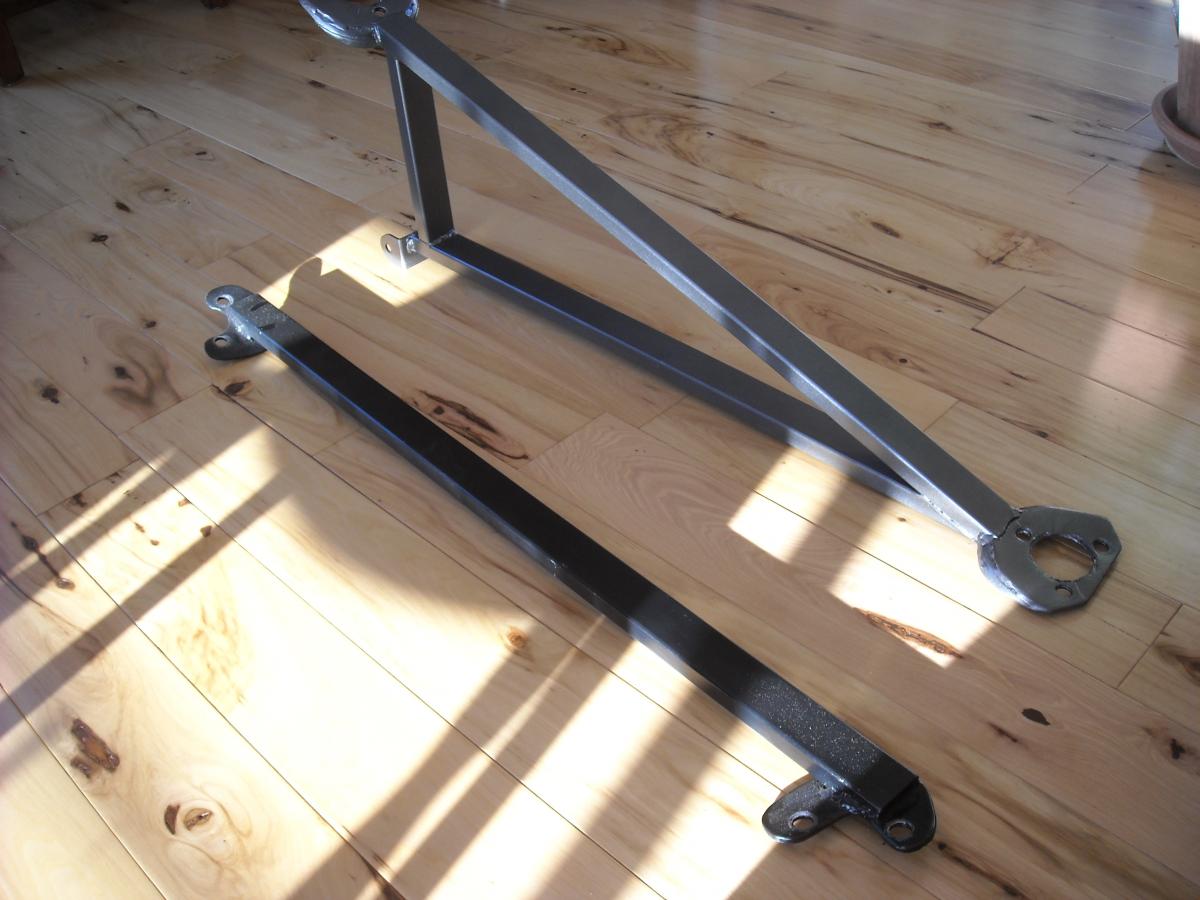
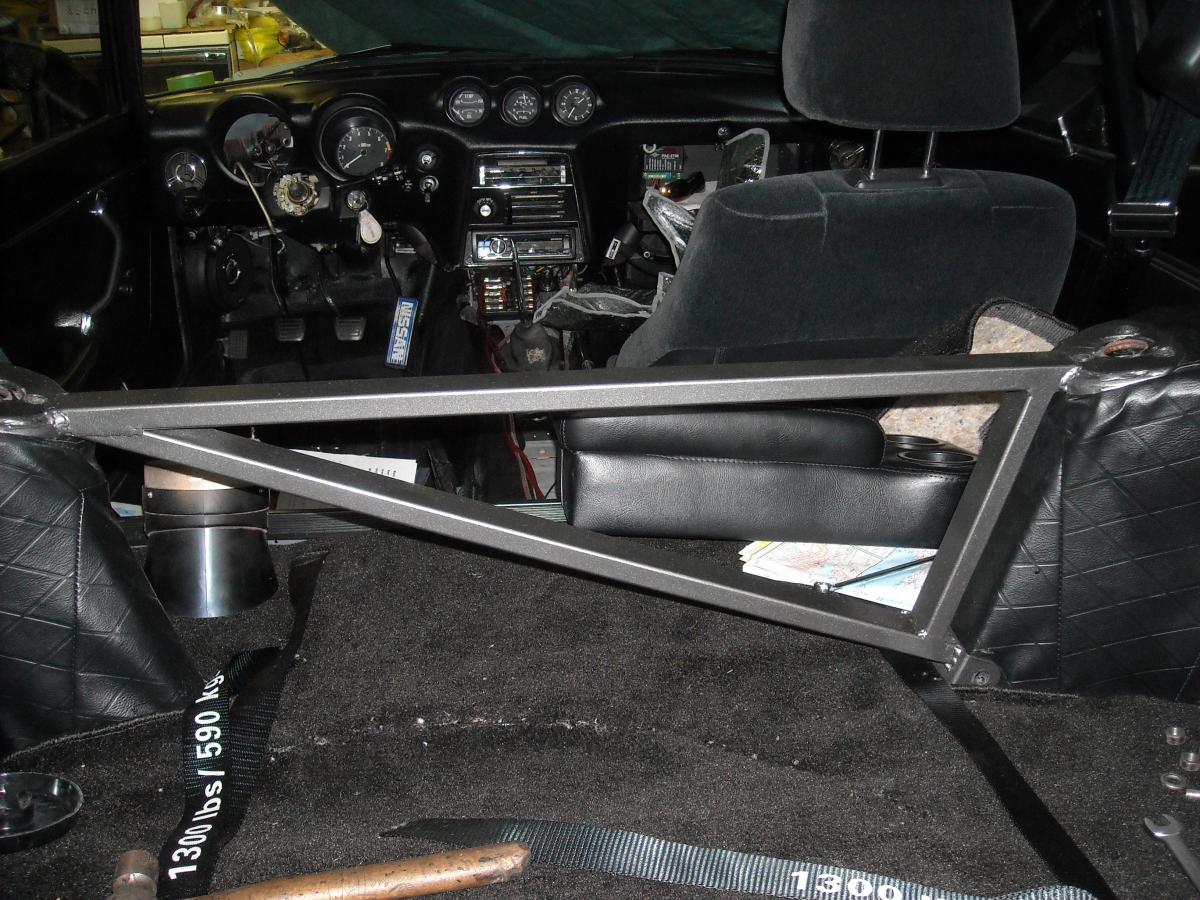
Thanks for all the replies, some good ideas bouncing around. I built the black single bar rear brace in the foreground a couple of years back, It seemed to me to really tighten up the rear end, but then read somewhere that the triangulated rear bar was even better so I put together the grey one behind it last fall. I haven't had a chance to wring the car out since I put it on BUT I noticed right away that most of all the squeaks from the interior panels had disappeared. I hadn't really noticed how loud they were until they were gone. This is the new version of the triangulated front shock tower brace, I just smoothed it out from the first one I built. Well that answers my question, also another good thing about having the diagonal bar attach to the lower passenger side shock tower is it's a great place to secure a fire extinguisher that is easily reached from the drivers seat. Chris

-
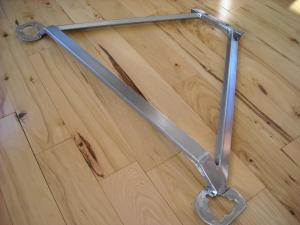
This is the rear shock tower brace I made for my Z, I'm now making up a bunch of other sets for guys in my local Z club and started wondering if there might be an advantage to fixing the bottom of the diagonal brace to one side over the other. Can anyone see an advantage one way or the other? Thanks, Chris

-
As the old saying goes," The rust you can see is only 10% of what is actually there" I've found that to be pretty accurate.
-
Cap'm, if you do produce an old style 5spd map please put me on a buyers list. Thanks, Chris
-
Bart, I'm sure your service manual says what it says but that is the exact opposite of everything I have read. I did quite a bit of study on it when I changed my rear end over to an R200 3.90 to match a close ratio 5-spd. Lost in translation perhaps?
-
I noticed after tightening the the nuts on the front and rear swing arms (after lowering the car to the ground) when I replaced all the rubber bushes with new ones, that the new rubber bushes also locked the swing arms so there was very little movement. Unlike poorly designed poly bushes that make the swing arms stick, the new rubber bushes allow movement but also act like a spring by bringing the swing arm back to the position they were tighten into. Would it be beneficial to sand down the sides of rubber bushes and lubricate them for easier movement?
-
Matt, it is just a joy to look through your photos, the level of detail is terrific. How far are you from starting her and going for the first drive?
-
Here's another one with good visuals, http://www.willtheyfit.com/index.php?width=215&aspect=60&diameter=15&wheelwidth=7.5&offset=0&width2=235&aspect2=45&diameter2=17&wheelwidth2=9&offset2=20#content
-
Adam, you could also drill the jets out, ultimately faster and cheaper. http://www.classiczcars.com/topic/50563-silver-soldering-jets/
-
rossiz or anyone, are the lash pads the only way to adjust the wipe pattern on the rocker? If the wipe pattern is off to one side does that mean the cam or the rockers have not been ground properly?
-
What Mike W. says, I went from the Pertronix unit to the 123Ignition distributor and am very happy with it. I set it once and haven't touched it since. With programable mechanical advance you can try any profile you like and change it in an instant to some other profile.This spring I'm going to start fooling around with the vacuum advance feature to see if I can improve the gas mileage on long trips. Chris
-
Chas, early Z's certainly had the the flash to pass on the signals stalk, but I can't comment on the relay.
-
Don't forget the rectangular pads that isolate the tank from the car body, glue or tape them to the tank before raising it.
-
Nissan still carried them this time last year.
-
Michael, part of the problem is the 14" wheels, they may have been right for the 70's but don't help fill the wheel well. I have cut springs on other cars with good effect. I have used a hack saw, band saws and even hand held electric cuttoff saw. Just don't use a cutting torch. Top or bottom? Maybe I'm just making myself feel good with no justification but I have always cut 1/8th off the top and 1/8th off the bottom. I wouldn't do that to a progressive spring though. If you are going to stick with the 14"s I would think you could take an entire coil with out much worry. Chris
-
I didn't use any adhesive on mine, just pinched the welt tight around the lip.
-
Arrange the shift forks(1/2,3/4,5/R) in their neutral position, with the striking lever and rod installed in the rear tail housing, lower the whole assembly onto the tranny with the striking lever moved off to the far right so it can clear the shift forks as you lower it. When there is about 1/2" between the aluminum tail housing face and the center steel adapter plate face move the striking guide (the hub that the shifter ball sits in) to the right so the striking lever can slide in between the shift forks, then lower the tail housing the rest of the way to mate up with the center adapter plate. Practice this a few times before putting any sealant on the faces. It's a tricky maneuver but after putting it on and taking it off several times you'll get the feel of it. Chris
-
Chas, that looks very promising. One of the things that I found the most irritating about the early wiring diagrams was the inclusion of A/T circuits. There were very few early cars produced with A/T . I just found it confusing when I was trying to track down a fault. I'm looking forward to the finished product. Chris
-
Love the wheels, do you know what make they are?