EuroDat
Free Member
-
Joined
-
Last visited
Everything posted by EuroDat
-
 I used the same Energy Suspension kit, but for the 280Z. One thing you should consider before you start is that the PU bushes transfer more road noise than the rubber and also make the ride harder. The black bushes are graphite impregnated and dont require periodic lubricating. Just my 2 cents Chas
 -
Goodluck with. Its a good idea to leave it a while with the acetone atf mix. The pin is so tight that the fluid might not penetrate that far. Keep us posted. It will be interesting to see when it comes out. Chas
-
What can I say. Spindle pins were invented to give us restorers nightmares. Its probably the most dreaded job you can do on a Z. The one your got looks like it came straight from hell. The press looks like a good investment. You would never had flog that pin out with a hammer. For your dounut you could try heavy gauged steel water pipe. Use a 3/4" inside a 1" pipe or 1" in 1-1/2". That will keep in from collapsing I hope. Your using a 20ton press which can destroy just about anything in its way. You could also try 5/8" grade 8 bolts. They are close to 16mm so you might need to grind them done a bit to get enough clearance. Try to get them as long as possible (2" or 3" long) cut the heads of and drop them in the hole and keep pushing through like that until it comes out the other end. The drivers side spindle pin on my 280z kept me and my mate of the street for a hole saturday and sunday morning. I had an anvil from the next door neighbour, a couple of different lenghts 1/2" bolts and plenty of heat. I wasnt looking forward to doing the other side and the dam thing came out so easy that I could reuse it. Maybe your other pin will be easier. Cant imagine it being any worse than this. Dont give up on it. It seems disapointing but your getting there, just a little behind your schedule.
-
Thats a good thread, lots of info/ideas to think about. Thanks Mike. I never really thought much about doing the inside of the rails and such, but since Bart started this post ive been enlightened. Mmm something else for the "things to do list" Chas
-
That Eatwood spray tool looks neat, but I dont know if it will be any benifit with bad rusty sections. Its not easy to treat rust in those hard to get places. One thing for certain You should not paint it. That only Hides it and let it do its dirty work unnoticed. I have used a fish oil based treatment in the past, but it only lasted 6 months and then you had to retreat it. I think the crown oil spray is similar. Chas
-
I would test it with a bit more pressure to compensate for the temp difference. More towards the 18 - 20 psi @ room temperature. Fill it with water and use air to pressure the core. You want as little air as possible. Let it stabilize for 15 - 20 minutes check the pressure and then again after another 15 minutes. The reason for this is because its full of water and very little air. The water temperature has to be stable and the same as the surrounding temperature. After that the smallest leak will show up quickly. An alternative is to fill it with air and submerse it in water and check for bubbles. Chas
-
Your problem is that you tightened the worn pinion bearing using the fsm specs. Now the geometry pinion/crownwheel is off causing it to whine. This is always a touchy operation. A lot of people have this problem after changing the pinion seal. What I have done with succes, 30k km and no noise is as follows: Mark the position of the old nut before removing it. Replace the seal Fit the old nut to original position. Check the tension on the nut with a tension wrench. Go back and forwards to make sure its right. It will be less than the fsm specs. Use a new nut and tighten it with tension wrench settings. Lock the nut by punching in tab. Hopefully it will be a lot better You can still do this since you know the position of the nut before you started. Goodluck Chas
-
LOTS of Heat on the out outside only. DONT heat the pin, it will expand and seize up. You need to heat the outside. That way it will expand and give you a better chance at getting the pin out. Dont direct heat through the cotter pin hole. Its tempting, but that will heat the pin more the the hub. You need to keep the pin as "cool" as possible otherwise it will expand and soften. Then you will only mushroom the end and make it harder to get out. Use a big hammer. A small hammer doesnt have the force. The more you hit it the more it will mushroom the pin. And a driving pin a little bit smaller than the spindle pin. If you dont have one big enough a 1/2" grade 8 bolt will be ok. A long one with the thread section cut off. It also has a nice big hex head which helps protect your fingers if you have lousy aim If you can get your hands on a press. That will make life a lot easier. I would still use heat on it and then press it out. Spindel pins, they can be the biggest PITA. Goodluck with it. Mine came out like yours, in pieces:disappoin Chas
-
You can check them using a tyre lever or something like that to move it up and dowm. The rubber will flex a bit, but if there is a bad one you will notice the differance. Just remember the the wheel and spring are trying to push the arm downwards. So you have to lever it upwards to check play. It just works like a simple counter lever. Wheel pushes up, spring pushes down and the bush end "pushes" up. IMO if any are suspect, I would just replace the lot. They have done well for 40 years, time for retirement. Spindle pins are a PITA. Every Z owners nightmare. Tools have been invented to make it easier. This link show how to replace step by step. Z Tech Tips Suspension (AtlanticZ.ca) || |Â |Â Â |Â Â Â |Â Â Â Â Â |Â Â Â Â Â Â Â |Â Â Â Â Â Â Â Â Â | Chas
-
The Z store doesnt have them anymore. The Nissan part number is 11061-N4200 so you could try Courtesy Nissan if they can track one down. A few years back they cost $28,00. Still plenty of good second hand ones available. Datsun 280z Thermostat Chas
-
You could use the thermostat housing from a 280Z. They have extra sensors for the EFI management. Motorsport! Thermostat Housings - The Z Store, Nissan-Datsun 240Z-260Z-280Z-280ZX-300ZX(Z31/Z32)-350Z-370Z Parts Chas
-
The camber and caster adjustment could be done by using the LCA bushes and threading the tension rod to correct caster. I wonder if anyone here has done this to a standard tension rod? I am using a Tension rod T/C kit which improved the steering over bumps a lot. Now I just want to fine tune the alignment. Without any changes the only adjustment you have is toe-in. Tension rod T/C: Motorsport! Tension Rod T/C Kit, 70-78 240Z-260Z-280Z - The Z Store! Nissan-Datsun 240Z-260Z-280Z-280ZX-300ZX(Z31/Z32)-350Z-370Z Parts LCA Camber adjusting bushes: Motorsport! Camber Adjustment Kit, Front, 70-78 240Z-260Z-280Z - The Z Store! Nissan-Datsun 240Z-260Z-280Z-280ZX-300ZX(Z31/Z32)-350Z-370Z Parts Camber adjusting insulators: Motorsport! Street Camber Kit, Front, 70-78 240Z-260Z-280Z - The Z Store! Nissan-Datsun 240Z-260Z-280Z-280ZX-300ZX(Z31/Z32)-350Z-370Z Parts Just wondering how this works. I figure you need to drop it out of the tower and rotate it 1/3 turn to change camber settings. They say "simple camber changes" If you have to drop it down to change setting its not that simple, but it doesnt require any cutting. The rear sets are the same price as the control arm adjusters. Only problem on a 280Z is it drops the ride height 3/4". The 280Z had taller rear insulators. In the 240/260Z they are all the same. Chas
-
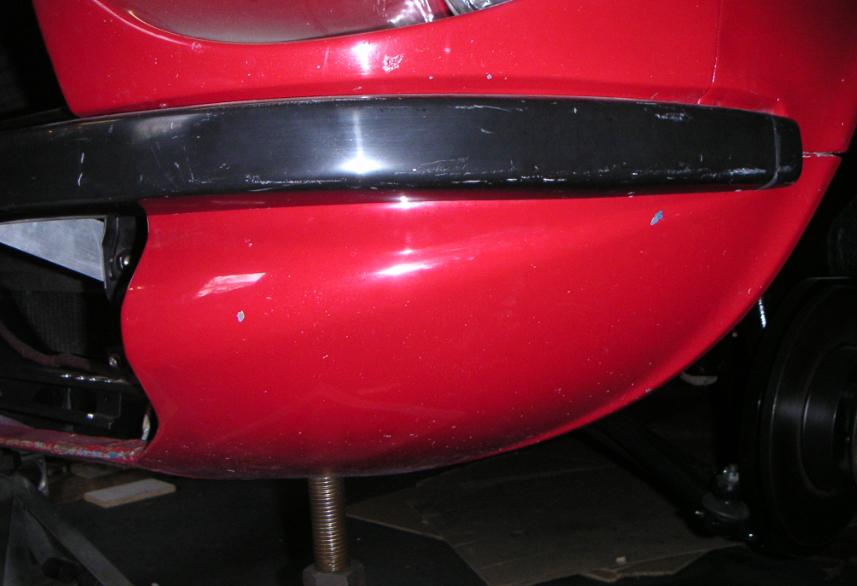
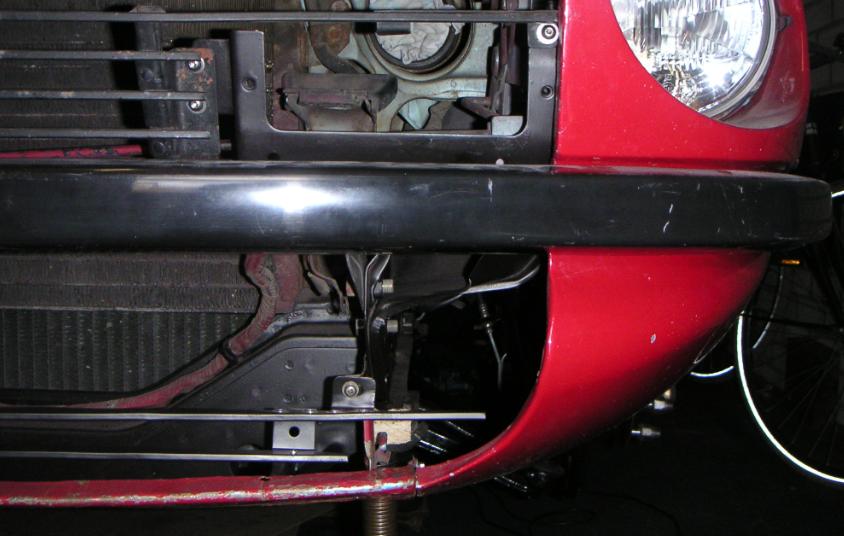
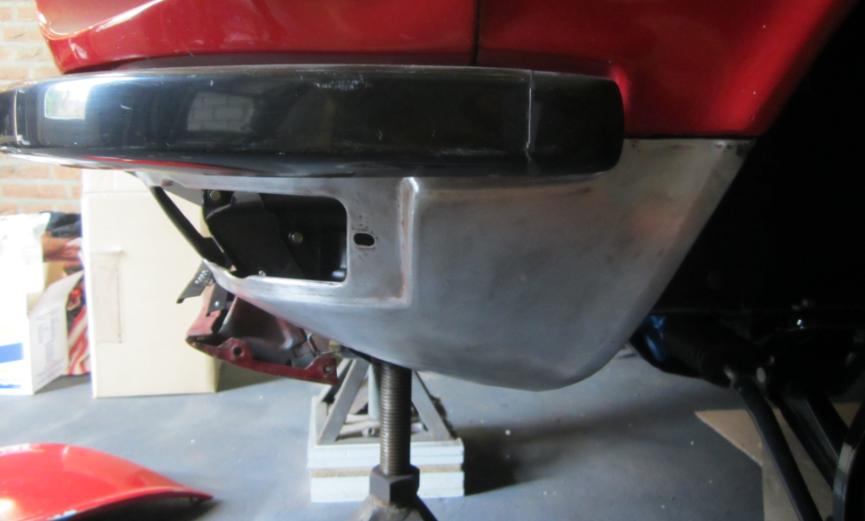
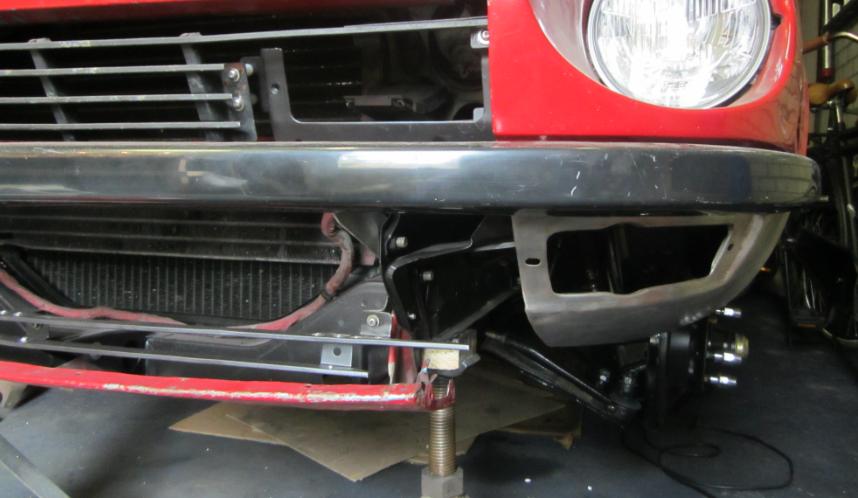
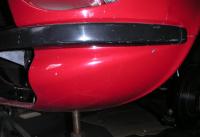
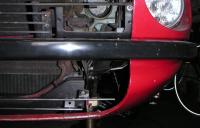
I took some photos this morning. What I want to do is replace the 280Z valences with the 240Z with lenses. Make a support between to to valences, because the centre section will not fit the 280Z. The crossmember is too low. Fit the 260Z airdam. Make a new grill, without the 280Z lenses. My only concern is how low is the 260Z airdam. Will it be low enough to cover the lower section of the crossmember frame? Does anyone how the measurements. Bumper to lower edge of airdam? Chas


-
Can you give some background to the question? Do you have a block, but no head? Or you have a head but its not repairable? The L24 used the E31 en E88, thats all documented in the link in Pomorza's post.
-
Chris, This is an awesome project. You have done so much work on it. Definitly something to be proud of when its finished.:classic: I get the feeling your next project will have a tittle like: When down to the sheet metal shop, and picked out my new datsun.LOLLOL Chas
-
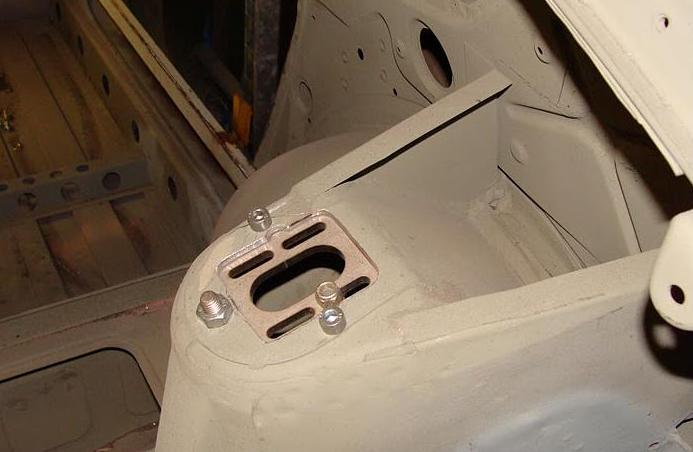
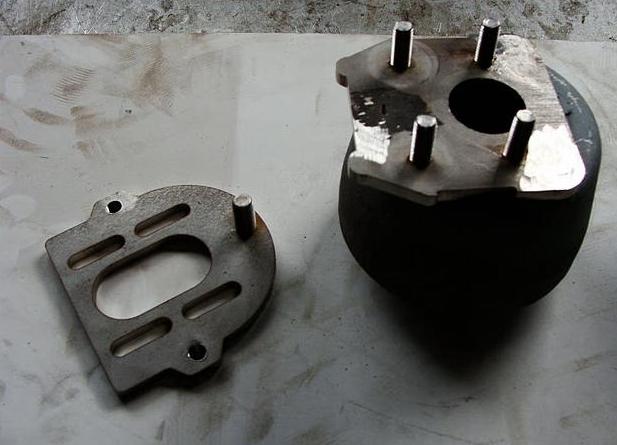
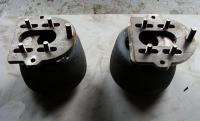
I have some photos from someones elses project. I was interested in the way he did it. This guy did a really impressive job rebuilding:cool: the car and documented it on his photo blog. The site is gone, or I cant find it anymore. Maybe he will come across this thread oneday, so I hope he doesnt mind me posting a couple of his photos. The rubber insulators are not original, so Im not sure where they come from, but it shows how the body in the strut tower is cut away to make room for the chamber plates. Its not for the faint harted because once you start there is no way back:ermm: Chas


-
What Phantom says is possible, but it makes the front very flexible. the airdam has to hold it all together and its not designed with that in mind. I have heard that they can start vibrating at high speed. My 280Z has 240Z bumpers and I am planning to go to the 240/260Z valances, but then I need to fabricate a bracket across the front under the radiator section to keep all the panels in the right place. The 240/260Z front section will not fit because the front cross member (in front of the radiator) is lower on the 280Z. It dips down about 10cm. The airdam will cover the contrction so its not visable. Chas
-
Tamo3, Ill post some photos today when Im back home. Homeboyx. Yer, something went wrong with post #37. I had two windows open and that post ended up here:stupid: Chas
-
Just use a propane or butane torch to heat the outside and twist the center bush until the rubber lets go. Then use a hacksaw to cut the outer bush tube. Thatsthe easiest way to do it. Chas
-
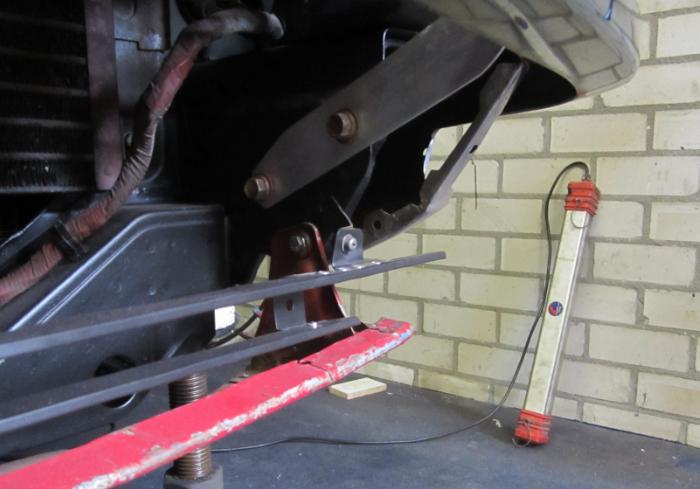
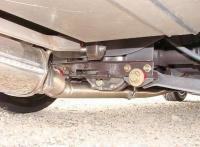
Hi Z boy mn, Thanks for your reply. I know mine pretty close, so 1.5° would probably be enough. I posted a photo of a home made rear toe in adjuster on your other thread "Builiding rear control arms". He was also using chambers plates in the strut towers. Chas
-
I found the photo. Its not very detailed, but it gives you enough info to be able to make your own. Chas
-
I have seen a modification involving just the brace behind the diff. The brace was cut and the center section removed. An adjustable bolt was then welded into place. This made toe in adjustment possible. Chamber adjustment was done using chamber plates in the tower. I have some photos that I can post tomorrow. Chas
-
I take it you used these control arm kits Motorsport! Camber Adjustment - The Z Store, Nissan-Datsun 240Z-260Z-280Z-280ZX-300ZX(Z31/Z32)-350Z-370Z Parts. I have always wondered if these would work well. They look like they can only do minor adjustments. Do you know how much (degrees) you had to correct? They probably give more suspension noise due to thin rubber bushing. Z boy m: if you were to use the units in your link. Can they do any caster adjustment or are they only for chamber? Does anyone have the ideal settings for the rear wheels? Thanks Chas
-
Double post
-
The only thing that will retract the shaft is the rubber boot. If it doesnt retract doesnt mean something is wrong with the bearings and spacers. Most likely a differance in flex in the boots or the bearings grease is starting to dry out and requiring more effort to retract. You can inspect them by carefully removing the retaining clip on the big end of the rubber boot. This way you can pull the boot back and check the grease and the balls. Slide them in and out to check them. If you have to grease them, you need to remove a circlip to get them apart. Be carefull, the bearings fall out and go everywhere if you are not carefull. Clean all old grease off and use high pressure bearing grease. They can be a pain to get back together. You just dont seem to have enough hands to hold everthing at once. Replace the retaining clip by using vice grips to grab the band and a screwdriver as a lever. Thats a bit of effort and practice, but keep at it and you will get it tight and secure. Left and right shafts are the same, but I would not mix the parts. Keep all the parts match. Chas