EuroDat
Free Member
-
Joined
-
Last visited
Everything posted by EuroDat
-
 Im in the proces of doing it. The TIU is finished, but haven't had the time to build it back in. Ill start a new thread about it when I get back at it.The car is driving ok now with the module behind the coil so the pressureis off to get it finished. Chas
 -
Hi Chris. It is important, but not for the problem your having. It won't have much if any effect on forth gear. The shim is to adjust the end play in the counter shaft. Too much end play you cause clunking sounds when the counter shaft moves forward and backward. I don't mean rotation, I mean its virtually moving towards the front or the back of the car. Occurs when you acelerate and decelerate. Don't get too excited and throw in an extra shim for good measure. The extra thrust pressure on the bearings can cause them to overheat and collapse. Pitty the tranny is out of the car. The tests I mentioned are quick and easy to do with it still in there. The way your going, you will be a specialist in Zed transmissions;)
-
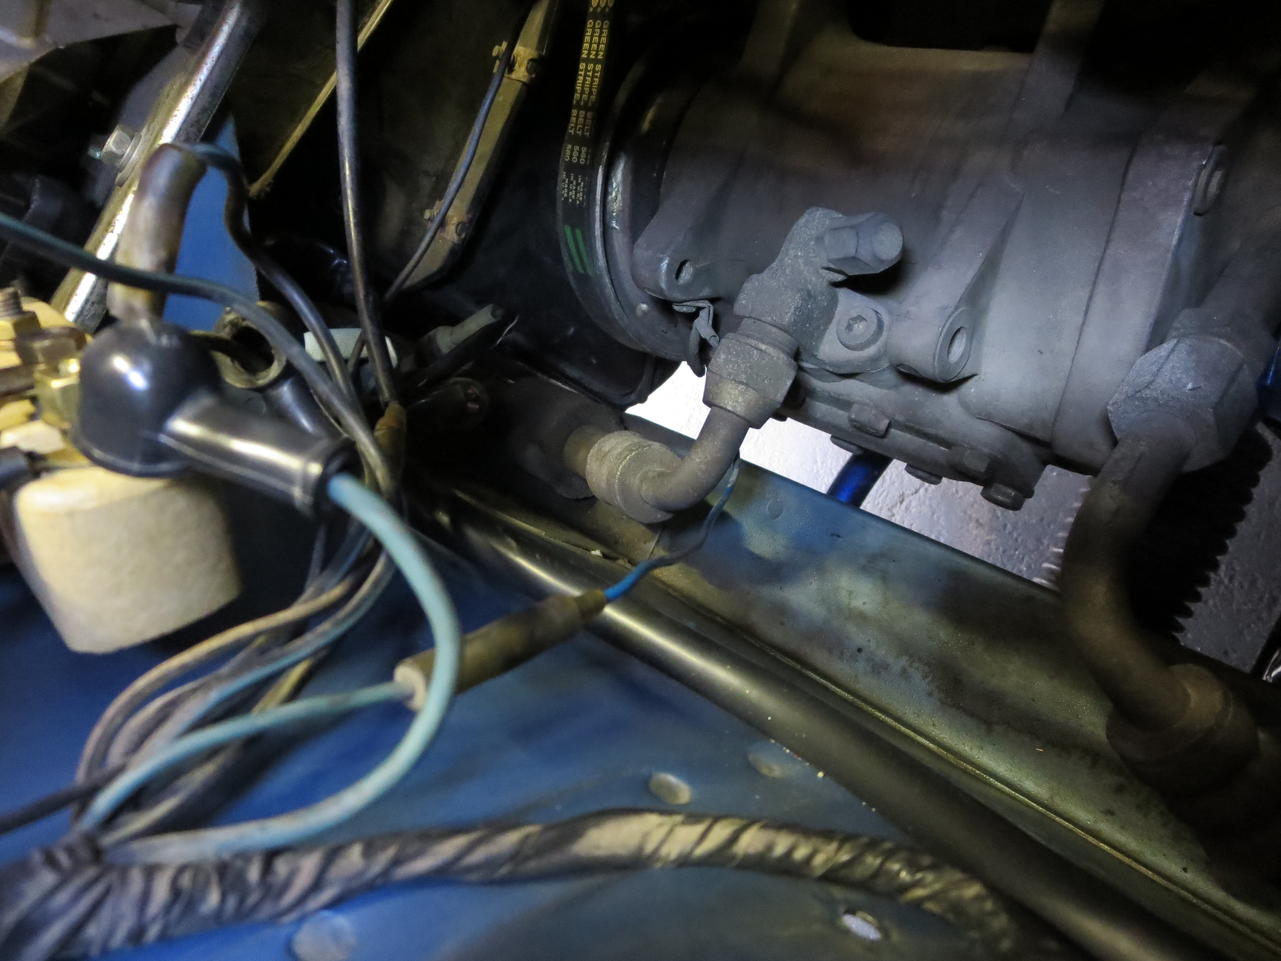
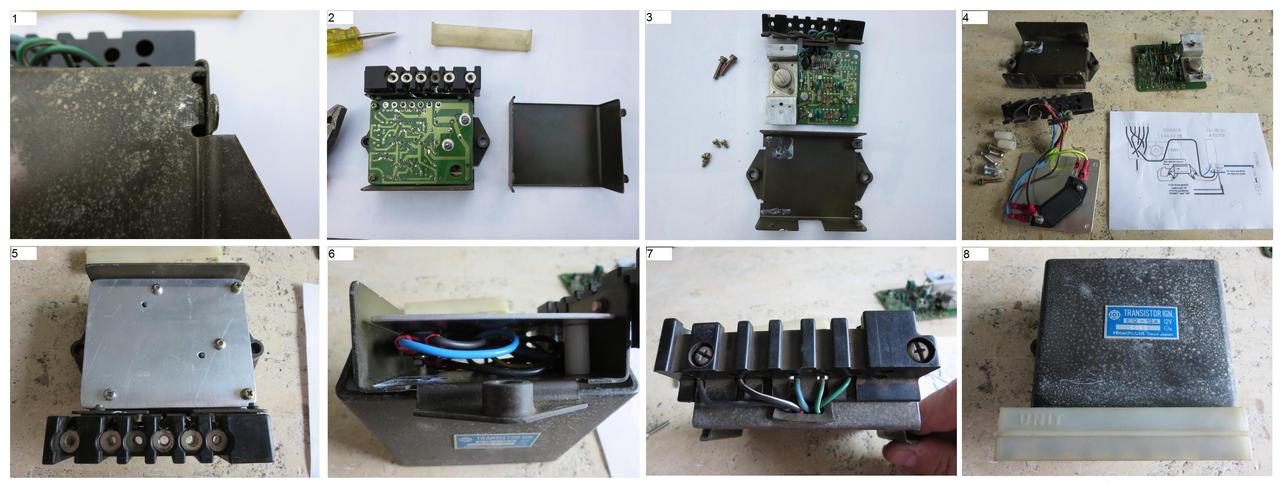
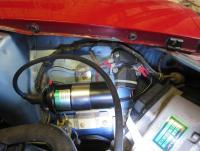
The wiring looks too stock to have a ZX dizzy, but I could be wrong. A photo of the dizzy would certainly clear that up. Here is a phot of the blue wire in my 77 280Z. It shows the connection to the AC compressor. I had a lot of problems with my TIU when it was warm and i did a crude HEI Module swap to see if it would help. Here is a photo of it now. I made it completly reversable so I could return it to original if it didn't solve the problem. I am planning to build the HEI module into the old TIU casing and get it back to stock looking. Not saying you should now change to the HEI module. There is still some checking you should do before you make that move. I just wanted to give you an idea what it is. Chas

-
It looks like you mean the frame rails. That is going by the photo you posted. Can you circle the area in question using microsoft paint or similar. If its the rail. The rails are not water tight, but once water gets in they work as a catchment area and hold it. There are lots of holes for mounting things like fuel lines etc and they are not completly seam welded to the floor pan which allows water to creep in during wet driving conditions. All that and the minimum rust prevention used in that era and you have a rust restoration just waiting to break through and show itself. A member in our local club drilled 5mm holes (2 in each rail) in the low points of his rails to allow water to escape. If rust has already started this wont stop it, but it could slow it down a little. Chas
-
Me niether. It that out of some sort of supplement with updates after the FSM release. Chas
-
Reading through this thread, I see some similar problems I had a couple of months back. I had bad fuel, lots of water in the filter and about two liters of water in the tank. After cleaning it all out, draining the and and a new fuel filter the engine ran normal again. When I took it for a drive I was lucky to limp back home with the engine coughing and backfiring. Went through the EFI bible test and found poor soldering on the aftermarket injector connectors and some minor things. It still would not run right once it warmed up. It was great cold, but once it warmed up bang it started again. The tacho was bouncing a little, but didn't seem enough to be the ignition module and it checked out ok. I thought it was due to the lurching forward and stallingof the engine. To eliminate the ignition I changed to a HEI Module and the engine has ran perfectly ever since. Im now in theprocess of fitting the HEI module into the old casing to keep the original look. It might not be your problem, but it threw me off, because of the bad fuel I had. The ignition unit played up fierce when it was hot. They are all getting older and prone to failure. Good luck with your problem solving. Chas
-
While you are visiting the xenons website, download the fuel injection supplement. Its inthe "Other" sections futher down the page. It has a great trouble shooting guide. Good luck Chas
-
That mistery blue wire is for the AC compressor clutch. If your car has factory airco it should be connected to a black wire that comes from the compressor just behind the pulley. Its not causing the problem the way it is now. Its shown in the 77 FSM in section AC37 and AC38. You should do the checks Zed Head posted. Sounds like it could be a defective ignition module. Chas
-
Hi Chris. Is it only doing it in 4th, not 3rd? Does it kick out with a lot force or can you hold it in gear with light finger pressure on the gear knob? There are a couple of things you should check before pulling the transmission. Jumping out of gear is often caused by poor adjustment in the shifter components. Some simple checks you can do: 1. Remove the center console and rubber transmission tunnel boot. Take it for a test drive and see if it still does it. The boot or console could be pushing on the gear lever knocking it out of gear. I have seen someone pull the transmission and replace components just to discover that the rubber transmission boot was pushing it out of gear.:stupid: 2. Check the shift lever bushes (2 side and end cap) for excessive play. Remove the rubber selector boot and visually check it for play. 3. Check the spring and the check ball for the 3rd/4th selector rod. Its the top one on the side of the adapter plate (The bottom one is 5th/reverse). Compare the springs for wear and tension. It could be worth swapping them to see if it improves. Do each check one at a time. That way if you solve the problem, you will know what caused it. If its not there than it could be wear in the center shaft bearing between the input and main shaft. You probably already replaced the neddle rollers, but they are not the only components that wear. The shaft contact surfaces can be worn. Or it could be the coupling sleeve, the synchronizer hub or the coupling teeth (teeth the coupling sleeve locks onto) on the gears for 3rd and 4th. If the teeth wear which can happen to forth when the bearings are worn and the alignment is off, that can cause this problem. I would expect that with a 4 speeds because it needs to be in forth a lot to get that much wear. Good luck Chas
-
Looking good, I like it:)
-
My ignition started playing up about two months ago. It started missing and stalling then would not start at all until it cooled down. Im now running a HEI module mounted on the coil bracket. It was a quick and easy $15 fix. Im also rebuilding the old ignition module with another HEI Module to clean up the engine bay and move the unit back under the dash. I can post some photo's. Chas
-
You should check the colour of your speedo gear. If its a manual with the original rear end it should have 3.364:1 diff ratio. The auto's had 3.545:1. The 280Z had the 3.545:1 in the manual and autos (R180 and R200). If the transmission came out of this model it will be reading off. The speedo gear should be black (17 teeth) for the 280Z with 3.545:1 Diff. You should need yellow colour with 16 teeth. Im not completly 100% sure of the part number. You could check with your local dealer. 16 teeth Speedo pinion (Yellow) P/N: 32703-P2616 Good luck. Chas

-
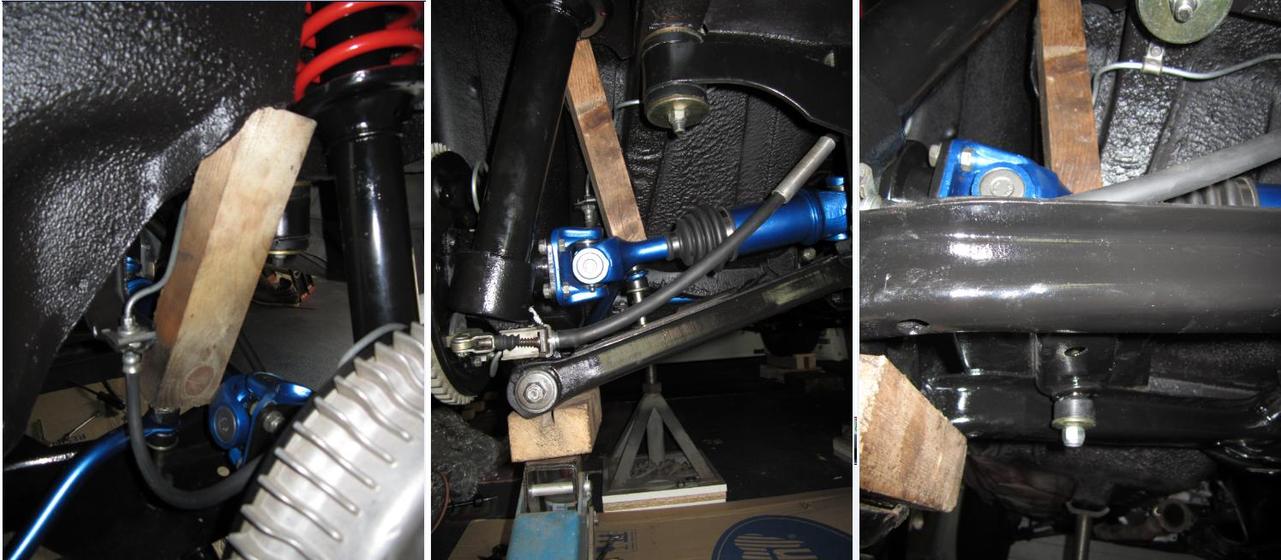
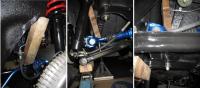
I managed to get them to fit with the bolt supplied with the energy suspension kit. I put the bolt in from the top and wedged a piece of wood between it and the body. That way I could compress the bushes enough to fit the nut. Here a some photos of the rear swaybar. Hope it helps Goodluck Chas
-
Good job. I agree with olzed. Sounds like someone overtightened them maybe trying to get to the next opening in the castle nut. If you tighten them to the torque quoted in the FSM specs, you can nudge them a little further to the next castle nut opening without overtightening them. You probably wont be removing them again, but if so or the next owner you have an easier job getting them free. Chas
-
Wheel cleaned up nice. Must feel great to drive with out any vibrations.
-
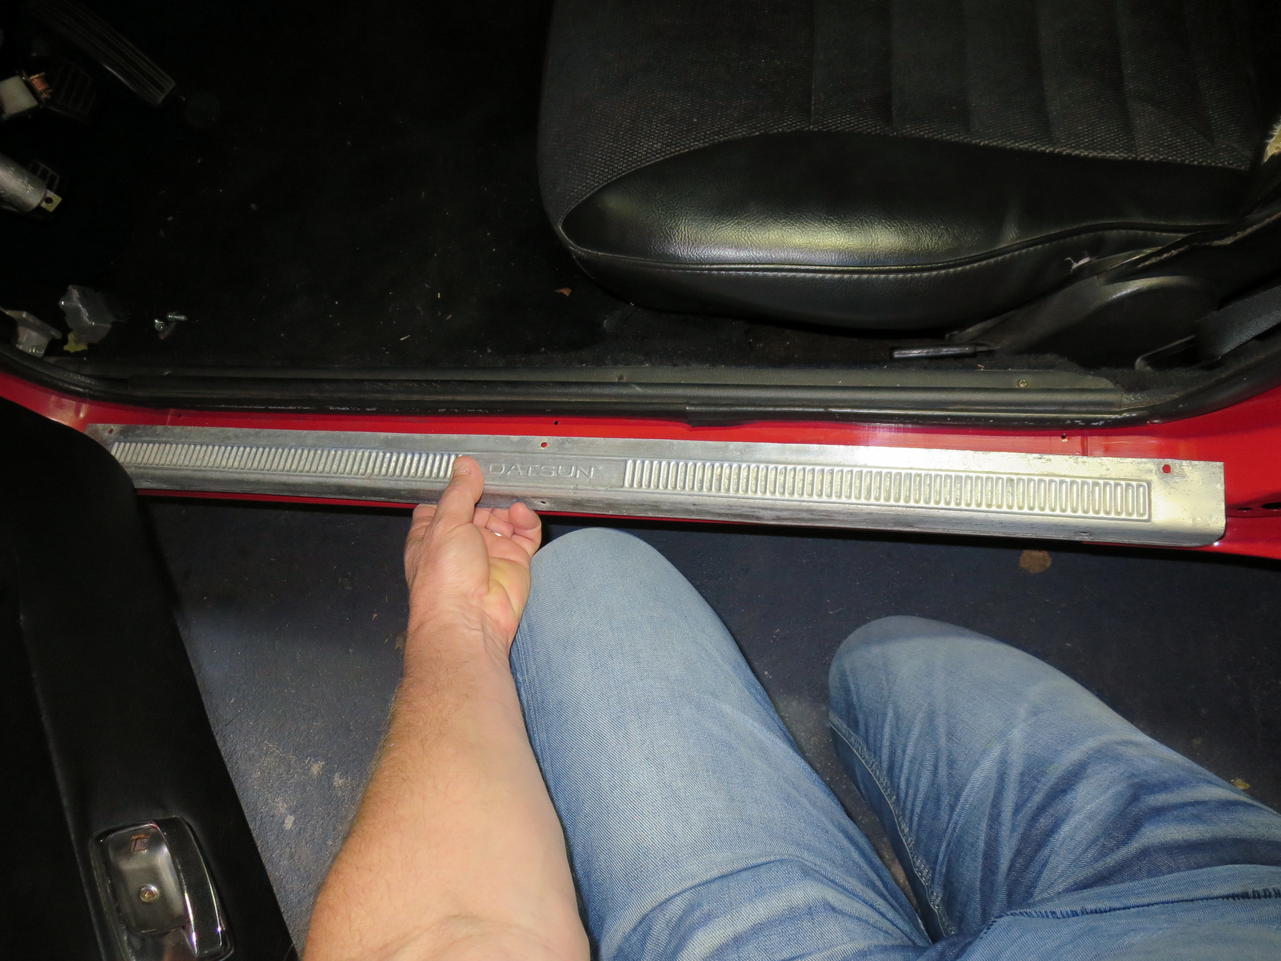
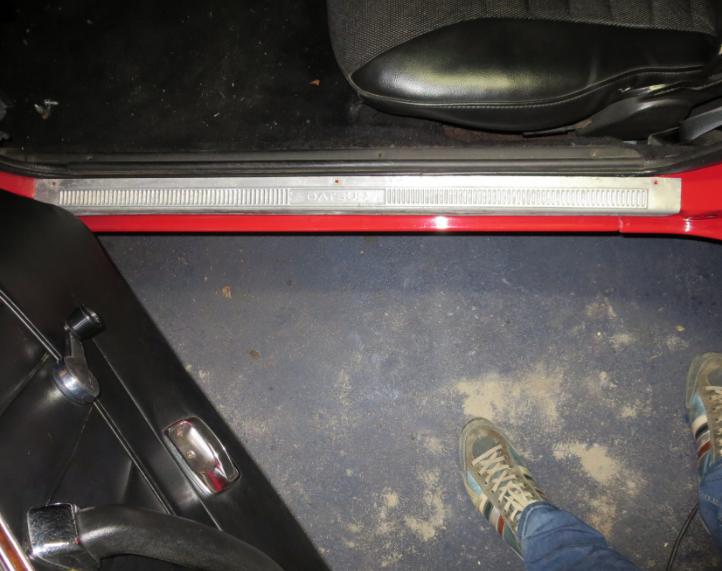
Thanks Rob, The holes are not the problem. These are simply too long. My 280Z came from California and was sitting in a garage under the PO's house until I bought it in 2010. It didn't have them when he got it, so the owner in the US removed them for what ever reason. I found another guy selling a set close by, but with out the Datsun stamped in the center. If you look in this photo you can see the three holes in the body and the difference in the sil plate length. I found the part numbers in the car parts manual Coupe P/N: 76950-E4100 (Datsun) to Feb 76 Coupe P/N: 76950-E4101 (Blank) fr. Feb 76 2+2 P/N: 76950-N3700 (Datsun) to Feb 76 2+2 P/N: 76950-N4100 (Blank) fr. Feb 76 I think I have the N3700 set for the 2+2. Thanks Chas

-
Welcome to the club James. The forum is great for advice and help when you need it or just social chit chat with other Zed owners. Five years standing on the street. Zeds like many other cars of that era are known for rusting away when neglected. If its mostly bolt on panels that have rusted, then you are very lucky. Floors can suffer a lot and are a pita to replace. What are your plans for it once swapped all the rust panels? Chas
-
I purchased a set of sil plates for my 280Z. The seller said they were for a 260Z. He was selling odd parts he still had after selling his Zed. They look great, but they are also too long. I think, and almost certain they are for a 2+2 or maybe something else altogether. The length of the long sils is 845mm and I need 745mm. As far as I can tell there is no difference in length between the 240, 260 and 280Z coupes. Just want to check here before a buy another set from another seller. Thanks Chas

-
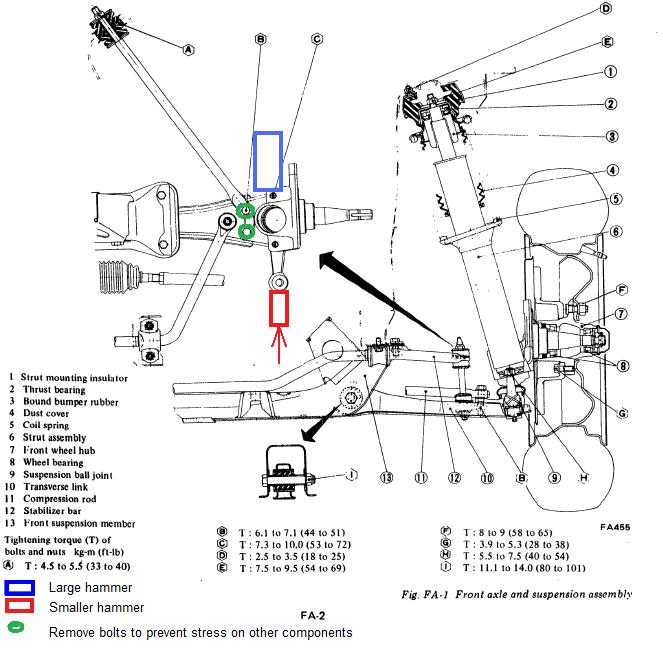
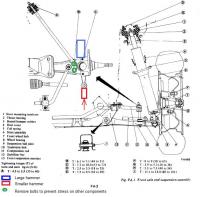
You can remove it two ways. 1. By using a ball joint puller or 2. Striking the side of the arm with a hammer to "shock" the taper and release the joint. I don't have a puller, but I have used the method described by olzed a lot with success. There are a couple of pointers to consider when you use this method because you can damage other components. Its not a good idea to try and belt the threaded shaft through the hole. The taperlock will nearly always be to tight and the top of the threaded section is weak because of the hole through it for the split pin. It will mushroom quickly and sounds like you are now in this situation. In the future if you do need to gently hit the threaded section use the nut to protect it (as Carl said) as much as possible. Reverse the nut to prevent damage to the castle section. Remember if the nut binds up on the threads it will be hard to remove later when the taper releases. Use a larger weight (hammer) on the oppersite side of the knuckle so the forces will consentrate in the knuckle when you hit it. The large hammer wants to stay where it is so most of the energy of the smaller hammer will be absorbed by the knuckle in between. This will briefly distort the taper and release the tie-rod. Having said that, you will have trouble finding room to hold a larger hammer on the oppersite side of the knuckle. The disc shield and lower control arm are obstructing you. I hold a large hammer behind the control arm and hit the front of the knuckle. Its like olzed said, a little hard to explain so I drew it on a section of the FSM. Its a good idea to relaese the torsion arm nuts to allow the suspension to move. Otherwise you can transfer all your forces to the lower control arm ball joint or the steering rack and damage them in the process. Chas
-
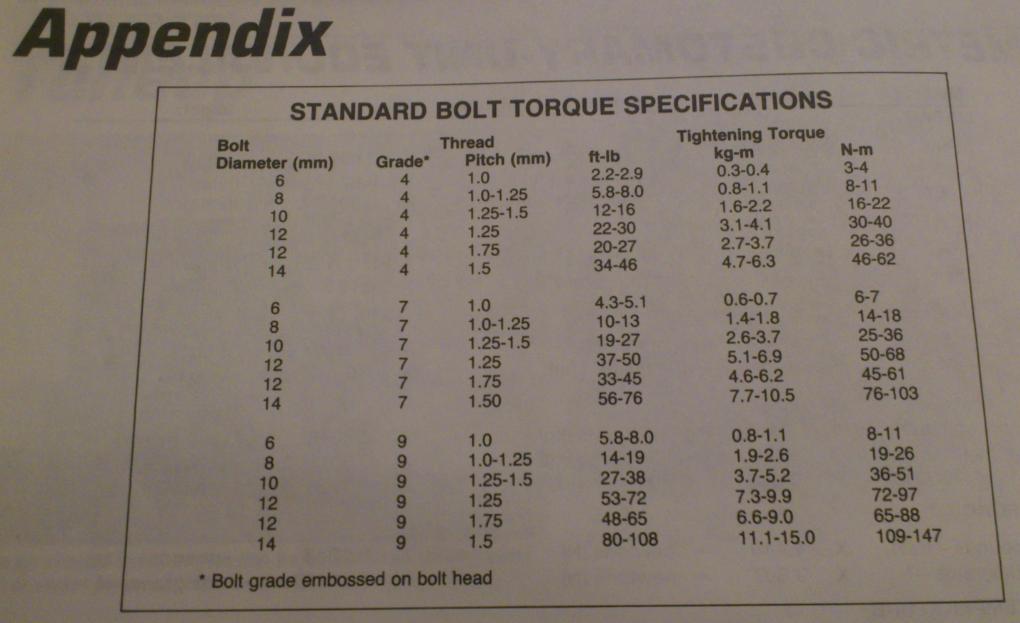
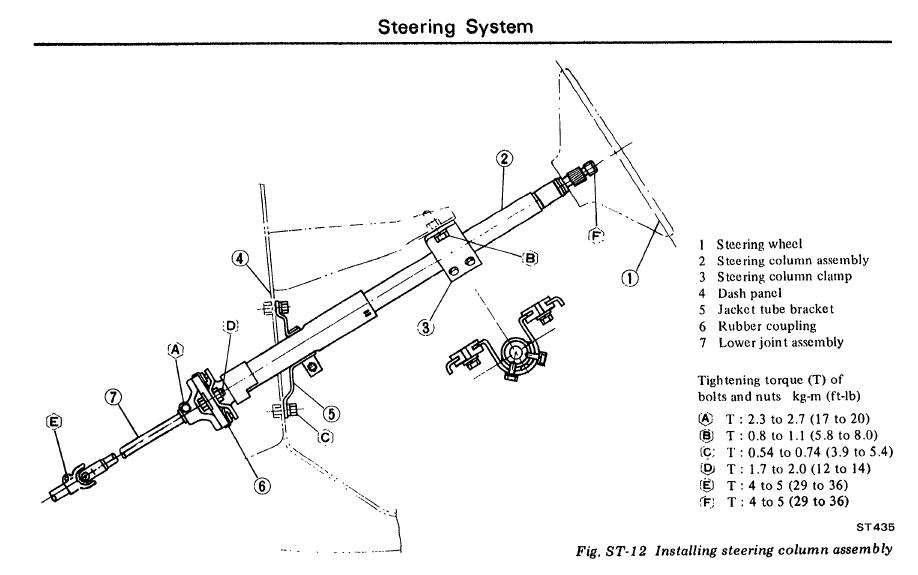
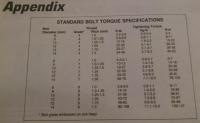
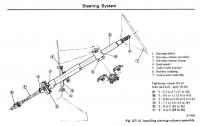
You can look up the bolts in the parts manual. See link Datsun 240Z/260Z/280Z Steering Column (Collapsible Type) For example the Steering column to firewall bolts are Pos#18, M6x1.0. P/N: 08120-61610. 4 pieces. Another method is to check the torque specification in the FSM and compare that to the torque table from Nissan. That table has the bolts and strength grade number; 4, 7 or 9. That number is in the head of the original Nissan bolts. Then you need to find the bolts with the right length. The example above would be "C" in the steering column 3.9 - 5.4ft-lb and the bolt table with the closest bolt is M6x1.0 Grade 7 (4.3 - 5.1ft-lb) Chas Datsun Torque Specifications.pdf
-
Just noticed this post. A bit late, but maybe still usefull info. Its not much of a photo, but going on your discription and whats visable in the photo it looks like a FS5W71B out of a ZX. What is commonly called the "close ratio" 71B. There are lots of different ratios in the trucks, maximas, 280Z en 280ZX. Not sure which ZX one it is. The ZX had three versions of the FS5W71B tansmissions. 78 - 7/79 (0.864 5th ratio) is the same as the 280Z and is not a "close ratio" box. Your photo looks like the 8/79 - 6/80 which had the 0.773 5th gear ratio or the 7/80 - 83 which has the 0.745 5th gear ratio. Chas.
-
Hi Chris, I used the Nissan uni joints for the "propeller" shaft. Like Zed Head said they are expensive, but you can adjust them with the shimes. Can't remember exactly which shimes wI used Wrote it down so I can look it up, but I needed different size shimes to get the tolerances right. Make sure you used the same size shime on opposite sides of the spider to keep the shaft centered. It took out the small high speed vibration I had. I used Moog uni joints in the two axles. Remember: The drive shaft can be one of the fastest rotating parts in the car when you drive in 5th at high speed. Chas
-
If your drive shaft has uni's with circlips, its probably fitted with the 240Z originals. Datsun 240Z/260Z/280Z Propeller Shaft Partnr. 37125-14627 uni-joint $54ea You can get different size shimes to get the tolerances right. Shimess 2.00mm 37146-14600 $0.60ea 2.02mm 37147-14600 2.04mm 37148-14600 2.06mm 37149-14600 KIT JOURNA :: Nissan Parts, NISMO and Nissan Accessories - Courtesyparts.com Courtesy Nissan still stock them. Chas
-
I was cleaning mine and it broke:(. Then I found out you can order them from Nissan for less than €1.50. Also helps if you fit the breather before you mount the diff under the car. They can be a tight fit and not much roomto move. BREATHER-C :: Nissan Parts, NISMO and Nissan Accessories - Courtesyparts.com Chas
-
A little bit of subject, but maybe interesting for some with auto transmissions. If you want these kits, you should google "Holden VL commadore nissan transmission shifter kit" In Australia Holden was using the Nissan RB3.0E engines and the 4N71B auto or the 5-speed manual transmissions in the late 85 through to 1988 Holden commadore until the Buik engine plant was ready for production. The VL was with the Ford Falcon one of the most popular cars in those years. All the auto transmission shops were doing these mods back in those days. See link in Gumtree. Kind of Craigslist in aussie land. VL Turbo Commodore Nissan Datsun Jatco Automatic Shift Kit Servic | Engine, Engine Parts & Transmission | Gumtree Australia Gladstone City - Gladstone | 1021151782 Chas