EuroDat
Free Member
-
Joined
-
Last visited
Everything posted by EuroDat
-
 I doubt it's caused by the brake switch. It could be a blockage in the piping to the front brakes.
 -
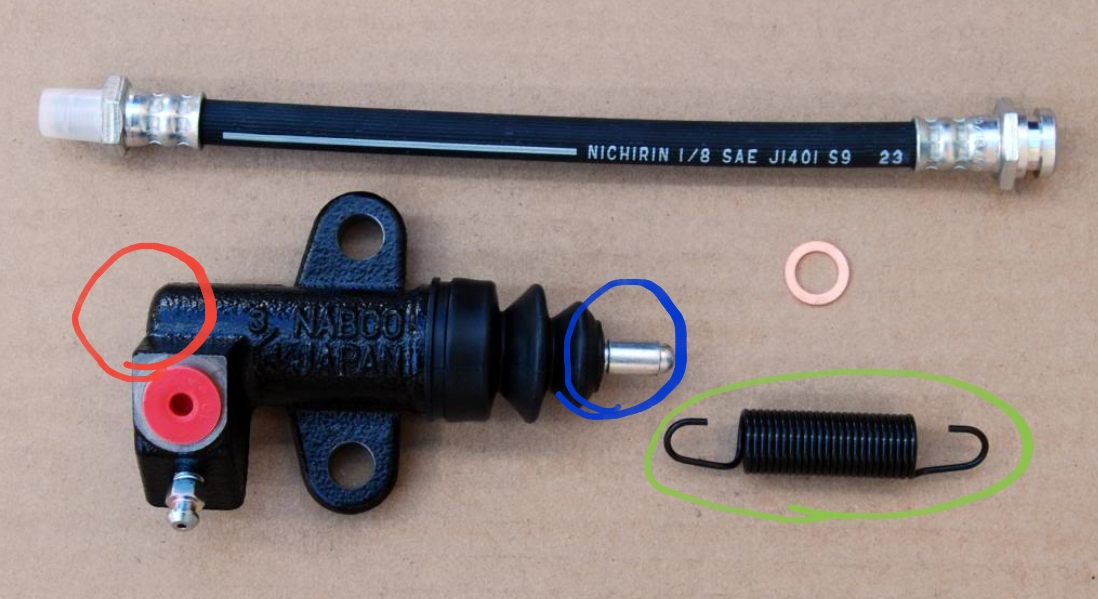
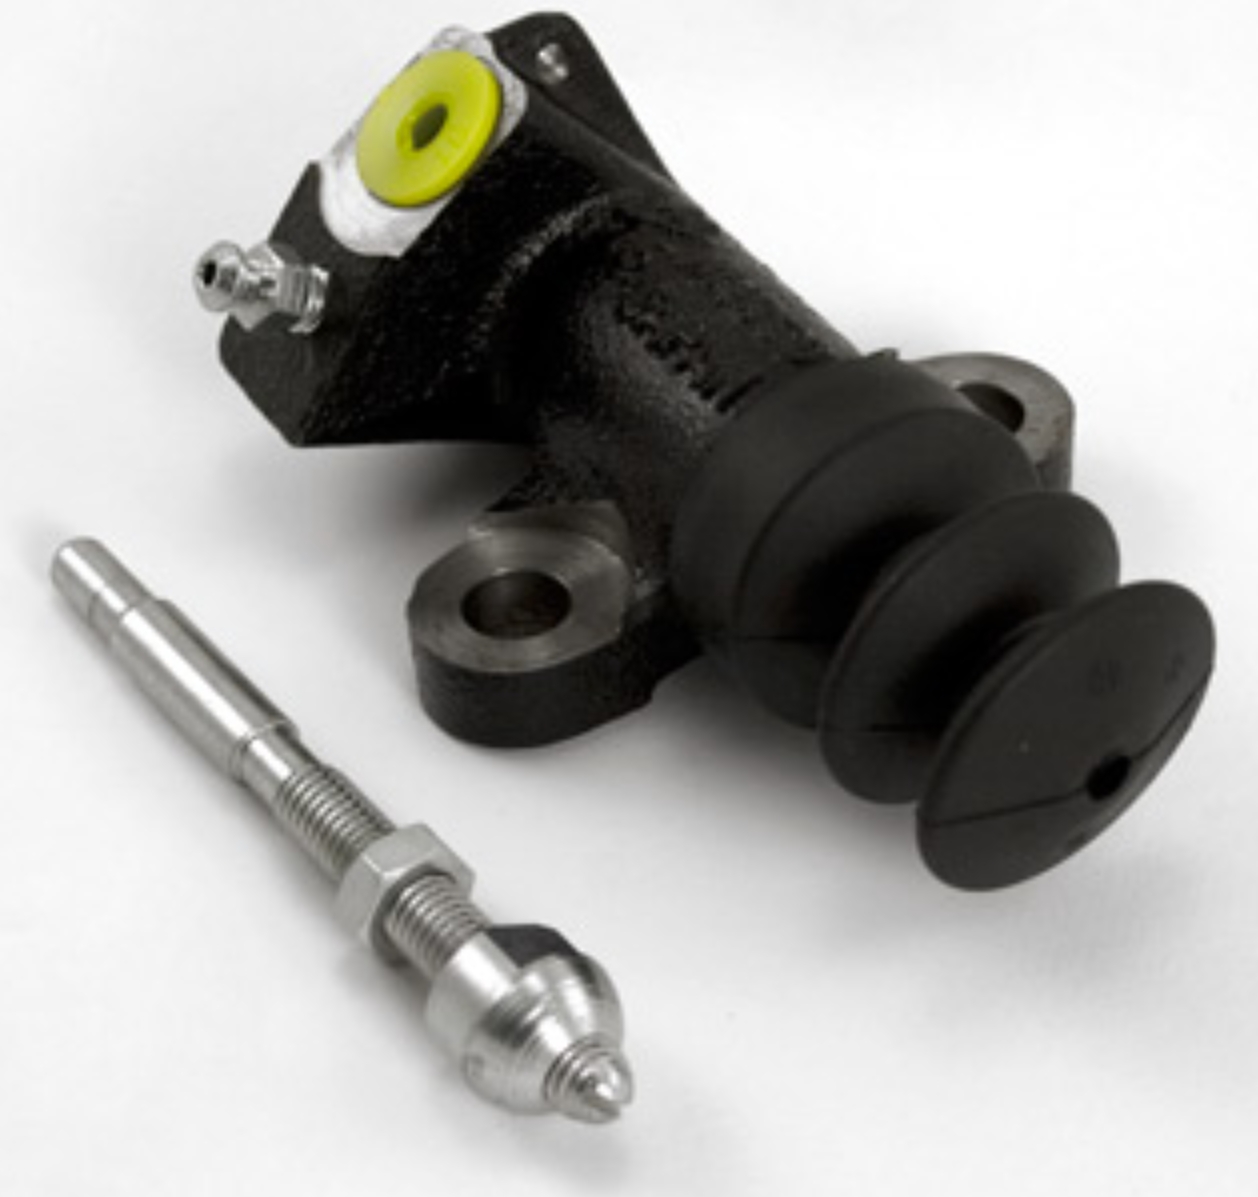
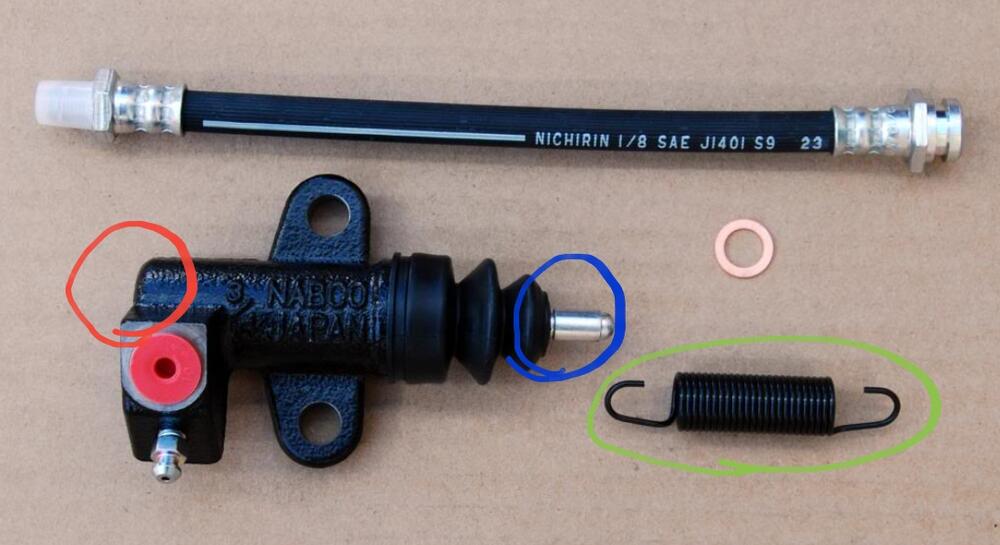
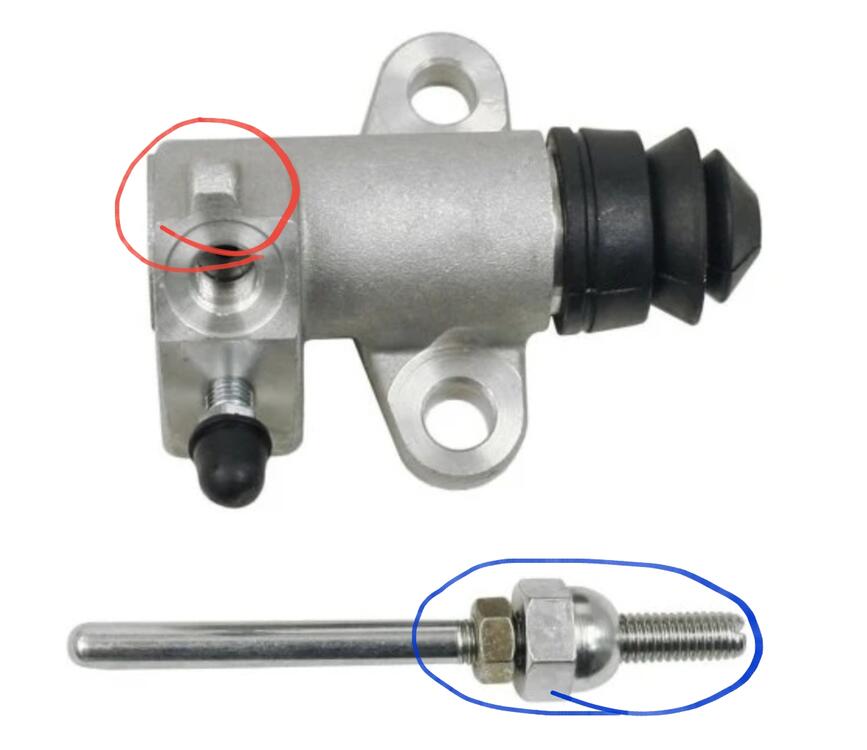
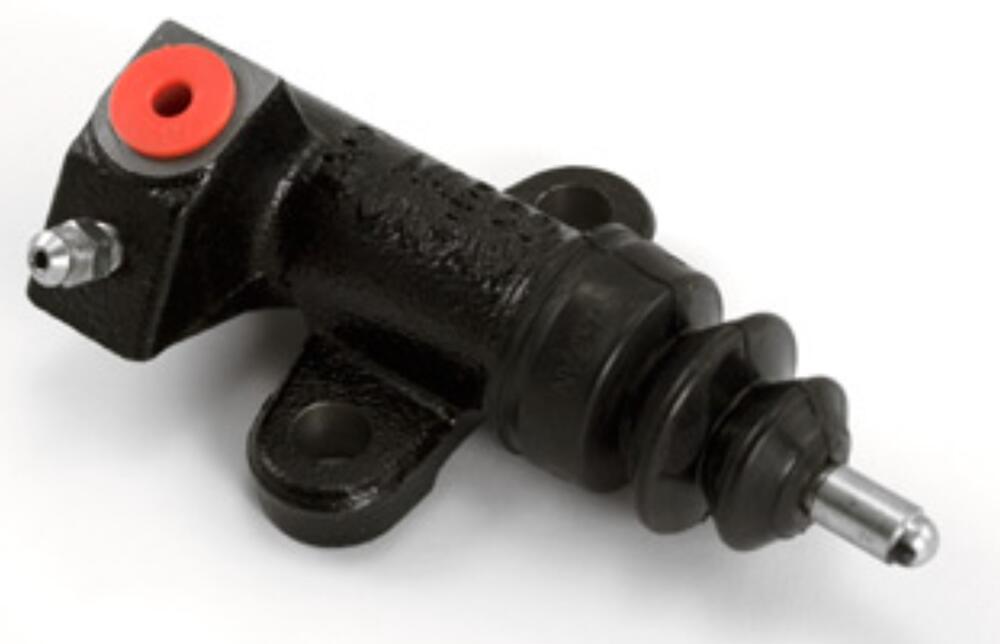
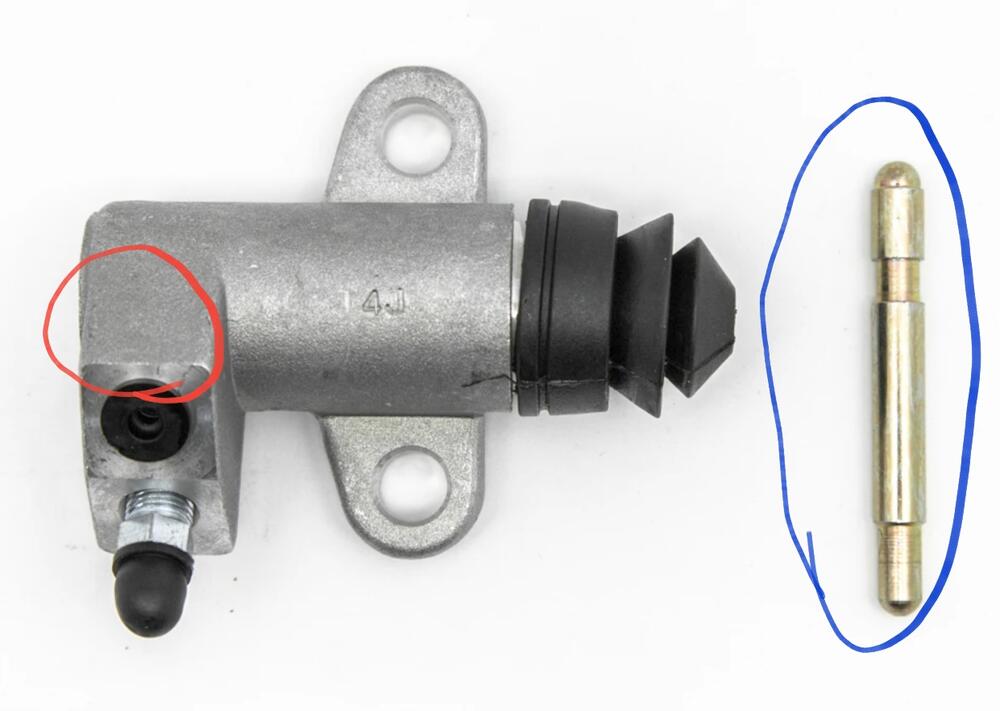
I googled "datsun 240Z slave cylinder" to check what was availabe. The first hit was a shocker from a webshop for Z parts. The parts are a mix match of the early and later types. Here they show a later type slave cylinder without the spring anchor point (red circle) and the non adjustable push rod (blue circle). Then they simple supply a spring (green circle) and describe is as early OEM nos parts. Early looks like this: Later type looks like:

-
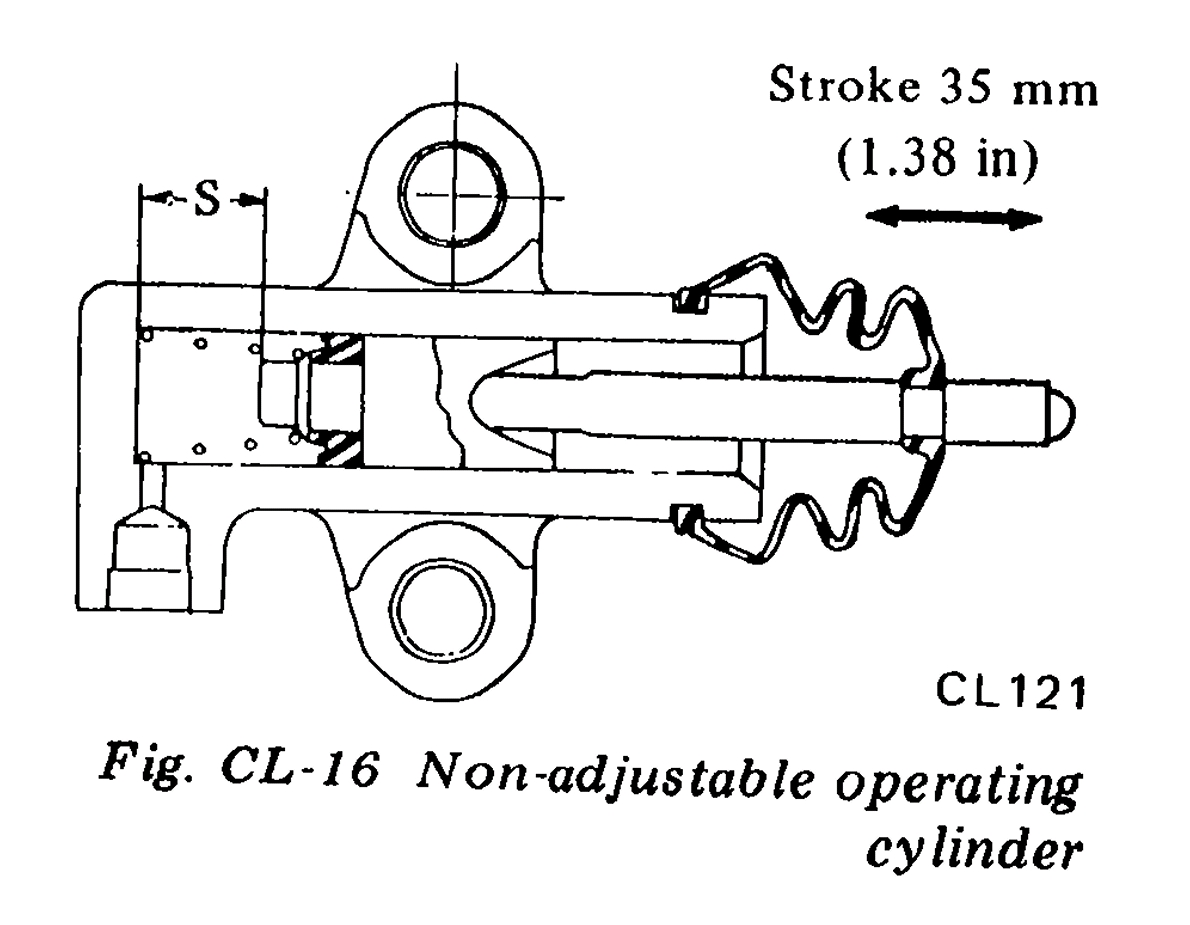
If you use the later version with the adjustable push rod, adjust the push rod as follows. 1. Assembly slave cilinder with push rod. NO return spring. 2. Adjust the pushrod until there is no free play. 3. With your hand behind the clutch fork push the push rod into the slave cilinder. It should travel approximatly 10 to 15 mm Into the slave cylinder. See diagram distance "S". Note: S is not 35mm. That is slave cylinder stroke or travel. 4. Adjust the push rod until this S distance is reduced 2 to 5mm. It must not bottom out. 5. Lock the push tod locking nut.

-
It's been a while since I had an early version in my hands, but I'm fairly certain the tab is on the end of the slave cylinder and irrelevant to which bellhousing is used.
-
You can use either, the function is the same, but you will need to adjust to early version occasionly or DON'T use the return spring on the later version. The later version self adjusts internally and the return spring will disable that function. You can use the adjustable push rod without the return spring.
-
Where does he get the time for this? I like his creativity.
-
The NAP-Z is a North American Production Z series engine. Not sure why they made an American dedicated Z series. It's tilted to reduce height for the 720 trucks etc. Some people say it is to clear the brake booster, but I think that is more a coincidence on the RHD cars. The brake booster is on the other side in LHD cars.
-
If the FS5W71B is out of a ZX coupe, dan most probably a "close ratio" and wel worth getting for $100. You won't find much use for the 71C stubby.. If it came out of a truck, than it bolted up to a Z series motor. They have the same bell housing bolt pattern as the L series but tilt the other direction. Here is a simple instruction to help identify the 71B. And the bell housing pattern.
-
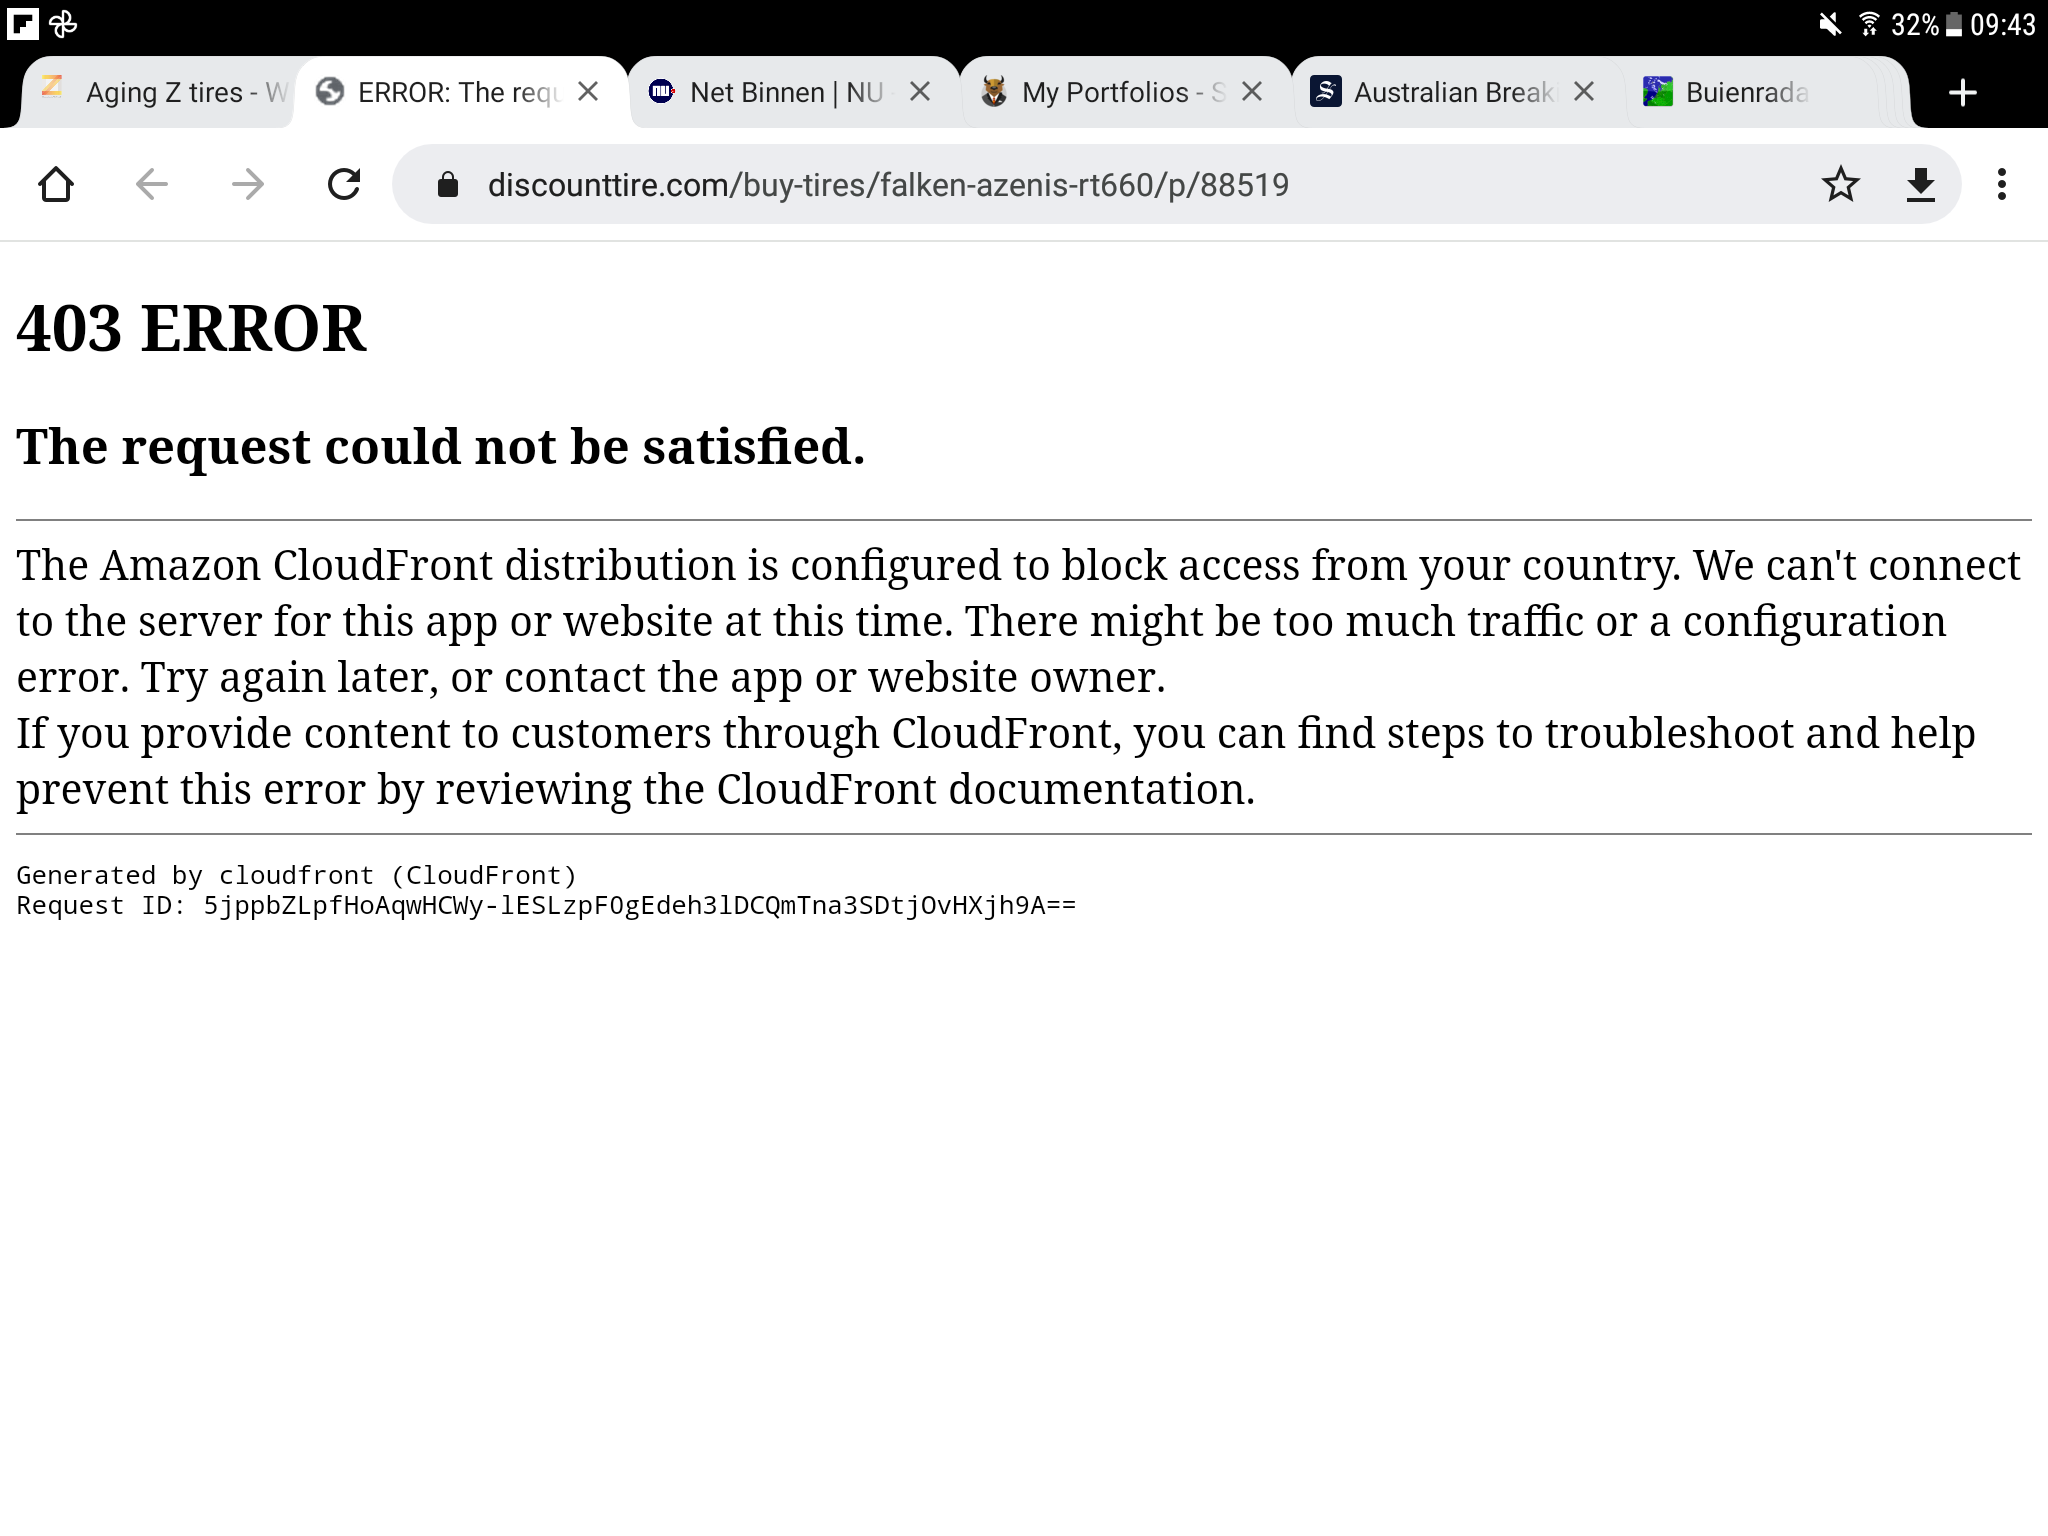
My Zed has 14" wheels running 185/70R14 tyres and getting older. I have been looking for alternatives, but a lot of the info is blocked here. Very unsatisfying🤐 Steve, can you post more info on the tyres?
-
Not sure, but is the dowel in far enough? I thought the dowel shoulder was flush with the flywheel surface. The shoulder prevents the dowel falling out once the pressure plate is fitted. Now the pressure plate is riding on the dowel shoulder.
-
Not sure, but is the dowel in far enough? I thought the dowel shoulder was flush with the flywheel surface. The shoulder prevents the dowel falling out once the pressure plate is fitted.
-
I was referring to the photo, but see now that he also posted a photo out of the fsm for the early type. If they start to clog up they can be a pita to reset. I think they may have removed the springs to stop the switch resetting before you fixed the problem. The springs would reset the switch when you released the brake pedal. Mine activates when I bleed the brakes, but resets after and I press the pedal down a thew times. If you can't get it to reset after repairing/replacing the faulty component, you can open a bleeder on the other section of the braking system, then slowly press the pedal down until the switch resets. Then colse the bleeder.
-
Something I have not tried, but know people that have done it. You can cut a thread in the cone section with an M3 tap, I believe, and use a M3 screw to pull it out with a claw hammer for example. The flare on the pipe is large enough that the thread will not effect its sealing. Like I said, never done it, but know of two peolle that have done it with no issues.
-
In the first post Seppi72 shows a photo of the later type. They don't have springs.
-
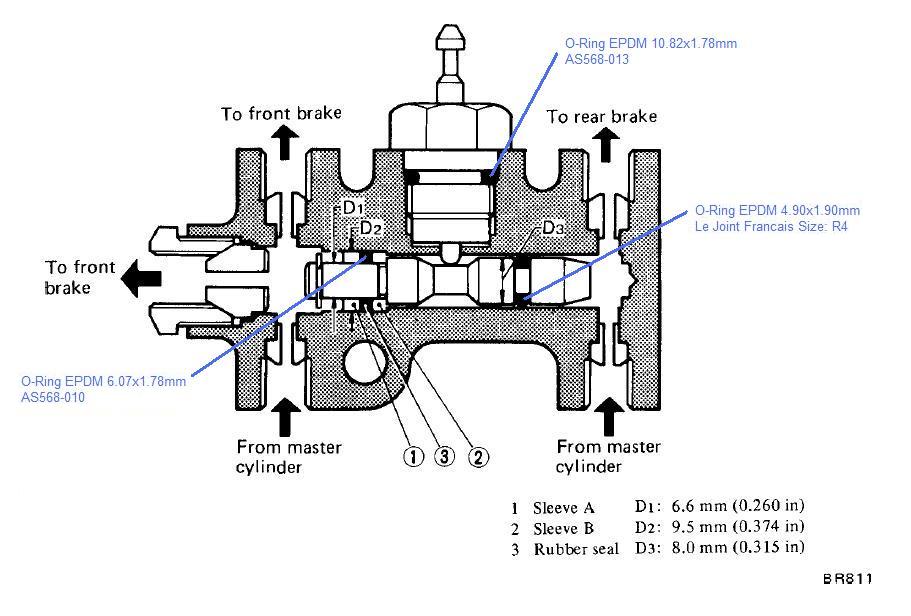
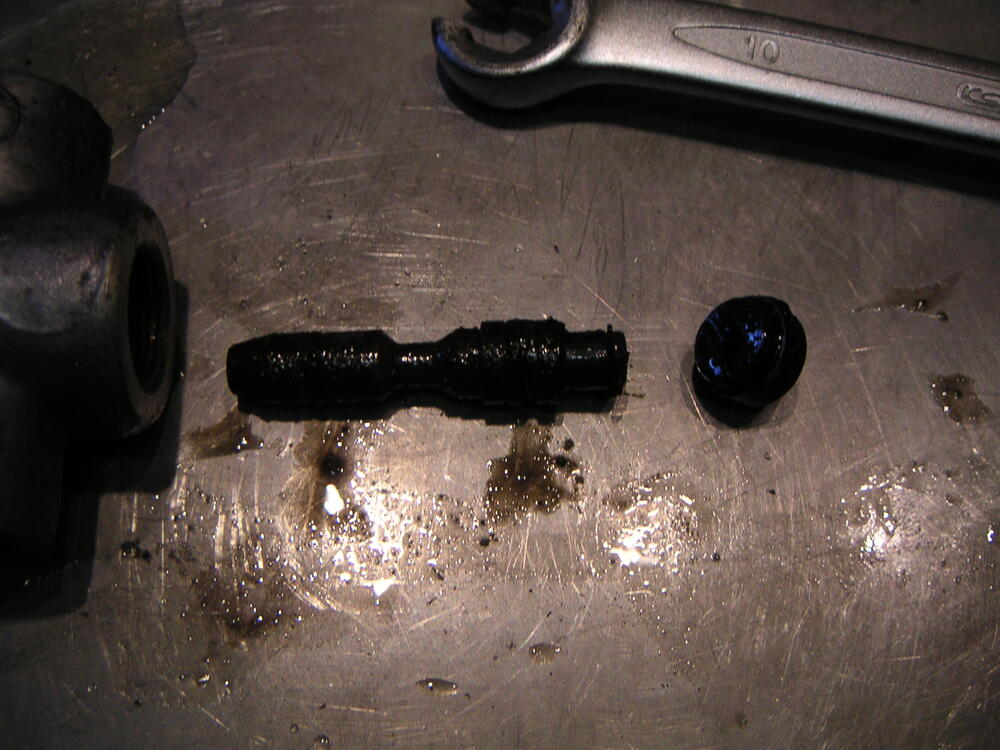
Ok, found it. You need EPDM rubber for brakes systems.

-
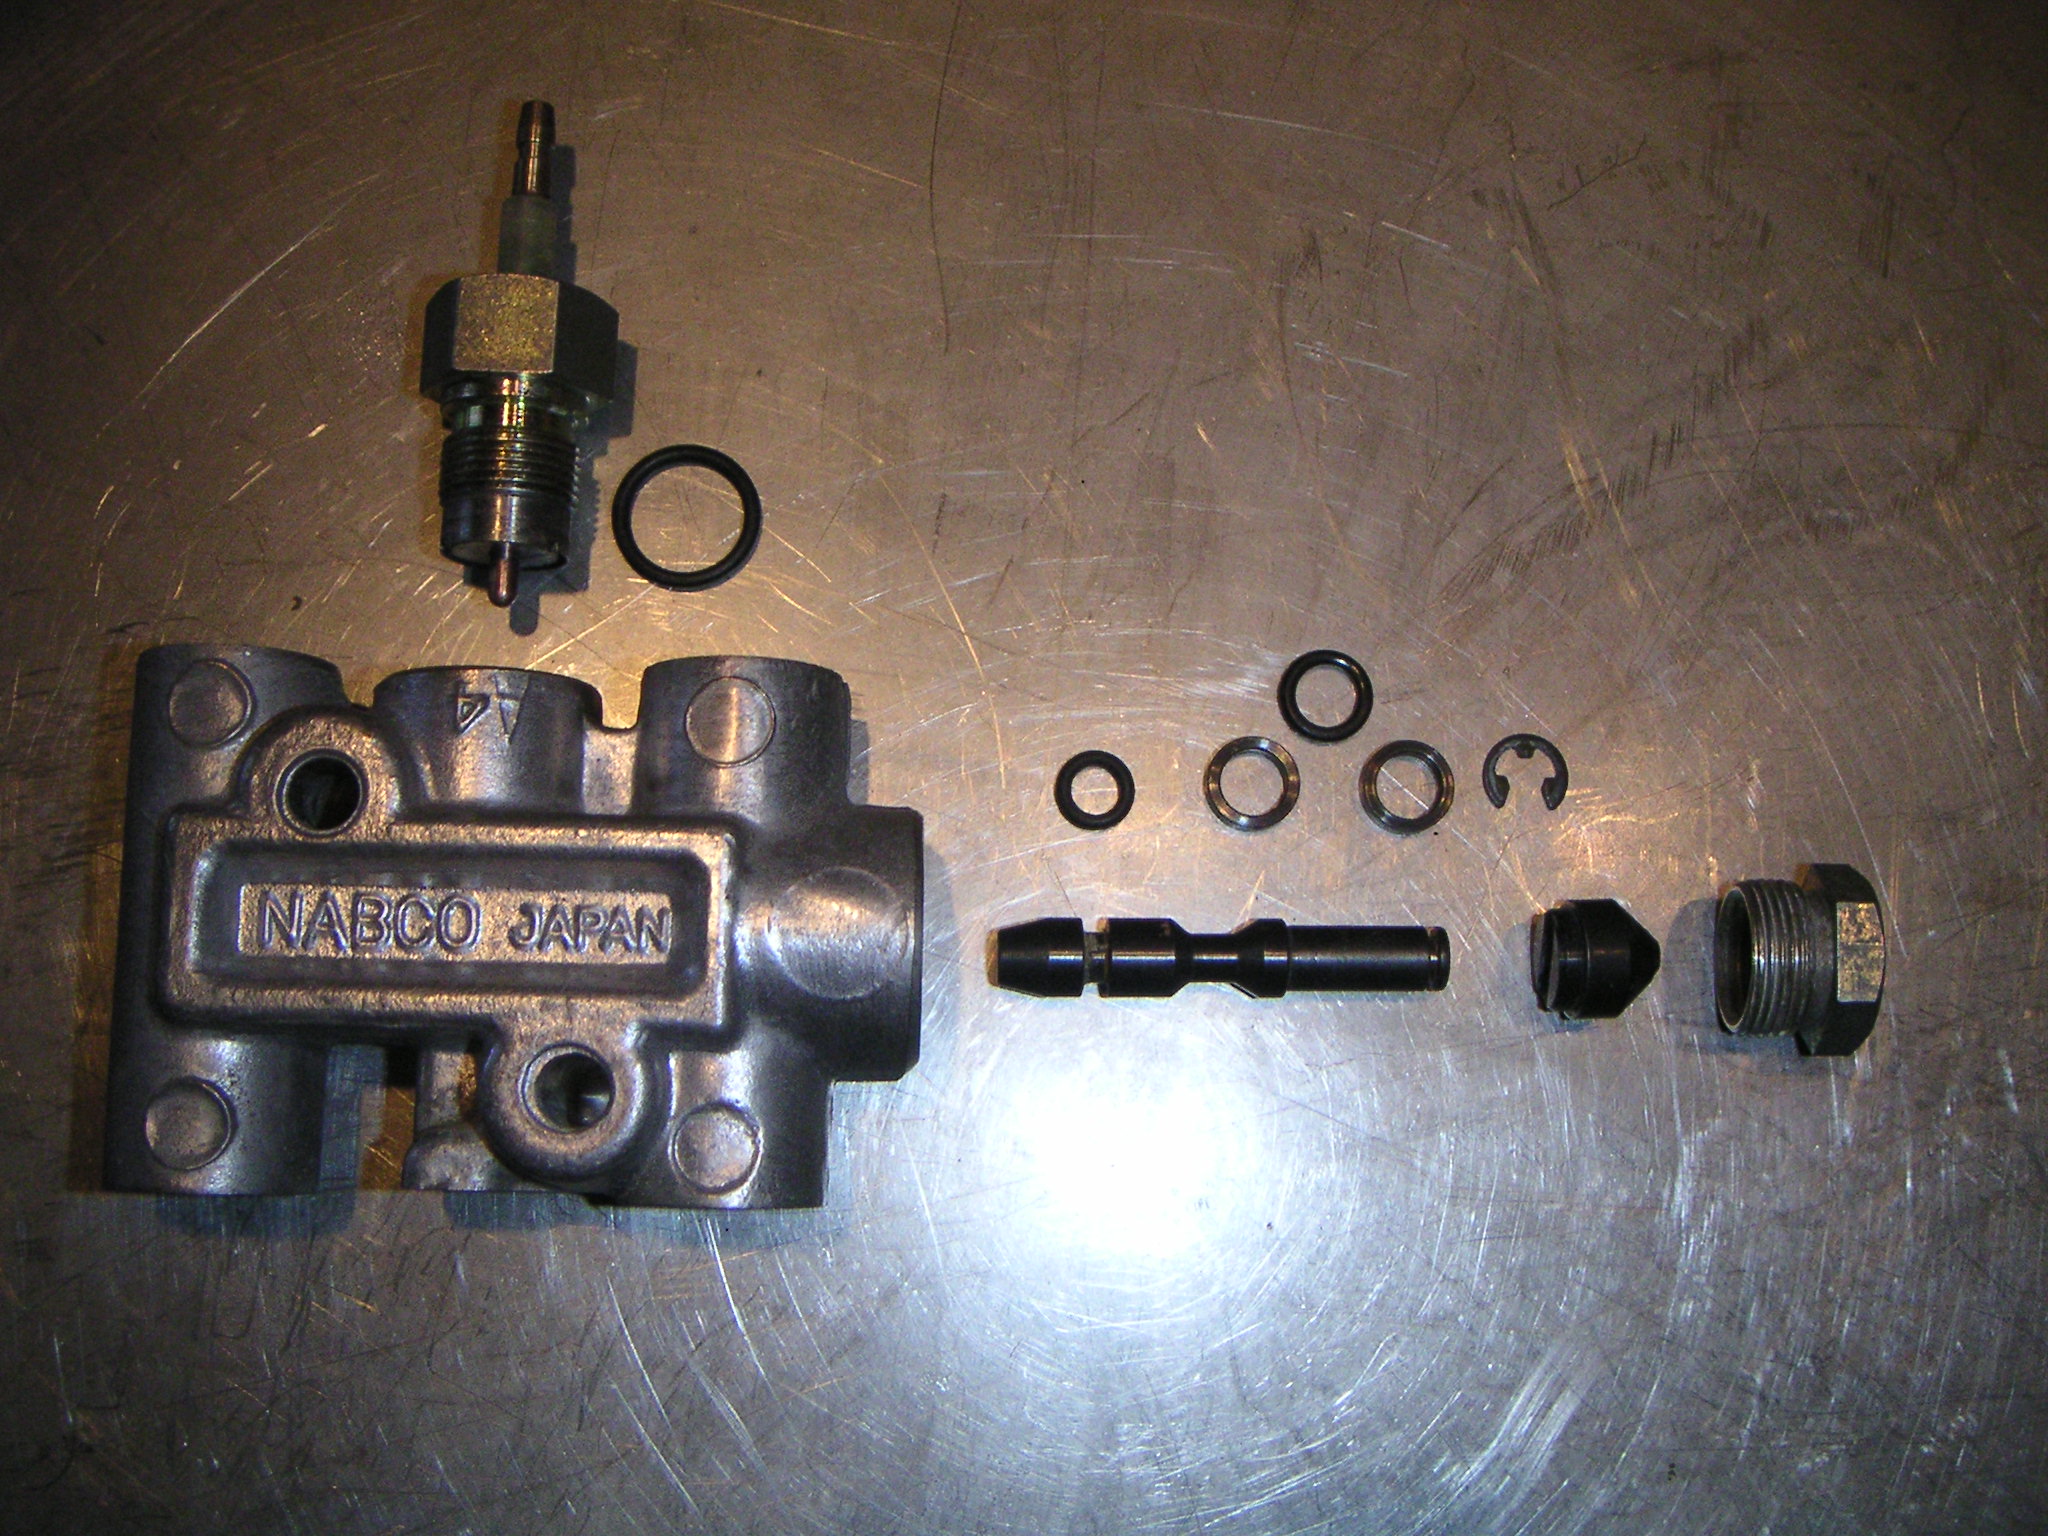
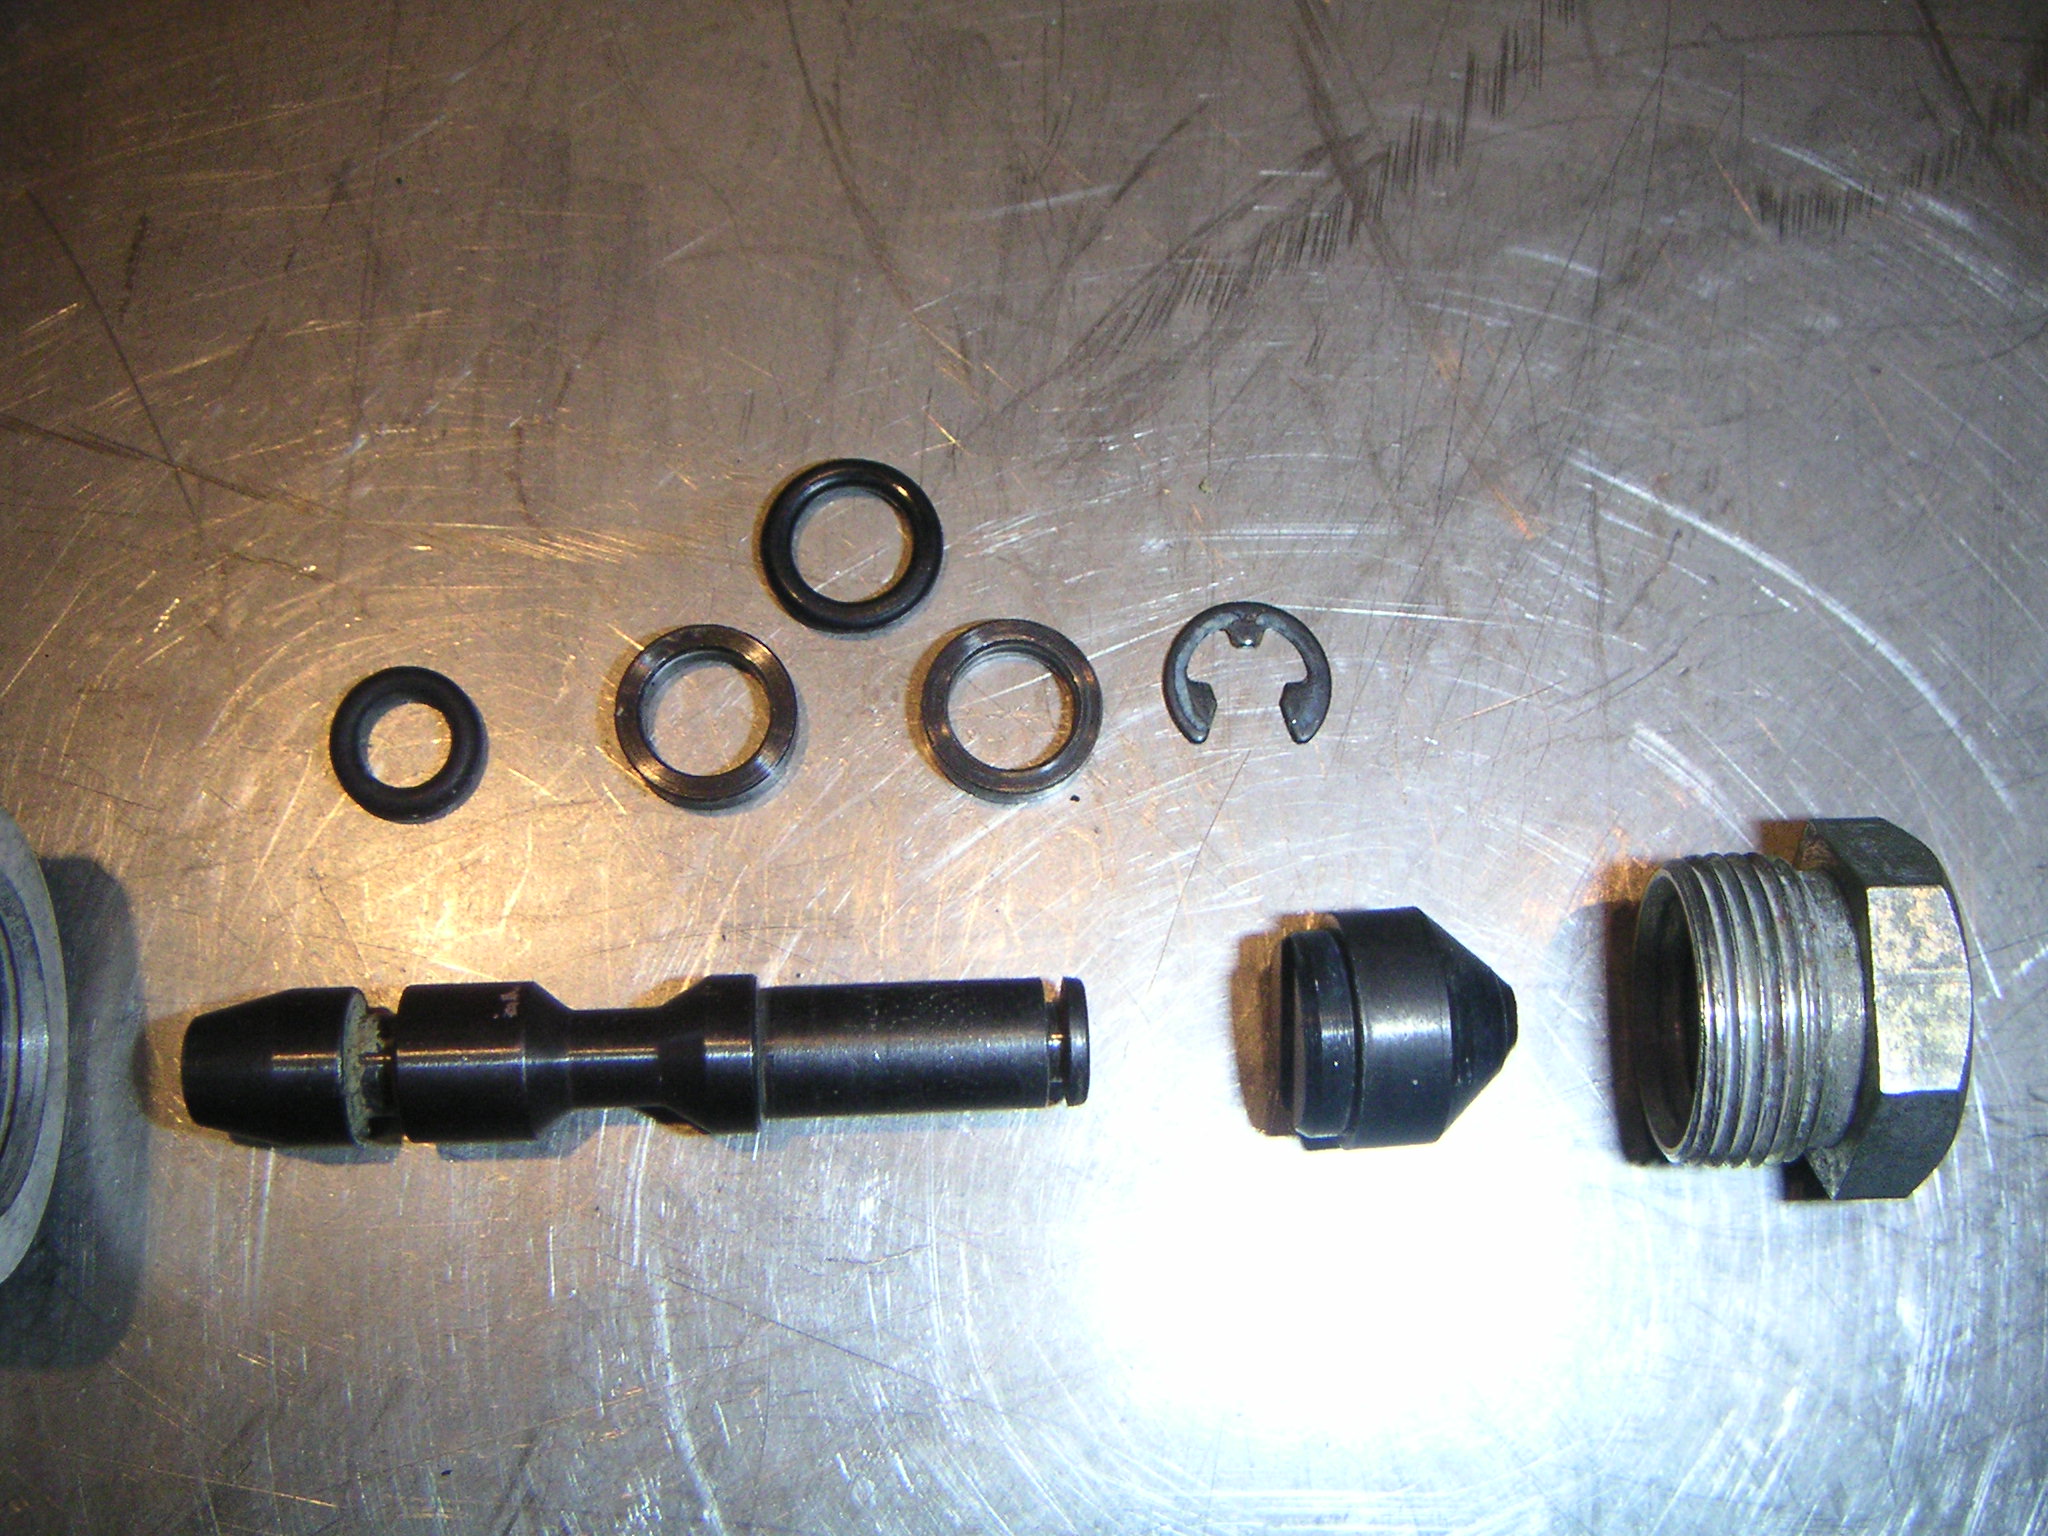
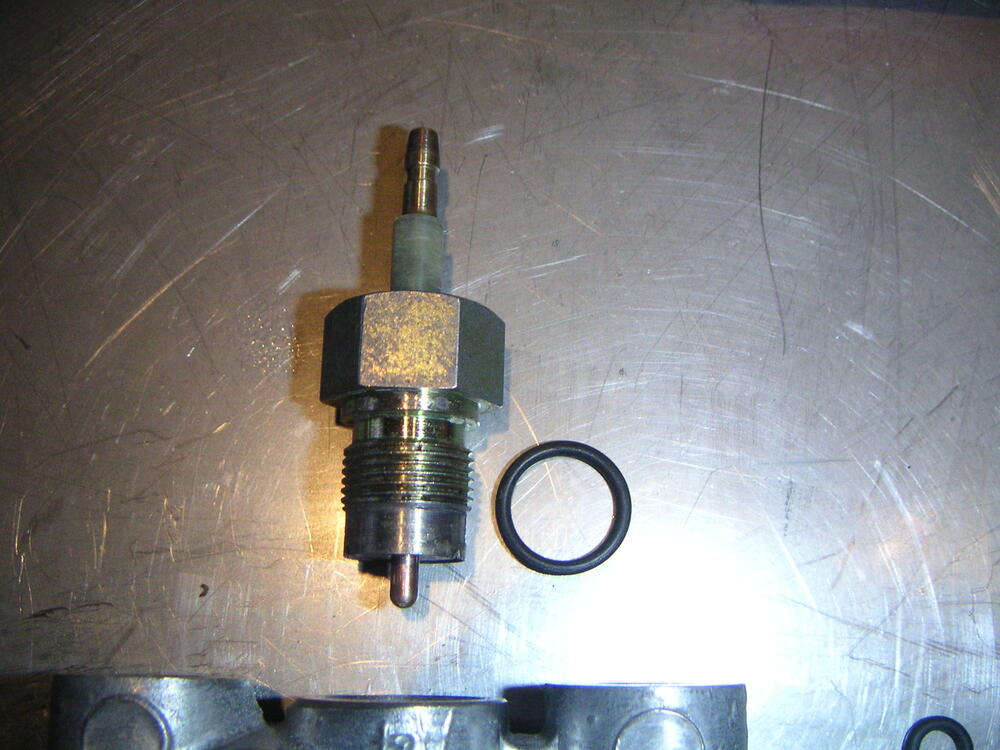
I have the size of the o-rings somewhere. Ill try to find them and post it here.
-
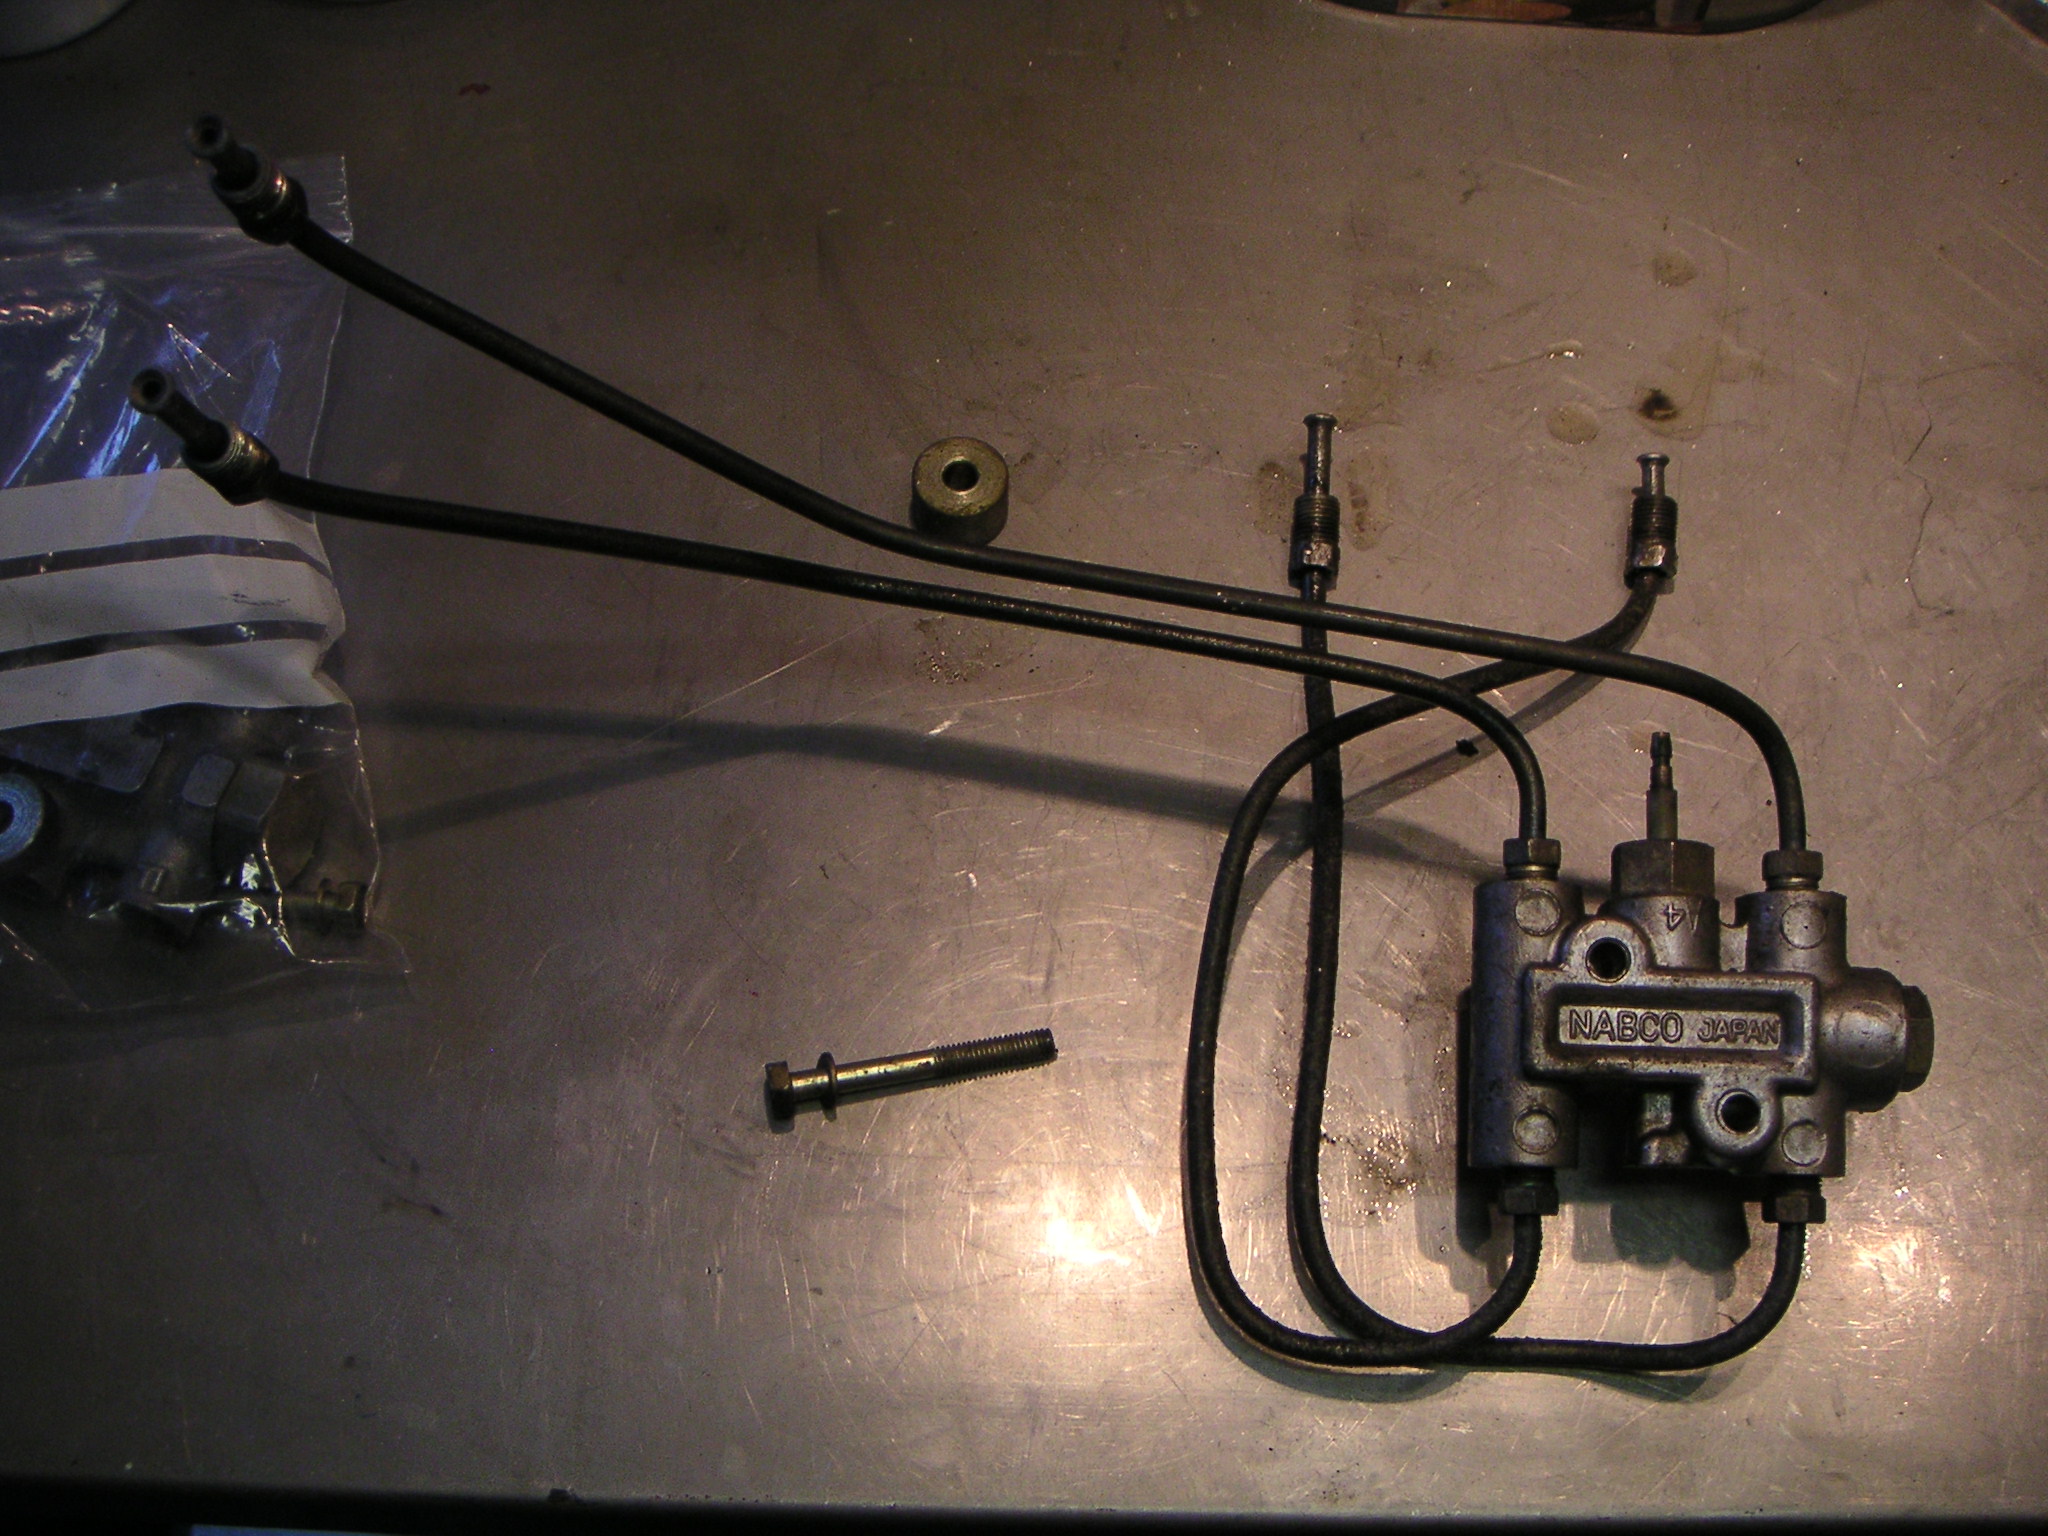
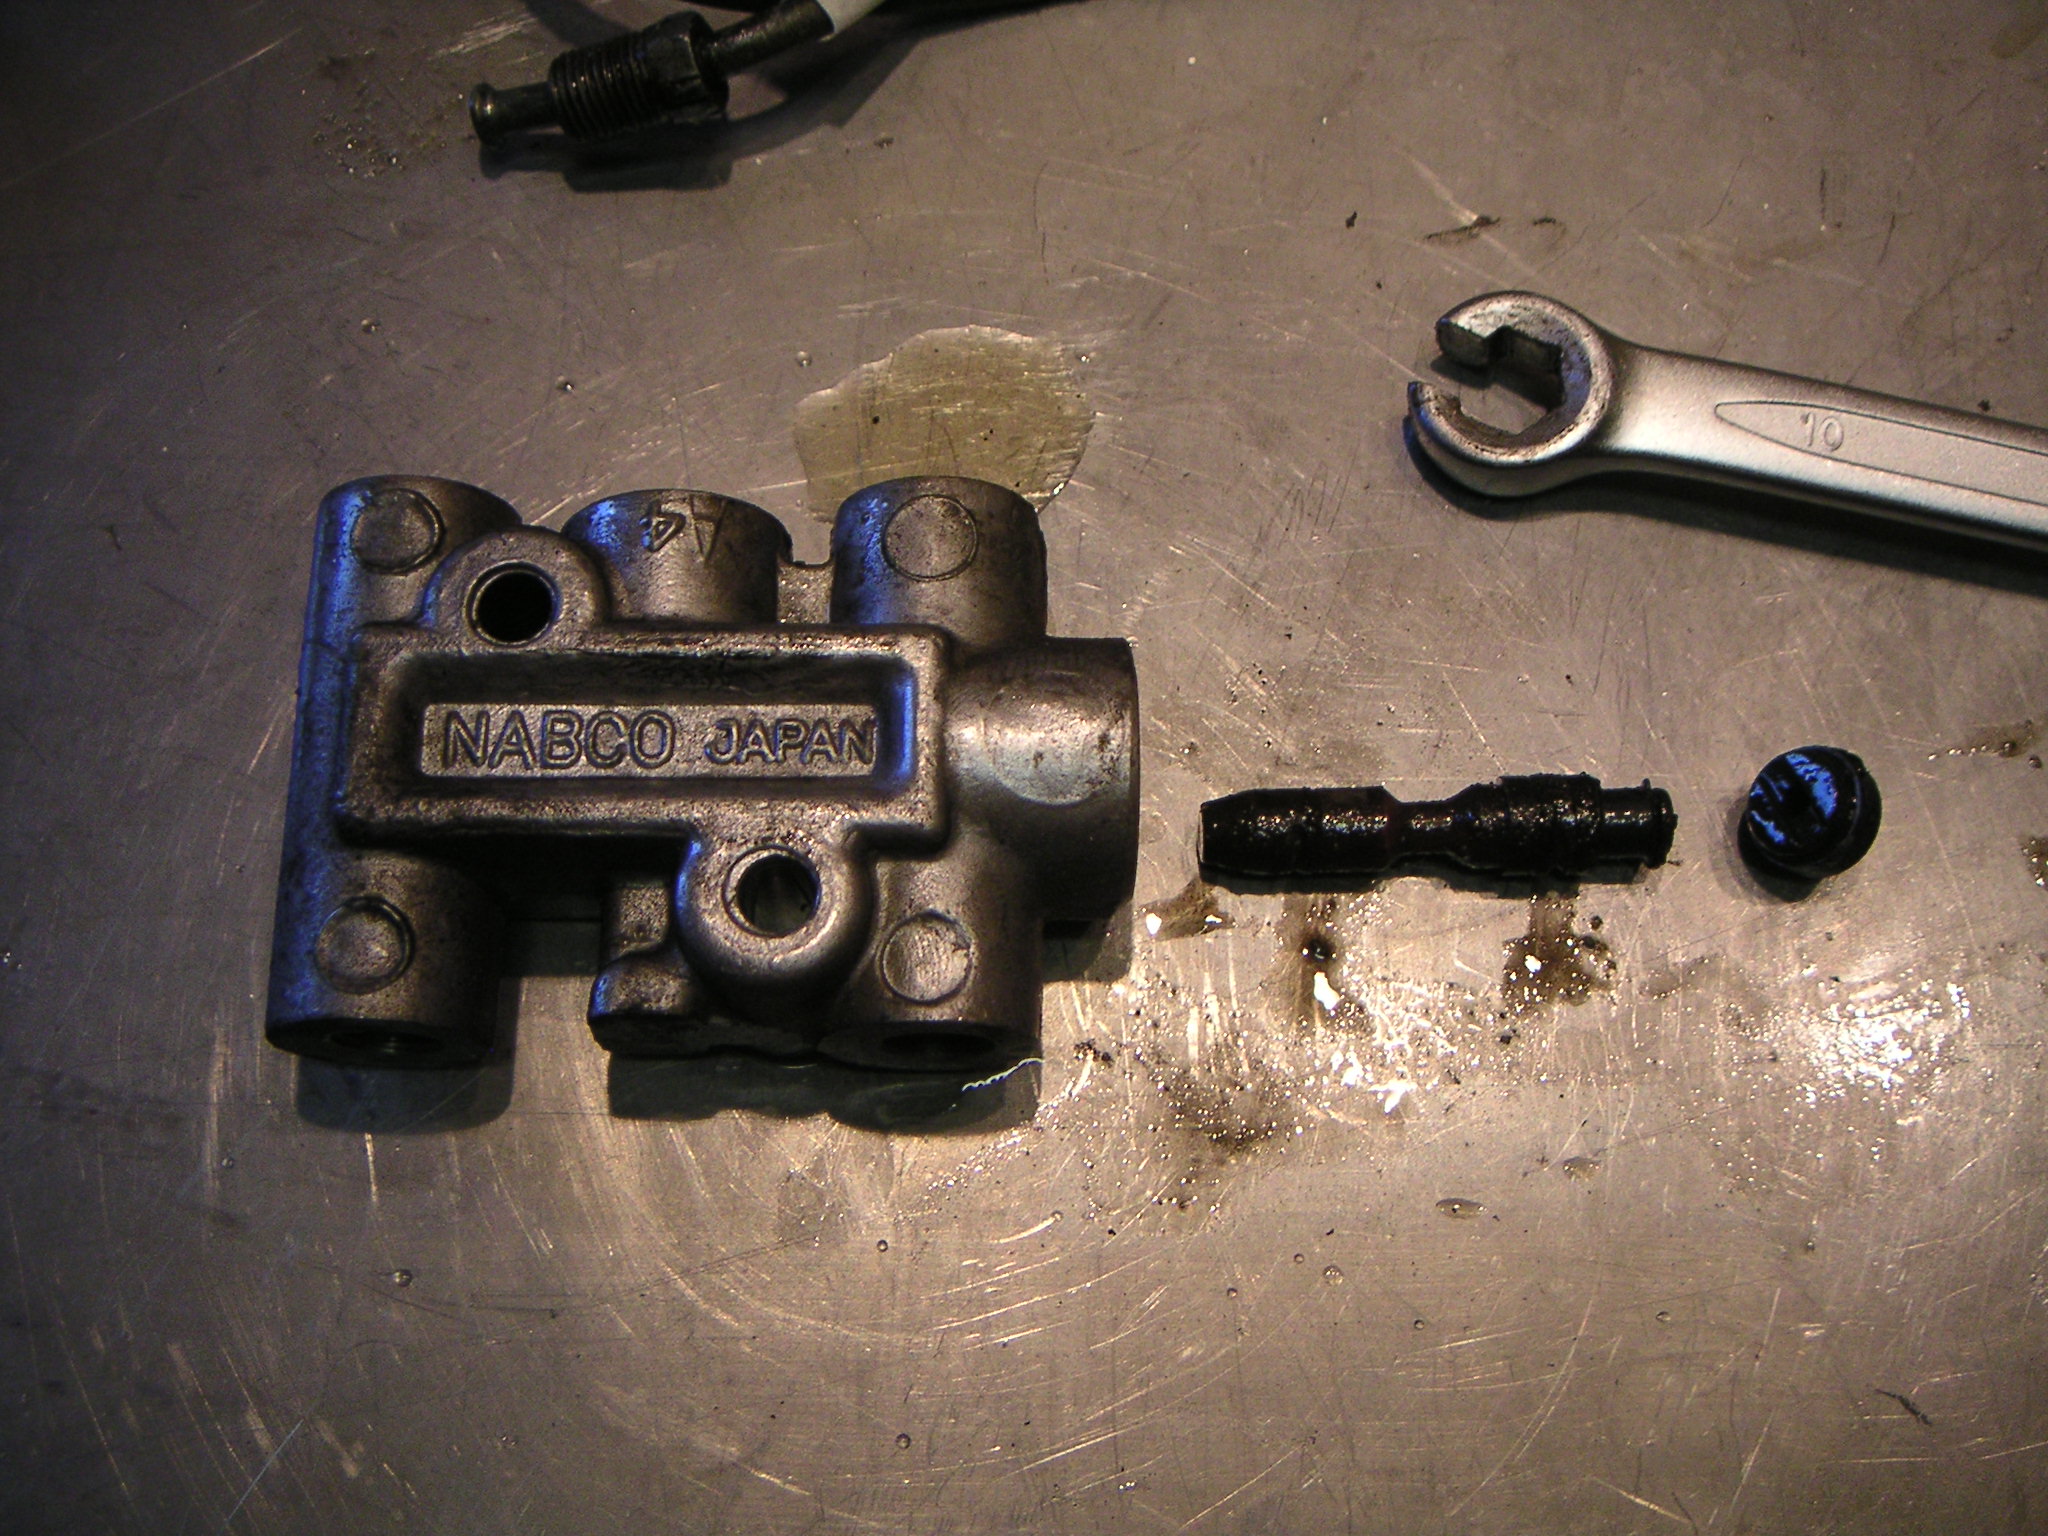
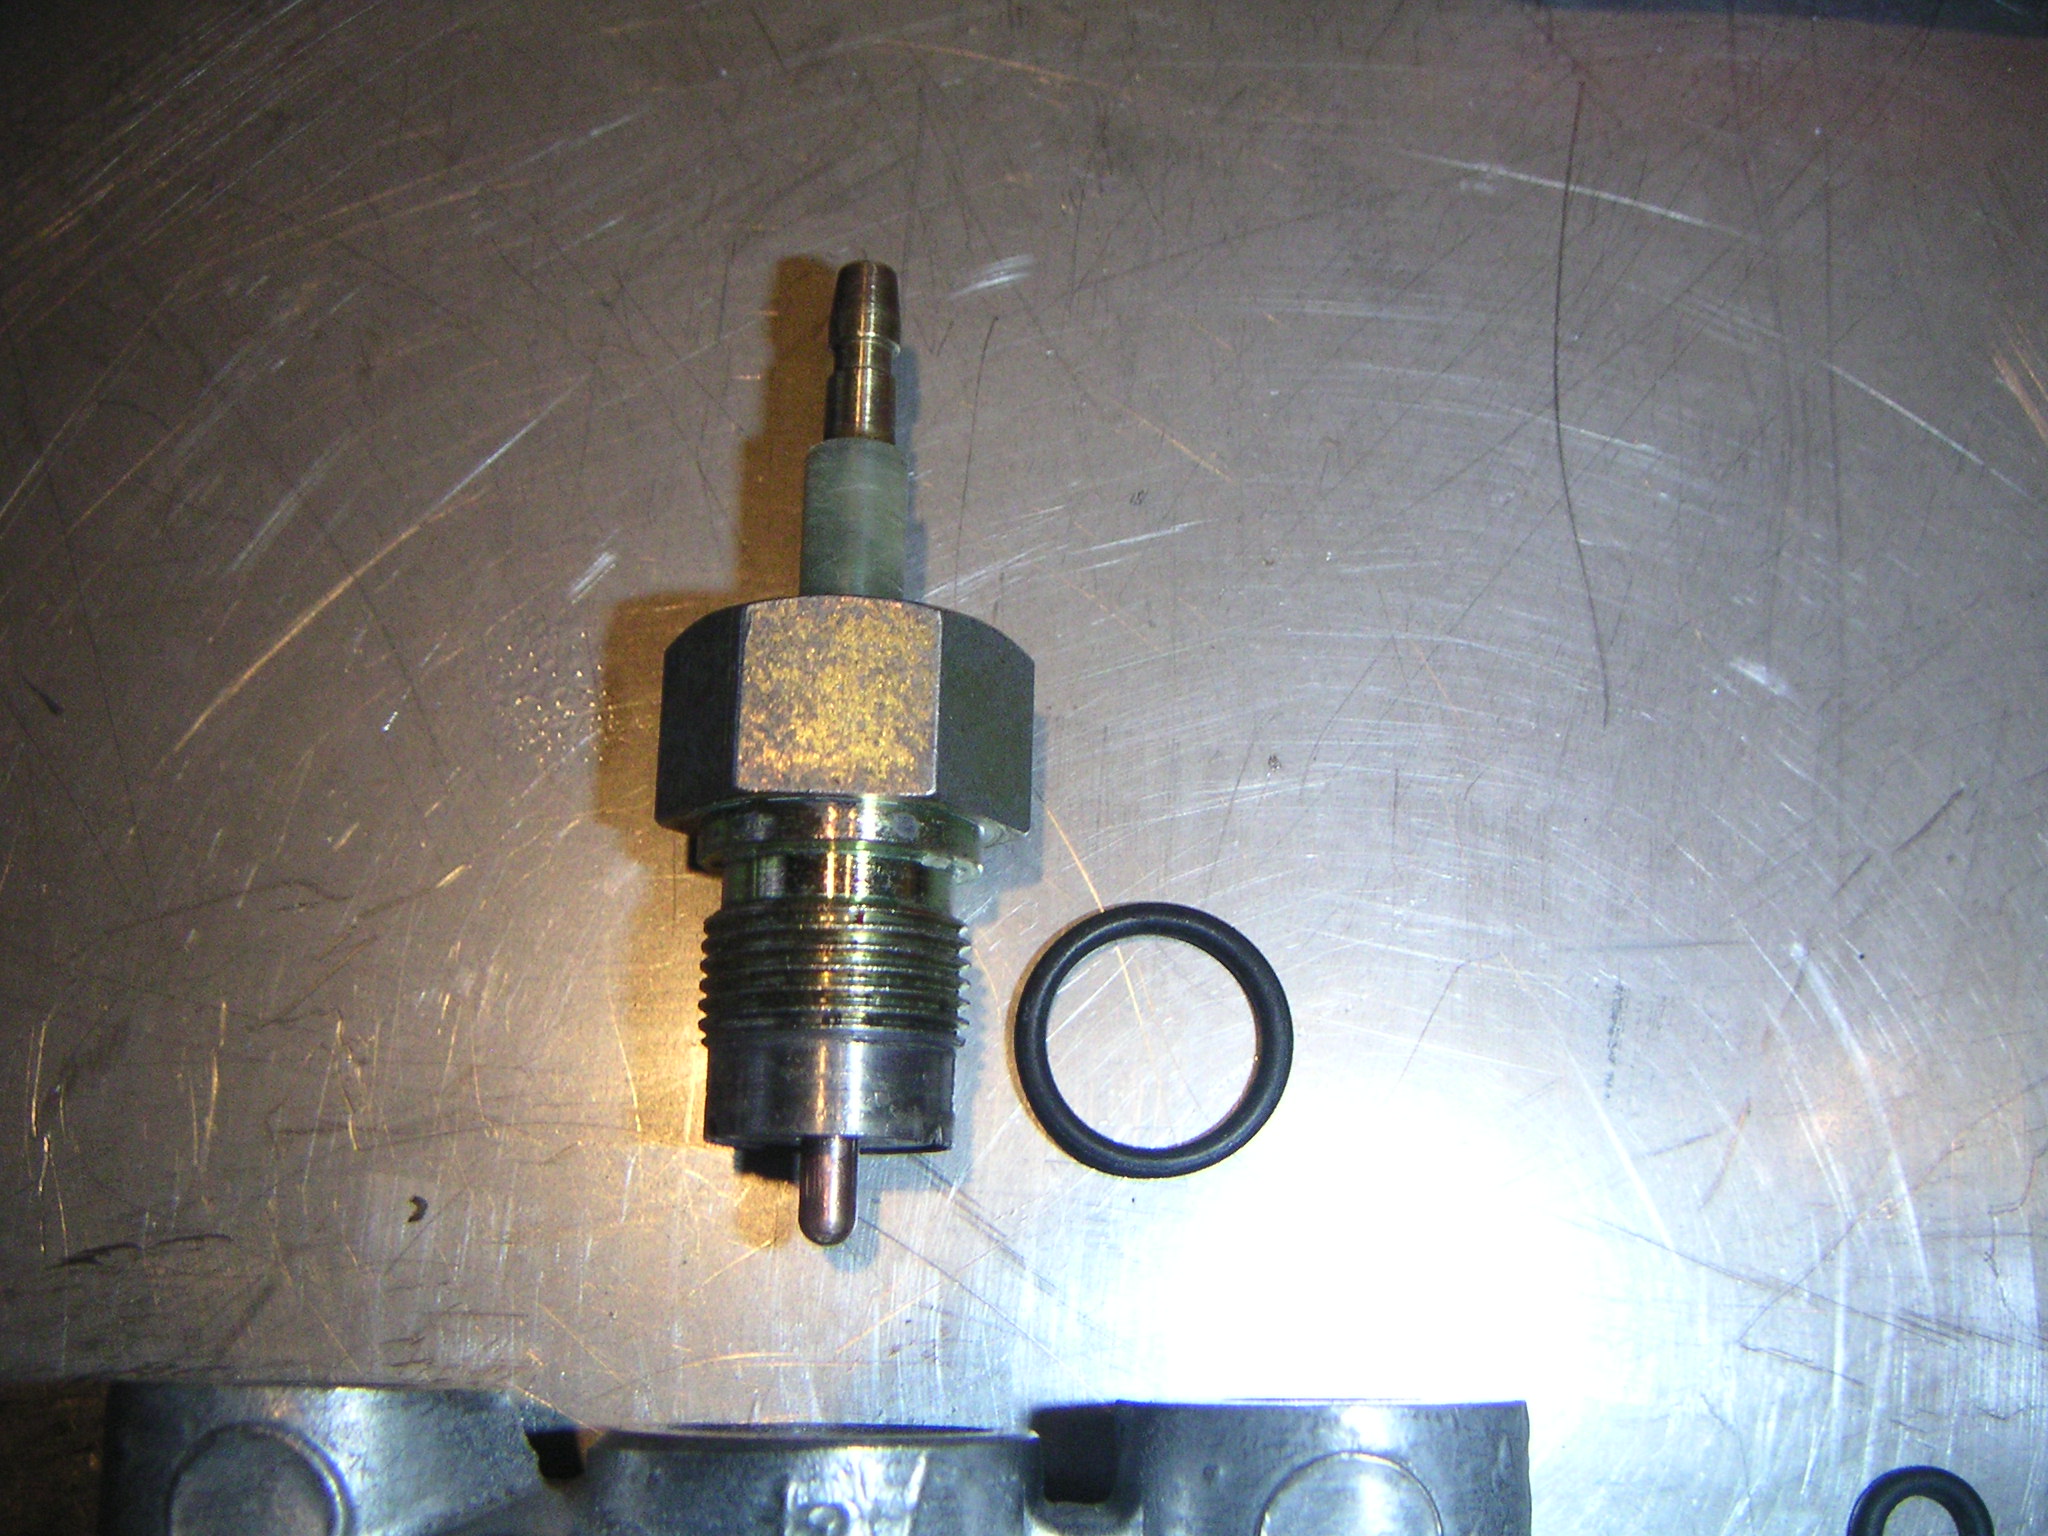
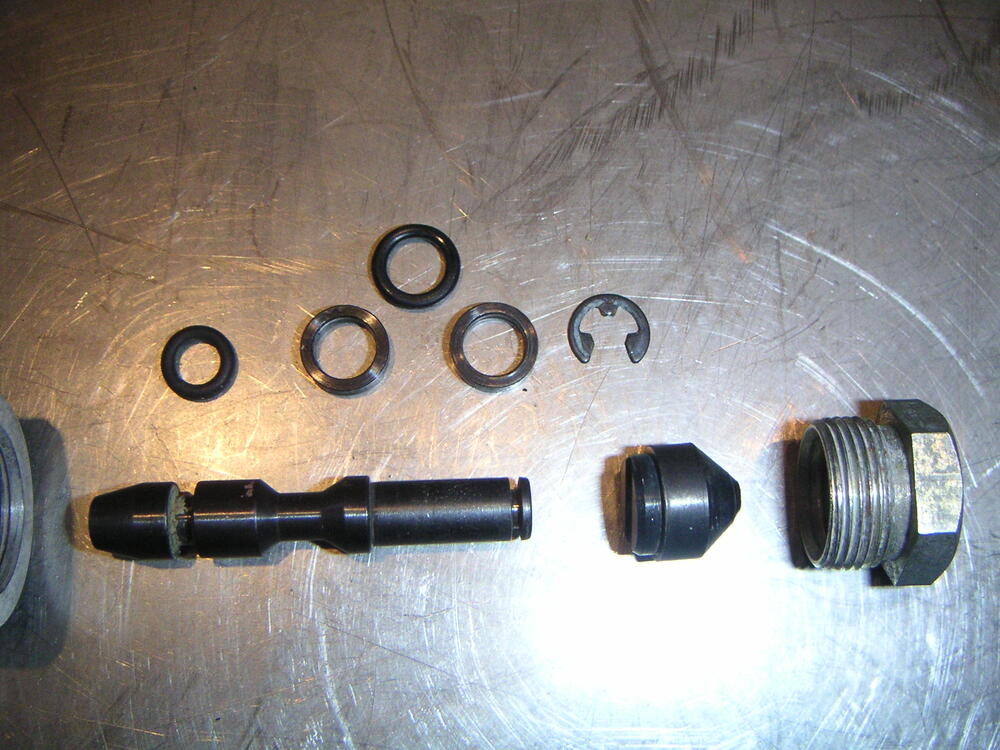
Mine was full of crud and slim. The piston aas not moving freely so I dismantled, cleaned it and replaced the o-rings. It has worked fine ever since, all 5 years. To get the cone section ouf the end, I heated the outer aluminiun body with a heat gun and tapped it hard on a wooden block. After tens minutss of tapping, heating and tapping it came free.


-
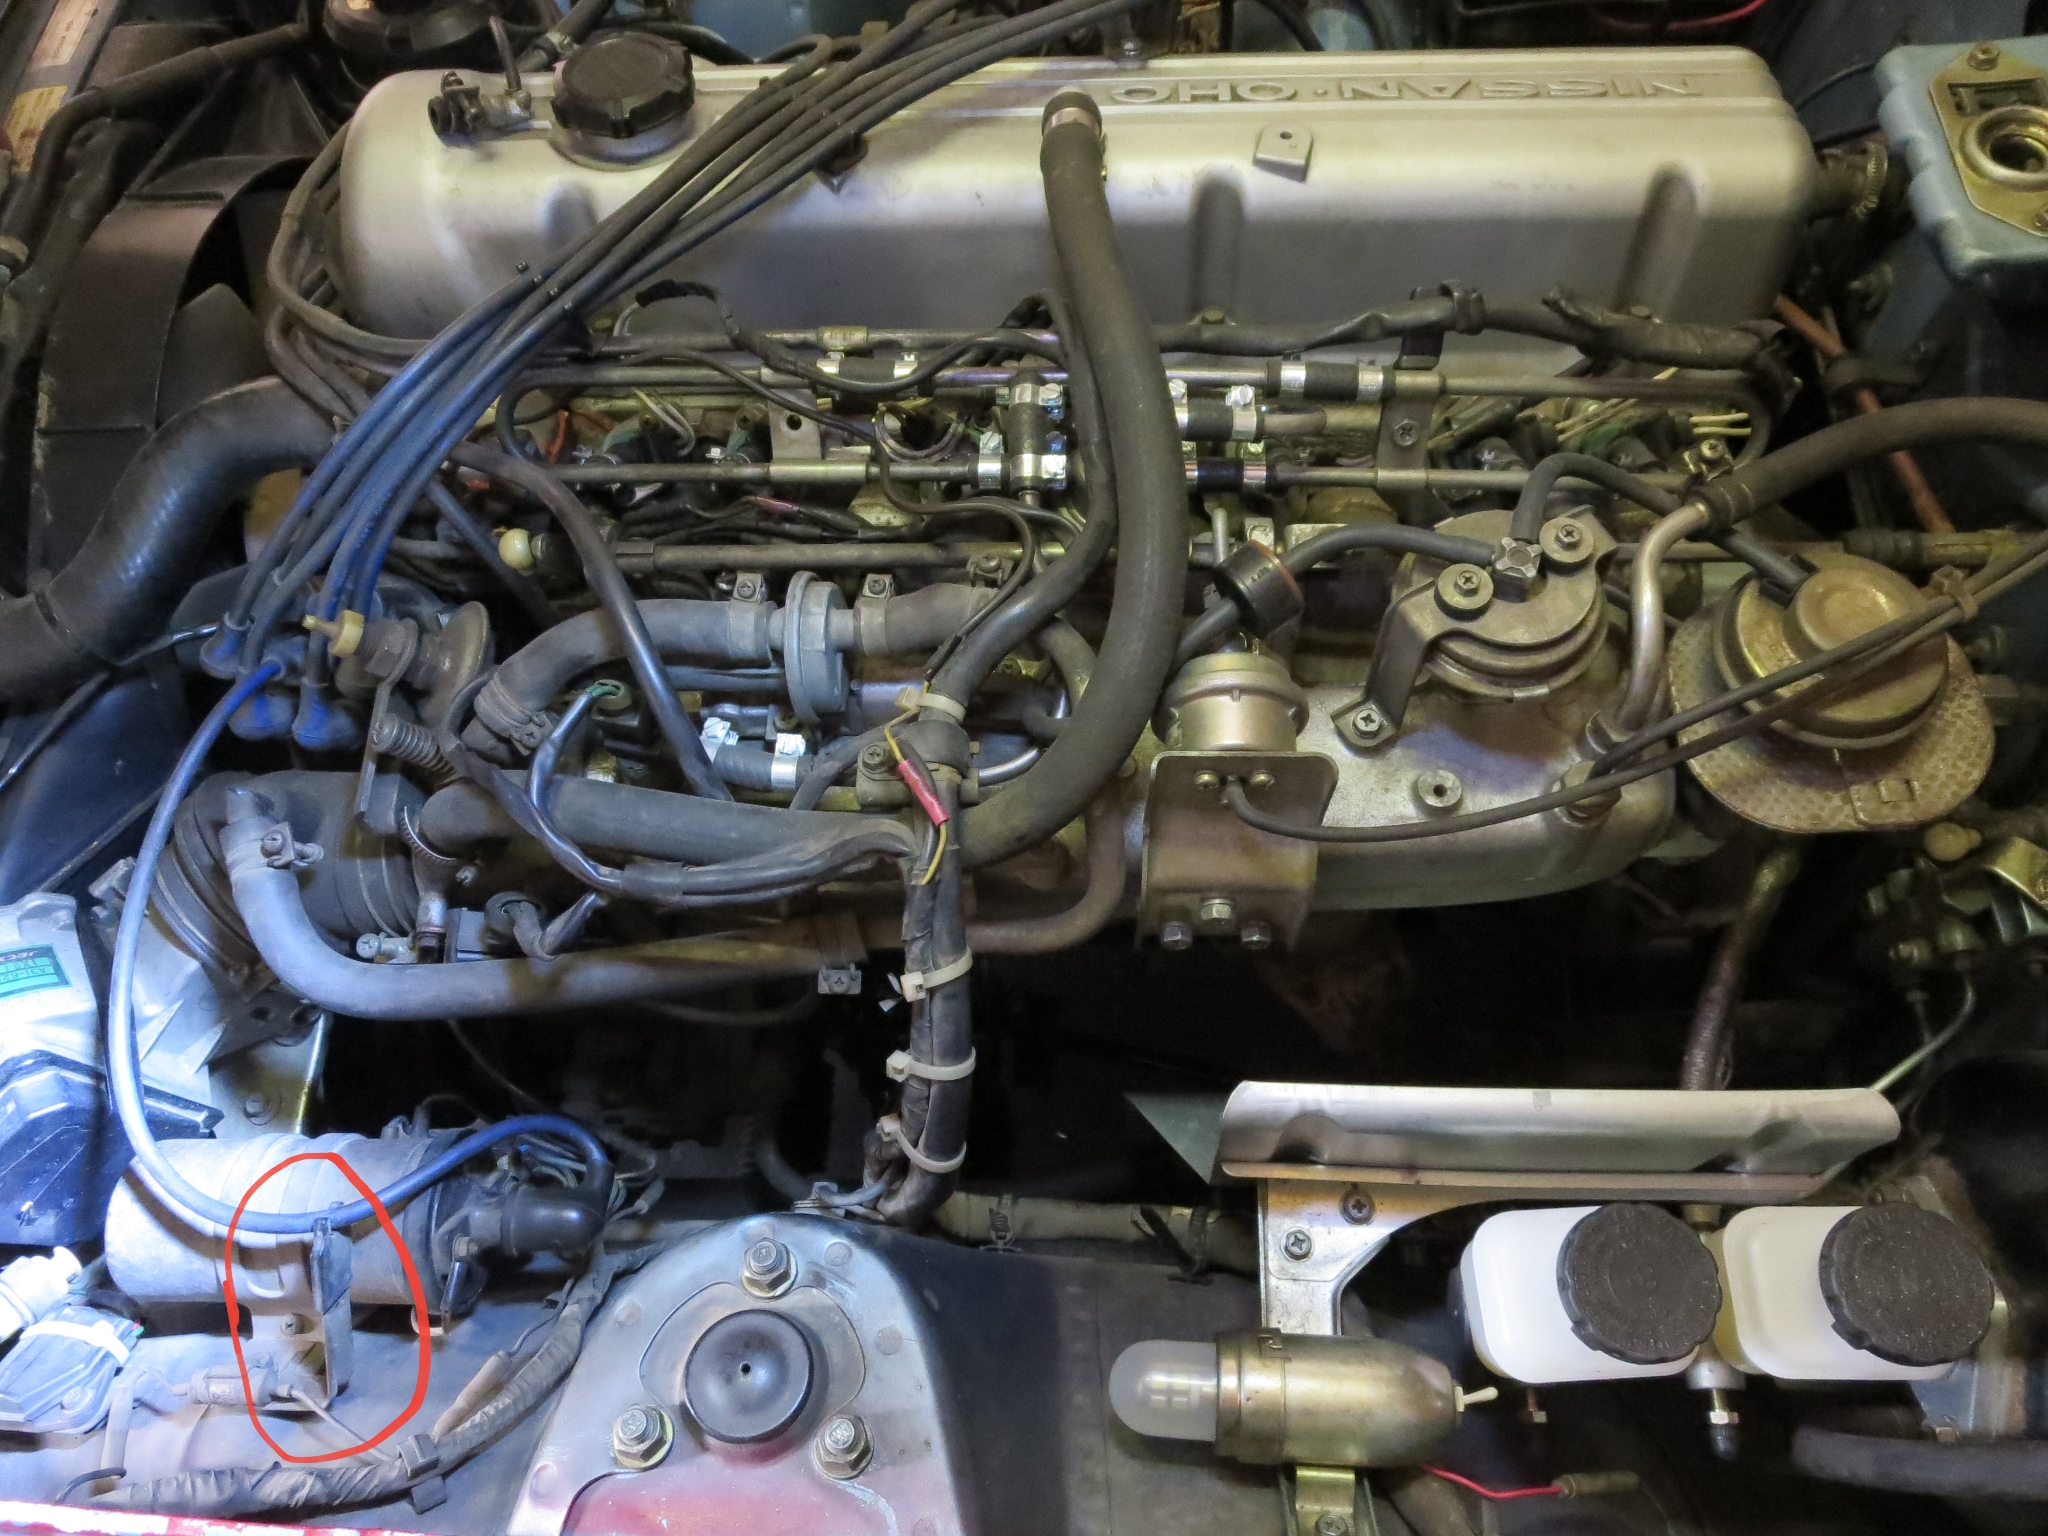
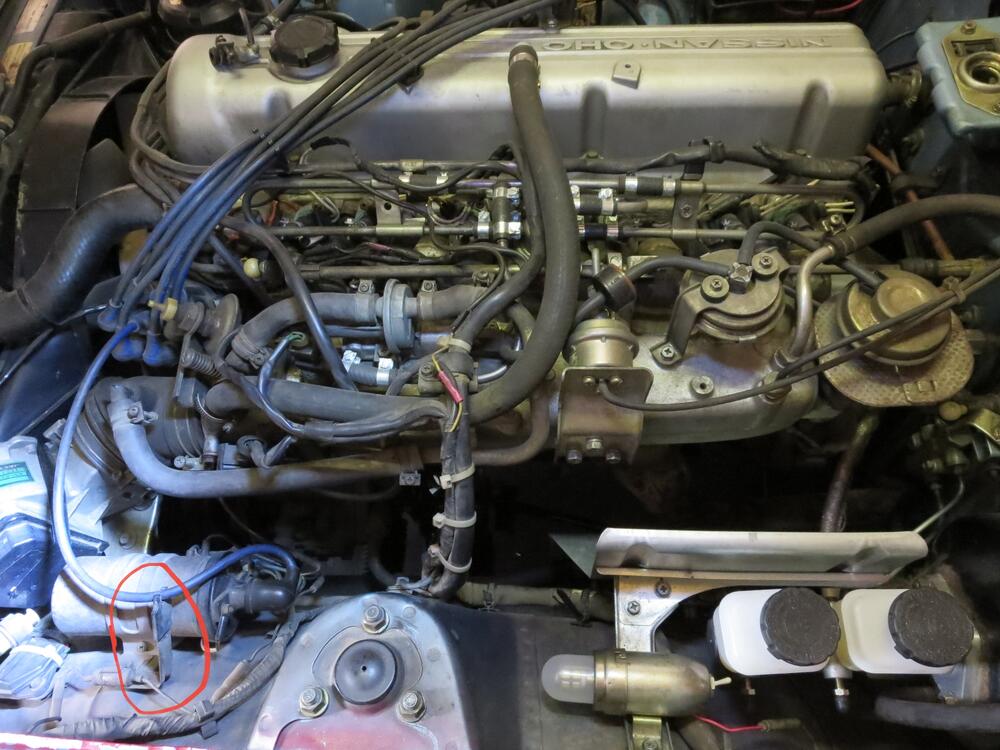
I found this photo in my tablet. It might help locate other parts. I circled part 7. Mine is a 77 model so the engine bay will be a little different. If you need any detailed areas, let me know and Ill post them here.
-
18 is fast idle for AC. Sits on top on inlet manifold and activates when airci is running to maintain idle.

-
Old posts with a lot of information on how to adjust the clutch, but not all acurate. The correct method is: 1. Adjust the pedal free travel according to the manual, with 1 to 5mm free travel. 2. Remove slave cylinder return spring. 3. Loosen the two nuts (Yes, both on slave cylinder side of fork. One is the adjusting nut and the thin nut is to lock it into place). 4. Adjust nut until all free play is removed. 5. Back off nut 1.5 turns (approx 2 to 3mm of free travel). 6. Lock the two nuts and check free travel 7. Fit return spring. Seems very much like the above posts are trying to adjust the later version slave cylinder in an early model setup. The later version has an internal spring and is self adjusting when fitted with the corresponding pushrod. It requires a different method of adjustment when combined with the early pushrod and you should not use the external spring in this setup. If you use the later version slave cylinder with the adjustable pushrod, do the following. 1. Loosen lock nuts. 2. Loosen the two nuts (both on slave cylinder side of fork). 3. Adjust first nut until all free play is gone. 4. Check that you can push the push rod into the slave cilinder about 10 - 12mm. Note: If you can not do this, then you have overtightened the adjusting nut or someone has removed the internal spring. Check the slave cylinder internals. 5. Screw adjusting nut a further two turns. 6. Tighten lock nut. Check you can still push the push rod into the slave cylinder about 8 - 10mm.
-
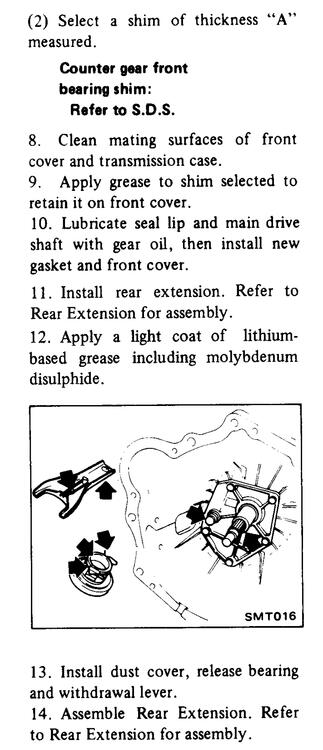
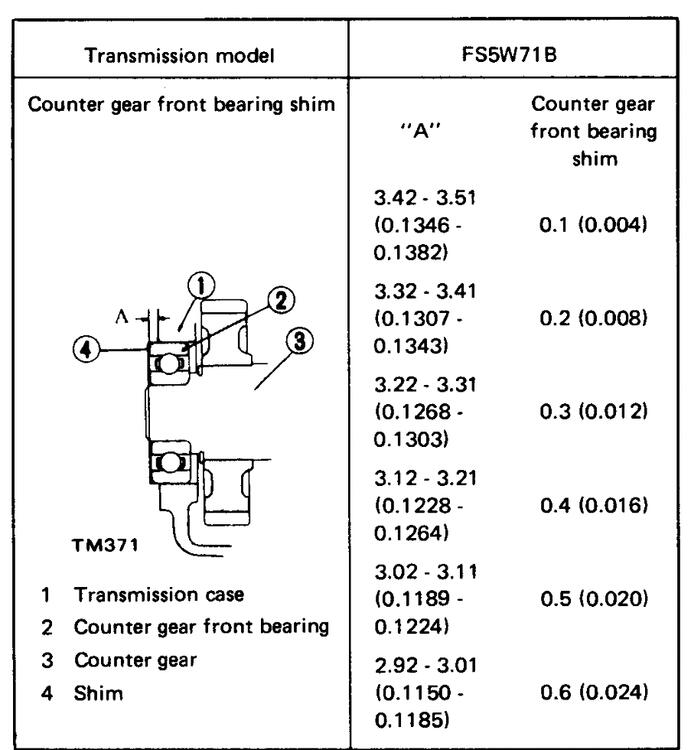
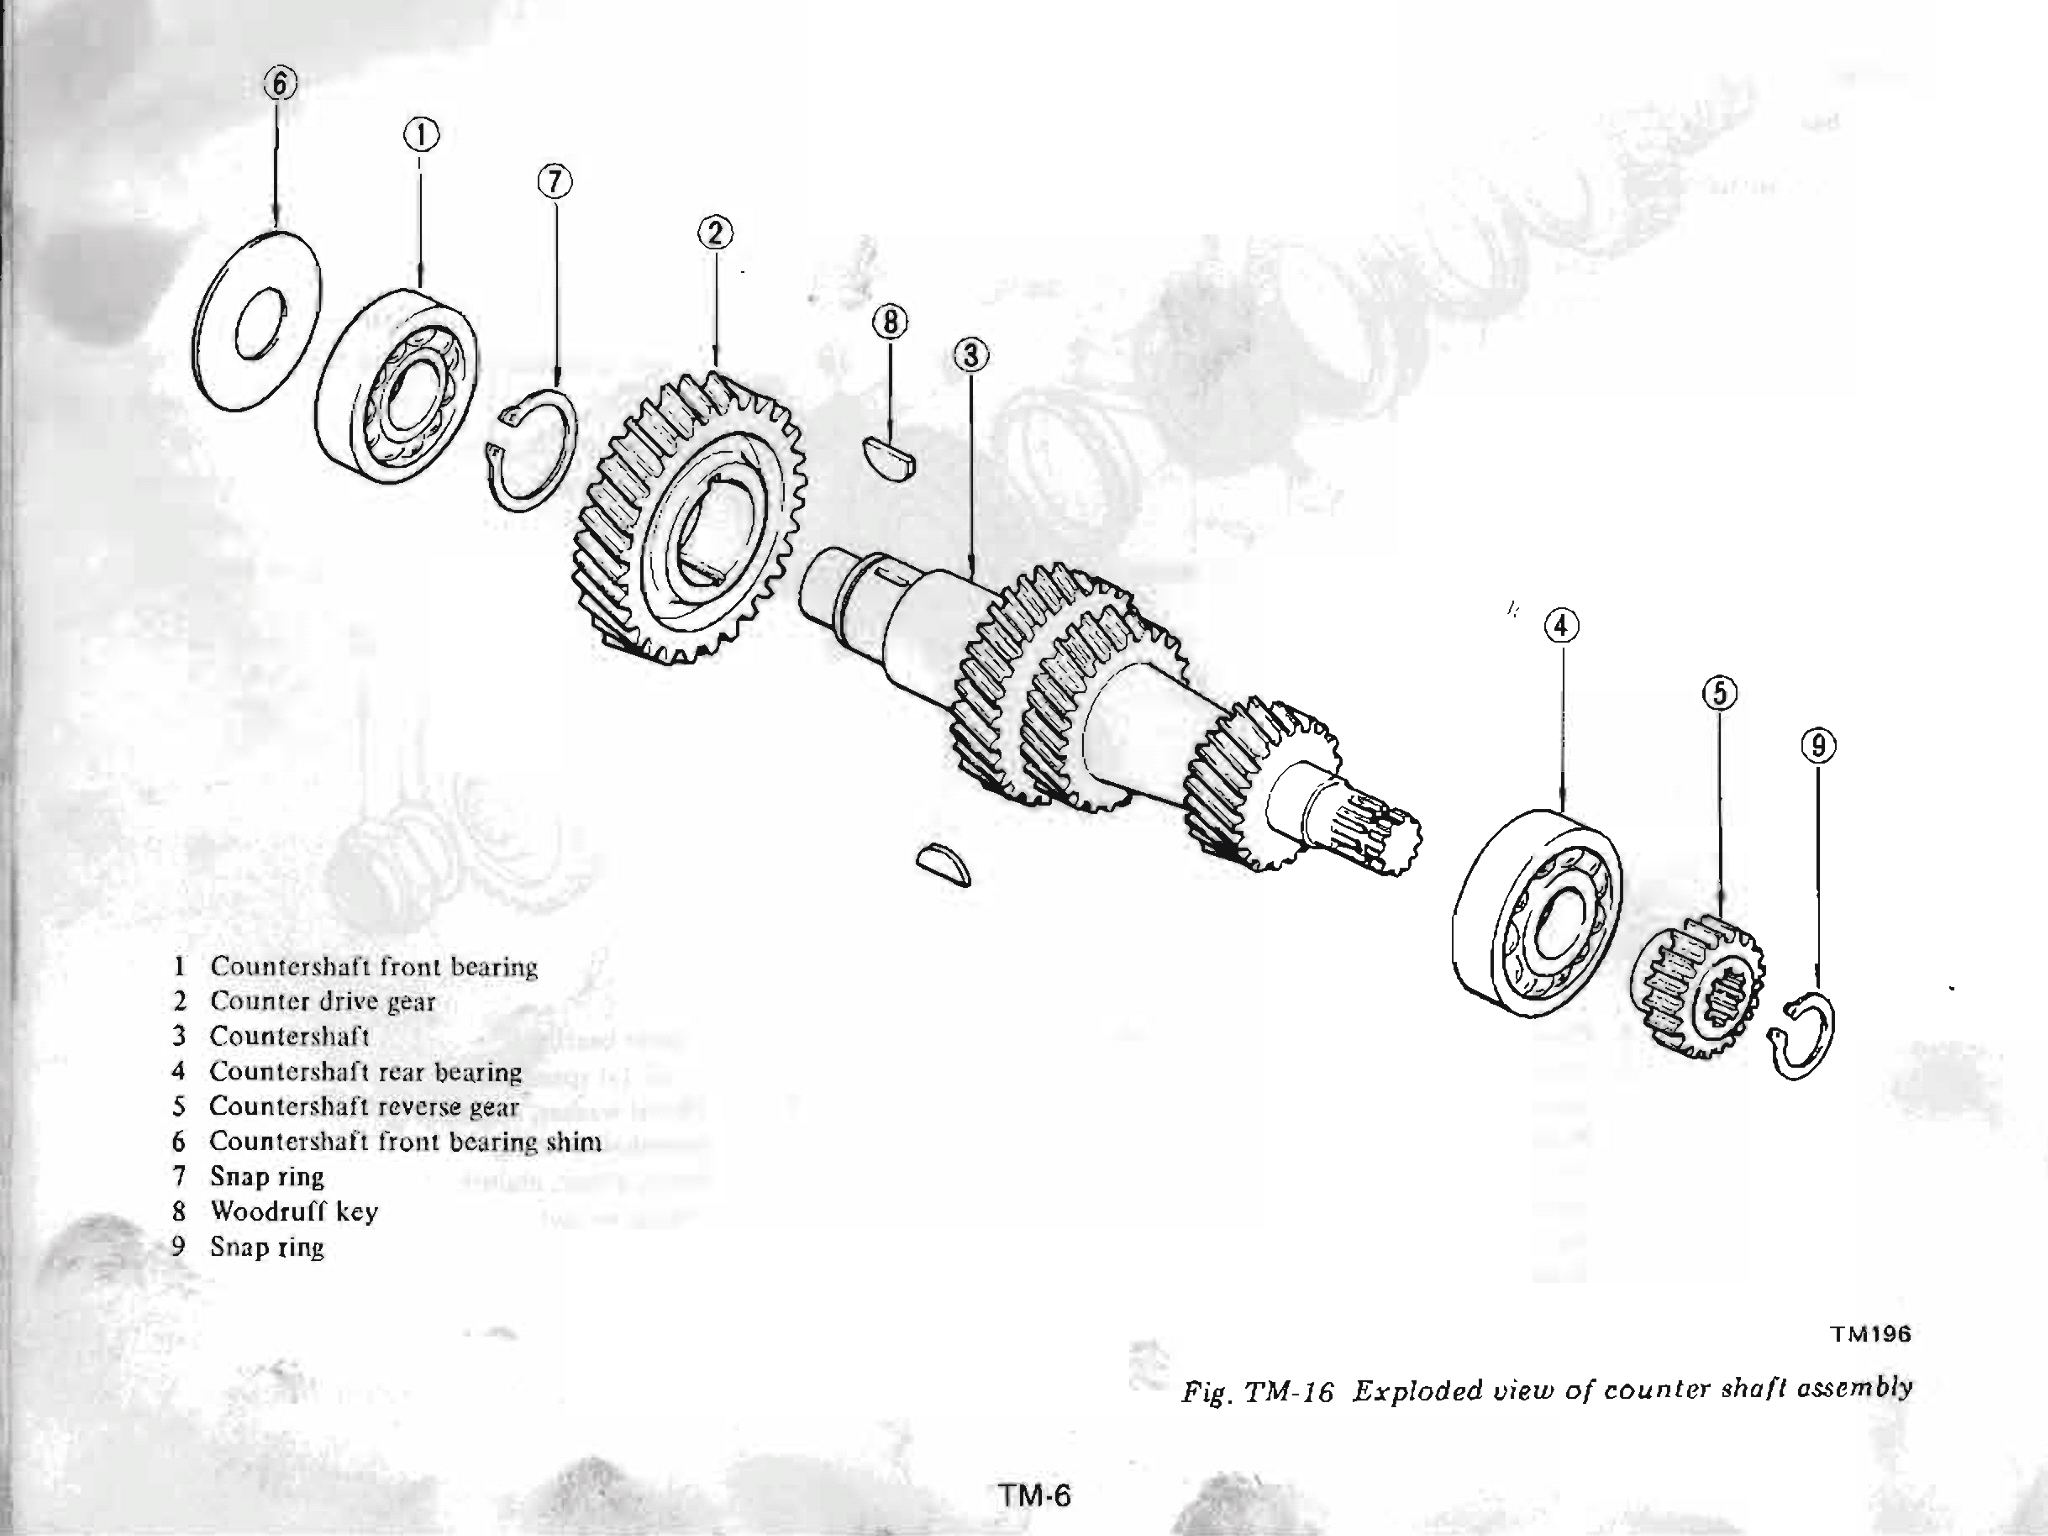
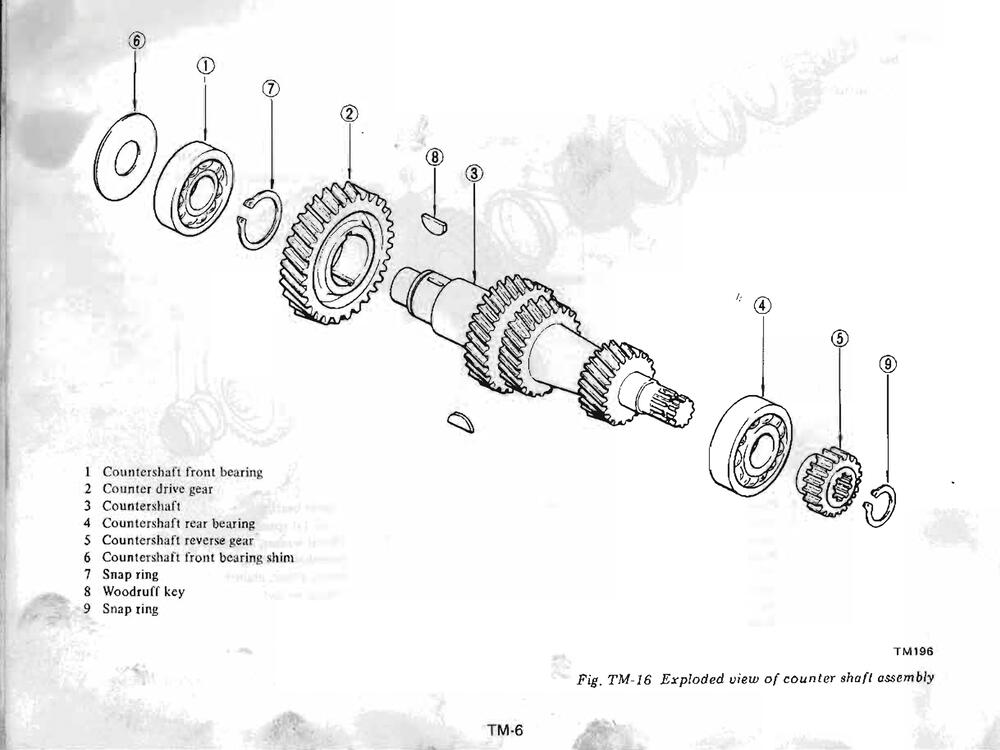
Do you have the manual where your screen shot came from? Would be nice to add it to the manuals database on this site. Looking at the figure TM-68 the front shim #18 is the adjustable shim like the 71B and it should be somewhere between 0.40 and 1.00mm. You now have no shim #18 in the front bearing and a 2.65mm shim in #19. I would still check the end play and if the end play is good make a shim for #18, preferably closer to 1.00mm and deduct it from #19.
-
The alignment on those gears in your photos is a little off. Thank you for posting the information about the different sizes for the #19 shim. That cleared up some things I couldn't understand. With yhe 71B the bearing in the adapter plate is fixed and you remove end play by adjusting shjm thickness in #18 located in the front bearing assembly cover. The 71A does not have the front bearing assembly cover. Instead it has the bellhousing with a fixed size shim. (And because it is a fixed size they won't mention the thickness anywhere). You adjust endplay by changing a shim in the adapter plate/main bearing retainer plate. You do this before fitting the rear extension housing. If I was doing this, and because finding the #18 thickness will be very hard, I would assembly it with the home made 2.65mm shim and check end play. If the end play was correct then I would have a 1.65mm shim made for #18 and a new 1.00mm shim for #19 to replace the home made shim. Or a 2.00mm #18 and a 0.65mm #19, just keep #19 in the range of sizes Nissan supplied. I'm not sure if the "A" reference will work on the 71A. That is why I would check end play with the old shim. When done it will move the cluster shaft back and align the gears.
-
Im out for a couple of hours, but when I get back Ill post what you need to do. It's allbecoming clear to me now. Looks like a PO has made a shim and didn't understand what shim Pos#18 was doing. Now the geomentry is allmessed up
-
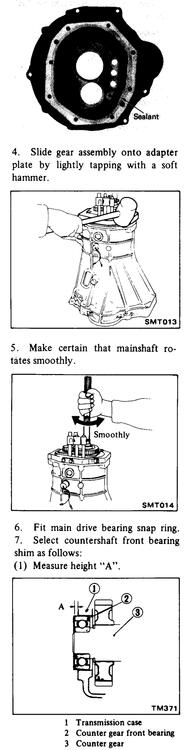
Pos#19 is not in the later 71B versions. Pos#18 (Pos#6 in the 71B 4 speed, see attachment) is used to correct the tolerances in the transmission housing. Pos#19 is designed to remove any axial movement between the adapter plate and the adapter plate bearing. I don't know why they chose this method to remove end play. The point to all of it is the bearing should fit neat in the adapter plate housing without any forward / backward movement.
-
That shim is for the cluster shaft end play. The 71B is slightly different but the priciple is the same. See attachment for the 71B set up. You shouldn't need to adjust the shim thickness after replacing the bearings. It becomes critical when you change the cluster shaft of the transmission housing. The cluster shaft and housing have tolerances and the shim compensates for this. The bearings on the other hand are precision machined parts and don't have those tolerance issues. It does not hurt to check. The bearing should have a small amount of end clearance. Ball bearings should not be pre-loaded. They are not designed for high axial tension like a tapered roller bearing.