EuroDat
Free Member
-
Joined
-
Last visited
Everything posted by EuroDat
-
 I would go for a silicone shore A 50 or 60. And one with a platinum catalyst instead of the tin catalyst variety. The tin catalyst silicone will work, but it feels oily and attracts dust and grime. Its not as durable as the platinum silicones. +1 on your supplier advice for sh. 80. The harder the better for wind resistance. Sh 80 will still be flexable. Have you looked at the website from Alumilite. They use to have some interesting how to videos. Good to get you thinking about how to go about it. https://www.alumilite.com
 -
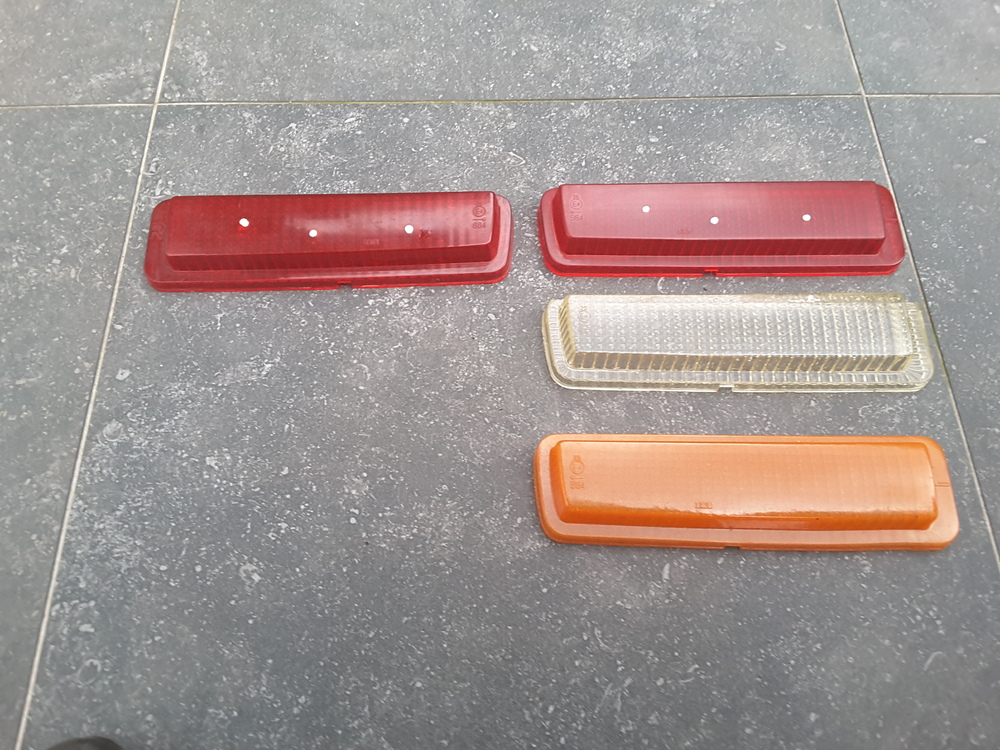
Can't believe I missed this thread. Playing with PU rubber I can probably understand the challenges you are/will have in this project. Fun but challenging. The biggest job I have done was my 280Z turn signal lenses for the tail light. The harder the shore the better. If you can get 80 or harder, I would use it. Another suggestion, use shore 60 for your experimental phase. It flows much better and is forgivjng while you perfect your technique. The resin begins to set after 15 minutes or so and the harder the shore, the harder it is to work with. You will want a vacuum pump that will get close to absolute vacuum. 200mBarA will not be enough to get all the air out of 75 shore PU. The container for the resin needs to be 4 times larger than the resin you are using otherwise it will boil over. 1 Litre resin = 4 litre container and a vacuum container to suit. Lightly spray the mold with release agent. Don't overspray it, but make sure you don't miss any sections. PU really likes to stick to silicone.

-
No worries, its Friday. I agree with the tuneup. The engine has a 20% increase in capacity over the L24 so everything working right you should have a noticable increase in power.
-
Hardway is using a L28 N42 block in his 240Z, but still 2.9L shouldn't be a problem if the rest of the engine components are for a L28. That was my point on the E88. "E88 with stock cam" is not going to work as well as a N42 or even a N47 with the bigger inlet valve. Thats is assuming it's of a L26. The L24 had smaller inlet and exhaust valves. Not enough info on what has been done to the head.
-
One thing I do when making any "improvements" is record a simple baseline performace to compare later. Easy to do. Go for a drive and do an acceleration test in 3rd, 4th or 5th gear, depending on your final gearing. Start the test at around 1500rpm full throttle to the maximum rpm you are happy with. Record how many seconds it takes to get to 2000rpm, 2500rpm, 3000rpm etc. After your improvements are done do the test again and note the difference. A friend of mine put tripple webers on his Zed and it sounded great, but when we tested it it was actually slower up to 2500rpm. Took a dyno tech 4 hours rejetting, and then playing with the timing and cam timing to make a big difference.
-
An E88 73 head could be an early L26 or the last of the L24 where they started with the emmision chambers. The E88 up to around mid 72 are the most desirable of the E88. The E88 on the L26 had the larger exhaust valve and emmision chambers. Too many unknowns in the head to say if it is causing you grief. Do you have any info on what is done to the head?
-
Probably the PO didn't tighten the bolts to the specified torque and they loosened over time. There is a reason for a certain tension on bolts. When the flywheel and crankshaft heat up, the bolts can expand and become a fraction longer. In this situation the flywheel can move and the bolts can loosen further over time. The tension Nissan specifies is calculated the prevent this from happening.
-
Personally I would not use high strength loctite because it will require heat to release the bolts. All I do is clean all the threads, lightly oil the threads and use a tension wrench to tighten them to spec. Dry threads have more resistance and will not tighten down as far ss lightly oiled threads.
-
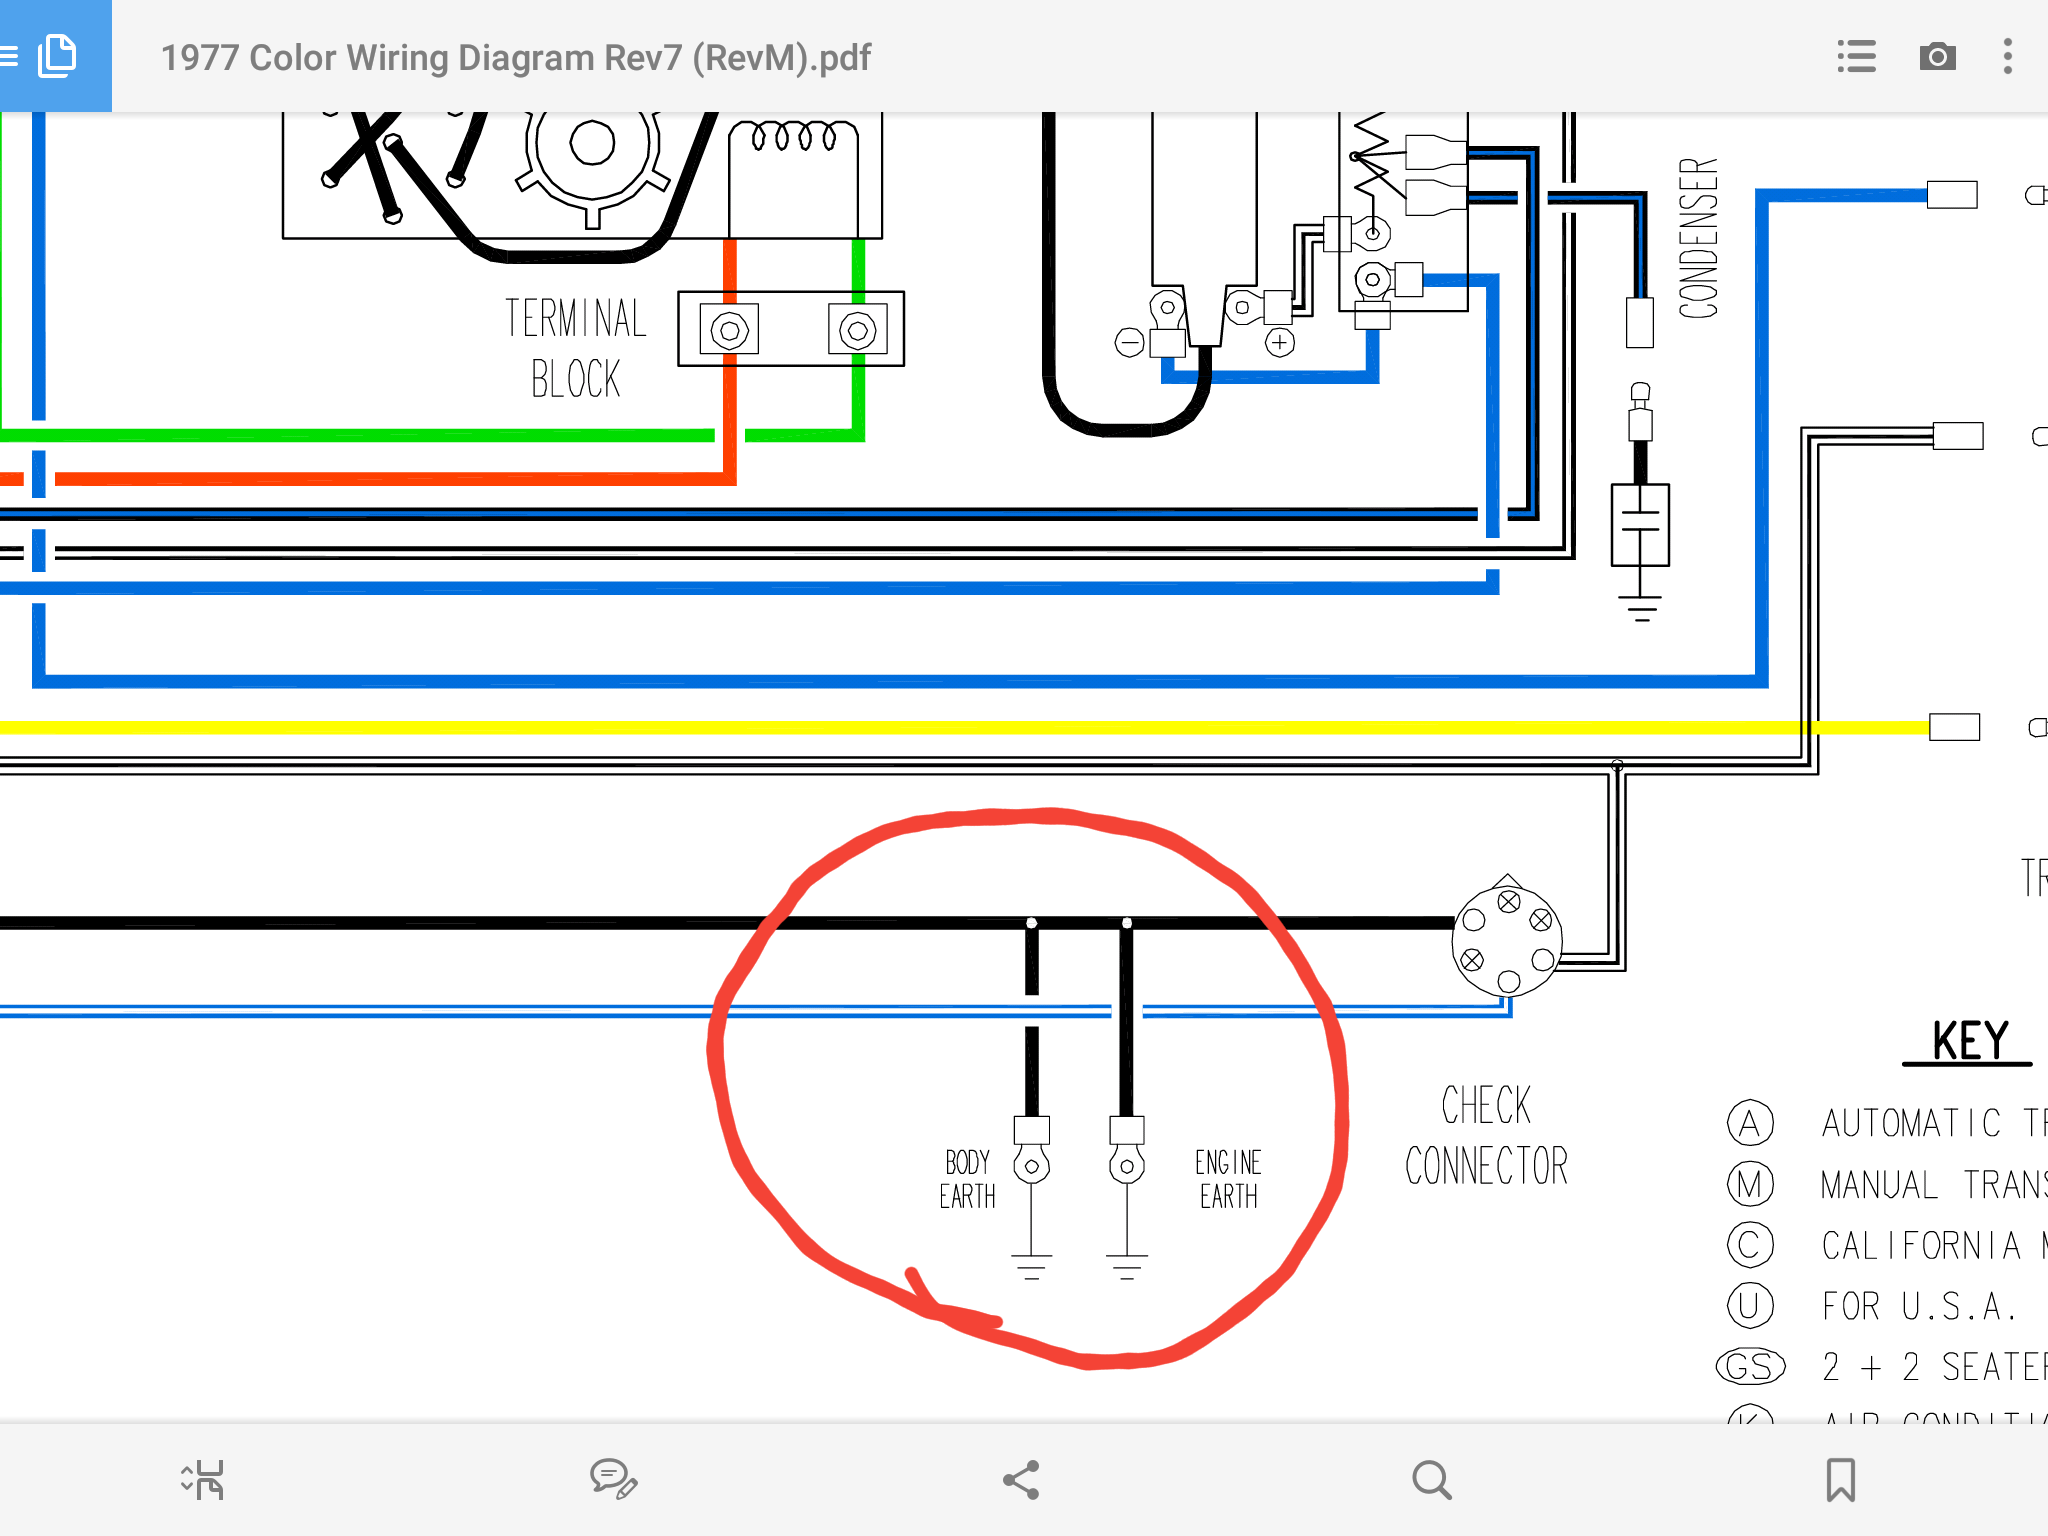
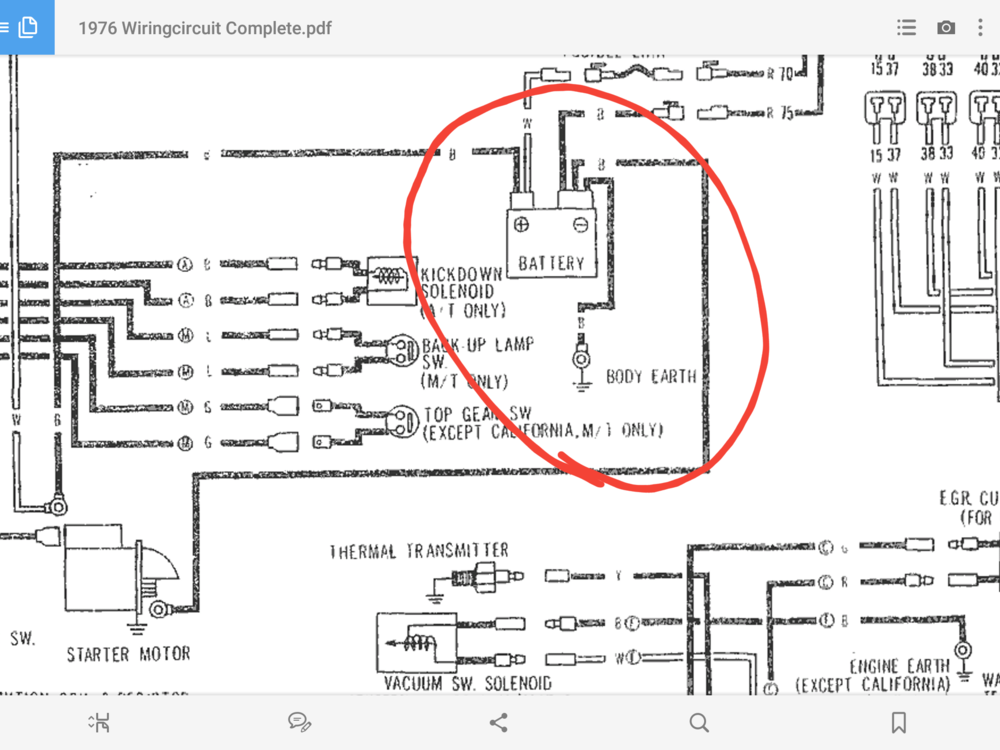
Jesus, When you check the earth wiring, check at the battery as well. The photo I posted is from a 5/77 model. Somewhere in 76 they changed from earthing the body to the battery to the style in the photo. Not sure which month they did it. Yours might be ok, just located at the battery. If that is the case, check the negative battery post for three cables, the large heavy duty cable for the starter, another cable with a connector (ECU ground) going over the firewall towards the brake booster and one going to the body just behind the battery. I made a couple of screenshots to show the difference. Chers

-
Godd work Siteunsen. I couldn't even find that one. I did find one where someone was asking about the yogut cup test. It might have something to do with the migrating from the old server to the new one.
-
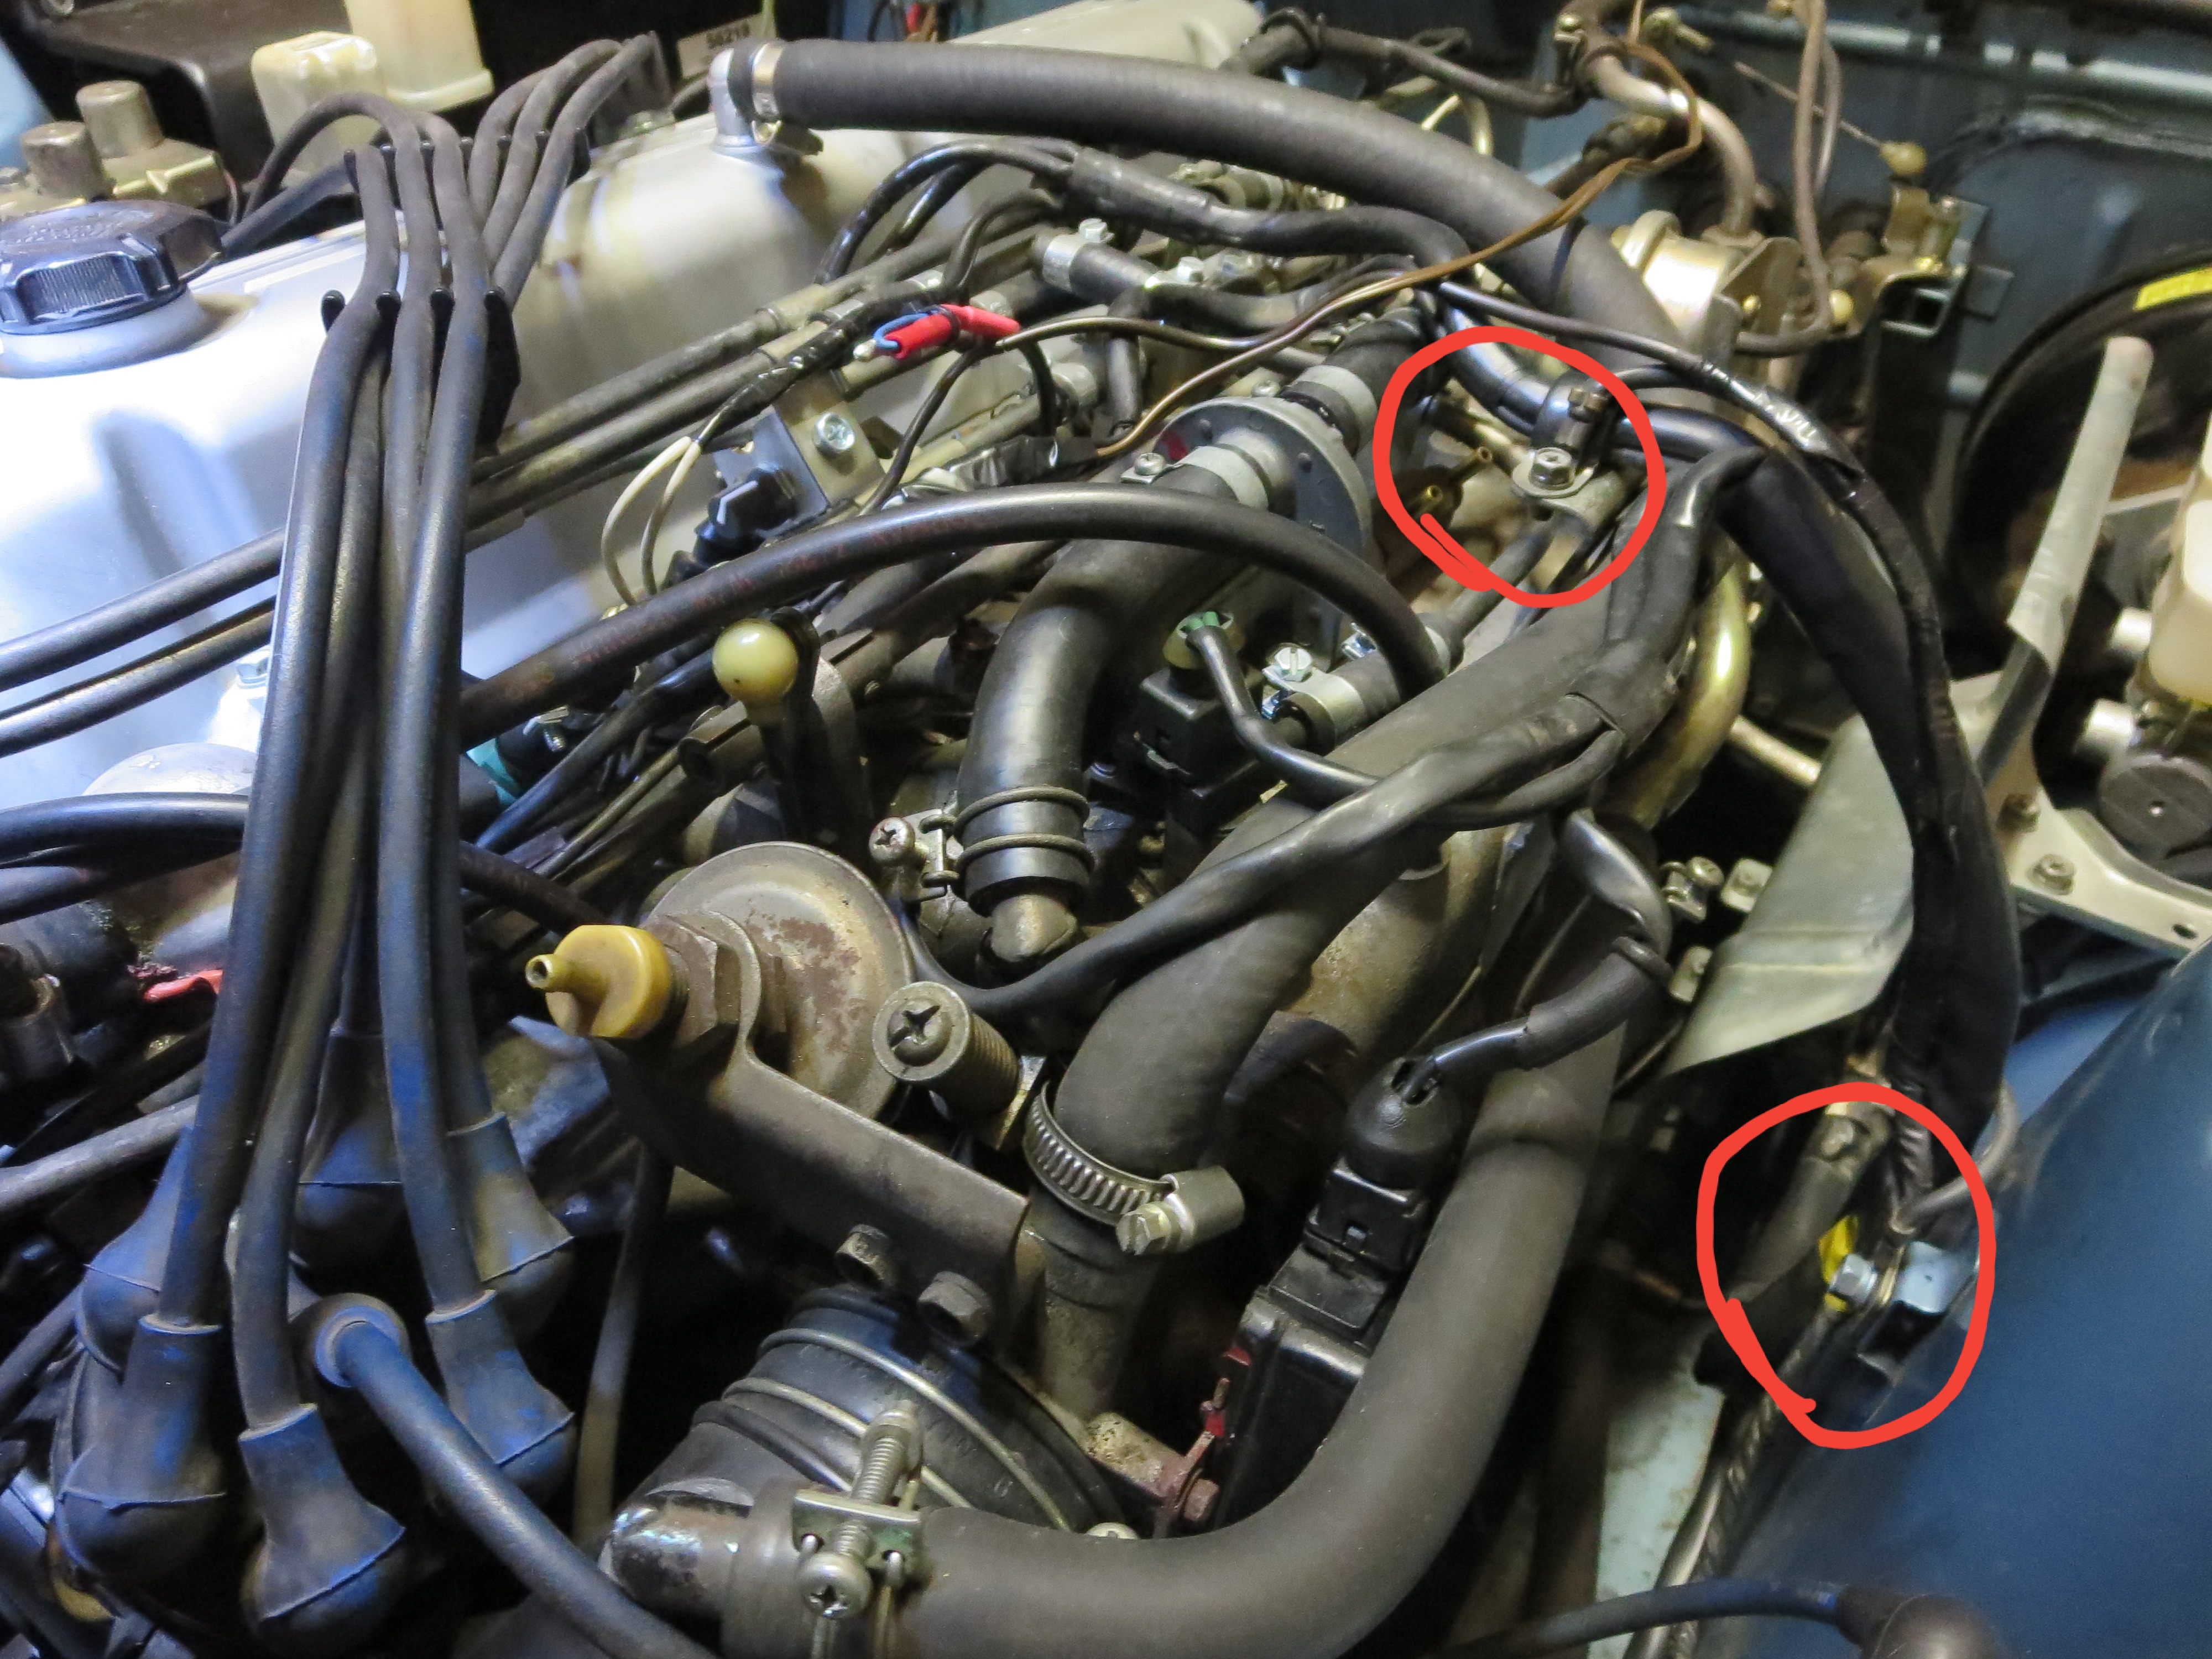
Hi Jesus, We have been PMing over your HEI module swap and I missed this thread altogether. Your problem could be caused by a number of issues or even a combination. The AFM switch is a common cause. The AFM has a cap with silicone kit. You can gently cut the kit and remove the cap to check the switch. Check the switch adjustment by reaching in from the air filter side and moving the vane or turning it by the counter weight by hand. Check for vacuum leaks. There was a thread on here called the Yoghurt cup test, but I can find it anymore. Basically its just removing the hose between the AFM and the throttle body and blocking the hole with a yoghurt cup. The removing a hose so you can blow air into the manifold with your mouth and searching for leaks with soapy water. Fuel pressure and pump capacity are also things that can cause your problem. Buy a simple gauge and you can do some symple test to check the pressure and flow. A blocked filter can be so bad, that the car will idle, but the pressure will drop right off when you open the throttle and need more fuel. The fuel system has infact two filters, one in the pump inlet and the filter at front right side of the engine. See the instruction in the pdf. It is for checking leak down, but the flow test and basic pressure check while running engine is what you need. Check the earth terminal on the top of the inlet manifold. It is very important for the EFI. And check where it connects to the body on the side of the strut tower. Cheers Instruction - Fuel Pressure Test 280Z RevA.pdf


-
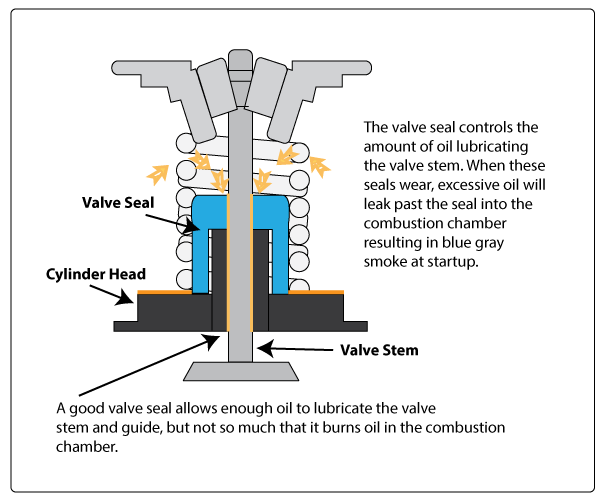
I agree with Mark. Valve seals are not that big a deal. You will get carbon buidup around the inlet vavle head (on the manifold side), people behind you may comment at the occasional smoke plume and it might use a little more oil than normal. Leaking valve stem seals won't leave you standing on the side of the road waiting for road side service.
-
Hi Jai. Yes, if you have enough revs and no throttle. There should be enough vacuum to pull in oil and not burn it. Then drive further a little harder than normal. Is it a good sign. The seals are not expensive and people use the ford units with succes. Getting them fitted could be costly or someone close by that is hangy with cars could do it.
-
Hi Jai, From your description, the first thing that comes to mind is valve stem seals. They are little rubber seals around the valve stems that limit the amount of oil passing through to the valve guide to a minimum. If the become old, they harden and break and allow oil to run down the stem and throught the valve guide to the inlet valve. The inlet valve is mostly under vacuum and causes the blue smoke problem after a period of coasting and the acceleration. A simple test would be to coast down a hill with no throttle and at the bottom of the hill a short burst of full throttle or hard acceleration. You should see a plume of grey blue smoke. That is a good indication. Why the test: When coasting, high vacuum pulls in more oil then normal, but a closed throttle doen't give it enough fuel air to burn the oil. When you give it full throttle, the fuel air mixture then burns the oil creating excessive smoke for some seconds. A compression test will tell you more about the overall condition of the engine. A bit hard to say if the putt putt sound was there before or not, since the muffler was changed, makes that hard to say with any certainty. And you mention the exhaust sound is more noticable with the new muffler. The smoke issue could be all some time, but it has now come to your attention due to the sounds from the new muffler. Goodluck with finding a solution Jai. Regadds Chas
-
The 5 pin connector version E12-27 was used in the 78 model and doesn't have the dual pick-up function. You can use it, but you will have choose one pickup and forget the white wire. Have you done the simple checks to determine the tiu is your problem? You can try the tests at the end of this instruction. Its for the 77 model, but the tests will workonthe 76. Instruction - Fitting a 4-pin HEI module to 280Z 1977 RevD.pdf
-
-
-
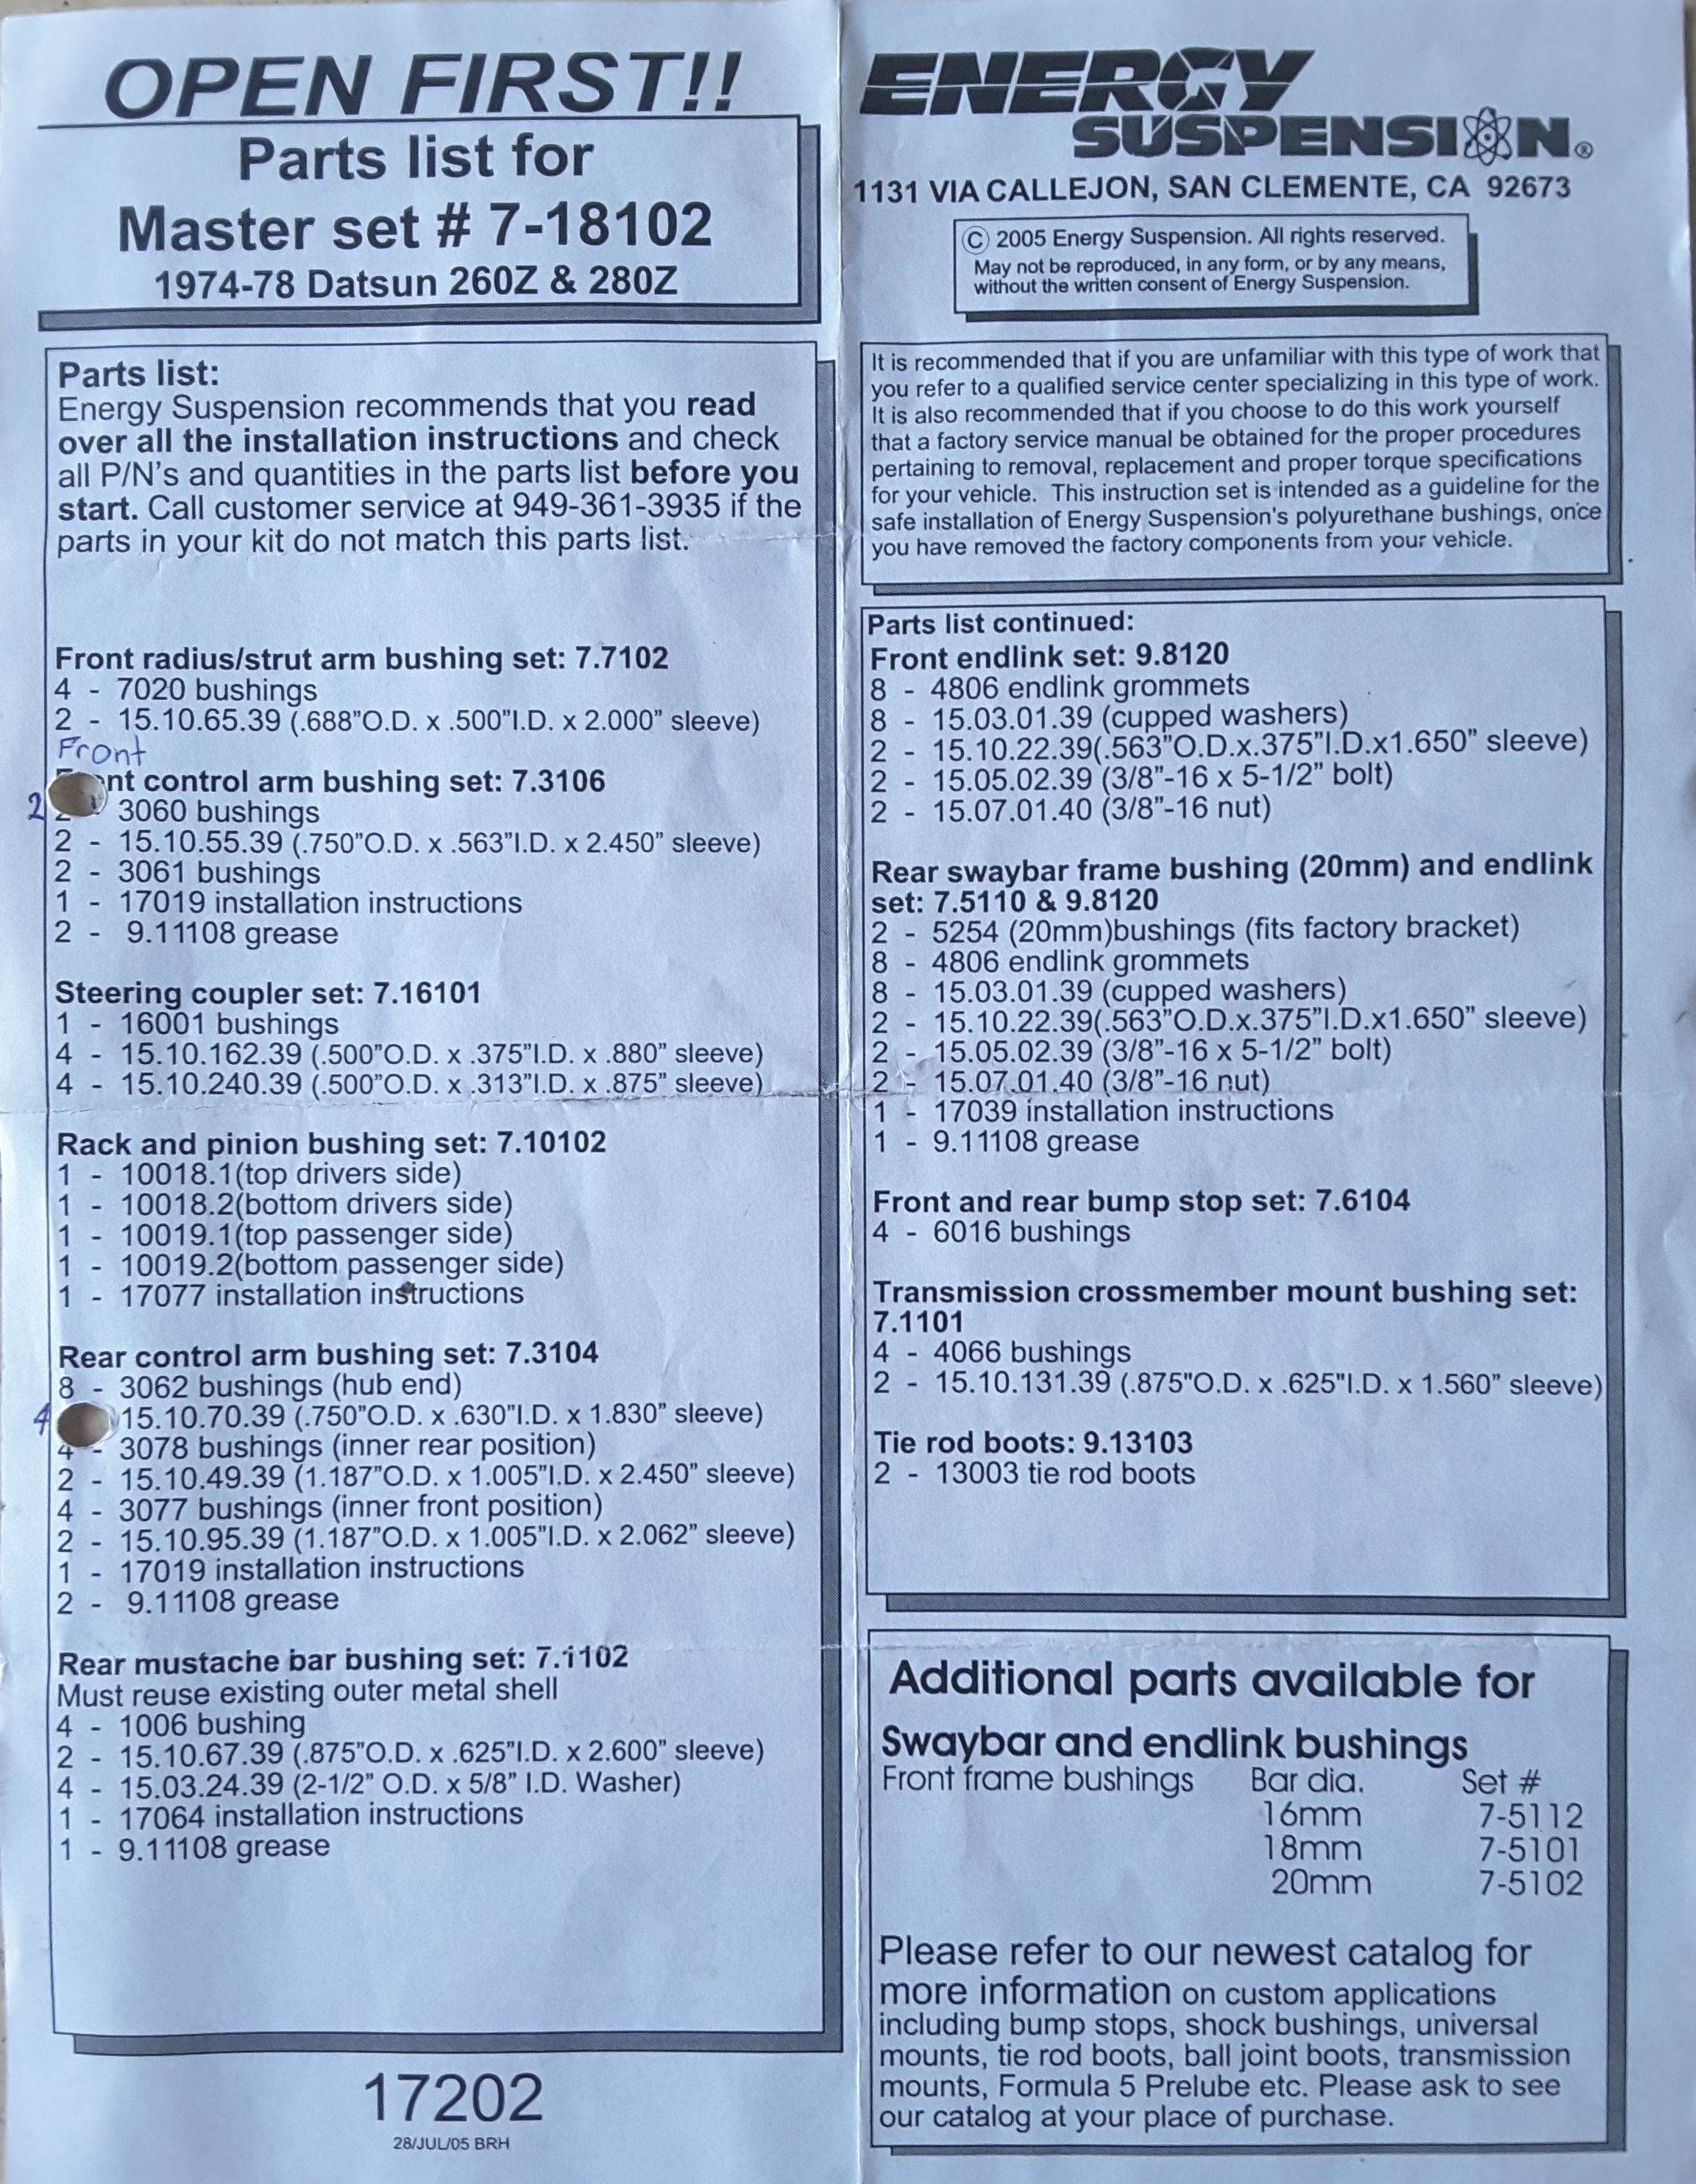
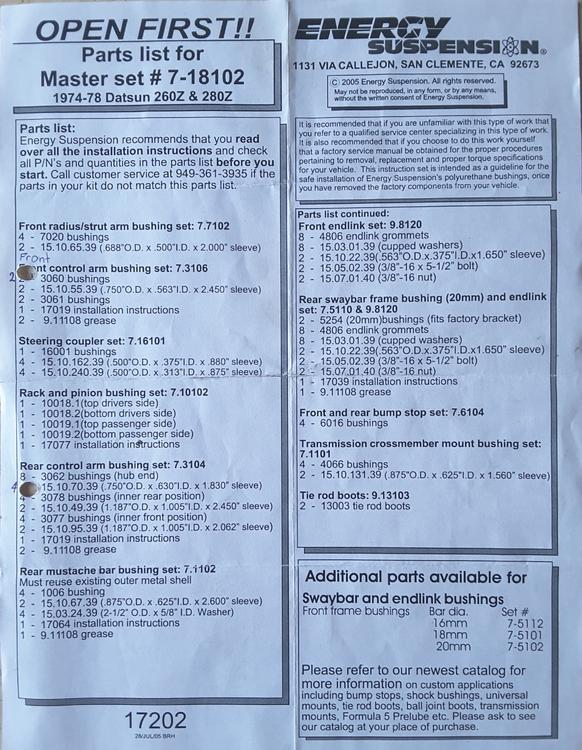
Not sure if this helps, but the kit I used was all in plastic bags with the part number on the bag. They were the correct bushes in the Master set #7-18102. That was back in 2012 and things change, including the way they package their product. It could be a simple issue of wrong part in the kit.
-
-
-
Good advice Jeff. My brother died five months ago, two months before my father past away. I hadn't spoken to him for almost 20 years. He lost everything in a downward spiral. Sad really, when you think about it.
-
-
If you remove the brown and yhe white wires, you can wire it just like the instruction for the 77. The red wire should go to the pick-up furthest away from the vacuum pot. The one closest should be the brown (retarded) pick-up. I would leave the brown wire connected to the terminal on the TIU and remove the wiring in the TIU. You can do the same with the white wire. That way it will be neat and tidy. Not loose wires hanging around.
-
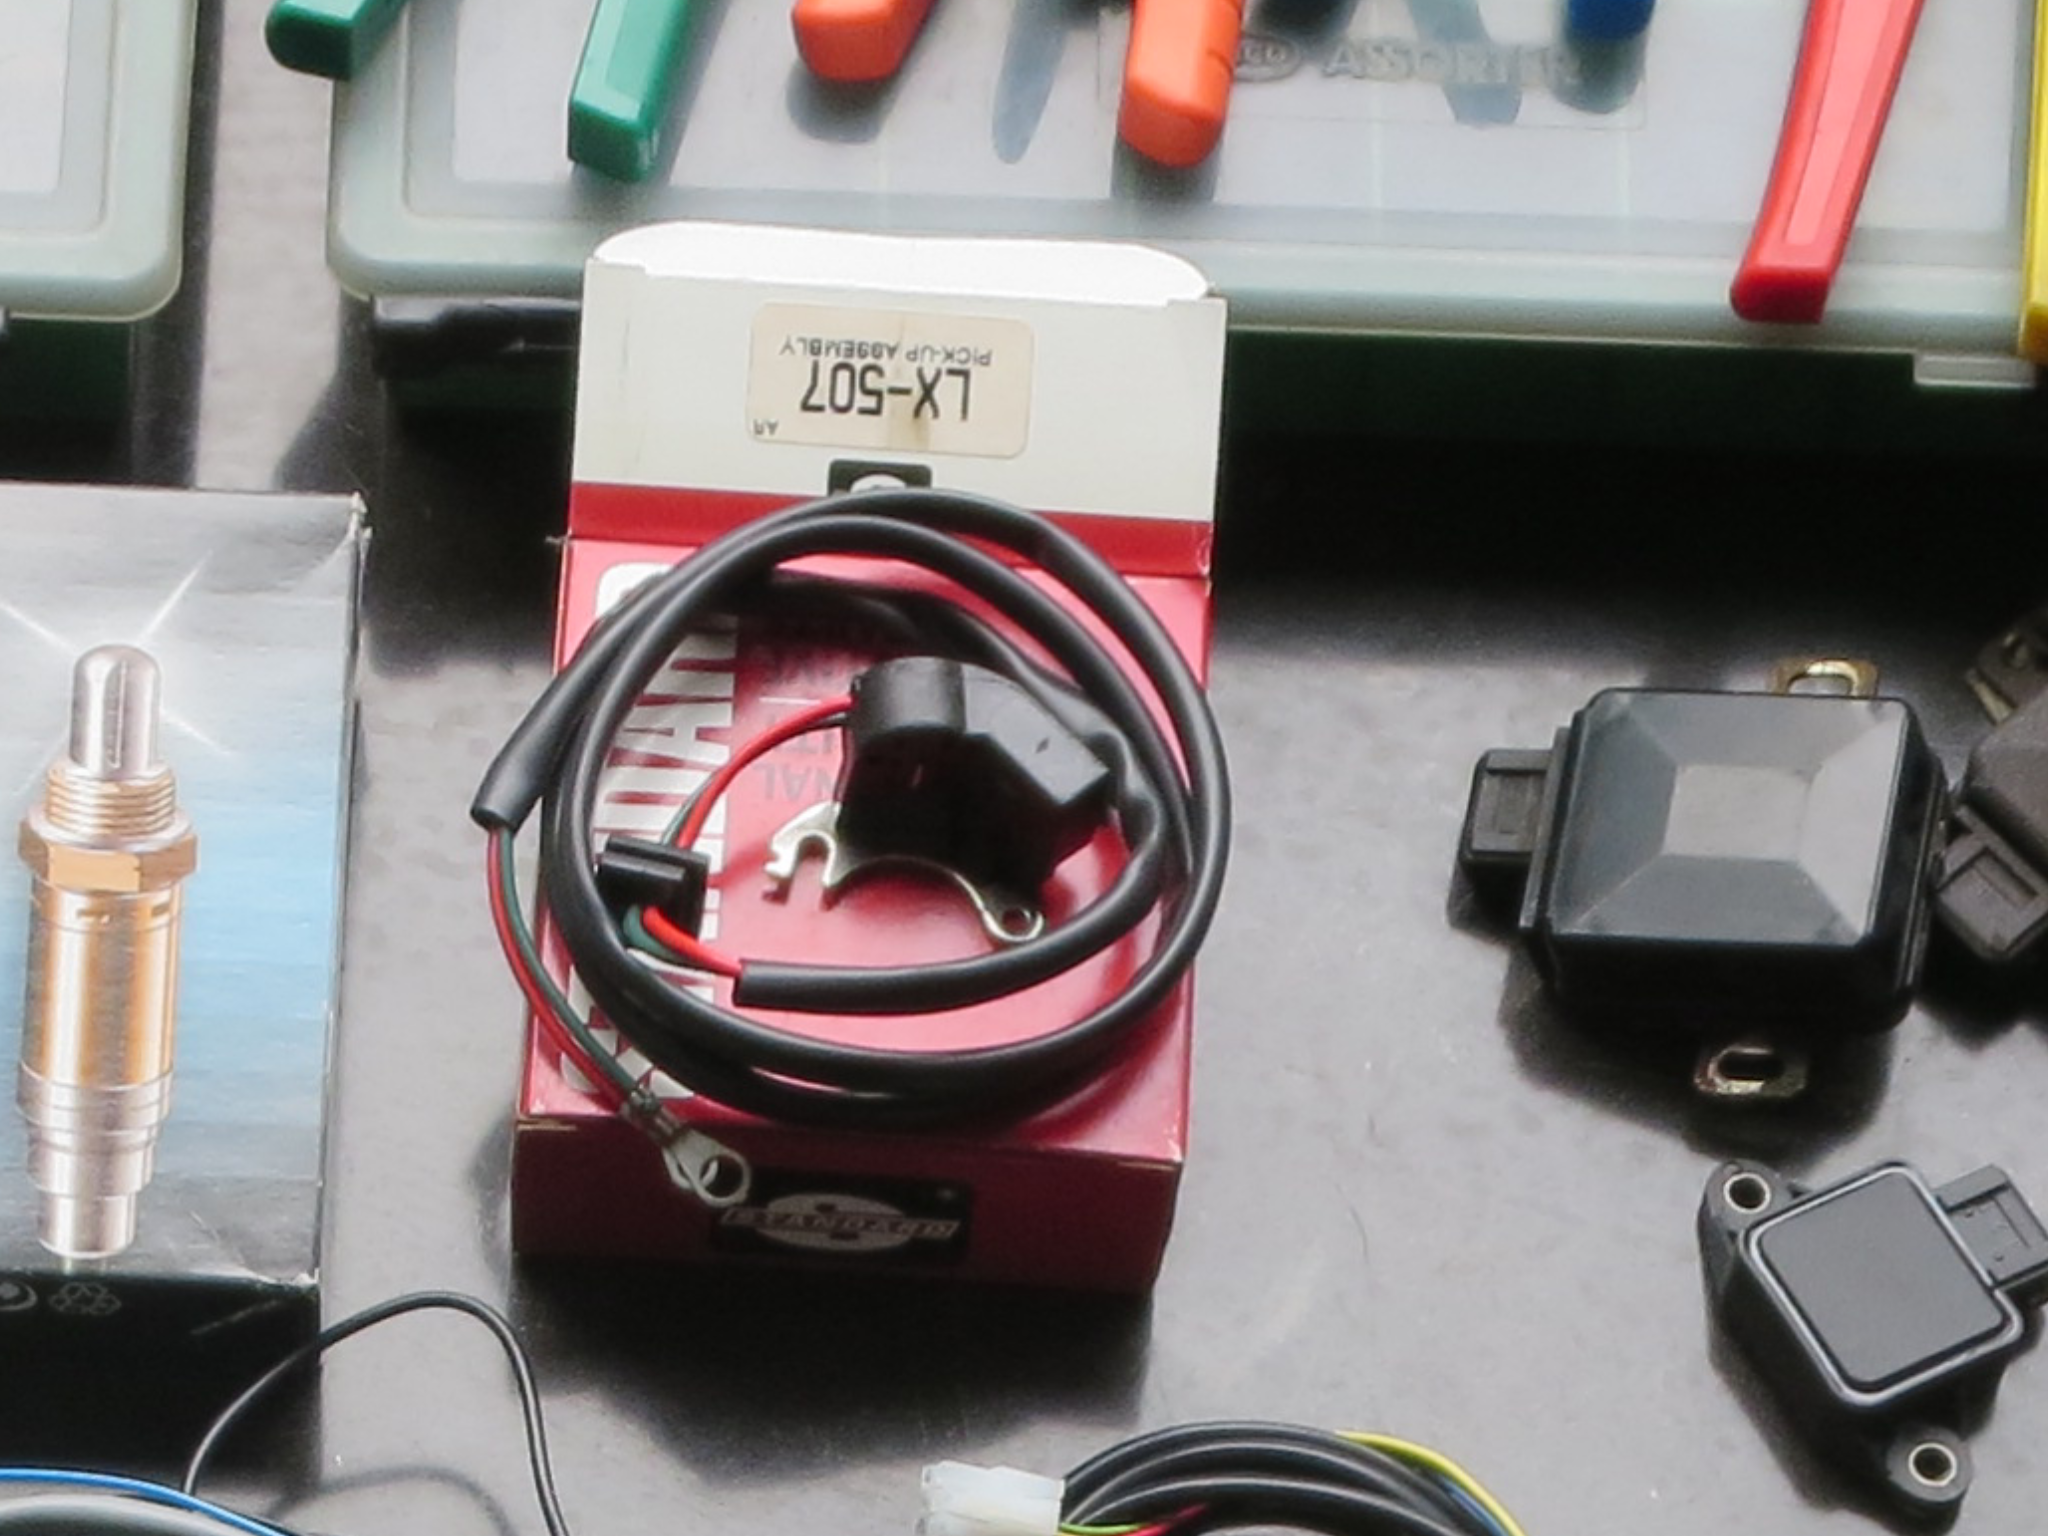
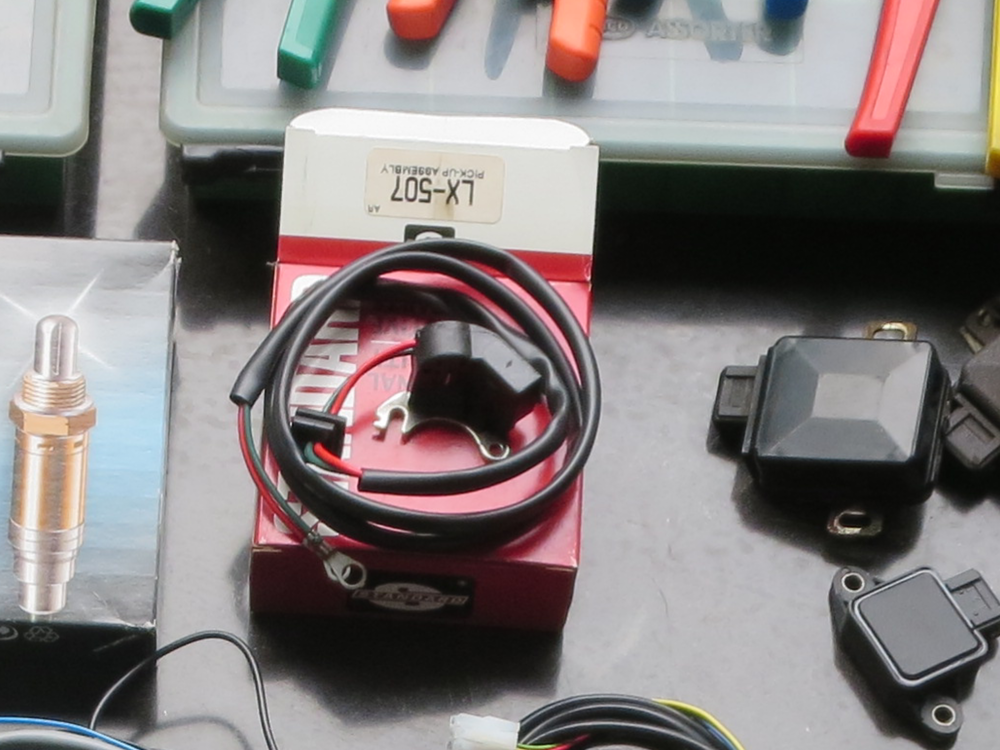
I can vouch for that. It will run, but you won't get it over 2500 rpm. Its en easy fix. Which blue wire goes where? You will probably have to break open the insulation and track it back to the pick-ups to be sure. Or seperate them from the (blue) green wire and use a meter to find the right end terminals for the pick-up you want to use. I would probably buy a new pick-up from Rock auto or somewhere. Part nr. LX-507 Btw. The green should go to both pickups. The brown is the extra pick-up and the red goes to the californian positioned pick-up, if that makes any sense.
-