EuroDat
Free Member
-
Joined
-
Last visited
Everything posted by EuroDat
-
 I was more curious than anything, it seem to be negelected. I have used diodes in the past to reduce the back emf. Don't know if they still call it that these days. I know diodes are less reliable, but I have never had one fail on me yet. Maybe I should have said "normal" instead of "servicable" relay since most relays don't have this voltage spike limiting function. I believe the resistor is between 600 - 800 ohm which wouln't draw much anyway.
 -
Nice work Tamo. Can you open the dimmer relay without irreversibly damaging it? If you could cut the resistance, it would also be a servicable relay. Maybe foglights or some other high current drawing system.
-
I can understand your reasoning completly Steve. Mine look terrible when you take a close look. I think the PO used them for a workbench.The temptation to lean on a fender when you are concentrating on something is hard to resist. It don't take much to dent them. Mine were very "flexible" until I replaced the padding blocks under the fender. That helped a lot. Aaha, I see you found your torque wrench😆
-
I didn't have any problems with the taillight panel. The 240Z taillight panel is different from the 280Z, but I would expect that section to still be the same.
-
You're right Steve. I should have said spanner or socket rachet. He can try the 17mm head. He will know soon enough when he has to fight it to get the spanner or socket off the bolt head. 17mm is a big increase compared to the original 14mm. What I was thinking is he could get them started with not problems because the bolt thread tolerance would allow enough movement for the socket to clear the bell housing. When it starts to torque up the bolt will centre itself and jam the socket against the bell housing. Yes, I've been there.....
-
Yer and they use a wrench size 17mm. The originals use 14mm. That will cause the socket to bind on the bellhousing giving you incorrect torque readings. I used genuine nissan. They were 3x 60mm and 1 was 65mm. The 65mm bolt goes nest to the exhaust. That thread is sunken 5mm in the block which makes the 60mm too short.
-
All 4 bolts are M10x1.5 pitch. The lengths are 3x 60mm and 1x 65mm. Part numbers M10x60mm P/N: 08131-0601A (was 08131-06010) M10x65mm P/N: 08131-0651A (was 08131-06510) M10x70mm P/N: 08131-0701A (was 08131-07010) Spring washer P/N: 08915-2401A You can use 70mm. They will fit with about 6 to 7mm spare. The hole depth is about 75mm. Chas
-
-
Thats bad luck. Hope the vavle hasn't done irreparable damage to the piston. They stick in the open position and then piston contact when it comes back up the bore.
-
The O-ring is also working against you, but the angle you have to work is always going to make it difficult. Tapping it with a screwdriver can also damage the tank adapter flange. If the flange distorted it could cause leaks in the furture. If you do it with the screwdriver. Keep moving around all the four tabs, use something like WD40 and try to be patient. I made a drawing of the tool I used only a month ago. Since then I have used the parts making other stuff for my front bumper/grill project. The way it works is simple. It picks up two of the tabs with the two fingers and you use a screwdriver through the hole to turn it. I made it using a bench vice, hack saw, files and a 10mm drill. I didn't weld it together because I only needed it for like 20 seconds to dismatle and 20 seconds to install. FuelSenderTool.pdf Its a lot easier with the tank out, but if you are not planning to remove the tank this tool is IMO the best method.
-
I made a tool out of a piece of 40x5mm x 60mm long steel. It hard to explain it, I can draw it better. It needed a 10x40mm section removed to clear the terminals. It needs to sit next to two of the four tabs, but clear everything else. That and a 1" diameter water pipe about 250mm long with slots to hold the plate and a hole through the other end for a screwdriver. Worked like a T-spanner. The problem with the screwdriver is you and hitting one side at a time and all the forces go out to the side jamming it. And the angle you have to work with due to the small opening only makes it worse. Ill post a pic later when I get home.
-
The sender is officially NLA. Nissan don't make them anymore, but I checked courtesy and they still have stock. $92. It would pay to check supply if you need to order one. I would first pull it out and see whats wrong with it first. No need ordering something thats not broken or repairable. http://www.courtesyparts.com/gauge-fuel-p-305191.html Your problem could be a simple case of a full tank gives you a little more head pressure to overcome the blockage and a full tank has a higher fuel to debris ratio means it takes longer to accumulate debris around the screen and block it again.
-
-
You will get use to all the short words eventually. Its typical forum chat. Dizzy is common, but there are others. Tranny - Transmission Carb, Carbs or Carby - Carburetor. The fuel filter looks very dirty for such a short time in use. I would seriously think about removing the tank and have it cleaned and coated. With todays fuels (mixed with ethanol) the rust deposits will onlt get worse and the tank could rust through and start leaking. Here is a thread on doing the tank with POR-15 http://www.classiczcars.com/topic/49166-por-15-gas-tank-repair/ Chas
-
Matt, Congrats. A well deserved recognition for the good work you have done.
-
Good work finding your problem. Sounds like you will need a new pump. It looks like a bosch pump, but the end (not the end with the terminals) seems sharper. Bosch has a radiused end if that makes any sense. These bosch pumps are originally made for Porches and can delivery 250L/hr and 6.0barg pressure. If you can't find a original type from a wrecking yard than my choice would be a bosch. Google: " bosch Fuel Pump - 0580254044 " and you will find info on them. They use them a lot in Europe as an aftermarket replacement for all kinds of cars.
-
Are the wheels Konig? They look good from the side. I have heard that 16X7 with 0 offset fits well without rolling the lip. Would depend on tyres of course. Goodluck with sanding. That can be a pita.
-
Looking at those early photos, I didn't think that boat anchor would clean up like that. Hard to beleive its the same head.
-
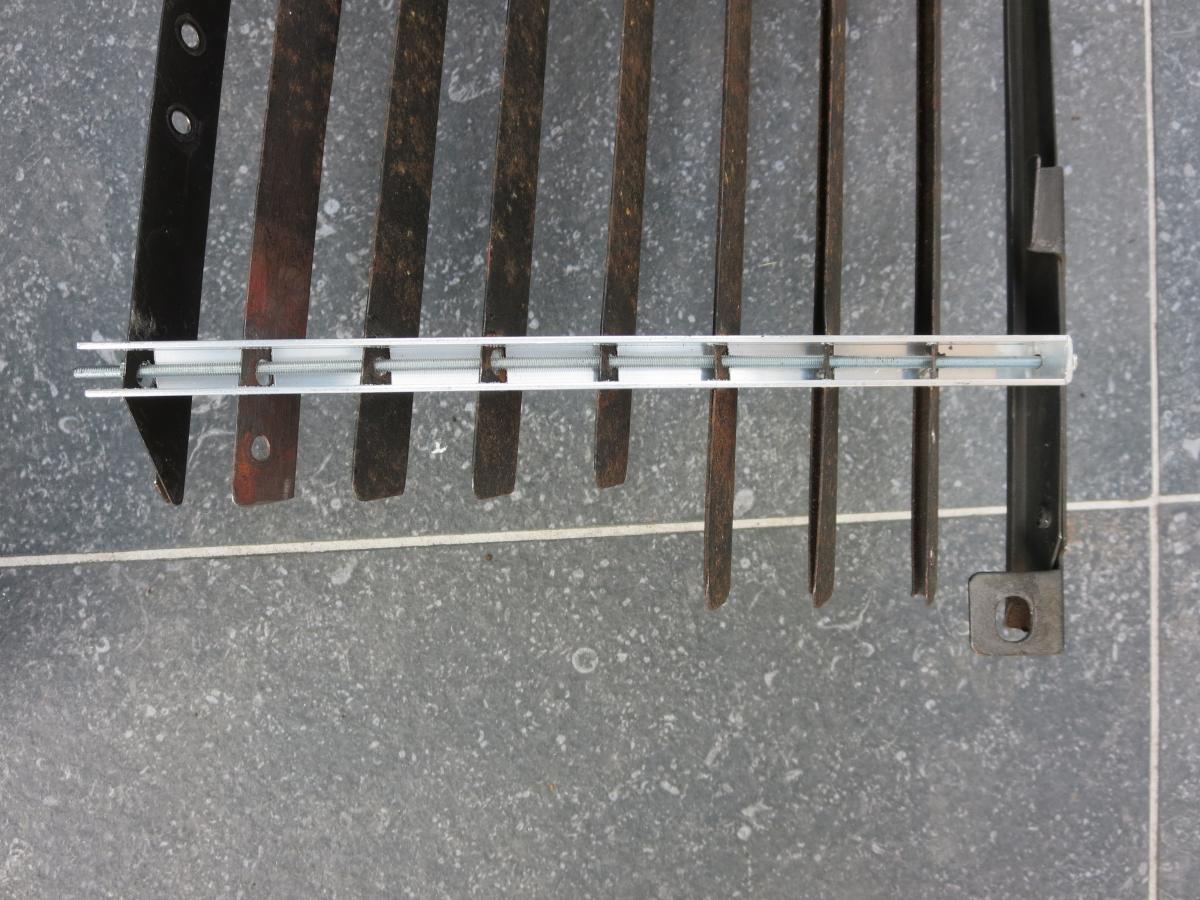
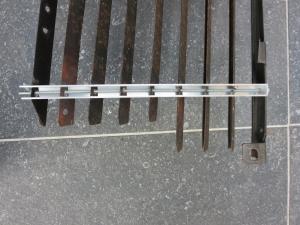
Hi Charles, The vertical bars are aluminium. I thought about using stainless, but decided it was harder to fabricate and the original design has a degree of flexability which the stainless would not equal. The horizontal bars fit snug in the slots and when you tighten the bolts the vertical bars compress and clamp it all together. The thinkness of the slots is important, too big and the vertical bar will bend and misvorm like a bananna. I used a sharpening stone to wear down the side of a hacksaw blade to get the right thickness. If you support both ends of the vertical bar and gently push it at its center from the back. That opens the slots a little and then you can easily insert the horizontal bars. If it was made of stainless it would be a lot more difficult to assemble. The thread is stainless. Back to the progress report: I made some test brackets yesterday and fitted then today, but made a mistake measuring the brackets. To fit the grill I plan to go back to the 240Z top brackets. The 280Z brackets are fitted to one bar and it keeps flexing, but when I measured the 240Z brackets I switched them, left to right, by accident and made the test bracket 20mm to short. It will be enough for a test setup. The next brackets will be 2mm stainless. In the photos the grill is hanging on the test brackets and the second horizontal bar is removed so I can take measurements. The grill will be lifted 10mm which will center the bars around the bumper better. Next the test bumper brackets, but that will have to wait till Sunday afternoon.
-
You say the PO replaced the points ignition system for an electronic ignition. Can you post photos? Its a bit hard to sugest anything not knowing what it is. Try to capture the wiring in a photo as well. If you see 12volts on both sides of the coil. It just means there is no load on the coil and the negative side is open circuit. That is normal for electonic ignition when the engine is not running. Here is a quick video on electronic ignition and how it works. https://www.google.nl/url?sa=t&source=web&rct=j&ei=zw1uVa3jJYP4ywP66oPgBw&url=http://www.youtube.com/watch%3Fv%3DQYx8J_5l5wY&ved=0CB8QtwIwAA&usg=AFQjCNEZFJDo9IW1XtQgTfky4zIFc3JP_g
-
It looks like a HG going by the grill although these cars are a bit like Zeds. You can swap parts easily. Looks in pretty good condition. If you think Datsuns were bad for rust in that era, Holdens where not must better and maybe worse. Can't tell if the engine is a 161 or a 186cu. It could even have a 173 or the 202 from one of the HQ's in the yard. Holden stroked the 161 and the 186 when they went to the bigger, heavier HQ series. I had an HT Monaro 327. Any luck finding a Datsun?
-
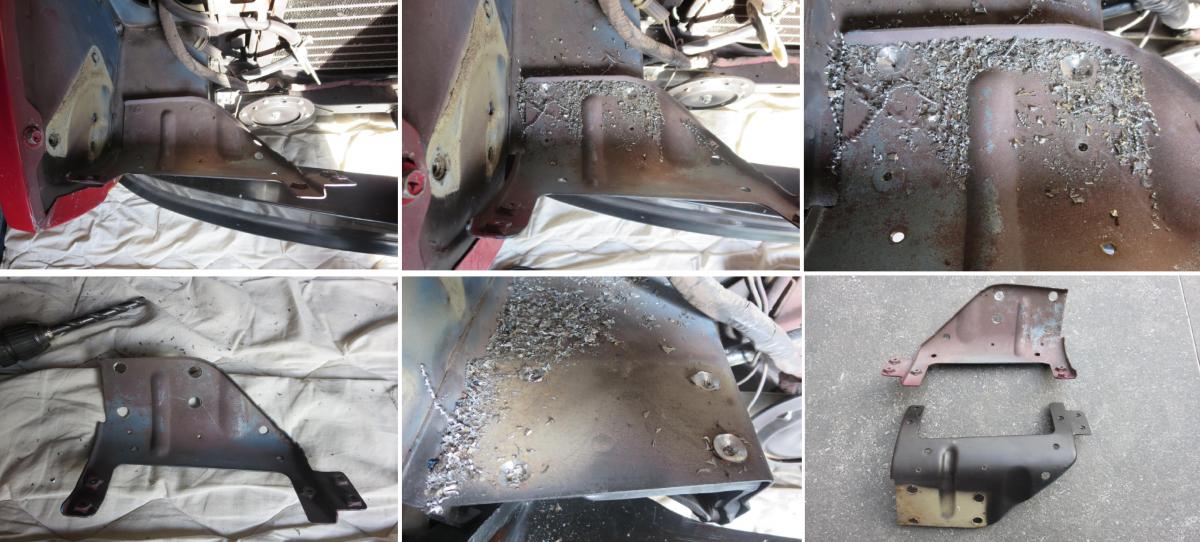
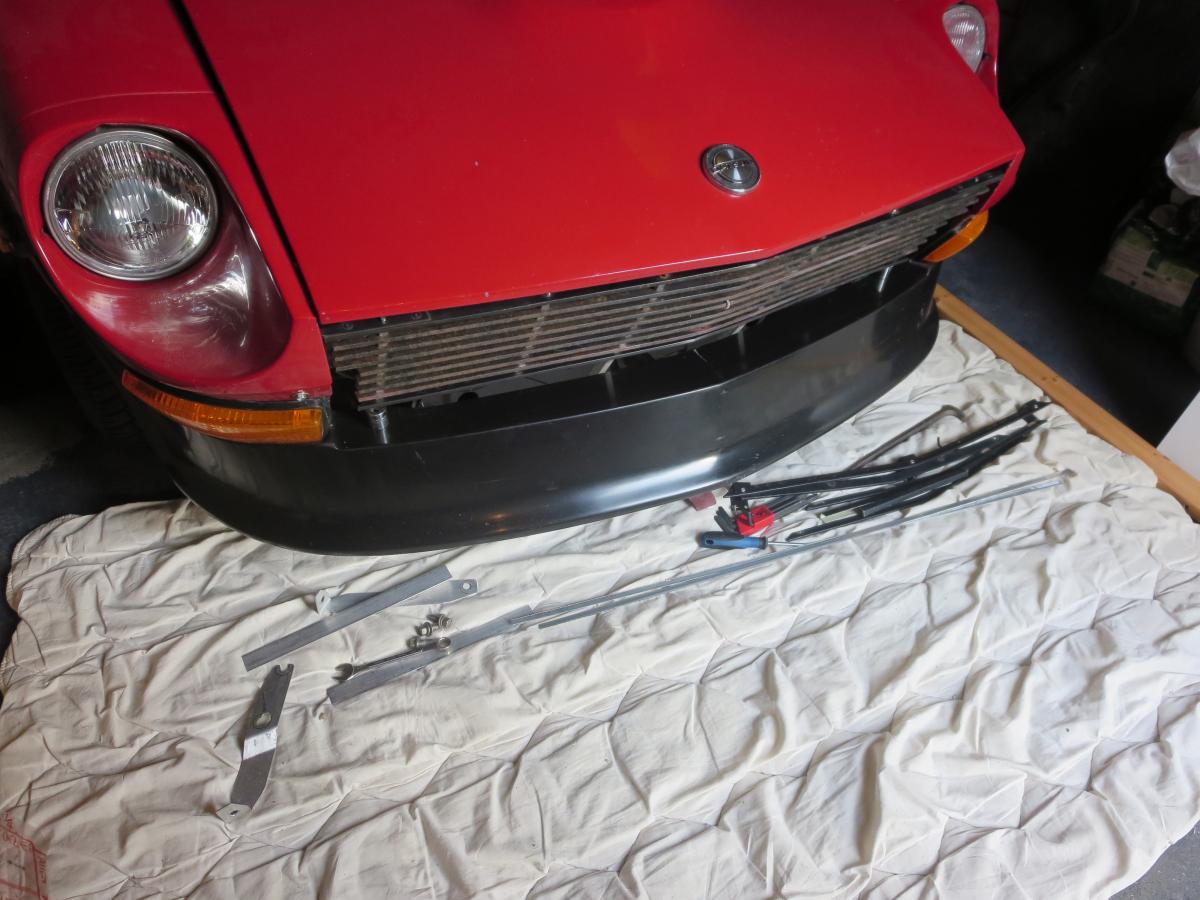
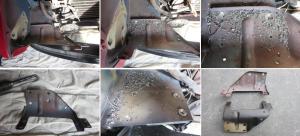
Removed the old turn signal supports today. I managed to get them out without butchering them, so I can reuse them if I ever decide to go back. Now buzy making new brackets to mount the grill. Charles, Here is a photo of the back of one of the vertical bars. Chas

-
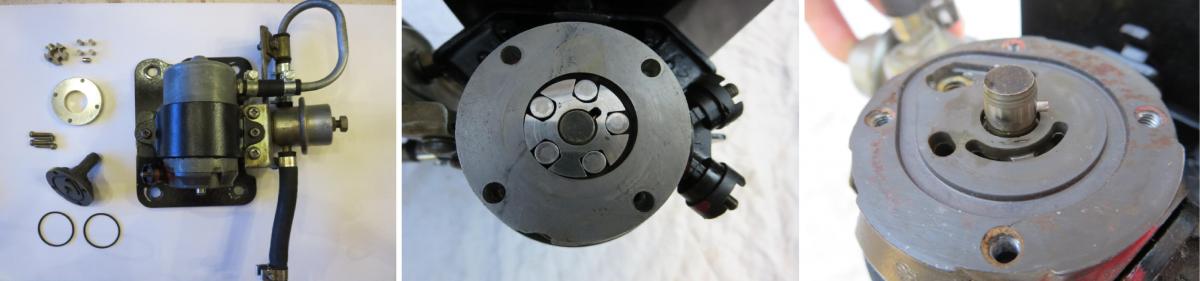
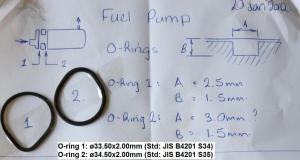
Here is my fuel pump. It will give you an idea what it looks like inside. Its a pretty simple design. Make sure you note the order the parts coma apart so you can rebuild it in that order. The 2nd photo is a calulation for the o-rings I used on my pump. If you need new o-rings make sure you use Viton or NBR material. I prefer NBR because of the hazards associated with viton if exposed to very high temperatures like fire. You never know... Chas

-
The vertical bars are made out of a h-profile. I had to cut a section off to make it a u-profile. The end result was a u-profile 12x10x12x1mm. Then I made a jig to cut the slots. I can make a couple of sets with the left over profile. First to get my proto type werking right.....
-
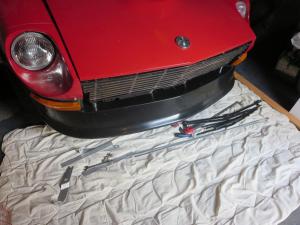
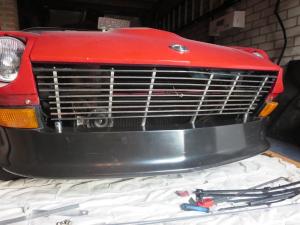
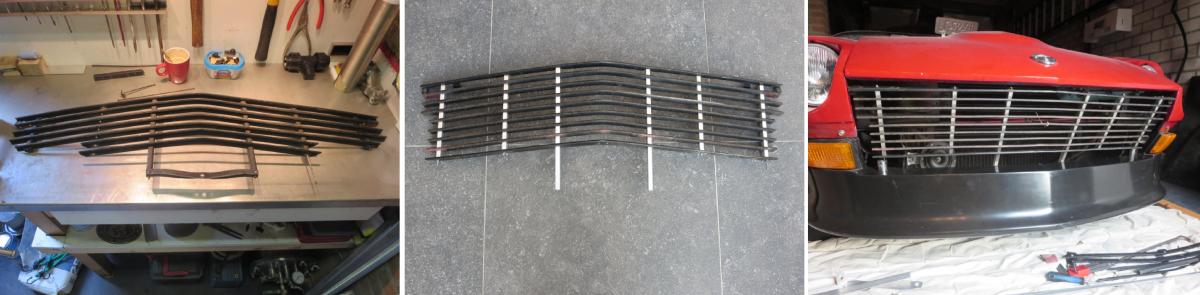
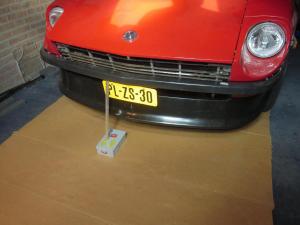
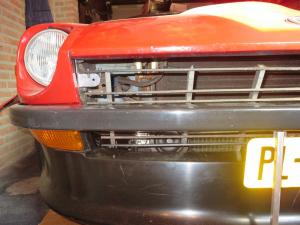
I revised my grill again today. Spent most of the afternoon making new vertical bars so I copuld extend the grill all the way down to the airdam. It won't work with my bumper brackets in the present situation, but Im planning to move then out to the 240Z position. To add the extra too "long" bars I needed to remove the top bar from the little grill under the 280Z bumper. Second was to try and repair the old top bar from the 240Z grill. Someone drilled extra holes in it and it was bent up a bit. I heated it red hot to straighten it and flatten the indentations for the vertical bars. Here are the "custom" parts I made to extend the grill. Here are some pics of the grill and a trial fit in the car. Its held in place with some wire. The two centre vertical bars will attach to the frame mounting where the old 280Z grill under the bumper mounted.