


Jarvo2
Free Member
-
Joined
-
Last visited
Everything posted by Jarvo2
-
 Are we talking condenser or ballast resister?
 -
I'm interested in the CARDONE questions as well....I've gotta think that a re-manufactured distributor has to be in better shape than my 42 year old one (and I actually have 2 original ones). Getting some minor fluctuation on my vacuum gauge and it appears to be electrical related.
-
Try getting your engine to TDC and then taking off the distributor. The shaft should appear at 11;25 as pictured in many other posts. If its not, you can easily drop the oil pump & adjust the shaft, just be ready to get dirty as the oil will be dripping out of there!
-
I love my electric pump & its so much more reliable than the mechanical one. Here's my write up for reference: http://jarvas240z.blogspot.com/2013/01/electric-fuel-pump-installation.html
-
You're not trying to use the zig-zag oil scrapper ring underneath the other ring are you? They each go in their own groove on the piston.
-
I didn't have any issues with the ITM rings I just installed on my L24. Just did the first start up of the engine this weekend & started on first crank. The oil ring in the picture above by the original poster is the lowest ring, and there should be two other ones that sit in the grooves above this oil scrapper. My 'trick' was to use a good ring spreader tool (not my fingers) and then stagger the gaps around the piston as shown in the ITM instructions. I also had an issue with the ring compressor I used (got a cheapo at first), but after biting the bullet & buying a good one they went in very easy (http://smile.amazon.com/gp/product/B008PVAEXO)
-
I plugged mine & no issues (or whistle) yet.
-
Chris -- How much are you asking for the rear strut brace that you've been making? I'm in the market for one and would prefer a 3-point rather than the cheapo adjustable ones that we see pop up too often.
I've searched high & low and have not been able to locate the proper placement of the "longer" head bolts. The FSM states there are different sizes, although there are no pictures/guides. I did order a new set of 280zx turbo bolts which I've heard are stronger than the ones I pulled out of my '72 240z (e88 head). Can someone please point me in the direction of where the longer ones should go? Thanks.
Sounds like an $800 parts car.
Here's a write up on my '72 upgrade to an internally regulated alternator.
I tried one and it did not work at all with my factory radio. I then hooked it upto a modern digital tuning radio & had similar. I ended up going back to my 12" rubber ducky antenna which works the best for both head units.
For starters, go take a look at the valuation tools on www.hagerty.com. Should give you a ballpark idea of what they're going for.
Depending on how exact you need it, I went with Pontiac Blue (which is bluish green) and its pretty close once it dries & is cured. http://jarvas240z.blogspot.com/2014/11/block-cleanup-and-preparation-for.html
Chuck -- Just sent you an email. Thanks.
I have a full door set of 'quality' seals that never fit correctly, they're too big, even with adjusting the strikers and hinges the doors never closed fully. I can't even bring myself to list them on eBay as I know they don't fit that well. I opted to go for the newer version (POS Chevy Cavilier). If anyone is interested in the set I have, happy to work out a "good" deal for shipping. http://jarvas240z.blogspot.com/2014/07/door-weather-seals.html
I've had great success with my needle height by following the Z-Therapy approach. Dial the knobs all the way in, then loosely screw the needle into the piston & then push the piston into the carb body. Pull the piston out & tighten up the needle set screw. Then adjust down 2.5 turns out on the dials & begin to tune the carbs. This allows for variation in the 40+ year old equipment, and possibly newer / rebuilt nozzles.
The first thing to do before adjusting the SU's is to make sure all other systems are properly functioning: Emissions, Valves/Engine, Timing .... and then carbs. Also want to make sure you have any and all vacuum leaks addressed first. I have the Just SU's video as well and its great, but I also found this series on YouTube that is very useful: Background on SUs: Tuning:
That is awesome. I have more Bob Sharp catalogs and other vintage publications than I know what to do with, including complete sets of Z Club of America monthly newsletters....I might be sitting on a gold mine!
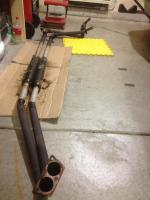
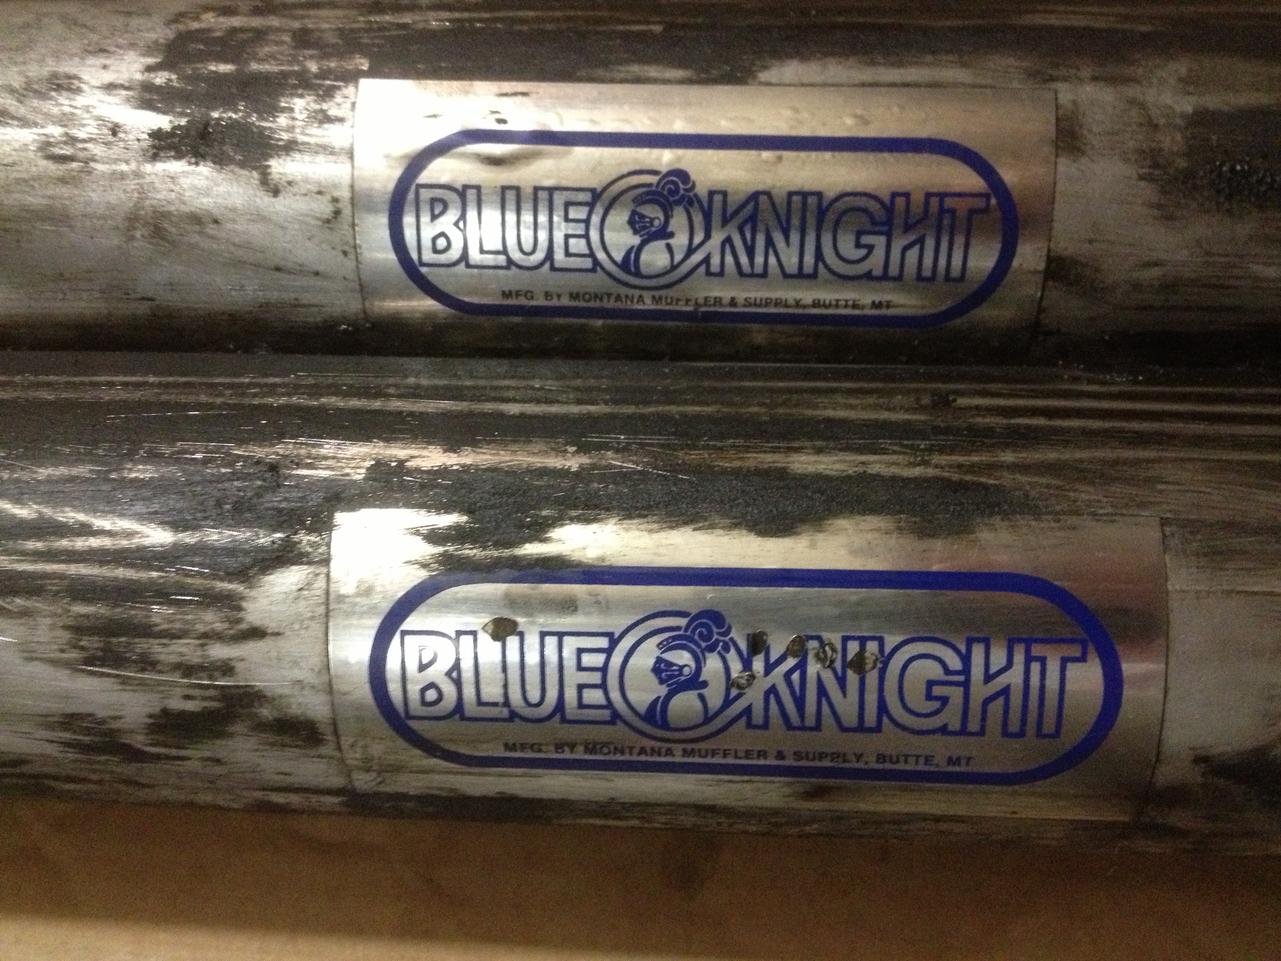
I'm curious why the seller says that it has Datsun Competition duel exhaust. It looks identical to what I have, and I always thought it was a fabricated set of twice pipes. The stickers on my glass packs say "Blue Knight"
 I love my Miata seats in my S30, other than how I had to mount them so I'd fit (no slider). I also added in speakers into the seats which help at highway speeds Miata Seat Install http://jarvas240z.blogspot.com/2014/04/miata-seats-installed.html Miata Seat Speakers http://jarvas240z.blogspot.com/2014/08/miata-seat-speakers.html
I've been looking at this for quite some time, just hesitant to pull the trigger... http://www.ezcarlift.com/
Enjoy,, my infamous electric fuel pump how-to...mine was done on a '72. Please note that some people also put in a fuel pump kill switch around where the inertia switch is to act as a theft protector...only can drive about a block or two before the fuel bowls run dry. http://jarvas240z.blogspot.com/2013/01/electric-fuel-pump-installation.html
Reference: http://jarvas240z.blogspot.com/2013/01/electric-fuel-pump-installation.html
I love my Miata seats in my S30, other than how I had to mount them so I'd fit (no slider). I also added in speakers into the seats which help at highway speeds Miata Seat Install http://jarvas240z.blogspot.com/2014/04/miata-seats-installed.html Miata Seat Speakers http://jarvas240z.blogspot.com/2014/08/miata-seat-speakers.html
I've been looking at this for quite some time, just hesitant to pull the trigger... http://www.ezcarlift.com/
Enjoy,, my infamous electric fuel pump how-to...mine was done on a '72. Please note that some people also put in a fuel pump kill switch around where the inertia switch is to act as a theft protector...only can drive about a block or two before the fuel bowls run dry. http://jarvas240z.blogspot.com/2013/01/electric-fuel-pump-installation.html
Reference: http://jarvas240z.blogspot.com/2013/01/electric-fuel-pump-installation.html


Important Information
By using this site, you agree to our Privacy Policy and Guidelines. We have placed cookies on your device to help make this website better. You can adjust your cookie settings, otherwise we'll assume you're okay to continue.