Jarvo2
Member
-
Joined
-
Last visited
Everything posted by Jarvo2
-
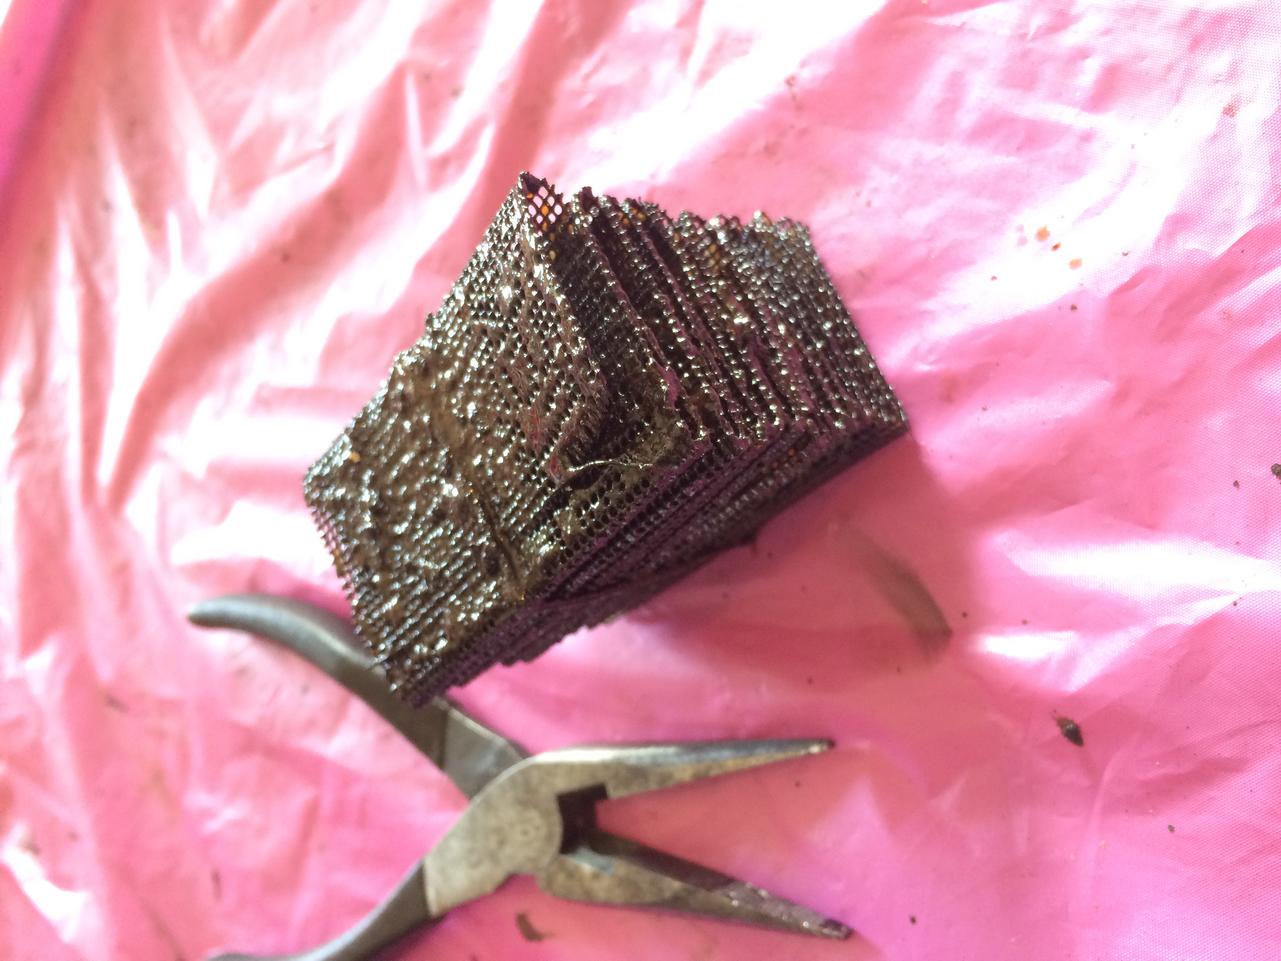
 You can continue to throw good money at a poorly tuned engine, but I'd suggest: 1) Start with ensuring the valves are adjusted corrrectly 2) Confirm emissions gear is working as designed, or blocked off & no vacuum leaks (and also check your PCV valve to make sure it rattles freely) 3) Set timing to specs 4) Tune the carbs Also remember, a 40+ year old car is not going to idle like a new modern fuel injected car, it has its own character with the gurgly idle. You may also be due for a full engine rebuild (top & bottom) if its never been done. Between old worn rings, bad gaskets/seals, and years of gunk growing in the engine, that could add to a poor idle. Check out what was living in my PCV filter of my '72 240z and the carbon buildup on the cylinders:
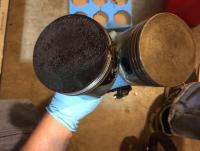
-
Miata seats did come in black leather, or you can get leather cover replacements. I picked my cloth seats up for $45 with sliders included!
-
Don't cut your door cards!! Take a look at putting speakers in your headrests (http://jarvas240z.blogspot.com/2014/08/miata-seat-speakers.html) or possibly pick up a set of mounts from MSA (http://www.thezstore.com/page/TZS/PROD/classic01a/50-1293)
-
I'm happy with the Pontiac blue/turquoises .
-
I went with Pontiac Bluish-Green engine paint from Duplicolor. Seemed pretty close, unless you want to buy the official reblend of Datsun Blue.
-
My 240z had the aftermarket A/C installed in it and did NOT have the FICD installed.

-
I painted my block before any assembly and am quite happy with the results. You are going to get some form of fluid on your freshly painted block, just need to clean it up right away! http://jarvas240z.blogspot.com/2014/11/block-cleanup-and-preparation-for.html
-
Upgrade to electronic ignition, like a Pertronix setup! http://jarvas240z.blogspot.com/2012/05/electronic-ignition.html
-
Regardless of the finish its all about the preparation work. Need to remove rust, grease, and other gunk that's baked on for the past 40+ years
-
I used the cheapo 1 ton harbor freight model & was able to pull the engine out from the front. I needed to take the front bumper off and valance/grill. A load-leveler really helps too
-
Tamo3 -- Both relays are mounted to the strut that holds the antenna to the body. This allowed me to keep them fairly hidden, only be powered when the switch energizes the antenna, and to keep the original wiring. Take a look at the last couple pictures on my blog site.
-
Might be a good package for Dave Irwin to put together as one of his technology upgrades. Just the parts end up being about $30 (including antenna & relays)
-
I've struggled with what type of antenna to replace the broken original with. I first tried an 11" rubber ducky that didn't work very well, as well as a hidden antenna that mounted to the window; again not working too well. I decided it was time to investigate how to repair or replace the old semi-automatic antenna that Datsun included originally. The great feature of the Datsun antenna is that it is controlled by the radio head unit with a switch, allowing the driver (or passenger) the ability to raise or lower the antenna to the proper level to tune in stations. The original Datsun antenna had a modulator box already installed that allowed the switch to power one wire for up, the other for down, and use the body of the antenna for a ground; this is how the switch works too. The modern semi-automatic that I sourced just reverses the polarity to have it go up and down. I was able to find a diagram of a door lock actuator that would allow me to use the original Datsun radio switch and wiring while making the new antenna work by means of two relays. Essentially reversing the polarity of the output wires. The results are great! I can accurately tune into any station in my '72 240z's radio that I can in a modern car with a digital tuner (meaning the antenna performs as good). Full Write-Up with Pictures: http://jarvas240z.blogspot.com/2015/05/amfm-antenna-upgrade.html
-
-
Depends what your goals are. A bone stock original/restoration will be worth more than a modified one. For me, I'm doing light modifications to enhance the enjoyment of my '72 240z and the drive-ability of it. I would suggest you start with the essentials (unless they've been done already) -- Struts, Bushings, Full Engine Rebuild, Round-Top Carbs (73 had the flat tops), New Fuel Hoses, Electronic Ignition (pertronix is hidden nicely), and Door seals, etc. Welcome to the club & enjoy your project!
-
Do share your sources!
-
Awesome idea of putting it in the interior. I would be worried about putting a fuel gauge inside though as it will require gasoline to pass through the firewall which is a big no-no. I ended up putting the vacuum gauge on the balance tube so it would help with dialing in the carbs. I do have a video at the bottom of this blog page to show you what mine looks like. Dropping down & then rebounding above normal & then returning to normal is what you're looking for. This was before I rebuilt my engine & it reads even better now with the new rings, gaskets, and cleaning out 40 years of crud. http://jarvas240z.blogspot.com/2012/11/vacuum-gauge-installed.html
-
-
Check out JDM Car Parts. I have my original one that I took off my '72 along with all of the smog gear if anyone is looking for parts. They're not show condition, but functional and can be cleaned up pretty easy. http://jdm-car-parts.com/collections/engine-parts-nissan-datsun-fairlady-z-240z-260z-280z-280zx
-
I got a cheapo red LED Bar from eBay/Amazon and installed it at the top of my rear window. Its mounted to the interior top plastic piece so it does not move with the hatch...had it there for a while but it kept falling off & the wires stuck out too much. Very easy to run another feed from the brake pedal switch or from the rear tail lights. I think it ended up costing me ~$15.
-
Please join us for the Midwest Z Heritage festival being hosted by the Windy City Z Club. The event will be the weekend of June 12-14 in Lisle IL. Please ensure you pre-register! http://www.midwestzheritage.com/
-
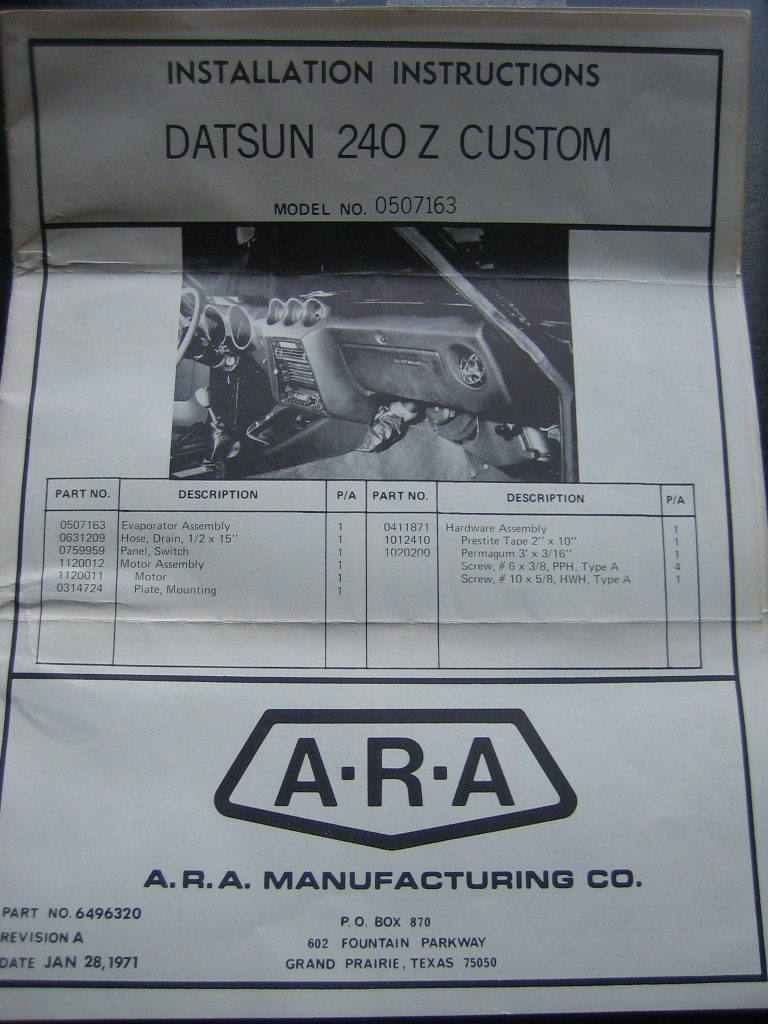
Just finished installing my real BRE rear spoiler. Seems like there are no good write ups on it, so I decided to document my journey. I even tracked down the original 70's instruction sheet & included it on my blog below. Now I just need to paint the rest of the car! Enjoy. http://jarvas240z.blogspot.com/2015/05/bre-rear-spoiler-install.html
-
I finally took my freshly rebuilt engine on its first "longer" trip. I've done several 5-10 miles journeys, but this was a 50 miler. I started with a full tank of 91 octane fuel and went out on the expressway to meet up with some Chicago Z guys for our monthly club meeting. I kept it around 55-60 mph (even with the semi's passing me) and it drove very well. To my surprise though, upon my return home when I refueled to allow me to check my mileage, I got over 30 MPG! Is this possible? I'm running a rebuilt stock 1972 L24 with N58 needles (I know they're lean) and with a pertronix ignition. I did put a wide-ratio 5 speed, along with my stock 3.36 rear end, which I know makes for very high gearing. Guess I must have gotten the old engine put back together correctly. What do you guys see for MPG?
-
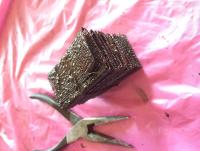
Agreed. Anyone who has not fully cleaned out their 40+ year old engine can expect to see this sludge in there...
-
Are we talking condenser or ballast resister?