


Wade Nelson
Free Member
-
Joined
-
Last visited
Everything posted by Wade Nelson
-
In Bayfield, Colorado. I can see SOME small rust spots bubbling the paint but overall very clean, at least a 8/10 on the exterior. THIS IS NOT MY CAR! CALL THE # ON THE SIGN! 970 759 3023 I've driven this car. (The last time it was for sale about 4 years ago) It ran well but felt like it was missing 20-30% of its horsepower, clogged fuel filter, late ignition timing, clogged exhaust, something in that genre. Tired shocks/struts too. I'd be glad to go test drive it if someone not in the area is seriously considering the purchase. (Assuming I don't get it repainted and turn MINE into a parts car...)


-
A can of Spray-Freeze will quickly determine if it is an ignition module overheating problem. A can of brake-cleaner or starting fluid will quickly determine if you have a fuel problem. Try also taking the gas cap off; if the vent is clogged, it will pull a vacuum until the pump can't suck any more fuel out of the tank. And a lot of spiders and bugs decide to build nests in those vent tubes.
-
No, you should NOT remove emissions equipment. The HP gain will be negligible and you may also INDUCE some problems, like pinging. The best strategy is to get the emissions equipment working the way it is INTENDED to, repairing it if necessary, especially EGR. Not to mention the problems you (or a future owner) will eventually run into trying to get it smogged if you rip everything off. You will markedly decrease the value of the machine to a collector as well.
-
At 6500 RPM's the thing that usually goes wrong is a valve starts floating. I'd pull your springs and check them all; you may have a weak one. As for overheating, sorry, we don't provide magic bullets here on ClassicZ but there are any number of overheating threads you can read and learn from, including this one: http://www.classiczcars.com/forums/help-me/49737-temperature.html I believe that once one understands the THEORY of overheating finding the mechanical cause is fairly straighforward.
-
I frequently drive my silver ZX from Arboles into Durango. I'll be looking for you.
-
Sounds to me like you've got an overheating problem. I'd start by pressure testing your cooling system. New radiator cap. Install that new thermostat. And check the fan clutch --- pull over on the highway when it's hot, shut off the motor, and try and spin it. Your needle should PARK somewhere in the 50-60% region.
-
-
I'd submerge the floats in a bowl of gasoline and make sure no bubbles are seen coming out. Are the needle valves and seats replaceable? It's been 25 years since I've been inside an SU, but carb floats typically operate the same way a toilet does, the float goes up and shoves the needle into a seat blocking further flow. Unless it's unnecessarily high the fuel pressure shouldn't change the float level at all. Is there slack on the "tang" on the float that surrounds the needle? Could the needle seat be moving up and down?
-
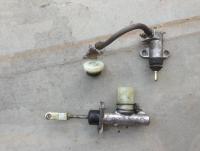
Full sets show up on eBay now and then. The best approach would be to buy a new ignition switch WITH keys (& steering lock collar) on Ebay and pay a mechanic to install it for you. Next, take a door apart (take the window crank and armrest off, pull the trim off) and pull one of the door locks out. Take it to a locksmith and have them make you keys for it. Should only be $35 or so. If you do this FIRST, you may get lucky and have that same key work in the ignition. You may end up with two different keys, one for doors, and the other for ignition, and that's a good thing because a theif can't slide-hammer a lock out of your door, go and make a key, and have it work in your ignition.
-
LESSONS LEARNED: It's very seldom I figure out where I went wrong the same day. Guess today's my lucky day! So here's lessons learned --- and how I got this system to bleed properly... 1) Go ahead, bench bleed your master. Or at least get some fluid in it and exercise it, moisten the seals. 2) Gravity bleeding works a lot better when gravity is on YOUR side, not the bubbles. Jacking one side of the car can create high points in the hydraulic lines from which bubbles WILL NOT escape under the power of gravity alone. If the car's level, normally there are no high spots and a gravity bleed will work just fine. 3) Reverse bleeding --- if you've got a system full of air, it's pretty easy to grab the shaft of the slave (clutch) cylinder and push it back, forcing any air/fluid BACK towards the master cylinder --- and perhaps unjamming a MC piston "stuck" at the end of its travel. 4) A pedal too far: Personally I love a clutch that disengages right at the top of the pedal stroke. Well, I went too far, extended the rod into the master cylinder an eensy bit too far -- so the piston never returned fully "home" and NEVER uncovered the port that allows fluid from the reservoir to re-fill the space in FRONT of the piston. So with no fluid to push, the piston did nothing but pump air. Shortening the rod by 1/2" made the problem go away, got SOME pedal, and then was able to bleed it normally. I'm going to re-lengthen it just a tad now that it's working. 5) One-way valve, one-man bleeders. These work great. Around $7 at the auto parts store. A clear hose with a one way valve you put onto the bleed screw on the slave cylinder. Fluid can go out, but air can't get sucked baack in. Truly makes bleeding a one-man job. Well there it is, five tricks to help you when a hydraulic system proves difficult to bleed.
-
I'm always singing the praises of Voltage Drop Testing. In reality I'm sometimes too lazy to do it. Like today. Usually my laziness bites me in the butt (like going out and buying a brand new starter when corroded battery terminals or a bad ignition switch was the problem) Today it was just the opposite. My starter has had an intermittent "click, no crank" for the past month. Usually I'll pop the hood, short from the starter + terminal over to the solenoid post with a screwdriver and she cranks right up. (It really helps if you remember to leave it in neutral when you do this.) Please don't ask me how I know this... Since a direct short to 12V made her immediately crank it caused me to ASSUME I have a failing ignition (starter) switch. Right? Get on RockAuto and order a new one.....forget about voltage testing, I already knew what it was gonna show me....or THOUGHT I did... An excessive voltage drop through burned contacts in the starter switch could easily cause a click, no crank condition. I expect I would have seen 4-7 volts instead of 12V at the starter solenoid post when I hit the starter switch had I actually PERFORMED voltage drop testing... But why was it intermittent, I kept wondering.... If I'd voltage dropped the starter circuit, in this case I would have come to the wrong conclusion It appears I've got a bad (intermittent) solenoid on this starter, one that is pulling too many amps. And how do I know that...now? Lazy butt that I am, instead of performing voltage drop testing I decided simply to wire a "failsafe" pushbutton starter switch on the dash to the starter solenoid. If turning the key didn't make it crank, I'd reach over, and press the failsafe button. When I was testing the circuit I temporarily wired it through an existing 15A circuit, just to confirm it worked. Whut!!! It blew the fuse! The starter solenoid was demanding more than 15A!!! No ignition switch in the world could be expected to supply more than 15A repeatedly without frying! So I'll be taking this starter back to NAPA for a replacement.... Mind you, this is the first time in 30 YEARS I've ever seen a solenoid that worked (only intermittently click, no crank) but demanded excess amperage... And it's the FIRST time I have EVER seen where performing Voltage Drop Testing would have led to the wrong conclusion!
-
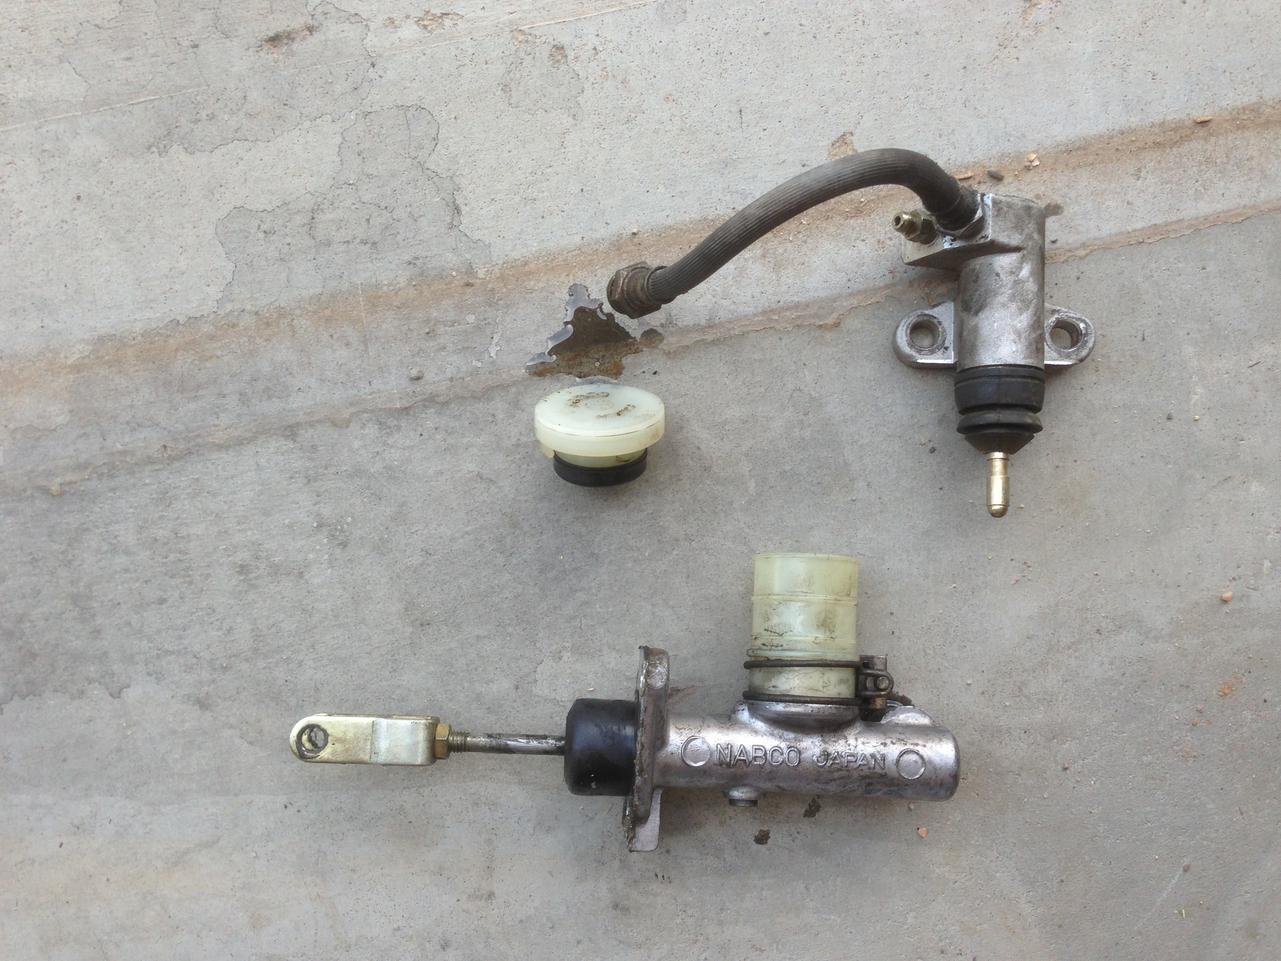
I've got a clutch hydraulic system I can't get to bleed. New slave, new flex line, new master cylinder because the old system was leaking fluid (somewhere!) and often required I pump it up to have a working pedal. I've installed dozens of clutch hydraulic cylinders, masters and slaves, in everything from Triumph TR-3's to my current 280ZX. Never run into one I couldn't get bled. Till today. Here's my theory. I've always thought "bench bleeding" a fresh master cylinder was a waste of time, because most of the fluid drips out while you're trying to connect the lines, makes a mess, and eats paint off of whatever it drips onto. Why bother? I suspect my new master cylinder sat on the shelf so long the piston is 'stuck" down at the end of the throw. If I'd "bench bled" it a bit, worked it back and forth a bit, I might be able to bleed it now. At least it would have lubricated the seals... How to get it to return, other than to reverse bleed it, pump fluid from the slave BACK to the master? I'll have to take the slave off the transmission so I can move the shaft back and forth to pump it... Right now the pedal moves to the floor, effortlessly, and most times just sticks there. I opened the bleeder screw (on the slave) and tried a gravity bleed, let it bleed a bit, saw the reservoir go down, so it SHOULD have given me SOME pedal...but it didn't. It doesn't get firm no matter how much I pump the pedal, nor does any fluid leave the reservoir. NEXT time I'm gonna do the bench bleed thing...put my finger over the output hole and make sure I'm getting pressure... TIPS FOR DOING THIS JOB: Remove the windshield squirter bottle, disconnect it's wires, move it and the injector resistor pack out of the way to replace the master. Get upside down under the dash to pull the hairpin and pin security the master cylinder rod to the clutch pedal assy. Loosen the flare nut fitting to the master BEFORE removing the two bolts securing the master to the firewall. Re-install in opposite order --- get the flare fitting STARTED, THEN bolt the master to the firewall loosely, install the pin and hairpin, tighten the master to the firewall, THEN tighten down the flare nut ALWAYS USE A FLARE NUT WRENCH or else you'll end up using VISE-GRIPS on stripped off flare nuts. The hardest fitting to work on is the one by the starter, connecting the hard (metal) hydraulic line to the flex line. Loosen the fitting on the hard metal line using a 10mmflare nut wrench BEFORE you take the clip off securing the flex hose. Install the flex hose USING A COPPER WASHER to the slave cylinder, use a vise or other to hold the slave and really get it snug and install as a single unit. Do NOT attempt to connect this under the car as you'll never get it tight enough. Again, get the flare nut fitting STARTED before locking the flex hose down with the clip; it sits in some little "dents" so it can't rotate while you tighten the flare nut down 1/4 turn at a time..aggh! If you can't get the clip on, you don't have it all the way through the bracket. Normally I'd offer some tips on bleeding the system but...not today!
-
Suggest you peruse this thread: http://www.classiczcars.com/forums/engine-drivetrain-280zx/49771-overheating-tips-lessons.html

-
I thought maybe you liked to shift a lot. Or else owned stock in Sachs....
-
Struts are normally sealed units. And why do you want a six speed? Better fuel economy? Speeds over 130mph?
-
Let's assume you have a "bad ground" on your vehicle that has .1 ohm of resistance between the wire and the actual ground, or negative battery terminal. How much voltage drop will that create? the answer is IT DEPENDS ON THE AMOUNT OF CURRENT FLOWING THROUGH IT! Let's say you have 10 AMPS passing through that "bad ground" on the way to the headlights. V = IR Volts equals current (10amps) times resistance (.1 ohms) So you'll incur a 1V voltage drop as a result of that "bad ground" Now pretend it's the cable to your starter that is passing through that bad ground. 100Amps x .1ohms = 10Volts! Well hell, if your battery only has 12.6 volts fully chraged, and there's a 10V voltage drop, the starter is only "seeing" 2.6 volts! It's gonna click, not crank! And that's what corrosion between the battery terminal and post does, is "inject" resistance into a circuit where there should be none --- or very little. A voltage drop occurs when current flows through an undesired, unwanted, or unexpected resistance in a circuit. Memorize it! Next: Determining if your voltage drop is on your positive or ground side of your circuit!
-
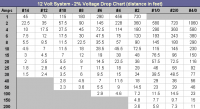
Madkaw perhaps said it best: Those 35 year old connections "NEED SOME LOVIN'" Dirty corroded connectors, battery terminals, burned switch and relay contacts are the most frequent causes of voltage drop. They may induce only .001 or .01 additional ohms of resistance into a circuit, but that can be enough to cause a failure of the circuit to operate properly. so how much voltage drop IS acceptable. Well, it depends on the circuit! Let's use headlights as an example. If your alternator is putting out 13.2 volts, but your headlamps are only receiving 12.9, they'll be 25-35% less bright. So on lighting circuits, a .3V drop is more than most of us care to tolerate. On a computer circuit, say a temperature guage sensor that feeds the ECM, you want a .1V voltage drop or less. Back to those headlights. Subaru (especially), Nissan, and others used wires that were BARELY thick enough to carry the amount of current needed by the headlamps. And THAT was back when the connectors were all brand new and shiny metal and not contributing much voltage drop. You're getting a voltage drop through the wires AS WELL as that poor ground connection, dirty or burned relay contacts, the tired headlamp switch, etc. Remember me telling you a 1000 foot spool of 14AWG wire has a resistance of around 17 ohms? So a 500 foot spool will have a resistance of about 8.5 ohms. And so on. The longer and thinner the wire, the more voltage drop it will incur. Auto manufacturers GENERALLY design for a 2-5% voltage drop in their circuits. Below is a chart showing the current, the wire length, and the gauge.
-
Welcome to the world of VOLTAGE DROP. If the motor spins when connected directly to the battery, there's nothing wrong with the motor. Period. With the connector disconnected, you say you are seeing "volts and ohms." Well guess what. There's a bad connection, a dirty relay contact, SOMETHING. When you "look" at it with a meter with 10M ohms, it "looks" like 12volts. But like static electricity, a few million volts, but it won't electrocute you because there's NO AMPERAGE. Congratulations! You have a VOLTAGE DROP! If you plug the connector back on, and probe the pins, you'll perhaps see 2-5 volts where there should be 12V, because of a VOLTAGE DROP! So work backwards! If you don't have 12V at the connector, when connected, go back to the switch. Does it have 12V? You may have to follow the circuit ALL the way back to the battery. Now, a voltage drop can be on EITHER side of the circuit! Your fan motor may not be properly grounded!!! So instead of "seeing" 0 volts, it's seeing 4 or 8 or 11 and not enough current flows to spin the motor. A voltage drop occurs when current flows through an UNWANTED resistance. It may be dirty switch contacts, burned relay contacts, a bad ground, something that is adding anywhere from .0001 to .1 ohms of undesired resistance to the circuit, preventing an adequate amount of current to flow to --- in this case -- make the motor spin! If you REALLY don't "get" the concept of voltage drop, call me on the phone and I'll go through it with you. You're gonna go "Oh, god, it's so simple, why doesn't EVERYONE understand and use this" once you "get it!"
-
I have to congratulate you on at least ATTEMPTING to identify and properly connect these wires instead of simply ignoring them, as so many others do. Let's start with: #1. It's not clear from the photo if that wire is insulated, or bare copper. If it's bare copper, then it MUST be a groundwire. It really doesn't matter WHERE you connect it, either to the body, the frame, or the engine block. The only important thing is that you remove the paint/rust/corrosion from beneath where you mount it, and lightly sand the ring connector too before bolting it down to ensure a good connection. Where does the other end of the wire go? Was this some massive ground the PO (previous owner) installed for a stereo amplifier or something? #2. Your only hope with that one is to trace it back through the firewall and see where it's coming from,. Alternately, you could put a meter on it, first engine off, then engine running. Start by seeing if it has any voltage on it in either of those conditions. If not, check and see if it has continuity to ground. If it has no voltage, and no continuity, I'd wrap the end in tape and forget about it. If it DOES receive power A) continuously, ignition on, C) engine running, D) cranking, then I'd still wrap it in tape and keep it in mind when you later discover something that NEEDS that power. Ditto if it shows continuity to ground with ABC or D. One day you'll discover something not working, like windshield wipers, and realize where that wire is supopsed to go. Interior wires --- not a clue. Are they OEM or added by the PO? The connectors look factory. Are they BOTH white, with no stripe? I'm thinking perhaps speaker wires for a speaker not in the door on this particular model. Again, test 'em with the meter and see if either or both shows power or continuity to ground. Battery holder? As the previous commenter suggested, following that wire to it's destination is your only real choice there. OR, you could remove the battery, apply 12V instead, and watch for smoke at the other end..... I don't see a loose wire in the last picture. I see both the blue lug, and the inline fuse holder, both of which appear (to me) to have wires attached. Is that a stray blue wire at the top of the photo? Factory wire or something PO added? HTH, and good luck.
-
Here's the short and long of it. SHORT: Yes, any generic 12V relay will work. Headlight relays, for instance. You can simply create some jumpers between the relay contacts and the socket if they are pinned out differently. LONG: Any relay used to engage a motor or coil of any sort needs a protective diode so the relay doesn't burn up quickly. Basically, when you turn a motor or coil OFF current ATTEMPTS to keep flowing. It will make a pretty good arc, which will quickly fry switch and/or relay contacts. So you wire in a diode to short out that voltage spike and protect the contacts. Getting the diode polarity right is the hard part. You want the diode NOT to short out the 12V to ground when the contacts are engaged, but the -12 to -200V spike that is created when the inductor is disconnected. Think about it, play with a diode, or get someone to help you wire it in properly and your $10 relay will last a lifetime.
-
Recently my 280ZX would click, but not crank. I took a screwdriver and shorted between the main starter post (connected directly to the battery B+) and the solenoid terminal , and it cranked over just fine. The diagnosis: A failing ignition switch, or something between the switch and the solenoid. But how did I know that? It all comes down to Voltage Drop. It's a concept that seems incredibly mysterious until you finally "get it," and then it seems so simple you're gonna *facepalm* or *forehead slap* yourself. Let me try, once again, in DIFFERENT terms and examples than the last time to explain this SO IMPORTANT concept. If you don't understand Voltage Drop, a voltmeter is pretty much useless in your hands OTHER than for simple tasks like measuring battery voltage or checking continuity. Voltage drop can make: Headlights dim Batteries not charge properly ECM's misbehave Sensors read incorrectly Starters click but not crank ... So here's the basic concept. Wires and switches and connectors ACTUALLY do have some resistance. (If I remember right 1000 feet of 14AWG wire has about 17 ohms) A corroded connector or battery terminal can have lots of resistance. A "bad ground" of a ring terminal screwed on painted body (versus bare metal) may only have .1 or .01 ohms of resistance, but that may be enough to prevent a circuit from working AS DESIGNED. That means if you put 12.8 volts INTO a thousand feet of 14AWG wire, you're going to get something LESS than 12.8 volts OUT of it. How MUCH less than 12.8 volts you'll get DEPENDS on how much current is flowing through how much resistance. A voltage drop occurs when a current flows through an undesired resistance. MEMORIZE THIS! A voltage drop occurs when a current flows through an undesired resistance. Let's say I had taken my voltmeter, and put it on the solenoid wire going to my starter, then turned the ignition switch to crank. It might show a full 12.8 volts. Why? Because the meter has 1million ohms or more, and virtually ZERO current will flow into the meter itself. Now if I put the solenoid wire BACK on the terminal, touch my meter lead to it, and THEN try and crank: I would have seen 5, maybe 8 volts. NOT enough to fully engage the solenoid! Why? Voltage drop! Either my contacts in my ignition switch are corroded, or the wire from the switch to the solenoid is in bad shape, passes through a corrded connector or relay with dirty contacts. Since the solenoid isn't getting enough VOLTS, it can't engage the starter. If your headlights are dim, you can REST ASSURED they're not getting the full 13.2 or whatever alternator output is, and are instead getting less than 12.0 volts. Why? Voltage drop through too-thin wires, dirty connectors, relays with burned contacts, etc. If you put one lead of your meter on the battery minus terminal, and trace along the path voltage takes from the other terminal, through the headlight switch, through the dimmer switch, through the headlight relay, through the bulb, and back to "ground" you can usually SPOT where your voltage drop is occuring. More often than not it's a bad ground. A car gets repainted and the body shop bolts the headlight ground terminal right on top of fresh paint. Solution: Use your die grinder or "wheel of death" to remove the paint, leave behind shiny metal, sand the ring terminal, and re-bolt it to the firewall. Alright, assuming ANYONE is actually reading this, it's time for me to take questions about VOLTAGE DROP....
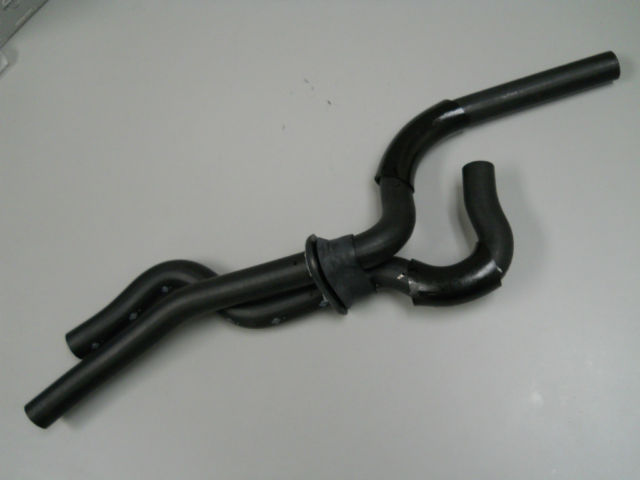
Shame on Nissan for not putting a firewall / bulkhead pass-through on these so-important hoses (brass fitting and separate hoses on separate sides of the firewall!)
ebay, also... Genuine Nissan 1979 1982 280ZX 280 ZX Heater Hose New | eBay
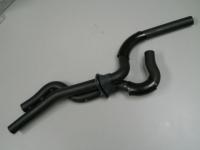 Nissan sez "Not available." No listing on Rock Auto. Any suggestion for a source for these?


Important Information
By using this site, you agree to our Privacy Policy and Guidelines. We have placed cookies on your device to help make this website better. You can adjust your cookie settings, otherwise we'll assume you're okay to continue.