Wade Nelson
Free Member
-
Joined
-
Last visited
Everything posted by Wade Nelson
-
Umm, can you provide more information, like WHICH Honda blower, out of WHAT model? Is it available from RockAuto? Is it three screws, two wires, and you're done, or is modification of the base necessary? Or point us towards a post which provides this info? Thanks.
-
Here's another one in my area on Craigslis No price listed. This is a VERY dry area, and this MIGHT be a fairly rust-free vehicle. http://farmington.craigslist.org/cto/3253232456.html

-
My Z was unstable and twitchy until I replaced most of the front end including ball joints, tie-rod ends, and especially the sway bar links and bushings. As well as the rear links, bushings, and struts. It was undrivable as purchased, until I replaced the rear struts. The thing that would make ANY early car 100% safer would be an airbag system. Good tires and brakes go without saying, just saying.... That and removing the cellphone.
-
$10,000 for this bucket? No way... http://farmington.craigslist.org/cto/3182793810.html

-
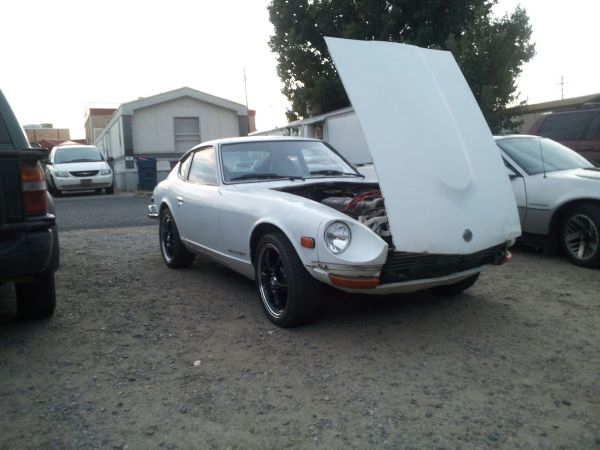
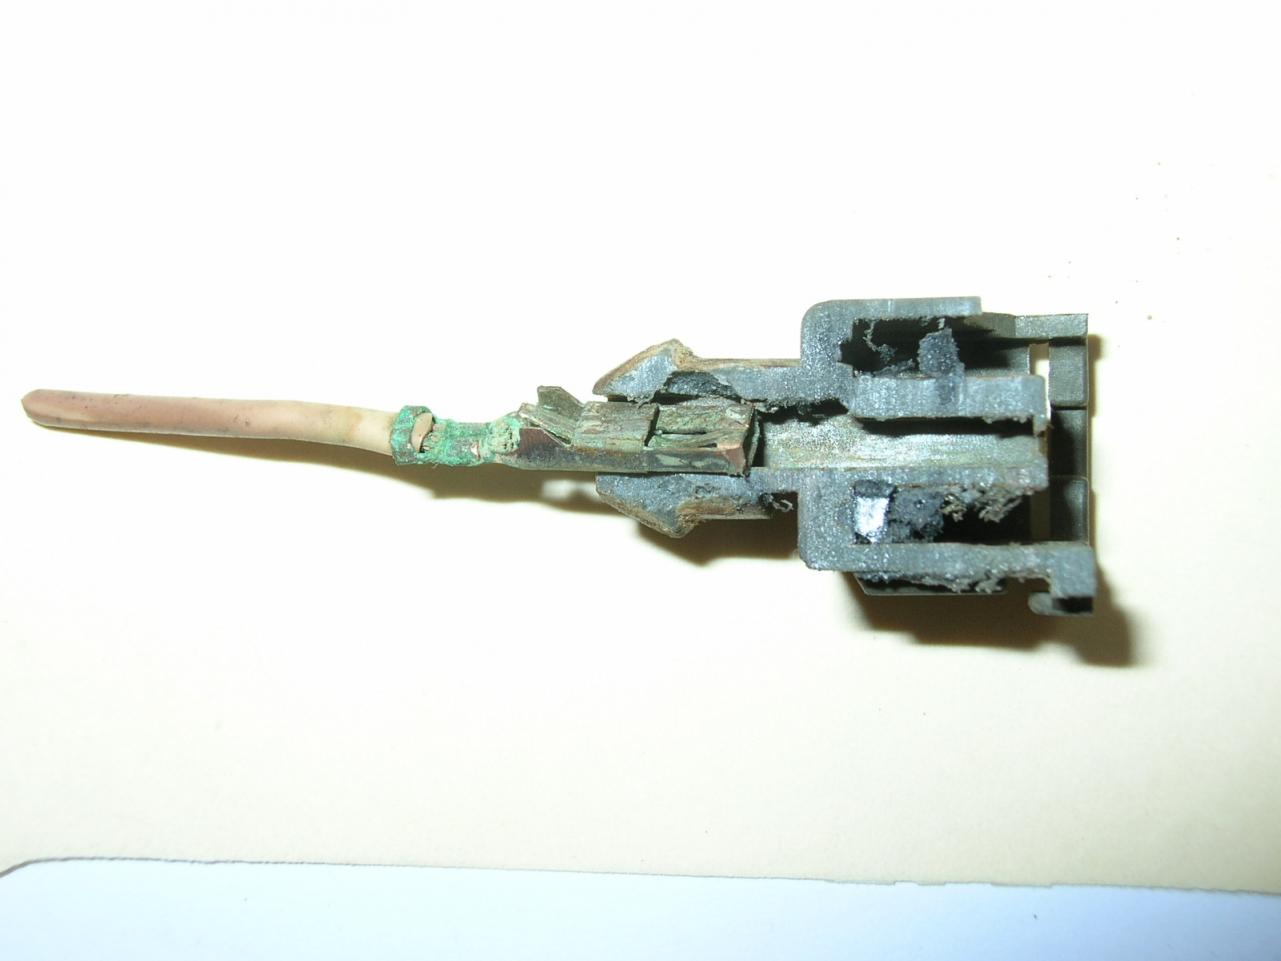
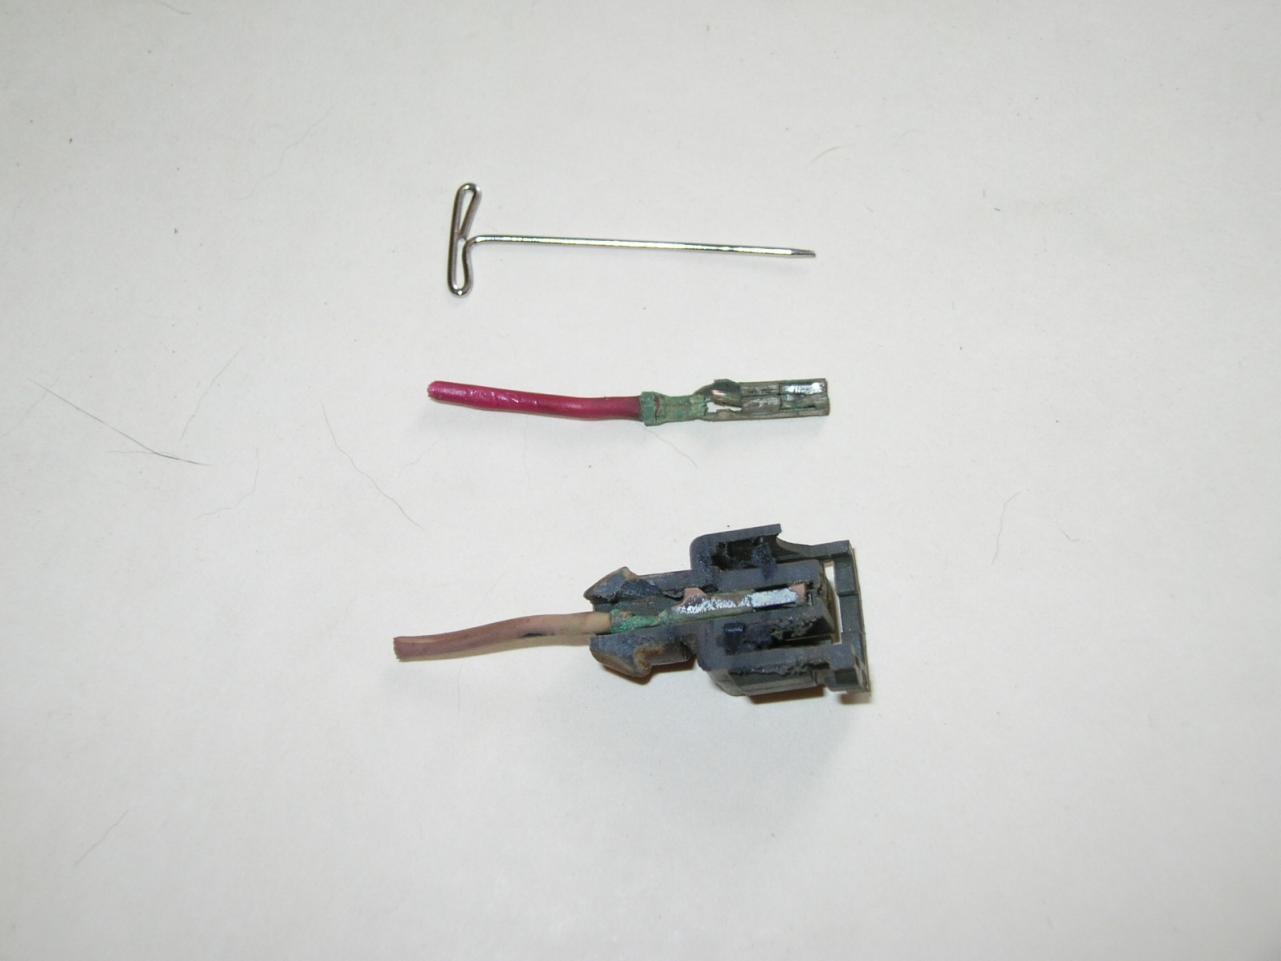
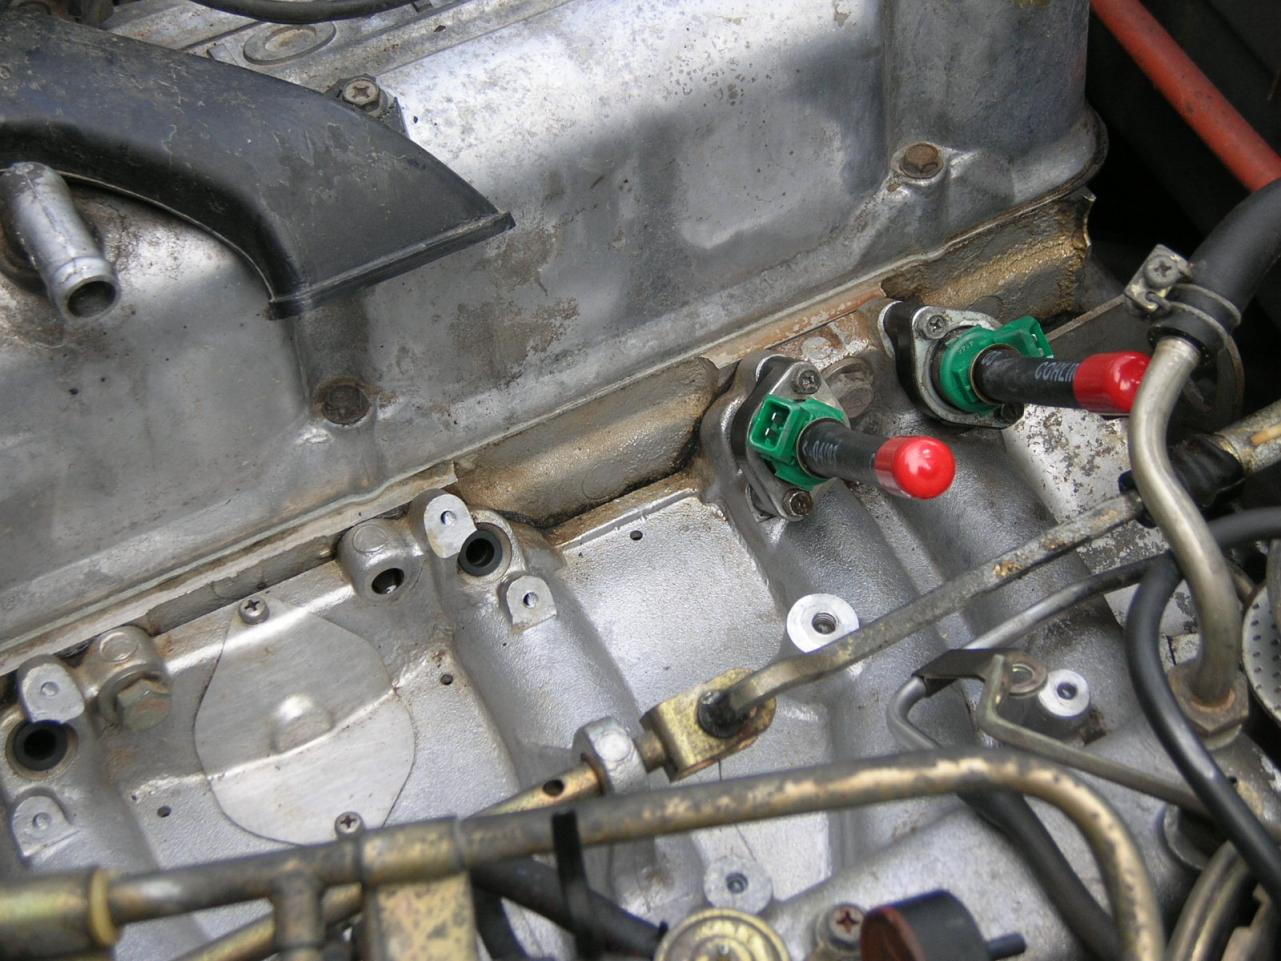
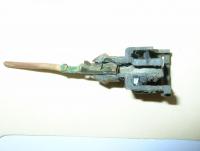
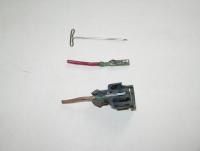
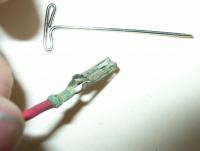
I recently took apart one of the fuel injector connectors that had failed on my Z car, and thought I'd share a little bit about "picking" connectors. "Picking" connectors is rather like lock-picking. You need patience, and strong, sharp little tools. by "picking" i mean reaching in and releasing the spring latch that holds the terminal into the connector shell, so you can withdraw the wire and terminal for repair or replacement. MOST automotive connectors can be "picked". But don't expect it to be easy, especially when the connector shell is full of corrosion and grime. Some connectors you "pick" from the front, others from the rear. The best situation is when you have a spare connector you can cut (or grind) in profile, so you can SEE how the locking tab is arranged. That's what I did in one of the pictures. I usually hold it up to grinder, and then clean off the melted plastic flashing that results with an Xacto knife. So on this particular connector (fuel injector) the FACE of the connector has two separate "channels," one for the terminal itself, and the other, where you can insert a pick and release the tab, allowing you to remove the terminal and wire from the rear. Actually, it's a T-shaped channel, but when the terminal is inserted, it LOOKS like two separate channels A factory "pick" for this terminal would probably be square, and tiny, but....none of those available here! So I use whatever I've got. Having worked on an assembly line, where connectors occasionally get smashed, broken, pins bent, etc. I can tell you the OEM connector "factory" picks are the single most prized possession on the factory floor! Even having sawn one side in half to see how it was arranged, it took me over 5 minutes of "picking" to get the other terminal out. I finally ground a flat tip on my "pick", a t-pin, so it couldn't slip into places I didn't want it to go. I considered trying to "square" it with a few blows of the hammer, but discarded that idea... If you look at the terminal itself, carefully, you'll see the little spring sticking up that latches it into the connector shell. As you push it in, this is what goes "snap" when it's all the way home. So to get it out, you have to hold down that little tab, and pull on the wire from the rear. On this one there was about a mm of slop, so I'd gently work it pack and forth attempting to hold the little spring tab down. Having three hands would have made it considerably easier. Again, if the cavity BENEATH the spring tab is filled with schmutz, it's gonna be double hard to get it to lay down for removal. Spraying contact cleaner in from the REAR of the shell may help remove schmutz and corrosion BEFORE you pick it. If the terminals themselves are alright, you can often slide them into a new, unbroken connector shell and avoid having to cut / solder the wiring harness. Mine were pretty "green" so I opted for cut N Paste. One could PERHAPS soak them all, still connected to their wires, in CLR, a great corrosion remover, and then see if they're re-usable in the morning. On numerous occasions I've simply cut the old wire off a terminal, for which I didn't have a replacement, and soldered a new wire over the top of the remains. You may get the insulation crimp open, but trying to undo the tiny wire crimp is usually impossible, but there's usually room for the old wire AND the new wire soldered over the top of it in the rear of the shell. (Unlike AFTERMARKET connectors, which you crimp onto the bare wire itself, on FACTORY connectors, there's usually a wire crimp AND an insulation crimp. The insulation crimp provides added physical strength, the wire crimp, the connectivity and SOME of the resistance to pulling out.) Sil-glide, or dielectric (non-conductive) grease packed into the connector shell before you snap it on the injector itself will make removal a LOT easier years down the road, and help keep air, water, and corrosion out. The only tricks to "picking" terminals out of connectors are practice, and patience. good Luck!

-
I ended up with an extra set of injector seals, if anybody's needing. How about $15 including shipping? I NEED an extra injector mount, aka "pedestal" if anyone's got one Wade 970 7 five nein 797 (nine minus one)
-
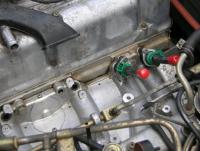
Ok, so here's the story on the rough running after injector replacement, and how it got diagnosed. If you just want the short version, it was the wires to one of the injector connectors. I had come up with a mental list of a number of possibilities. One, the cracked pedestal I was forced to re-use was leaking air. Two, I had perhaps forgotten to put one of the tip seals on one of the injectors, and it was...leaking air. Third, some vacuum hose somewhere, or the once-repaired PCV hose, was once again....leaking air. The idle was lopey, and to ME, it sounded like a vacuum leak. My mechanic friend Ed immediately said, "Hmm, sounds like an ignition misfire. I'd check the basics..." Since he's got about 50X as much experience as I do, I listened to him instead of arguing for a vacuum leak. Other clues: Runs well above idle, didn't feel like I was only running on 5 cylinders, yet fuel mileage seems to have dropped considerably. Something that is VOLTAGE related, like a fouled plug, will often run better at higher speeds when there's enough voltage to arc through the crud. So I checked the cap & wires, which I had removed to do the job. Everything looked nominal. Pulled the spark plugs. #1 was heavily carbon fouled. All the others looked OK. This kinda pointed to the Cold Start Valve / Auxiliary Air Relay connectors possibly being swapped, as the CSV is closest to cylinder #1. But connecting / disconnecting neither improved matters. (I need to get in the FSM and check the wire colors, and grab the meter and check proper operation, but that's for a later day...) So Ed grabs a can of brake cleaner, and sprays ALL AROUND the injectors, and pedestals. There is no increase in RPM from the addition of faux fuel. So it's probably NOT an air leak, at least not at any of the injectors. Whew! About this time Keith, the service writer walks over, and can't help himself but get involved, . He pulls the hose on and off the fuel pressure regulator, and engine rpm responds as expected. Next he starts playing with the first three injector connectors, (all three of which are broken and no longer sport a retaining clip) and voila! Wiggling #1 causes the miss to disappear. Using contact cleaner on it, and a pick to tighten the pins doesn't fix it though. We deduce the wire is cracked slightly upstream of the connector itself, and held at just the right angle it makes a connection. AND, as noticed earlier, at higher RPM's where the voltage simply jumps the gap. Instead of a stethoscope, Keith grabs a 2 foot screwdriver, holds it to his ear, and can HEAR the injector cutting in and out as he wiggles the wires, comparing the sound to #2. So replacing those connectors is a real good idea when you go to replace injectors. And hopefully these quick diagnostic steps will help anyone else with an injector miss. I was tired, had kind of reached the end of my patience after replacing the injectors, and I really needed a fresh set of eyes to figure out the problem. That's when it's good to have friends in the business. They'll find a cold six pack in their fridge at 5:00
-
Don't trust the mechanic. Replace the thermostat AND the radiator cap with a new Stant. Then PRESSURE TEST the cooling system. A single drippy hose, perhaps under the dash and instead of 7psi, you're running 0 psi, and coolant is turning to steam in the head, and it's overheating. Wheneer you put fresh, BARE metal into a cooling system, like a NEW radiator, you get a battery effect taht will plate metal from one place to another. Often the thermostat SHAFT is where it ends up, so the t-stat jams and quits working. I do NOT reccoment caustic cooling system flushes. Just let it settle down. Try running for a day or so WITHOUT a thermostat and you'll get a better picture of what is going on, if the pressure test doesn't reveal anything.
-
Headlights are fairly easy and quick to diagnose after you've done a few. The #1 failure is the GROUNDING wire for BOTH headlights comes loose from the body. Both bulbs go out. If a single headlight fails, MOST OFTEN it's a burned out bulb. One followed by the other typically means something more complex. So you turn on your headlights (ignition on), because SOME cars headlights don't stay on when the ignition is off, and I can never remember WHICH the Z does...and pull the connector off a single headlight. See if you've got battery voltage (12.2-12.8) on one of the pins, and ground on the other. Flip it to high beams and check again. You can use a test light to check for voltage AND ground, putting the end of the lead first on the battery negative, and then positive terminal. No meter needed! Next, what I should have checked FIRST, would be the fuse for the headlights. If your connector is getting hot your switch is pulling WAY too many amps, and you should IMMEDIATELY install headlight relays. Unless, of course, you like replacing $159 headlight switches (Rock Auto still has 'em) The connector getting hot is a vital clue --- if the connector is hot, but the bulbs are not lighting up, you PROBABLY have a dead short to ground somewhere in the headlight harness. You can unwrap the entire harness to find it, or just wire around it (including your new relay pack) and save a whole bunch of time. If you add relays, your headlamps will be noticeably brighter, provided you use the correct gauge of wire. The voltage DROP in a headlamp switch means, if your battery is at 12.6, you're lucky if you're getting 12.3 at the bulb connector in a 30 year old car. That .3v voltage DROP means a significant reduction in brightness --- like 30% or more. Which is why I always wire headlamps and associated relays with 10 or at most 12 gauge, and NEVER the 14 gauge mfr's do. (Even the aftermarket headlight sockets/pigtails today come with 14 AWG wires!!!! ) I like my headlights bright white, not yellow. Beefy wiring and new bulbs and even an OLD car, with an alternator putting out 13.5+ volts can LIGHT UP THE NIGHT. Hope this helps!
-
If you'll search on "injectors" you'll find several excellent threads and pictoral how-to's on this site, including: http://www.classiczcars.com/forums/thread40882.html I just got done doing the job, and would like to offer a couple of tips to anyone planning to do this. First of all, the job took a serious six hours, even with air tools with only 1-2 very minor screwups. Taking pictures along the way repeatedly "saved" me lots of heartache. Plan on replacing innumerable vacuum lines / emissions hoses that are baked and aren't going to come off their nipples easily, unless you've already replaced them all. I discovered a crack on the BOTTOM of my hard-as-a-rock PCV line that had clearly been allowing faux air to enter the manifold. Since it's a molded line, and it was Sunday, I didn't have many options there. (Has anyone found any of these for the ZX in stock anywhere -- L-shaped with a wave at the end...the one I bought on ebay didn't fit...for earlier model, apparently...) Removing all the err, ahh "important stuff" will give you access to some hoses you couldn't or probably wouldn't otherwise replace, like the tiny 7/64" hoses on the thermoswitch buried beneath/beside the Aux Air valve. So stock up on rubber fuel / emissions hose before you begin -- 1/4, 5/16, 7/64. Cutting the 5/16" fuel line to the cold start injector right in the middle is BY FAR the easiest way to disconnect the fuel rail without otherwise breaking the plastic nipple on the $79 piece. Be sure and label your injector connectors along with your Aux Air Valve and Cold Start Injector connectors before removal, since they're identical... Unless they're all in pristine condition, I would HIGHLY recommend going ahead and buying NEW injector connectors (electrical) off eBay before you begin. Most of mine were brittle, already cracked, and some were already missing the retaining clip. http://www.ebay.com/itm/injector-connector-kit-6pc-datsun-280z-280zx-300zx-/290452375892?pt=Motors_Car_Truck_Parts_Accessories&hash=item43a04f8954&vxp=mtr#ht_2668wt_932 Next, BEFORE you remove the old injectors, notice what position (on the clock dial) the electrical connectors are FACING, so you can install the new ones facing the same direction. This will minimize the wrestling you have to do with the old, stiff wires & rubber boots on them, esp #3, which is buried beneath the FP regulator. One of my injector pedestals / holders was cracked. Usable, but I sure wish I'd had a spare or two in hand before discovering it on a Sunday afternoon. (things your mechanic will never tell you --- yeah, I just re-installed it and hoped for the best...) http://www.ebay.com/itm/NISSAN-DATSUN-FACTORY-OEM-FUEL-INJECTOR-HOLDERS-280Z-280ZX-1975-1983-BRAND-NEW-/160868597488?pt=Motors_Car_Truck_Parts_Accessories&hash=item257483fef0&vxp=mtr#ht_1197wt_754 I used an impact wrench, with a #1 phillips bit, to remove the injector hold-down screws, on a very low torque setting. There simply IS NOT ROOM for an 8mm, even a thin-wall deep socket, on many of these. Poor design, but fortunately none of mine stripped out. You might be able to get an 8mm open-ended in there, on SOME, to crack them loose, but some will just prove impossible to reach. I loosened all the injectors and took them out still attached to the rail. I then used a hose cutter to sever their attaching hoses right in the middle, and THEN removed the clamps & rubber from the barbs on the rail. I used a boxcutter to slit the hoses before attempting to twist and fight them off the barbs. A little grease on the barbs, which gasoline will dissolve, makes re-installing the rail about 1000% easier. Avoid Sil-Glide or other silicone lubes which can "kill" your 02 sensor. The rubber seals on my old injectors were baked SO HARD that they couldn't be cut off, to remove the hold-down flanges for re-use on the new injectors. I had to hold them up to my grinder and grind off the old, hard rubber. Tip: Wear leather gloves. Why? *observe Band-aid on index finger...* See picture.... Wire-wheeling the flanges can make them look a lot nicer before re-installation. Wish I'd had a spare set to get cadmium plated before I began....if it were a restoration job... Install the small seals ONTO the tips of the injectors BEFORE mounting them. Do NOT install them in the holes in the manifold and then try and slide the injectors through them. I ended up with an EXTRA set of injector seals (six large six small) if anyone needs a set. $15 plus shipping.... This is where you need to rotate the new injectors to match the direction the electrical connectors were on the old ones before tightening them down. Since these are rubber seals, I tightened them down, waited 30 minutes, then went around and hit 'em all again to make sure the rubber was properly compressed. I had to TRIM the hoses on the new injectors to 1 7/8". The old ones measured 1 3/4, but I'd rather cut twice so I went 1/8 long....just in case. Folks, be SURE and put fuel injection clamps around the rubber hoses BEFORE you fit the rail back on. I only got five out of six so I had to settle for a screw clamp on the one this bonehead missed. I'll be reminded of this mistake forever, every time I look under the hood from now on... Overall the job was a fight from beginning to end. Every single component possible is in the way and has to be removed. There are lots of bolts passing through TWO tabs before screwing into the block, and getting 'em both to line up (and not strip the bolt) was a PITA. (A better design is when they give you bolts with an unthreaded TIP that makes starting a lot easier) When I fired it up it cranked forever, and ran quite poorly. I had used lots of engine degreaser and a garden hose to clean off the galley, and perhaps it ingested some of that. The next morning it, after going around, re-checking EVERY hose clamp, it started right up and ran a lot better, although the idle was NOTICEABLY lower and still feels a little rougher than before. I attribute this to the now-sealed PCV air leak, but I'm not 100% convinced I'm at 100% yet... The "galley" has several drain holes that let water escape. If any don't drain, you probably want to poke a wire through them... Disconnecting the battery and forcing the ECM to "re-learn" its adaption is probably a good idea, I just haven't done it yet.... I had a friend holding a fire estinguisher standing by when I cranked it, JUST IN CASE I'd missed tightening any fuel hose clamps, including the one on the cold start injector I'd replaced as well. Leaking fuel hoses spraying fuel at 30psi can get exciting REAL fast... I can't say this was a fun or easy job. I wouldn't recommend it unless you've got all the possible parts you might in hand, tools-a-plenty, and a fair bit of wrenching experience under your belt. I was absolutely exhausted by the time I was done. I can already detect an improved throttle response, but there wasn't any big jump in horsepower, engine smoothness, or anything else. She DOES seem to catch (and start) when I crank it noticeably faster. Hope this helps the next guy...

-
-
So you publicly acknowledge tampering with emissions equipment, intentionally disabling it. Is that correct? If a vehicle IS equipped with a smog pump, no, it does NOT pump out the "same ount of exhaust" if the pump is disconnected. The added oxygen supplied by the pump assists in completing combustion of unburned fuel, and also helps to keep the catalytic converter and/or diesel particulate filter working properly. A diesel with SCR may ALSO need the added 02. I'd have to re-research it. When your DPF fails, you will be in for an even larger expense, and may live to regret disabling these systems. Along with the fine imposed by the EPA for your disabling of federally mandated emissions equipment. Best of luck to ya.
-
Very few cars today sport a smog pump. And functions like EGR actually BOOST mileage by reducing manifold vacuum under cruise conditions. ABout the only thing you can honestly rail against is a cat converter, which DOES increase back pressure --- but it also functions as a muffler, meaning you can get by with a lighter, less complex muffler on a car with a cat. Basically you've suggested that mileage, and meeting tight emissions, are incompatible, and they're not. You take an engine with variable valve timing, it can perform the EGR function without even the add-ons. Keeping a cat healthy means burning a near-optimum fuel-air mix. Sure, if you could run SLIGHTLY leaner than what the cat demands (for longevity and health) you could get slightly better mileage. Calling emissions equipment "useless crap" pretty muchh destroys your entire argument. You apparently didn't live in the "smog days" in LA, when it used to look like Bejing. As a nation, pollution from cars directly impacts our healthcare costs. (REMOVED ON EDIT). The government mandated emissions, and safety systems on modern vehicles are one of the best things that ever happened to this country. Just wait till you crash one and NEED that airbag, or stability system on an icy road. (REMOVED ON EDIT)
-
As an engineer, I can see that 54.5 is very difficult. Today's BEST technology, a Prius, can hit 51, provided you keep it @ 55mph. to hit 55+ would require a lithium battery in place of the NiMH, and to AVERAGE out the trucks and other lower MPG vehicles, you'd need SOME that got 75-80MPGs. That would require a tiny, turbocharged diesel in place of the gas motor in the Prius. And how do you calculate CAFE when it includes vehicles CAPABLE of all-electric operation, like the Leaf, and Volt. The math will be VERY important to automakers. There simply isn't a "free" 20mph on the table, anywhere. The Prius gets MOST of its great mileage from it's low weight, low wind and rolling resistance. The hybrid synergy drive only adds 4-5 on top of that. The average car today weighs TWICE what a Prius does, and accelerating and decelerating that mass costs energy, hence MPG's. Regenerative braking is less than 20% efficient, it can take as many as FIVE full stops to regen enough power for a single take-off in the lighweight Prius. It's a noble goal, but short of some serious breakthroughs in batteries, small diesels, etc, it will be add considerable $$$ to the price of a vehicle in 2025. IMHO.
-
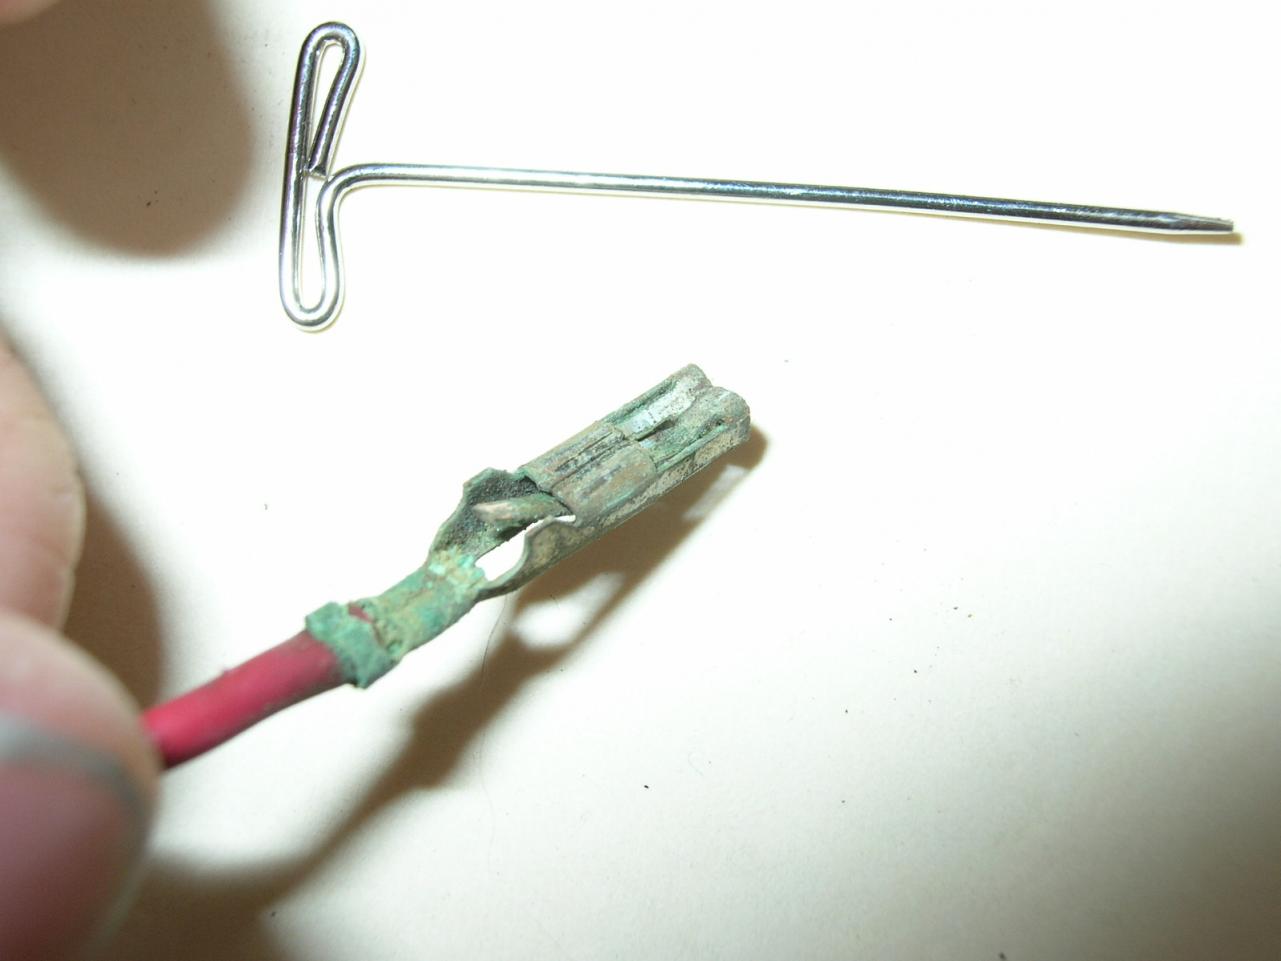
Durango Colorado, I see a white ZX with t-tops running around, a purple Z or ZX, a red 280ZX parked out at Trimble hotsprings sometimes, and a silver 2+2 driven by a young man. And mine, with the bullet holes in the hood.
-
A longer quote from the article: I put the stability control system in sport mode—I'm happy to have a safety net when I'm not in the Z—and luxuriate in the Scion's balance as the rear end rotates just enough to tuck around a corner at a faster speed than the Z could manage. Only, there it is, right in my rearview mirror. "That Z's pretty quick, given the right driver," a sweating, beaming Nelson says at the next switch point with a wink that! find absolutely infuriating. Actually, though, he's right. What the Datsun lacks in structural rigidity and refinement, it mostly makes up for with balance as good as that of the Scion and steering that communicates the moment its fourteen-inch radials begin to give way. In other words, the forty-one-year-old Datsun Z approaches the capabilities of a new Scion FR-S, at least as measured by seat-of-the-pants, real-world driving. What's even more surprising and splendid, though, is that the Scion FR-S feels a lot like a forty-one-year-old Datsun Z. You can read the whole article at the link given elsewhere in this thread. What I did was screen-capture the above section, and ran it through a free online OCR program Very sneaky, huh?
-
I don't think it's extreme at all to suggest hiring a professional to someone who has replaced six alternators in eight years. If you want to, via back-and-forth messages on a Internet forum, try and teach a non-EE how to first test their meter, and then successfully USE it to measure parasitic drains, and how to avoid all the simple mistakes that will blow their meter's fuse (like opening a door and activating courtesy lights while the meter is on a mA setting,) go for it. From one EE to another....MORE POWER TO YA!
-
Unless you have a firm grounding (pun intended) in electricity, and know how to use your digital volt meter to measure milliamps, and haven't blown the protective fuse INSIDE your meter by accidentally measuring AMPS, I'd suggest you take your car to a qualified technician and tell him you have a parasitic drain. I'm an electrical engineer, and, quite simply, this isn't the right territory for shade-tree mechanics. A guy who knows what he's doing can have your car diagnosed and fixed in 2 hours or less labor. 50mA or less is an acceptable drain on a battery --- keep alive memory inside the radio, etc. Anything over that and you have a problem. A 100mA drain will flatten a battery in 3wks to a month. 200ma, 2 weeks. 300ma (typical courtesy lamp bulb) one week or less. Newer cars pull 15ma or less when everything's off. If you leave a door open, hence courtesy light, when measuring your battery drain, you're likely to poof the fuse in your meter. Like I said, diagnosing and fixing parasitic drains isn't territory for novices. Your alternators are failing because they're having to work too hard, constantly recharging flat batteries. They are a symptom, not a cause. The cause is a parasitic drain. Never "go for a drive" to recharge a flat battery, unless you like buying alternators. Use a professional recharger, or keep your car on a trickle charger. All the alternator is DESIGNED to do is to "top up" the battery after cranking, and to supply enough current AT NIGHT to run the lights, etc. without the battery getting drained. You've already paid far too much buying batteries and alternators. Now's the time to hire a pro and get the problem fixed, IMNSHO.
-
Flushes, in general, are a BAD idea. They often make the problems worse, oil OR radiator flushes. Save them as a last ditch effort before a tear-down.
-
Pressure testing is the way you get started diagnosing overheating. Even a simple loose hose clamp can allow the system to lose pressure, and then, instead of boiling at 260 degrees and 7 psi, it boils at 212 degrees and 0psi. Result: You overheat. Buy or borrow a pressure tester. Check engine cold, then warm up the engine with the radiator cap off, and see if it holds pressure hot. Next is to perform a block test, seeing if you have a blown head gasket. There are chemical tests your mechanic can do, it changes colors if combustion gasses are getting pumped into the coolant. The chemical goes "stale" fast, so have him TEST the chemical before testing your block. Driving WITHOUT a thermostat in is how you determine total cooling system CAPACITY. If it can't stay cool doing 30mph, or climbing hills, you've got other problems. Leaves/dirt plugging the radiator is one. Just replace ANY thermostat with a new Stant and call it good. Never re-use an old radiator cap either. And excess flushing only causes problems. The steel/aluminum in your engine/radiator form a battery, when you flush it with caustic acid, you expose lots of shiny new metal, and the battery action starts up all over again. A lot of drivers MISTAKENLY put 100% antifreeze in the system once they start having cooling system problems. Bad, wrong! Ethylene glycol has LESS heat carrying capacity than water. Use a 50:50 or a 60 water 40 antifreeze mix. Gauge problems mislead SOME drivers into THINKING they have an overheating problem. If you run the engine, till warm, with the radiator cap off, any air trapped in the Z's engine should bleed itself out. Some other cars don't work so well and require special tricks to get the air out of the system. And the most frequent cause of bubbles, air, is....blown head gaskets. (And the most common cause of blown head gaskets is plugged up catalytic converters, btw...) To remain cool a car needs only a few basic things, sufficient coolant, sufficient pressure, sufficient flow (waterpump) and sufficient airflow. Looking at when and WHERE your car overheats should tell you which of those you don't have. And no, I would not stick ANYTHING in a spinning radiator fan unless you like buying new fans. Those plastic blades are brittle now, not flexible like 30 years ago when your mechanic USED to stick a magazine in 'em.
-
Start by checking vacuum. That will tell you if the timing chain has jumped a link, if you have a valve spring that's broken, or other MECHANICAL causes for failure to rev. Several sites on the web will give you a tutorial on how to use a vacuum gauge.
-
Just to finish this thread out the leak was two-fold, one, a leaking vacuum actuator under the dash, and the hose supplying vacuum from the motor repeatedly cracking.
-
Salvage yard. All that does is give you idle-up when the AC is on, right? Can you dissassemble the valve (mounted on the vacuum tank) , clean it, lube it, put it back together and put some foil or sheet metal between it and the heat source? Can you just suck on the hose for the FICD actuator while engine is running and see if it works properly? Once I got rid of some old, brittle rubber hose with numerous cracks in it, mine worked fine. (ZX) Alternately you could "build" a replacement system, just scavenge any 12V vacuum solenoid off an old (e.g.) Subaru, TEST IT, and then plumb it in. Depending how the valve on the tank is "stuck" you might need a new vacuum tank as well. They come in a lot of shapes and sizes, the spherical ones hidden under the fenders on various GM's and Fords holds the most? least? vacuum in the smallest space. You might even find one of those with a solenoid already on it. Dang it, now I'm gonna spend all day wondering most vs. least... The most of a negative is the least,right?
-
Hard 2 shift = clutch not fully disengaging. IS typically a lot worse on reverse and can cause grinding. Throw a new slave cylinder at it for $20 or less, bleed it good, 20 minute job tops, and if that still doesn't fix it, rebuild your master.
-
Sawzall works first time, every time!