djwarner
Free Member
-
Joined
-
Last visited
Everything posted by djwarner
-
 And Finally, T196 08 350ZX Conv sold for $22,000
 -
Wednesday's results: W276 77 280Z California car $13,500 W56 69 Datsun PickUp $5,000 W46 85 300ZX $5,000 W240.1 03 350Z twin turbo 650 HP $24,000
-
G172 83 280ZX sold $4500
-
L86 no sale - last bid $7000 L4 sold $2000
-
For a change there are several Z's and a Datsun P/U for sale at Mecum's this week. For those who interested: Lot /Yr /Model /When G172 83 280ZX w Ttops Tues 1/22 W276 77 280Z Wed 1/23 7:10 PM W56 69 Pickup Wed 1/23 L86 77 280Z Sun ?1/20 or 1/27? W46 85 300ZX Wed 1/23 L4 88 300ZX 2+2 Sun ?1/20 or 1/27? W240.1 03 350Z 650Hp 6sp Wed 1/23 5:55PM T196 08 350ZX Conv Thurs 1/24 4:45PM You can watch the auctions live on the web but you have to register first.
-
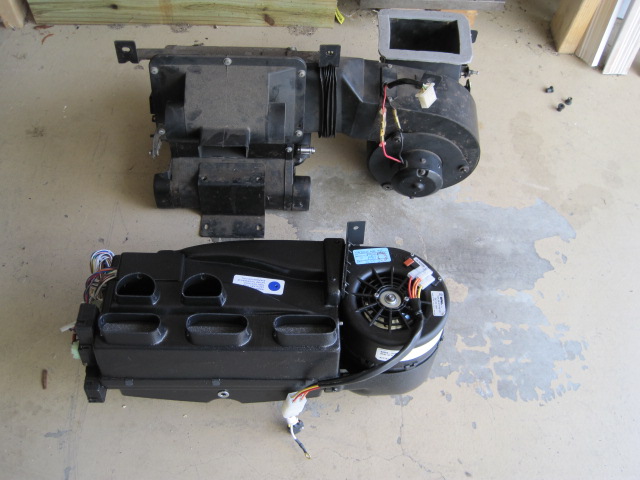
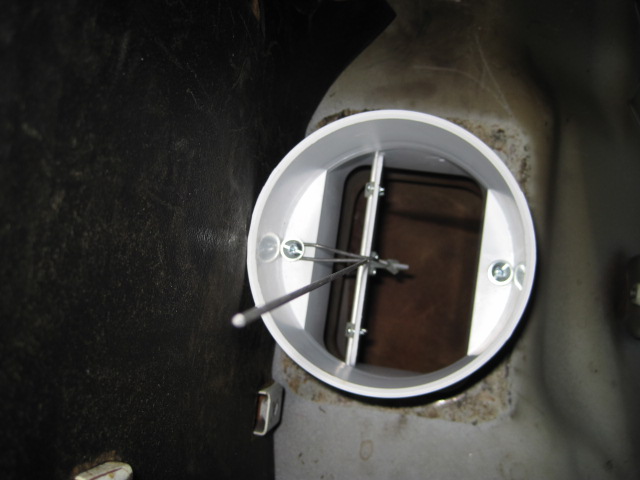
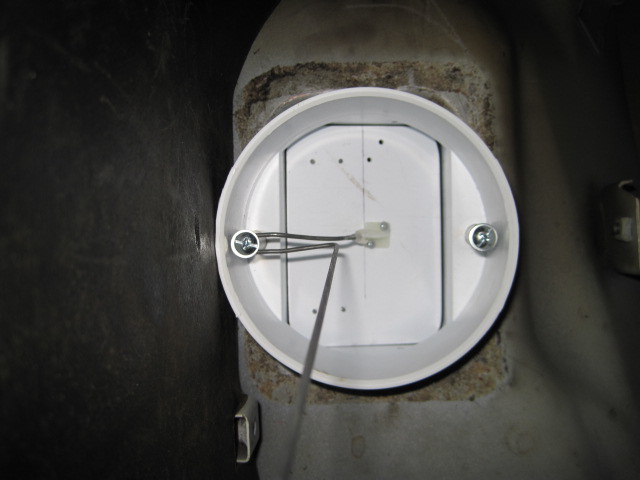
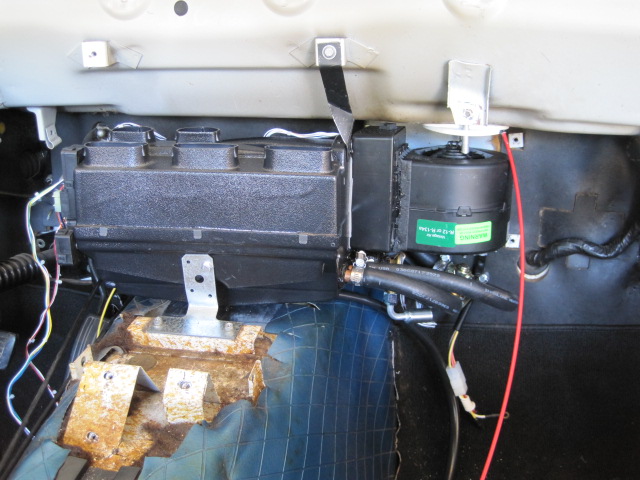
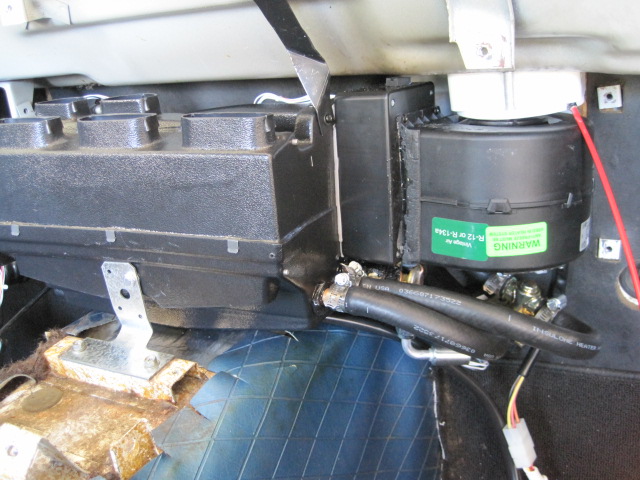
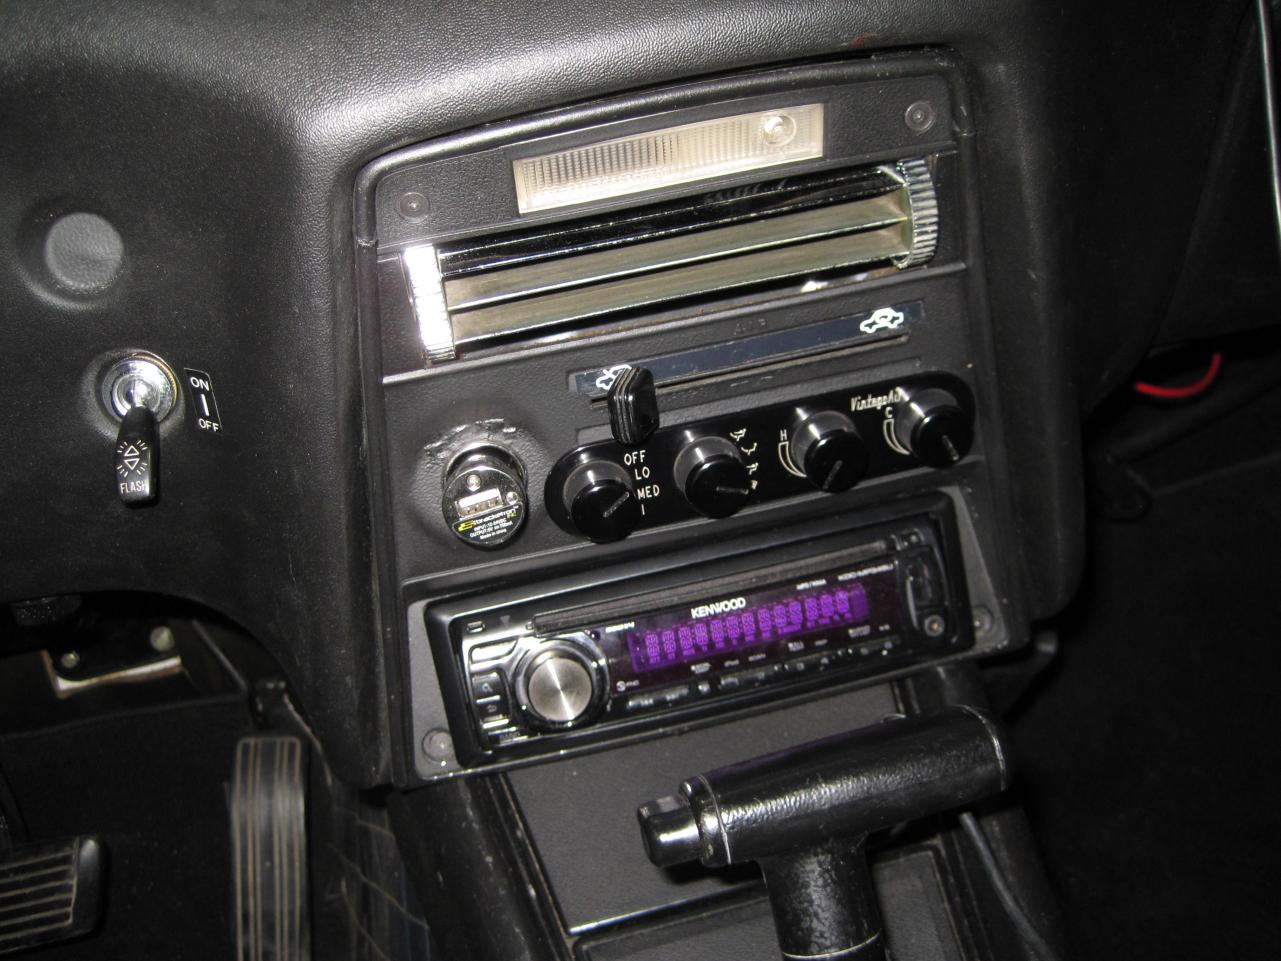
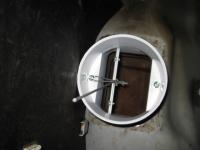
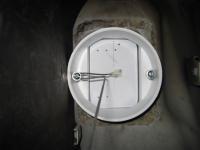
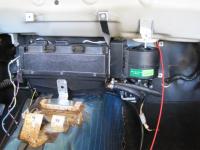
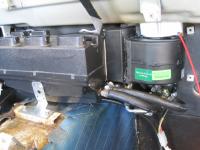
I've just completed installing the VintageAir Mini and controller you are thinking about. I did decide to modify the system to retain the fresh air ventilation. This required the creation of a damper door inside of a shuttle. When raised, the damper door is closed and air is taken from the interior into the top and bottom of the fan. When lowered, the damper door is opened and the shuttle drops onto the top end of the fan. In order to facilitate the fresh air shuttle, I moved the fan left by inserting a duct box. I also inverted the fan to move it forward and to aid the shuttle fit up (avoiding the wires that were on top.) Again, as I said before, if I were doing it again, I would get a sliding gate from Woodcrafters and leave the Evaporator Box stock to preserve the warranty. see http://www.woodcraft.com/product/2000899/2167/4-basic-blast-gate-dust-collection-fitting.aspx

-
You guys just made my day. I just ordered a set of 205/70R14s to replace my 195/70s because I had a belt separation issue on a tire that sat for long periods over the last 10 years. Went with the 205 over the 195 for the looks and because the 195/70 has a slightly smaller diameter than the 175HR14. Figured it would help remove some of the speedo error.
-
I second the vacuum leak theory. At idle the intake manifold is at a high vacuum resulting in significant air entering through the leak, leaning out the mixture. As you open the throttle, vacuum drops and less air enters via the leak, and the mixture richens.
-
Once you remove the four bottom nuts from the seat bracket, the entire seat will slide easily out the door. It may be difficult to gain access to the inside seat back screws while the seats are still mounted.
-
Just found Keith Martin's website http://collectorcarpricetracker.com/ and searched for Series I auctions. First thing I found was that many Series II cars were included in his Series I DB search. So I decided to do an indepth review of the 2012 auctions. There 20 completed auctions on Ebay for Series I cars (omitting 2 entries for sales that did not complete). The highest price paid was $28K for a RB26dett engined unit to $700 for barn find with engine out and a frozen rear wheel. Sales broke down as follows: 4 cars sold for over $10K 7 cars sold for $5K-$10K 6 cars sold for $2950 - 5K 3 hulks sold for $700 - $1025 Others on this forum have estimated less than 1,000 Series I cars still on the road. If so these represent only a 2% auction sales rate. Either these cars change hands extremely rarely, very few are moving on Ebay (if not, where), or there are fewer still on the road than we think. :disappoin
-
It sounds like the internal resistance of the battery is much higher than it should be. When you measure an unloaded battery with a meter, the meters input resistance is many times higher than the internal resistance of the battery, so virtually little voltage is dropped across the internal resistance and almost all is dropped across the meter's resistance. When you put a load on the battery, if the load resistance is equal to the internal resistance, half of the voltage is dropped internally and half is dropped across the load, ie 6volts would be measured across the terminals with the load inplace. Pull you battery out and get it tested as your local parts store. They can tell you if the battery is finito or simply discharged.
-
Getting ready to put my '02 Q45 up for sale on Ebay and I know that there are good time and bad times to end an auction. Any advice from the experts out there?
-
If you can insert the old bulb and it still works, you are making poor contact with the LED. I am assuming you bought one tha mimics the terminals of old bulb. Mine is a tube with terminal caps with points on each end. Scratch the contacts with a fine sandpaper or steelwool.
-
Exactly, did your bulb work before you tried the LED? First place to look is corrosion in the door switches. These switched supply a ground to the circuit. Try opening each door, snapping the nylon button a couple times and then twisting th button while it is fully extended.
-
Voltage is potential - not power. If there is a high resistance (compared to a light bulb) in the circui, it might be inconsequential to the very high resistance in your meter. This results in a very small voltage drop as read by your meter. When you insert a bulb, this resistance appears huge and drops a lot of voltage. Don't measure ohms, measure voltage across the socket contacts with the bulb out and then in. If there is a serious drop in voltage when you insert the bulb, you have high resistance somewhere in the circuit. As others have said, automotive LEDs usually only work mounted in one direction. First check is to reverse the mounting to see if things get better or worse. One last thing, I replaced the Malibu lamp bulbs with automotive LEDs. Found the cheap contacts in the lamps and cheap contacts in the Chinese LED didn't always make good contact. You may have the same situation and may have to scuff the contacts with some fine sandpaper to get a good contact.
-
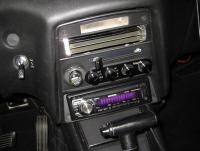
If you have the Gen II system that control panel is designed for, the heater control is a simple potentiometer. You should be able to get a replacement through Radioshack, or if they don't have a direct replacement through Digikey.
-
Good, I hope you've found it. Intermittent electrical connections can be some of the most difficult things to trouble shoot. Some of my best war stories center around resolving this type of problem.
-
Could be with the age of our cars. Check the voltage being supplied through the ignition switch compared to the battery while the engine is running. One point of caution - I'm assuming you jumpered before the resistor. These old ignition system designs date back to the days when we all had 6 volt batteries. The resistor is designed to drop the 12 volts in our cars back down to something the coil and points could live with. If you jumper across the resistor, it would be like supercharging - lots more power with a dramatically shortened lifespan.
-
Steve, my computer couldn't find/read the page.
-
I suggest you examine the inside of the distributor cap looking for cracks, carbon traces where sparks jumped where they shouldn't. Look for burn marks on the rotor and verify the center contact point is making good contact. Then I'd look for sloppy linkages on the points mechanicals. Last I'd look for a vacuum leak or loose electrical connections up to and including corrosion in the negative battery terminal wiring.
-
It just occurred to ask, "Have you replaced the cam bearing with new units and not center bored them?" These bearing were designed to be somewhat undersized when new anticipating that they will be center bored. To give you some idea of the precision required, here are some tolerances: Head flatness - typically less than 0.002", Max less than .004" (after machining and before re-warping this was greater than 0.012") Cam Bearing Clearance (difference in ID of the Bearing and OD of the cam surface) Typical 0.0015" to 0.0026" Max 0.0039" This means the center of the cam bearings in the towers must be within 0.0015" of the theoretical common axis to assure no contact. I can guarantee you that no cylinder heads or towers or bearing were mass produced in the early 1970's to within these tolerances. This is why center boring was done after the towers and bearings were bolted to the head. If Ben's head had been milled flat during the overhaul, I'm sure a quality shop would have center bored new bearings as described. However Ben's head was still out of flat (read warped excessively) after milling, and he is in a salvage situation here. The service manual solution here is to replace the head and not attempt to repair. If he follows my suggestions, he might be able to save it this time if the problem is a single tower out of position. Considering the out of pocket cost to isolate the problem is low, he may save the head with the cost of his time and avoiding the cost of a new head.
-
Hi Ben, Yes I would proceed with the tests. Every cam with multiple tower bearings has some degree of runout - it was made by humans - not God. If your cam had zero runout, it would either bind all the way around, or not bind at all. The towers aren't perfect either. At some point in the installation, the cam imperfection and tower imperfection are making contact. Our job is to find out where. Once we can find out where, we can determine what needs to be done to fix it. We know you head was warped, machined, and intentionally re-warped. There is no reason to believe that the other machined surfaces on the head magically fell back into perfect alignment after all that. Even without warping, the engine manual states: "Note: Never remove the camshaft bearings. If you once remove camshaft bearings, the bearing centers will be out of alignment and the recondition is difficult without center borings." Center boring is taking the cylinder head with towers, cam bearings, and caps installed and running a very rigid boring tool down the axis of the cam shaft thereby cutting perfect circles in the bearings all on that common axis. So without the ability to center bore, you're really trying to pull a rabbit out of your hat. You are lucky to have only a single point of binding. Thinking about what you have gone through, I have a couple of other points. I have assumed that the head is currently mounted on the block and torqued to spec. If not, any work you do now may evaporate like smoke once the head is stressed during installation. Second, are you sure that you have maintained the order and orientation of each tower, bearing cap, and bearing? Reversing a cap is like putting a new part and all the previous alignment work is gone by the wayside. So lets double check your order and orientation and then verify which tower/bearing is the culprit first.
-
Ben, I feel your frustration. I'm not an engine mechanic, but I know my way around a machine shop. Perhaps I can give you some places to look. You are assuming the binding began when the head warped and wasn't corrected when the machine shop tried to warp is back to flat. You are looking for a tower that is not aligned with the others when they are not torqued down and you are using the cam shaft as a go-nogo gauge. To do anything other than hunt and peck, you are going to need a weightless indicator or at least a drop indicator mounted on a magnetic base. The first objective would be to qualify your go-nogo gauge (cam shaft) by verifying it was not bent. To do this, mount the numbers 1 and 5 towers properly torqued and then mount the cam shaft. Place the indicator to ride on the bearing surfaces for towers 2, 3, and 4. With the indicator riding on each bearing, slowly rotate the camshaft and note the runout (highest reading minus the lowest reading). If the cam shaft is straight and true, the runout should be minimal and simlar from bearing surface to bearing surface. If the runout get progressively larger towards one end, the cam shaft might be bent towards that end. To verify, remove the offending out board tower and mount the next tower inboard and again observe the runout. Assuming your cam shaft is straight and true and assuming the rotation is smooth using only towers 1 and 5, add tower 2, 3, or 4 one at a time to find which tower causes the binding. (From your last post, I doubt it is number 3 since you removed it and there was no change.) Don't stop when you find the first binding tower because it may be ok and an end tower is out of kilter. Once you have identified the culprit, mount all the other towers and verify the cam is happy. With the other towers inplace, again measure the runout on the problem bearing surface. Note the location of the high spot and mark near it with a magic marker in a place you can see with the last tower installed. Re-install the last tower and find the point of rotation where the binding is the worst. Locate the mark for the high spot and this is where the contact is being made. (Remember the tower may be too high, too low, leaning left or right, or twisted.) If these steps haven't isolated your problem, you may have one tower marginally shifted one way and the adjacent tower marginally shifted the other.
-
I can suggest Glycerin as an alternative. It evaporates much slower the either alcohol or soapy water. If you don't want to visit the local drug store, liquid hand soaps use Glycerin in lieu of tallow. I would dilute it one part soap to two parts water. This solution also works great for bicycle handlebar grips and golf club grips.
-
http://cgi.ebay.com/ebaymotors/Datsun-Z-Series-280Z-Nissan-S30-280Z-First-Series-Body-Style-2-owner-49-964-miles-Pac-NW-Z-Rare-/190752260987#v4-40